
TABLE - Lamp Luctra - Free user manual and instructions
Find the device manual for free TABLE Luctra in PDF.

| Product type | LED desk lamp with biologically effective light |
| Brand | Luctra |
| Model | TABLE |
| Rated voltage (lamp) | 12 V DC |
| Power consumption (lamp) | 10 W, 0.8 A |
| Supply voltage (power supply) | 100–240 V, 50/60 Hz |
| Output power (power supply) | 12 V, 15 W, 1.25 A DC |
| Protection class (lamp) | III (SELV) |
| Protection type | IP20 |
| Number of LEDs | 4 LEDs (2 cool white, 2 warm white, CREE) |
| Color temperature | 2700 K / 3600 K / 6500 K |
| Illuminance | 1000 Lux at 65 cm height |
| Brightness adjustment | 5 levels |
| Light color adjustment | 3 levels: cool, neutral, warm |
| Control type | VITACORE® touch panel |
| Included mounting types | Table stand (TABLE), wall/table clamp (TABLE CLAMP), cable passage mount (TABLE PIN) |
| Maintenance | No maintenance required |
| Cleaning | Slightly damp cloth or provided microfiber; no solvents or abrasives |
| Safety | Do not cover the lamp; do not look directly at the LEDs; use only in dry indoor rooms |
| Spare parts | Replaceable protective plate (original part); power cable replaceable by manufacturer |
| After-sales service | Free telephone support (from Europe): 00800 00 58 28 72; other: +49 23 71 66 24 45 |
| Energy efficiency class | A |
| Ambient operating temperature | 25 °C |
Frequently Asked Questions - TABLE Luctra
User questions about TABLE Luctra
0 question about this device. Answer the ones you know or ask your own.
Ask a new question about this device
Download the instructions for your Lamp in PDF format for free! Find your manual TABLE - Luctra and take your electronic device back in hand. On this page are published all the documents necessary for the use of your device. TABLE by Luctra.
USER MANUAL TABLE Luctra
DE Originalgebrauchsanweisung 8
EN Translation of the original instructions.... 15
FR Traduction de la notice originale....22
ES Traducción del manual original....29
NL Vertaling van de oorspronkelijke gebruiksaanwijzing 36
IT Traduzione delle istruzioni originali....43
SV Översättning av bruksanvisning i original....50
PL Tłumaczenie instrukcji oryginalnej....57
RU Перевод оригинального руководства по эксплуатации.... 64
DA Oversættelse af den originale brugsanvisning 71
NO Original driftsinstruks i oversettelse 78
FI Alkuperäisten ohjeiden käännös....85
TR Orijinal işletim talimatı tercümesi 92
JA 元の命令の翻訳....99
AR ترجمة دليل التشفيل الأصلي 112
The lamp is designed for lighting a workplace in dry indoor rooms (ambient temperature of 25^ C).
Perform only the activities described in this user manual. Any other use constitutes unauthorised misuse. The manufacturer accepts no liability for damage resulting therefrom.
For your safety
Basic safety instructions
- The user must have read and understood this user manual before starting to use the lamp to ensure safe handling.
- Observe all safety instructions! You put yourself and others at risk if you disregard these instructions. Retain this user manual for future reference and always keep it within easy reach.
- If you ever sell or pass on the lamp, please ensure that you also hand over this user manual.
- Use this lamp only if it is in perfect working order. Please contact our service team if the lamp or a part thereof (including the LEDs) are faulty.
- This lamp is not designed to be used by persons with limited physical, sensory or mental capabilities or a lack of experience and/or knowledge unless they are supervised by a person responsible for their safety or have received instructions from them on how to use the lamp.
• Make sure that children do not play with the lamp. - Always observe the valid national and international safety and health regulations and work directives.
Electrical safety
- Only plug the lamp into earthed sockets that have been properly installed, earthed and tested.
- Make sure that the power supply corresponds to the connection data for the lamp before plugging in the lamp.
- Do not touch the power plug wit wet hands! Always grasp the plug and not the cable to pull the plug out of the socket.
- Do not bend, crush, tug or run over the power cable. Protect it from sharp edges, oil and heat.
- Do not lift the lamp by the cable.
- Check the plug and cable before each use.
- Pull out the power plug immediately if the power cable is damaged. Never use the lamp if the power cable is damaged.
• Always switch off the lamp before removing the plug. - Always pull out the power plug immediately if the lamp is not used for a longer period of time.
• Always pull out the power plug before transporting or repositioning the lamp. - Only use extension cables that are suitable for the lamp and its surroundings.
- Do not use additional dimmers.
- If the power cable on the lamp is damaged, it must be replaced by the manufacturer to avoid any risk of danger.
Product-specific safety instructions
- Do not cover the lamp with cloths or other objects. This may cause a fire hazard.
- Always remove the lamp from the mounting first before transporting or repositioning the lamp.
• Always unplug the lamp before changing the position of the table-top base. - Never open the VITACORE® control panel. The lamp will suffer irreparable damage.
Explanation of symbols
- Warning signs on your lamp must not be removed or covered.
Read and observe the user manual before starting to use the lamp.

flowchart
graph TD
    A["Human Figure"] --> B["Warning Triangle"]
    B --> C["House Icon"]
    C --> D["Broken Bridge"]
    D --> E["Down Arrow"]
Risk of eye damage! Never look directly into the LEDs.
You must only use the lamp in dry indoor rooms.
Replace any protective panel that is cracked. The light source is located behind a protective panel that protects the user against burns and the LEDs against damage. It is not permitted to operate the lamp without the protective panel or with a damaged protective panel. The protective panel must be replaced by a new, undamaged protective panel (original part).
Product and functional description
LUCTRA ^® provides biologically effective light where the light colour can be varied between a cold white light with a high blue content and a warm white light with a high red content. Coupled with its high light intensity, LUCTRA ^® gives your body the clear light signals that it needs to adapt its internal body clock and thus to its biological rhythm during the course of the day. The better this works, the higher your sense of well-being and the better your performance.
The optimum biological effectiveness is achieved if the light colours vary significantly during the course of the day. We therefore recommend having very cold white light in the mornings that is reduced at lunchtime, then slightly increased again after lunch and then continuously reduced in the afternoon. The red content should prevail in the evening. You may modify these settings on the VITACORE® control panel at any time. Ultimately, your well-being is determined by the light setting that is right and comfortable for you.
You can find out more about the combinations and effect of biological light at www.luctra.eu.
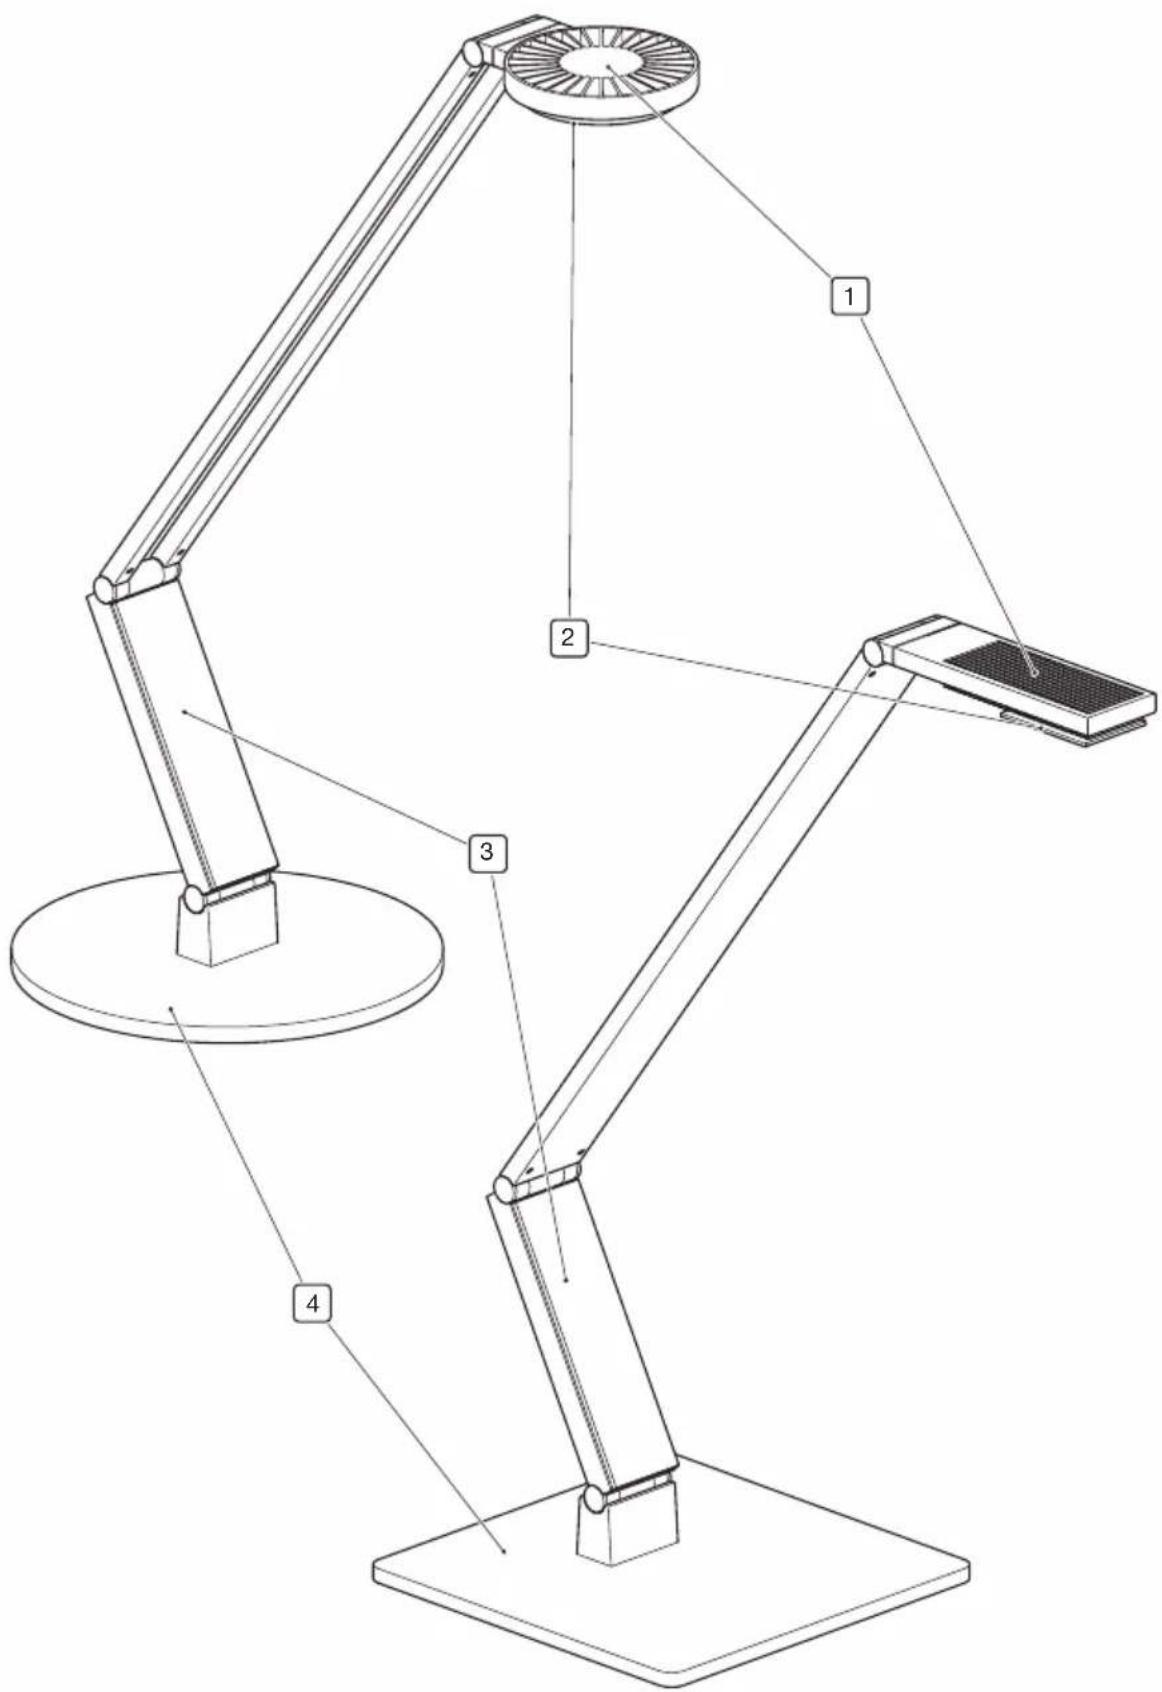
Your lamp at a glance
▶ see image 1
- Lamp head
- Protective panel
- VITACORE ^® control panel (touch screen)
- Table-top base
Scope of delivery
- User manual
- Lamp
• Power supply unit with plug-in connector
• European-style plug for power supply
• British-style plug, type G for power supply - Microfibre cloth
Different mountings and accessories are included with the delivery depending on the LUCTRA®
TABLE series product that you have chosen:
• TABLE: Table-top base to set up on tables
- TABLE CLAMP: Wall or table-top mounting (with 2× adhesive foam pads, 1× Allen key, 4× screws and rawlplugs for wall mounting)
- TABLE PIN: Fastening to a mounting hole or drill hole on the table (1× adhesive foam pad, 1× Allen key)

Note:
Please contact our service team if one of the parts are missing or damaged.
Assembly
- Always place the lamp on a pre-assembled pin as the last assembly step irrespective of the mounting being used.

NOTICE!
Risk of damage to the lamp!
Make sure that the lamp is fully supported on the pin and can be moved freely.

Note:
A minimum gap (approx. 1–2 mm) is needed between the lamp and mounting for easy rotation of the lamp.
The different mounting options are described below. The electrics must be connected after the lamp has been assembled (▶ see “Connecting the electrics” on page 19).
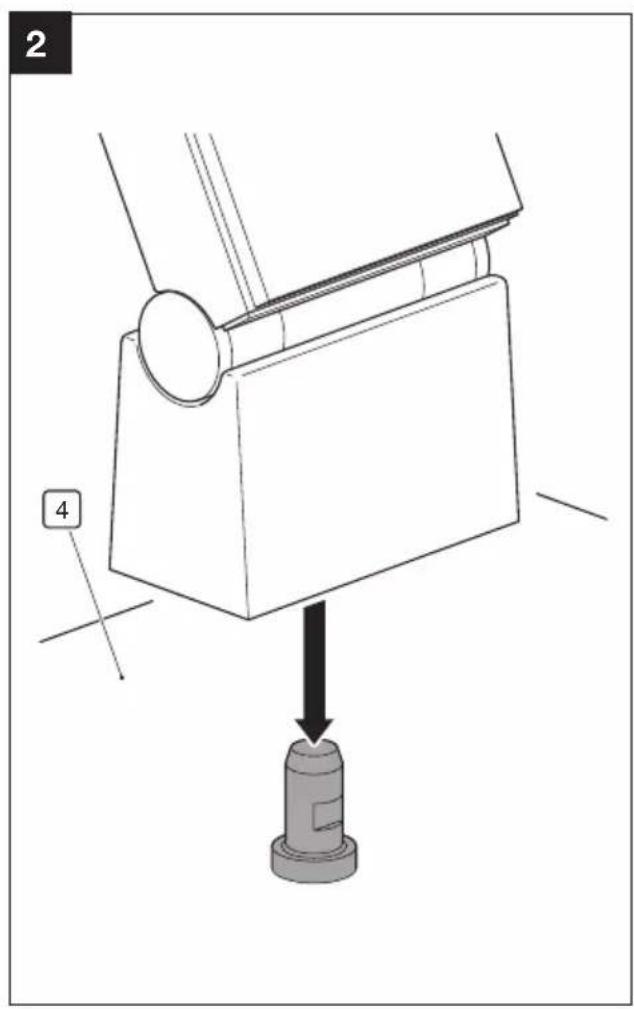
TABLE
▶ see image 2
- Place the table-top base (4) at the desired position.
- Place the lamp onto the table-top base (4) as shown.
TABLE CLAMP
You can screw or fasten your lamp to the wall or on tables with a thickness of up to 78 mm with the TABLE CLAMP.
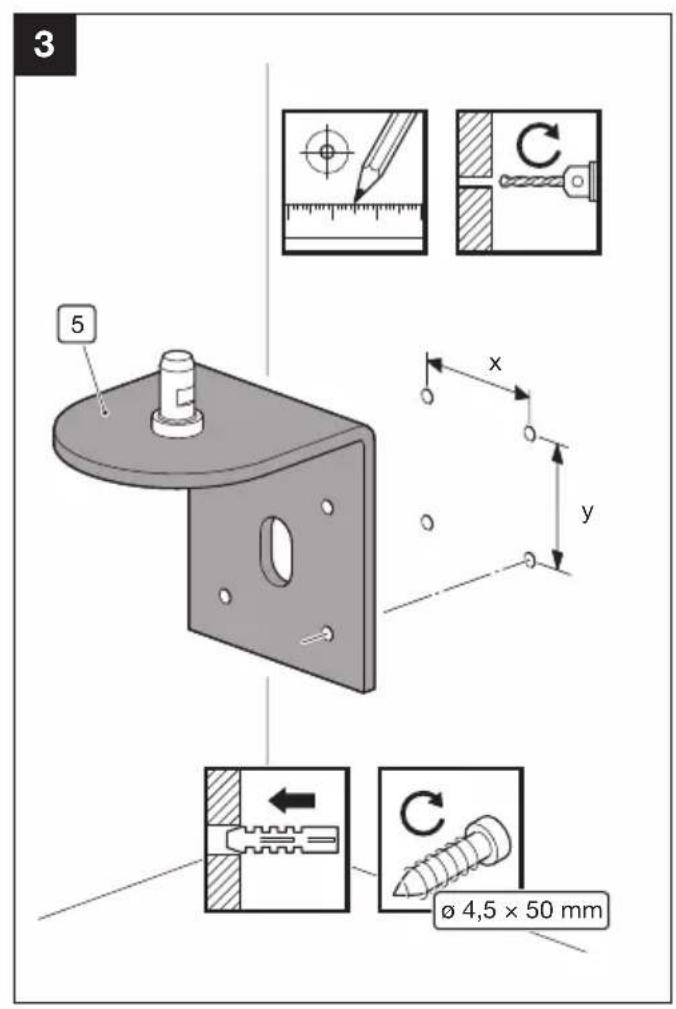
Wall mounting
▶ see image 3

NOTICE!
Risk of property damage!
Make sure that you check the type of wall and the load-bearing capacity of the wall structure before the assembly. The enclosed rawlplugs are suitable for fastening the TABLE CLAMP to concrete walls or solid masonry. You must use special rawlplugs or install another support structure suitable for the load with different types of walls (plasterboard, breeze block, etc.) and a deviating load-bearing capacity. Consult a specialist if you are unaware of the subsurface.
- Mark the four drill holes with the distances
$$ x = 4 5 \mathrm{mm} $$
$$ y = 5 0 \mathrm{mm} $$

DANGER!
Risk of fatal injury caused by drilling through supply lines!
Check for supply lines (e. g. power cables, gas and water pipes) before drilling into the wall.
- Drill the holes with a diameter of 6 mm and 60 mm deep.
- Fasten the TABLE CLAMP (5) to the wall with the enclosed screws 4.5 × 50 mm and wall plugs.
- Place the lamp onto the pin of the TABLE CLAMP (5).
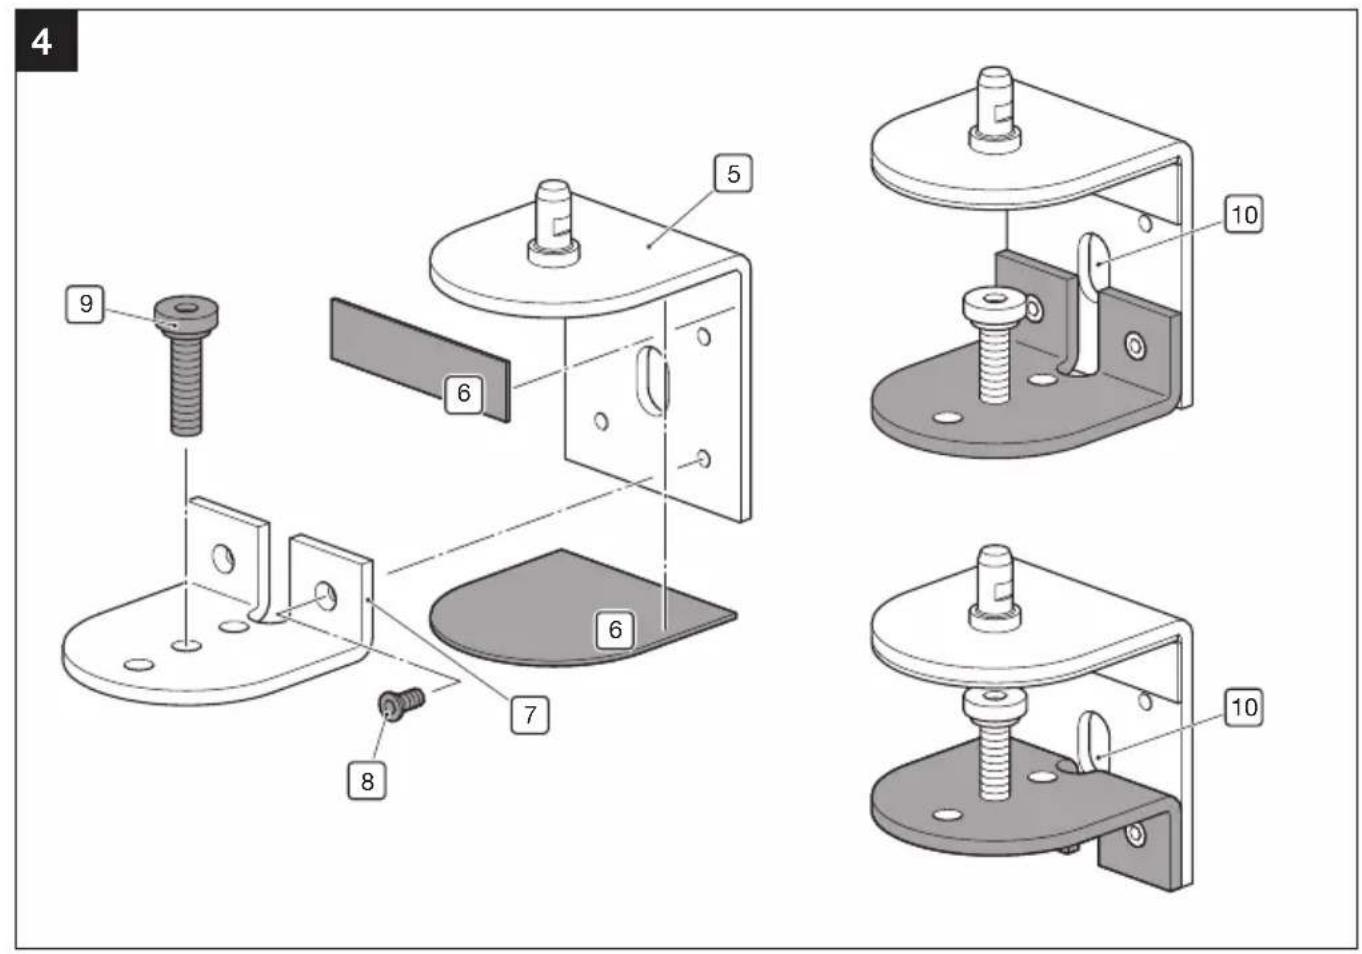
Table-top mounting
▶ see image 4
- Attach the adhesive foam pads (6) as shown.
- Choose the orientation of the lower plate (7) depending on the thickness of the table and tighten the clamping screw (9).

Note:
You can screw the clamping screws into three different holes. This allows you to overcome obstacles, such as edge trims.
- Fasten the lower plate (7) with the screws (8).
- Fasten the TABLE CLAMP (5) to the table using the clamping screw (9). Tighten the clamping screw (9) with the enclosed Allen key.
- Place the lamp onto the pin of the TABLE CLAMP (5).
- Run the power cable through the designated opening (10).
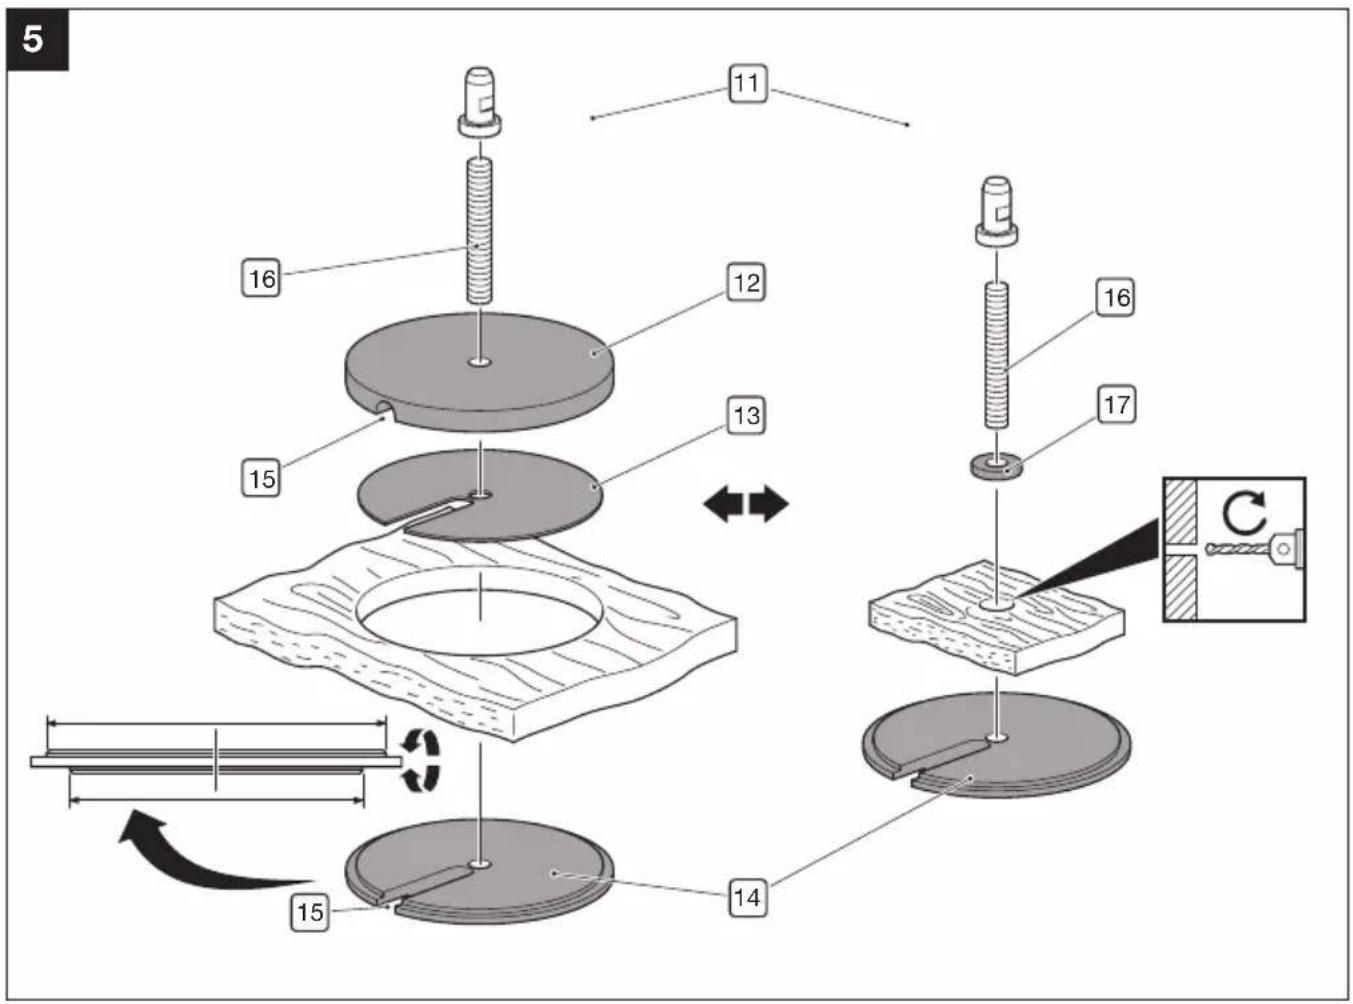
TABLE PIN
▶ see image 5
You have following mounting options available for the TABLE PIN (11):
Mounting with a cable hole
The TABLE PIN holds your lamp firmly on any mounting hole ranging from 20 mm to 80 mm.
- Attach the adhesive foam pad (13) to the upper plate (12).
- Place the upper plate (12) with the pin and threaded rod (16) from above into the mounting hole.
-
Screw the lower plate (14) facing upwards onto the threaded rod (16) using a centring gauge matching the diameter of the mounting hole.
-
Run the power cable through the designated opening (15)

NOTICE!
Risk of damage to the cable!
Do not fasten the TABLE PIN by rotating the lower plate once you have run the power cable through the designated opening (15).
Otherwise the cable will wrap around the threaded rod and be damaged.
-
Fasten the TABLE PIN by rotating the threaded rod (16). Use the enclosed Allen key to do this.
-
Place the lamp onto the pin of the TABLE PIN (11).
Mounting without a cable hole
You can fasten your lamp to the TABLE PIN even if the table does not have a cable hole.
NOTICE!
Risk of property damage!
The table top must be at least 25 mm thick so that it is not damaged when adjusting the lamp.
- Drill a hole in the table top with a minimum diameter of 6.5 mm/maximum diameter of 8 mm.
- Insert the pin with the threaded rod (16) and washer (17) through the hole from above.
- Fasten the TABLE PIN by screwing the plate (14) facing upwards to the threaded rod using the wider centring gauge.
- Place the lamp onto the pin of the TABLE PIN (11).
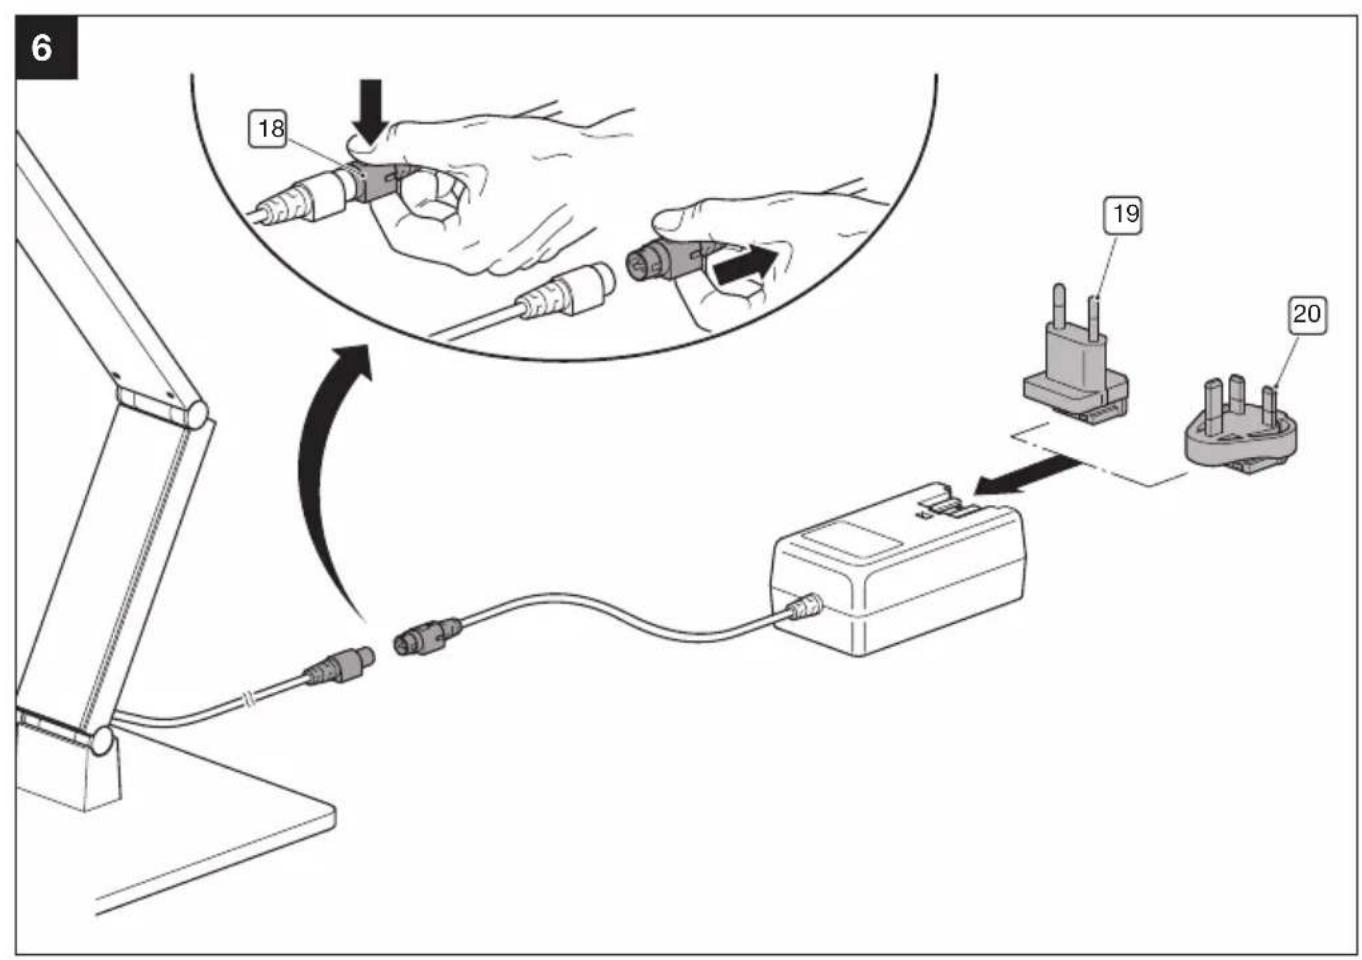
Connecting the electrics
▶ see image 6
- Connect the connecting cable of the lamp to the power supply unit.

Note:
You must first release the plug lock (18) to disconnect the lamp and power supply unit.
- Fit the plug appropriate for your mains power network onto the power supply:
– European-style plug (19)
- British-style plug (20)
- Plug the power supply into the socket.
Adjusting the lamp

NOTICE!
Risk of damage to the lamp!
Do not rotate the lamp head against the resistance in the swivel joint.
Operation

NOTICE!
Risk of property damage!
The lamp head is designed in such as way that the LEDs can be ideally cooled, thus achieving a long service life.
Never cover the lamp head. This may cause a fire hazard.
You can change the settings on the VITACORE® control panel.
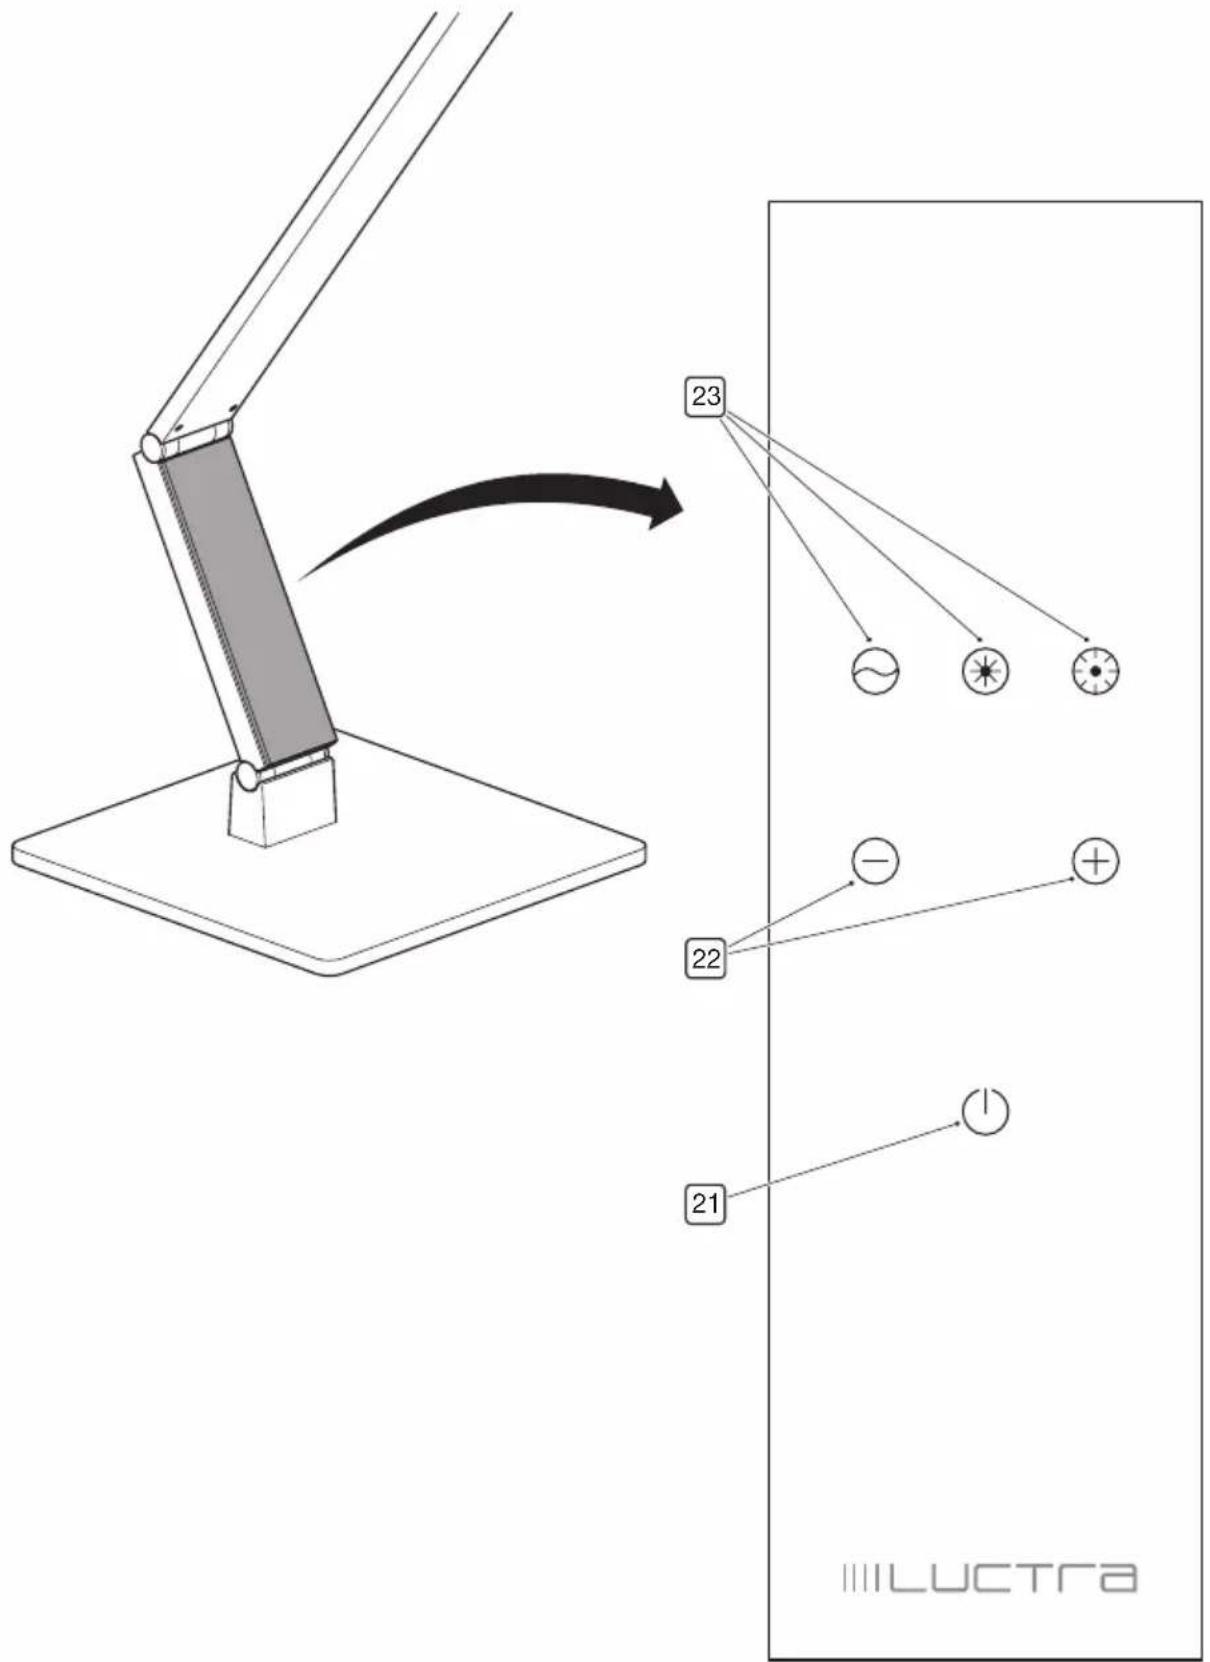
Operating the VITACORE® control panel
▶ see image 7
- On-Off touch button
- Touch-operated buttons are used to adjust the intensity of the light (5 levels)
-
Touch-operated buttons are used to adjust the colour of the light (3 levels)
-
Tap the ⓄOn-Off touch button to switch the light on or off.
- Tap the -touch button to reduce the light intensity.
- Tap the touch button to increase the light intensity.
- Tap the -touch-operated button to set to a warm (reddish) light.
- Tap the touch-operated button to set to a neutral light.
- Tap the touch-operated button to set to a cold (bluish) light.
Cleaning and maintenance

DANGER!
Risk of fatal injury from electric shock!
Never immerse the lamp in water when cleaning it.

NOTICE!
Risk of product damage!
Do not use any abrasive or sharp objects or aggressive cleaning agents.
Do you use any solvents.
- Wipe the lamp dry with a soft damp cloth or with the enclosed microfibre cloth.
• The lamp requires no maintenance.
Service
You can reach the LUCTRA® team from most European countries on our freephone service hotline (German/English): 00800 00582872.
Alternatively, please call: +49 23 71 66 24 45 (Note that charges may apply depending on the network provider).
Always have the serial number of your lamp at hand should you have any queries.
You can find this on the label on the power cable and on the back of this user manual.
Only return a damaged light in the original box. If you no longer have the original packaging, please request appropriate packaging from the Service hotline. The packaging will be sent out to you immediately.
Disposal
Disposing of the lamp
Appliances that are marked with the symbol shown must not be disposed of with household waste. You are obliged to dispose of such waste electrical and electronic equipment separately.
- Find out more from your local authority about controlled waste disposal options.
With separate waste disposal you send old appliances for recycling or to other forms of reprocessing. In this way, you help to prevent hazardous substances potentially being released into the environment.
Disposing of packaging
The packaging is made of cardboard and appropriately marked plastics that can be recycled.

- Send these materials for recycling.
Technical data
| Product name LINEAR TABLE RADIAL TABLE | |
| Article numbers 9201 9202 | |
| Nominal voltage 12 V DC | |
| Power consumption max. 10 W, 0.8 A | |
| Protection class | III (SELV, Safety Extra Low Voltage) |
| Protection type IP20 | |
| Energy efficiency class A | |
| Ambient temperature 25 °C | |
| Light source | |
| LED | 2 cold white & 2 warm white LEDs (CREE),2700 K/3600 K/6500 K, 1000 lux at a height of 65 cm |
| Power supply | |
| Nominal voltage 100–240 V, 50/60 Hz | |
| Power consumption 0.5 A | |
| Power output | max. 12 V, 15 W, 1.25 A DC |
| Protection class | II □ |
| Protection type IP20 | |
CE
flowchart
graph TD
    A["Person Reading"] --> B["Warning Symbol"]
    B --> C["House with Cross mark"]
    C --> D["Broken Structure"]
    D --> E["Down Arrow"]
$$ x = 4 5 \mathrm{MM} $$
$$ y = 5 0 \mathrm{mm} $$

ОПАСНОСТЬ!
flowchart
graph TD
    A["Person with book"] --> B["Warning symbol: Crossed line"]
    B --> C["House"]
    C --> D["Broken bridge"]
    D --> E["Empty box"]
flowchart
graph TD
    A["Human Figure"] --> B["Warning Symbol"]
    B --> C["Cracked Ground"]
    C --> D["Downward Arrow"]
flowchart
graph TD
    A["House"] --> B["Cracked Structure"]
    B --> C["Downward Arrow"]