WCM-8010 MK3 - Video camera DENVER - Free user manual and instructions
Find the device manual for free WCM-8010 MK3 DENVER in PDF.
User questions about WCM-8010 MK3 DENVER
0 question about this device. Answer the ones you know or ask your own.
Ask a new question about this device
Download the instructions for your Video camera in PDF format for free! Find your manual WCM-8010 MK3 - DENVER and take your electronic device back in hand. On this page are published all the documents necessary for the use of your device. WCM-8010 MK3 by DENVER.
USER MANUAL WCM-8010 MK3 DENVER
natural_image
Close-up of a camouflage video camera with multiple lenses and a central lens (no visible text or symbols)WCM-8010 MK3
denver.eu
October-2023

FR
Please read the safety instructions carefully before using the product for the first time and keep the instructions for future reference.
- This product is not a toy. Keep it out of reach of children.
- Keep product out of the reach of children and pets to avoid chewing and swallowing.
- Never use old and new batteries or different types of batteries together in main unit. Remove the batteries when you are not using the system for a longer period of time. Check the polarity (+/-) of the batteries when inserting them in the product. Wrong positioning can cause an explosion. Batteries are not included.
- Product operating and storage temperature is from -20 degree Celsius to 40 degree Celsius. Under and over this temperature might affect the function.
- Never open the product. Repairs or service should only be performed by qualified personnel.
- Do not expose to heat or direct sunlight!
- Do not use non original accessories together with the product as this can make the product functionality abnormal.
1. Instructions
1.1 General Description
This digital trail camera with MMS function (built-in antenna) can work automatically day and night. It can be triggered by any movement of human (or animals) in a certain region monitored by motion sensor, and then automatically captures pictures (up to 12M pixels) or records 1080p or HD video clips.
During daytime it begins to take color photos and video till light is not enough, then it begins to take monochrome photos and video.
It supports 2G/GSM/MMS/SMTP/SMS. And it is waterproof IP65.
1.2 Camera Body Interface
It has the following interfaces: USB Type C connector, MICRO SD-Card Slot, Standard SIM card slot, external DC power connector.
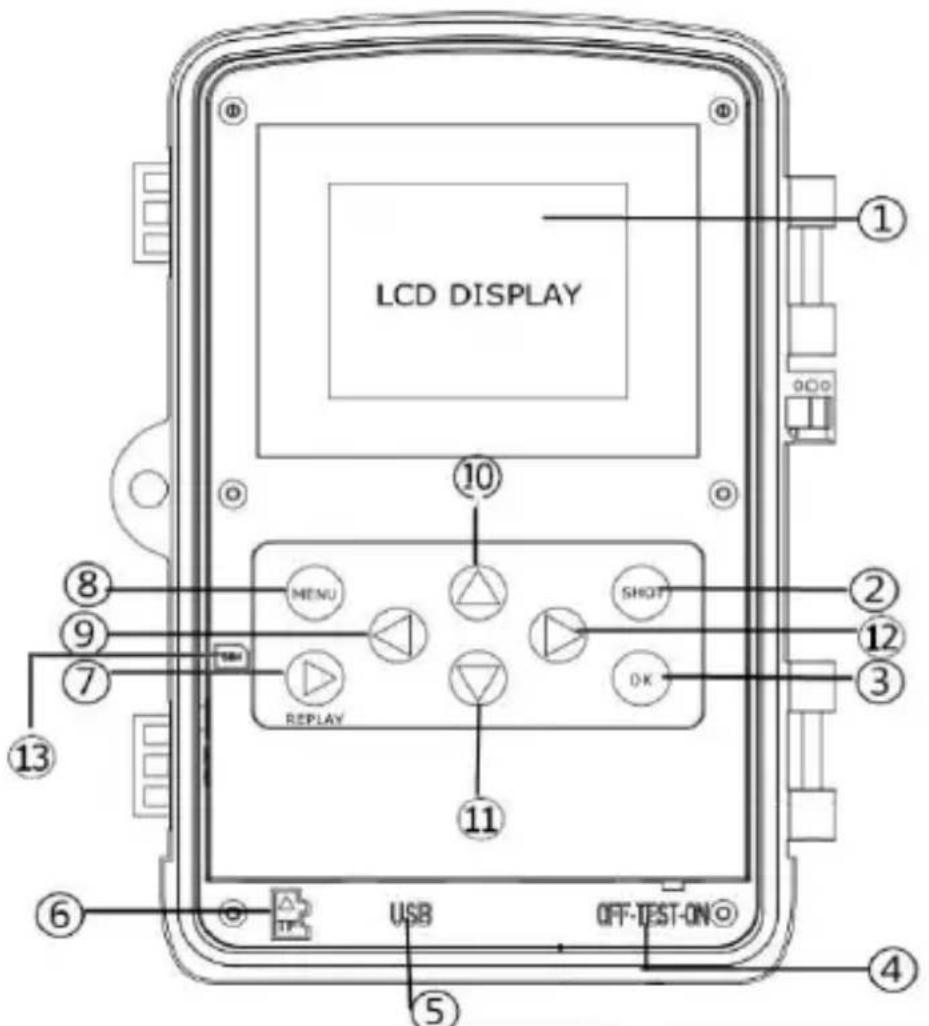
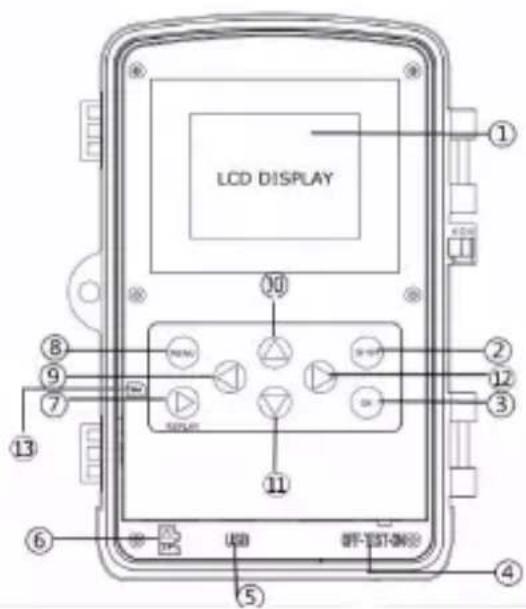
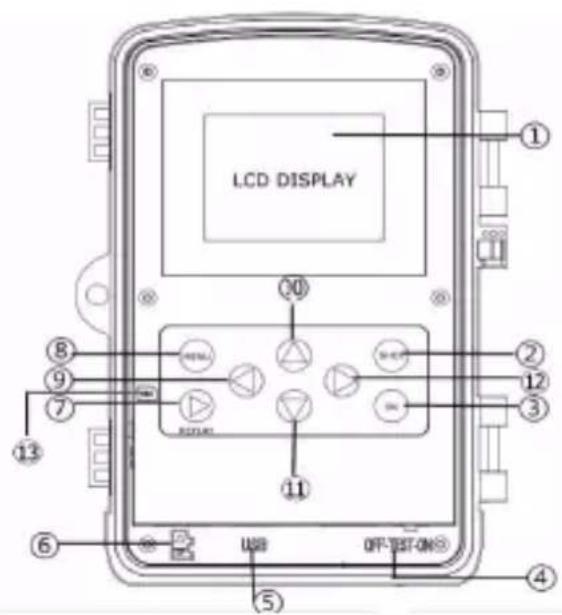
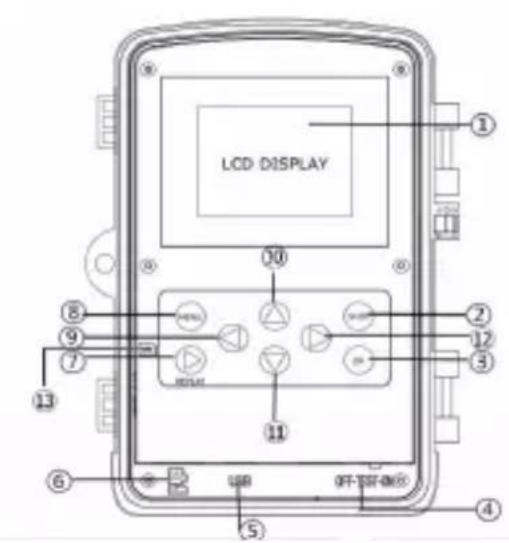
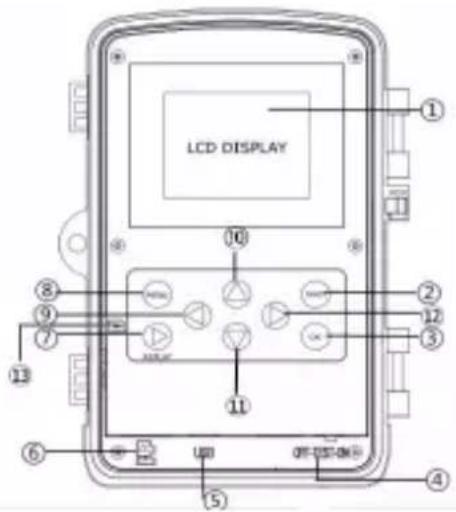
1.3 Camera components and features
text_image
LCD DISPLAY MENU REPLAY SHOT OK USB OFF-TEST-ON ① ② ③ ④ ⑤ ⑥ ⑦ ⑧ ⑨ ⑩ ⑪1) 2inch color LCD Display
2) Shot button
3) OK button
4) Power Switch
5) USB Type C connector
6) Micro SD card slot (Card not incl.)
text_image
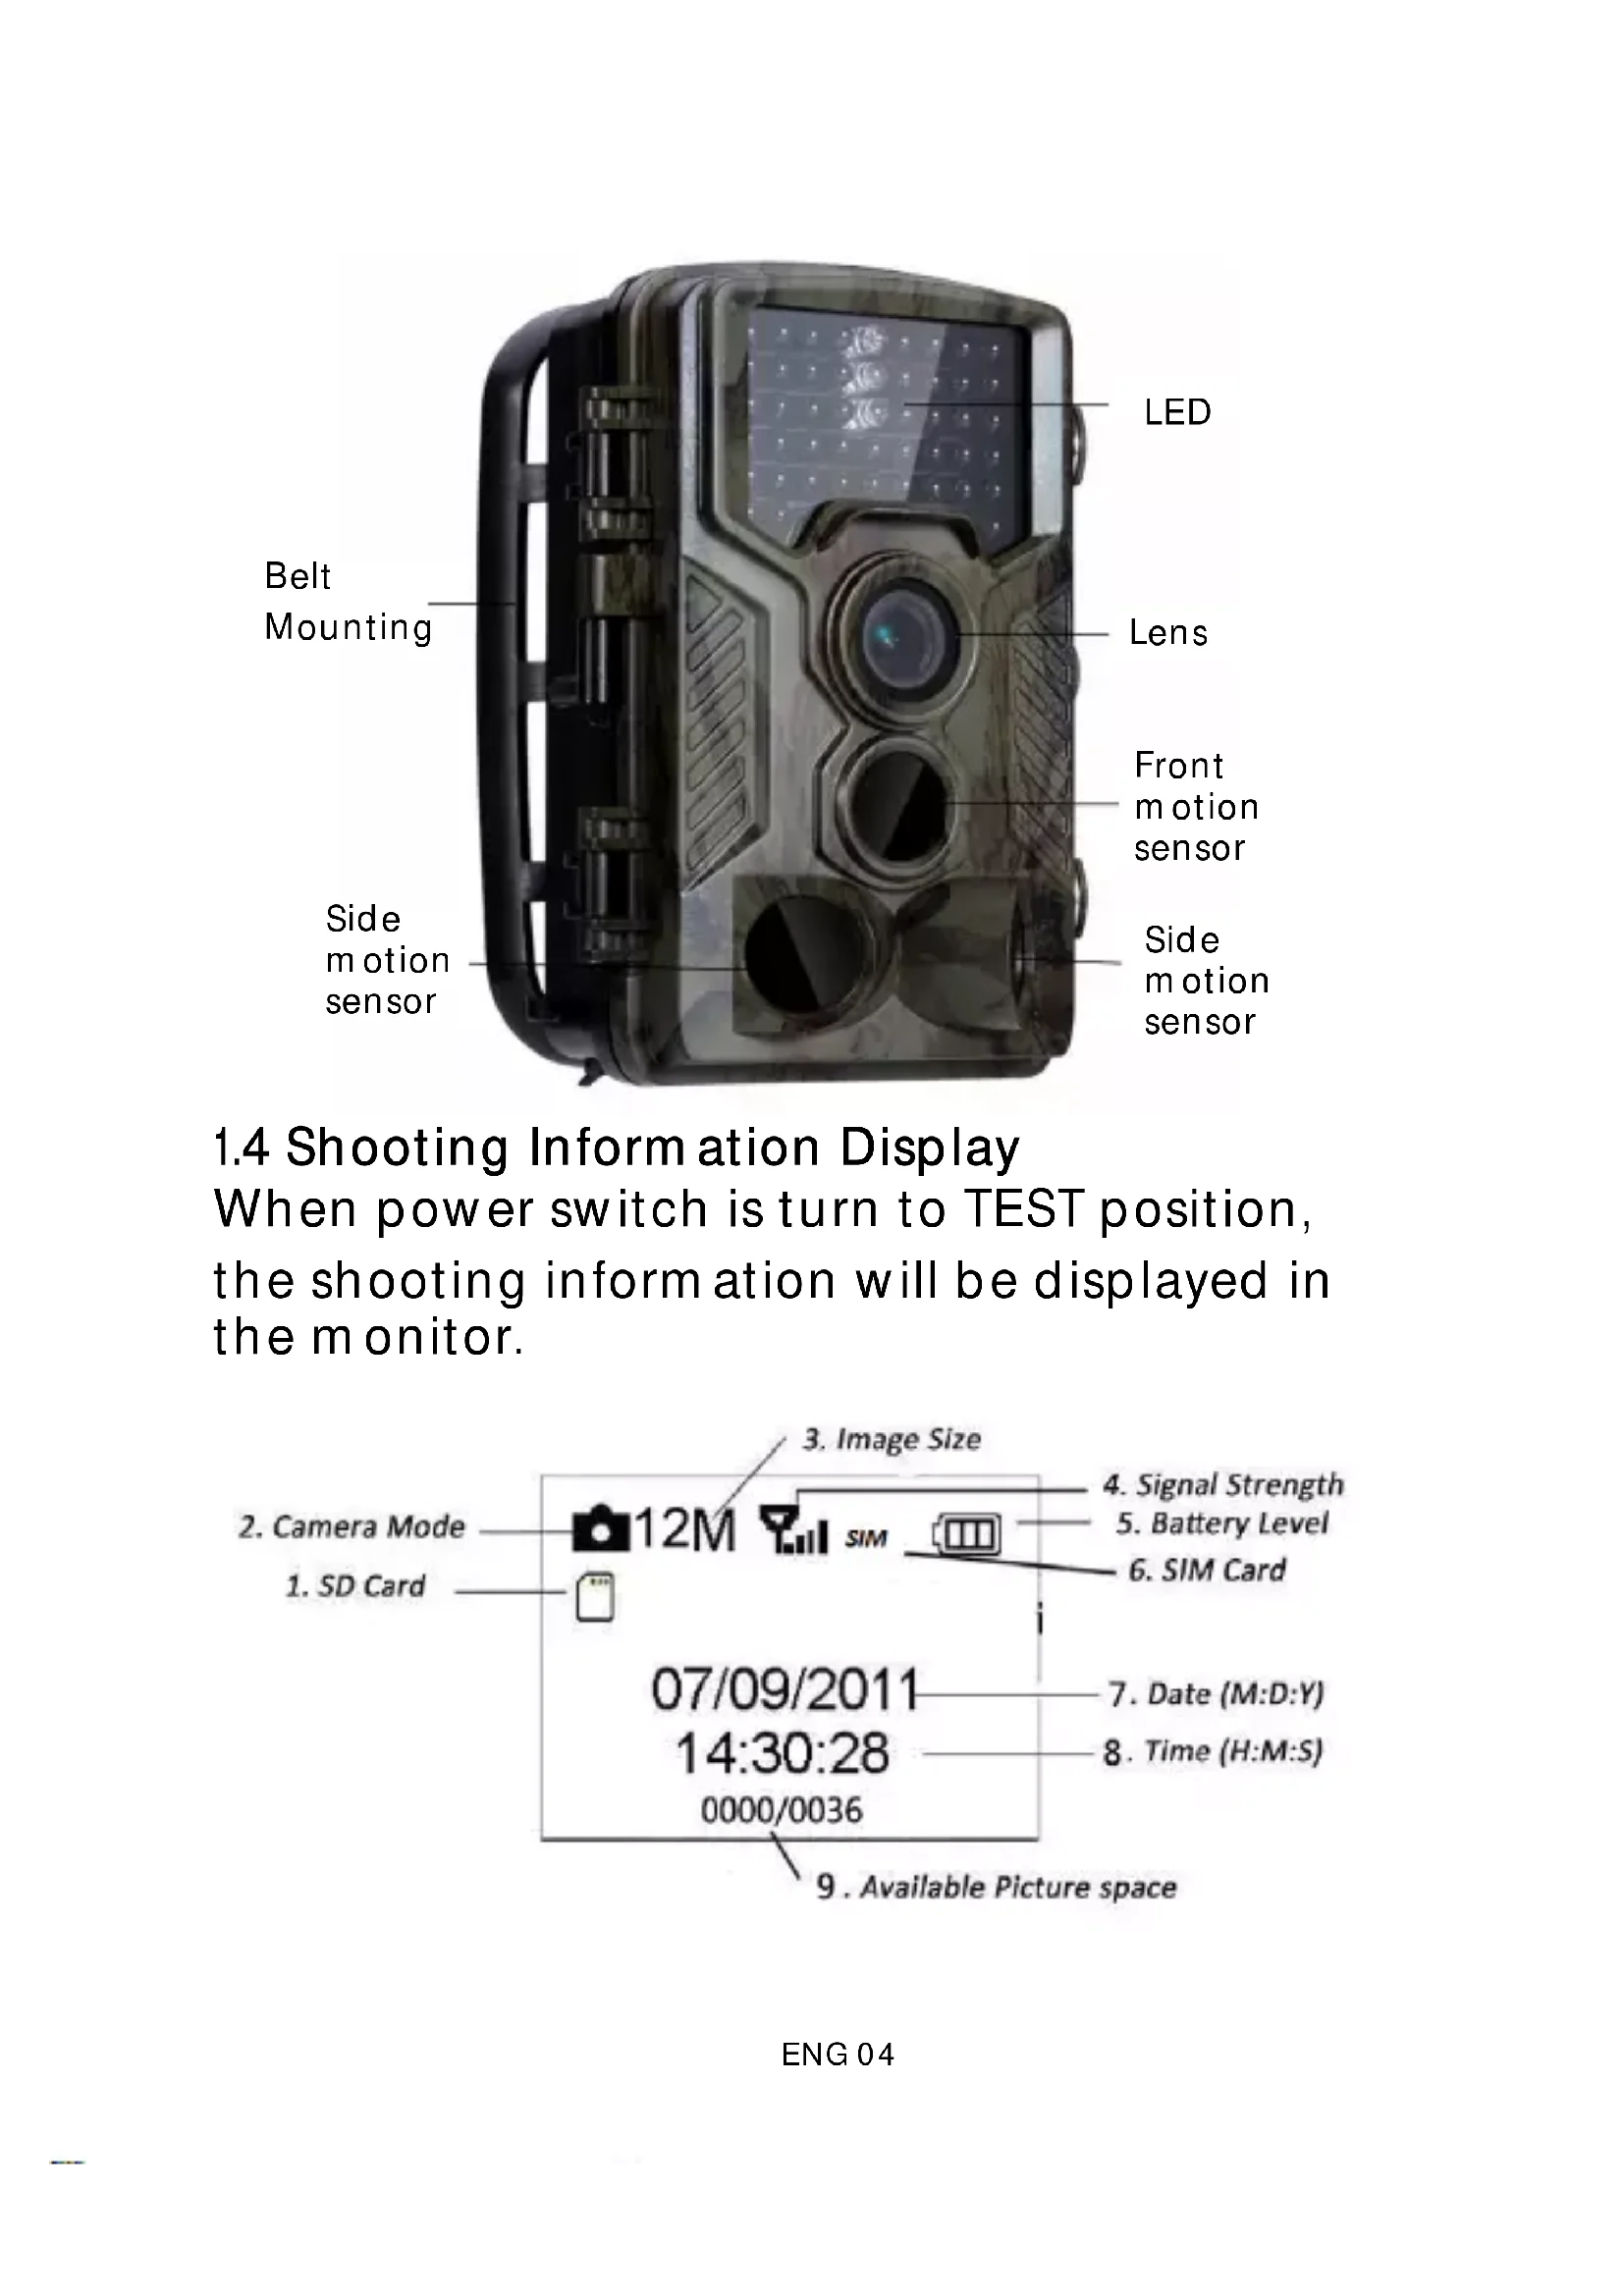
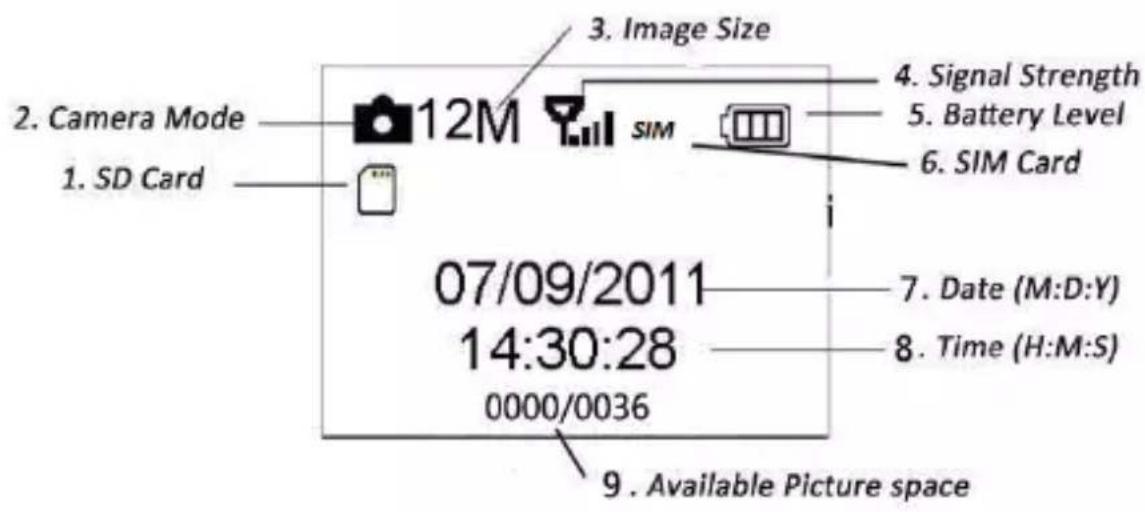
LED Lens Belt Mounting Front motion sensor Side motion sensor Side motion sensor1.4 Shooting Information Display When power switch is turn to TEST position, the shooting information will be displayed in the monitor.
text_image
2. Camera Mode 1. SD Card 12M 3. Image Size SIM 4. Signal Strength 5. Battery Level 6. SIM Card 07/09/2011 14:30:28 0000/0036 7. Date (M:D:Y) 8. Time (H:M:S) 9. Available Picture space1.5 Brief Introduction for SIM card and Signal There are two SIM card icons. SIM It means the SIM card is inserted and it can work well.
It means the network signal in your local place is very good.
1.6 Supported Form at
| Item | Form at |
| Photo | JPG |
| Video | AVI |
- Easy Operation
2.1 Power Supply
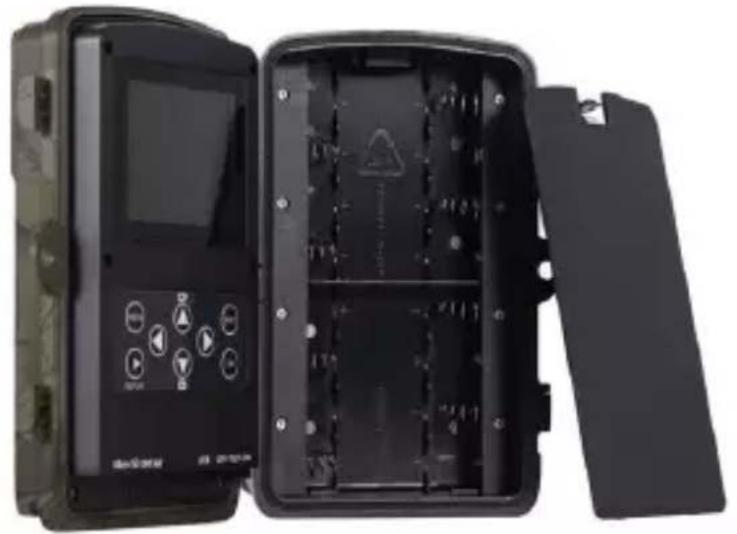
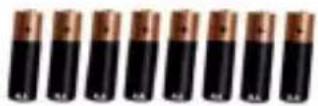
To supply power for the camera, 8 AA batteries are needed. (Batteries not incl)
The following batteries with 1.5V output can be used:
-
High-density and high-performance alkaline batteries (Recommended)
-
Rechargeable alkaline batteries
-
Rechargeable NiMH batteries
When in Test Mode, camera will be automatically shut down to save power if without any operation within 3 minutes; it could be waked up by any movement detection. When in low power state, camera will also automatically shut down. Please change the batteries in time.
2.2 Insert the MICRO SD-card and the SIM-card Insert MICRO SD-card and SIM into the card slot. (Card not incl)
When use MMS/E-mail function, be sure to insert SIM-card into the SIM-card slot correctly.
natural_image
Interior view of a black electronic device with open ports and control panel (no visible text or symbols)
natural_image
Yellow pixelated icon resembling a stylized letter or symbol, no text or symbols presentStandard SIM (not included)

Micro SD Card 32GB
(not included)
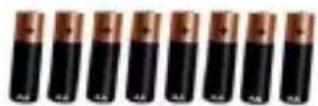
8X AA Batteries
(not included)
2.3 Enter into the TEST Mode
Turn the power switch to the TEST position to enter into the TEST mode. There are some functions in TEST mode: user settings, manually capture, preview.
2.3.1 User Settings
Press the MENU button. The camera can be set (mode, interval, picture resolution, video resolution & length, etc.) the detailed operations will be described in following chapter.
2.3.2 Manual Capturing
Press Shot to manually capture photos or record video.
2.3.3 View Images or Videos
There are two ways to view the captured images or videos:
-
LCD screen on camera
-
USB Type-C cable connects to the computer and reads the video files in the SD card.
2.4 Power on and Enter into the ON Mode
Before switching on, please pay attention to the following items:
-
Do not face light source directly. These may cause false triggers
-
The height from ground for placing should be 1-2 meters. For example for deer height is good size appropriately.
After switching on the camera, the red light will blink for about 10s. The 10s is a buffering time before automatic capturing, e.g. for closing and locking the bottom cover, fixing the camera on a tree and walking away.
2.5 Power Off
Slide the power switch to OFF position to turn off the camera.
Therefore, please remove the battery if the camera will not be used for a long time.
3. Advanced Operations
This chapter explains that user settings can only be done in TEST mode and the remote control is needed.
3.1 Settings Menu
Press MENU when camera in the TEST mode. The settings menu will be shown on the LCD or the external TV monitor.
3.1.1 Photo Setting
| Camera | ||
| Resolution | 12MP 8MP 5MP | |
| Interval | 1 Second 5 Seconds 10 Seconds 30 Seconds 1 Minute 5 Minutes 10 Minutes 30 Minutes | |
| Multi | Single 3 Pictures 6 Pictures 9 Pictures | |
| ISO | 100 200 400 | |
| ID | CAN000 | |
ENG 08
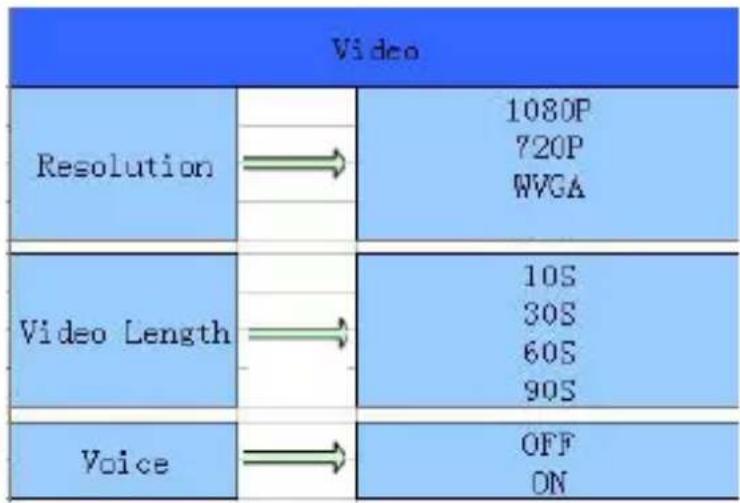
3.1.2 Video Setting
text_image
Video Resolution 1080P 720P WVGA Video Length 10S 30S 60S 90S Voice OFF ON3.1.3 System Setting
| Setting | ||
| Node | Camera Video Camera+Video | |
| Language | English Francais Deutsch Espanol etc | |
| Date/Time | Month/Day/Year Hour/Minute/Second | |
| Timer | 0:00:00 23:59:59 | |
| Format | All data will be deleted Cancel OK | |
| Password | OFF/ON | |
| Default | Cancel OK | |
| Version | ||
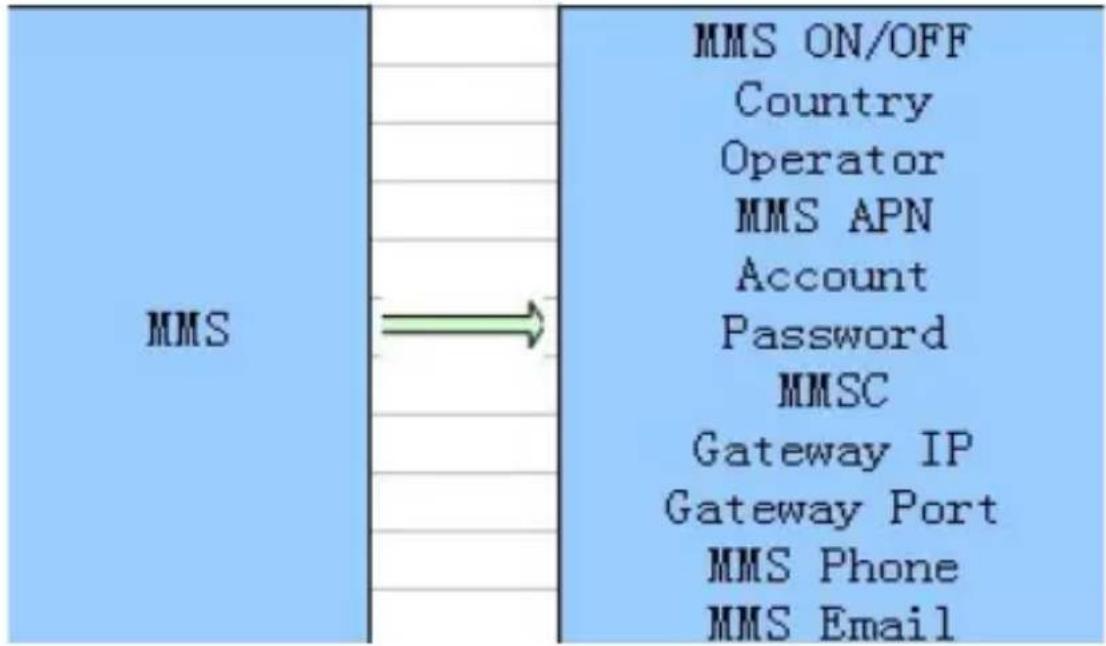
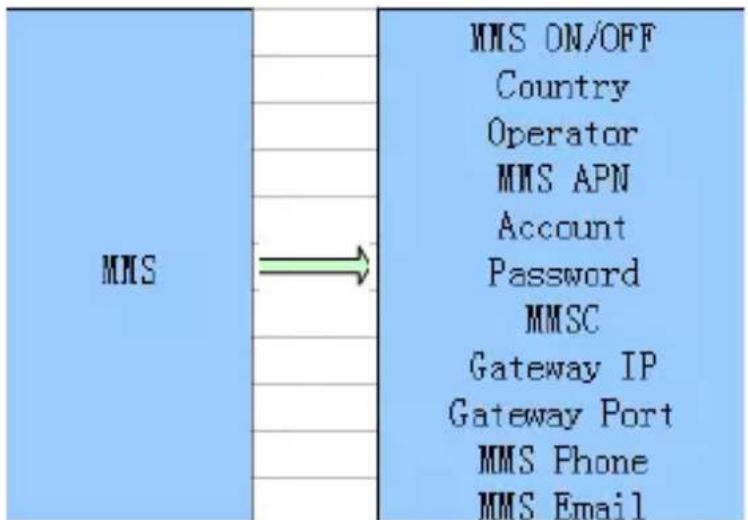
3.1.4 MMS Menu Setting
text_image
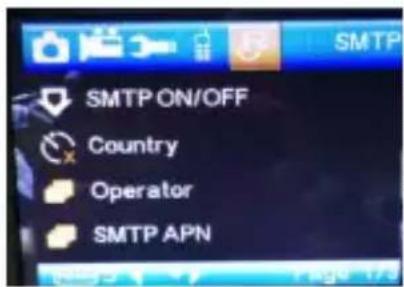
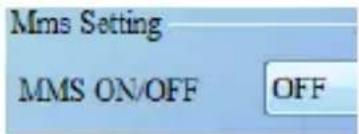
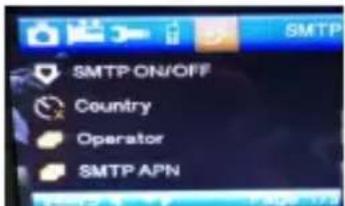
MMS MMS ON/OFF Country Operator MMS APN Account Password MMSC Gateway IP Gateway Port MMS Phone MMS Email3.1.5 SMTP Menu Setting
| SMTP | SMTP ON/OFF Country Operator SMTP APN Account Password SMTP Server SMTP Port SendEmail SendEmail Password SMTP Email |
This camera can send pictures instantly to user's mobile via MMS method. So before using this function user needs to finish the settings mms in MMSCONFIG.
3.2 MMS/SMTP Settings
3.2.1 Preparation
- 2G/GSM Mobile Operator Service
- form at 2GB+ MICROSD or SD card
- computer (Vista, Windows 7, windows 8 system)
- One SIM card without PIN lock
- The SIM card should be able to send images via 2G/GSM/ GPRS/MMS network
- 9V power (8 AA Batteries, or 12V input power supply)
- MMSCONFIG Program in CD
- Users need to ask the provider 2G MMS data (APN+Account+Password, MMSC+IP+PORT), or find this info on providers homepage.
- 2G GPRS data for SMTP setting from provider (APN+Account+Password)
- Sender Email server info( server+port+email+password)
3.2.2 MMS setting:
- Insert card and SIM to camera, put batteries in cam then turn camera to test mode, check there are signal bar and "SIM" on the camera screen. Then connect the camera to the PC with the included USB cable insert CD to computer, open and then double click

MMSCONFIG

text_image
2. Choose Mode or Camera Mode Camera & Video in Menu , Go to MMS table, select MMS MODE Manual
flowchart
graph TD
    A["3. Insert"] --> B["Gprs Setting"] --> C["and"] --> D["Server Setting"]
    E["4. Fill in"] --> F["Phone Setting"]
    E --> G["Phone1"] --> H["and or"] --> I["Email Setting"]
    I --> J["Email1"]

text_image
5. Go to SMTP , choose Smtp Setting SMTP ON/OFF OFF
text_image
6. Click Save button and save as Parameter.dat to MICROSD card
text_image
7. Plug USB cable from camera
text_image
8. Go to in camera menu, check the subsetting is the same with above setting
text_image
9. Turn camera to on mode3.2.3 SMTP setting
-
Insert card and SIM to camera, put batteries in cam then turn camera to test mode, check there are signal bar and "SIM" on the camera screen. Then connect the camera to the PC with the included USB cable insert CD to computer, open and then double click
-
Choose Mode Camera or Mode Camera & Video, Go to
SMTP
table, select
SMTP MODE
Manual
- Insert all
text_image
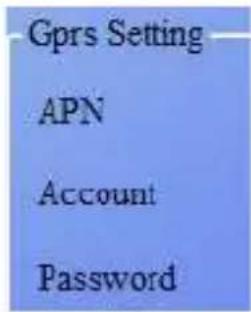
Gprs Setting APN Account Password- Fill in sender email info in
and

text_image
Email Setting Email1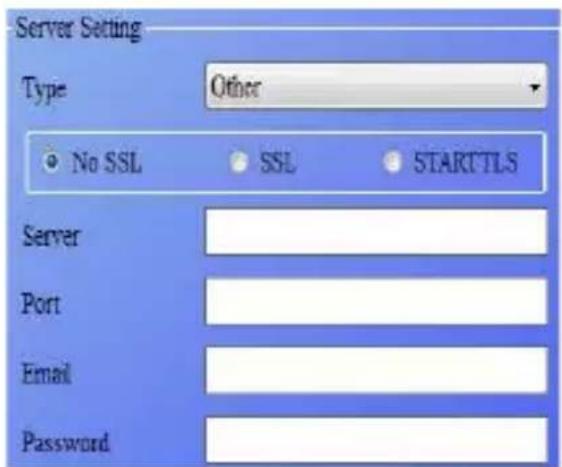
text_image
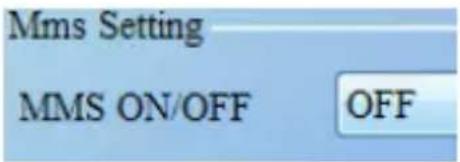
Server Setting Type Other No SSL SSL SARTTLS Server Port Email Password- Go to MMS table, choose

text_image
Mms Setting MMS ON/OFF OFF-
Click Save button and save as Parameter.dat to MICROSD card
-
Plug USB cable from camera
-
Go to
text_image
SMTP SMTP ON/OFF Country Operator SMTP APNin cam menu, check the subsetting is the same with above setting
- Turn camera to on mode
3.3 SMS Command Code m m s/sm tp need to be set 'on' mode well before using thes sm s command
*500* take picture
(Can work in both mms and smtp mode)
*505* take picture and send to the mobile who sends sm s sim in camera will send picture to m ms Mobile or smtp email when got* 505* Command, no matter MMS or smtp mode. But sim will send m ms to the mobile who sends sm s when camera only in m ms mode
*520* check the picture quantity and battery status
(Can work in both mms and smtp mode) sim will send Total Jpg: Free Space: Battery Level: when receive *520* command
*530* turn on camera
(Can work in both mms and smtp mode) sim will send PIR ON when receive *530* command
*531* turn camera to sleeping mode
(Can work in both mms and smtp mode)
Sim will send PIR OFF when receive *531*
command

text_image
Warning symbol image with exclamation mark inside triangle4. Cautions
The working voltage of the camera is 12.0 V.
Please unlock and form at the Micro SD card.
Please insert the Micro SD-card when the power switch is at OFF position.
Please do not insert or take out the Micro SD-card when the power switch is at ON position.
Please ensure full power when having firm ware upgrade, otherwise the upgrade process could be stopped.
As communications networks may vary we can't guarantee 100% MMS and GPRS can work fine
Appendix | : Parts List
| Part Name | Quantity |
| Digital Camera | 1 |
| USB Type C Cable | 1 |
| User's Manual | 1 |
| CD | 1 |
| Strap | 1 |
Appendix || : Technical Specifications
| Image Sensor Type (True Megapixels) | 8 Mega Pixels Color CMOS |
| Memory | Micro SD Card 8GB~32GB |
| Lens | F=3.1; FOV=10 8° |
| Size | 135m m *95m m *85 m m |
| IR Filter: | Full Automatic IR Filter |
| TFT Display Screen: | 2.0 inch |
| PIR Sensor Sight Angle | 120 Degrees |
| PIR Sensing Distance | 65ft/20m |
| Number of IR LED | 42 LEDs Black or White |
| Max Night Vision Lighting Distance | 65ft/20 meters |
| Trigger Speed 0.3 second | d |
| Triggering Interval : | 1 second ~ 30 mins (default 1 sec) |
| Selectable Image Resolution: | 12MP/8MP/5MP |
| Multiple Frame | 1/3/6/9 |
| Video Resolution | 1080 P/720 P/WVGA |
| File Form at | JPEG/AVI |
| Date Time Im print | Yes |
| Moon Phase Im print | Yes |
| Exposure: | Auto |
| MMS/EMAIL | Support |
| SMS Control | Support |
| Password Security | 4 Digits set by yourself |
| Universal password | 1314 |
| Default camera ID | CAM000 |
| Periodic shot | 1Second~24Hours |
| Stand-by current | 0.2mA |
| Stand-by time 3 Months | s (8 AA Battery) |
| Interface | USB Type C; Micro SD Card Holder; 12V DC External |
| Operation Temperature | -30 ~+70°C/-22~+158°F |
| Power Supply | 8×AA battery |
| Camera Socket Yes | |
| Water proof | IP65 |
| Menu Langugae | English, French, Germany, Spanish, Danish, Dutch, Poland, Portuguese, Swedish, Italian, Finnish, CR |
Please notice - All products are subject to change without any notice. We take reservations for errors and omissions in the manual.
ALL RIGHTS RESERVED, COPYRIGHT DENVER A/S

denver
denver.eu

text_image
C E
natural_image
Symbol of a trash bin crossed with a diagonal line and a horizontal bar below (no text or labels)Electric and electronic equipment and included batteries contains materials, components and substances that can be hazardous to your health and the environment, if the waste material (discarded electric and electronic equipment and batteries) is not handled correctly.
Electric and electronic equipment and batteries is marked with the crossed out trash can symbol, seen below. This symbol signifies that electric and electronic equipment and batteries should not be disposed of with other household waste, but should be disposed of separately.
As the end user it is important that you submit your used batteries to the appropriate and designated facility. In this manner you make sure that the batteries are recycled in accordance with legislature and will not harm the environment.
All cities have established collection points, where electric and electronic equipment and batteries can either be submitted free of charge at recycling stations and other collection sites, or be collected from the households. Additional information is available at the technical department of your city.
Hereby, Denver A/S declares that the radio equipment type WCM-8010MK3 is in compliance with Directive 2014/53/EU. The full text of the EU declaration of conformity is available at the following internet address: Please enter: denver.eu and then click the search ICON on topline of website, write model number: WCM-8010MK3 Now enter product page, and RED directive is found under download/other downloads
DENVER A/S
Omega 5A, Soeften
8382 Hinnerup
Denmark
www.facebook.com/denver.eu
Operating frequency rate:850-1900MHz
Max output power:2W
Sicherheitshinweise
text_image
LEDs Lens Gurtm o ntage Front m otion sensor Side m otion sensor Side m otion sensor1.4 Display
natural_image
Open black electronic device with control panel and display, showing internal compartments and buttons (no readable text or symbols)
Micro SD Card 32GB
text_image
Video Resolution → 1080P T20P WVGA Video Length → 10S 30S 60S 90S Voice → OFF ONtext_image
Setting Mode → Camera Video Camera+Video Language → English Francais Deutsch Espanol etc Date/Time → Month/Day/Year Hour/Minute/Second Timer → 0:00:00 23:59:59 Format → All data will be deleted Cancel OK Password → OFF/ON Default → Cancel OK Version →3.1.4 MMS-Menüeinstellungen
text_image
MMS MMS ON/OFF Country Operator MMS APN Account Password MMSC Gateway IP Gateway Port MMS Phone MMS Email3.1.5 SMTP-Menüeinstellungen
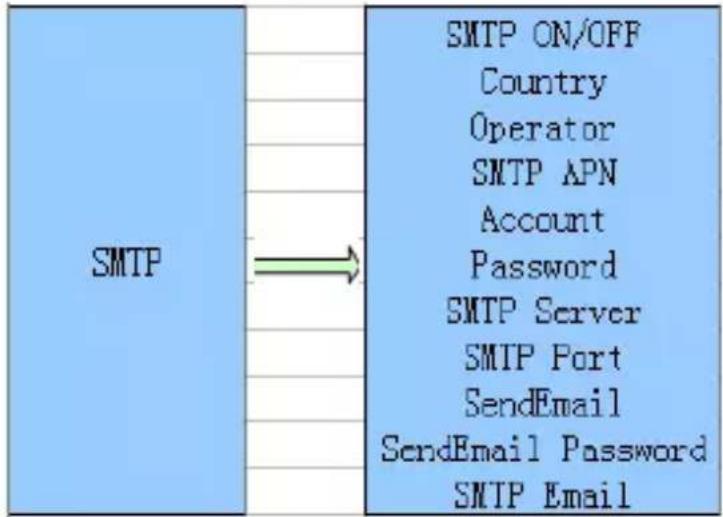
flowchart
graph LR
    A["SMTP"] --> B["SMTP ON/OFF\nCountry\nOperator\nSMTP APN\nAccount\nPassword\nSMTP Server\nSMTP Port\nSendEmail\nSendEmail Password\nSMTP Email"]
text_image
Phone Setting Phone1text_image
Warning symbol image with exclamation mark inside triangleGER 36
natural_image
Symbol of a trash bin crossed out by two diagonal lines (no text or numbers present)
natural_image
Open black tactical device with multiple control panels and buttons, no visible text or symbolsMicro SD Card 32GB (ikke inkluderet)
8X AA Batteries
(ikke inkluderet)
text_image
LCD DISPLAY 10 8 9 7 13 6 5 USB OFF-TEST-ON 11 2 12 3 4 ① ② ③ ④ ⑤Oversigt
1) 2 tommer LCD-skærm
2) Shot-knap
3) OK-knappen
4) Strøm afbryder
5) USB Type C stik
6) Micro SD-kortspor Replay-knap
8) Menuknap
9) Venstre knap
10) Op-knappen
11) Ned-knappen
12) Højre knap
13) Standard SIM (tilkøb)
Phone Setting Phone1
og / eller
Email Setting Email1

text_image
5.Gå til SMTP og væ lg Smtp Setting SMTP ON/OFF OFF6.Klik på knappen Save og gem som Param eter.dat på microSD-kortet.
7. Fjern USB-kablet fra kam eraet.
8. Gå til i menuen kamera og tjek, at de enkelte punkter er indstillet som vist herover.
9. Stil kam eraet på normal optagetilstand.
Sådan foretages GPRS-indstillinger
text_image
Gprs Setting APN Account Passwordtext_image
Server Setting Type Other ✓ No SSL SSL STARTTLS Server Port Email Passwordog

text_image
Email Setting Email15.Gå til fanen
MMS
og væ lg
text_image
Mms Setting MMS ON/OFF OFF6.Klik på knappen Save og gem som Param eter.dat på microSD-kortet.
text_image
SMTP SMTP ON/OFF Country Operator SMTP APNi menuen kam era og tjek, at de enkelte punkter er indstillet som vist herover.
text_image
4.Vul Phone Setting of Email Setting in. Phone1 Email1text_image
Server Setting Type Other ✓ No SSL SSL STANTTLS Server Port Email PasswordMms Setting MMS ON/OFF OFF
text_image
SMTP SMTP ON/OFF Country Operator SMTP APN- Schakel de camera in
F. SMS-opdracht code
natural_image
Open black electronic device case with internal compartments and control buttons (no visible text or symbols)Micro SD Card 32GB (non inclus)
8X AA Batteries
(non inclus)
text_image
LCD DISPLAY ① ② ③ ④ ⑤ ⑥ ⑦ ⑧ ⑨ ⑩ ⑪ USB OFF-TEST-ON 12 13Vue d'ensemble
text_image
MMS ON/OFF Country Operator MMS APNÉtapes de la configuration GPRS
text_image
Mms Setting MMS ON/OFF OFFtext_image
SMTP SMTP ON/OFF Country Operator SMTP APNtext_image
Micro SD Card 32GB 8X AA Batteriestext_image
LCD DISPLAY ① ② ③ ④ ⑤ ⑥ ⑦ ⑧ ⑨ ⑩ ⑪ ⑫ ⑬ ⑭4.Rellene Phone Setting y o Email Setting Phone1 Email1
5.Vaya a SMTP , y elija Smtp Setting SMTP ON/OFF OFF
text_image
Server Setup Type Other No SSL SSL SSTARTTILS Server Pool Email Passwordy
- Vaya a la tabla
MMS y elija

text_image
SMTP ON/OFF Country Operator SMTP APNtext_image
Gprs Setting APN Account Passwordtext_image
Server Setting Type Other No SSL SSL SATAFTILN Server Port Board Passworde

text_image
Mms Setting MMS ON/OFF OFFtext_image
SMTP SMTP ON/OFF Country Operator SMTP APNnatural_image
Symbol of a trash bin crossed with a diagonal line, representing no waste or discharge (no text or numbers present)
text_image
Mms Setting MMS ON/OFF OFFtext_image
SMTP SMTP ON/OFF Country Operator SMTP APNtext_image
LCD DISPLAY ① ② ③ ④ ⑤ ⑥ ⑦ ⑧ ⑨ ⑩ ⑪ ⑫ ⑬ ⑭ ⑮ ⑯ ⑰ ⑱ ⑲ ⑳Ö versikt
1) 2 tums LCD-färgskärm
2) Shot-knapp
3) OK-knappen 4) Strömbrytare
5) USB typ C-kontakt 6) Micro SD-kortplats
7) Replay-knapp 8) Menyknapp
9) Vänster knapp 10) Upp-knappen
11) Ner knapp 12) Höger knapp
13) Standardiserat SIM-kort (ingår inte)
text_image
Server Setting Type Other No SSL SSL SARTETS Server Post Email Passwordoch

text_image
Mms Setting MMS ON/OFF OFFtext_image
SMTP ON/OFF Country Operator SMTP APNnatural_image
Symbol of a trash bin crossed with a diagonal line and a horizontal bar below (no text or labels)natural_image
Interior view of an open battery pack with external components and a close-up of 8X AA batteries (no text or symbols on main subject)(ei kuulu m ukaan)
text_image
LCD DISPLAY ① ② ③ ④ ⑤ ⑥ ⑦ ⑧ ⑨ ⑩ ⑪ ⑫ ⑬ ⑭ ⑮ ⑯ ⑰ ⑱ ⑲ ⑳Yleiskatsaus
text_image
MMS ON/OFF Country Operator MMS APNkam eran valikossa aliasetus on sam a asetus
text_image
Server Setting Type Others No SSL SSL SSTARTTLS Server Port Email Passwordja

text_image
Mms Setting MMS ON/OFF OFFtext_image
SMTP SMTP ON/OFF Country Operator SMTP APNkameran valikossa aliasetus on sam a asetus.
text_image
Micro SD Card 32GB 8X AA Batteries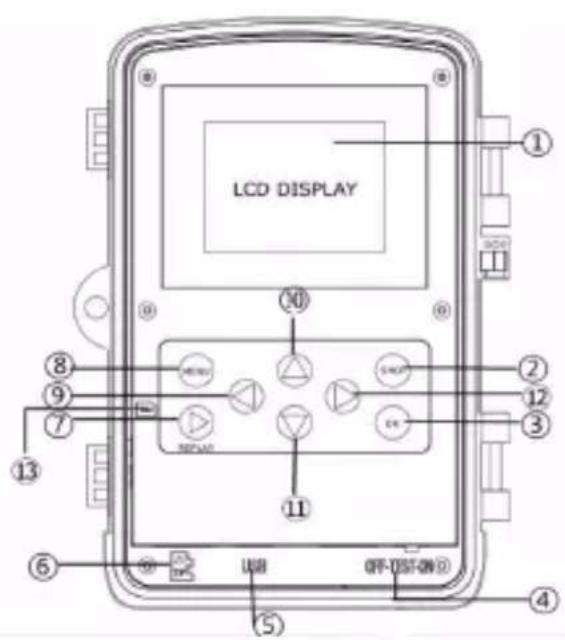
text_image
LCD DISPLAY ① ② ③ ④ ⑤ ⑥ ⑦ ⑧ ⑨ ⑩ ⑪ USB OFF-DSF-ON Dikke inkludert
Oversikt
1) 2-tommers LCD-skjerm
2) Shot-knapp
3) OK-knappen
4) Strømbryter
5) USB type C-forbinder
6) Micro SD-kortspor
7) Replay-knapp
8) Menyknapp
9) Venstre knapp
10) Opp-knapp
11) Ned-knappen
12) Høyre knapp
13) Standard SIM (ikke inkludert)
text_image
Mms Setting MMS ON/OFF OFF-
Trykk på Save -knappen og lagre som Param eter.dat til microSD-kortet.
-
Trekk ut USB-kabelen fra kam eraet.
-
Gå til kontroller
text_image
SMTP ON/OFF Country Operator SMTP APNi kam eram enyen, at underinnstillingen
natural_image
Symbol of a trash bin crossed with a diagonal line, representing no waste or discharge (no text or labels)
text_image
Micro SD Card 32GB 8X AA Batteries(nie zażwczono)
text_image
LCD DISPLAY ① ② ③ ④ ⑤ ⑥ ⑦ ⑧ ⑨ ⑩ ⑪ ⑫ ⑬ ⑭ ⑮ ⑯ ⑰ ⑱ ⑲Przeglwd Przeglwd
text_image
Gprs Setting APN Account PasswordEmail Setting Email1
text_image
Mms Setting MMS ON/OFF OFFtext_image
SMTP ON/OFF Country Operator SMTP APN9.Wawcz kam erę.
F. Lista polece« SMS
(Push "1" for support)
For technical questions, please write to:
support.hp@denver.eu
For all other questions please write to:
contact.hp@denver.eu
Benelux
Denver BENELUX B.V.
Barwoutswaarder 13C+D
3449 HE Woerden
The Netherlands
Phone: +0900-3437623
E-Mail: support-nl@denver.eu
Spain/Portugal
Denver SPAIN S.A
Ronda Augustes y Louis Lumiere,
Denver Germany GmbH Service
Max-Emanuel-Str. 4
94036 Passau
Phone: +49 851 379 369 40
support.de@denver.eu
Fairfxx GmbH
Repair and service
Rudolf-Diesel-Str. 3 TOR 2 53859
Niederkassel
(for TV, E-Mobility/Hoverboards/
Balanceboards,
Smartphones & Tablets)
Tel.: +49 851 379 369 69
If your country is not listed above, please write an email to
support@denver.eu

denver
Denver A/S
Omega 5A Soeften
DK-8382 Hinnerup Denmark
denver.eu
facebook.com/denver.eu

text_image
22 PAP
text_image
denverDenverA/S Omega 5A, Soeften DK-8382 Hinnerup Denmark
denver.eu