
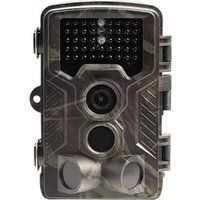
WCS-5020 - Video camera DENVER - Free user manual and instructions
Find the device manual for free WCS-5020 DENVER in PDF.


| Product Type | Trail Camera / Wildlife Camera |
| Brand | Denver |
| Model | WCS-5020 |
| Power Supply | 4 x 1.5V AA batteries (not included) |
| Memory Card Support | Micro SD up to 32GB, Class 6 or higher |
| Photo Resolution | Up to 12MP (4000x3000) |
| Video Resolution | Up to 1920x1080P at 30fps |
| Motion Sensor Sensitivity | Low / Middle / High |
| IR Distance | Near / Middle / Far |
| Night Vision | Infrared LEDs, black & white images |
| Time-Lapse Mode | Normal (still images) or TL Video |
| Loop Recording | Yes (Endless Capture) |
| Audio Recording | Yes, with video (On/Off) |
| Display | Built-in LCD screen |
| Ports | USB, DC adapter, micro SD slot, tripod slot |
| Dimensions (approx.) | 140 x 80 x 50 mm |
| Weight (approx. with batteries) | 300 g |
| Compliance | CE, RE Directive 2014/53/EU |
| Care & Cleaning | Keep away from water, dust, strong vibration; avoid direct sunlight |
| Safety | Correct battery polarity; do not expose to extreme heat; password protection available |
| Spare Parts & Repairability | Not specified; mounting strap and USB cable included; reset to factory defaults restores functionality |
Frequently Asked Questions - WCS-5020 DENVER
User questions about WCS-5020 DENVER
0 question about this device. Answer the ones you know or ask your own.
Ask a new question about this device
Download the instructions for your Video camera in PDF format for free! Find your manual WCS-5020 - DENVER and take your electronic device back in hand. On this page are published all the documents necessary for the use of your device. WCS-5020 by DENVER.
USER MANUAL WCS-5020 DENVER
Infrared Trail Camera User's Manual
WCS-5020

natural_image
Close-up of a camouflage video camera with a bird photograph displayed on its screen (no text or symbols visible)Package List:
*Camera
*Mounting Strap
*USB Cable
*User Manual

Parts Of The Camera
- Display screen
- IR lamps
- Lens
- Up/Video Button
- Down/Capture Button

- Motion sensor
- OK/Shot button
- Menu Button
- Right button
- Playback button
- DC adapter port
- Tripod Slot

-
Micro SD card slot
-
Battery compartment
- ON-TEST-OFF button
- USB jack
Power Supply
Please install batteries before using the camera. Unlock the camera and you will find the battery compartment. Install 4 pieces of 1.5V AA batteries. Please make sure the battery polarity is correct.
Inserting the Memory Card
- Please prepare a Micro SD card and insert it into the camera for saving files. Before recording, please format the memory card first.
- You are suggested to use a micro SD card up to 32GB with class 6 or above high speed.
- To avoid malfunction, the memory card should be far away from water, strong vibration, dust, hot source and direct sunlight.
-
Do not insert the memory card forcibly. Please refer to the marking on the camera.
-
For the first time of use, please wait for the memory card temperature reach the ambient temperature. The camera will be short-circuited by environment temperature and humidity. Please protect the camera when using it outdoor.
- If the capacity of memory card is full, the camera will stop recording automatically.
- Press the edge of the card gently to pop-up the TF card.
Basic Operation
Turn On / Off the Camera
- Switch the Mode Button to “Test /On” to turn on the camera.
- Switch the Mode Button to “Off” to turn off the camera.
System Setup
Switch Mode Button to “Test”, then you can set the system parameters.
-
Press Menu button to open the setup menu.
-
Press Up/Down button to scan all menus. Then press OK button to enter the options interface.
- Press Up/Down button to scan all options. And press OK button to confirm options.
- Press Menu button again to turn back to last menu or exit the setup menu.
Following below instructions to set up the menus and functions:
Mode
Set the working mode. In photo mode, the camera just takes pictures. In Video mode, the camera just records videos. In photo & video mode, the camera will take a photo first, and then record a video.
Options: [Photo]/[Video]/[Photo & Video].
Photo Resolution
Set the resolution of a still image.
Options: [12MP (4000x3000P)]/[8MP (3264x2448P)]/[5MP (2592x1944P)]/[3MP (2048x1536P)]/[1MP (1280x960P)].
Photo Series
Set the photo number of continuous shootings. In photo mode, the camera will take photos continuously. Options: [1 photo]/[2 photos in series]/[3 photos in series].
Video Resolution
Set the video resolution. The larger the resolution is, the longer the video time will be stored.
Options: [1920x1080P]/[1280x720P]/[720x480P]/[640x480P]/[320x240P].
TL Video Resolution
Set the resolution of a time-lapse video.
Options:[2592x1944P]/[2048x1536P].
Video Length
Set the duration of recording a video clip. The shortest time can be set is 3 seconds and the longest time is 10 minutes.
Options: 3 seconds\~10 minutes.
Audio Recording
Access this function, the camera will record audio when record a video at the same time.
Options: [On]/[Off].
Shot Lag
Set the time of delay shooting when the camera detects a motion. In the selected time, the camera will not record any image or video. This function can avoid storing too many same events and waste of memory.
Options: 5 seconds\~60 minutes.
IR Distance
Set the distance of infrared induction.
Options: [Near]/[Middle]/[Far].
Sensitivity Motion Sensors
- Set the sensitivity level of the sensor. Normally the environmental impact is small in indoors, you can choose “Low” sensitivity. In normal condition of outdoor, choose “Middle”. Choose “High” if the environment impact is huge in outdoors.
- The temperature can also impact the sensor sensitivity. "High Sensitivity" should be applied to mild environment while "Low Sensitivity" should be applied to cold environment.
Options: [Low]/[Middle]/[High].
Target Recording Time
Set the target recording time. As shown in below picture, you can set the start and stop time. The camera will work just in the stated time slot. In other time, the camera will keep in standby state.
Options: [On]/[Off].

Time-lapse
In Time-lapse menu, there are three options as below:
[Normal]: The camera will take pictures automatically as per set time interval. For example, set the interval time to 1 hour, the camera will take a photo each hour. If you want to observe a plant blooms, the camera will take 24 photos in 24 hours to record the whole process of blooming.
[TL Video]: You can set the interval time within a time range to take photos and convert these photos into a video. The time range is from 1 second to 24 hours. For example, set the interval to 1 hour, the camera will take a photo each hour. If the camera works for 24 hours, there will be 24 photos. These photos will be converted into a video.

[Off]: Close the time-lapse function.
Language
Set the language display on screen.
Options: [English]/[German]/[Danish]/[Finnish]/[Swedish] [Spanish]/[French]/[Italian]/[Dutch]/[Portuguese]/[Simplified Chinese]/[Japanese].
Endless Capture
Set the camera to record video in loop.
Options: [On]/[Off].
Time & Date
Set the date and time of camera. Press Right button to choose an item and press Up / Down button to adjust the value. And then press OK button to confirm.
- Options of date format: dd/mm/yyyy, yyyy/mm/dd, mm/dd/yyyy.
- Options of time format: 24h, 12h.
Options: [Set time & date]/[Time format]/[Date format].
Photo Stamp
Stamp the date & time on the photos.
Options: [Time & date]/[Date]/[Off].
Password Protection
Set the power-on password of the camera. The password is four digits; each digit can be select from 0 to 9.
If you forget the password, please reset the camera. Then all parameters will reset to the factory settings.
Options: [On]/[Off].
Beep Sound
Open/close the touch-tone.
Options: [On]/[Off].
Format Memory Card
Formatting the memory card will delete all data permanently. Before using a new memory card or a card that has been used in another device previously, please format the memory card.
Options: [Yes]/[No].
Serial No.
Set the unique serial number for the camera. The number is four digits, each digit can be selected from 0 to 9 and A to Z.
Options: [On]/[Off].
Reset Settings
Restore the camera to factory default settings including password, serial number and so on.
Options: [On]/[Off].
Version
Look up the Firmware information of the camera.
Take Photos, Record Videos, Playback
Switch the Mode Button to “Test”. In this mode, you can take photos, record videos and playback files manually.
• Take Photos: Press Capture button to switch to photo mode. Press Shot button to take a picture.
- Record Video: Press Video button to switch to video mode. Press Shot button to record a video clip. Press Shot button again to stop recording.
- Playback: Press Playback button to enter the playback interface. Press Up/Down button to scan photos or videos. When playback a video, press OK button to play the video.
1) Press OK button again to pause the playback.
2) Press Menu button to stop the playback.
3) Press Playback button again to exit the playback mode.
- Playback Menu:
1) Delete current file: Delete the current photo or video. Options: [Cancel]/[Delete].
2) Delete all files: Delete all photo and video files in the memory card. Options: [Cancel]/[Delete].
3) Activate slide show: Playback the photos in slide way. Each photo displays 3 seconds. Press OK button to stop playing.
4) Write protect: Lock the file. It can avoid accidental deletion. Options: [Write-protect current file]/[Write-protect all files]/[Unlock current file]/[Unlock all files].
Working Mode
Switch the Mode Button to “On”. After turning on the camera, the screen will display 15 seconds countdown. Then the LEDs and screen will go out. The camera begins to operate independently and enter standby mode.
- If the wild animals enter the detection range of the motion sensors, the camera will be activated and detect the motion trail.
- If the wild animals continue to move to the detection zone of the sensor, the camera will take photos or record video automatically.
- When the wild animals leave the detection zone of the sensors, the camera will be deactivated and turn back to standby mode.
Night Mode
In night mode, the pictures just can display white and black. When record a video for long time in the evening, the low voltage may have a great influence on the stability of the machine, thus do not record video with low voltage in the evening.
Using a Card Reader
- Pop-up the memory card from the camera and insert it into a card reader. Then connect the card reader to a computer.
- Open [My Computer] or [Windows Explorer] and double-click the removable disk icon that represents the memory card.
- Copy image or video files from the memory card to your computer.
Connecting the Camcorder to a PC by the USB Cable
- Connect the camera to the computer via a USB cable. Turn on the camera, the screen displays “MSDC”.
- Open [My Computer] or [Windows Explorer]. A "Removable Disk" appears in the drive list. Double-click the "Removable Disk" icon to view the contents from the camera.
Please notice - All products are subject to change without any notice. We take reservations for errors and omissions in the manual.
ALL RIGHTS RESERVED, COPYRIGHT DENVER ELECTRONICS A/S
DENVER®
www.denver-electronics.com


natural_image
Symbol of a trash bin crossed with two diagonal lines, representing no waste or discharge (no text or labels)
Electric and electronic equipment and included batteries contains materials, components and substances that can be hazardous to your health and the environment, if the waste material (discarded
electric and electronic equipment and batteries) is not handled correctly.
Electric and electronic equipment and batteries is marked with the crossed out trash can symbol, seen above. This symbol signifies that electric and electronic equipment and batteries should not be disposed of with other household waste, but should be disposed of separately.
As the end user it is important that you submit your used batteries to the appropriate and designated facility. In this manner you make sure that the batteries are recycled in accordance with legislature and will not harm the environment.
All cities have established collection points, where electric and electronic equipment and batteries can either be submitted free of charge at recycling stations and other collection sites, or be collected from the households. Additional information is available at the technical department of your city.
Hereby, Inter Sales A/S declares that the radio equipment type WCS-5020 is in compliance with
Directive 2014/53/EU. The full text of the EU declaration of conformity is available at the following internet address: www.denver-electronics.com and then click the search ICON on topline of website.
Write model number: WCS-5020. Now enter product page, and red directive is found under downloads/other downloads.
DENVER ELECTRONICS A/S
Omega 5A, Soeften
DK-8382 Hinnerup
Denmark
www.facebook.com/denverelectronics


- Infrared Trail Camera User's Manual
- Parts Of The Camera
- Power Supply
- Inserting the Memory Card
- Basic Operation
- Turn On / Off the Camera
- System Setup
- Mode
- Photo Resolution
- Photo Series
- Video Resolution
- TL Video Resolution
- Video Length
- Audio Recording
- Shot Lag
- IR Distance
- Sensitivity Motion Sensors
- Target Recording Time
- Time-lapse
- Language
- Endless Capture
- Time & Date
- Photo Stamp
- Password Protection
- Beep Sound
- Format Memory Card
- Serial No.
- Reset Settings
- Version
- Take Photos, Record Videos, Playback
- Working Mode
- Night Mode
- Using a Card Reader
- Connecting the Camcorder to a PC by the USB Cable
- DENVER®
Brand : DENVER
Model : WCS-5020
Category : Video camera