
CAD-405 - Car radio DENVER - Free user manual and instructions
Find the device manual for free CAD-405 DENVER in PDF.


| Product Type | Car Stereo |
| Brand | Denver |
| Model | CAD-405 |
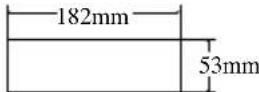
| Dimensions (W x H x D) | 178 mm x 50 mm x 100 mm (1 DIN) |
| Weight | ~0.5 kg |
| Power Supply | DC 12 V (negative ground) |
| Radio Bands | AM / FM |
| CD Player | Yes |
| USB Port | Yes (front panel) |
| AUX Input | Yes (3.5 mm jack) |
| Bluetooth | No (model without Bluetooth) |
| Display | LCD with backlight |
| Max Power Output | 4 x 50 W (max) |
| RMS Power Output | 4 x 20 W |
| Preamp Outputs | 1 pair (front) |
| Supported Audio Formats | MP3, WMA |
| Remote Control | Yes (included) |
| Installation | Standard 1 DIN slot, mounting sleeve and screws included |
| Safety | Replaceable fuse (5A) in rear panel |
| Cleaning | Use soft, dry cloth; avoid solvents |
Frequently Asked Questions - CAD-405 DENVER
User questions about CAD-405 DENVER
0 question about this device. Answer the ones you know or ask your own.
Ask a new question about this device
Download the instructions for your Car radio in PDF format for free! Find your manual CAD-405 - DENVER and take your electronic device back in hand. On this page are published all the documents necessary for the use of your device. CAD-405 by DENVER.
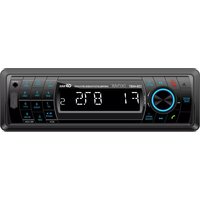
USER MANUAL CAD-405 DENVER
WITH PLL FM STEREO RADIO
RDS
USB / SD / MMC CARD INPUT
FRONT AUX IN
FLIP DOWN/DETACHABLE FRONT PANEL
LOCATION OF PARTS AND CONTROLS

- POWER ON/OFF ()
- FUNCTION SELECT BUTTON: BASS/TREBLE/BALANCE/FADER / TA SEEK/MASK DPI/RETUNE/AUDIO DSP/LOUDNESS/CD MULTI/BEEP/SEEK/STEREO/LOCAL
- VOL UP/VOL DOWN FOR BASS/TREBLE/BALANCE/FADER / TA SEEK/MASK DPI/RETUNE/AUDIO DSP/LOUDNESS/CD MULTI/BEEP/SEEK/STEREO/LOCAL
- PRESET STATIONS (1,2,3,4,5,6)
- 'AF' function (ALTERNATIVE FREQUENCIES)
- 'TA' function (TRAFFIC ANNOUNCEMENT)
- 'PTY' function (PROGRAM TYPE)
- DISPLAY BUTTON (DISP)
- MODE BUTTON (MODE)
- BAND BUTTON (BAND)
- AUTOMATIC OR MANUAL TUNING
(FREQ UP OR ▶FREQ DOWN )/
CD TRACK/SEARCH BUTTON - AUTO SEEK SEARCH TUNING (A/PS)
- 'SCAN' AUTOMATIC TUNING CONTROL (SCAN)
- MUTE BUTTON (MUT)
- LCD DISPLAY
- PANEL RELEASE BUTTON ( )
- CD SLOT
- CD EJECT BUTTON ()
- PAUSE BUTTON
- INTRO BUTTON (Preview all Tracks)
- REPEAT BUTTON
- RANDOM BUTTON
23, 24. + 10 TRACK SEARCH DOWN/UP - USB PORT
- MULTI-MEDIA CARD (MMC) / SD CARD SLOT
- FRONT AUX IN
- RESET BUTTON
- POWER INDICATOR LED


ISO CONNECTOR
RCA Line Out: Red (right) White (left)
CONNECTOR A
- MEMORY +12V
- AUTO ANTENNA OUTPUT
- +12V (TO IGNITION KEY)
- GROUND
Note: (connector A no. 7) must be connected by car ignition key in order to avoid that car battery becomes weak when the car will be not used for long period.

CONNECTOR B
- REAR RIGHT SPEAKER (+)
- REAR RIGHT SPEAKER (-)
- FRONT RIGHT SPEAKER (+)
- FRONT RIGHT SPEAKER (-)
- FRONT LEFT SPEAKER (+)
- FRONT LEFT SPEAKER (-)
- REAR LEFT SPEAKER (+)
- REAR LEFT SPEAKER (-)
Maintenance
FUSE REPLACEMENT
If the fuse blows, check the power connection and replace the fuse. If the fuse blows again after the replacement, there may be an internal malfunction. In this case, consult your nearest repairing center.
Warning
Use the specified amperage fuse for each lead. Use of a higher amperage fuse may cause serious damage.
INSTALLATION
PRECAUTIONS
- Choose the mounting location carefully so that the unit will not interfere with the normal driving functions of the driver.
- Avoid installing the unit where it would be subject to high temperatures, such as from direct sunlight or hot air from the heater, or where it would be subject to dust, dirt or excessive vibration.
- Use only the supplied mounting hardware for a safe and secure installation.
- Be sure to remove the front panel before installing the unit.
NOTE : Inclination angle for car radio installation must not exceed 30^ otherwise the front panel will not open.


natural_image
Diagram of two electronic devices with a cable being inserted into one (no text or symbols visible)Note: Keep the release key in a safe place as you may need it in future to remove the unit from the car.
TO SUPPORT THE UNIT

- UNIT
- RELEASE CASE
- DASH BOARD
- HEX NUT
- LOCK WASHER
- PLAIN WASHER
- CAR BODY
- REAR SUPPORT STRAP
- TAPPING SCREW
- M5 X 15 HEX BOLT
Detaching and attaching the front panel
The front panel of this unit can be detached in order to prevent the unit from being stolen.
FOLDING DOWN AND DETACHING/ATTACHING THE FRONT PANEL
Before detaching the front panel, be sure to press the button (1) OFF first.
Then press the button (16), let the Front Panel arrive in horizontal position and detach the panel by pulling it towards you as illustrated.

flowchart
graph TD
    A["Device 1"] --> B["Device 2"]
    B --> C["Device 3"]
    C --> D["Device 4"]
    D --> E["Device 5"]
    E --> F["Device 6"]
    F --> G["Device 7"]
    G --> H["Device 8"]
    H --> I["Device 9"]
    I --> J["Device 10"]
    style A fill:#f9f,stroke:#333
    style B fill:#f9f,stroke:#333
    style C fill:#f9f,stroke:#333
    style D fill:#f9f,stroke:#333
    style E fill:#f9f,stroke:#333
    style F fill:#f9f,stroke:#333
    style G fill:#f9f,stroke:#333
    style H fill:#f9f,stroke:#333
    style I fill:#f9f,stroke:#333
    style J fill:#f9f,stroke:#333
Notes:
- Do not press the front panel hard against the unit when attaching it. It can be easily attached by pressing it lightly against the unit.
- When you carry the front panel with you, put it in the supplied front panel case.
- Do not press hard or give excessive pressure to the display window of the front panel when attaching it to the unit.
OPERATION
1. POWER ON/OFF ()
By pressing this key, the unit is on or off.
This unit is turned on by pressing any key.
2,3. FUNCTION SELECT BUTTON: BASS/TREBLE/BALANCE/FADER / TA SEEK/MASK DPI/RETUNE/AUDIO DSP/LOUDNESS/CD MULTI/BEEP/SEEK/STEREO/LOCAL (SEL)
Turning the VOL knob Right or Left (3), you can adjust VOL/BASS/TREB/BAL/FAD. To select other functions, press the VOL (3) knob shortly until the desired functions is shown on the display. Figure 1 shows how control functions are selected using the VOL knob.

flowchart
graph LR
    A["1"] --> B["2"]
    B --> C["3"]
    C --> D["2"]
    D --> E["4"]
    E --> F["2"]
    F --> G["5"]
    G --> H["2"]
    H --> I["6"]
    I --> J["2"]
    J --> K["End"]
    A -->|Loop| B
    B -->|Loop| C
    C -->|Loop| D
    D -->|Loop| E
    E -->|Loop| F
    F -->|Loop| G
    G -->|Loop| H
    H -->|Loop| I
    I -->|Loop| J
    J -->|Loop| K
Fig. 1 Selection of sound control functions
-
VOL
-
SEL
-
BAS
-
TRE
-
BAL
-
FAD
Turning the VOL knob Right or Left. Increase or decrease the volume by turning to adjust the BASS, TREBLE, BALANCE and FADER.

or

These buttons can be used
TA SEEK/TA ALARM (2)
When press the SEL button for more than 2 seconds, it is activated as selecting mode of these function.
TA SEEK Mode or TA ALARM mode is selected by

or VOL.
2 sec.
SEL
TA SEEK

TA SEEK / TA ALARM
- TA SEEK mode:
When newly turned station does not receive TP information for 5 sec., the radio retunes to next station which has not the same station (PI) as the last station, but has the TP information. In TA seek mode, the current station can be changed to the completely different station because the unit searches TP station when the field strength of the current station is very weak, or the current station has no TP signal.
- TA ALARM mode:
Any automatic retune mode is not activated, just can hear Beep sound.
MASK DPI (2)
When press the SEL button for more than 2 seconds, it is activated as selecting mode of these function.

flowchart
graph LR
    A["SEL"] --> B["TA SEEK"]
    B --> C["SEL"]
    C --> D["MASK DPI"]
    D --> E["VOL"]
    E --> F["MASK DPI / MASK ALL"]
    style A fill:#f9f,stroke:#333
    style E fill:#ccf,stroke:#333
MASK DPI: masked only the AF which has different PI.
MASK ALL: masked the AF which has different PI and NO RDS signal with field strength.
RETUNE L / S CONTROLS (2)
When press the SEL button for more than 2 seconds, it is activated as selecting Retune mode.
RETUNE L: Select 90 seconds as the initial time of automatic TA search.
RETUNE S: Select 30 seconds as initial time.

flowchart
graph LR
    A["2 sec. SEL"] --> B["TA SEEK"]
    B --> C["SEL"]
    C --> D["MASK DP"]
    D --> E["SEL"]
    E --> F["RETUNE"]
    F --> G["VOL"]
    G --> H["RETUNE L / RETUNE S"]
AUDIO DSP CONTROLS (2)
When press the SEL button for more than 2 seconds, it is activated as selecting mode of these function.

flowchart
graph LR
    A["SEL"] --> B["TA SEEK"]
    B --> C["SEL"]
    C --> D["RETUNE"]
    D --> E["SEL"]
    E --> F["DSP ON"]
    F --> G["VOL"]
    G --> H["POP M --- ROCK M --- CLASS M --- FLAT M --- DSP OFF"]
LOUDNESS CONTROLS (2)
When press the SEL button for more than 2 seconds, it is activated as selecting mode of these function.

flowchart
graph LR
    A["2 sec. SEL"] --> B["TA SEEK"]
    B --> C["SEL"]
    C --> D["MASK DPI"]
    D --> E["RETUNE"]
    E --> F["SEL"]
    F --> G["LOUD ON/OFF"]
LOUD ON/OFF mode is selected by or VOL. The bass and treble response will be boosted.
MULTI CD SECTION MODE (2)
When press the SEL button for more than 2 seconds, it is activated as selecting mode of these function.

flowchart
graph LR
    A["2 sec. SEL"] --> B["TA SEEK"]
    B --> C["SEL"]
    C --> D["MASK DPI"]
    D --> E["SEL"]
    E --> F["RETUNE"]
    F --> G["SEL"]
    G --> H["..."]
    H --> I["SEL"]
    I --> J["LOUD"]
    J --> K["SEL"]
    K --> L["MULTI"]
    L --> M["vol"]
    M --> N["CD MULTI ON/OFF"]
CD MULTI ON/OFF mode is selected by section only. or VOL. CD MULTI ON: Read multi section CD. CD MULTI OFF: Read first
BEEP MODE (2)
When press the SEL button for more than 2 seconds, it is activated as selecting mode of these function.

flowchart
graph LR
    A["2 sec. SEL"] --> B["TA SEEK"]
    B --> C["SEL"]
    C --> D["MASK DPI"]
    D --> E["SEL"]
    E --> F["RETUNE"]
    F --> G["SEL"]
    G --> H["..."]
    H --> I["SEL"]
    I --> J["LOUD"]
    J --> K["SEL"]
    K --> L["MULTI"]
    L --> M["SEL"]
    M --> N["BEEP"]
    O["VOL"] --> P["BEEP ON/OFF"]
BEEP ON: BEEP sound can be heard from speaker when the buttons are pressed.
SEEK MODE (2)
When press the SEL button for more than 2 seconds, it is activated as selecting mode of these function.

flowchart
graph LR
    A["SEL"] --> B["TA SEEK"]
    B --> C["SEL"]
    C --> D["MASK DPI"]
    D --> E["SEL"]
    E --> F["RETUNE 2"]
    F --> G["SEL"]
    G --> H["LOUD"]
    H --> I["SEL"]
    I --> J["MULTI"]
    J --> K["SEL"]
    K --> L["BEEP"]
    M["SEL"] --> N["..."]
    N --> O["vol"]
    O --> P["SEEK1 / SEEK 2SEEK"]
SEEK 1: When SEEK 1 mode is activated, AUTO SEEK SCAN is stopped when station is detected even user still push SEEK button.
SEEK 2: Auto SEEK SCAN is not stopped even station is detected if user push SEEK button. When release this SEEK button, then stop when station is detected.
STEREO/MONO (2)
When press the SEL button for more than 2 seconds, it is activated as selecting mode of these function.

flowchart
graph LR
    A["2 sec. SEL"] --> B["TA SEEK"]
    B --> C["SEL"]
    C --> D["MASK DPI"]
    D --> E["SEL"]
    E --> F["RETUNE"]
    F --> G["SEL"]
    G --> H["LOUD"]
    H --> I["SEL"]
    I --> J["MULTI"]
    J --> K["SEL"]
    K --> L["BEEP"]
    M["SEL"] --> N["SEEK"]
    N --> O["SEL"]
    O --> P["STEREO"]
    P --> Q["VOL"]
    Q --> R["STEREO/MONO"]
When FM stations are weak and are disturbed, listening can be improved by selecting MONO.
LOCAL/DX (2)
When press the SEL button for more than 2 seconds, it is activated as selecting mode of these function.

flowchart
graph LR
    A["2 sec. SEL"] --> B["TA SEEK"]
    B --> C["SEL"]
    C --> D["MASK DPI"]
    D --> E["SEL"]
    E --> F["RETUNE"]
    F --> G["SEL"]
    G --> H["..."]
    H --> I["SEL"]
    I --> J["LOUD"]
    J --> K["SEL"]
    K --> L["MULTI"]
    L --> M["SEL"]
    M --> N["BEEP"]
    O["SEL"] --> P["SEEK"]
    P --> Q["SEL"]
    Q --> R["STEREO"]
    R --> S["SEL"]
    S --> T["LOCAL"]
    T --> U["VOL"]
    U --> V["LOCAL/DX"]
"Local" position in areas with strong signals to let radio stop at only strong stations during manual tuning (LOC appears). Select Distant position in areas with weak signals to listen to all stations.
4. PRESET STATIONS (1,2,3,4,5,6)
(A) RADIO MODE:
When pressed shortly, these keys select a preset station directly. When pressed longer than 1 sec., current station is stored in preset memory bank. When PTY mode is selected, the PTY switch is shared as follows:
PTY music group ---- PTY speech group ---- OFF
MUSIC SPEECH
- POP M, ROCK M 1. NEWS, AFFAIRS, INFO
- EASY M, LIGHT M 2. SPORT, EDUCATE, DRAMA
- CLASSICS, OTHER M 3. CULTURE, SCIENCE, VARIED
- JAZZ, COUNTRY 4. WEATHER, FINANCE, CHILDREN
- NATION M, OLDIES 5. SOCIAL, RELIGION, PHONE IN
- FOLK M 6. TRAVEL, LEISURE, DOCUMENT
(B) CD/MP3/WMA PLAYER MODE:
- PAUSE 2. INT 3. RPT 4. RDM
USING THE RDS FUNCTION
What is RDS?
The RDS (Radio Data System) is a digital information system developed by the EBU (European Broadcast Union). Piggy-backed on normal FM broadcasts, RDS offers a variety of information services and automatic retuning functions for RDS-compatible car stereos.
In 1988, RDS became available in the United Kingdom, France, West Germany, Ireland and Sweden. Test transmissions are being conducted in many other European countries. It is expected that RDS will be available in most Western European countries in the near future.
5. 'AF/REG' function (ALTERNATIVE FREQUENCIES)
When pressed shortly, AF/REG switching mode is selected.
When AF/REG switching mode is selected, the radio checks the signal strength of the AF all the time. When pressed long, it is activated as regional mode ON/OFF.
- Regional mode ON:
AF switching or PI SEEK is implemented to the station which have all PI codes same as current station. REG segment is turned on, in LCD display.
- Regional mode OFF
The regional code in the format of PI code is ignored when AF switching or PI SEEK is implemented.
6. 'TA' function (TRAFFIC ANNOUNCEMENT)
When pressed shortly, it is activated as TA mode on or off
When TA mode is on and traffic announcement is transmitted
- When the unit is in CD/MP3 mode, it will switch to radio mode temporarily.
- If the volume level was under the threshold point, it will be raised to the threshold point.
- When TP station is received, TP segment is turned on in LCD display.
7. 'PTY' function (PROGRAM TYPE)
While selecting PTY type, its selection is implemented by preset buttons as described in preset key. When PTY is selected, the radio starts to search corresponding PTY information, and stops if the corresponding PTY information is detected.
8. DISPLAY (DISP)
Press DISP button to switch between display informations such as radio frequencies, clock, track and other informations depending on the playing MODE.
9. MODE BUTTON (MODE)
By pressing this key, user can select. AUX/TUNER/CD-MP3/USB or MMC/SD mode.
10. BAND BUTTON (BAND)
Each band is toggled cyclically by pressing this key FM1---FM2---FM3.
11. AUTOMATIC OR MANUAL TUNING (FREQ UP ▶▶▶ OR FREQ DOWN ◀◀)
(A) RADIO MODE
When pressed shortly, these keys are operated as MANUAL tuning mode.
When pressed longer than 1 sec., they are operated as SEEK tuning mode.
When pressed shortly, they are operated as TRACK UP or TRACK DOWN mode.
When pressed longer than 1 sec., they are operated as CUE or REVIEW mode.
12. AUTO SEEK SEARCH TUNING (A/PS)
By pressing shortly, the radio searches for each preset station.
When field strength level is bigger than the threshold level of stop level, the radio is holding at that preset number for 5 sec. with releasing mute, and then searches again.
By pressing longer than 1 sec, and then 6 strongest stations are preset to the corresponding preset number. When AS operation is finished, the radio executes the preset scan.
13. 'SCAN' AUTOMATIC TUNING CONTROL (SCAN)
This key is operated as RADIO SCAN. The operation is similar as normal search but different thing is holding 5 seconds on every station detected in RADIO SCAN mode.
14. MUTE BUTTON (MUT)
Press this button, audio will disappear. Press this button again in order to hear audio newly.
15. LCD DISPLAY
The Liquid Crystal Display will display the current state of the unit.
16. OPEN THE FRONT PANEL
Press button and the front panel will open.
CD/MP3/WMA CONTROL LOCATION OF PARTS
TRACK/SEARCH BUTTON (11)
FORWARD AND REVERSE TRACK SEARCH (or changing songs)
Press the SKIP button (on) during play to go to the desired track(song).
▲▼ ....REVERSE ▶▼FORWARD
Press and hold the SKIP button (10) during play to scan the disc at high speed. When the desired music section of the disc is found, release the button. Normal play will resume.
17. CD SLOT
18. CD EJECT BUTTON
Press the button to remove the CD.
19. PAUSE BUTTON
During "PLAY", press (19) 'PAU' button to "PAUSE". Press it again to resume play.
20. INTRO BUTTON (Preview all Tracks)
When this button is pressed, 'INT ON' indication is displayed and the first several seconds of each track of the disc are played. Press again to stop intro and listen to track.
21. REPEAT BUTTON
When this button is pressed, 'RPT ON' indication is displayed and play of the selected track will be continually repeated until the Track repeat mode is cancelled by pressing 'RPT' button again.
22. RANDOM BUTTON
When this button is pressed, 'RDM ON' indication is displayed and each track of the disc are played in random instead of normal progression. To cancel RANDOM mode, press 'RDM' button (22) again.
23, 24. 10 TRACK UP/DOWN SELECT: (In case of MP3/WMA files)
M5: 10 Track down / M6: 10 Track up
HOW TO SELECT MP3/WMA FILES
1. Searching Track:
- Press "A/PS", then searching track is activated.
- Press "VOL", then the first digit is blinking.
- With "VOL / VOL " knob, select first digit you want.
- Press "VOL", then the first digit is fixed and second digit is blinking.
- With "VOL / VOL " knob, select 2'nd 3'rd respectively.
- Then automatically the song you selected will start.
2. Searching File Name:
- Press "A/PS" twice, then file search is activated.
- Press "VOL", then the first directory is displayed.
- With "VOL / VOL " knob, you can select the directory you want.
- Press "VOL" again, then the directory is fixed and the first file name is displayed.
- With "VOL / VOL " knob, you can select the file you want.
- Press "VOL", then the song you selected will start.
3. Searching Character:
- Press "A/PS" 3 times, then character search mode is activated.
- Press "VOL" button, then "A" character is displayed.
- With "VOL / VOL " knob, you can select the letter you want.
- Press "VOL" key longer than 2 sec.
- The song which has same character you selected is displayed.
- With "VOL / VOL " knob, you can select the song you want.
- Press "VOL" key, then the song you selected will start.
Connecting it to Portable MP3 Player
25. USB Port
Using USB cable to connect Your Portable MP3 Player.
26. MULTI-MEDIA CARD (MMC) / SD CARD SLOT
Support MP3 ID3 format music only.
\* IMPORTANT INFORMATION:
BECAUSE OF THE GREAT VARIETY OF PRODUCTS WITH USB, SD AND MMC CARD PORTS AND THEIR SOMETIMES QUITE MANUFACTURER-SPECIFIC FUNCTIONS WE CAN NEITHER GUARANTEE THAT ALL DEVICES WILL BE RECOGNIZED NOR THAT ALL OPERATING OPTIONS THAT ARE POSSIBLE IN THEORY WILL ACTUALLY WORK
27. FRONT AUX IN
Convenient easy to use front "AUX IN" input jack, allows easy connection of Portable Media and digital MP3 Players.
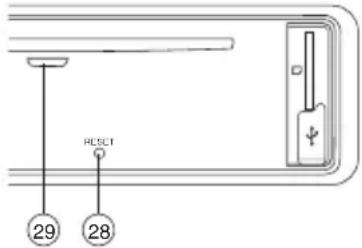
28. RESET
Reset button is placed on the housing.
The reset button is to be activated for the following reason:
- Initial installation of the unit when all wiring is completed.
• All the function button do not operate.
• Error symbol on the display.
29. POWER INDICATOR LED
Flash LED when ignition is switched on.
TECHNICAL SPECIFICATIONS
CD/MP3/WMA PLAYER SECTION
| Signal to Noise Ratio | >60 dB |
| Channel Separation | >50 dB (1kHz) |
| Frequency Response | 20Hz - 20 kHz |
TUNER (FM)
| Frequency range | 87.5-108 MHz |
| Intermediate frequency | 10.7 MHz |
| Sensitivity | 2.8 μV |
| Stereo separation | 30 dB |
| Signal to noise ratio | 50 dB |
| Channel step | 50 kHz |
LINE-OUT
| Output | 1.5 V (max.) |
| Impedance | 10k Ohm |
LINE-IN
| Frequency Response | 20 Hz - 20 kHz |
| Sensitivity | 775 mV |
| Impedance | 20k Ohm |
GENERAL
| Power Supply | 12V DC (10.8-15.6V allowable) |
| Speaker impedance | 4 or 8 ohm |
| Output power | 40W x 4CH |
| Fuse | 10A |
Note: Specification and the design are subject to possible modification without notice due to improvements.

Instructions on environment protection
Do not dispose of this product in the usual household garbage at the end of its lifecycle; hand it over at a collection point for the recycling of electrical and electronic appliances. The symbol on the product, the instructions for use or the packing will inform about the methods for disposal.
The materials are recyclable as mentioned in this marking. By recycling, material recycling or other forms of re-utilization of old appliances, you are making an important contribution to protect our environment.
Please inquire at the community administration for the authorized disposal location.
ALL RIGHTS RESERVED
COPY RIGHT DENVER ELECTRONICS A/S

www.denver-electronics.com
- LOCATION OF PARTS AND CONTROLS
- ISO CONNECTOR
- CONNECTOR A
- CONNECTOR B
- Maintenance
- FUSE REPLACEMENT
- Warning
- INSTALLATION
- PRECAUTIONS
- TO SUPPORT THE UNIT
- Detaching and attaching the front panel
- FOLDING DOWN AND DETACHING/ATTACHING THE FRONT PANEL
- Notes:
- OPERATION
- POWER ON/OFF ()
- 2,3. FUNCTION SELECT BUTTON: BASS/TREBLE/BALANCE/FADER / TA SEEK/MASK DPI/RETUNE/AUDIO DSP/LOUDNESS/CD MULTI/BEEP/SEEK/STEREO/LOCAL (SEL)
- TA SEEK/TA ALARM (2)
- - TA SEEK mode:
- - TA ALARM mode:
- MASK DPI (2)
- RETUNE L / S CONTROLS (2)
- AUDIO DSP CONTROLS (2)
- LOUDNESS CONTROLS (2)
- MULTI CD SECTION MODE (2)
- BEEP MODE (2)
- SEEK MODE (2)
- STEREO/MONO (2)
- LOCAL/DX (2)
- PRESET STATIONS (1,2,3,4,5,6)
- RADIO MODE:
- MUSIC SPEECH
- CD/MP3/WMA PLAYER MODE:
- USING THE RDS FUNCTION
- What is RDS?
- 'AF/REG' function (ALTERNATIVE FREQUENCIES)
- - Regional mode ON:
- - Regional mode OFF
- 'TA' function (TRAFFIC ANNOUNCEMENT)
- 'PTY' function (PROGRAM TYPE)
- DISPLAY (DISP)
- MODE BUTTON (MODE)
- BAND BUTTON (BAND)
- AUTOMATIC OR MANUAL TUNING (FREQ UP ▶▶▶ OR FREQ DOWN ◀◀)
- RADIO MODE
- AUTO SEEK SEARCH TUNING (A/PS)
- 'SCAN' AUTOMATIC TUNING CONTROL (SCAN)
- MUTE BUTTON (MUT)
- LCD DISPLAY
- OPEN THE FRONT PANEL
- CD/MP3/WMA CONTROL LOCATION OF PARTS
- TRACK/SEARCH BUTTON (11)
- CD SLOT
- CD EJECT BUTTON
- PAUSE BUTTON
- INTRO BUTTON (Preview all Tracks)
- REPEAT BUTTON
- RANDOM BUTTON
- 23, 24. 10 TRACK UP/DOWN SELECT: (In case of MP3/WMA files)
- HOW TO SELECT MP3/WMA FILES
- Searching Track:
- Searching File Name:
- Searching Character:
- Connecting it to Portable MP3 Player
- USB Port
- MULTI-MEDIA CARD (MMC) / SD CARD SLOT
- \* IMPORTANT INFORMATION:
- FRONT AUX IN
- RESET
- POWER INDICATOR LED
- TECHNICAL SPECIFICATIONS
- Instructions on environment protection
Brand : DENVER
Model : CAD-405
Category : Car radio