
DCX200 - Tumble drier MAKITA - Free user manual and instructions
Find the device manual for free DCX200 MAKITA in PDF.
| Product Type | Heated Sweatshirt |
| Brand | Makita |
| Model | DCX200 |
| Material | 100% polyester |
| Temperature Settings | 3 (High, Medium, Low) |
| Nominal Voltage | 10.8 V DC (for CXT battery) |
| Compatible Batteries | Makita CXT (10.8 V - 12 V max) and LXT (14.4 V / 18 V); BL1055B included |
| USB Port (on battery holder) | Output 5 V DC, 2.4 A (type A) or 1.5 A (type C) depending on model |
| Battery Life (with BL1860B battery) | Approximately 7.5 h (High), 16 h (Medium), 33 h (Low) |
| Washing | Machine washable, remove battery and battery holder, use a wash bag, neutral detergent, no fabric softener |
| Maintenance | Clean the terminals if malfunction; repair by Makita authorized service center |
| Safety | Do not use by children under 3 years, persons insensitive to heat; do not use while sleeping; stop if overheating |
| Included Accessories | BL1055B battery, battery holder, USB cable |
| Weight (approx.) | Approximately 500 g (sweatshirt only, without battery) |
| Dimensions (approx.) | One size or M-XXL depending on version |
Frequently Asked Questions - DCX200 MAKITA
User questions about DCX200 MAKITA
0 question about this device. Answer the ones you know or ask your own.
Ask a new question about this device
Download the instructions for your Tumble drier in PDF format for free! Find your manual DCX200 - MAKITA and take your electronic device back in hand. On this page are published all the documents necessary for the use of your device. DCX200 by MAKITA.
USER MANUAL DCX200 MAKITA
natural_image
Line drawing of two different types of long-sleeve jackets with visible stitching and shoulder details (no text or symbols)
text_image
Fig.1 1 2 3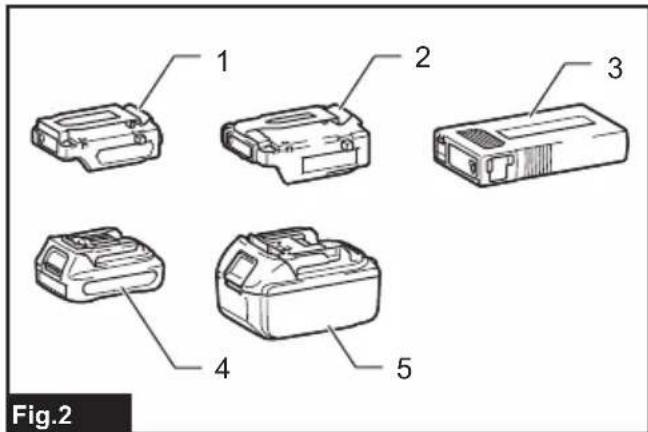
text_image
1 2 3 4 5 Fig.2
text_image
1 2 3 4 Fig.3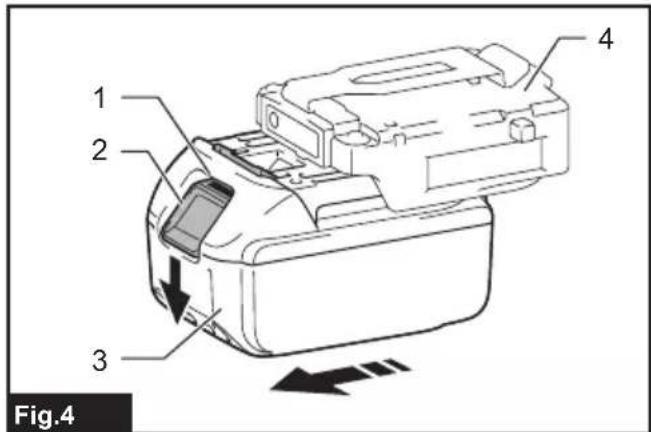
text_image
1 2 3 4 Fig.4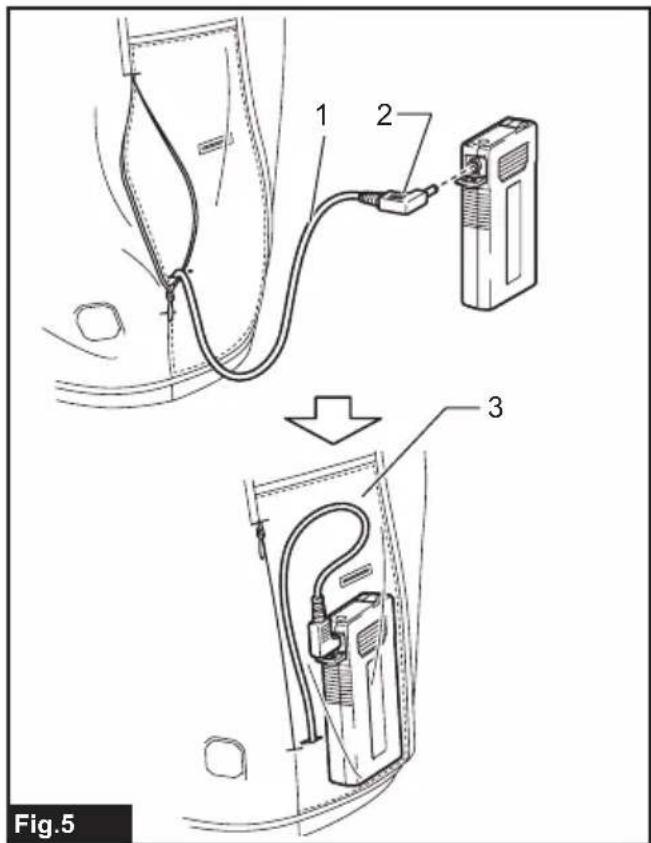
text_image
Fig.5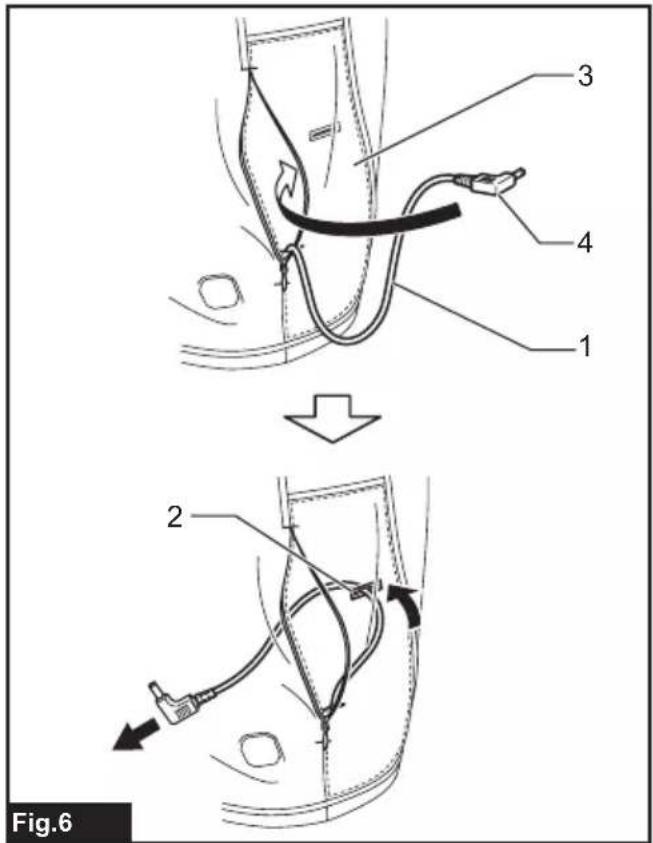
text_image
1 2 3 4 Fig.6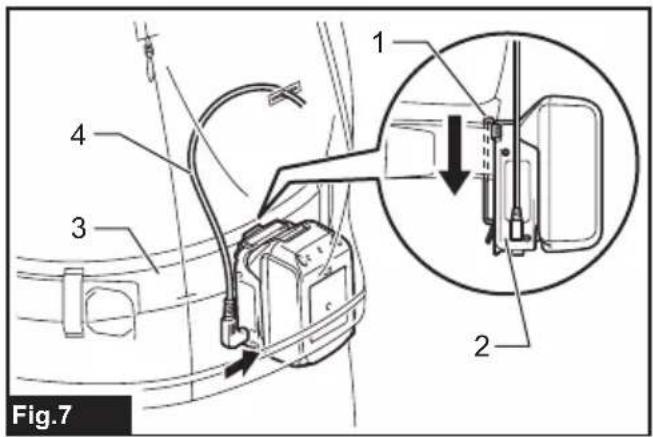
text_image
Fig.7 1 2 3 4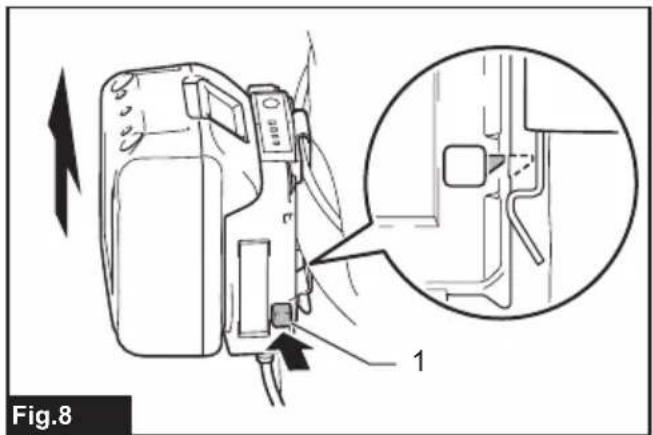
text_image
Fig.8 1
text_image
1 2 3 4 ① 1 2 3 4 ① Fig.9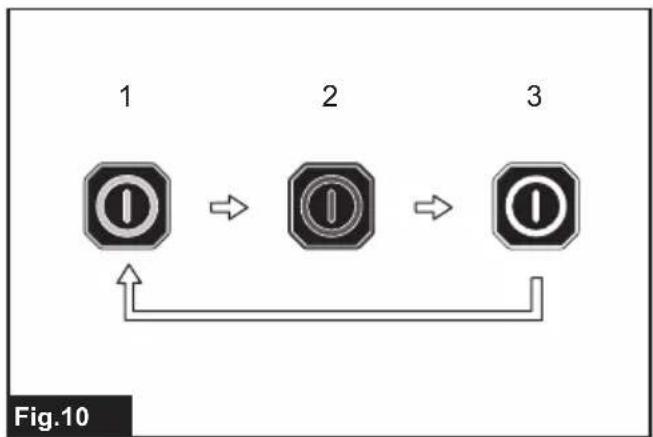
flowchart
graph LR
    A["Step 1: Open circle"] --> B["Step 2: Closed circle"]
    B --> C["Step 3: Closed circle"]
text_image
Fig.11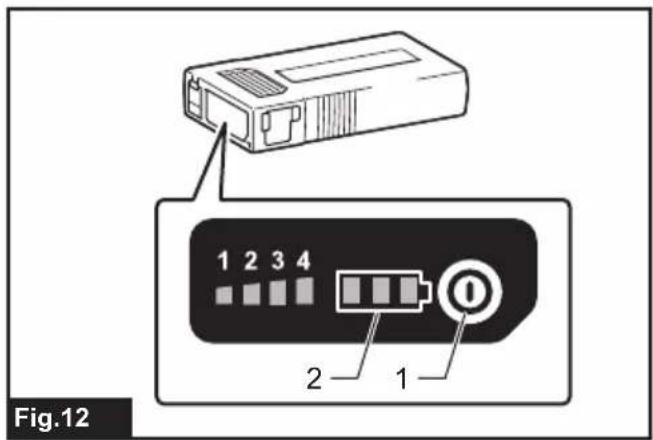
text_image
Fig.12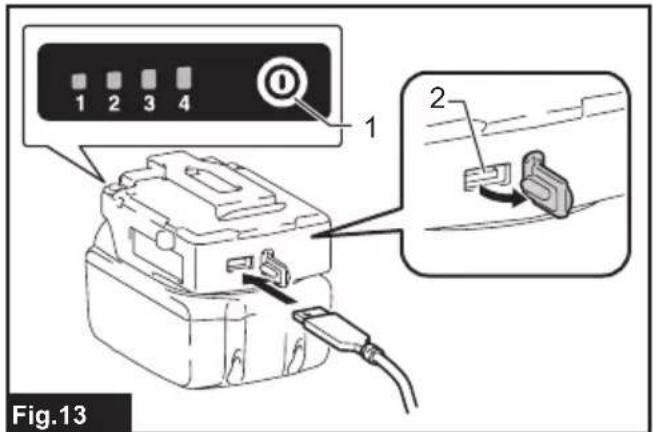
text_image
1 2 3 4 1 2 Fig.13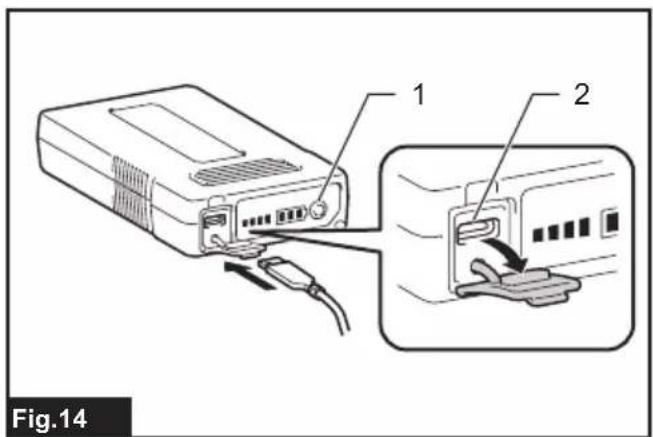
text_image
Fig.14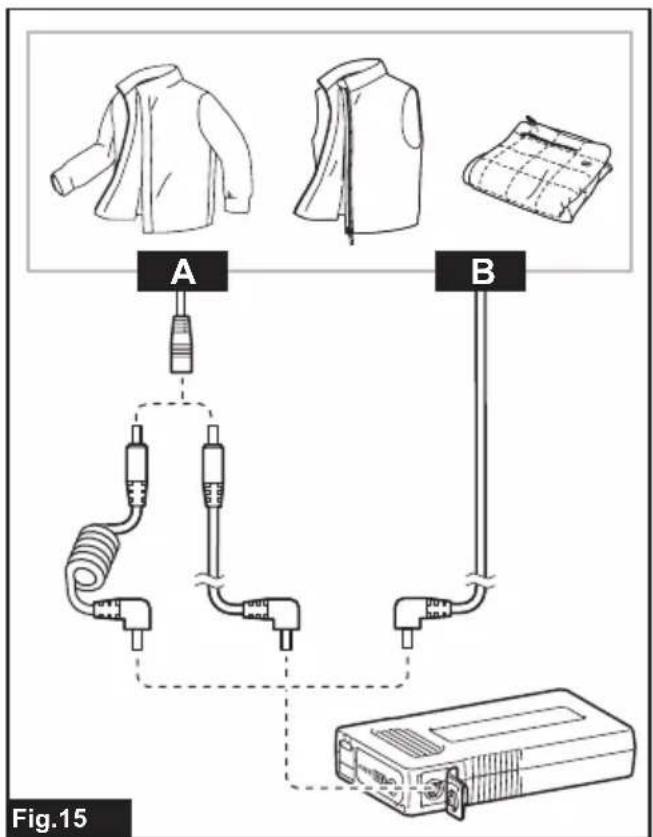
text_image
A B Fig.15WARNING
Important instructions. Retain for future use.
- For users in Europe: This appliance can be used by children aged from 8 years and above and persons with reduced physical, sensory or mental capabilities or lack of experience and knowledge if they have been given supervision or instruction concerning use of the appliance in a safe way and understand the hazards involved. Children shall not play with the appliance. Cleaning and user maintenance shall not be made by children without supervision.
- For users in areas other than Europe: This appliance is not intended for use by persons (including children) with reduced physical, sensory or mental capabilities, or lack of experience and knowledge, unless they have been given supervision or instruction concerning use of the appliance by a person responsible for their safety. Children should be supervised to ensure that they do not play with the appliance.
- See the chapter "SPECIFICATIONS" for the type reference of the battery.
• See the section “Installing or removing battery cartridge” for how to install or remove the battery. - When disposing the battery cartridge, remove it from the tool and dispose of it in a safe place. Follow your local regulations relating to disposal of battery.
• If the tool is not used for a long period of time, the battery must be removed from the tool. - Do not short the battery cartridge.
• See the chapter "MAINTENANCE" for the appropriate details of precautions during user maintenance.
For flexible heating appliances
- When not in use, store as follows:
— Allow it to cool down before folding.
— Do not crease the appliance by placing items on top of it during storage.
- Examine the appliance frequently for signs of wear or damage. If there are such signs, if the appliance has been misused or does not work, return it to the supplier before switching it on again.
- This appliance is not intended for medical use in hospitals.
• This appliance must not be used by persons insensitive to heat and other very vulnerable persons who are unable to react to overheating.
• Children under the age of three are not allowed to use this appliance due to their inability to react to overheating. - The appliance is not to be used by young children over the age of three unless the controls have been pre-set by a parent or guardian, or unless the child has been adequately instructed on how to operate the controls safely.
- Inspect switch and cord for cracks to prevent water from getting inside during washing and, during drying, the cord must be positioned to ensure that water does not flow into the switch or control.
• If you suffer the symptoms listed below while you are using the appliance, take it off immediately and consult a doctor. Otherwise, there is a risk of heat exhaustion or heat stroke.
— First signs:
Any discomfort; excessive sweating; neck pain; nausea; dizziness or drowsiness.
— Symptoms of heat exhaustion/heat stroke:
Nausea and vomiting; throbbing headache; dizziness and drowsiness; absence of perspiration; red, hot and dry skin; muscle weakness or seizures; rapid heartbeat; quick, shallow breathing; behavior changes such as confusion, disorientation or staggering; unconsciousness.
SPECIFICATIONS
| Model: DCX200 DCX201 | ||
| Material 100% Polyester | ||
| Temperature adjustment steps 3 | ||
| - Applicable battery cartridge | |||||
| BL1055B BL | 1016 /BL1021B /BL1041B | BL1415N /BL1430B /BL1440 /BL1460B | BL1815N /BL1820B /BL1830B /BL1840B /BL1850B /BL1860B | ||
| Applicable battery holder No battery | holderrequired | Battery holderfor CXT bat-tery cartridge | Battery holder for LXT batterycartridge | ||
| Rated Voltage D.C. 10.8 V D.C. 10.8 V - | 12 V max | D.C. 14.4 V D. | C. 18 V | ||
| USB power supply port(on the battery holder) | Output voltage D.C. 5 V | ||||
| Output current 1.5 A | 2.4 A | ||||
| Type | Type C | Type A | |||
- Due to our continuing program of research and development, the specifications herein are subject to change without notice.
- Specifications and battery cartridge may differ from country to country.
WARNING: Only use the battery cartridges listed above. Use of any other battery cartridges may cause injury and/or fire.
Operating time
| Temperature setting | Battery cartridge | |||
| BL1055B BL | 1041B BL | 460B BL | 860B | |
| HIGH | 5.5 hours | 3.5 hours | 5.5 hours | 7.5 hours |
| MEDIUM | 11 hours | 7 hours | 10.5 hours | 16 hours |
| LOW | 20 hours | 15 hours | 23 hours | 33 hours |
• The operating times in the above table are a rough guideline. They may differ from actual operating times.
- Operating times may differ depending on battery type, charging status, and usage condition.
- Battery cartridge may differ from country to country.
Symbols
Some of the following symbols which may be used for the equipment. Be sure that you understand their meaning before use.
| Read the instruction manual. | |
| Machine wash at below 30°C on the gentle cycle. | |
| Do not bleach. | |
| Do not wring. | |
| Do not iron. | |
| Do not dry clean. |
 | Not to be used by very young children (0-3 years). |
 | Do not insert pins. |
 | Tumble dry with low heat. |
 | Line drying. |
 | Class III appliance. |


Ni-MH Li-ion
Only for EU countries
Due to the presence of hazardous components in the equipment, waste electrical and electronic equipment, accumulators and batteries may have a negative impact on the environment and human health. Do not dispose of electrical and electronic appliances or batteries with household waste!
In accordance with the European Directive on waste electrical and electronic equipment and on accumulators and batteries and waste accumulators and batteries, as well as their adaptation to national law, waste electrical equipment, batteries and accumulators should be stored separately and delivered to a separate collection point for municipal waste, operating in accordance with the regulations on environmental protection.
This is indicated by the symbol of the crossed-out wheeled bin placed on the equipment.

Do not expose battery to water or rain.

Do not throw the battery in fire

Do not short-circuit the battery.
Intended use
The appliance is intended for warming up the body in cold environments.
SAFETY WARNINGS

WARNING: Read all safety warnings and
all instructions. Failure to follow the warnings and instructions may result in electric shock, fire and/or serious injury.
Save all warnings and instructions for future reference.
General safety warnings
- Children, handicapped persons, or anyone who are insensitive to heat, for example a person with poor blood circulation, shall refrain from using the appliance.
- Do not use the appliance other than its intended use.
- Never use the appliance when inside of it is wet.
- Wear long-sleeved underwear when wearing the appliance. Do not wear the appliance with bare skin.
- If you sense anything unusual, switch off the appliance and remove the battery immediately.
- Do not let the power cable be pinched. Damaged cable may cause electric shock.
-
If any abnormality is found, contact your local service center for repair.
-
Do not use pins or like. The electric wiring inside may be damaged.
- Keep maintenance labels and nameplate. If they become unreadable or missing, contact our authorized service center for repair.
- Choose appropriate temperature settings in accordance with the usage environment for continuous use.
- The battery cartridge, battery holder and connectors must not be allowed to get wet during washing and drying.
- The appliance can be used by children older than 3 years and younger than 8 years under supervision and with the control always set to minimum temperature value.
- Be careful not to touch the same part of the skin with the heating section for a long time. If the heating section touches the same part of the skin for a long time, there is a possibility of low temperature burns even at a relatively low temperature (40 to 60 °C).
- Stop using the appliance you feel it is hot.
- Never use the appliance while you are sleeping.
- In order to avoid the possibility of heatstroke, disconnect the clothing when moving to an environment having significantly higher temperature.
- Check carefully on the marking ⚙ in the internal part of the cloth. Do not insert pins on the cloth from external or internal parts.
- Remove the batteries from the appliance before charging.
- Remove exhausted batteries from the appliance and dispose of them safely.
- Before storing the appliance, remove the batteries.
- Do not short-circuit the supply terminals.
- Store the appliance in a place where pets cannot touch.
Washing
- When washing the appliance, follow the instructions in the caution tag on the appliance.
- Before cleaning the appliance, remove the battery holder and the battery cartridge and then place the power cable in the battery pocket and close the fastener.
Work area safety
- Keep work area clean and well lit. Cluttered or dark areas increase accident risk.
Electrical safety
- Do not expose the appliance to rain or wet conditions. Water entering the appliance may increase the risk of electric shock.
- Do not abuse the cord. Never use the cord for carrying, pulling or unplugging the appliance. Keep cord away from heat, oil, sharp edges.
-
Do not connect power source to USB port. Otherwise there is risk of fire. The USB port is only intended for charging lower voltage device.
• Always place the cover onto the USB port when not charging the lower voltage device. -
Do not insert a nail, wire, etc. into USB power supply port. Otherwise a circuit short may cause smoke and fire.
- Do not handle the cord and battery with wet or greasy hand.
- Never use the appliance when the cord or plug is damaged.
• Always use the battery holder specified by Makita. - Do not leave any cord disconnected while the battery power is supplied. Young children may put the live plug in their mouth and cause injury.
- Do not connect the plug of the battery holder to appliances other than the appliance specified by Makita.
- Have servicing performed by a qualified repair person using only identical replacement parts. This will ensure that the safety of the product is maintained.
- Do not modify or attempt to repair the appliance or the battery pack except as indicated in the instructions for use and care.
Personal safety
- Stay alert, watch what you are doing and use common sense when using the appliance. Do not use the appliance while you are tired or under the influence of drugs, alcohol or medication. A moment of inattention while using the appliance may result in serious personal injury.
Flexible heating appliances use and care
- Do not use the appliance if the switch does not turn it on and off. Any appliance that cannot be controlled with the switch is dangerous and must be repaired.
- Maintain the appliance. Check for breakage of parts and any other condition that may affect the operation. If damaged, have the appliance repaired before use.
- Use the appliance in accordance with these instructions, taking into account the working conditions and the work to be performed. Use of the appliance for operations different from those intended could result in a hazardous situation.
- If the fuse link has ruptured, return the appliance to our authorized service center for repair.
- Do not use the appliance in the folded state. Do not wring the appliance.
Battery tool use and care
- Recharge only with the charger specified by the manufacturer. A charger that is suitable for one type of battery pack may create a risk of fire when used with another battery pack.
- Use power tools only with specifically designated battery packs. Use of any other battery packs may create a risk of injury and fire.
-
When battery pack is not in use, keep it away from other metal objects, like paper clips, coins, keys, nails, screws or other small metal objects, that can make a connection from one terminal to another. Shorting the battery terminals together may cause burns or a fire.
-
Under abusive conditions, liquid may be ejected from the battery; avoid contact. If contact accidentally occurs, flush with water. If liquid contacts eyes, additionally seek medical help. Liquid ejected from the battery may cause irritation or burns.
- Do not use a battery pack or tool that is damaged or modified. Damaged or modified batteries may exhibit unpredictable behaviour resulting in fire, explosion or risk of injury.
- Do not expose a battery pack or tool to fire or excessive temperature. Exposure to fire or temperature above 130 °C may cause explosion.
- Follow all charging instructions and do not charge the battery pack or tool outside the temperature range specified in the instructions. Charging improperly or at temperatures outside the specified range may damage the battery and increase the risk of fire.
Important safety instructions for battery cartridge
- Before using battery cartridge, read all instructions and cautionary markings on (1) battery charger, (2) battery, and (3) product using battery.
- Do not disassemble or tamper with the battery cartridge. It may result in a fire, excessive heat, or explosion.
- If operating time has become excessively shorter, stop operating immediately. It may result in a risk of overheating, possible burns and even an explosion.
- If electrolyte gets into your eyes, rinse them out with clear water and seek medical attention right away. It may result in loss of your eyesight.
- Do not short the battery cartridge:
(1) Do not touch the terminals with any conductive material.
(2) Avoid storing battery cartridge in a container with other metal objects such as nails, coins, etc.
(3) Do not expose battery cartridge to water or rain.
A battery short can cause a large current flow, overheating, possible burns and even a breakdown.
- Do not store and use the tool and battery cartridge in locations where the temperature may reach or exceed 50 °C (122 °F).
- Do not incinerate the battery cartridge even if it is severely damaged or is completely worn out. The battery cartridge can explode in a fire.
- Do not nail, cut, crush, throw, drop the battery cartridge, or hit against a hard object to the battery cartridge. Such conduct may result in a fire, excessive heat, or explosion.
- Do not use a damaged battery.
- The contained lithium-ion batteries are subject to the Dangerous Goods Legislation requirements. For commercial transports e.g. by third parties, forwarding agents, special requirement on packaging and labeling must be observed.
For preparation of the item being shipped, consulting an expert for hazardous material is required. Please also observe possibly more detailed national regulations.
Tape or mask off open contacts and pack up the battery in such a manner that it cannot move around in the packaging.
- When disposing the battery cartridge, remove it from the tool and dispose of it in a safe place. Follow your local regulations relating to disposal of battery.
- Use the batteries only with the products specified by Makita. Installing the batteries to non-compliant products may result in a fire, excessive heat, explosion, or leak of electrolyte.
- If the tool is not used for a long period of time, the battery must be removed from the tool.
- During and after use, the battery cartridge may take on heat which can cause burns or low temperature burns. Pay attention to the handling of hot battery cartridges.
- Do not touch the terminal of the tool immediately after use as it may get hot enough to cause burns.
- Do not allow chips, dust, or soil stuck into the terminals, holes, and grooves of the battery cartridge. It may cause heating, catching fire, burst and malfunction of the tool or battery cartridge, resulting in burns or personal injury.
- Unless the tool supports the use near high-voltage electrical power lines, do not use the battery cartridge near high-voltage electrical power lines. It may result in a malfunction or breakdown of the tool or battery cartridge.
- Keep the battery away from children.
SAVE THESE INSTRUCTIONS.
⚠️CAUTION: Only use genuine Makita batteries. Use of non-genuine Makita batteries, or batteries that have been altered, may result in the battery bursting causing fires, personal injury and damage. It will also void the Makita warranty for the Makita tool and charger.
Tips for maintaining maximum battery life
- Charge the battery cartridge before completely discharged. Always stop tool operation and charge the battery cartridge when you notice less tool power.
- Never recharge a fully charged battery cartridge. Overcharging shortens the battery service life.
- Charge the battery cartridge with room temperature at 10 °C - 40 °C (50 °F - 104 °F). Let a hot battery cartridge cool down before charging it.
- When not using the battery cartridge, remove it from the tool or the charger.
- Charge the battery cartridge if you do not use it for a long period (more than six months).
PARTS DESCRIPTION
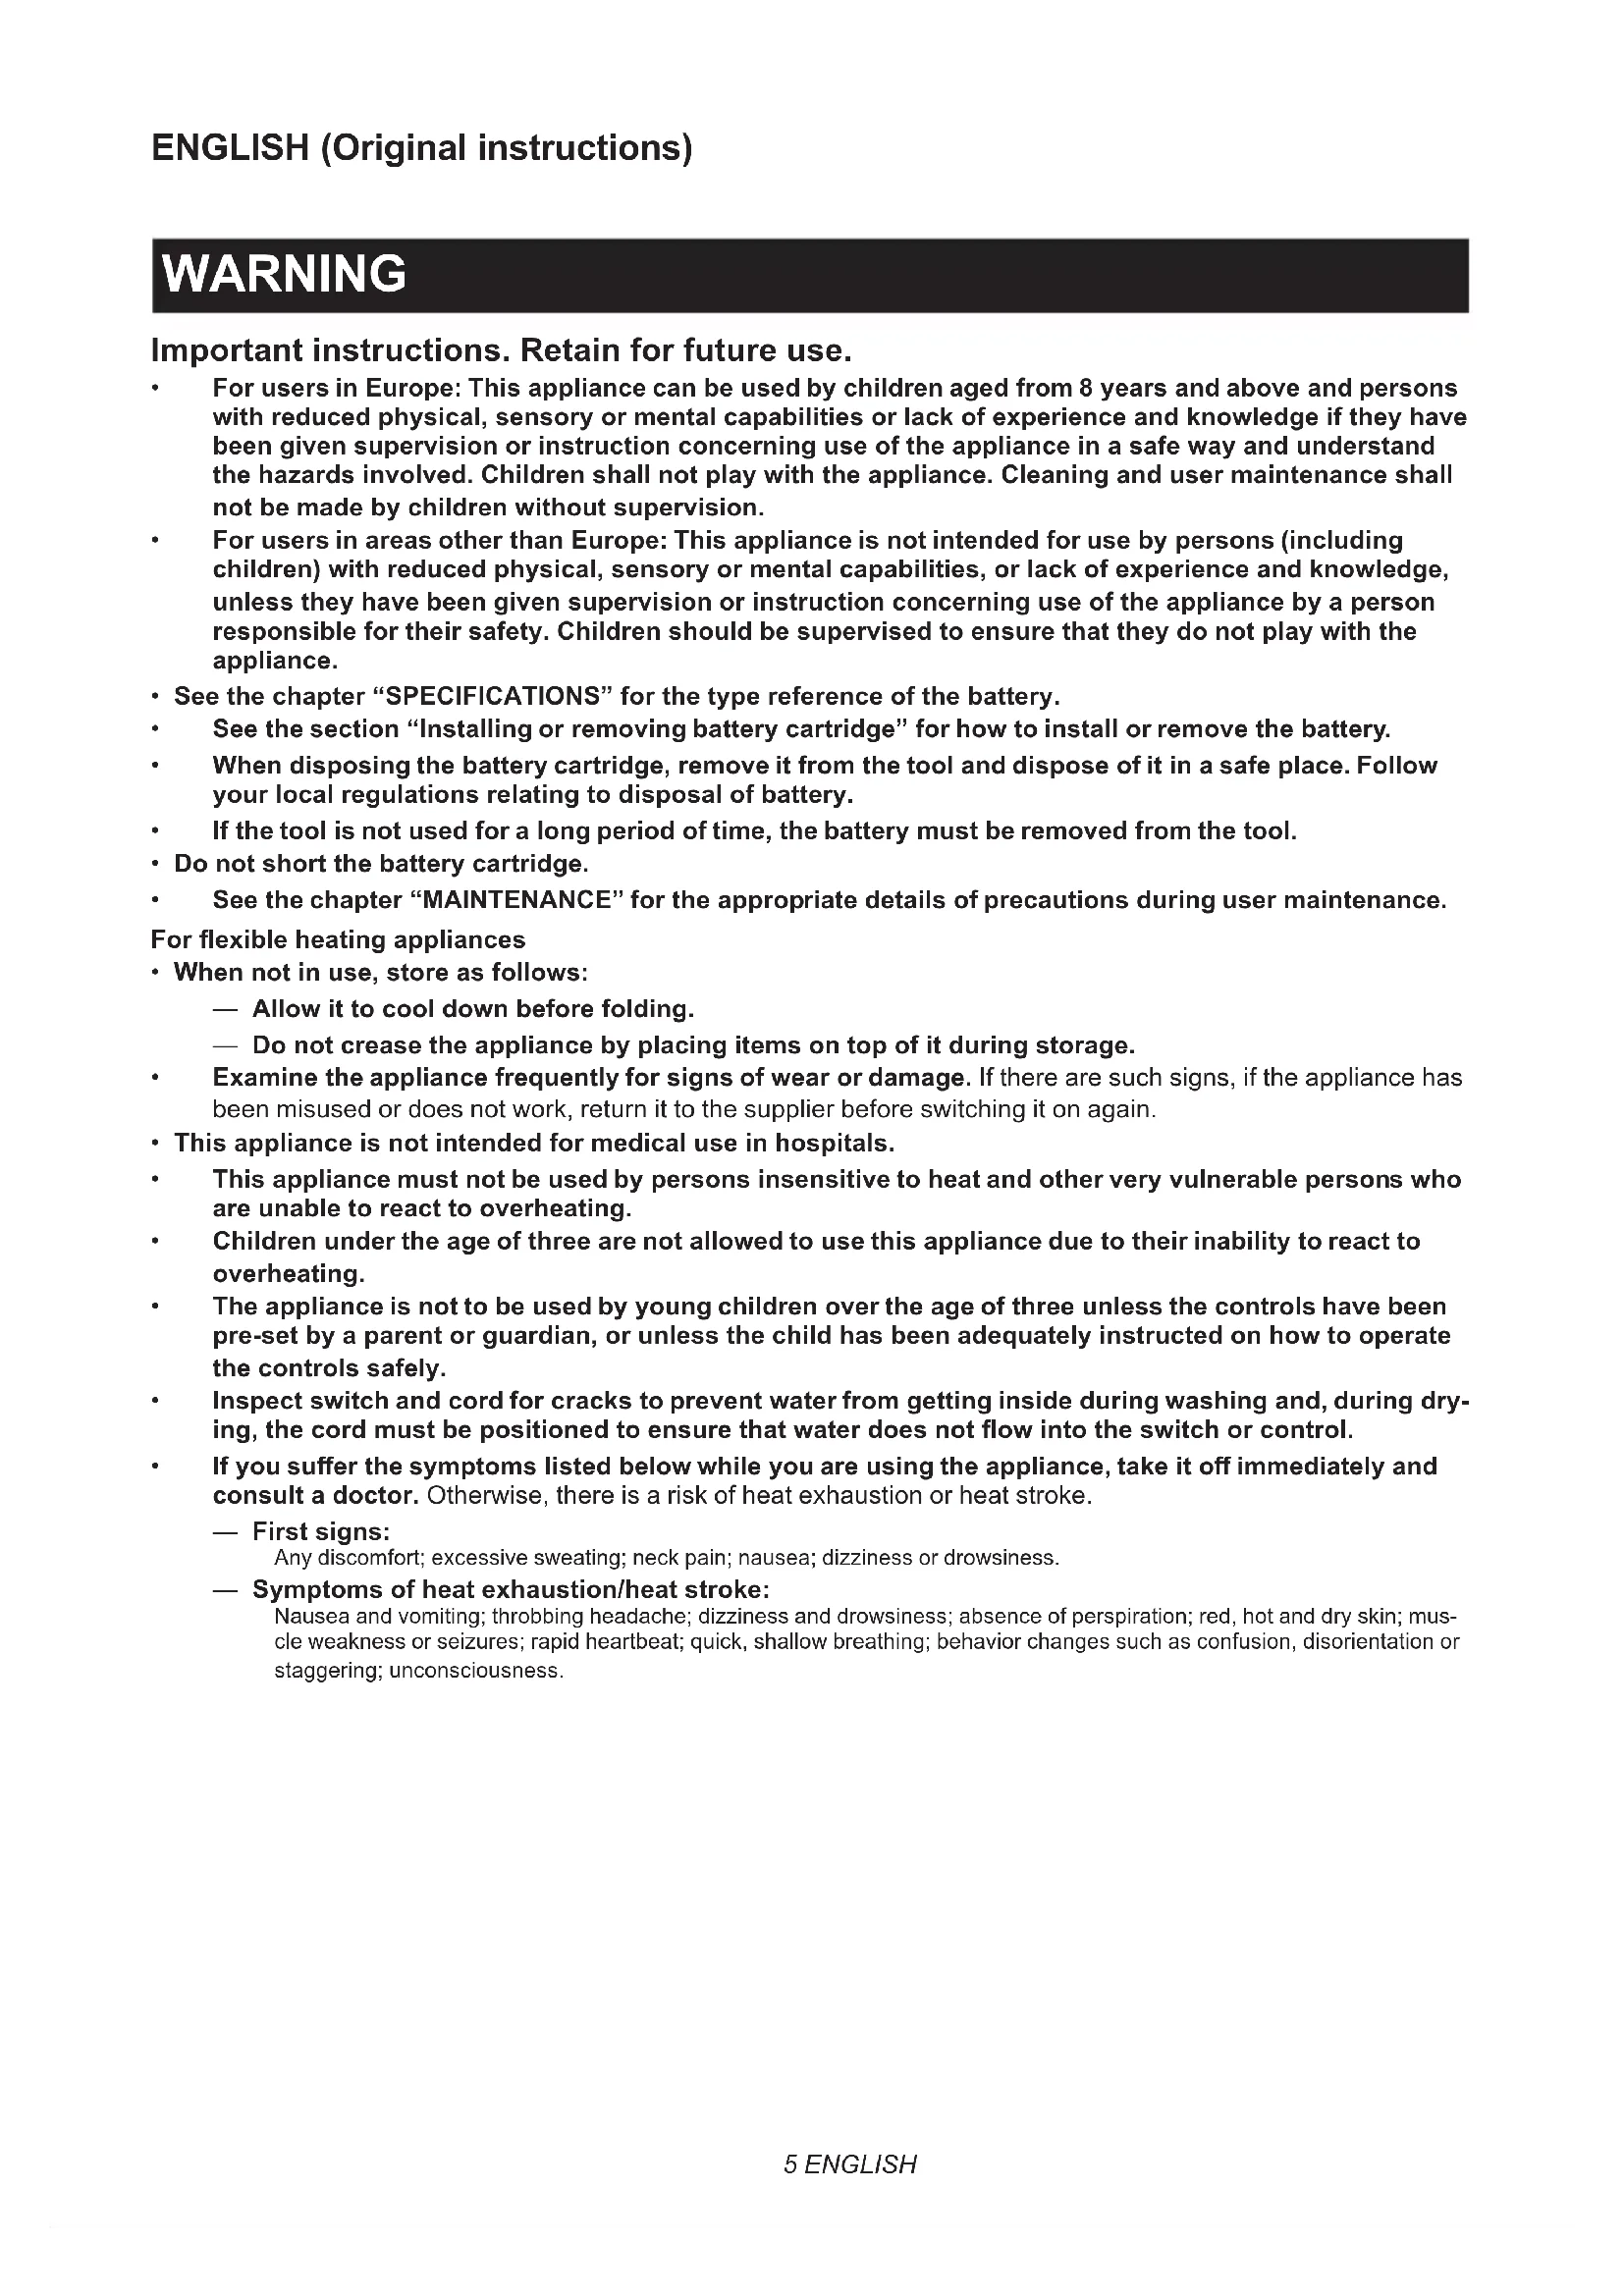
▶ Fig.1
| 1 Power button 2 Battery pocket | ||
| 3 Plug -- |
Optional accessory
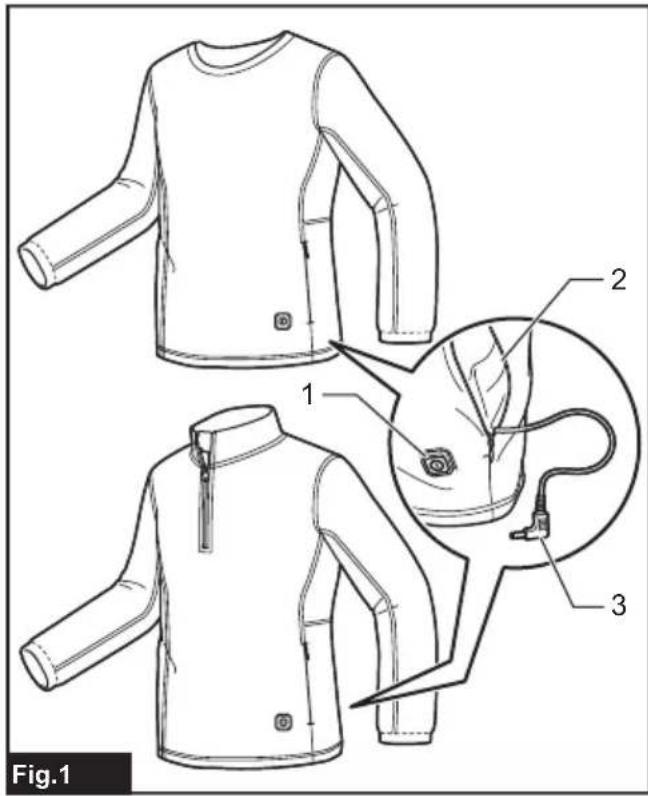
▶ Fig.2
| 1 Battery holder for CXT battery cartridge | 2 Battery holder for LXT battery cartridge |
| 3 Battery BL1055B (Country specific) | 4 CXT battery cartridge (10.8 V - 12 V max) |
| 5 LXT battery cartridge (14.4 V / 18 V) | - |
INSTALLATION
Charging the battery
Battery cartridges used with battery holder
Refer to the instruction manual of the charger for how to charge the battery.
Battery BL1055B
Open the cover on the USB port. Connect the battery and AC Power Adapter ADP07 (not included) or other general USB charger using the USB cable supplied with the battery. The recommended output spec for general USB charger is 5 V / 3 A or lower. After that, plug the AC Power Adapter ADP07 to the mains. When the charging is finished, all battery capacity indicator will light up and then turns off after a certain period. Unplug the AC Power Adapter and disconnect the USB cable, and then close the cover.
▶ Fig.3: 1. AC Power Adapter ADP07 2. Battery BL1055B 3. Cover 4. USB cable
Meaning of the indicator lamp
| Indicator lamps Remaining | capacity | ||
| [75×3] | [14×3A] | [47×1] | |
| Lighted Off | Blinking | ||
| (TCH4) [HCTA]↓(60×10) [72×66](The lamps go off after a certain period.) | 100%(The charging is finished) | ||
| [XSD2] [SGY2] | 50% to 100% | ||
| (62×9) [X7×2] | 25% to 50% | ||
| [HTA3] [SWC6] | Less than 25% | ||
Installing or removing the battery cartridge
Only when using the battery cartridge used with battery holder
⚠️CAUTION: Always switch off the device before installing or removing the battery cartridge.
⚠️CAUTION: Hold the battery holder and the battery cartridge firmly when installing or removing the battery cartridge. Failure to hold the battery holder and the battery cartridge firmly may cause them to slip out of your hands and result in damage to the battery holder and battery cartridge and/or a personal injury.
To install the battery cartridge, align the tongue on the battery cartridge with the groove in the housing and slip it into place. Insert it all the way until it locks in place with a little click. If you can see the red indicator as shown in the figure, it is not locked completely.
To remove the battery cartridge, slide it from the battery holder while pressing the button on the front of the cartridge.
▶ Fig.4: 1. Red indicator 2. Button 3. Battery cartridge 4. Battery holder
⚠️CAUTION: Always install the battery cartridge fully until the red indicator cannot be seen.
Otherwise the battery cartridge may accidentally fall out of the battery holder, causing injury to you or someone around you.
⚠️CAUTION: Do not forcibly install the battery cartridge. If the battery cartridge does not slide in easily, it is not being inserted correctly.
Battery pocket
The battery can be stored in the battery pocket. Connect the plug of power cable to the battery. Then put the battery into the battery pocket and fasten the fastener.
▶ Fig.5: 1. Power cable 2. Plug 3. Battery pocket
NOTE: The battery holder (with battery cartridge) cannot be stored in the battery pocket.
Attaching the battery holder
You can hang the battery holder on your waist belt. To prevent the battery holder from dropping accidentally, attach a strap using the strap hole and secure it.
- Feed the plug through the hole in the battery pocket and pull it through to the inside of the base layer shirt.
▶ Fig.6: 1. Power cable 2. Hole 3. Battery pocket 4. Plug - Attach the belt hook of the battery holder to your waist belt. Connect the plug of the power cable to the battery holder.
▶ Fig.7: 1. Belt hook 2. Battery holder 3. Waist belt 4. Power cable
The battery holder has an anti-drop function. When removing the battery holder from the belt, pull up the battery holder while pressing the unlock button.
▶ Fig.8: 1. Unlock button
FUNCTIONAL DESCRIPTION
Power button
To turn on the base layer shirt, connect all the cables, press and hold the power button on the battery or battery holder. To turn off, press and hold the power button on the base layer shirt.
NOTE: The power level indicator on the battery holder is not used with the base layer shirt. Only the power level indicator 4 will light up when using the base layer shirt.
▶ Fig.9: 1. Power button 2. Power level indicator
NOTE: The battery and the battery holder automatically turns off approximately 1 hour after the base layer shirt is turned off.
Temperature adjustment
CAUTION: For continuous operation, set the temperature setting to "low" (blue). If the base layer shirt is overheated, the base layer shirt may cause a malfunction and cause an injury.
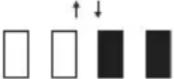
There are three temperature settings (high, medium, low). When you switch on the base layer shirt, the temperature is set to "low". Each time you press the power button, the temperature setting changes as shown in the figure. The color of the power button shows the current setting.
▶ Fig.10: 1. Blue: "low" 2. Red: "high" 3. White: "medium"
Indicating the remaining battery capacity
NOTE: Depending on the conditions of use and the ambient temperature, the indication may differ slightly from the actual capacity.
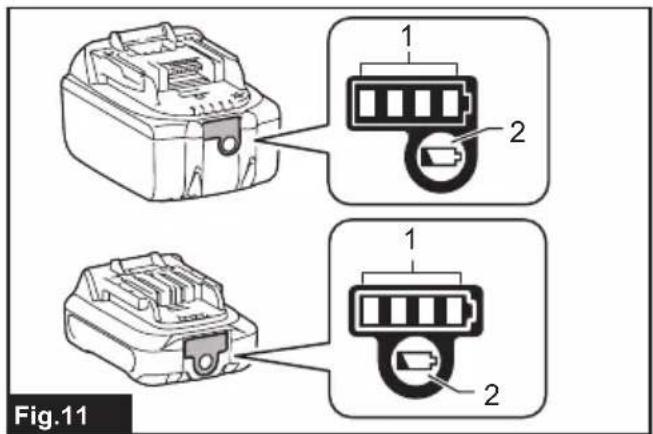
Only when using the battery cartridge (with the indicator) used with battery holder
Press the check button. The indicator lamps light up for a few seconds.
▶ Fig.11: 1. Indicator lamp 2. Check button
Meaning of the indicator lamp
| Indicator lamps Remaining | capacity | ||
| Lighted Off | Blinking | ||
 | 75% to 100% | ||
 | 50% to 75% | ||
 | 25% to 50% | ||
 | Less than 25% | ||
 (For LXT batteries only) (For LXT batteries only) | Charge the battery. | ||
  (For LXT batteries only) (For LXT batteries only) | The battery may have malfunctioned. | ||
NOTE: For LXT batteries only:
The first (far left) indicator lamp will blink when the battery protection system works.
Battery BL1055B
While the battery BL1055B is unplugged, press the power button. The battery capacity indicator lights up for a few seconds.
▶ Fig.12: 1. Power button 2. Battery capacity indicator
Meaning of the indicator lamp
| Indicator lamps Remaining | capacity | ||
| Lighted Off |  Blinking Blinking | ||
 | 50% to 100% | ||
 | 25% to 50% | ||
 | 10% to 25% | ||
 | Less than 10% | ||
 | Battery abnormality | ||
Battery protection system
If the remaining battery capacity is too low, the device will not operate. When you turn the device on, the power is supplied to the heating parts again, but stops soon. In this situation, remove and recharge the battery cartridge.
Connecting USB devices
⚠️ CAUTION: Connect only devices that are compatible with the USB power supply port. Not doing so may cause a malfunction.
NOTICE: Before connecting a USB device, always back up the data on the USB device. Not doing so may cause a loss of your data.
NOTICE: The battery holder and Battery BL1055B may not supply power to some USB devices.
NOTICE: When not using or after charging, remove the USB cable and close the cover.
NOTE: The actual output current varies depending on the USB device to be connected.
NOTE: Battery power is consumed while the power button is turned on. Always turn off the switch when not in use.
NOTE: When charging multiple USB devices in succession, wait about 10 seconds after charging of the previous device has completed before beginning to charge the next device.
The battery holder (with the battery) and Battery BL1055B can work as an external power supply for USB devices.
- Open the cover and connect a USB cable (not included) to the USB port. Then connect the other end of the cable to the device.
- Start charging:
— When using battery holder (with the battery), press and hold the power button until the power level indicator lights up. The battery supplies DC 5 V, 2.4 A.
Battery holder (with battery)
▶ Fig.13: 1. Power button 2. USB port
— When using Battery BL1055B, press the power button. The battery supplies DC 5 V, 1.5 A.
Battery BL1055B
▶ Fig.14: 1. Power button 2. USB port
MAINTENANCE
⚠️CAUTION: Always be sure that the base layer shirt is switched off and the battery cartridge is removed before attempting to perform inspections or maintenance.
CAUTION: If the base layer shirt does not switch on or any fault is found with a fully charged battery cartridge, clean the terminals of the battery holder and the battery cartridge. If the base layer shirt still does not work properly, stop using the base layer shirt and contact our authorized service center.
NOTICE: Never use gasoline, benzine, thinner, alcohol or the like. Discoloration, deformation or cracks may result.
To maintain product SAFETY and RELIABILITY, repairs, any other maintenance or adjustment should be performed by Makita Authorized or Factory Service Centers, always using Makita replacement parts.
Cleaning the base layer shirt
- Detach the battery and the battery holder from the base layer shirt before washing.
- Follow the instructions on the tag.
- Do not wash the base layer shirt with other clothes. Doing so may cause color fading or color transfer.
- Use a laundry net when using a washing machine.
- Do not use the fabric softener.
- Use only neutral detergent.
• After washing, take out the base layer shirt from washing machine at once. - Be sure to put the plug in the battery pocket and close the zip fastener before washing.
OPTIONAL ACCESSORIES
⚠️CAUTION: These accessories or attachments are recommended for use with your Makita tool specified in this manual. The use of any other accessories or attachments might present a risk of injury to persons. Only use accessory or attachment for its stated purpose.
If you need any assistance for more details regarding these accessories, ask your local Makita Service Center.
- Battery holder
- Makita genuine battery and charger
NOTE: Some items in the list may be included in the tool package as standard accessories. They may differ from country to country.
ADDITIONAL INSTRUCTIONS FOR BL1055B
Country specific
Specifications
| Rated voltage capacity (internal battery) | D.C. 10.8 V (16.75 Ah) |
| Charging time 5 V / 1.0 A | : 14 hours5 V / 1.5 A : 12 hours5 V / 2.4 A : 10 hours |
This battery can be used for following Makita fan jacket/vest and heated jacket/vest/blanket/base layer shirt.
▶ Fig.15
| Group Model | |
| A Fan jacket /vest:DFV210, DFJ206, DFJ207, DFJ210, DFJ211,DFJ212, DFJ213, DFJ214, DFJ216, DFJ304,DFJ305, DFJ310, DFJ311, DFJ405, DFJ407,DFJ410, DFJ411, DFJ416Heated jacket /vest/blanket:CV102D, DCV202, CJ105D, CJ106D, DCJ205,DCJ206, CB100D, DCB200 | |
| B Fan jacket /vest:DFJ212A, DFJ213A, DFJ214A, DFJ216A,DFJ312A, DFJ416A, DFV210A, DFV214A,DFV215AHeated base layer shirt:DCX200, DCX201 |
AVERTISSEMENT
VEILIGHEIDSWAAR- SCHUWINGEN

OPTIONELE ACCESSOIRES
▶ Fig.9: 1. Strømknapp 2. Indikator for strømnivå
▶ Fig.14: 1. Strømknapp 2. USB-port
VEDLIKEHOLD

3-11-8, Sumiyoshi-cho,
Anjo, Aichi 446-8502 Japan
www.makita.com
CX200D-10L-SE9-
RU3-HK(CE)-2209
EN, FR, DE, IT, NL,
ES, PT, DA, EL, TR,
SV, NO, FI, LV, LT,
ET, RU, KK, ZHTW
20221014