MMX 200 wireless - Headphones BEYERDYNAMIC - Free user manual and instructions
Find the device manual for free MMX 200 wireless BEYERDYNAMIC in PDF.
| Product type | Wireless headset |
| Brand | Beyerdynamic |
| Model | MMX 200 wireless |
| Transducer | Dynamic |
| Operating principle | Closed |
| Frequency response | 20 Hz – 20,000 Hz |
| Weight (without cable) | 360 g |
| Battery life | Up to 35 hours |
| Microphone type | Condenser (Electret) |
| Microphone polar pattern | Cardioid |
| Microphone frequency range | 50 Hz – 18,000 Hz |
| Wireless transmission | Bluetooth, low latency (LC3), hybrid |
| Bluetooth profiles | A2DP, HFP, SBC, LC3 |
| Connectors | USB-C, 3.5 mm 4-pole jack |
| Charging while in use | Yes |
| Additional functions | Call handling, microphone mute, volume control, enhanced mode |
| Included accessories | 1 USB-C to USB-A cable (2.4 m), 1 wind shield, 1 wireless dongle |
| Care | Clean with a soft cloth dampened with water. Do not use solvents or a vacuum cleaner. |
| Safety | Risk of hearing damage at high volume. Do not use in traffic. |
| Repairability | Battery replaceable by a professional. Do not open yourself. |
| Disposal | Do not dispose of with household waste. Free take-back by retailers. |
Frequently Asked Questions - MMX 200 wireless BEYERDYNAMIC
User questions about MMX 200 wireless BEYERDYNAMIC
0 question about this device. Answer the ones you know or ask your own.
Ask a new question about this device
Download the instructions for your Headphones in PDF format for free! Find your manual MMX 200 wireless - BEYERDYNAMIC and take your electronic device back in hand. On this page are published all the documents necessary for the use of your device. MMX 200 wireless by BEYERDYNAMIC.
USER MANUAL MMX 200 wireless BEYERDYNAMIC
Safety instructions 3
Operating elements....4
Connect the microphone 4
Connect the USB cable....5
Connect the jack cable 5
Charging 6
Overview light guide display 6
Overview light guide display dongle 7
Overview microphone LED display ....7
Set volume 7
Microphone mute on/off 7
Augmented Mode 8
Low Latency Mode 8
Bluetooth® Mode 8
Hybrid Mode 8
Operating functions / operation....9
Replacing the ear pads 9
Maintenance....10
Firmware update....10
Service....10
Supplied accessories 10
Accessories / replacement parts....10
Technical specifications ....10
Disposal....10
Trademarks 11
Useful links....11
Congratulations to your Meta Pick!
We hope you will enjoy your MMX 200 wireless headset from beyerdynamic.
Please take some time to read carefully through this manual before using the product.
ENJOY THE SOUND!
Your beyerdynamic Team
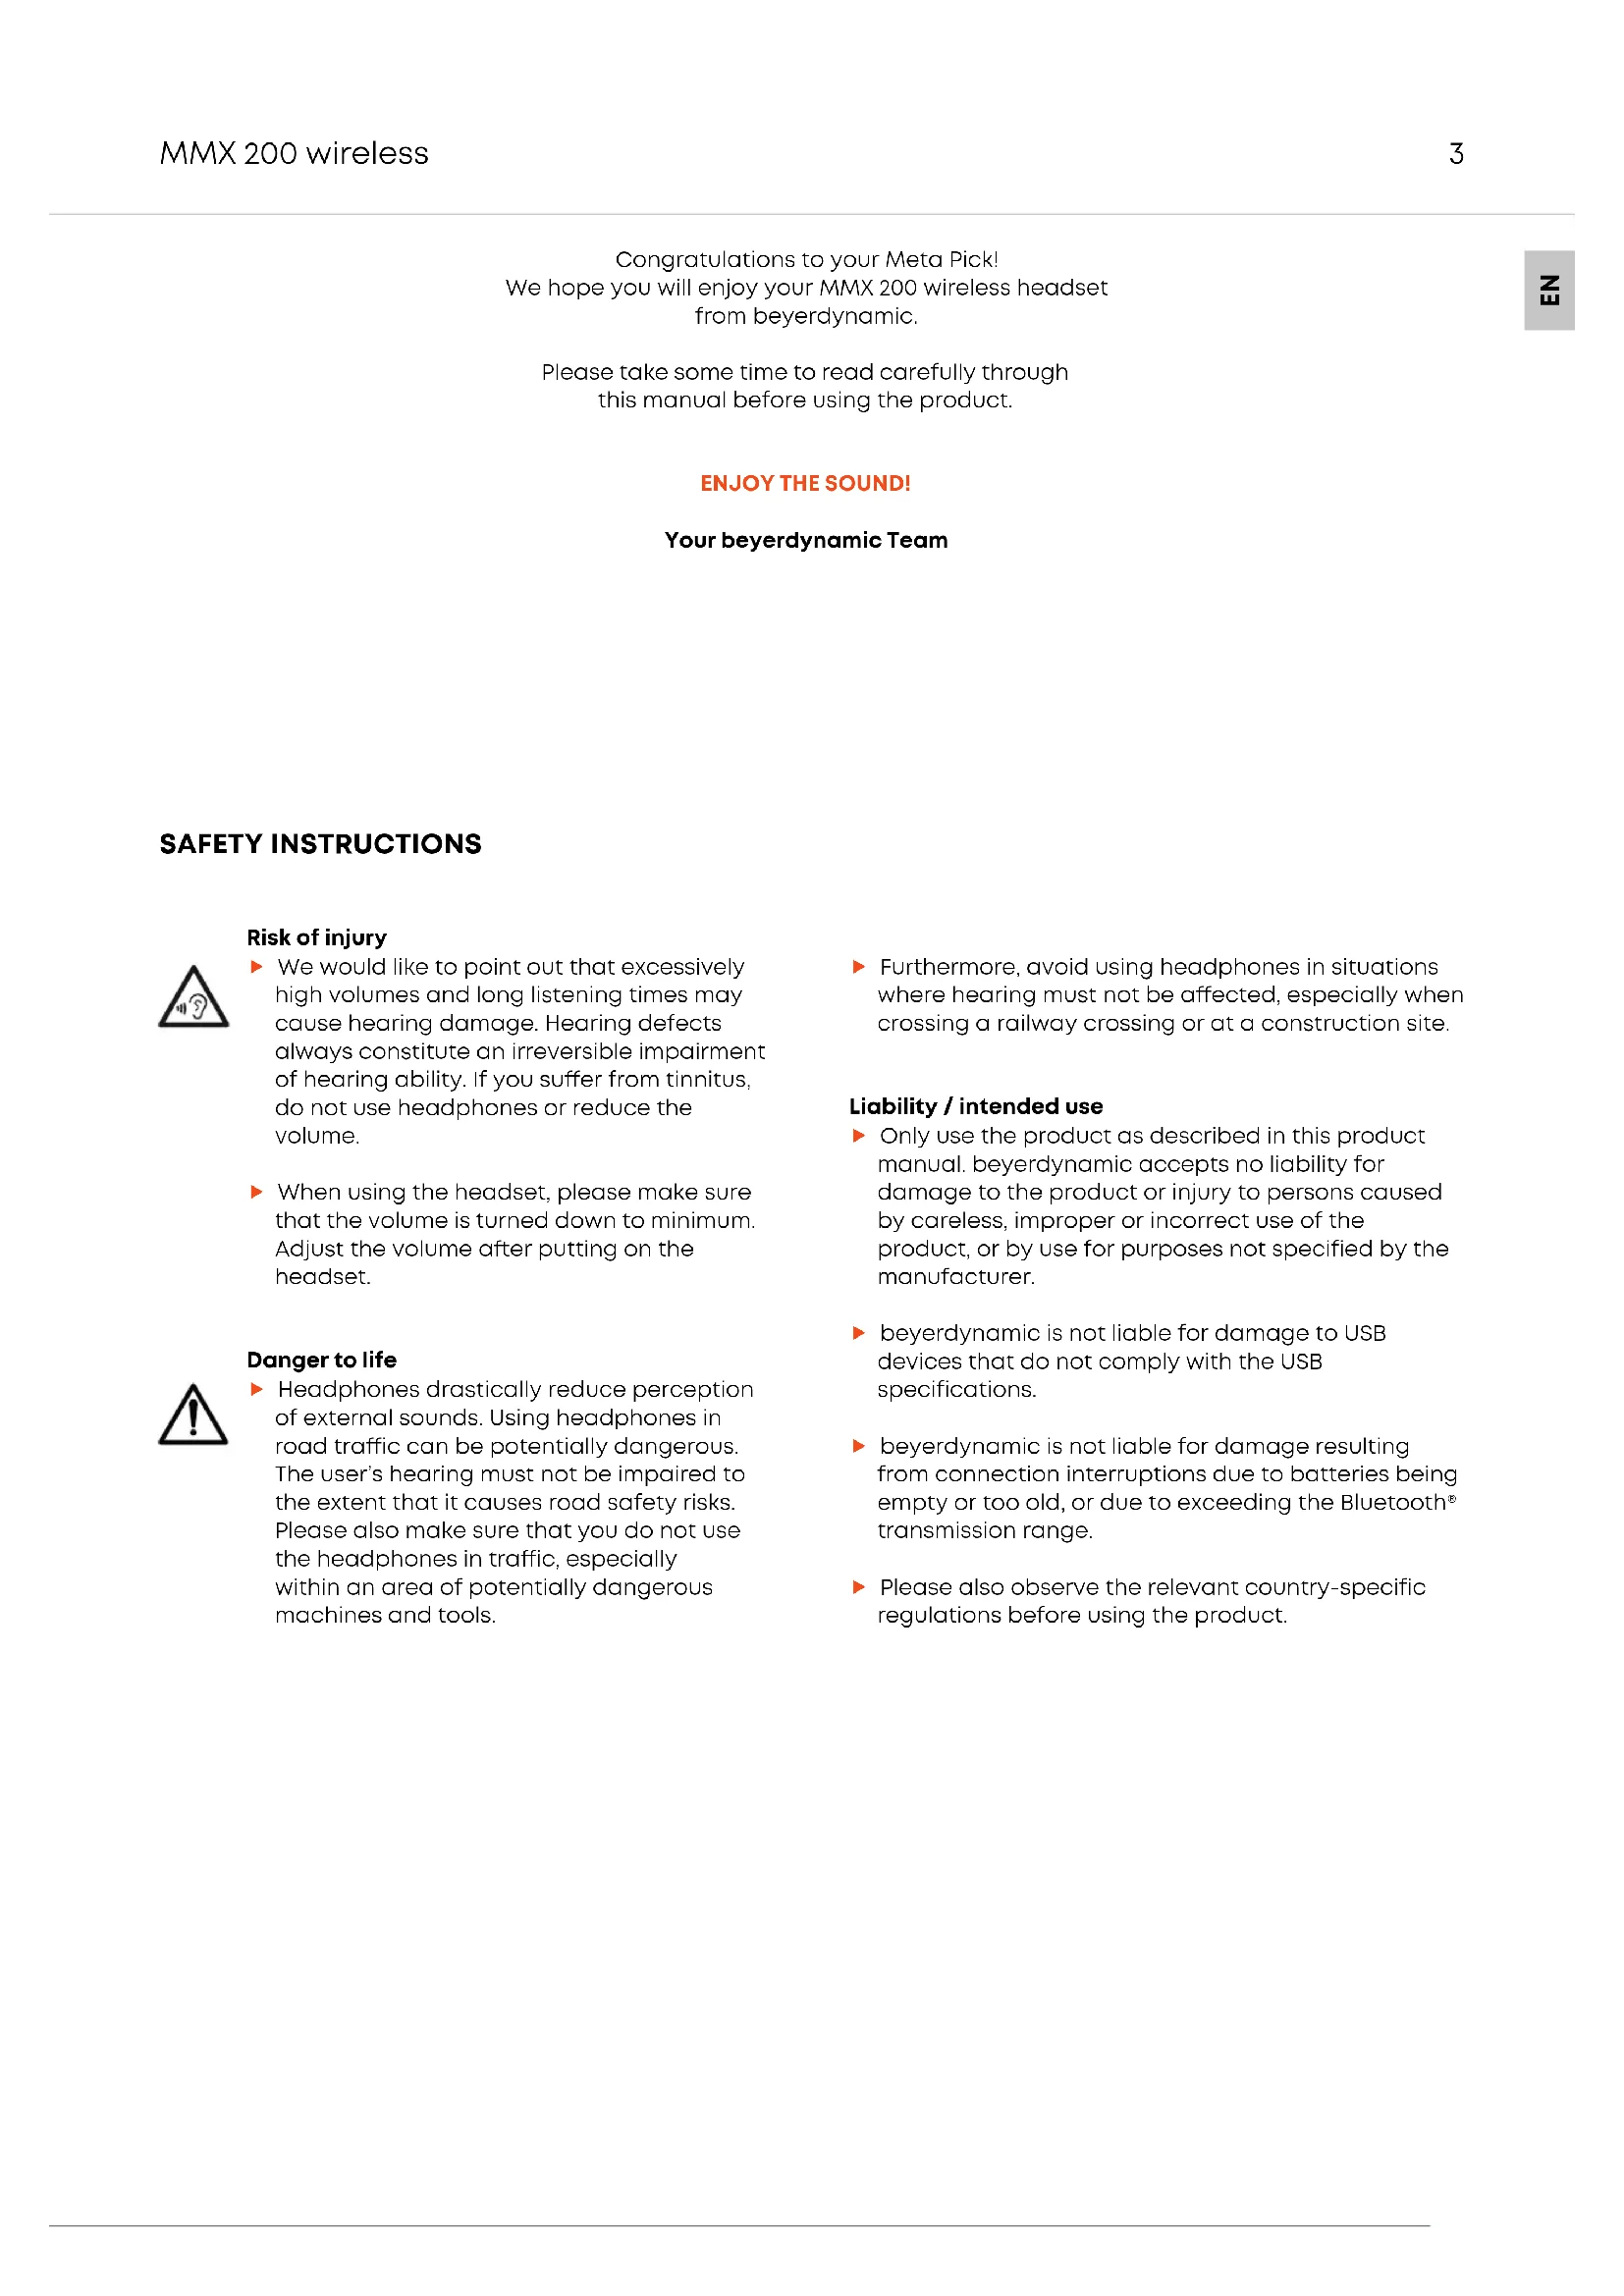
SAFETY INSTRUCTIONS
Risk of injury

We would like to point out that excessively high volumes and long listening times may cause hearing damage. Hearing defects always constitute an irreversible impairment of hearing ability. If you suffer from tinnitus, do not use headphones or reduce the volume.
When using the headset, please make sure that the volume is turned down to minimum. Adjust the volume after putting on the headset.

Danger to life
▶ Headphones drastically reduce perception of external sounds. Using headphones in road traffic can be potentially dangerous. The user's hearing must not be impaired to the extent that it causes road safety risks. Please also make sure that you do not use the headphones in traffic, especially within an area of potentially dangerous machines and tools.
▶ Furthermore, avoid using headphones in situations where hearing must not be affected, especially when crossing a railway crossing or at a construction site.
Liability / intended use
Only use the product as described in this product manual. beyerdynamic accepts no liability for damage to the product or injury to persons caused by careless, improper or incorrect use of the product, or by use for purposes not specified by the manufacturer.
▶ beyerdynamic is not liable for damage to USB devices that do not comply with the USB specifications.
▶ beyerdynamic is not liable for damage resulting from connection interruptions due to batteries being empty or too old, or due to exceeding the Bluetooth ^® transmission range.
▶ Please also observe the relevant country-specific regulations before using the product.
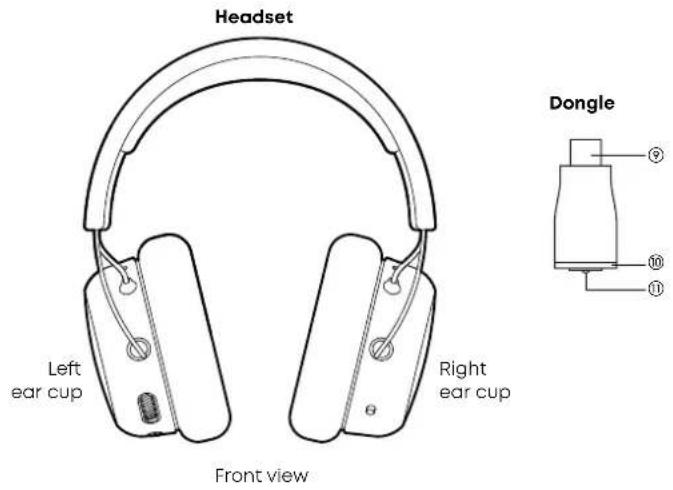
OPERATING ELEMENTS
text_image
Headset Left ear cup Right ear cup Front view Dongle ⑨ ⑩ ⑪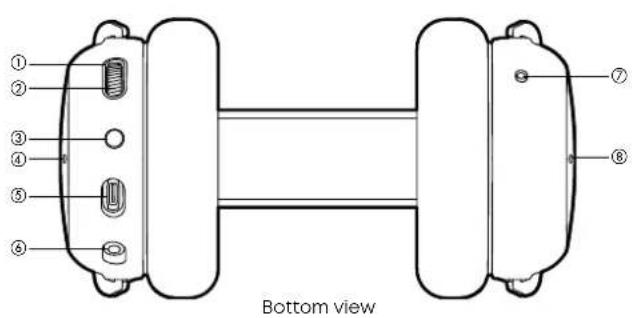
text_image
① ② ③ ④ ⑤ ⑥ Bottom view① Light guide: display of different states
② Control wheel: volume, Augmented Mode, microphone mute
③ √/* button: change between Low Latency (LL) and Bluetooth® (BT) mode
④ Microphone opening for Augmented Mode microphone, left
⑤ USB port: for use with digital cable or charging
⑥ Microphone connection for the gooseneck microphone, 4-pole mini jack (3.5 mm)
⑦ On-off button:
Switch "on" before use.
Switch "off" after use.
⑧ Microphone opening for Augmented Mode microphone, right
⑨ USB connector
⑩ Light guide
⑪ Function button
When connecting the microphone, please observe the position of the jack.
If the microphone is removed from the headset, the microphones built into the ear cups are automatically activated.
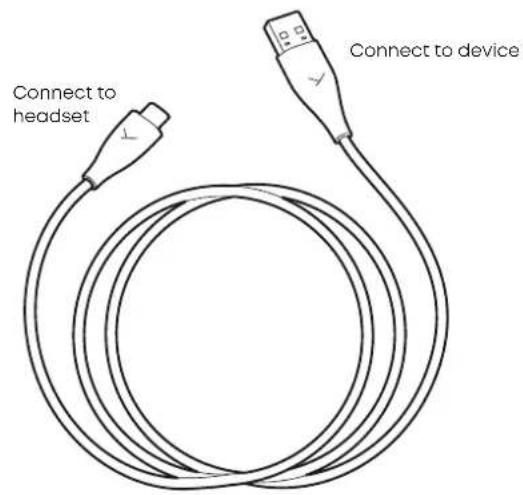
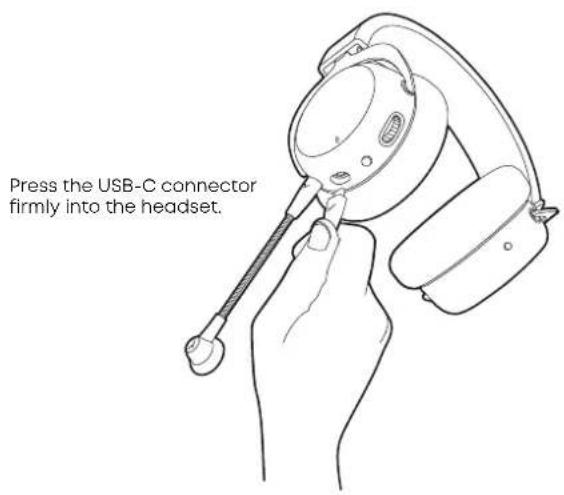
natural_image
Line drawing of a hand holding a device with a magnified inset showing internal components (no text or symbols)CONNECT THE USB CABLE
When connecting the provided USB-C to USB-A cable, the USB-C is connected to the headset, while the USB-A is connected to the device (e.g. computer / console).
For devices with USB-C ports, please use a third party USB-A to USB-C adapter or cable.
Once the headset is connected, it will automatically install the driver. This may take a few seconds.
▶ Please check your system audio settings and select the MMX 200 wireless as input and output device, if it's not already selected.
If you want to use the headset as a USB audio device, switch it off and connect it via USB. The headset will start automatically and is ready as a USB device.
If you want to charge the headset during wireless operation, connect it to the PC. This does not affect the wireless connection, but the headset is not available as a USB audio device.
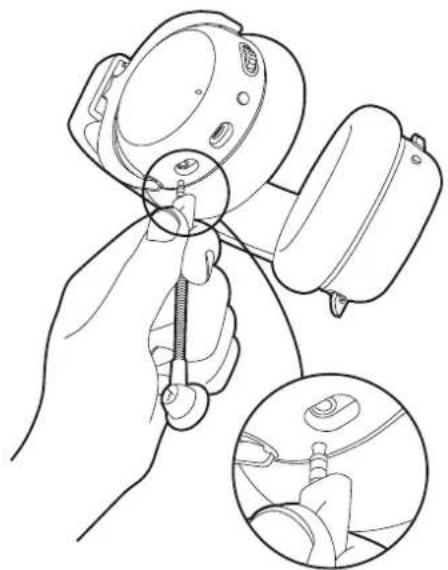
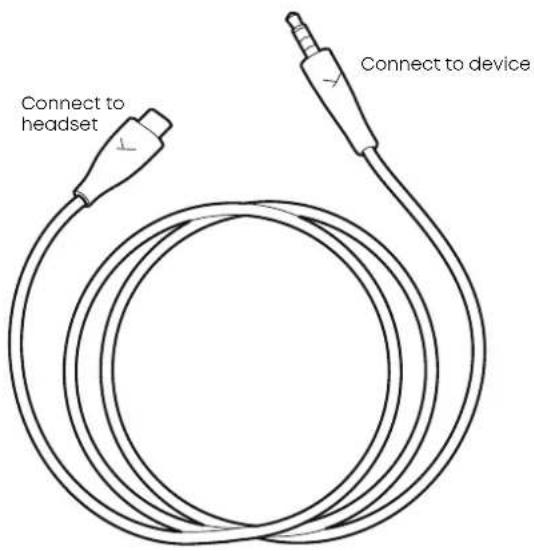
text_image
Connect to headset Connect to deviceConnect the USB-C connector to your headset and the jack plug to your device. The output signal should now be played back by the MMX 200 wireless, as well as input signals that will be picked up by the microphone.
▶ Please switch on the headset! Only after switching on, the headset is also active in analogue mode.
When connecting to a computer, please also check your system audio settings and select your computer's sound card as input and output device.
Caution: Connect the jack plug of the cable to a headphone socket only! If you connect the headset to any other jack socket, the headset could be damaged.
text_image
Connect to headset Connect to deviceCHARGING
Connect the USB-C connector of the USB cable to the USB-C port on the MMX 200 wireless. Connect the USB-A connector to your device (e.g. power supply unit or computer etc.)
During charging, the light guide pulses green.
When the battery is low, the light guide flashes red.
The MMX 200 wireless is supplied with a charge of approx. 60%. Please fully charge before use.
In order to protect the battery, we recommend, that you do not charge the product continuously for more than 30 hours.
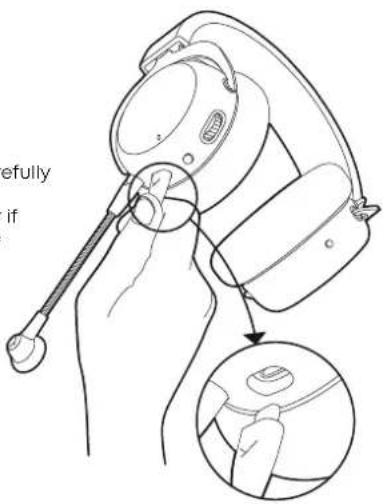
text_image
Press the USB-C connector firmly into the headset.Pull the connector carefully to disconnect when charging is finished or if another cable is to be used.
text_image
defully ifOVERVIEW LIGHT GUIDE DISPLAY
| Function Light guide display | |
| Headset tries to connect to receiver/device Flashing red/blue | |
| Headset connected to Bluetooth® device when dongle is connected (Augmented Mode is off) | Slowly flashing orange |
| Headset is connected to Bluetooth® device Slowly flashing blue | |
| Incoming call Flashing red/green | |
| Augmented mode is activated Slowly flashing turquoise | |
| Microphone is muted Illuminates red | |
| Headset is being charged Battery full = illuminates green | Battery >30% = slowly flashing yellow |
| Battery < 30% = slowly flashing red | |
| Error = rapidly flashing red | |
| Software update is being carried out Flashing magenta | |
| Headset is switched off Illuminates orange | |
| Bluetooth® pairing/discovering Alternately flashing blue/red | |
| Bluetooth® connection lost | Rapidly flashing blue |
| Bluetooth® connection lost when dongle is connected | Rapidly flashing orange |
| LC3 audio playback | Slowly flashing orange |
| A2DP audio playback Slowly flashing blue | |
| Microphone not muted during call | Slowly flashing green |
OVERVIEW LIGHT GUIDE DISPLAY DONGLE
Function Light guide display
Dongle connected to USB port (not paired) Illuminates white
Headset is connected to dongle illuminates orange
Headset is switched off while being connected to the dongle
Light guide is off
OVERVIEW MICROPHONE LED DISPLAY
Function Microphone display
Microphone is muted LED illuminates red
Battery is almost empty LED is rapidly flashing red
SET VOLUME
▶ To increase the volume, simply turn the control wheel upwards.
▶ To decrease the volume, turn the control wheel downwards.
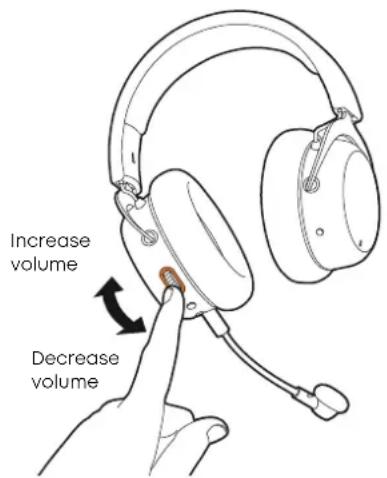
text_image
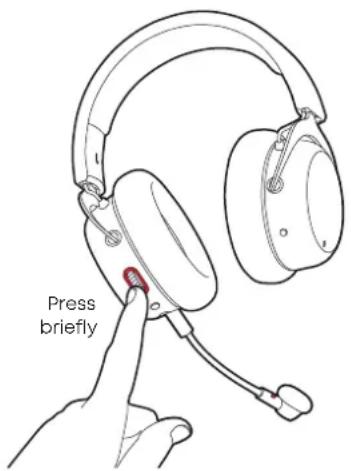
Increase volume Decrease volumeMICROPHONE MUTE ON/OFF
▶ Press the control wheel briefly to mute the microphone.
▶ A red light on the microphone as well as around the control wheel illuminate.
▶ Briefly press the control wheel again to unmute the microphone. The red light goes out.
text_image
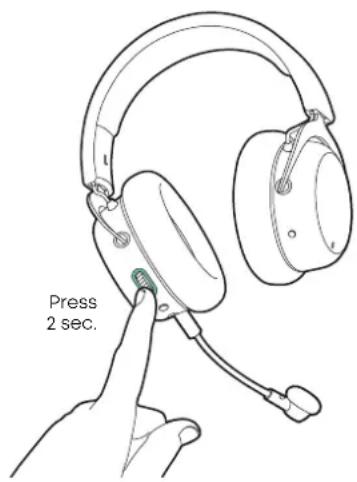
Press brieflyAUGMENTED MODE
▶ Using the Augmented Mode, your headset works as if it were open, i.e. you can hear your voice more natural and you can hear your surroundings such as people talking to you or the doorbell.
▶ Press and hold the control wheel (2 seconds).
The Augmented Mode is enabled when you hear the voice prompt. The light guide around the control wheel will illuminate turquoise.
▶ To disable the Augmented Mode, press and hold the control wheel again for 2 seconds. The turquoise light will go off.
text_image
Press 2 sec.LOW LATENCY MODE
By default, the MMX 200 wireless is supplied in Low Latency Mode.
This mode is suitable for gaming on devices with USB connection (PC, PlayStation ^® , Nintendo Switch ^™ ).
Connect the dongle to the USB connection of the device (PC, PlayStation® Nintendo Switch™).
When the headset is in Bluetooth® Mode: Press the √ / * button twice briefly to switch to the Low Latency Mode.
If the supplied dongle is lost and a new dongle is to be used, it must be paired with the headset. You can find more information at: support.beyerdynamic.com
BLUETOOTH® MODE
Before the headset can be used in Bluetooth® Mode, it must be paired with a mobile phone or another Bluetooth®-enabled device.
The pairing procedure can differ between various devices.
▶ Please refer to the operating instructions of the device with which the headset is to be paired.
When the headset is in Low Latency Mode: Press the √ / * button three times in rapid succession to switch to Bluetooth® Mode.
▶ Select MMX 200 wireless in the pairing list on the mobile phone or other Bluetooth®-enabled device.
Once the headset is connected, audio and telephone functions are available via the √/‡ button. Please refer also to the "Operating functions/operation" table.
HYBRID MODE
For Hybrid Mode: Whilst the headset is in Bluetooth® Mode, it is connected via a mini jack (3.5 mm) to an analogue headphone output (e.g. controller) with the optional analogue cable. The audio signals from Bluetooth® and the analogue device are mixed 50/50.
Whilst the headset is in Bluetooth® Mode, connect the headset to the headphone output (e.g. controller) with the analogue cable.
If the cable is disconnected from the device, the headset switches to the Bluetooth® Mode or connects to the dongle, if no Bluetooth® connection has been active before.
When Bluetooth ^® is disconnected, the headset operates in the analogue mode.
▶ Please control the volume of the Bluetooth ^® and analogue source (e.g. game console) directly on the analogue or Bluetooth ^® device.
Operating functions Operation
| Switch on ▶ Press and hold the on-off button for 3 sec. | |
| Switch off ▶ Press and hold the on-off button for 3 sec. | |
| Microphone mute on/off ▶ Briefly press the control wheel | |
| Augmented Mode enable/disable | ▶ Press the control wheel for approx. 2 sec. |
| Enable Bluetooth® Mode ▶ Briefly press the / button 3 x | √ * |
| Enable Low Latency Mode (Dongle connected) | ▶ Briefly press the √/‡ button 2 x |
| Pair a new device via Bluetooth® | ▶ Press and hold the √/‡ button for 3 sec. |
| Set volume | ▶ Increase volume: turn the control wheel upwards ▶ Decrease volume: turn the control wheel downwards |
| Accept / end a call (Bluetooth® Mode) | ▶ Briefly press the √/‡ button 1 x |
| Reject an incoming call (Bluetooth® Mode) | ▶ Press and hold the √/‡ button for 2 sec. |
| Play / stop music (Bluetooth® Mode) | ▶ Briefly press the √/‡ button 1 x |
| Delete pairing list | ▶ Switch off the headset, then press and hold the on-off button for 6 sec. |
| Reset to factory settings | ▶ Switch off the headset, then press and hold the on-off button for 16 sec. |
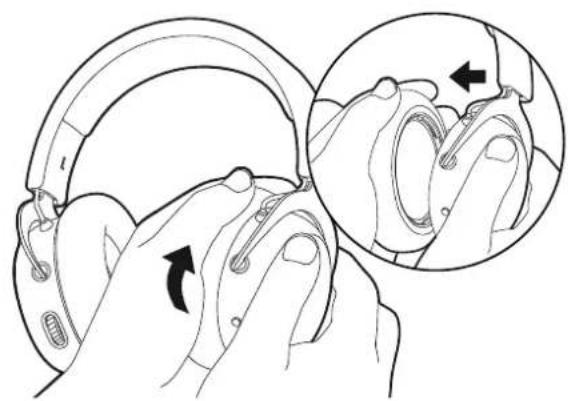
REPLACING THE EAR PADS
▶ To remove the ear pad, gently turn it counterclockwise and pull it off.
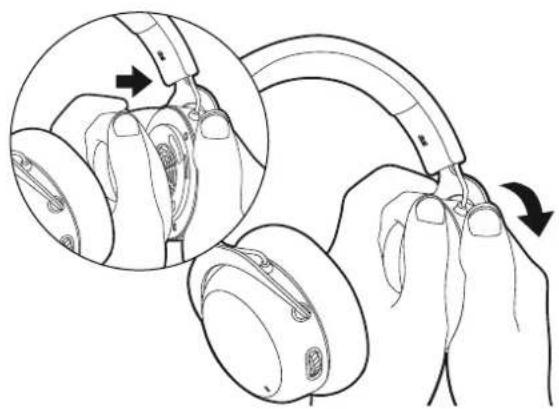
To attach the new ear pad, place it onto the orange housing and gently turn it clockwise until it sits tight.
natural_image
Illustration of a hand holding a helmet with a magnified inset showing the joint detail (no text or symbols)Turn counter-clockwise and pull off.
natural_image
Illustration of hands holding a hard hat with a circular inset showing the grip mechanism (no text or symbols)Replace ear pad and turn clockwise.
MAINTENANCE
▶ Use a soft cloth moistened with water to clean the surface.
▶ Make sure that no water enters the headset.
▶ Do not use cleaning agents containing solvents.
▶ Never use a vacuum cleaner for cleaning the headset, as this may cause irreparable damage.
FIRMWARE UPDATE
▶ Firmware updates keep the MMX 200 wireless up to date with the latest technology.
Connect the MMX 200 wireless to a computer via the USB cable.
▶ You can find the latest firmware for your MMX 200 wireless at: www.beyerdynamic.com/mmx-200-wireless
▶ First download the beyerdynamic Update Hub from the "Downloads" section and install it on your computer.
▶ Then start the firmware update and follow the instructions on the screen.
▶ Please make sure that you always keep the firmware up to date.
SERVICE
▶ If you require service, please contact qualified service personnel or directly:
beyerdynamic Service and Logistics Centre E-mail: service@beyerdynamic.de
Dismantling the headset yourself will invalidate the guarantee.
SUPPLIED ACCESSORIES
▶ 1 x USB-C to USB-A cable, 2.4 m (7.9 ft), to connect the headset to a computer/console
▶ 1 x Microphone pop shield
▶ 1 x Dongle (Low Latency Wireless Adapter)
ACCESSORIES / REPLACEMENT PARTS
▶ 1 x USB-C to 4-pole jack cable (CTIA), 1.2 m (3.9 ft), to connect the headset to analogue/portable devices
▶ More accessories and replacement equipment can be found at: www.beyerdynamic.com
If you have technical questions while using the headset or need further guidance, please visit our FAQ website at: support.beyerdynamic.com
TECHNICAL SPECIFICATIONS
Transducer......Dynamic
Operating principle .... Closed
Frequency response....20 Hz - 20,000 Hz
Transmission .... Low Latency (LC3), Bluetooth, Bluetooth + Analogue Connection, USB Audio
Bluetooth.... 5.3, A2DP, HFP, SBC, LC3
USB .... USB-C
Analogue connection .... Yes
USB audio connections Yes
Charging during use .... Yes
Battery life ..... 35 hours (microphone and loudspeaker at a certain playback volume)
Additional functions....Call handling, mute microphone,
volume control,
Augmented Mode
Weight (without cable) 360 g
Microphone
Type. Condenser (electret)
Polar pattern.... Cardioid
Frequency response....50 - 18,000 Hz
Capsule diameter....10 mm
Open circuit voltage ....-26 dBV @ 1 kHz
Dongle
Codec....LC3
Connector USB-C
LED....multi-coloured
DISPOSAL
This symbol on the product, in the operating instructions or on the packaging means that the electrical and electronic devices must be disposed of separately from household waste at the end of their life-cycle.

▶ Always dispose of used equipment in accordance with applicable regulations.
▶ Dealers for electronic equipment are generally obliged to take back waste electrical/electronic equipment free of charge. This obligation also applies to sales via remote communication.
For further information, please contact the local authorities or the dealer from whom the product was purchased.
TRADEMARKS
The Bluetooth ^® word mark and logos are registered trademarks of Bluetooth SIG, Inc. and all use of these trademarks by beyerdynamic is under licence. Other trademarks and trade names are the property of the respective owners.
USB Type A, USB Type B and USB Type C are trademarks of USB Implementers.
THIRD PARTY LICENSES
For more information on 3rd party licenses, please go to: https://www.beyerdynamic.com/media/downloads/headphones/manual/Licenses_MMX_200_wireless.md
REPLACE BATTERY
The battery can be replaced by qualified personnel. Please contact the service department at beyerdynamic, your specialist dealer or a licensed dealer in your region.
USEFUL LINKS
www.beyerdynamic.com
Firmware update:
www.beyerdynamic.com/mmx-200-wireless
INHALT
Low Latency Mode ....18
Bluetooth® Mode....18
Hybrid Mode 18
natural_image
Line drawing of a hand holding a device with a magnified inset showing internal components (no text or symbols)natural_image
Illustration of hands holding a helmet with a magnified inset showing the hand being adjusted (no text or symbols present)natural_image
Illustration of hands holding a headset with a close-up inset showing the joint detail (no text or symbols)natural_image
Line drawing of a hand holding a device with a magnified inset showing internal components (no text or symbols)BRANCHER LE CÂBLE USB
text_image
Appuyer 2 sec.MODE FAIBLE LATENCE
REEMPLACER LES COUSSINETS
natural_image
Illustration of hands holding a hard hat with a magnified inset showing the hand's ear and wrist (no text or symbols)natural_image
Illustration of hands holding a hard hat with a circular inset showing the grip mechanism (no text or symbols)natural_image
Line drawing of a hand holding a device with a magnified inset showing internal components (no text or symbols)natural_image
Illustration of hands adjusting a helmet with a magnified inset showing the hand positioning (no text or symbols)natural_image
Illustration of hands holding a hardcover with a magnified inset showing the cable being inserted (no text or symbols)natural_image
Line drawing of a hand holding a device with a magnified inset showing internal components (no text or symbols)COLLEGAMENTO DEL CAVO USB
text_image
Diagram illustrating a hand holding a device with a tool, showing a close-up of the component being inserted.PANORAMICA SUGLI INDICATORI DELLA GUIDA LUMINOSA
natural_image
Illustration of hands adjusting a helmet with a magnified inset showing the hand positioning (no text or symbols)natural_image
Illustration of hands holding a hard hat with a magnified inset showing the ear and wrist (no text or symbols)natural_image
Line drawing of a hand holding a device with a magnified inset showing internal components (no text or symbols)ANSLUTA USB-SLADD
ANSLUTA TELEPLUGG-SLADD
https://www.beyerdynamic.com/media/downloads/headphones/manual/Licenses_MMX_200_wireless.md
BYTA BATTERI
natural_image
Line drawing of a hand holding a device with a close-up inset showing the internal components (no text or symbols)USBケーブルの接続
natural_image
Illustration of a hand holding a headset with a close-up inset showing the joint detail (no text or symbols)時計と反対周りに回して取り外します。
natural_image
Illustration of hands holding a hardcover with a magnified inset showing the ear and grip mechanism (no text or symbols)https://www.beyerdynamic.com/media/downloads/headphones/manual/Licenses_MMX_200_wireless.md
充電池の交換
Low Latency Mode....78
Bluetooth® Mode 78
Hybrid Mode....78
natural_image
Line drawing of a hand holding a device with a tool, showing a close-up inset (no text or symbols)การเชื่อมต่อสาย USB
https://www.beyerdynamic.com/media/downloads/headphones/manual/Licenses_MMX_200_wireless.md
การเปลี่ยนแบตเตอร์
natural_image
Line drawing of a hand holding a device with a magnified inset showing the close-up of its internal components (no text or symbols)插入 USB 数据线
natural_image
Illustration of a hand holding a helmet with a magnified inset showing the joint detail (no text or symbols)沿逆时针方向转动并取下。
更换耳垫
natural_image
Illustration of hands holding a hard hat with a curved cable, showing the grip and adjustment mechanism (no text or symbols)更换耳垫并沿顺时针方向拧紧。
保养
https://www.beyerdynamic.com/media/downloads/headphones/manual/Licenses_MMX_200_wireless.md
更换电池
For further distributors worldwide, please go to www.beyerdynamic.com
Non-contractual illustrations. Subject to change without notice.