PSJ 520 E - Saw Prowork - Free user manual and instructions
Find the device manual for free PSJ 520 E Prowork in PDF.
| Product type | Electronic jigsaw |
| Brand | Prowork |
| Model | PSJ 520 E |
| Rated voltage | 230 V ~ 50 Hz |
| Power consumption | 520 W |
| Stroke frequency | 500 - 3000 min⁻¹ |
| Stroke | 16 mm |
| Cutting depth in wood | 65 mm |
| Cutting depth in plastic | 20 mm |
| Cutting depth in steel | 8 mm |
| Bevel cut | max. 45° (left and right) |
| Sound pressure level | 86.2 dB(A) |
| Sound intensity level | 99.2 dB(A) |
| Vibration (handle) | 6.7 m/s² |
| Weight | 2.1 kg |
| Double insulation | Yes (Class II) |
| Chip extraction | Yes, with vacuum cleaner connection |
| Adjustable base plate | Yes, tilt up to 45° |
| Electronic speed control | Yes, integrated in the switch |
| Pendulum stroke | Yes, switchable (4 positions) |
| Safety feature | On/off switch with continuous locking |
| Eye protection | Integrated (splinter guard) |
| Maintenance | Clean regularly, grease the guide roller |
| Spare parts | Saw blades, screws, base plate, roller |
| Repairability | Repairs by a qualified electrician, original replacement parts |
Frequently Asked Questions - PSJ 520 E Prowork
User questions about PSJ 520 E Prowork
0 question about this device. Answer the ones you know or ask your own.
Ask a new question about this device
Download the instructions for your Saw in PDF format for free! Find your manual PSJ 520 E - Prowork and take your electronic device back in hand. On this page are published all the documents necessary for the use of your device. PSJ 520 E by Prowork.
USER MANUAL PSJ 520 E Prowork
natural_image
Pure technical line drawing of a mechanical component without any text, numbers, or symbolsPSJ 520E

⑭ Bitte vor Montage und Inbetrlebnahme die Betrlebsanleitung aufmerksam lesen
^18 Please read the operating Instructions carefully before assembling and using
⑤ Veuillez lire attentivement ce mode d'emploi avant de procéder au montage et à la mise en service
® Gelieve vóór montage en Ingebruiknemling de gebruiksaanwijzing aandachtig te lezen
① Si prega, prima di assemblare ed avviare il trapano, di leggere attentamente le istruzioni sul funzionamento
® Læs driftsvejledningen grundigt inden montage og idrifttagning
Przed montażem i uruchomieniem urządzenia proszę uważnie przeczytać instrukcję obsługi
Перед проведением монтажа и началом эксплуатации, пожалуйста, внимательно ознакомьтесь с настоящей инструкцией
H A összeszerelés és használatba vétel előtt kérjük a használati utasítást figyelmessen átolvasni.
Pročitajte pažljivo ove upute za uporabu i posebno obratite pažnju na mjere sigurnosti. Čuvajte ovu knjižicu uputa zajedno s aparatom.
© Bitte Seite 2 ausklappen
GB Please pull out page 2
⑤ Veuillez ouvrir les page 2
NL Gelieve bladzijden 2 te ontvouven
① Aprire le pagine dalle 2
© Fold siderne 2 ud
PL Proszę rozłożyć stronę 2
③ Пожалуйста, раскройте страницу 2
① A 2 -es oldalat kérjük szétnyitni.
HR Molimo Vas da otvorite stranicu 2
© Seite 4 - 6
GB Page 7 - 9
① Page 10 - 12
NL Blz. 13 - 15
① Pagina 16 - 18
⑭ Side 19 - 21
® strona 22 - 24
③ страница
⑧ Oldal 28 -30
HR Str. 31 - 33
text_image
1 2 3 4 5 6 7 8 9 13
D
Beschreibung
1 Netzkabel
2 Feststellknopf
3 Ein/Ausschalter
text_image
Technical diagram of a mechanical device with labeled components and an inset schematic showing a component with a circular symbol.4
text_image
Technical diagram showing a mechanical component with angular annotations and a schematic view of a fan-like structure.natural_image
Line drawing of a mechanical device with no visible text or symbols6
GB
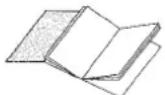
Description
1 Power cable
2 Locking button
3 O n/Off switch
4 Knurled screw for regulating the speed
5 Protection guard
6 G uide roller
7 Selector switch for pendulum action
8 Adjustable base
9 Dust extractor socket
General safety and accident prevention regulations
To work safely with this machine and to prevent accidents it is imperative to read the following safety regulations and operating instructions in full and to put all the information into practice.
● Always check the machine, the power cable and the plug before use. Only ever use the machine if it is in perfect, undamaged condition. Damaged parts are to be repaired or replaced immediately by a qualified electrician.
● Always pull the plug out of the power socket before carrying out any work on the machine, before changing the tool and in periods of non-use.
● Always run the power cable away from the back of the machine to guard it from damage.
- For outdoors work use only suitably approved extension cables with a minimum conductor cross section of 1.5 ~mm^2 . The plug connectors must have earthing contacts and be rain-water-proof.
- Keep the machine in a safe place and out of the reach of children.
● Always wear goggles, safety gloves and ear muffs when grinding, brushing and cutting. Wear a breathing mask on dusty jobs.
● Never leave any tool keys or adjustment spanners in position on the machine. Before switching on, check that all keys and adjustment spanners have been removed.
- Secure the workpiece (with a clamp) so that it cannot slip.
- It is imperative to use a dust extractor when working on stone (cutting or grinding). Make sure the dust extractor is approved for stone dust.
- It is prohibited to use the machine on asbestos materials. Please note the accident prevention regulations in force in your country.
● Use only original spare parts.
● Repairs are to be carried out by qualified electricians only.
● The level of noise at the workplace may exceed 85 dB(A). In this case you will need to introduce noise protection measures for the user. The noise produced by this electric tool is measured in accordance with IEC 59 CO 11, IEC 704, DIN 45635 Part 21, NFS 31-031 (84/537/EEC).
● Make sure of your footing. Avoid abnormal working positions.
- Keep your electric tool out of the rain. Never use electric tools in wet or damp conditions, and never use them near inflammable liquids.
- Never carry the machine by its power cable. Keep the power cable safe from damage. Oil, solvent and sharp edges can damage cables.
- Keep your workplace tidy.
● Make sure the power switch is off before inserting the plug in the socket.
● Wear suitable clothing. Never wear loose-fitting clothes or jewelry. Use a hair-net on long hair.
- For your own safety, use only the manufacturer's accessories and attachments.
- Use only sharp saw blades that are in perfect condition. Replace bent and cracked saw blades immediately.
● After switching off the jigsaw, do not press against the side of the blade to bring it to a halt.
● Always cut at a steady rate of progress. This will prevent accidents and prolong the life of your jigsaw and the blade.
GB
Operating instructions for the electronic jigsaw
STARTING UP
Instant response operation (Figure 2) Switching on: Press the On/Off switch Switching off: Release the On/Off switch
Continuous operation
Switching on: Press the On/Off switch, keep pres sed and lock with the locking button Switching off: Press the On/Off switch and release
Electronic speed control setting (Figure 3)
Using the knurled screw on the On/Off switch you can pre-set any speed. Turn the knurled screw in PLUS direction for a higher speed and turn it in MINUS direction for a lower speed. The ideal cutting rate depends on the specific material and working conditions.
The general rules for tool speed in cutting operations apply.
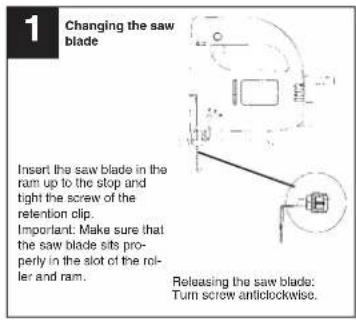
Changing the saw blade (Figure 1)
Switch off the jigsaw and remove the plug from the power socket before changing the blade or carrying out any other work on the jigsaw.
Use the supplied hexagon-socket spanner to undo the two screws on the ram (Figure 2). Slide the saw blade into the guide slot and up to the stop between the piston rod and the retention clip. Use the supplied hexagon-socket spanner to tighten the two screws. The teeth of the saw blade must face in cutting direction. Make sure that the saw blade sits properly in the guide slot of the ram and roller.
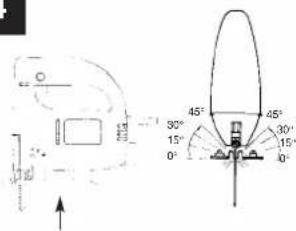
To adjust the cutting angle, undo the two screws (Figure 4) until you can just about move the blade. Adjust to the required angle and re-tighten the two screws.
To enable you to saw right up to the edge, the base can be pushed backward. To do so, undo the two screws underneath (Figure 4) and push the base to the back. Re-tighten the two screws.
Dust extraction
The jigsaw is equipped with a dust extractor socket. Any vacuum cleaner can be connected to the socket at the rear of the jigsaw. If you require a special adapter, please contact the manufacturer of your vacuum cleaner.
TECHNICAL DATA
| Nominal voltage: 230 V - 50 Hz | |
| Power consumption: 520 W | |
| Cutting rate: 500 - 3000 strokes/min. | |
| Stroke height: 16 mm | |
| Cutting depth in wood: 65 mm | |
| Cutting depth in plastic: 20 mm | |
| Cutting depth in iron: 8 mm | |
| Mitre cuts: up to 45° (left and right) | |
| Sound pressure level LPA: 86,2 dB(A) | |
| Sound power level LWA: 99,2 dB(A) | |
| Vibration a_w | 6,7 m/s ^ |
| Double isolation II / [1] | |
| Weight 2,1 Kg | |
Vibration measured on the handle acc. to ISO 5349.
Adjusting the base
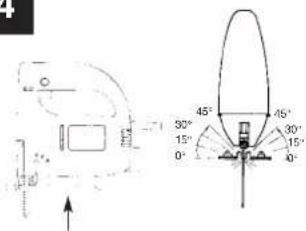
(for mitering and sawing near edges, Figure 4) For mitre and bevel cuts you can swivel the base by up to 45^ in either direction after undoing the two screws on the bottom. The angles 15^ , 30^ and 45^ are marked but you can adjust the saw to any angle between these markings as required.
GB
text_image
1 Changing the saw blade Insert the saw blade in the ram up to the stop and tight the screw of the retention clip. Important: Make sure that the saw blade sits properly in the slot of the roller and ram. Releasing the saw blade: Turn screw anticlockwise.
text_image
4 Undo the two screws to set the base to an angle of up to 45° on the right or left side.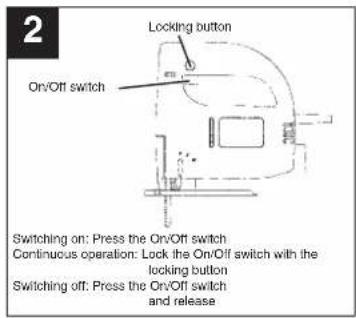
text_image
2 Locking button On/Off switch Switching on: Press the On/Off switch Continuous operation: Lock the On/Off switch with the locking button Switching off: Press the On/Off switch and release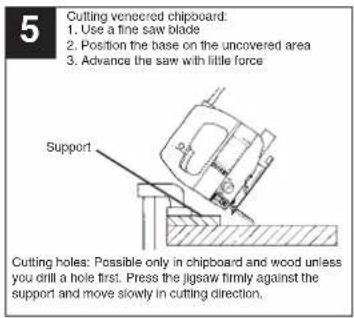
text_image
5 Cutting veneered chipboard: 1. Use a fine saw blade 2. Position the base on the uncovered area 3. Advance the saw with little force Support Cutting holes: Possible only in chipboard and wood unless you drill a hole first. Press the jigsaw firmly against the support and move slowly in cutting direction.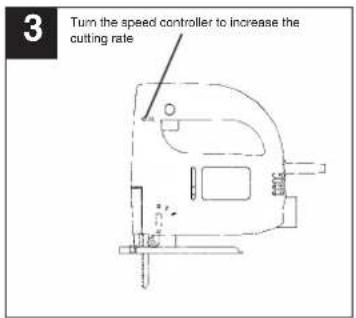
text_image
3 Turn the speed controller to increase the cutting rate9
F
Description
natural_image
Pure electrical circuit lines without any symbols4
text_image
45° 30° 15° 0° 45° 30° 15° 0°natural_image
Technical line drawing of a mechanical device with no visible text or symbols24
RUS
Описание
natural_image
Technical line drawing of a mechanical component or tool assembly (no text or symbols visible)30
Opis dijelova
x 98/37/EG
87/404/EWG
x 73/23/EWG_93/68/EEC
R&TTED 1999/5/EG
97/23/EG
2000/14/EG: LWM = dB; LWA = dB
P = kW
x 89/336/EWG_93/68/EEC
95/54/EG:
90/396/EWG
97/68/EG:
89/686/EWG
EN 60745-1; EN 60745-2-10; EN 55014-1; EN 55014-2; EN 61000-3-2; EN 61000-3-3
Eschenstraße 6 · D-94405 Landau/Isar (Germany)
Info-Tel. 0180-5 120 509 • Telefax 0180-5 835 830
The product described in these instructions comes with a 2-year warranty covering defects. This 2-year warranty period begins with the passing of risk or when the customer receives the product.
For warranty claims to be accepted, the product has to receive the correct maintenance and be put to the proper use as described in the operating instructions. Your statutory rights of warranty are naturally unaffected during these 2 years.
This warranty applies in Germany, or in the respective country of the manufacturer's main regional sales partner, as a supplement to local regulations. Please note the details for contacting the customer service center responsible for your region or the service address listed below.
NL GARANTIE
Unit 5 Morpeth Wharf
Twelve Quays
Birkenhead, Viral
Tel. 0151 6491500, Fax 0151 6491501
Sc. A, AP 9 Sector 1
RO-75121 Bucures
Tel. 021 4104900, Fax 021 4103568
© Polar Plus S.R.O.
Areal vu Bechovice
Budava 10 B
CZ-19011 Prahe - Bechovice 911
© Slav GmbH
Mihail Koloni str. 18 W
BG-9000 Varna
Tel. 052 605254
HR Einhell Croatia d.o.o.
Volika Ves 2
HR-49224 Lepajci
Tel 049 342 444, Fax 049 342 392
⑩ GMA-Elektromechanika d.o.o
Cesla Andreja Bileno
SLO 1000 Ljubijana Tel. 01/5838304 Fax 01/5183603
for a research
OR An. Mavrolidopoulos S.A.
Technical & Commercial Company
12, Papastralou &
SA 10545 P#DS
107 02
sermas Afluoviruses absens. 24
РУС 107072 Новод
Tel 095 7870179. Fax 095 5401750
① Dirivita
Metalo str. 23
LT-02190 Vilnius
Tel 05 2395769, Fax 05 2395770
EAT AS Ball
Roiu alev
Haaslava valid
EL-02102 Tantu Tel: 07 891 709 Fax: 07 891 754
(WE) Halai Trading Co. LLC
POB 9282, Nakheel Rd. Daima, Shop No. 15
UAE-DUBAI
Tel. 04 2278334. Tax 04 22117036
IR Alborz Abzar Co. Ltd. No. 111, Boston Dr
No. 111, Bistium Basuga, Imum Khomani Ave. IP-11146 Tohamp
Tel. 021 6716073 Fax. 021 6727177
BH FIS d.o
Poslovni Centar 96
BA-87000 Vitez
Tel 030 715 267. Fax 030 715 320
© MANIMEX d.o.o
Uzicke republike \$3
SCG-31000 02ice
RK VORLER
Zupna 4
SK-95301 Zlaté Moravce
②A Eurasia Industrial and Automotive Supply
Bessemer S
Duncanville 74 Versoepia
Tel 16 455 571 2. Fax 16 455 571 6


D
The reprinting of reproduction by any other means, in whole or in part, of documentation and papers accompanying products is permitted only with the express consent of ISC GmbH.