BHS 1300 - Saw Alpha Tools - Free user manual and instructions
Find the device manual for free BHS 1300 Alpha Tools in PDF.

| Product type | Handheld circular saw |
| Brand | Alpha Tools |
| Model | BHS 1300 |
| Power supply voltage | 230 V ~ 50 Hz |
| Power consumption | 1300 W |
| No-load speed | 4500 rpm |
| Cutting depth at 0° | 65 mm |
| Cutting depth at 45° | 46 mm |
| Blade diameter | 185 mm |
| Blade bore | 16 mm |
| Blade thickness | 2.4 mm |
| Weight | 4.2 kg |
| Dimensions (L x W x H) | 34 x 24 x 24 cm |
| Sound pressure level | 91 dB(A) |
| Sound power level | 104 dB(A) |
| Vibration | 1.75 m/s² |
| Insulation | Double insulation (Class II) |
| Cutting angle | 0° to 45° |
| Parallel guide | Yes, included |
| Dust extraction connection | Yes |
| Protective guard | Tilting |
| Riving knife | Included |
| Warranty | 6 years |
| Maintenance | Cleaning of ventilation slots and brush inspection |
| Safety | Mandatory wearing of goggles and ear protection |
Frequently Asked Questions - BHS 1300 Alpha Tools
User questions about BHS 1300 Alpha Tools
0 question about this device. Answer the ones you know or ask your own.
Ask a new question about this device
Download the instructions for your Saw in PDF format for free! Find your manual BHS 1300 - Alpha Tools and take your electronic device back in hand. On this page are published all the documents necessary for the use of your device. BHS 1300 by Alpha Tools.
USER MANUAL BHS 1300 Alpha Tools
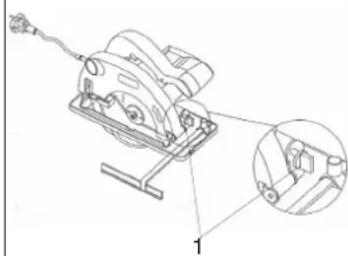
text_image
Technical diagram of a mechanical device with numbered components for identification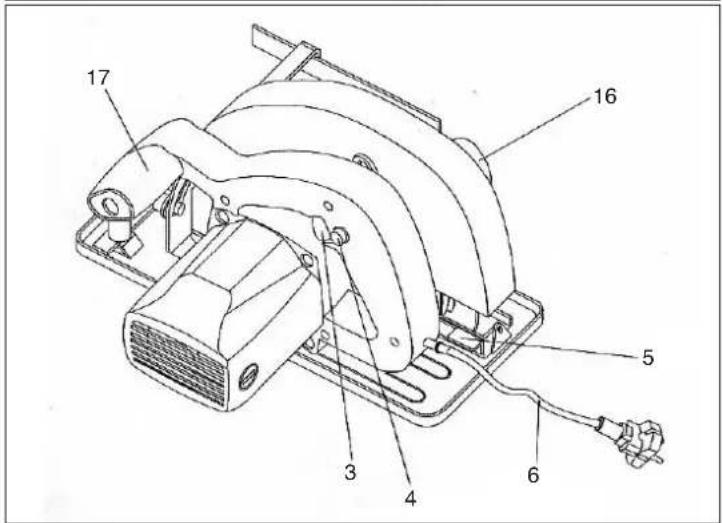
text_image
Technical diagram of a mechanical device with numbered components labeled 3 through 17
3
D
Beschreibung:
natural_image
Technical line drawing of a mechanical device with an inset close-up view (no text or symbols)
D

text_image
Technical diagram of a mechanical device with numbered parts labeled 3 and 46
Description
- Handle
- Nameplate
- On/Off switch
- Interlock button for On/Off switch
- Lock screw for the depth of cut setting
- Power cable
- Splitter
- Hinged guard hood
- Allen screw
- Shoe
- Flange
- Saw blade
- Parallel stop
- Lock screw for the parallel stop
- Lock screws for litre cuts
- Dust extractor connection
- Additional handle
- Actuator for the hinged guard hood
Please read these instructions carefully and pay particular attention to the safety regulations. Keep the instructions together with the circular saw.
Technical data
Voltage 230 V \~ 50 Hz
Power rating 1300 W
Idle speed 4500 rpm
Cutting depth at 0° 65 mm
Cutting depth at 45" 46 mm
Saw blade 185 mm dia.
Saw blade mount 16 mm dia.
Saw blade thickness 2,4 mm
Sound pressure level LPA 91 dB(A)
Sound power level LWA 104 dB(A)
Vibration a_W 1,75 m/s
Weight 4.2 kg
Dimensions 34 x 24 x 24 cm
Totally insulated II / 回
Accessories supplied
Parallel stop
Applications
The hand-held circular saw is designed for sawing straight cuts in wood, in materials similar to wood, and in plastics.
Safety regulations
- Adjust the splitter so that it is no more than 5 mm from the tooth rim of the saw blade and its lowest point is not retracted more than 5 mm relative to the tooth rim.
- Do not use cracked or misshapen saw blades.
- Do not use saw blades made of high-alloy, high-speed steel (HSS).
● Never use saw blades which do not conform with the specifications quoted in these instructions.
● Make sure that all the moving parts of the blade guard work properly without jamming.
● Make sure that all devices which play a role in covering the saw blade are in proper working order.
● The splitter must be properly adjusted and used at all times except for plunge-cuts. - Do not use the saw near fumes or combustible liquids.
- Use only sharp blades and suitable accessories.
● Always pull the plug out of the socket before converting, cleaning or adjusting the saw. - Keep the power cable safe from damage. Oil and acid can cause damage to the cable.
● Never use saw blades with plates that are thicker or with sets that are smaller than the thickness of the splitter. - Never remove the plug from the socket by pulling on the power cable and do not carry the saw by its cable.
● Have repairs carried out only by specialists. - If you use a cable reel, the complete cable must be drawn off the reel. The conductor must have a minimum cross section of 1.5 mm ^2 . Maximum fuse rating 16 A.
- Secure all workpieces sufficiently and do not overload the machine.
● Wear suitable clothing and goggles and use a dust mask on dusty jobs.
● Wear ear muffs to protect your ears! - For lengthy jobs on wood and when cutting materials which produce a great deal of dust, the circular saw should be connected to a suitable dust extractor (observe you country's regulations regarding wood dust extraction).
GB
Working with the hand-held circular saw
● Always hold the circular saw firmly.
● The hinged guard hood will be pushed back automatically by the workpiece.
● Never apply force! Advance the circular saw gently and steadily.
● The off-cut piece should be to the right of the circular saw so that the wide part of the base plate is supported over its entire surface.
- When sawing along a marked line, guide the circular saw along the corresponding groove
- Clamp small pieces of wood securely before sawing. Never hold them in your hand.
● Always observe the safety regulations! Wear goggles!
- Do not use defective saw blades or blades with cracks or flaws.
- Do not use flanges or flange nuts with a hole which is larger or smaller than that of the saw blade used.
- Do not try to stop the saw blade with your hand or by applying pressure to the side of the blade.
● The hinged guard must not jam and must return to its original position once work is completed.
● Before plugging in the circular saw, check that the hinged guard is functioning properly.
- Before each use, always check that the safety devices - the hinged guard, splitter, flanges and adjustment devices - are functioning properly and have been adjusted and secured correctly.
- You can connect a suitable dust extractor to the guard hood. Check that the dust extractor is fitted securely and properly.
● The hinged guard hood is not to be wedged in the retracted guard hood when sawing.
Maintenance
- Keep the cooling vents on the motor housing clean and unobstructed at all times. Blow out any dust and dirt at regular intervals.
● Have a specialist workshop check the carbon brushes in the event of excessive sparking.
● Worn carbon brushes are to be replaced only by a specialist workshop or by our Customer Service Centre. - Keep the machine clean at all times.
● Never use any caustic agents to clean the plastic parts. - If ever you discover any damage, consult the exploded drawing and parts list to determine exactly which replacement parts you need to order from our Customer Service Centre.
Important!
Wear ear muffs and goggles.
text_image
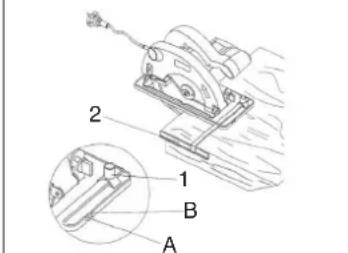
2 1 B AParallel cuts
-
Release the lock screw
-
For 90° cuts, adjust the parallel stop 2 using the scale on groove A, for 45° cuts adjust the parallel stop 2 using the scale on groove B. Observe the saw blade width.
-
Tighten the lock screw.
Important!
First make a trial cut.
Adjustment of the cutting depth
- Release the lock screw.
- Swing the shoe downwards.
- Adjust the cutting depth using the scale.
The saw teeth must project approx. 2 mm out of the wood. - Tighten the lack screw.
natural_image
Technical line drawing of a mechanical device with a magnified inset showing a detail (no text or symbols)GB
text_image
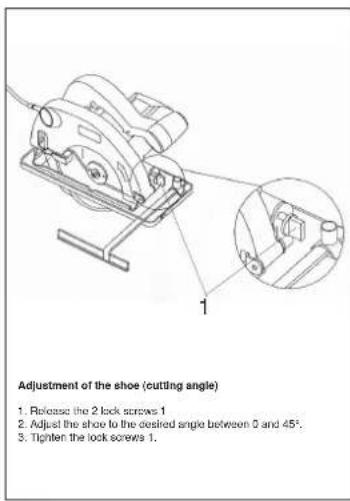
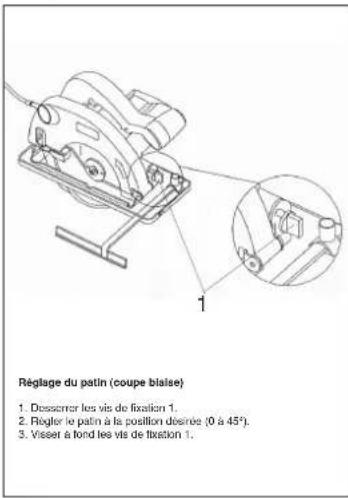
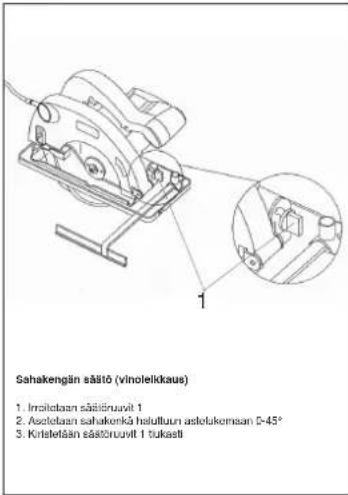
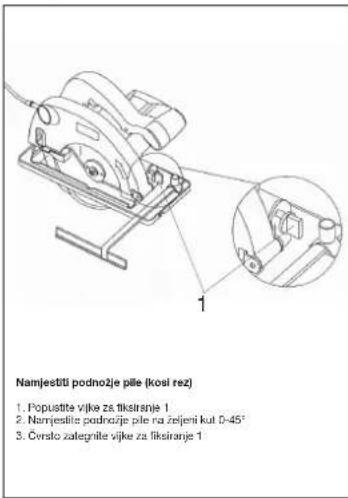
Adjustment of the shoe (cutting angle) 1. Release the 2 lock screws 1 2. Adjust the shoe to the desired angle between 0 and 45°. 3. Tighten the lock screws 1.Important!
Pull out the plug before making any changes to the circular saw!
Before pressing the On/Oil switch, check that the saw blade is properly fitted, that the moving parts run smoothly and that the clamping screws are tight.
Switching on
text_image
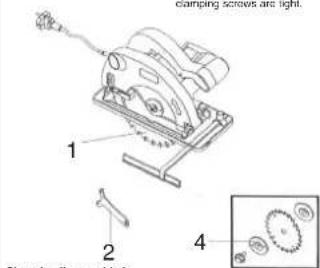
Clamping screws are light. 1 2 4 Chancing the new bladesChanging the saw blade
-
Open the hinged guard hood 1 and hold.
-
Use the face spanner 2 to stop the saw blade from moving.
-
Undo the screw with the wrench.
-
Remove the flange 4 and the saw blade by dropping down
-
Clean the flange and insert a new bisco. Into the direction
-
Clean the large and insert a flow bell. The rotation (see view on the tuned boer)
-
Tighten the screw and check for concentricity.
text_image
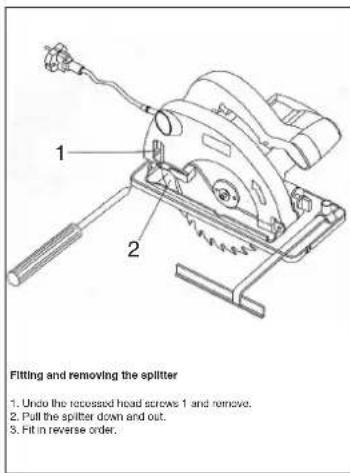
1. Undo the recessed head screws 1 and remove. 2. Pull the splitter down and out. 3. Fit in reverse order. Fitting and removing the splitter 1. Undo the recessed head screws 1 and remove. 2. Pull the splitter down and out. 3. Fit in reverse order.Switching on and off
To switch on: Press the interlock button 3 and the switch 4 simultaneously.
To switch off: Reiser the interlock button and the switch
To switch off: Release the interlock button and the switch.

text_image
Technical diagram of a mechanical device with numbered parts labeled 3 and 4F
Description:
natural_image
Technical line drawing of a mechanical device with a close-up inset showing a detail (no text or symbols)
F
text_image
Technical diagram of a mechanical device with numbered parts labeled 3 and 4Descripción
natural_image
Technical line drawing of a mechanical device with a close-up inset showing internal components (no text or symbols)E
text_image
Technical diagram of a mechanical device with numbered parts labeled 3 and 4DK
Beskrivelse:
natural_image
Technical line drawing of a mechanical device with a close-up inset showing internal components (no text or symbols)DK
text_image
Technical diagram of a mechanical device with numbered parts labeled 3 and 4Beskrivning:
natural_image
Technical line drawing of a mechanical device with a close-up inset showing a detail (no text or symbols)
text_image
Technical diagram of a mechanical device with numbered parts labeled 3 and 4FIN
Erittely:
natural_image
Technical line drawing of a mechanical device with a cable and bracket, showing internal components and an inset close-up (no text or symbols)FIN
text_image
Technical diagram of a mechanical device with numbered parts labeled 3 and 4natural_image
Technical line drawing of a mechanical device with a close-up inset showing a detail (no text or symbols)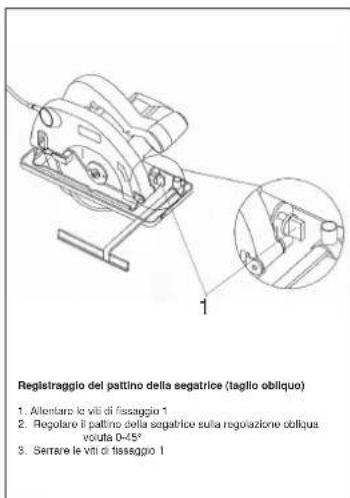
text_image
Technical diagram of a mechanical device with numbered parts labeled 3 and 4CZ
Popis:
Džadlo
natural_image
Technical line drawing of a mechanical device with an inset close-up view (no text or symbols)CZ
text_image
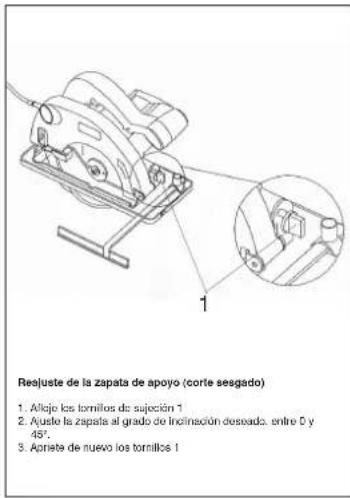
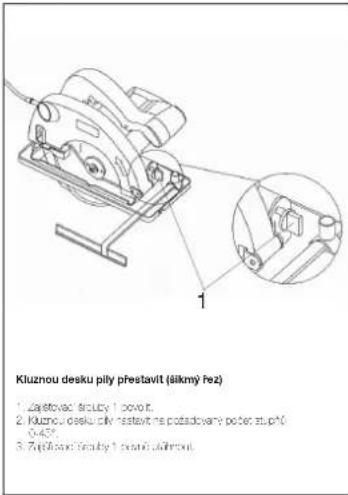
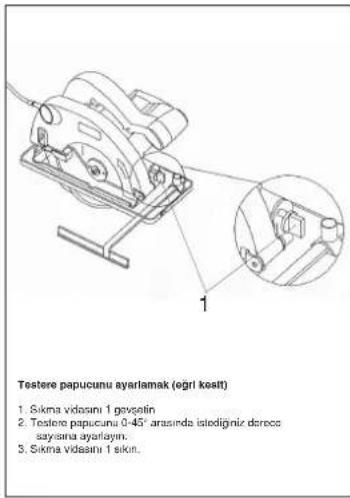
Kluznou desku pily prestavit (sikmy) pez 1. Zajstovac skutby 1 povot. 2. Kluznou desku pily prestavit na poziadovany polek stuplo 0,45°. 3. Zjujihovac skutby 1 svane sullmou.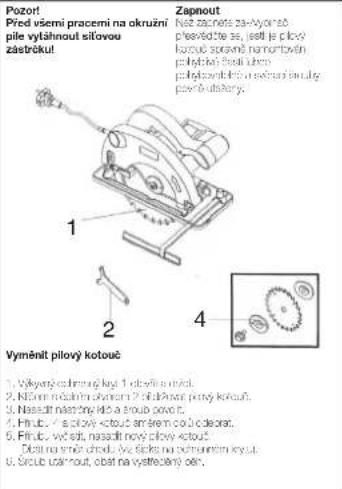
natural_image
Technical line drawing of a mechanical device with an inset close-up view (no text or symbols)SLO
text_image
Technical diagram of a mechanical device with numbered parts labeled 3 and 4HR
Opis:
- ručka
- označna pločica
- prekidač
- tipka za blokiranje prekidača
- vijak za fiksiranje namještene dubine rezanja
- priključni kabel
- razdvoinik
- preklopni zaštitni poklopac
- imbusni vijak
- podnožie pile
- prirubnica
- list pile
- paralelni graničnik
- vijak za fiksiranje paralelnog graničnika
- vijci za fiksiranje za rezanje pod kutom
- priključak za usisavanje prašine
- dodatna ručka
- stremen za pokretanje pokretnog zaštitnog
poklopca
Molimo da pažljivo pročitate naputak za upotrebu i da osobito uvažite sigurnosne upute. Čuvajte naputak za upotrebu zajedno s kružnom pilom.
Tehnički podaci:
| Napajanje: 230 V – 50 Hz | |
| Primljena snaga: 1300 Watt | |
| Broj okretaja pri praznom hodu: 4500 min-1 | |
| Dubina rezanja pri 0°: 65 mm | |
| Dubina rezanja pri 45°: 46 mm | |
| List pile 185 mm | |
| Prihvat lista pile: 16 mm | |
| Debljina lista pile 2,4 mm | |
| Razina tlaka zvuka LPA 91 dB(A) | |
| Razina snage zvuka LWA 104 dB(A) | |
| Vibracija a w 1,75 m/s2 | |
| Težina | 4,2 |
| Dimenzije | 34 x 24 x 24 cm |
| Zaštitno izolirana | II / ☑ |
Oprema:
Paralelni graničnik
Područje primjene
Ručna kružna pila je prikladna za rezanje ravnih rezova u drvu, materijalu sličnom drvu i plastici.
Sigurnosne upute:
- Razdvojnik se mora tako namjestiti da razmak do zubaca lista pile ne bude veći od 5 mm, a njegova najdonja točka da ne bude odmaknuta od zubaca vlše od 5 mm.
- Napuknuti i deformirani listovi pile se ne smiju koristiti.
- Listovi pile od visokolegiranog brzoreznog čelika se ne smiju koristiti.
● Listovi pile koji ne odgovaraju specifikaciji iz ovoga naputka za uporabu se ne smiju koristiti. - Treba osigurati da svi pokretni dijelovi zaštitnog poklopca lista pile funkcioniraju bez smetnje.
- Treba osigurati da sve naprave za pokrivanje lista pile funkcioniraju ispravno.
- Razdvojnik se - osim za ureze za umetanje - uvijek mora upotrebljavati i točno podešavati.
- Ne koristite pilu u blizini isparivanja ili zapaljivih tekućina.
- Koristite samo oštre listove pile i prikladan pribor.
- Prije svih radova preuredjivanja, čišćenja i podešavanja izvadite utikač iz utičnice.
- Čuvajte priključni kabel od oštećenja. Ulje i kiselina mogu oštetiti kabel.
- Listovi pile tijelo kojih je deblje ili razvodjenje zubaca je manje od debljine razdvojnika, ne smiju se koristiti.
- Ne vucite kabel da biste izvadili utikač iz utičnice, ne nosite uredjaj na kablu.
● Popravke mora izvoditi stručnjak. - Kada koristite kabelski bubanj, cijeli se kabel mora odmotati od bubnja. Presjek žice najmanje 1,5 mm². Osiguranje najviše 16 A.
- Dovoljno pričvrstite sve predmete koje želite odradjivati, a nemojte preopteretiti stroj.
- Nosite prikladnu odjeću i zaštitne naočale, a prilikom radova pri kojima nastaje prašina, koristite masku protiv prašine.
● Radi zaštite ušiju nosite zaštitnik za uši! - Pri dužoj obradi drva ili drugog materijala pri piljenju kojega nastaje prašina, električni alat priključite na prikladnu napravu za usisavanje prašine. (U Njemačkoj su za drvene prašine propisane naprave za usisavanje prašine, ispitane po TRGS 553).
natural_image
Technical line drawing of a mechanical device with an inset close-up view (no text or symbols)HR
text_image
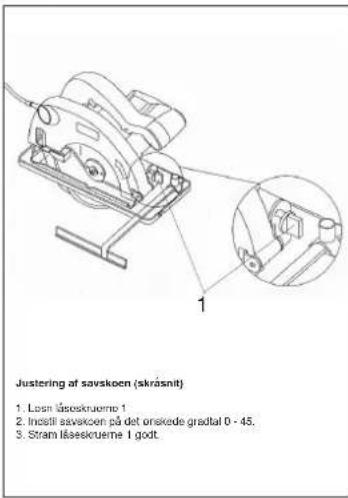
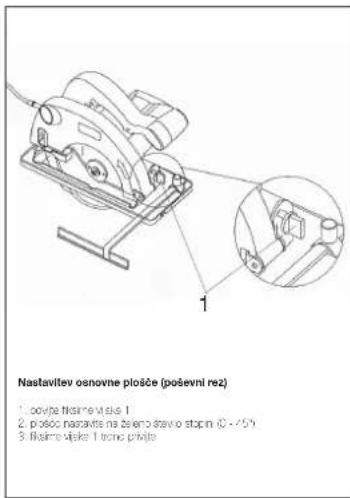
Namjesti podnojne pile (kosi rez) 1. Popustite vijke za tikisiranje 1 2. Namjestite podnojne pile na željeni kut 0-45° 3. Črsto zalegrnite vijke za tikisiranje 1text_image
Technical diagram of a mechanical device with labeled parts and an inset showing gear assemblytext_image
Technical diagram of a mechanical device with numbered parts labeled 3 and 436
Tanim:
natural_image
Technical line drawing of a mechanical device with an inset close-up view (no text or symbols)38
TR
text_image
Technical diagram of a mechanical device with numbered parts labeled 3, 4, and 5ISC GmbH
Eschenstraße 6
D-94405 Landau/Isar
The product described in these instructions comes with a 6-year warranty covering defects. This 6-year warranty period begins with the passing of risk or when the customer receives the product.
For warranty claims to be accepted, the product has to receive the correct maintenance and be put to the proper use as described in the operating instructions.
Your statutory rights of warranty are naturally unaffected during these 5 years.
That warranty applies in Germany, or in the respective country of the manufacturer's main regional sales partner, as a supplement to local regulations. Please note the details for contacting the customer service center responsible for your region or the service address listed below.
E CERTIFICADO DE GARANTIA
Eschenstraße 6 - D-94405 Landau/Isar (Germany)
Info-Tel. 0180-5 120 509 • Telefax 0180-5 835 830
E Commercial Einball, S. A
Commercial Limited, S.A.
Travista Villa Estor, 9 B Religano Industrial El Nogal
F-28119 Algate-Madrid
® Einbeil Portugal de
Einnell Portugal
Apanado 2100
Rus. da Aldeia, 225 Apertado 2100
P-4405-017 Arcozelo VNG
Tel. 022 0917500 Fax 022 0917529
① Fishoil Italy o.r.l
Ettel Italia S.13.
Via Marcini, 16
Barlasigatan 3 6.41467 September
5-41463 Goteborg
N. Finball News A
Einnell Norge A/S
Sophus Bugge
Postboks 2005
N-3255 Larvik
Technical & Commercial Company
- Panastratou & Askliniqu Str
GB 18545 Pirăus
GR 10545 Pflaus
- 2016-12-31
⑪5
fitofuvelers, abcess, 24
Alturyevskode skosse, 2A
RUS-127273 Moscow
Tel 095 7870179. Fax 095 5401750
⑪ Dirbito
Arlcita Metals, str. 89
Metalo str. 23
LT-02190 Vilnius
Tel. 05 2395769. Fax 05 2395770
(FT) 40 Detail
as Baroll
Roiu alev
Heasleva valid
FF-62102 Tertu
Tel. 07 301 700 Fax 07 301 701
④ Helai Trading Co. LLC
lateral Trading Co. LLC
POB 9282, Nalheel Rd. Deira, She
UAE-Dubal
Tel. 04 2279554. Fax. 04 2217696
(16) Alhoyz Abzar Co Ltd
VRSF. RUBU, CO., LTD.
No. 111, Bastan Passage, Iman
IR-11146 Teheran
Tel 021 6716072.
618 EJ 4.0
15 0.0.0
Poslovní Center 96
BA-87000 Vitez
Tel 030-715-267 Fax 030-715-320
⑥ MANUFACTURE
MANIMEX d.o.o
Uzicke republike 83
SCG-31000 Uzi
Tel: 031 551 393 Fax: 031 651 539
Tel: 051 551 553, Fax: 051 651 559
② Eursia Industrial and Automotive Supply
Papacitius Cis
Bassumbar &
Duncanville
ZA-Vereeniging 1930
Tel 16 455 571 2, Fax 16 455 571 6
D
The reprinting or reproduction by any other means, in whole or in part of documentation and papers accompanying products is permitted only with the express consent of ISC GmbH.