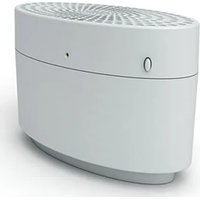
PAVO - Humidifier STYLIES - Free user manual and instructions
Find the device manual for free PAVO STYLIES in PDF.

| Product type | Air dehumidifier (also works in continuous mode) |
| Brand | Stylies |
| Model | PAVO |
| Dimensions (L x H x D) | 347 x 495 x 247 mm |
| Weight | 10.2 kg |
| Power supply | 220-240 V / 50/60 Hz |
| Dehumidifying capacity | Up to 12 L/day |
| Tank capacity | 2 L |
| Operating temperature range | 0 °C to 40 °C |
| Recommended relative humidity | 40%, 50%, 60% or continuous mode |
| Noise level | 35 dBA |
| Recommended area | Up to 40 m² (or 100 m³) |
| Main functions | Dehumidification, timer (1/2/4/8 h), fan speed (2 levels), built-in hygrostat, automatic defrost, automatic shut-off when tank full |
| Maintenance and cleaning | Empty the tank daily; clean the tank and filter once a month; vacuum the filter; do not put in dishwasher |
| Safety | Overheat protection, compressor protection circuit, automatic shut-off when tank full, do not use with an external timer |
| Spare parts and repairability | Tank, filter and cover are removable; drainage hose not supplied; repairs by qualified personnel only |
| Warranty | 2 years (conditions apply) |
| Compliance | CE, WEEE, RoHS |
Frequently Asked Questions - PAVO STYLIES
User questions about PAVO STYLIES
0 question about this device. Answer the ones you know or ask your own.
Ask a new question about this device
Download the instructions for your Humidifier in PDF format for free! Find your manual PAVO - STYLIES and take your electronic device back in hand. On this page are published all the documents necessary for the use of your device. PAVO by STYLIES.
USER MANUAL PAVO STYLIES
natural_image
White air purifier device with blue indicator light, placed on a floral background (no text or symbols visible)2010015
styles
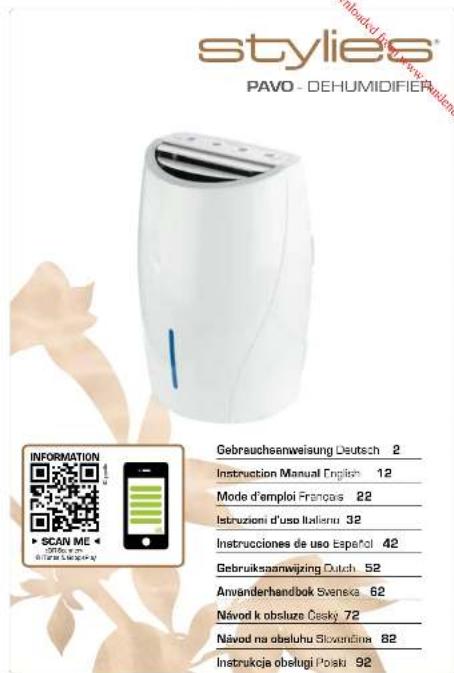
PAVO - LUFTENTFEUCHTER
DEHUMIDIFIER
Deutsch
natural_image
Close-up of a white air conditioner unit with control buttons (no visible text or symbols)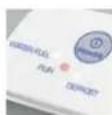

5.
6.
6.
6.
6.
2.
Congratulations! You have just become the owner of the exceptional and high-tech Stylies «PAVO» dehumidifier. This dehumidifier will bring you a lot of pleasure when using it and will improve the air quality of your rooms.
As with all electrical household devices, special caution is required when using this dehumidifier in order to avoid injuries, fire and damage to the device itself. Before you use it for the first time, please read through this instruction manual carefully and pay attention to the safety guidelines and indications printed on the device.
IMPORTANT SAFETY INSTRUCTIONS
- Please read through the instruction manual carefully before using the Styles PAVO dehumidifier for the first time and store it in a safe place for future reference. If you ever give the dehumidifier to a new owner, make sure you also pass on this instruction manual.
- Coplax AG accepts no liability for any damage caused by non-compliance with this instruction manual.
- This appliance can be used by children aged 8 years and above if they are supervised or else have been instructed in how to use the appliance safely and understand the hazards involved. Cleaning and user maintenance should not be undertaken by children unless they are older than 8 years old and supervised. Keep the appliance and its cord out of the reach of children aged below 8 years old.
- Children below 3 years old should be kept away from the device unless continuously supervised.
- Children aged between 3 and 8 years old should only switch on/off the appliance when supervised or else if they have been instructed in how to use the appliance safely and understand the hazards involved and provided that the device has been placed or installed in its intended normal operating position. Children aged between 3 and 8 years old should not plug in, adjust or clean the appliance or perform user maintenance.
- If the supply cord is damaged, it must be replaced by the manufacturer, an authorised representative or a qualified person in order to avoid a hazard.
• The device is for indoor use only.
• Do not store the appliance outdoors. -
Place the dehumidifier on a firm, even, waterproof surface. Make sure it is standing securely so that the dehumidifier cannot tip or fall over. If it tipped over, please pull out the plug immediately. Water can damage furniture and floor coverings.
-
Unwind the cord completely. If not completely unwound, the cord can lead to overheating and cause a fire.
- Do not use an extension cord, connector strip, switched socket or a continuously adjustable speed controller. This can cause overheating, fire, an electric shock or failure of the compressor.
- Only connect the dehumidifier to a single-phase, earthed socket with the supply voltage as stated on the type plate.
- Always switch the dehumidifier off with the power button and always disconnect the plug from the power socket when the dehumidifier is not in use or when it is being moved, handled or cleaned. Do not tug at the cord to disconnect the plug.
- Do not disconnect the plug when the dehumidifier is running. Always switch the dehumidifier off first with the power button.
- The dehumidifier functions at its best at a room temperature of between 13 °C and 35 °C. Optimal dehumidifying performance is only achievable in the higher temperature range (from 22 °C) and with a higher room humidity (from 70%). [The lowest working temperature is 5 °C and relative humidity is 30%. The highest working temperature is 40 °C and the relative humidity is 90%.]
- Do not use the dehumidifier anywhere near easily inflammable gases or substances, near an open fire or at a location where oil and water could splash. Do not spray insecticides or similar substances onto the dehumidifier. Make sure that the dehumidifier is not exposed to direct sunlight. Do not use the dehumidifier in a greenhouse or near a bathtub, shower or swimming pool. Do not put any hot or heavy objects on the dehumidifier.
- The air intake and air outflow vents must always be kept open during dehumidification. Make sure that no objects can get into the air intake or air outflow vents. This can lead to overheating, fire or electric shock. The dehumidifier must not be installed behind curtains, drapes or other objects and obstacles that could impair the air circulation. A safety distance of at least 50 cm from other objects must be maintained. In addition, a safety distance of at least 60 cm from wet areas such as showers, washbasins, sinks, bathtubs etc. must be maintained. A safety distance of 120 cm from water supplies, e.g. a water tap, is necessary.
- When operating to dry clothes, keep the clothing at least 50 cm away from the unit and do not allow water to drip onto the unit.
- Do not remove the water tank while the dehumidifier is running. Drops of remaining water could damage the furniture and floor coverings
- Wait for 3 - 5 minutes after switching the dehumidifier off before you switch it back on again.
- Do not immerse the dehumidifier into water or any other liquids and do not pour water or any other liquids onto the appliance or into the air intake and outflow vents.
- Clean the dehumidifier regularly, following the cleaning instructions.
- Always transport the dehumidifier in an upright position. Before using the dehumidifier for the first time, leave it standing in an upright position for 24 hours. Always stand the dehumidifier in an upright position immediately after transporting the appliance and wait for at least 60 minutes before switching it back on. The water tank must be emptied every time before transportation.
- The dehumidifier must always be operated according to this instruction manual. Non-observance of these instructions can lead to injuries, a fire, electric shock or faults in the appliance.
• The dehumidifier is designed for private use indoors and is not intended for commercial use. - Do not use the dehumidifier if it is faulty or showing signs of damage or if it is not functioning correctly. Disconnect the plug from the power socket.
• The appliance should be installed in accordance with the National Electrical Code.
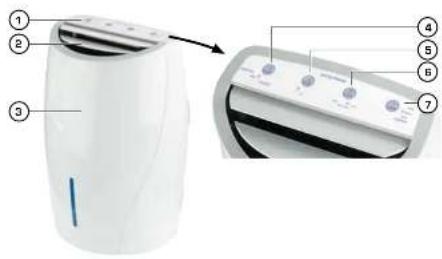
DESCRIPTION OF THE DEVICE
The device consists of the following main components:
- Control panel
- Air outlet (do not cover)
- Dehumidifier
-
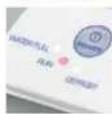
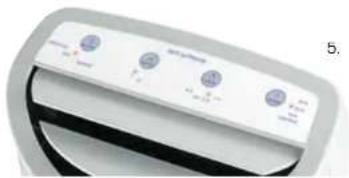
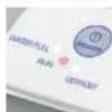
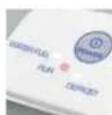
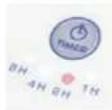
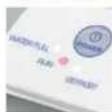
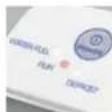
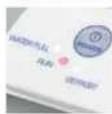
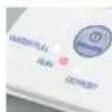
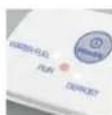
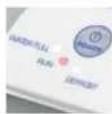
- ①POWER» On/off switch and control
displays
- «WATER FULL»: Water tank is full
- «RUN»: Device operating
-
«DEFROST»: Defrost function for the
evaporator -
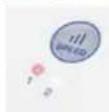
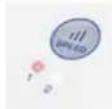
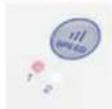
- Speed: Air volume [1-2]
-
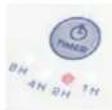
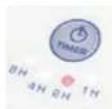
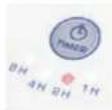
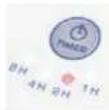
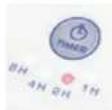
- ③TIMERs: Autom. power on/off
[1, 2, 4 or 8 h]
- ③TIMERs: Autom. power on/off
-
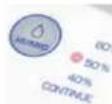
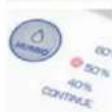
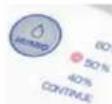
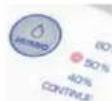
- △HUMID» Humidity (40, 50)
60% rel. and continuous operation]
- △HUMID» Humidity (40, 50)
- Handle
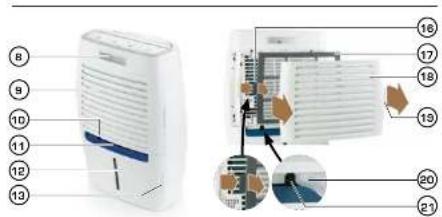
- Air intake (do not dover)
-
Outlet pipe connector
-
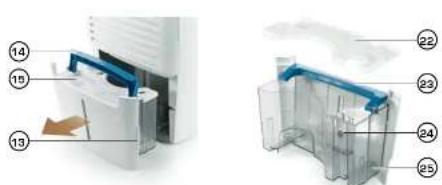
Handle for water tank
- Water level gauge
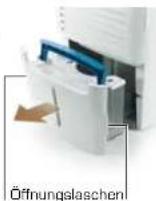
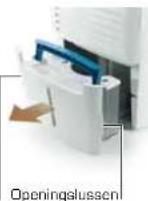
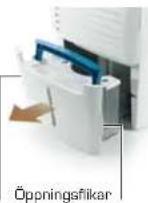
- Opening flaps for water tank
- Handle for water tank (opened out)
- Cover for water tank
- Filter mounting bracket
- Air intake filter
- Air intake cover
- Opening flaps
- Outlet pipe o 8/10 mm [internal/external]
diameter; not included) - Connector for outlet pipe
- Water tank cover (removed)
- Water tank handle
- Water level float
- Transparent water tank
STARTING UP / QUICK GUIDE
This quick guide helps practised users set up the device in a few steps. For detailed startup instructions, please consult the next chapter.
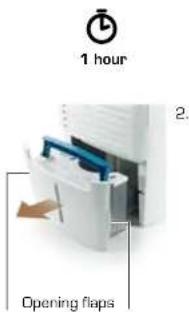
- Place the device on a stable and water-proof surface. Do not place directly on a carpeted or wooden floor. Important to ensure that the compressor has not sustained any damage after transportation of the device, wait at least an hour before operation (no warranty). Ensure the device is upright when transported and never lay flat.
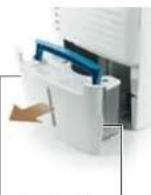
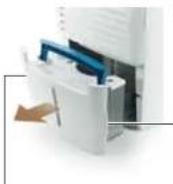
- Pull out the opening flaps (13) on the reverse and remove the water tank. Ensure that there is no packaging material inside. If there is not, return the water tank to its position and ensure it snaps into place.
- Plug in the power plug (all LEDs will light up red briefly). Do not connect to a timer or switched cable connector.
- For optimal functioning, close the windows and doors.
- Switch on : Press «POWER»
(«RUN» will light up, the air outlet flaps will open and the fan and compressors will start).
Switch off: Press «POWER» 📄gain
Good to know:
- If the dehumidifier has been turned off shortly beforehand, the compressor will start with up to 3 minutes' delay (= protective circuit).
- «Water Full» → Water tank is full → empty tank → p. 16.
-
«Defrost» → Defrost process started → p. 17.
-
Displays/settings:
-
ill «SPEED» → Changing of air volume - low «1»/high «2».
- Ⓤ «TIMER» → Device switches on or off automatically after 1, 2, 4 or 8 hours.
- Automatic switch-on: First switch the device off and then press the «TIMER» button until the required time is displayed. If no LED lights up, the timer function is switched off.
- Automatic switch-off: Just as with the «Automatic switch-on» function, turn on the device first and then press the «TIMER» button until the required time is displayed. If no LED lights up, the timer function is switched off.
- ◇ «HUMID»→ Set humidity.
«Continue» → Continuous operation to ensure dehumidification process is as fast as possible. «40, 50, 60 %» → Required humidity in % rel. (40 % = dryer, 60 % = damper)
-
«WATER FULL» = Water tank full:
-
WATER FULL) → Water tank full; compressor will switch off → Empty tank
- A pipe can also be attached (not included) → p. 17.
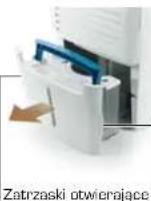
- Remove water tank → Pull out the two opening flaps (13) on the reverse of the tank. Hold the tank with the blue carry handle and empty down the sink (the white lid does not need to be removed when emptying the tank).
Good to now:
Do not use the water for other purposes (contains dirt particles from the air). Clean the inside of the tank on a monthly basis → Hygiene.
- Reset water tank → Fold down carrier handle → Reposition water tank until it snaps into place («WATER FULL» will disappear and compressor will start, after a short delay).
natural_image
Close-up of a white air conditioner unit with control buttons (no visible text or symbols)5.

5.

6.
6.
6.
6.
2.
Opening flaps
FIRST USE / OPERATION
- Place the device on a stable and water-proof surface. Do not place directly on a carpeted or wooden floor. Important to ensure that the compressor has not sustained any damage after transportation of the device, wait at least an hour before operation. This allows the coolant/lubricant to settle again and avoids damage to the compressor (no warranty).
- Check whether there is any packing material in the water tank. Pull out both of the opening flaps (13) on the water tank (snap into place). If there is no packaging material in the tank, slide the tank back into place (it should snap into position).
- Plug in the power plug (all LEDs will light up red briefly).
- For optimal functioning, close the windows and doors.
- Turn on the device using the «POWER» button ①. The red «RUN» control display will light up, the air outlet flaps will open and the fan and compressors will start. Press the button again to switch off the device.
Good to know:
- If the dehumidifier has been turned off shortly beforehand, the compressor will start with up to 3 minutes' delay (= protective function).
- If «WATER FULL» is lit up, the water tank is full and needs to be emptied → see page «17». The compressor will remain switched off until the emptied tank is reinserted.
- The device must not be connected to a timer or switched socket/cable connector (danger of damage to compressor).
- «DEFROST» Defros process started → see page «17».
6. Other displays / available settings:
- ill «SPEEDs: Changing of air volume - low «1»/high «2». After switching on, the device will operate with a high output («2» will light up).
- ◎ «TIMER»: Device switches on or off automatically after 1, 2, 4 or 8 hours.
- ◇ «HUMID»: Set humidity. After switching on, the device will operate on continuous operation («CONTINUE»). This is useful with a very high humidity level or to dehumidify the room as quickly as possible. If the room in question is in frequent use, the «50 %» relative humidity setting is recommended. Once the required level of humidity has been reached, the compressor will switch off until the humidity level increases again. The fan will continue to operate so that the humidity can be measured.
7. «WATER FULL» = Water tank is full:
- Bei When the water tank is full, the compressor will switch off and «WATER FULL» will light up.
- Remove water tank: Pull out the two opening flaps [13] on the reverse of the tank. Hold these and pull the tank out. Pull up the blue carry handle to carry the tank comfortably then empty down the sink. The white lid on top does not need to be removed to empty the tank.
- Reset water tank: Reposition water tank until it snaps into place. «WATER FULL» will disappear and the compressor will start again.
- Good to know:
Do not use the water for other purposes because it also contains dirt particles from the air. Wash the inside of the tank with warm water and a normal detergent at least once a month for hygiene reasons. First, remove the white tank lid (22) (hold the front edge of the lid, swivel up slightly and then pull away from yourself). Do not place the tank or lid in a dishwasher or clean with an abrasive agent otherwise the parts may become damaged.
8. Water outlet pipe:
- When the device is situated in a room with a wastewater drainage system in the ground, the water can be channelled here directly. The tank will then not be filled and will no longer need to be emptied. A tube will be required for this (not included). This should have an internal/external diameter of 8/10 mm.
- Remove the rubber cover from the connector pipe (10) and then place the tube over the pipe.
- Good to know:
The tube must be positioned such that it lies level. It should not be angled upwards because this will stop the water from draping away.
- The «DEFROST» display will light up when the temperature of the evaporator reaches approx. -1 °C and has formed a layer of ice. This may be the case after approx. 20 minutes of continuous operation or at lower room temperatures. The compressor will then switch off and the defrosting process begins. The fan will continue to operate and the water from defrosting will be channelled directly into the water tank. If the ice on the evaporator is melted within 5 minutes, the compressor will start again automatically and «DEFROST» will light up. If not, the device will switch off after 20 minutes (= compressor protective function).
10. Protective circuits:
- Your dehumidifier will be monitored constantly by a protective circuit. This will automatically switch off the compressor in the event of any malfunction. This prevents the compressor from being directly switched on again and overloaded after being switched off. It will only be switched back on after 1-3 minutes.
- The protective circuit also monitors the temperature of the device; if this falls below 0 °C or rises above 40 °C, the device will switch off or will be unable to operate. The device can only start to operate again when the temperature falls within the specified range and the power plug is removed and re-inserted (= «Re-set»).
- After a power cut, the device will switch back on using the previous settings. Important: For safety reasons, the device cannot be switched on or off with a timer, switched socket etc. [compressor may become damaged]!
11. Hygrostat:
- The integrated hygrostat constantly measures the humidity and manages the dehumidification process.
- Good to know:
The standard tolerances of an integrated hygrostat are + / - 5% . This means that the effective relative humidity will fluctuate accordingly.
CLEANING PROCEDURE
- Switch off the device and unplug the power cable from the socket before all maintenance work and after each use.
- Never submerge the device in water (this can result in short-circuiting/ electric shock). To clean the device, simply wipe it with a damp cloth and then dry it thoroughly. Always ensure the power cable has been unplugged beforehand.
• The cover [18] and air filter [17] on the reverse can be removed to enable easier cleaning. - Remove cover: pull down one of the side opening flaps (19) and remove the cover (18).
- Remove air filter: unhook one of the two side mounting brackets (16) by pressing it in gently. Then remove the filter by pulling backwards.
- Remove fluff with a brush or vacuum with a brush attachment. Do not press on the filter (it may tear). Clean any plastic components with a damp cloth.
- Re-insert the components in reverse order: re-attach the filter to the case using the mounting bracket. Gently press the flap on the other side in the middle so that it can be attached to the case (should snap into place). Attach the cover to the device from the back until all four fastening tabs have snapped into place (do not use force; cover may be upside down and therefore may not fit). Never use the device without a filter or cover!
• Empty the water tank daily. - Wash the inside of the tank with warm water and a normal detergent at least once a month for hygiene reasons. First, remove the white tank lid (22) (hold the front edge of the lid, swivel up slightly and then pull away from yourself).
- Do not place the tank or lid in a dishwasher or clean with an abrasive agent otherwise the parts may become damaged.
STORAGE
- Unplug when not using the device for a long period of time (e.g. while on holiday). Empty the water tank and leave to dry along with the device for 1-2 days (to enable condensation inside to evaporate and ensure that the device is completely dry). Then store the device in a dry end dust-free location.
• Tip: Retain the packaging to store the device.
TECHNICAL DATA
Dimensions 347 x 495 x 247 mm (width x height x depth)
Weight 10.2 kg
Voltage 220-240 V / 50/60 Hz
Output 255 W
Suitable for room size 40m² or 100m³
Dehumidification capacity max. 12
Automatic switch-on/off yes/yes
Tank capacity 21/0.528 US gallons
Fulfils EU regulations CE/WEEE/RoHS
Subject to technical changes and errors without notice.
TROUBLE-SHOOTING
«Water Full» lit up
Water tank is full; empty tank → page 17.
«Water Full» light on
Water tank is not properly in place à slide tank in fully (must snap into place and sit flush with the sides).
Compressor protective circuit is still active. It can take 3 minutes for the compressor to switch back on (and for the display to turn off).
Device off and none of the buttons working
The room temperature is too low (below 0 °C) or too high (over 40 °C) à page 17. If the device does not react after warming or cooling of the room, remove the plug for a few seconds and then re-insert (= «Reset»).
«DEFROST» lit up and compressor not working
Device needs to be defrosted → page 17.
Water tank leaking
Water droplets can escape when the tank is inserted/removed. However if the tank actually is leaking, it will need to be replaced. Never drop the tank or place it in a dishwasher because it may become damaged.
REPAIRS / DISPOSAL
- Repairs to all electric devices (including replacement of the power cable) may only be performed by authorised experts. Carrying out inappropriate repairs voids the warranty and no liability shall be accepted.
- If the power cable has become damaged, it must be replaced by the manufacturer, an official service partner or a qualified person in order for further damage to be avoided.
- Never operate the device if the cable or the plug is damaged, if the device has malfunctioned or if the device has been dropped or damaged in any other way (i.e. with cracks or breakages to the casing).
- Do not use any sharp, abrasive objects or corrosive chemicals.
- Any old devices must be immediately rendered unusable (unplug power cable) and taken to the appropriate waste collection point.
This device must not be disposed of with household refuse. Please dispose of this device at the appropriate waste collection centre. Collecting and recycling electrical and electronic waste saves valuable resources. - The packaging material is recyclable. Dispose of the packaging in an environmentally friendly way and ensure that it is taken to a collection centre for recyclable materials.
- If electrical devices are disposed of in an unregulated way, the effects of weathering can cause hazardous substances to contaminate the groundwater and the food-chain or can result in a burden on flora and fauna for years to come.
TWO YEAR WARRANTY
During the warranty period of 2 years after the purchase of the appliance, we will repair or replace (at our discretion) any device or part of a device shown to be defective in terms of materials or workmanship without you incurring any cost for the replacement parts or work undertaken.
WITH THE EXCEPTION OF THE WARRANTY PROVIDED ABOVE, Coplex DOES NOT OFFER ANY IMPLICIT GUARANTEE, WARRANTY OF MERCHANTABILITY OR FITNESS FOR A PARTICULAR PURPOSE WITH RESPECT TO THE PRODUCT FOR ANY PERIOD AFTER EXPIRY OF THE WARRANTY. Coplex will, at its sole discretion, repair or exchange a product under warranty. NO credit will be issued. The remedies described above are your sole remedies in the event of any breach of the warranty provided above.
Who is covered by the warranty?
Any original owner of a privately-owned Coplax appliance, who can provide a dated proof of purchase in the form of an invoice or receipt, is covered. The warranty is not transferable. The original dated proof of purchase (a copy needs to be faxed, e-mailed, mailed) prior to returning the unit. Please provide the model number of your appliance and a detailed description (preferably typed) of the problem with the item. Enclose your description in an envelope and tape it directly to the appliance before the box is sealed. Do not write anything on or alter the original box in any way.
What this warranty does not cover:
Parts that normally require replacement.
- Damage, failure, loss or deterioration due to ordinary wear and tear, abuse, misuse, improper use, negligence, accident, faulty installation, placement and operation, improper maintenance, unauthorised repair and exposure to unreasonable temperatures or conditions. This includes damage caused by misusing essential oils or water treatments and cleaning solutions.
• Damage resulting from inadequate packaging or carrier mishandling of returned products.
- Incorrect installation or loss of accessories such water tank etc.
• Shipping and transportation costs to and from any place of repair.
- Direct, indirect, special or consequential damages of any kind, including loss of profits or other economic losses.
- Transportation damage of a unit shipped from one of our retailers. Please contact them directly.
This warranty does not cover damages or defects caused by or resulting from failure to conform strictly to Coplax's specifications in connection with the installation, operation, use, maintenance or repair of the Coplax device.
Français
natural_image
Close-up of a white air conditioner unit with control buttons (no visible text or symbols)5.
5.

6.
6.

6.

6.
2.
natural_image
Close-up of a white appliance control panel with buttons and indicator lights (no visible text or symbols)5.
5.
6.
6.
6.
6.
2.


natural_image
Close-up of a white air conditioner unit with control buttons (no visible text or symbols)5.
5.

6.

6.

6.
6.
BESCHRIJVING APPARAAT
7.《WATER FULL》=watertank vol:
natural_image
Close-up of a white air conditioner unit with control buttons (no visible text or symbols)5.
5.
6.
6.
6.
6.
2.

1. INBEDRIJSTELLING/BEDIENING
natural_image
Close-up of a white air conditioner unit with control buttons (no visible text or symbols)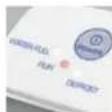
IDRIFTTAGNING/ ANVÄNDNING
natural_image
Close-up of a white air conditioner unit with control buttons (no visible text or symbols)5.
5.
6.

6.

6.

6.
DÔLEŽITÉ BEZPEČNOSTNÉ POKYNY
natural_image
Close-up of a white air conditioner unit with control buttons (no visible text or symbols)5.
5.
6.
6.
6.
6.
2.

What this warranty does not cover:
Parts that normally require replacement.
Damage, failure, loss or deterioration due to ordinary wear and tear, abuse, misuse, improper use, negligence, accident, faulty installation, placement and operation, improper maintenance, unauthorised repair and exposure to unreasonable temperatures or conditions. This includes damage caused by misusing essential oils or water treatments and cleaning solutions.
• Damage resulting from inadequate packaging or carrier mishandling of returned products.
- Incorrect installation or loss of accessories such water tank etc.
- Shipping end transportation costs to end from any place of repair.
- Direct, indirect, special or consequential damages of any kind, including loss of profits or other economic losses.
- Transportation damage of a unit shipped from one of our retailers. Please contact them directly.
This warranty does not cover damages or defects caused by or resulting from failure to conform strictly to Coplax's specifications in connection with the installation, operation, use, maintenance or repair of the Coplax device.
Polski
GRATULACJE! WŁAŚNIE NABYLI PAŃSTWO NADZWYCZAJNY OSUSZACZ POWIETRZA PAVO MARKI STYLIES, W KTÓRYM ZASTOSOWANO NAJNOWSZE ROZWIĄZANIA TECHNICZNE. POPRAWIA ON JAKOŚĆ POWIETRZA W POMIESZCZENIACH, A KORZYSTANIE Z NIEGO JEST ŁATWE I PRZYJEMNE.
ABY UNIKNĄĆ OBRAŻEŃ, POŻARU I USZKODZENIA SPRZĘTU, PRZY UŻYWANIU OSUSZACZA POWIETRZA NALEŻY ZACHOWAĆ SZCZEGÓLną OSTROŻNOŚĆ, PODOBNIE JAK W PRZYPADKU INNYCH ELEKTRYCZNYCH URŻAŻDZEN GOSPODARSTWA DOMOWEGO. PRZED PIERWSZYM UŻYCIEM NAŁEŻY DOKŁADNIE ZAPOZNAĆ SIE Z INSTRUKCJĄ OBSŁUGI, ZWRACAJĄC UWAGĘ NA WYTYCZNE DOTYCZĄCE BEZPIECZEŃSTWA ORAZ WSKAZÓWKI UMIESZCZONE NA URŻADZENIU.
natural_image
Close-up of a white air conditioner unit with control buttons (no visible text or symbols)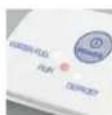


URUCHOMIENIE / OBSŁUGA
Downloaded from www.vandenhore.be