TITAN - Humidifier STYLIES - Free user manual and instructions
Find the device manual for free TITAN STYLIES in PDF.

| Product type | Ultrasonic humidifier |
| Brand | Stylies |
| Model | TITAN |
| Dimensions (L x H x D) | 235 x 200 x 346 mm |
| Weight | 3.2 kg |
| Power supply | 220-240 V / 50 Hz |
| Power consumption | 18-105 W |
| Tank capacity | 5.5 liters |
| Humidification power | Up to 400 g/h |
| Noise level | 23.5 dB |
| Auto shut-off | Yes, in case of water shortage |
| Humidity adjustment | 40-75% RH or continuous mode (Co) |
| Timer | 1 to 12 hours |
| Steam intensity levels | 3 levels (low, medium, high) |
| Pre-heating | Yes, built-in |
| Nozzle rotation | 360° |
| Connected functionality | QR code for information access |
| Maintenance and cleaning | Weekly descaling; descaling cartridge to replace every 1-2 months; Silver Cube to replace per season |
| Safety | Water shortage indicator; auto shut-off; splash protection (not submersible) |
| Spare parts and consumables | Descaling cartridge, Silver Cube, cleaning brush |
| Warranty | 2 years |
Frequently Asked Questions - TITAN STYLIES
User questions about TITAN STYLIES
0 question about this device. Answer the ones you know or ask your own.
Ask a new question about this device
Download the instructions for your Humidifier in PDF format for free! Find your manual TITAN - STYLIES and take your electronic device back in hand. On this page are published all the documents necessary for the use of your device. TITAN by STYLIES.
USER MANUAL TITAN STYLIES
natural_image
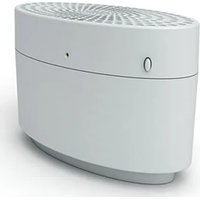
White water purifier device with blue floral decoration, no visible text or symbols on the device itself.stylies ^®
TITAN - HUMIDIFIER
natural_image
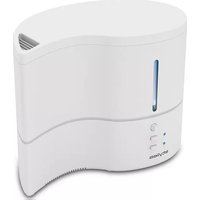
White rectangular water heater with digital display and control buttons (no visible text or symbols)
Instruction Manual English 12
Downloaded from www.vandenborre.be
styles®
TITAN - ULTRASCHALL - ULTRASONIC

natural_image
Line drawing of a hand holding a piece of paper or paper, with no text or symbols present.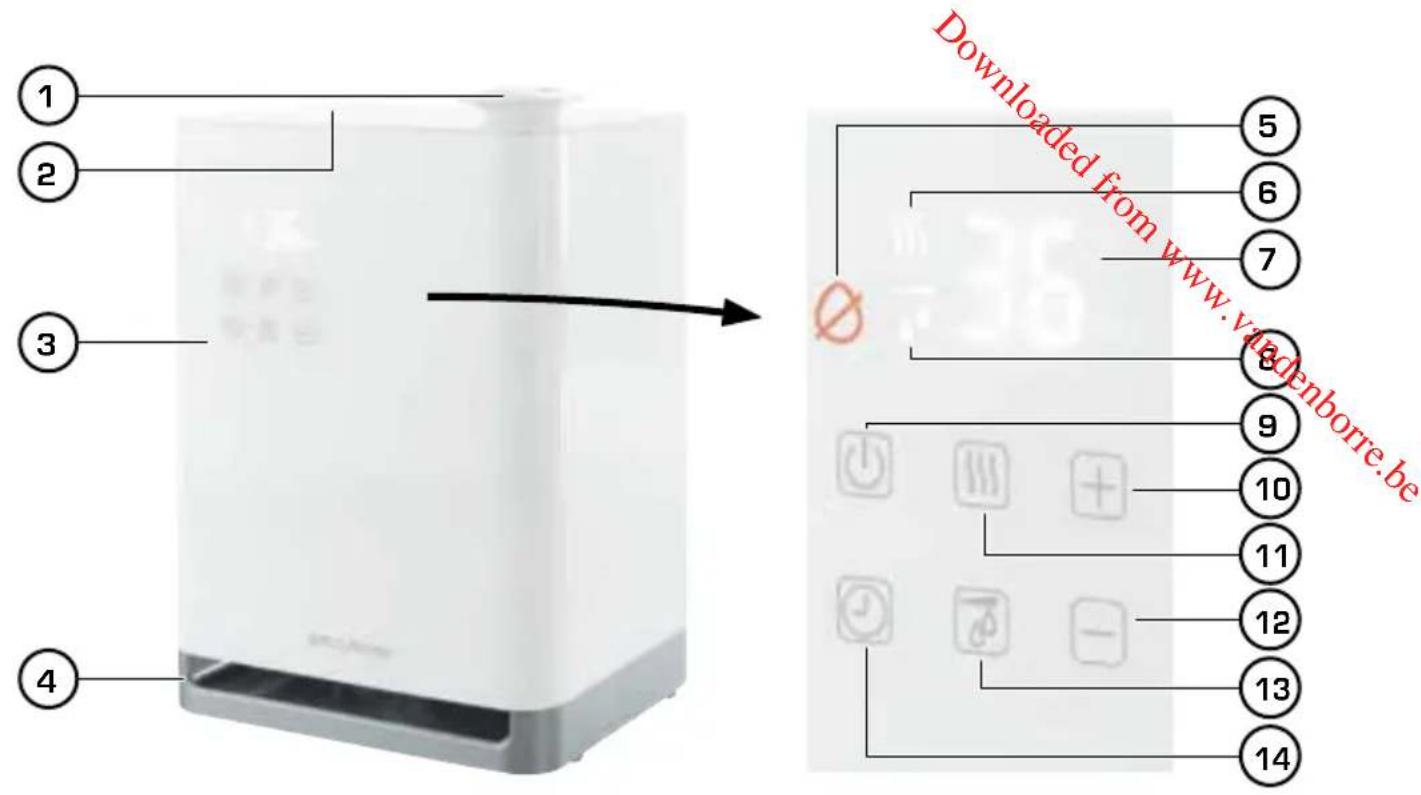
natural_image
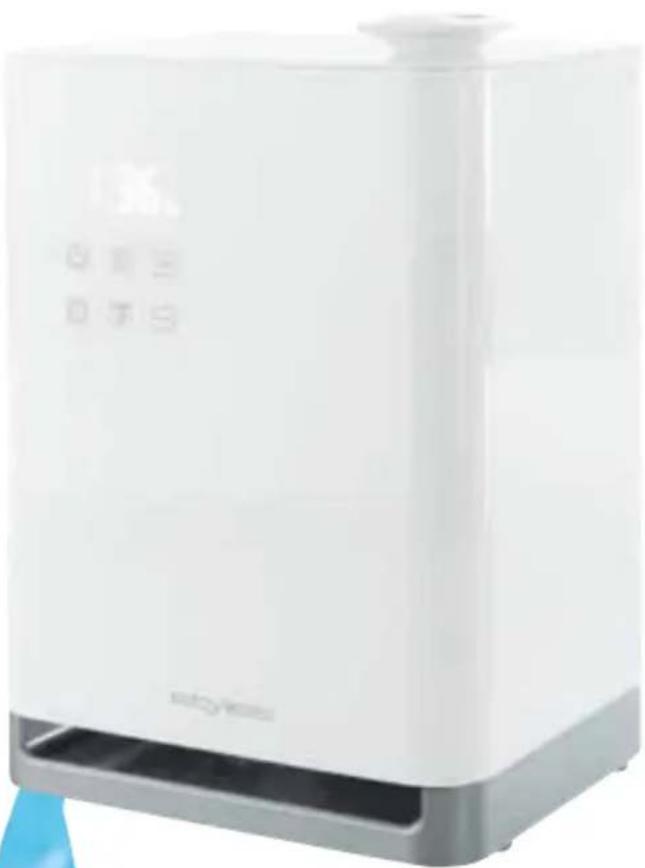
White digital water purifier with a hand inserting a small object into the top container (no visible text or symbols)1./8.
natural_image
3D illustration of a battery with a rotating component and blue circular arrows indicating rotation (no text or symbols)3.


- und fertig!

natural_image
Illustration of a smartphone displaying a green menu bar (no text or symbols)Congratulations! You have just become the owner of the extraordinary Stylies Ultrasonic humidifier TITAN with State-of-the-Art technology. It will bring you a lot of pleasure when using it and it will improve the air quality of your rooms.
As for all electrical household devices, special caution is required when using this humidifier in order to avoid injuries, fire and damages to the device itself. Before you use it for the first time, please read through this instruction manual carefully and pay attention to the safety guidelines and indications printed on the device.
IMPORTANT SAFETY GUIDELINES
- Please read through the operating instructions carefully before you use the appliance for the first time and keep them safely for later reference; if necessary pass them on to the next owner.
- Coplax AG refuses all liability for loss or damage which arises as a result of failure to follow these operating instructions.
- The appliance is only to be used in the home for the purposes described in these instructions. Unauthorised use and technical modifications to the appliance can lead to danger to life and health.
- This appliance can be used by children aged from 8 years and above and persons with reduced physical, sensory or mental capabilities or lack of experience and knowledge if they have been given supervision or instruction concerning use of the appliance in a safe way and understand the hazards involved. Children shall not play with the appliance. Cleaning and user maintenance shall not be made by children without supervision.
- Only connect the cable to alternating current. Observe the voltage information given on the appliance.
• The device must always be unplugged:
- before the device is moved to another place
- before the device is opened or when it is refilled with water
- in the case of malfunction
- before any cleaning
-
after each use.
-
Do not use damaged extension cords.
-
Never carry or pull the device by the power cable.
• Penetrating the housing is strictly prohibited. -
Do not run the power cord over sharp edges and make sure that it does not get trapped.
- Do not pull the plug from the socket with wet hands or by holding on to the power cord.
- Do not use the appliance in immediate vicinity of a bath tub, a shower or a swimming pool (observe a minimum distance of 3 m). Place the appliance such that a person in the bath tub cannot touch the appliance.
- Do not place the appliance near a heat source. Do not subject the power cord to direct heat (such as a heated hotplate, open flames, hot iron sole plates or heaters for example). Protect power cords from oil.
- Do not position the device directly next to walls, curtains or furniture.
- See to it that the appliance is properly positioned to ensure a high stability during its operation and make sure that no one can trip over the power cord.
• The appliance is not splash-proof.
- For indoor use only.
- Do not store the appliance outdoors.
- Store the appliance in a dry place inaccessible to children (pack the appliance).
- Do not add anything to the water (fragrances, essential oils or water fresheners).
- If the power cord is damaged, it must be replaced by the manufacturer or a repair shop authorized by the manufacturer or by similarly qualified persons in order to avoid a hazard.
- Prior to any maintenance, cleaning and after each use, switch off the appliance and unplug the mains cable from the socket.
- Do not place the device directly on the floor. Use a water-proof underlay!
DESCRIPTION OF THE DEVICE

The device consists of the following main components (please see inside cover):
- Mist outlet
- Water tank lid
- Display / controls
- Base
- ∅ «Low water warning»
- «Reheating signal»
- Air humidity, e.g. «36 %RH»
- «Air humidity display»
- Off switch
-
Adjustment «+»
-
Water tank handle
- Water tank
- Base
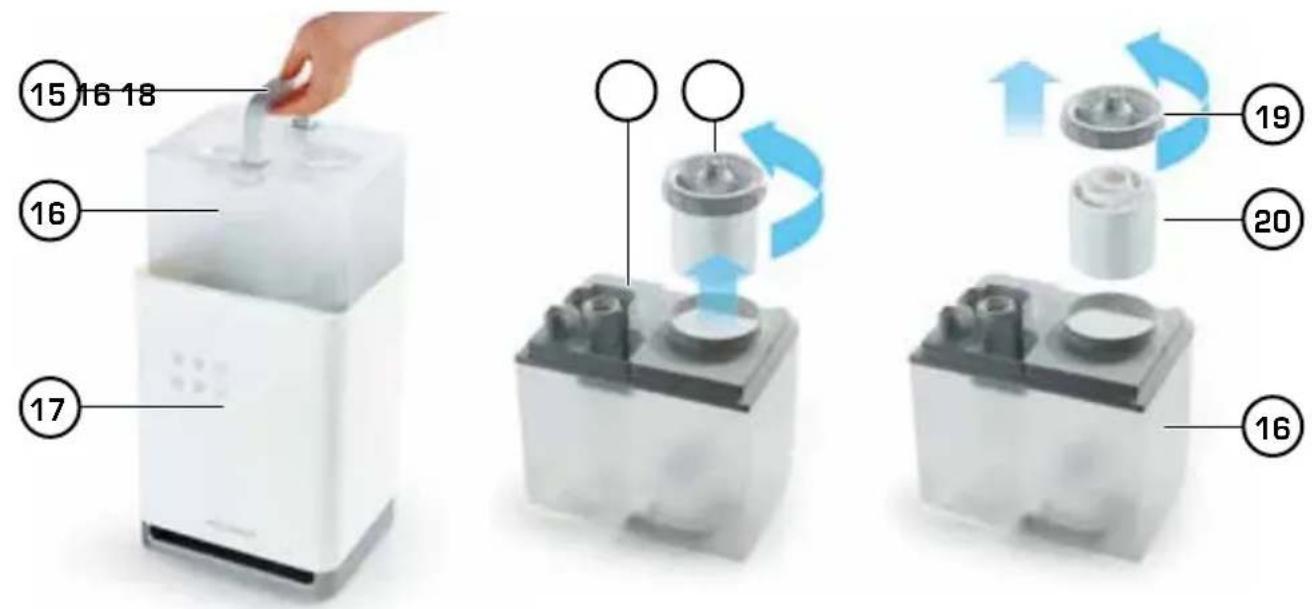
- Descaler cartridge with tank lid
- Tank lid
- Descaler cartridge
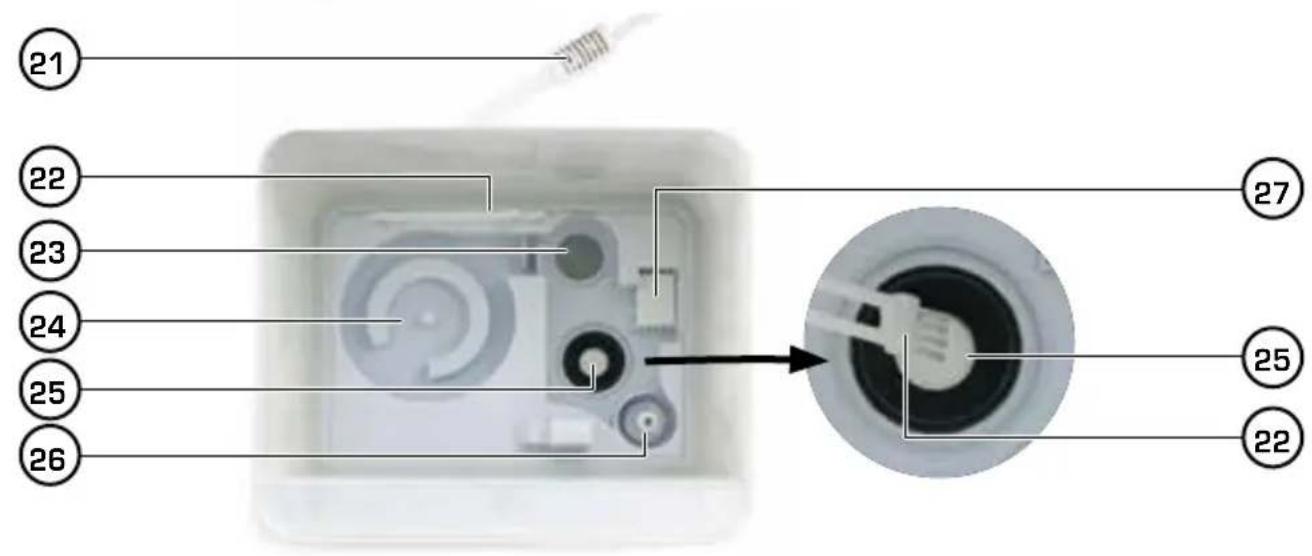
- Power cable with Hygrostat sensor
- Cleaning brush in holder
-
Preheating
-
☑reheating adjustment
- Adjustment «-»
- Air humidity setting (40-75%) or «Co» (= Continuous operation)
-
Timer adjustment for automatic shutdown
-
Water collector
- Ultrasonic membrane. Do not touch: danger of burning
- Water level sensor
- «Silver Cube»
STARTING UP / QUICK GUIDE
This quick guide helps practised users to start the device in a few steps. For detailed start-up instructions, please consult the next chapter.
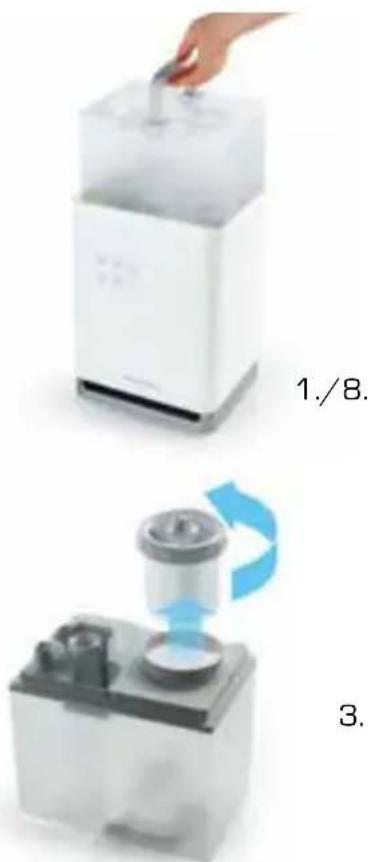
- Place the humidifier on a stable and watertight surface, never on a carpet or parquet floor.
-
Remove the water tank [2]. Hold the water tank firmly by the handle [15] and pull it upward.
-
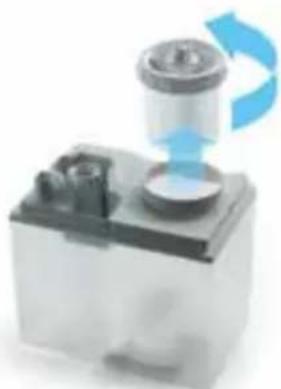
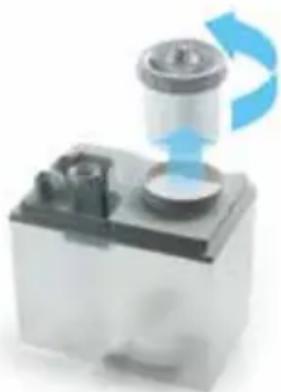
Turn the tank upside down. Unscrew and remove the tank lid [18].
- Fill the tank with no more than 5.5 litres (1.45 US gallons) of cold fresh water.
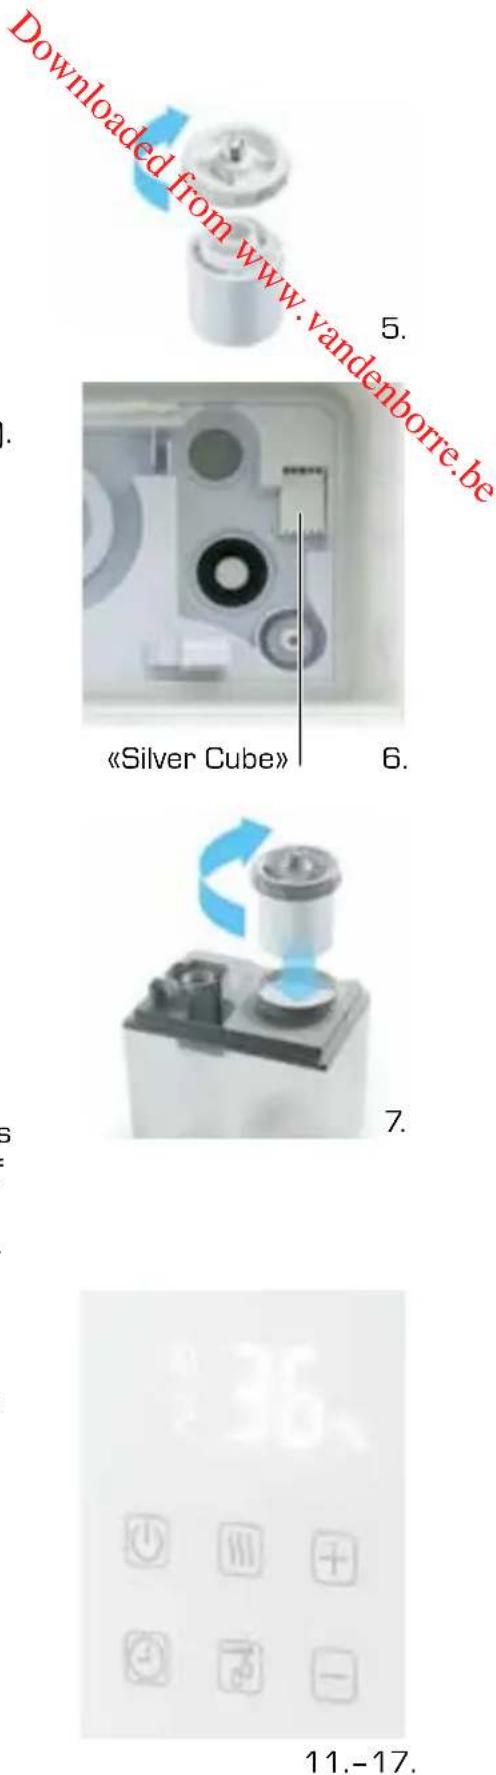
- The descaler cartridge (15) is works-fitted. Please check that it is firmly screwed on to the tank lid (19).
To change the descaler cartridge [20], unpack a new one and firmly screw it onto the tank lid [19].
-
The «Silver Cube» (27) is works-fitted (more details on page 18).
-
Screw the tank lid with cartridge (18) firmly onto the tank.
-
Turn the tank upside down and check for water leakage.
-
Install the tank, and you should hear a bubbling sound (water collector filling).
-
Replace the water tank lid (2).
-
Insert the power plug (the current air humidity is displayed).
-
As soon as the water collector is completely full, the red symbol ∅ in the display goes out. The humidifier is now ready to use.
-
The display [7] lights up when a key is pressed. After 15 seconds it goes dark. The air humidity is also displayed when switched off (to prevent this, pull out the power plug).
-
Press the power key Ⓤ. The display flashes «2» for mist quantity, and mist dispersion starts.
-
To set the humidity: first press key, then set the desired humidity (40-75% rel.) by repeatedly pressing the and keys. We recommend 40-60%. When the display stops flashing, the humidity setting is saved and automatically monitored. Set «Co» for continuous operation without humidity monitoring, but this may cause excess humidity if used too often.
-
Set the desired misting quantity: (3 stages) by repeatedly pressing the hands keys. Turn the mist outlet on top into the room.
-
Press the timer key ☑ to activate the automatic shutdown time: (display flashes «1H»). Adjust the shutdown time in hours with the ☑ and keys (1-12 hours or «-- H» for no timer).
WORLD INNOVATION: ADDIX-INFORMATION-SYSTEM®
It's never been so simple; with one click you can get on your mobile/tablet all the information you need about your new humidifier! Forget about looking for instruction manuals!
This is how it works:
- Your humidifier has a «QR» code label.
- Open a «QR» scanner app on your mobile to scan it in.
-
Depending on Internet connection speed, you'll quickly see all the main information on your screen - always updated!
-


- finished!

natural_image
Illustration of a smartphone displaying a green menu bar (no text or symbols)What is «QR» code?
- The QR (quick response) code is an extended bar code, originally used for logistics, that can be read by a scanner. Here it enables your mobile to display all the information about your humidifier, such as user instructions.
What does the ADDIX-Information-System ^® need?
- A mobile phone or tablet with camera and Internet connection.
- A normal «QR scanner» app or an app with QR scanner (e.g. Codecheck). This may already be pre-installed on some devices.
How to get a QR scanner app?
-
No problem; you can download it on your mobile, e.g.
-
for iPhone, from the «App Store» (press «App Store»)
-
for Android, from «Google Play» (press «Google Play»)
-
Then search for «QR», choose one of the apps offered (e.g. for Apple: «Scan») and install it on your device. That's all!
Tip: You can choose any QR-compatible app, but avoid free offers because they'll annoy you with advertising.
FIRST USE / OPERATION
Please note: never transport the device with a full water tank.
Possible hazards:
- too much water from water tank comes into the Main Base (17), this overloaded water level will cause dramatic reduction of mist output of the device.
• water can easily come out from the Main Base [17]. -
the water tank can fall off from the Main Base (17) and get damaged due to the heavy weight from the water (and water can leak on to the floor).
-
For this reason, Main Base (17) of the Stylies TITAN humidifier should be placed first with empty Water Tank (16) in a suitable location.
- When the device is in the desired location: Fill Water Tank [16] with fresh water and screw the Tank Cover [19] back on firmly and check that it is sealed properly. Place Water Tank on base.
- Plug Power Cable into the power socket. Switch on the device by pressing the On/Off switch 📋 on the Control Panel (3), the display lights up white.
Caution: If the red «Low water» warning ⏻ lights up, the humidifier cannot be switched on. Check if the water tank is full. If so, it may take several minutes to refill the water collector (24) if necessary (the red light then goes out).
- The Mist outlet (1) can be turned 360°. Never point the outlet at walls or furniture, etc. Don't point the mist outlet toward the cable, otherwise the hygrostat can't measure the relative room air humidity properly. The Display panel (7) shows the current relative air humidity in the room, e.g. «36 % RH».
- Select the desired air humidity level by pressing the humidity button ☑ on the Control Panel and adjusting with the + and - buttons. Settings are in 5% stages from 40 % to 75 % rel. air humidity. «Co» means continuous operation without automatic control. We recommend 40-60 % rel. air humidity for living areas.
When the display (7) stops flashing, the setting has been saved and the current air humidity is displayed again. The humidifier starts automatically as soon as the humidity is lower than the setting, and stops when it is higher. During humidification the lamp ♂ on the left of the humidity display lights up.
Note: If «Co» (continuous operation) is set, the humidifier WILL NOT STOP OR START automatically. To avoid excessive humidity, use «Co» for a short time only.
- Set the mist quantity in three stages by pressing ⊕ and ⊖ (1 = low, 3 = high).
- The display lights up as soon as any button is pressed, and goes dark 15 seconds afterwards. The air humidity is displayed even when switched off (to prevent this, pull out the power plug).
- Press the timer key ☑ to activate the automatic shutdown time (display flashes «1H»). Adjust the shutdown time in hours with the and keys (1-12 hours or «-- H» for no timer).
- «Low water» warning: this red LED ⚙, lights up if the water collector is empty or too low. In this case turn off the «On/Off» power switch Ⓤ and fill the tank with fresh water. Then replace the tank in the base and turn the power on again.
Note: When you remove the tank, some water can flow out of the descaler cartridge.
To prevent damage, always turn off the power when the «Low water» warning lights up.
CLEANING PROCEDURE
- Switch off the device and unplug the power cable from the socket before all maintenance work and after each use.
- Never submerge the device in water (this can result in short-circuiting). To clean the device, simply wipe it with a damp cloth and then dry it thoroughly.
- Descale the humidifier as appropriate for the hardness of the water, but at least once a week: First remove the water tank and clean it with a brush. Descale the water collector (24) in the base with a standard descaler and then rinse it thoroughly. Make sure no water penetrates inside. So only fill with descaler/water mixture to a height of 2-3 cm. Reassemble the device completely before use.
• Thoroughly rinse out the water tank on a regular basis. - Replace the Descaler Cartridge (20) every 1-2 months as appropriate for the hardness of the water.
Descaler Cartridge and Water Hardness
- The life-span of the descaler cartridge is dependent on the hardness of the water. This can be tested using the test strip on the reverse side of this instruction manual.
- Unpack the test strip and dip into the water for one second.
- After approx. one minute, the result can be seen on the measuring strip. Some of the green areas will change their colour to pink. The number of pink areas corresponds to the hardness of the water.
• Example: If there are three pink areas, the water has a hardness of «3».
| Number of pink areas | Water hardness | Hardness (°dH) | Descaler cartridge needs replacing after days/litres(approx. for 3 litres per day) |
0/1 soft from 4°dH 120 days / 360 litres
2 medium from 7°dH 60 days / 180 litres
3 slightly hard from 14°dH 40 days / 120 litres
4 very hard from 21°dH 20 days / 60 litres
- Tipp: a simple test can be carried out to determine whether the descaler cartridge is functioning correctly. Hold a small mirror in the mist coming out from the unit for a few seconds. If a white deposit has been left on the mirror (a sign of lime scale), the cartridge needs to be replaced.
Silver Cube
Before installing the water tank, insert the «Silver Cube» in the base in the position (27) indicated (the «Silver Cube» is works fitted).
The «Silver Cube» with its patented technology prevents the growth of bacteria and germs in the water collector. It can be used for a maximum of one season, and must be replaced at the start of the next heating season (i.e. when the weather becomes cold). Despite using the «Silver Cube», you should replace the water on a daily basis.
USEFUL INFORMATION:
Information on how an ultrasonic vaporizer works
How does the ultrasonic vaporizer work? An ultrasonic membrane (25) in the interior of the device causes the water to oscillate, causing very fine droplets of water to be «cataputted off» from the water surface. These droplets mix with the air in the spray chamber and are then blown into the room through a fan as a visible spray. This fine spray evaporates in the warm air in the room, moistening the air that people breathe.
Hygrostat
The standard-tolerance of an integrated hygrostat is +/- 10% . That means the effective relative humidity level can deviate accordingly.
White dust
The ultrasonic vaporizer's method of action causes all substances contained in the water to be sprayed, including calcium carbonate (a cause of lime scale) and minerals. In order to prevent this as far possible, the water is fed through the descaler cartridge before being sprayed. The cartridge retains a large percentage of the substances contained in the water. Tap water varies greatly from region to region in terms of its calcium and mineral content. Some minerals cannot be sufficiently filtered by the descaling resin used. In this case, a white, dust-like deposit is left in the room, which is first visible on electrostatically charged surfaces (such as TV sets). This deposit also occurs when the descaler cartridge needs replacing (see the chapter on «Descaler Cartridge and Water Hardness», page 18).
Tips for water
Do not use water that has been subject to salt-based softening in a descaling system. These systems replace the calcium with salt, which then settles in the room as a white deposit. Clean water must always be used to ensure that the air remains hygienic to breathe. The device, and the water tank in particular, must always be hygienically clean.
Recommendation: always use the «Silver Cube», as this reduces the formation of germs in the water (see page 18).
TECHNICAL DATA
| Dimensions | 235 x 346 x 200 mm (width x height x depth) | ||
| Weight | approx. | 3.2 kg | |
| Mains voltage | 220-240 V / 50 Hz | ||
| Power consumption | 18-105 W | ||
| Humidifying capacity | up to 400 g/h | ||
| Automatic | shutoff | yes | |
| Water tank capacity | 5.5 litres / 1.45 US gallons | ||
| Noise level | 23.5 dB | ||
| EU compliance | CE/WEEE/RoHS | ||
| Technical changes and errors reserved. | |||
TROUBLE-SHOOTING
«Low Water» warning light ☐ (6) does not switch off after tank has been filled with water: The device switches off automatically if there is not enough water. The «No Water» Light ☐ switches on (in red color) to warn you for the refill. To restart the generation of mist, the device must first be switched off and then switched back on again (this resets the device). This is a protective function for the ultrasonic vaporizer.
Device does not switch on although the water tank has been attached and the On/Off ⏻ switch has been pressed:
This is not a malfunction. It takes few minutes till enough water runs from the water tank through the descaler cartridge and into the base. Wait until the red light goes out and the air humidity is displayed (e.g. «36 % RH»), and then press the On/Off switch again.
The water tank is leaking:
Turn the Tank Lid (18) with descaler cartridge anti-clockwise to remove it from the Water Tank. Screw the tank lid and descaler cartridge (20) together again. Make sure the tank cover screws squarely on to the descaler cartridge, or water will leak. Screw the lid with cartridge back on the tank, making sure again that it screws on squarely.
Low performance, no steam output, device not functional:
Perform maintenance as described in the chapter on «Cleaning Procedure».
REPAIRS / DISPOSAL
- Repairs to all electric devices (including replacement of the power cable) may only be performed by authorised experts. Carrying out inappropriate repairs voids the warranty and no liability shall be accepted.
- If the power cable has become damaged, it must be replaced by the manufacturer, an official service partner or a qualified person in order for further damage to be avoided.
- Never operate the device if the cable or the plug is damaged, if the device has malfunctioned or if the device has been dropped or damaged in any other way (i.e. with cracks or breakages to the casing).
- Do not use any sharp, abrasive objects or corrosive chemicals.
- Any old devices must be immediately rendered unusable (unplug power cable) and taken to the appropriate waste collection point.
This device must not be disposed of with household refuse. Please dispose of this device at the appropriate waste collection centre. Collecting and recycling electrical and electronic waste saves valuable resources. - The packaging material is recyclable. Dispose of the packaging in an environmentally friendly way and ensure that it is taken to a collection centre for recyclable materials.
- If electrical devices are disposed of in an unregulated way, the effects of weathering can cause hazardous substances to contaminate the groundwater and the food-chain or can result in a burden on flora and fauna for years to come.
TWO-YEAR WARRANTY
For the warranty period of 2 years after the purchase of the appliance, we will repair or replace with a refurbished product (at our option), without any cost to you for either the parts or labor, any machine or part that proves to be defective in materials or workmanship.
EXCEPT FOR THE WARRANTY PROVIDED ABOVE, Coplax DISCLAIMS ANY AND ALL OTHER IM PLIED WARRANTIES AND ANY WARRANTY OF MERCHANTABILITY OR FITNESS FOR A ARTICULAR PURPOSE WITH RESPECT TO THE PRODUCT FOR ANY PERIOD AFTER THE EXPIRATION. Coplax will, at its sole discretion, repair or exchange a product under warranty. NO credit will be issued. The remedies described above are your sole remedies in the event of any breach of the warranty provided above.
Who is covered:
The original owner of a privately-owned Coplax appliance who can provide a dated proof of purchase in the form of an invoice or receipt is covered. The warranty is not transferable. The original dated proof of purchase (a copy needs to be faxed, e-mailed, mailed) prior to returning the unit. Provide the model number of your appliance and a detailed description (preferably typed) of the problem with the item. Enclose your description in an envelope and tape it directly to the appliance before the box is sealed. Do not write anything on or alter in any way the original box.
What this warranty does not cover:
Parts that normally require replacement, such as demineralization cartridges, «Silver Cube», active carbon filters, water wick filters and any other consumable item that needs regular replacement except for material or workmanship defects.
• Damage, failure, loss or deterioration due to ordinary wear and tear from abuse, misuse, neg-
- ligence, accident, faulty installation, placement and operation, improper maintenance, unauthorized repair, exposure to unreasonable temperatures or conditions. This includes damages caused by misusing essential oils or water treatment and cleaning solutions.
• Damage resulting from inadequate packaging or carrier mishandling of returned products.
- Misplacement or loss of accessories such as nozzle, fragrance capsule, water tank cap etc.
• Shipping and transportation costs to and from any place of repair.
- Direct, indirect special or consequential damages of any type, including loss of profits or other economic loss.
- Transportation damage of a unit shipped from one of our retailers. Please contact them directly.
This Warranty does not cover damages or defects caused by or resulting from failure to conform strictly to Coplax's specifications in connection with the installation, operation, use, maintenance, or repair of the Coplax appliance.
natural_image
White digital water purifier with a hand inserting a small container into its top (no text or symbols visible)1./8.

natural_image
3D illustration of a mechanical device with blue directional arrows indicating motion or flow (no text or symbols)3.
natural_image
Close-up of a mechanical component with a blue curved arrow indicating rotation or compression (no text or symbols visible)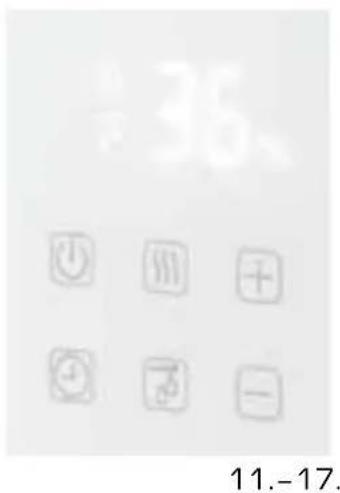
NOUVEAUTÉ MONDIALE : LE SYSTÈME D'INFORMATION ADDIX-INFORMATION-SYSTEM®
natural_image
Illustration of a smartphone with green horizontal lines on screen (no text or symbols)natural_image
Two-step diagram showing a hand placing a component into a white appliance, with blue arrows indicating rotation (no text or symbols)


natural_image
Illustration of a smartphone with green horizontal lines on screen (no text or symbols)BESCHRIJVING APPARAAT

natural_image
White digital water dispenser with a hand inserting a small container (no visible text or symbols)1./8.
natural_image
Mechanical component with blue directional arrows indicating motion or rotation (no text or symbols)3.


- en klaar!

natural_image
Illustration of a smartphone displaying a green menu bar (no text or symbols)Wat is een QR-code?


- Så lätt är det!

natural_image
Illustration of a smartphone with green horizontal lines on screen (no text or symbols)Vad är en «QR»-kod?


- Hotovo!
natural_image
Illustration of a smartphone with green horizontal lines on screen (no text or symbols)Co je «QR» kód?
DÔLEŽITÉ BEZPEČNOSTNÉ POKYNY


- Hotovo!

natural_image
Illustration of a smartphone with green horizontal lines on screen (no text or symbols)Čo je «QR» kód?
natural_image
Two-step diagram showing a hand placing a small object into a white appliance, with blue arrows indicating rotation or change (no text or symbols present)- i gotowe!

natural_image
Illustration of a smartphone with green horizontal lines on screen (no text or symbols)Downloaded from www.vandenborre.be
Downloaded from www.vandenborre.be