FR 2446 - Deep fryer SEVERIN - Free user manual and instructions
Find the device manual for free FR 2446 SEVERIN in PDF.

| Product Type | Oil-free fryer (air fryer) |
| Brand | SEVERIN |
| Model | FR 2446 |
| Maximum capacity (frozen fries) | 1 kg |
| Adjustable temperature | 70 °C to 200 °C |
| Timer | Up to 8 h (dehydration) |
| Automatic programs | 8 programs (fries, meat, poultry, fish, shrimp, whole poultry, pizza, dehydration) |
| Additional functions | Memory function, manual temperature and time selection, interior light |
| Included accessories | Frying basket, rotating basket, rotisserie spit, 3 racks, drip tray, handles |
| Basket material | Non-stick coating |
| Power supply | 220-240 V~, 50/60 Hz |
| Power | 1500 W (estimated) |
| Dimensions (W x D x H) | Approx. 30 x 35 x 30 cm (estimated) |
| Weight | Approx. 5 kg (estimated) |
| Cleaning of accessories | Dishwasher safe or wash with soapy water |
| Cleaning of housing and cavity | Damp cloth |
| Removable door | Yes, for easy cleaning |
| Safety | Automatic shut-off, hot surface warning, child safety (8+ years) |
| After-sales service | SEVERIN customer service for repairs |
| Repairability | Spare parts available through customer service |
Frequently Asked Questions - FR 2446 SEVERIN
User questions about FR 2446 SEVERIN
0 question about this device. Answer the ones you know or ask your own.
Ask a new question about this device
Download the instructions for your Deep fryer in PDF format for free! Find your manual FR 2446 - SEVERIN and take your electronic device back in hand. On this page are published all the documents necessary for the use of your device. FR 2446 by SEVERIN.
USER MANUAL FR 2446 SEVERIN
natural_image
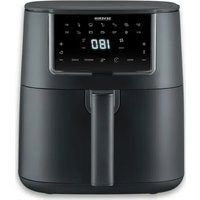
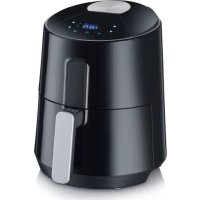
Exterior view of a black SEVERIN air fryer with digital display and transparent interior (no text or symbols on device)ART.-NO. FR 2446
GB Instructions for use
FR Mode d'emploi
text_image
Diagram showing various kitchen utensils and icons with labels like 'MIN', 'CO', and directional symbols.| Technische Daten / Technical Data / Caractéristiques techniques / Technische gegevens /Datos técnicos / Dati tecnici / Tekniske data / Tekniska data / Tekniset tiedot /Dados técnicos / Dane techniczne / Τεχνικά χαρακτηριστικά | |
| Art.Nr. / Item no. / Art. n° / Art.nr. / Nr. ° Art. / Num. art. /Artikelnr. / Art.nr. / Tuotenro / N.° Art.° / Nr art. / Αρ. πρ. | FR 2446 |
| Leistungsaufnahme / Power consumption / Puissance absorbée / Stroomverbruik /Consumo de energía / Potenza assorbita / Strømforbrug / Prestandaupptagning /Ottoteho / Consumo energético / Pobór mocy / Ισχύς εισόδου | 2000 W |
| Spannung/Frequenz / Voltage/Frequency / Tension/Fréquence / Spanning/frequentie /Tensión/frecuencia / Tensione/Frequenza / Spænding/Frekvens / Spänning/Frekvens /Jännite/taajuus / Tensão/frequência / Napięcie/częstotliwość / Τάση/Συχνότητα | 220-240 V~50-60 Hz |
| Volumen Garraum / Cooking chamber volume / Volume de la cavité de cuisson / Volume gaarruimte /Volumen de la cámara de cocción / Volume della camera di cottura / Volumen ovnrum /Volym tillagningsutrymme / Kypsennystilan tilavuus / Volume da câmara de cozedura /Objętość przestrzeni obróbki termicznej / Όγκος θαλάμου μαγειρέματος | 11 l |
Heißluftfritteuse
Before using the appliance, read the following instructions carefully and keep this manual for future reference. The appliance must only be used by persons familiar with these instructions.
Connection to the mains supply
The appliance should only be connected to an earthed socket installed in accordance with the regulations. Make sure that the supply voltage corresponds with the voltage marked on the rating label.
This product complies with all binding CE labelling directives.
Familiarisation
- Operating display
- Cooking chamber
- Mounting bearing for rotary spit
- Drainer
- Power cord with plug
- Appliance door
- Grill rack
- Grating, 3 pieces
- Handle for rotating basket and spit
- Rotating basket
- Rotary spit
- Handle for frying basket
- Frying basket
Important safety instructions
- In order to avoid hazards, repairs to this electrical appliance or its power cord must be carried out by our customer service. If repairs are needed, please send the appliance to our customer service department (see appendix).
- Before cleaning the appliance, ensure it is disconnected from the power supply and has cooled down completely.
• To avoid the risk of electric shock, do not clean the housing or power cord with water and do not immerse them.
- Clean the inserts after each use in the rinsing water and dry thoroughly or
clean in the dishwasher.
- For detailed information on cleaning the appliance, please refer to the section Cleaning and care.
- The appliance is not intended to be operated by means of an external timer or separate remote-control system.
- Place the appliance freely on a stable, heat-resistant, splash-proof surface.
- Attention! The cooking chamber is marked with the warning sign “Hot surfaces” which indicates that there is a risk of burns.
- The cooking chamber and also the appliance door, the inserts and the food get hot.
- Only handle all inserts with suitable oven mitts.
- Only remove and insert the frying basket, rotary basket and spit from the appliance using the respective handle.
- Do not touch the food until it has cooled down a little.
- Only place all accessories on heat-resistant surfaces.
- Hot steam escapes from the ventilation slots on the back of the appliance and when the appliance door is opened. Do not reach or bend over the appliance!
- The appliance is intended to be used in private households.
- staff kitchens in shops, offices and other similar working environments, - agricultural working environments, - by customers in hotels, motels etc. and similar accommodation,
- it must not be used in bed and breakfasts, for example.
- This appliance may be used by children (at least 8 years of age) and by persons with reduced physical, sensory or mental capabilities, or lacking experience and knowledge, provided they have been given supervision or instruction concerning the use of the appliance and fully understand all dangers and safety precautions involved.
- Children must not be permitted to carry out any cleaning or maintenance work on the appliance unless they are supervised and at least 8 years of age.
- Children must not be permitted to play with the appliance.
- The appliance and its power cord must be kept well away from children under 8 at all times.
- Caution: Keep any packaging materials well away from children - such materials are a potential source of danger, e.g. of suffocation.
- Only operate the low fat fryer under supervision.
- Do not operate the low fat fryer without a drip tray.
- Only use the low fat fryer with the inserts supplied.
- Every time the appliance is used, the main body including the power cord as well as any attachment fitted should be checked thoroughly for any defects. Should the appliance, for instance, have been dropped onto a hard surface, or if excessive force has been used to pull the power cord, it must no longer be used: even invisible damage may have adverse effects on the operational safety of the appliance. In this case, please contact our customer service.
- Do not place the appliance underneath any wall-cupboards or hanging objects, nor directly by a wall or in a corner.
- Keep a minimum distance of 15 cm on all sides.
- Set up the appliance so that the air outlet opening on the back of the unit does not point at objects that are sensitive to heat, grease or moisture, such as wallpaper, glass panes, furniture walls, etc.
- Ensure that no inflammable materials are stored in the vicinity.
- Caution: Do not cover the ventilation slots.
- Caution: Do not allow the appliance or its power cord to touch hot surfaces or to come into contact with any heat sources. Do not allow the power cord to hang free; the cord must be kept well away from hot parts of the appliance.
- Let the appliance cool down sufficiently before moving it.
· Always remove the plug from the wall socket - after use,
- in case of any malfunction, and
- before cleaning the appliance.
- When removing the plug from the wall socket, never pull on the power cord; always grip the plug itself. Never touch the mains plug with wet hands.
- Do not operate the appliance with wet hands.
- Do not use metal kitchen utensils when loading and unloading food into the frying basket to avoid scratching the coating.
- No responsibility will be accepted if damage results from improper use, or if these instructions are not complied with.
Intended use
- This appliance must only be used for cooking food. Any other use must be considered improper and may lead to personal injuries or material damage.
- Unlike conventional deep-fryers, this appliance is not intended to be used with oil or fat.
- Use the appliance indoors only.
Before using for the first time
- Before using the appliance for the first time, remove any remaining packaging materials and stickers.
- Heat the appliance with the frying basket to 200°C for 30 minutes without contents to allow the appliance's own odour to dissipate (see "Cooking by manually setting the time and temperature").
- Ensure adequate ventilation by opening windows or balcony doors.
- Then clean the appliance and the inserts as described under Cleaning and care.
Operating display
 | Display - Automatic programmes |
 | Selector keys - Temperature higher / lower |
 | Light selection button |
 | Automatic programme selection button & saving automatic programme changes (memory function) |
 | On/Off & Start/Stop selection button |
 | Rotation selection button |
 | Time higher / lower selection buttons |
 | Temperature shown in the display |
 | Remaining time shown in the display |
 | Heating up shown in the display During the frying process, the symbol lights up repeatedly to indicate that the appliance is heating up. |
 | Frying/hot air shown in the display |
Insert selection
The following inserts are available for the various applications:
Frying basket
- For the preparation of all types of fried food
Rotating basket
• Particularly suitable for french fries, vegetables, etc.
- Fill in the food to be cooked and close the flap.
- Place the loaded rotating basket on the handle.
- Place the rotary basket with the left side in the drive and insert it with the right side in the bearing mount.
- After starting the appliance, the rotation of the rotary basket must be started by pressing the button to start it.
Rotary spit
- For preparing whole grilled chickens or rolled roasts.
- Chicken/roll roasts of max. 1 kg can be prepared.
- Push the skewer through the centre of the chicken/roll roast and secure the meat with the clamps. The meat must not touch the inside of the cooking chamber.
- Fix protruding parts of the food (e.g. wings of the chicken) with roulade needles or similar.
- Place the loaded spit on the handle.
- Place the rotating spit with the left side in the drive and insert it with the right side in the holder of the bearing.
- After starting the appliance, the rotation of the spit must be started by pressing the ○ button to start it.
Grill rack
• For preparing pizza, rolls, baguettes
- Fit the grill grate and push it into the centre of the appliance.
Gratings
• For drying fruit and vegetables
- Cut fruit and vegetables into slices of max. 5 mm thickness.
- Load the grids and push them into the appliance.
Switch on the cooking chamber lighting
- During preparation, the interior lighting can be switched on or off by pressing the button to switch the interior lighting on or off.
• After some time, the lighting switches off again. - When the door is opened, the lighting switches on automatically.
Preparing the unit
- Always place the unit on a dry, level, non-slip and heat-resistant surface impervious to contact with the rubber feet.
- Prepare the food to be air-fried.
- Insert the plug into the socket. The display symbols flash briefly and the button lights up.
- Place the drip tray on the bottom of the cooking chamber.
- Insert the selected accessories into the appliance. If using the rotating basket, fill it with the food beforehand and close the flap.
- Switch on the low fat fryer by pressing the button for 2 seconds! To switch off, press it again for 2 seconds.
If the appliance is not being used, it will switch off automatically after a short time.
Using automatic programmes
| Symbol Food Attachment Tips | Recommended | amount | Temperature Time | ||
 | Chips (frozen) Rotary basket or deep-frying basket | Max. 1 kg | 400 – 750 g | 180 °C 30 min | |
 | Meat Grill rack 500 – 800 g 180 °C 20 min | ||||
 | Chicken pieces (fresh) | Frying basket Turn once 400 – 800 g | 180 °C 30-35 min | ||
 | Fish Grill grate or frying basket | 500 – 800 g 180 °C | 18 min | ||
 | Shrimps Grill grate or frying basket | Prepare breaded shrimps in the rotating basket | 500 – 800 g 180 °C | 15 min | |
 | Chicken (whole, max. 1.5 kg) | Rotary spit 500 – 1000 g | 200 °C 60 min | ||
 | Pizza Grill rack | Turn once 1 frozen pizza | 180 °C 10 min | ||
 | Dry fruit | Gratings | 200 – 300 g | 70 °C 8 h | |
- Proceed as described under Preparing the unit (1-7) and tap the Ⓤ key.
The first automatic programme shows on the display.
- Keep tapping the ⏱ key until the desired automatic programme is shown. Temperature and time alternate in the display.
Hint:
To adjust the temperature and time settings individually, press the ∧V or ∧V keys to set the time resp. temperature.
The Memory function allows for permanently saving changes to the automatic programme. This is done by keeping the ⏱ key pressed for approx. 2 seconds. 2 beep signals confirm that the setting has been saved. The saved value is confirmed by a signal tone.
- Tap the ⚠️ key.
The food is now being cooked. The display changes between temperature and remaining running time. Audible beeps indicate that the pre-set processing time has elapsed.
- The ventilation of the appliance continues for some time and 00 lights up in the displa.
Remove the inserts from the low fat fryer. Only remove all inserts from the appliance using suitable oven mitts or the respective handle.
Attention!
To open the flap of the rotating basket, use the handle part of the handle.
- Pour or place the food in a heat-resistant container or on a heat-resistant plate.
- Let the inserts and the appliance cool down.
- Remove the plug from the wall socket.
- Clean the inserts and the cooking chamber as described in "Cleaning and care"
Using the manual temperature / time selection
- Proceed as described under Preparing the unit (1-7).
- Use the _L keys to adjust the minutes.
- Use the _0 keys to adjust the temperature.
- Tap the ⚠key. The display alternates between temperature and remaining running time.
The food is now being cooked. Audible beeps indicate that the pre-set processing time has elapsed. - Proceed as described in the section Using automatic programmes, steps 4-9.
Useful hints for air-frying
- You can prepare your food using the basic automatic programme settings, or adjust the settings according to your own requirements.
- Note that the cooking times listed are only approximate. Depending on the type of food, the cooking times and temperatures may have to be adjusted.
- With larger quantities, the cooking time increases. We recommend frequent turning of the food.
Tip!
When preparing frozen pizza, the pizza must be turned halfway through to ensure even cooking.
• If the food turns out too dark, try lowering the temperature first, before shortening the cooking times.
- For nutritious, healthy deep-frying we recommend to use a temperature setting of no higher than 170 °C when deep-frying amylaceous food, i.e. food with a higher-than-average starch content. With the reduced frying temperature, and with an equally reduced amount of food in the frying basket, the build-up of substances detrimental to health is limited to a minimum.
Cleaning and care
- Before cleaning, always unplug the appliance and allow the low fat fryer to cool down thoroughly.
- Caution: To avoid the risk of electric shock, do not
clean the outside of the fryer or its power cord with any liquids and do not immerse either of them in water.
- Do not use sharp or abrasive cleaning agents to avoid scratching the housing and the non-stick coating on the frying basket and drip tray.
- Clean all removable inserts in the rinsing water and dry thoroughly or clean in the dishwasher.
- Wipe the housing and the cooking chamber with a damp cloth.
• The appliance door can be removed for easier cleaning.
• To do this, open the door.
- Slide the slider on the door hinge (←OPEN) to the left and remove the door upwards.
- Wipe the door with a damp cloth. Do not immerse in water!
- Replace the dry door.
• The unit cannot be switched on without the door.
Disposal

Devices marked with this symbol must be disposed of separately from your household waste, as they contain valuable materials which
can be recycled. Proper disposal protects the environment and human health. Your local authority or retailer can provide information on the matter.
Troubleshooting
| Problem Possible cause | Solution | |
| The appliance will not switch on. | The appliance is not plugged in. Insert | the mains plug into the socket. |
| The food has not become cooked. | Too much food was filled in. Fill in less | food. |
| The preparation time was too short. Re | -cook the food for a few minutes and set a longer run time next time. | |
| The temperature was too low. Cook the | food for a few minutes and set a higher temperature the next time. | |
| The food did not get crispy. | Food was used that is not suitable for preparation in the low fat fryer. | Only use food that is suitable for the low fat fryer. |
| Moisture from the last preparation has remained in the frying basket. | Clean and dry the frying basket after each use. | |
| Chips made from fresh potatoes are not crispy. | The chips lack oil. Mix the potato pieces | together with a tablespoon of oil in a bowl before cooking. |
| The fresh potato pieces were too moist. | Pat the potato pieces dry before cooking in the low fat fryer. | |
| The potato pieces were too big. Cut the | fresh potatoes into smaller pieces. |