
FR 2462 - Deep fryer SEVERIN - Free user manual and instructions
Find the device manual for free FR 2462 SEVERIN in PDF.

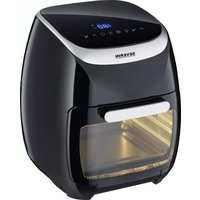
| Product Type | Air fryer |
| Brand | Severin |
| Model | FR 2462 |
| Number of automatic programs | 12 |
| Temperature range | 60 °C to 200 °C |
| Maximum timer | 60 minutes |
| Special functions | Memory (2 profiles), Delayed start, Shake, Keep warm |
| Basket capacity | MAX mark (not specified in liters) |
| Power supply | 220-240 V, 50/60 Hz |
| Power | Not specified |
| Display type | Digital screen |
| Basket material | Non-stick ceramic coating |
| Cleaning | Removable parts dishwasher safe |
| Safety | Hot surface warning, auto shut-off at end of cooking, cooling fan |
| Included accessories | 2 frying baskets with basket inserts |
| Additional information | Oil-free use, suitable for frozen fries, meat, fish, vegetables, etc. |
| Warranty | See separate warranty booklet |
Frequently Asked Questions - FR 2462 SEVERIN
User questions about FR 2462 SEVERIN
0 question about this device. Answer the ones you know or ask your own.
Ask a new question about this device
Download the instructions for your Deep fryer in PDF format for free! Find your manual FR 2462 - SEVERIN and take your electronic device back in hand. On this page are published all the documents necessary for the use of your device. FR 2462 by SEVERIN.
USER MANUAL FR 2462 SEVERIN
ART.-NO. FR 2462
GB Instructions for use
FR Mode d'emploi
Before using the appliance, read the following instructions carefully and keep this manual for future reference. The appliance must only be used by persons familiar with these instructions.
Connection to the mains supply
The appliance should only be connected to an earthed socket installed in accordance with the regulations. Make sure that the supply voltage corresponds with the voltage marked on the rating label.
This product complies with all binding CE labelling directives.
Familiarisation
- Casing
- Operating display
- Power cord with plug
- Handle/frying basket
- Frying basket with basket insert
- Nameplate (appliance underside)
Important safety instructions
- In order to avoid hazards and to comply with safety regulations, any repairs to the appliance and the power cord must only be carried out by our customer service. If repairs are needed, contact our customer service by phone or email (see our service addresses in the separate warranty booklet or on www.severin.de).
- Before cleaning the appliance, ensure it is disconnected from the power supply and has cooled down completely.
- To avoid the risk of electric shock, do not clean the housing or power cord with water and do not immerse them.
-
Clean the removable parts in hot rinsing water after each use and dry thoroughly.
• Refer to the Cleaning and care section for detailed cleaning instructions. -
The appliance is not intended to be operated by means of an external timer or separate remote-control system.
- Place the appliance on a stable, heat-resistant work surface impervious to splashes and stains, with sufficient space around it.
- Warning! Risk of burns! The “Hot surface” warning signs found on the slot area of the frying basket and the vents on the appliance’s rear indicate the risk of burns.
- When the basket holder is not in place, never reach into the open appliance.
- Hot steam escapes from the vents on the rear of the appliance ( ) and when the basket holder is removed. Do not reach or bend over the appliance!
- Both the food and the frying basket are hot. Only hold the frying basket by the handle. Leave the food to cool down slightly before touching it.
- Only place the frying basket on heat-resistant surfaces.
-
This appliance is intended for domestic or similar applications, such as the
-
staff kitchens in shops, offices and other similar working environments,
- agricultural working environments,
- by customers in hotels, motels etc. and similar accommodation,
- in bed-and breakfast type environments.
Children under 8 must not be
permitted to operate this appliance.
- Older children of 8 or more, however, may operate the appliance if they are under constant supervision.
- The appliance may only be used by persons with reduced physical, sensory or mental capabilities, or lacking experience and knowledge, if they have been given supervision or instruction concerning the use of the appliance and fully understand all dangers and safety precautions involved.
- Children must not be permitted to play with the appliance.
- Children must not be permitted to carry out any cleaning or maintenance work on the appliance unless they are supervised.
- Children under the age of 8 must be kept away from the appliance and its power cord, especially during use and when the appliance is cooling down.
- Caution: Keep any packaging materials well away from children - such materials are a potential source of danger, e.g. of suffocation.
- Do not leave the deep fryer unattended while in use.
- Do not operate the low fat fryer without the basket insert in the frying basket.
- Every time the appliance is used, the main body including the power cord as well as any attachment fitted should be checked thoroughly for any defects. Should the appliance, for instance, have been dropped onto a hard surface, or if excessive force has been used to pull the power cord, it must no longer be used: even invisible damage may have adverse effects on the operational safety of the appliance. In this case, please contact our customer service.
- Do not place the appliance underneath any wall-cupboards or hanging objects, nor directly by a wall or in a corner.
- Keep a minimum distance of 15 cm on all sides.
- Set up the appliance so that the air outlet opening on the back of the unit does not point at objects that are sensitive to heat, grease or moisture, such as wallpaper, glass panes, furniture walls, etc.
- Ensure that no inflammable materials are stored in the vicinity.
- Caution: Do not cover the ventilation slots.
- Caution: Do not allow the appliance or its power cord to touch hot surfaces or to come into contact with any heat sources. Do not allow the power cord to hang free; the cord must be kept well away from hot parts of the appliance.
- Let the appliance cool down sufficiently before moving it.
· Always remove the plug from the wall socket - after use,
- in case of any malfunction, and
- before cleaning the appliance.
- When removing the plug from the wall socket, never pull on the power cord; always grip the plug itself.
- Never touch the mains plug with wet hands.
- Do not use metal kitchen utensils when loading or removing food from the frying basket to avoid scratching the coating.
- No responsibility will be accepted if damage results from improper use, or if these instructions are not complied with.
Intended use
- This appliance must only be used for cooking food. Any other use must be considered improper and may lead to personal injuries or material damage.
- Unlike conventional deep-fryers, this appliance is not intended to be used with oil or fat.
- Use the appliance indoors only.
Before using for the first time
- Before using the appliance for the first time, remove any remaining packaging materials and stickers. Never remove the identification label.
- Clean the appliance as described in the Cleaning and Care section.
- Let the appliance with the frying basket and basket insert in place heat up to 200 °C for 30 minutes without food to allow the appliance's own odour to dissipate (see Cooking by manually setting the time and temperature).
- Ensure adequate ventilation by opening windows or balcony doors.
- Then repeat the cleaning procedure as described under Cleaning and Care.
Standby
- If the appliance is idle and no button is pressed, it will switch to standby mode.
Operating display
- The operating display can be used to switch the appliance on and off and select the individual functions. The selected functions light up or flash.
- To select the automatic programmes, first press the button MENU
 | Selection buttons for higher / lower temperature |
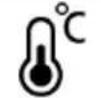
 | Preset temperature display in °C |
  | Time higher / lower selection buttons |
 | Preset time display in minutes |
 | Fan indicator |
 | Shake function indicator |
 | Selection button for automatic programmes |
 | Delayed start function option button |
 | On/Off & Start/Stop selection button |
 | Memory function option button |
 | Memory M1 display |
 | Memory M2 display |
 | Temperature display in °C |
 | Time display in minutes |
 | Shake function option button |
 | Display for automatic programmes |
Preparing the unit
- Always place the unit on a dry, level, non-slip and heat-resistant surface impervious to contact with the rubber feet.
- Prepare the food to be air-fried.
- Remove the frying basket and place the basket insert inside.
- Fill the food into the frying basket. The "MAX" mark must not be exceeded.
- Insert the frying basket into the low fat fryer.
Switch the device on
- Plug the power cord into the power outlet. All display symbols light up briefly, followed by two brief beeps. The option button lights up constantly.
- Tap the option button . The display alternates between the cooking time and temperature settings as they flash.
Attention! If the appliance is inactive after being switched on, it will go into standby mode. To exit standby mode, first manually select the cooking time and temperature.
Cancelling the cooking process before the timer is up: Press and hold the option button ▶ for approx. 3 seconds.
The fan will continue to run for some time after the appliance has been switched off. You cannot adjust any other settings during this time.
Using automatic programmes
Attention! The delayed start function should not be used when cooking perishable food (e.g. meat or fish).
There are 12 automatic programs with time and temperature presets.
- Proceed as described under "Getting started" and "Switching on the appliance".
- After switching on the device, repeatedly tap the option button to switch between the programs. The temperature and time are displayed alternately.
Hint:
You can set the desired temperature and time individually by pressing buttons 1/4 or -/.
- Tap the option button . ▶%
The food is deep-fried. The temperature and the remaining time light up alternately on the display. The option button lights up steadily. When the time has elapsed, a signal tone sounds.
- Remove the frying basket from the low fat fryer by using the handle.
- Unload the food into a heat-resistant container.
- Allow the frying basket with basket insert to cool down.
-
Disconnect the power plug from the socket.
-
Clean the frying basket with basket insert as described in "Cleaning and care"
Automatic program defaults
| Symbol Food Temperature Time | |||
 | French fries (deep-frozen) | 200 °C 20 | min |
 | Bacon 180 °C 10 | min | |
 | Chicken 180 °C 20 | min | |
 | Steak/chops 180 °C | 12 | min |
 | Small cakes in ovenproof cake-tins | 160 °C 15 | min |
 | Keep-warm function | 60 °C 60 | min |
 | Fish 180 °C 10 | min | |
 | Frozen food 180 °C | 15 | min |
 | Shrimps 180 °C 12 | min | |
 | Bread 160 °C 15 | min | |
 | Tofu 160 °C 15 | min | |
 | Vegetables | 160 °C 15 | min |
Using the manual temperature / time selection
Attention! The delayed start function ⏻ should not be used when cooking perishable food (e.g. meat or fish).
- Proceed as described under "Preparing the appliance" and "Switching on the appliance".
The display alternates between the indicator and the temperature preset ^ C and the display and the MIN time preset as they flash. - Use the ⚫ + or — buttons to set the temperature.
- Set the time (in minutes) using the ⏱+or—buttons.
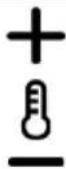
Attention! The temperature can be adjusted in 5 °C increments in the range of 60 to 200 °C.
The time can be adjusted in minute increments ranging from one minute to 60 minutes.
Press and hold the button + or — to quickly adjust the settings forwards or backwards.
-
Tap the option button .
The food is deep-fried. The temperature and the remaining time light up alternately on the display. The option button lights up constantly and indicates together with the display that the appliance is in operation. You can change the cooking time and temperature at any time during cooking by following the instructions above.
When the time has elapsed, a signal tone sounds. -
Proceed as described under "Frying with automatic programme" 4-8.
Pausing the cooking process:
- Tap the option button during cooking.
This interrupts the cooking process, stops the timer, and the option button ⬆ flashes. The fan will keep running for a few seconds after the cooking process has been interrupted.
Resuming the cooking process:
- Tap the option button again to resume the cooking process.
Memory function
You can save two individual programs for cooking time and temperature using the memory function MEMORY.
-
Tap the option button .▶% The display alternates between the cooking time and temperature presets as they flash.
-
Tap the memory function option button MEMORY once to select Memory M1 and twice to select Memory M2. If both memory units are empty, the display shows 180 °C for 15 minutes.
-
Use the button + or to set the desired temperature and time.
-
Press and hold the memory function selector button MEMORY for approx. 3 seconds until a beep sounds to save the setting in the selected memory.
Opening the memory:
-
After switching on the appliance, tap the memory function option button MEMORY once to select Memory M1 and twice to select Memory M2
-
Press the option button ▶% to start the cooking process.
Delayed start function
Attention! This function must not be used when the appliance is left unattended during cooking.
Attention! The delayed start function should not be used when cooking perishable food (e.g. meat or fish).
- Proceed as described under "Getting started" and "Switching on the appliance".
- Set the temperature and time or select the desired cooking program.
- Tap the option button . The display shows 90 MIN.
- Use the buttons to adjust the delayed start time: 10->20->30->60->90->120->150->180
- Tap the option button . ➕ The timer starts the countdown. The option button flashes, and the display shows the remaining time until the program starts. The cooking process starts after the delayed start timer is up.
Attention! If you do not press the option button ▶the appliance remains switched on.
To change the delayed start time, proceed as follows:
-
Tap the option button twice.
The display shows 90 MIN. -
Set the new desired delayed start time and start the cooking process.
Shake function
The shake function reminds you halfway through the cooking time with a flashing symbol and short beeps that the food needs to be rearranged, flipped or shaken over several times during the cooking process. The "Chips" program is an exception. This program notifies you after one third and two thirds of the cooking time.
- Tap the option button before or after starting the program.
The symbol lights up continuously.
The symbol flashes halfway through the cooking time (after one third and two thirds of the cooking time for "Chips"). After the drawer has been removed, the shake function is disabled. When using the "Chips" program, the shake function is disabled after the second notification and after removing the drawer.
Keep-warm function
When the selected program is complete, you can start the keep-warm function.
The keep-warm function only allows you to shorten the time. The temperature is preset to 60 °C and cannot be changed.
- Tap the option button
- Press the option button repeatedly to select the keep-warm function 📄
- Press 🔍 — to shorten the keep-warm time if necessary.

The keep-warm time can be increased back to 60 minutes.
- To start the keep-warm function, press the option button ▶%
The keep-warm time can be adjusted within 60 minutes from the program start.
Cooking finished
After the cooking timer is up, the appliance will beep three times briefly and go into standby mode.
Useful hints for air-frying
- The food can be prepared according to the basic setting of the automatic programmes or according to individual settings.
- Note that the cooking times listed are only approximate. Depending on the type of food, the cooking times and temperatures may have to be adjusted.
- With larger quantities, the cooking time increases. We recommend frequent turning of the food.
- If the food turns out too dark, try lowering the temperature first, before shortening the cooking times.
- For nutritious, healthy deep-frying we recommend to use a temperature setting of no higher than 170 °C when deep-frying amylaceous food, i.e. food with a higher-than-average starch content. With the reduced frying temperature, and with an equally reduced amount of food in the frying basket, the build-up of substances detrimental to health is limited to a minimum.
Cleaning and care
- Before cleaning the appliance, ensure that the low fat fryer disconnected from the power supply and has completely cooled down.
- Attention! Risk of electric shock! To avoid the risk of electric shock, do not clean the outside of the fryer or its power cord with any liquids and do not immerse either of them in water.
- Attention! Avoid using harsh or abrasive detergents that can damage the housing and ceramic coating on the frying basket and basket insert during cleaning.
- Attention! All removable parts can be cleaned in the dishwasher. However, we recommend gentle cleaning by hand as the salt in the dishwasher detergent can damage the non-stick coating if cleaned frequently.
- Remove the basket insert from the frying basket using the silicone handle.
- Clean the frying basket and basket insert in hot rinsing water and dry thoroughly.
- Use a damp cloth to wipe the housing and the slot area for the frying basket.
Disposal

Devices marked with this symbol must be disposed of separately from your household waste, as they contain valuable materials which can be recycled. Proper disposal protects the
environment and human health. Your local authority or retailer can provide information on the matter.
Chère cliente, Cher client,


- ART.-NO. FR 2462
- Connection to the mains supply
- Familiarisation
- Important safety instructions
- Intended use
- Before using for the first time
- Standby
- Operating display
- Preparing the unit
- Switch the device on
- Using automatic programmes
- Hint:
- Using the manual temperature / time selection
- Pausing the cooking process:
- Resuming the cooking process:
- Memory function
- Opening the memory:
- Delayed start function
- Shake function
- Keep-warm function
- Cooking finished
- Useful hints for air-frying
- Cleaning and care
- Disposal
- Chère cliente, Cher client,
Brand : SEVERIN
Model : FR 2462
Category : Deep fryer