DGCCS 1825 - Saw Deltafox - Free user manual and instructions
Find the device manual for free DGCCS 1825 Deltafox in PDF.

| Product type | Battery chainsaw |
| Brand | Deltafox |
| Model | DGCCS 1825 |
| Motor voltage | 18 V |
| Idle speed | 3000 min⁻¹ |
| Cutting speed | 5,6 m/s |
| Weight (without battery and charger) | 3,2 kg |
| Oil tank capacity | 220 ml |
| Blade (guide bar) type | Trilink |
| Chain | Trilink CL15040PB |
| Chain pitch | 3/8\" (9,5 mm) |
| Chain thickness | 1,3 mm |
| Cutting length | Approximately 250 mm |
| Runtime (idle) | 20 – 28 min |
| Sound pressure level (LpA) | 86,2 dB(A) (K=3 dB) |
| Guaranteed sound power level (LWA) | 99 dB(A) |
| Vibrations (ah) | 2,47 m/s² (K=1,5 m/s²) |
| Power supply | 18 V lithium-ion battery (interchangeable) |
| Chain brake | Yes, with brake lever / hand guard |
| Lubrication | Automatic (bio oil) |
| Chain tensioner | Quick tension system |
| Usable materials | Wood only (no plastic, stone, metal, etc.) |
| Intended use | DIY hobby |
| Warranty | 24 months (excluding wear parts) |
Frequently Asked Questions - DGCCS 1825 Deltafox
User questions about DGCCS 1825 Deltafox
0 question about this device. Answer the ones you know or ask your own.
Ask a new question about this device
Download the instructions for your Saw in PDF format for free! Find your manual DGCCS 1825 - Deltafox and take your electronic device back in hand. On this page are published all the documents necessary for the use of your device. DGCCS 1825 by Deltafox.
USER MANUAL DGCCS 1825 Deltafox
10 Verrouillage anti-demarrage
Motorspanning. 18 V=
Deviations from the measurement data of the cutting geometry can lead to an increase of the springback slope of the machine. Increased danger of accident!
Before initial start-up, please read through these operating instructions carefully prior to using the machine. Keep the instructions safe and pass them on to any subsequent user so that the information is always available.
Content
Intended purpose 75
General description 76
Extent of the delivery 76
Function description 76
Overview. 76
Technical Data 77
Notes on safety 77
Symbols 77
General safety instructions for
power tools 79
Safety functions 83
Operation startup 84
Fitting the blade and saw chain 84
Tensioning the saw chain 85
Chain lubrication. 85
Operating. 85
Indicator charge level 86
Removing / inserting the battery.....86
Switching on 86
Checking the chain brake. 86
Checking the oil automatic system...87
Change the blade / sawing chain ....87
Sawing techniques 87
General 87
Bucking. 88
Limbing 88
Felling trees 89
Maintenance and cleaning. 90
Cleaning 90
Sharpening the saw chain 91
Adjusting the chain tension. 92
Starting up a new saw chain. 92
Maintaining the chain bar 92
Maintenance intervals. 93
Storage 93
Waste disposal and environmental
protection 93
Replacement parts/Accessories 94
Guarantee 94
Repair service 94
Trouble shooting 95
Translation of the original EC declaration of conformity 211
Exploded Drawing 217
Service-Center 219
Intended purpose
The cordless chainsaw is constructed for sawing wood only. The saw is not designed for any other types of application (e.g. cutting of brickwork, plastic or food). The chainsaw is designed for employment in the do-it-yourself sector. It was not designed for continuous employment in the commercial sector.
The device is designed for use by adults. Young people over 16 years old may use the chainsaw under supervision only. The manufacturer is not liable for damages, which were caused through use in applications for which it was not designed, or incorrect operation.
This chainsaw is to be used only by one person and only for sawing wood. The chainsaw must be held with the right hand on the rear handle and the left hand on the front handle. Before use, the user must have read and understood all of the information and directions in the operating instructions. The user must wear appropriate personal protective equipment (PPE). The chainsaw is to be used only for sawing wood. Materials such as plastic, stone, metal or wood containing foreign objects (e.g. nails or screws) must not be machined!
General description

The illustration how to handle the appliance can be found on pages 2-4.
Extent of the delivery
Carefully unpack the appliance and check that it is complete:
Scope of Delivery for Prod. No.72030312 Device WITH battery
- Cordless chainsaw
-Chainbar - Saw chain
- Saw bar protection sheath
-
180 ml Bio chain oil
-
1 Battery
- Battery charger
- Instruction Manual rechargeable battery/Charger
- Instruction Manual
Scope of Delivery for Prod. No.72030313 Device WITH battery
- Cordless chainsaw
-Chainbar - Saw chain
- Saw bar protection sheath
- 180 ml Bio chain oil
- 2 Battery
- Battery charger
- Instruction Manual rechargeable battery/Charger
- Instruction Manual
Scope of Delivery for Prod. No.72030314 Device WITHOUT battery
- Cordless chainsaw
-Chainbar - Saw chain
-
Saw bar protection sheath
-
180 ml Bio chain oil
- Instruction Manual
Dispose of the packaging material correctly.
Function description
The cordless chainsaw is fitted with a rapid-action chain-tensioning system and a fast-acting chain brake. An automatic oil dosing regulator ensures continuous chain lubrication. The chainsaw is equipped with various protection fittings for the protection of the user.Refer to the following descriptions for the function of control elements.
Overview

1 Rear handle
Oil filler cap
3 Chain brake handle, front hand guard
4 Chain bar
5 Saw chain
6 Nose sprocket
7 Bumper
8 Front handle
9 Motor (hidden)
10 Safety lock
11 On/off switch
12 Chain catcher (hidden)
13 Fastening bolt for sprocket chain wheel covering
14 Screw for the chain quick-tensioning system
15 Sprocket chain wheel covering
16 Rear hand guard
17 Guide rails for battery
18 Saw bar protection sheath
19 Battery
20 Battery charger
21 Bio chain oil

22 Chain sprocket
23 Coach screw
24 Lug
25 Chain tensioner pin holder
26 Chain tensioner pin

27 Oil level control

28 Oil passages
Technical Data
Cordless chainsaw...DG-CCS 1825
DG-CCS 1825 Set
Rated input voltage. 18 V
Idle time 20-28 min*
ldling speed 3000 min-1
Chain speed v_0 5.6 m/s
Weight
(without battery and charger)..... 3.2kg
Oiltank 220 ml
Chain bar Trilink
Chain Trilink CL15040PB
Chain pitch. 3/8" (9,5 mm)
Chain width 1.3 mm
Teeth of the sprocket chain wheel.....6
Sawing length........................ approx. 250 mm
Acoustic pressure level
(L_pA) 86.2 dB(A); K_pA = 3.0 dB
Noise and vibration values were determined according to the standards and stipulations mentioned in the declaration of conformity.
The stated vibration emission value was measured in accordance with a standard testing procedure and may be used to compare one power tool to another.
The stated vibration emission value may also be used for a preliminary exposure assessment.

Warning: The vibration emission value may differ during actual use of the power tool from the stated value depending on the manner in which the power tool is used.
Try to keep the exposure to vibrations as low as possible. Examples of measures to reduce vibration exposure are the wearing of gloves when using the tool and limiting the working hours. All parts of the operating cycle are to be taken into account in this (for example times in which the electric tool is turned off and those in which even though it is turned on, it is not running under a load).
Notes on safety
This section deals with the basic safety regulations while working with the chainsaw.

Before working with the chainsaw, familiarise yourself with all the controls. Practise handling the saw (by cutting logs to size on a sawhorse) and have the functionality, mode of action, sawing techniques and personal safety equipment explained to you by an experienced user or an expert.
Symbols
Symbols used on the saw

A chainsaw is a dangerous device, which can cause serious or even fatal injuries with incorrect or careless use. Thus, for your own safety and the safety of others, you should always take note of the instructions on safety and, in case of difficulties, consult a specialist for advice.
GB

Read and take note of the operating manual belonging to the machine

Wear personal protective equipment. Basically, wear protective goggles or, even better, face protection, safety helmet, cut-protection

working clothes and ear protection

Use protective clothing

Wear cut-protection gloves

Wear cut-protection safety boots with anti-slip soles.
Always use the chainsaw with both hands.

Caution! Spring-back - Be careful of spring-back of the machine during work.

Do not expose the unit to rain. The device must not be wet, nor should it be operated in a moist environment.

Remove the battery from the unit before servicing it.

Sound power level guaranteed

Sawing length
Machines do not belong with domestic waste.
Graphical symbol beneath the chain sprocket cover:

Observe direction of travel of the saw chain. Caution! Read the operating instructions.
Graphical symbol on the blade:
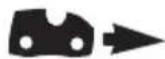
Direction of travel of the saw chain
Graphical symbol on the oil tank cap: Saw chain lubrication.
Graphical symbol on the fixing screw for the chain sprocket cover:
OPEN
CLOSE
Graphical symbol on the chain brake lever:

Chain brake
Symbol on the screw for the chain quick-tensioning system:
loosen

tighten
Symbols used in the instructions

Hazard symbols with information on prevention of personal injury and property damage.

Precaution symbol (explanation of precaution instead of exclamation mark) with information on prevention of harm / damage.

Notice symbol with information on how to handle the device properly.
General safety instructions for power tools

WARNING! Read all safety directions and instructions. Omissions in the compliance with safety directions and instructions can cause electrical shock, fire and/or severe injuries.
Retain all safety directions and instructions for future use.
The term "Power Tools" used in the safety instructions refers to mains-operated power tools (with power cord) and to battery-operated power tools (without power cord).
1) WORK AREA SAFETY
a) Keep work area clean and well lit. Cluttered or dark areas invite accidents.
b) Do not operate power tools in explosive atmospheres, such as in the presence of flammable liquids, gases or dust. Power tools create sparks which may ignite the dust or fumes.
c) Keep children and bystanders away while operating a power tool. Distractions can cause you to lose control.
2) ELECTRICAL SAFETY
a) Power tool plugs must match the outlet. Never modify the plug in any way. Do not use any adapter plugs
with earthed (grounded) power tools. Unmodified plugs and matching outlets will reduce risk of electric shock.
b) Avoid body contact with earthed or grounded surfaces, such as pipes, radiators, ranges and refrigerators. There is an increased risk of electric shock if your body is earthed or grounded.
c) Do not expose power tools to rain or wet conditions. Water entering a power tool will increase the risk of electric shock.
d) Do not abuse the cord. Never use the cord for carrying, pulling or unplugging the power tool. Keep cord away from heat, oil, sharp edges or moving parts. Damaged or entan opergled cords increase the risk of electric shock.
e) When operating a power tool outdoors, use an extension cord suitable for outdoor use. Use of a cord suitable for outdoor use reduces the risk of electric shock. Use of a cord suitable for outdoor use reduces the risk of electric shock.
f) If operating a power tool in a damp location is unavoidable, use a RCD (Residual Current Device) protected supply. Use of an RCD reduces the risk of electric shock.
3) PERSONAL SAFETY

Please note that children, individuals with limited physical, sensory or mental capabilities, those with insufficient experience or knowledge or individuals who are not familiar with the instructions must never be permitted to use the machine. Local regulations may specify an age restriction for the user.
a) Stay alert, watch what you are doing and use common sense when operating a power tool. Do not use a power tool while you are tired or under the influence of drugs, alcohol or medication. A moment of inattention white operating power tools may result in serious personal injury.
b) Use personal protective equipment. Always wear eye protection. Protective equipment such as dust mask, non-skid safety shoes, hard hat, or hearing protection used for appropriate conditions will reduce personal injuries.
c) Prevent unintentional starting. Ensure the switch is in the off-position before connecting to power source and/or battery pack, picking up or carrying the tool. Carrying power tools with your finger on the switch or energising power tools that have the switch on invites accidents.
d) Remove any adjusting key or wrench before turning the power tool on. A wrench or a key left attached to a rotating part of the power tool may result in personal injury.
e) Do not overreach. Keep proper footing and balance at all times. This enables better control of the power tool in unexpected situations.
f) Dress properly. Do not wear loose clothing or jewellery. Keep your hair, clothing and gloves away from moving parts. Loose clothes, jewellery or long hair can be caught in moving parts..
g) If devices are provided for the connection of dust extraction and collection facilities, ensure these are connected and properly used. Use of dust collection can reduce dust-related hazards.
h) Warning! During operation, this electric tool generates an electromagnetic field which, under certain circumstances, may impair the functionality of active or passive medical implants. To reduce the risk of serious or lethal injuries, we recommend that persons with medical implants consult their doctor and the manufacturer of their medical implant before operating the machine.
i) Change your working position regularly. Long use of the equipment can result in vibration-related circulatory disorders in the hands. However, the length of use can be extended by using suitable gloves or taking regular breaks. Note that a personal tendency for poor circulation, low outdoor temperatures, or high gripping forces during work will reduce the length of use.
4) POWER TOOL USE AND CARE
a) Do not force the power tool. Use the correct power tool for your application. The correct power tool will do the job better and safer at the rate for which it was designed.
b) Do not use the power tool if the switch does not turn it on and off. Any power tool that cannot be controlled with the switch is dangerous and must be repaired.
c) Disconnect the plug from the power source and/or the battery pack from the power tool
- before making any adjust -ments, changing accessories, or storing power tools.
- whenever the user no longer remains in the vicinity of the machine.
- before the removal of blockages.
-
before checking, cleaning or working on the machine.
-
after touching a foreign body in order to check the machine for damage.
- for an immediate check if the machine begins to vibrate excessively.
Such preventive safety measures reduce the risk of starting the power tool accidentally.
d) Store idle power tools out of the reach of children and do not allow persons unfamiliar with the power tool or these instructions to operate the power tool. Power tools are dangerous in the hands of untrained users.
e) Maintain power tools. Check for misalignment or binding of moving parts, breakage of parts and any other condition that may affect the power tool's operation. If damaged, have the power tool repaired before use. Many accidents are caused by poorly maintained power tools.
f) Keep cutting tools sharp and clean. Properly maintained cutting tools with sharp cutting edges are less likely to bind and are easier to control.
g) Use the power tool, accessories and tool bits etc. in accordance with these instructions, taking into account the working conditions and the work to be performed. Use of the power tool for operations different from those intended could result in a hazardous situation.
5) CAREFUL HANDLING AND USE OF BATTERY DEVICES
- Charge the batteries only in chargers that are recommended by the manufacturer. Risk of fire if a charger that is suitable for a specific type of battery is used with other batteries.
-
In the power tools, use only the batteries designed for the purpose. The use of other batteries may result in injuries and risk of fire.
-
Keep the unused battery away from paper clips, coins, keys, nails, screws and other small metal objects, which could cause bridging of the contacts. A short circuit between the battery contacts may cause burns or fire.
- If used incorrectly, liquid may leak from the battery. Avoid contact with this. In the event of accidental contact, rinse off with water. If the liquid gets into eyes, seek medical assistance. Leaking battery fluid may cause skin irritations or burns.
6) SERVICE
a) Have your power tool serviced by a qualified repair person using only identical replacement parts. This will ensure that the safety of the power tool is maintained.
7) CHAIN SAW SAFETY WARNINGS:
a) Keep all parts of the body away from the saw chain when the chain saw is operating. Before you start the chain saw, make sure the saw chain is not contacting anything. A moment of inattention white operating chain saws may cause entanglement of your clothing or body with the saw chain.
b) Always hold the chain saw with your right hand on the rear handle and your left hand on the front handle. Holding the chain saw with a reversed hand configuration increases the risk of personal injury and should never be done.
c) Wear safety glasses and hearing protection. Further protective equipment for head, hands, legs and feet is recommended. Adequate protective clothing will reduce personal
injury by flying debris or accidental contact with the saw chain.
d) Do not operate a chain saw in a tree. Operation of a chain saw white up in a tree may result in personal in jury.
e) Always keep proper footing and operate the chain saw only when standing on fixed, secure and level surface. Slippery or unstable surfaces such as ladders may cause a loss of balance or control of the chain saw.
f) When cutting a limb that is under tension be alert for spring back. When the tension in the wood fibres is released the spring loaded limb may strike the operator and/or throw the chain saw out of control.
g) Use extreme caution when cutting brush and saplings. The slender material may catch the saw chain and be whipped toward you or pull you off balance.
h) Carry the chain saw by the front handle with the chain saw switched off and away from your body. When transporting or storing the chain saw always fit the guide bar cover. Proper handling of the chain saw will reduce the likelihood of accidental contact with the moving saw chain.
i) Follow instructions for lubricating, chain tensioning and changing accessories. Improperly tensioned or lubricated chain may either break or increase the chance for kickback.
k) Keep handles dry, clean, and free from oil and grease. Greasy, oily handles are slippery causing loss of control.
1) Cut wood only. Do not use chain saw for purposes not intended. For example: do not use chain saw for cutting plastic, masonry or non
wood building materials. Use of the chain saw for operations different than intended could result in a hazardous situation.
m) Hold the power tool only on the insulated handle surfaces, as the saw chain can come into contact with concealed power lines. Contact between the saw chain and a live wire can make metal parts of the equipment live and cause an electric shock.
8) CAUSES AND OPERATOR PREVENTION OF KICKBACK

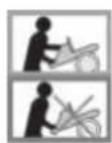
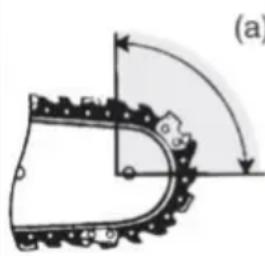
Beware of kickback! Be careful of kickback of the machine during work. There is danger of injury here. You can avoid kickbacks by exercising caution and using a correct sawing technique.
pic 1
Kickback may occur when the nose or tip of the guide bar touches an object, or when the wood closes in and pinches the saw chain in the cut. (see pic 1.b).
Tip contact in some cases may cause a sudden reverse reaction, kicking the guide bar up and back towards the operator Pinching the saw chain along the top of the guide bar may push the guide bar rapidly back towards the operator. (see pic 1/. a). Either of these reactions may cause you to lose control of the saw which could result in serious personal injury. Do not rely ex
clusively upon the safety devices built into your saw. As a chain saw user, you should take several steps to keep your cutting jobs free from accident or injury.
Kickback is the result of tool misuse and/or incorrect operating procedures or conditions and can be avoided by taking proper precautions as given below:
a) Maintain a firm grip, with thumbs and fingers encircling the chain saw handles, with both hands on the saw and position your body and arm to allow you to resist kickback forces. Kickback forces can be controlled by the operator, if proper precautions are taken. Do not let go of the chain saw
b) Do not overreach and do not cut above shoulder height. This helps prevent unintended tip contact and enables better control of the chain saw in unexpected situations.
c) Only use replacement bars and chains specified by the manufacturer. Incorrect replacement bars and chains may cause chain breakage and/or kickback.
d) Follow the manufacturer's sharpening and maintenance instructions for the saw chain. Decreasing the depth gauge height can lead to increased kickback.
RESIDUAL RISKS
Even if properly operating and handling this electric tool, some residual risks will remain. Due to its construction and build, this electric tool may present the following hazards:
a) Cuts
b) Ear damage if working without ear protection.
c) Damage to your health caused by swinging your hands and arms when operating
the appliance for longer periods of time or if the unit is not held or maintained properly.

Warning! During operation, this electric tool generates an electromagnetic field which, under certain circumstances, may impair the functionality of active or passive medical implants. To reduce the risk of serious or lethal injuries, we recommend that persons with medical implants consult their doctor and the manufacturer of their medical implant before operating the machine.

Safety functions
1 Rear grip with hand guard (16)
Protects the hand against branches and boughs in the case of springing away by the chain.
3 Chain braking lever/hand guard
Control system, which stops the saw chain immediately in case of a springback; lever can also be activated manually; protects the left hand of the operator if it slides from the front grip.
5 Saw chain with small spring-back
helps you to catch spring-backs with specially developed control systems.
7 Metal stop claw
Reinforces the stability when vertical cuts are carried out and facilitates sawing.
10 Switch-on block
The switch-on block must be released for switching on the device.
11 On-off switch with safety chain brake
On releasing the On/Off switch, the device immediately switches off.
Operation startup

Always wear protective gloves when working with the chainsaw and employ only original parts. Injury hazard!
Prior to commissioning the device, you must:
- assemble the blade and the sawing chain
- tension the sawing chain
- fill it with biological chain oil
- charge and insert the battery
- test the oil automatics and the operability of the chain brake

Note that the saw can re-oil.
Please note that the saw re-oils after use and oil may leak out if it is stored on its side or on the head. This is a normal process due to the necessary ventilation opening on the upper edge of the tank and does not constitute a reason for complaint. As each saw is checked during production and tested with oil, a small residue may be in the tank despite draining, which may slightly dirty the housing with oil in transit. Please clean the housing with a cloth.
Fitting the blade and saw chain

Switch off the device and remove the battery from the device.

-
Lay the saw on a flat surface.
-
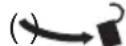
Turn the fastening bolt (13) anticlockwise () to remove the sprocket chain wheel covering (15).
-
Spread the chain (5) out into a loop with the cutting edges running clockwise. Use the graphical
symbol on the blade or below the chain sprocket (22) as a guide to align the saw chain (5).

- Slide the saw chain (5) into the bar guide groove. To mount the guide bar (4), raise it to an angle of approx. 45 degrees. This will make it easier to replace the saw chain (5) onto the sprocket (22).
- Place the chain bar (4) and saw chain (5) on the bar bolts (23). When the lug (24) to the right of the coach screw (23) sits in the slotted recess on the blade, the blade is placed correctly. It is normal that the saw chain (5) is slack.
- Place the sprocket cover (15) into position. The chain tensioner pin (26) on the inside of the sprocket cover (15) must be guided into the chain tension pin holder (25).
- Slightly tighten the mounting screw (13) of the sprocket cover ( ) .
- Pre-tension the saw chain (5) by turning the screw for the chain quick-tensioning system (14) in a clockwise direction.
- Tighten the mounting screw (13) of the sprocket cover ( )
Tensioning the saw chain
With a correctly tensioned chain you get good cutting performance and a longer life.

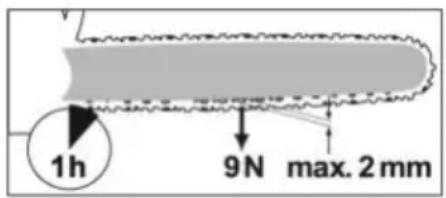
An incorrectly tensioned chain may break or spring off, leading to danger of injury. Test the saw before every start and the chain tension after every hour of sawing.
The chain is correctly tensioned if it does not sag at the rail underside and can be rotated completely around with the gloved hand.
When the saw chain is tensioned with 9 N (approx. 1kg ), the gap between the saw chain and the guide rail may not be more than 2mm .

-
Ensure that the chain brake has been released, that is, that the chain brake lever (3) is pulled up against the front grip (8).
-
Unscrew the fastening bolt (13)
- To tension the saw chain, turn the screw (14) for the chain quick-tensioning system in clockwise direction.
To loosen the tension, turn the screw (14) in counter-clockwise direction.
- Tighten up the fastening bolt (13) again

With a new saw chain, you must readjust the chain tension after at least 5 cutting operations.
Chain lubrication

The rail and chain must never be without oil. If you operate the electric chainsaw with too little oil, the cutting performance and the lifetime of the saw chain is reduced, since the chain becomes blunt faster. You can identify a case of too little oil where smoke development or discoloration of the rail occurs.
The chainsaw is equipped with an automatic oiling system. As soon as the motor is speeded up, the oil also flows faster to the chain bar (4).
Filling up with chain oil:
- Check the oil fill level and regularly top up with oil (27). The oil tank holds 220ml of oil.
- Use Grizzly Tools bio-oil; this product contains additives that reduce wear and tear and does not damage the pump system. bio-oil is available from our Service-Center.
- If you have no Grizzly bio-oil available, use chain lubrication oil with low adhesive additive content.

-
Unscrew the oil fill cap (2) and fill up with chain oil.
-
Wipe off any spilled oil and close the cap again.

Always switch off the device and allow the motor to cool before filling with chain oil. There is a risk of fire if oil overflows.
Operating

Switch on the chainsaw only when chain bar, saw chain and sprocket chain wheel covering are correctly assembled.
Make sure you have a secure stance. Before starting, ensure that the electric chainsaw is in contact with no objects.

Caution! Saw can oil up, see notes on Operation startup.

Indicator charge level
Press the "Press" button on the right of charging level indicator (19b), in order to check the status of the battery. The number of illuminated LED lights shows the charge level of the battery.

Removing / inserting the battery
- To remove the battery (19) from the appliance, press the release button (19 a) on the battery and pull out the battery.
- To insert the battery (19), place it on the guide track (17) and push it back into the appliance. It will audibly snap in.

Switching on
- Check before the start, whether sufficient chain oil is in the tank and, if necessary, refill with chain oil (see Chapter "Operation startup"). - the charge status of the battery (see):
- Release the chain brake, where you shift the brake arm (3) back against the front grip (8).
- Hold the chainsaw firmly with both hands, with the right hand on the rear grip (1) and the left hand on the front handle (8). Thumb and finger must close securely over the handles.
- For switching on, activate the switch-on block (10) with the right thumb and
then press the On/Off switch (11), the chainsaw runs with highest speed. Release the switch-on block again
- The power saw switches off when you release the On/Off switch (11) again. Switching for continuous running is not possible.
Checking the chain brake

The motor cannot be turned on if the chain brake has engaged. Do not employ the chain brake in order to start the chainsaw or to switch it off.

-
Place the chainsaw onto a solid, flat surface. It must not contact any objects.
-
Release the chain brake, where you shift the brake arm (3) back against the front grip (8).
-
Hold the chainsaw firmly with both hands, with the right hand on the rear handle (1) and the left hand on the front handle (8). Thumb and finger must close securely over the handles.
-
Turn on the chainsaw.
- Activate the chain braking lever (3), with running motor, with the left hand. To do so, push the chain braking lever/front hand protection (3) away from the front handle (8). Chain should stop abruptly.
- Once the chain brake is working properly, release the on/off switch (10) and the chain brake.

If the chain brake does not function correctly, you must not use the chainsaw. A slack saw chain leads to danger of injury. Return the chainsaw to our Service-Center for repair.
Checking the oil automatic system
Check the oil level and the automatic oil system before commencement of work.
- Switch on the chainsaw and hold it above a bright background. The saw must not touch the ground. If an oil trace can be seen, the chainsaw is working trouble-free.

If no oil trace can be seen clean the oil passages or turn the chainsaw to our Service-Center for repair.

Clean the oil passages of the chain bar (28), in order to guarantee a trouble-free, automatic oiling of the saw chain during operation.

Change the blade / sawing chain
- Lay the saw on a flat surface.
- Turn the fastening bolt (13) and the screw for the chain quick-tensioning system (14) in counter-clockwise direction in order to loosen the chain tension and to remove the sprocket chain wheel cover (15).
- Remove the saw bar (4) saw chain (5). To remove the guide bar (4), raise it to an angle of approx. 45 degrees. This will make it easier to take the saw chain (5) off the sprocket (22).
- For assembly, see "Assembling the blade and the sawing chain"

Refer to the start-up section on how to tension the saw chain.
Sawing techniques
General

Observe the noise protection and local regulations when cutting wood. Local requirements may require a suitability test. Ask the forestry commission.
- Dirt, stones, loose bark, nails, staples and wire must be removed from the tree.
After completing the cut, wait for the chainsaw to come to a standstill before removing the chainsaw.
Always switch off the chainsaw motor before moving from one tree to another. - Lay the connecting lead such that it will not be caught on branches or similar during sawing.
- For each cut, apply the claw stop securely and only then start sawing.
- You have better control when you saw with the bottom side of the chain bar (with pulling saw chain) and not to with the top side of the chain bar (with pushing saw chain).
- The saw chain must not contact either the ground or another object during sawing through or after sawing completion.
- Make sure that the saw chain does not become jammed in the wood. Do not let the tree trunk break or split off.
- Consider also the precautions against spring-back (see notes on safety)..
- For sawing work on a slope, always stand above the tree trunk. To keep control at the moment of "sawing through", reduce the contact pressure at the end of the cut without loosening the firm grip on the chainsaw handles. Ensure that the saw chain does not come into contact with the ground. After completing the cut, wait for the chainsaw to come to a standstill be
fore removing the chainsaw. Always switch off the chainsaw motor before moving from one tree to another.

If the saw chain jams, you do not attempt to pull out the electric chainsaw using power. There is a danger of injury here. Switch off the motor and use a lever or wedge to free the electric chainsaw.
Bucking
This refers to sawing up a felled tree trunk into smaller sections.
Ensure that you are in a secure position and that your body weight is distributed evenly on both feet. If possible, underpin and support the stem with branches, beams or wedges.
- Ensure that the saw chain does not come in contact with the ground during sawing.
- Make sure you have a secure stance and, in the case of sloping ground, stand above the log.
To maintain full control at the moment of "sawing through", reduce the contact pressure at the end of the cut, without releasing the firm grip on the chain saw handles. Once cutting is complete, wait for the saw chain to come to a standstill before removing the chain saw from there. Always switch off the chain saw before changing from tree to tree.

1. Log is lying on the ground:
Saw through the log completely from above and ensure at the end of the cut not to contact the ground.
If you can turn the tree trunk, saw two-thirds of the way through it. Then turn the trunk around and
saw the rest of the way through from above.
2. Log is supported at one end:
Start sawing from the bottom and work your way up (with the upper edge of the bar) a third of the way into the diameter of the trunk to prevent splitting. Then saw from the top downwards with the lower edge of the bar towards the first cut to prevent the bar from becoming jammed in the wood.
3. Log is supported at both ends:
Start from the top and work down (with the lower edge of the bar) to a third of the diameter of the trunk. Then saw from underneath with the upper edge of the bar until the two cuts meet.
4. Sawing on a sawhorse:
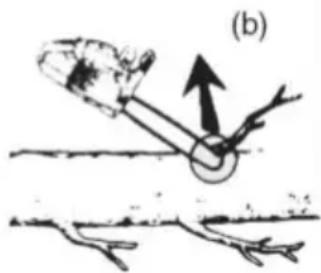
Hold the electric chainsaw steady with both hands, keeping the saw in front of you while sawing. Once the saw is through the wood, guide the machine passed you on the right (1). Hold your left arm as straight as you can (2). Watch out for the falling trunk. Position yourself to prevent any danger from the separated trunk. Watch your feet. The trunk may cause injuries when falling. Keep your balance (3).

Limbing
Limbing is the designation for the sawing off of branches and boughs from a felled tree.

Many accidents occur during the removal of branches. Never cut tree limbs when you are standing on the log. Keep the spring-back area in mind if branches are under tension.
- Do not remove support branches until after the sawing off.
- Branches under tension must be sawed from below to above, in order to prevent jamming of the chainsaw.
When working on thicker branches, use the same technique as when you are sawing up a felled trunk.
- Work to the left of the log and as near as possible to the electric chainsaw. As far as possible, the weight of the saw should rest on the log.
- Change position to saw off branches on the other side of the trunk.
- Branches sticking out are cut off separately.(see).
Felling trees

A lot of experience is necessary in felling trees. Cut down trees only when you can safely handle the electric chainsaw. In no case should you use the electric chainsaw if you feel unsure about anything.
- Ensure that no people or animals are in the field of action. The safety distance between the tree to be felled and the nearest-located workplace must be 212 tree lengths.
- Note the felling direction: The user must be able to move safely near the felled tree, to saw off the tree easily and remove branches. It is to be avoided that the felled tree snags itself on another tree. Note the natural felling direction, which is dependent on the slope and curvature characteristic of the tree, wind direction and the number of branches.
- In the case of sloping ground, stand above the tree to be felled.
- Small trees, with a diameter of 15-18 cm, can usually be sawn off with one cut.
In case of trees with a larger diameter, a notched cut and a back cut must be implemented (see diagram).
- If cutting and felling is being carried out by two or more persons simultaneously, the distance between the felling and cutting persons must be at least twice the height of the tree to be felled. When felling trees, ensure that no other persons are subject to hazards and that no material damage is caused. If a tree should come into contact with a power line, the supply company must be informed immediately.
- Dirt, stones, loose bark, nails, clips and wires must be removed from the tree.

Do not fell any trees when a strong or changing wind is blowing, if the danger of property damage exists or if the tree could fall on electric wires.

Immediately after termination of the sawing procedure, remove the ear protection so that you can hear hooter and alarm signals.

1. Removal of branches:
Remove hanging branches by positioning the cut from above the branch. With removal of branches, never work higher than shoulder level.

2. Escape area:
Remove the undergrowth around the tree to ensure an easy escape. The escape area (1) should be around 45^ either side behind the planned felling direction (2).

3. Cutting notch (A):
Make a felling notch in the direc-tion in which you wish the tree to fall. Start with the bottom, hori
zontal cut. The cut depth should be around 1/3 of the trunk diameter. This will prevent the saw chain or the guard rails from jamming when placing the second chamfer. Now make a slanted saw cut from above at an angle of roughly 45^ to meet exactly with the bottom saw cut.

Never step in front of a tree which is notched.

4. Felling back cut (B):
Make the back cut from the other side of the log, where you stand to the left of the log and saw with the chainsaw pulling. The back cut must run horizontally 5 cm above the horizontal notched cut.
The back cut should be so deep that the separation distance between the back cut and the notch cutting line is at least 1/10 of the trunk diameter. The part of the stem not sawn through is called a stay (felling gib). The stay prevents the tree from turning and falling in the wrong direction. Do not saw through the stay.gen Sie den Steg nicht durch.

- As you approach the felling cut on the stay the tree should start falling. If it becomes apparent that the tree may not fall in the required direction or is leaning back, and the saw chain is jamming, stop felling and use wedges made of wood, plastic or aluminium to open the cut and to tilt the tree in the required felling line.

- If the trunk diameter is larger than the length of the chain bar, make two cuts.

For safety reasons, we advise inexperienced users not to fell any logs with a rail length which is smaller than the trunk diameter.
- After carrying out of the back cut, the tree falls by itself or with the aid of the felling wedge or crowbar.

As soon as the tree begins to fall, pull out the saw from the section, stop the motor, place the chainsaw down and leave the workplace using the withdrawal path.
Pay attention to falling branches and do not stumble.
Maintenance and cleaning

Remove the battery prior to servicing the appliance.
Danger of injury!
Leave any maintenance and servicing work not covered by this manual to our Service-Center. Use only original spare parts.
Allow the machine to cool down before all maintenance and cleaning works. Danger of burn injuries!

Use cut-protection gloves when handling the chain or the chain bar. Risk of cuts!

Remove the battery from the unit before servicing it.
Cleaning
-
Clean the machine thoroughly after every use. In this way, you extend the life of the machine and avoid accidents.
-
Keep the gripping handles free of petrol, oil or grease. Clean the gripping handles, where appropriate, with a moist cloth soaked in soap. Use no solvents or petrol for cleaning!
- Clean the saw chain after every use. Use a paint brush or wipe for that. Do not use any liquids to clean the chain. After cleaning, oil the chain lightly with chain oil.
- Clean the ventilation slots and the surfaces of the machine with a paint brush, whisk or dry cloth. Do not use any liquids for cleaning.
Sharpening the saw chain

An incorrectly sharpened saw chain increases the danger of spring-back!
Use cut-protection gloves when you are handling the chain or the chain bar.

A sharp chain guarantees an optimal cutting performance. It eats effortlessly through the wood and leaves large, long wooden chips. A saw chain is blunt if you have to press the cutting equipment through the wood and the wooden chips are very small. In the case of a very blunt saw chain, no chip cuttings result at all, only sawdust.
- The sawing parts of the chain are the cutting elements, which consist of a cutting tooth and a depth limiting projection. The vertical separation distance between these two determines the sharpness depth.
- The following values must be noted in sharpening the cutting teeth:

- Sharp edge angle (30^)
Breast angle (85^)
Sharpness depth (0.65 mm)
Round file diameter (4.0 mm)

Deviations from the measurement data of the cutting geometry can lead to an increase of the spring-back slope of the machine. Increased danger of accident!
Special tools are necessary for sharpening the chain, which guarantee that the cutting edges are sharpened at the correct angle and to the correct depth. For the inexperienced user of chainsaws, we recommend to have the saw chain sharpened by a specialist or a specialist workshop. If you think yourself capable of sharpening the chain, you can acquire the special tools in the specialist trade.

-
Remove the saw chain (refer to the section on operating the saw). The chain should be well-tensioned to ensure proper sharpening.
-
For the sharpening, a round file with 4.0mm diameter is necessary.

Other diameters damage the chain and can lead to danger during work!
- Sharpen only from the inside to the outside. Guide the file from the inner side of the cutting teeth to the outer side. Lift the file when you are withdrawing it.
-
Sharpen first the teeth on one side. Turn the saw around and sharpen the teeth of the other side.
-
The chain is worn and must be replaced by a new saw chain if only approx. 4mm of the cutting teeth is remaining.
- After the sharpening, all cutting elements must now be equal in length and width.
- After every third sharpening, the sharpness depth (depth limitation) must be checked and the height filed with the aid of a flat file. The depth limitation should be set back about 0.65mm from the cutting tooth. After the setting back of depth limitation, round it off a little at the front.
Adjusting the chain tension
The adjustment of the chain tension is described in the chapter: Starting operation, tensioning chainsaw.
- Switch off the device and remove the battery from the device
- Check the chain tension regularly and re-adjust this as often as possible. When the saw chain is tensioned with 9N (approx. 1kg ), the gap between the saw chain and the guide rail may not be more than 2mm .
Starting up a new saw chain
In the case of a new chain, the tensioning force decreases after some time. Therefore you must re-tension the chain after the first 5 cuts and at longer intervals after this.

Never attach a new chain to a worn drive pinion or place onto a damaged or worn chain bar. The chain could spring back or break, potentially leading to serious injury.

Maintaining the chain bar

Use cut-protection gloves when handling the chain or the chain bar.
- Switch off the saw and remove the battery from the device (19).
- Remove the sprocket chain wheel covering (15), the saw chain (5) and the chain bar (4).
- Check the chain bar (4) for wear. Remove burrs and straighten the guide surfaces with a flat file.
- Clean the oil passages (28), of the chain bar, in order to guarantee a trouble-free, automatic oiling of the saw chain during operation.
- Mount chain bar (4), chainsaw (5) and sprocket chain wheel covering (15) and tighten the chainsaw.

With the oil nozzles in good condition and the oil regulator set correctly, the saw chain will spray a little oil off after starting.
The blade (4) must be inverted every 8-10 working hours in order to guarantee even wear.
- Switch off the saw and remove the battery from the device (19).
- Remove the sprocket chain wheel covering (15), the saw chain (5) and the chain bar (4).
- Turn the blade around its horizontal axis and install the blade and chain as described under "Fitting the blade and saw chain".
When doing so, pay attention to the correct rotation direction of the saw chain!
Direction of travel of the saw chain
Use the graphical symbol below the chain sprocket cover (15) as a guide to the alignment of the saw chain (5) when the blade is rotated. The illustrated direction of travel on the blade is no longer true.
Maintenance intervals
Regularly carry out the maintenance operations listed in the following table. The life of the saw is extended by regular maintenance of your chainsaw. Furthermore, you get optimum cutting performance and avoid accidents.
Maintenance Interval Table
| Machine part Action | Before every use | After 10 hours of operation | |
| Komponenten der Kettenbremse | Check, replace if required | ✓ | |
| Kettenritzel (22) Check, replace if required | ✓ | ||
| Saw chain (5) | Check oil, regrind or replace if required | ✓ | |
| Guide bar (4) Check, clean and oil | ✓ | ||
| Guide bar (4) Turn around | ✓ | ||
| Automatic oil system | Check, clean oil aperture if necessary | ✓ |
Storage
- Clean the equipment before putting it away.
- Empty the oil tank before longer periods of non-use. Dispose of waste oil environmentally correctly (see „Waste disposal and environmental protection").
- Put on saw bar protection sheath.
- Store the appliance in a dry place well out of reach of children
Waste disposal and environmental protection
Remove the battery from the device and take the device, battery, accessories and packaging for environmentally friendly recycling.

Machines do not belong with domestic waste.
- Before disposal, remove batteries from the device first.
- Hand the device and the charger in to a recycling point.
- Do not dispose of used oil in the sewage system or drains. Dispose of used oil in an environmentally correct manner - bring it to a waste disposal center.
Defective units returned to us will be disposed of for free.
Replacement parts/ Accessories
Spare parts and accessories can be obtained at www.service-deltafox.de
If you have any other questions, contact the "Service-Center" (see "Service-Center").
Chain bar Trilink CL 30091617
Saw chain Trilink CL 15040PB ...30091616
Bio chain oil 1 liter. 30230001
Bio chain oil 5 liter .30230002

The Trilink replacement saw chain is to be used only in conjunction with the associated Trilink blade and the chainsaw approved for this. There is a risk of injury.
Guarantee
This unit has a guarantee period of 24 months. Commercial use will invalidate the guarantee.
Damages, which can be attributed to natural wear, overloading or inappropriate use, are excluded from the guarantee. Certain component parts are subject to a normal wear and are excluded from the guarantee. In particular, these include: Saw chain, chain bar, sprocket chain wheel and carbon brushes, provided that the complaints cannot be attributed to flaws in the materials themselves. Also, all damage to the machine, the saw chain and the chain bar, which can be attributed to inadequate lubrication, are excluded from the guarantee.
Furthermore, a condition of the guarantee services is that the maintenance intervals, indicated in the operating instruction, have been adhered to and the instructions on the cleaning, care and maintenance have been followed. Damages, which originate due to material or manufacturer faults, will be repaired free of charge by replacement delivery or repair. This is conditional upon the device being returned in one piece complete with proof of purchase and guarantee to our service centre.
Repair service
Our Service-Center will also carry out any non-guarantee repair work for a charge.
We will be happy to give you a quote.
We will only work on units that have been sent in with the appropriate packaging, postage paid. The transportation risk is borne by the sender.
Caution: Please, in no case, send defective devices with filled oil tank. Completely empty the tank. Possible material damages (oil runs out if device is placed on its side or upside down!) and/or fire damages during transport are borne at the expense of the sender.
Devices sent in with freight collect - by bulk freight, express or with other special freight - are not accepted.
We will dispose of tools free of charge.
Trouble shooting
| Problem Possible ca | use Fault correction | |
| Gerät startet nicht | The battery (A 19) is empty or not inserted | Check the charge level, and have repairs carried out by a qualified electrician, if necessary. |
| Defective On/Off switch (A 11) | Repair by customer service | |
| Worn carbon brushes Repair by customer service | ||
| Defective motor Repair by customer service | ||
| Chain does not rotate | Chain brake blocks saw chain (A 5) | Check chain brake. Possibly release chain brake |
| Inferior cutting performance | Incorrectly mounted saw chain (A 5) | Mount saw chain correctly |
| Saw chain (5) blunt | Sharpen cutting teeth or place on new chain | |
| Chain tension insufficient Check chain tension | ||
| Saw runs with difficulty, chain comes off | Chain tension insufficient Check chain tension | |
| Chain becomes hot, smoke development during sawing, discoloration of the rail | Too little chain oil | Check oil level and, where appropriate, refill with chain oil, check oil automatic system and, where appropriate, clean oil outflow duct or have repaired by customer service |

Indikatorstavunabiti 175
Vlozeni/vyjmuti akumulatoru 175
Zapinani 175
Kontrolanapnuti retezu 175
| GB Translation of the original CE declaration of conformity | |
| We confirm, that the Cordless chainsaw model DG-CCS 1825, DG-CCS 1825 Set Batch number B-47414 conforms with the following applicable relevant version of the EU guidelines: | |
| 2006/42/EC • 2014/30/EU • 2000/14/EC • 2011/65/EU* • 2005/88/EC | |
| In order to guarantee consistency, the following harmonised standards as well as national standards and stipulations have been applied: | |
| EN 60745-1:2009/A11:2010 • EN 60745-2-13:2009/A1:2010 EN 55014-1:2017 • EN 55014-2:2015 • IEC 62321-3-1:2013 | |
| The following are also confirmed as complying with Noise Emissions Directive 2000/14 2000/14/EC: Guaranteed sound power level: 99 dB(A) Measured sound power level: 96.1 dB(A) The conformity evaluation procedure employed is compliant with appendix III of 2000/14/EC Registered Office: No: 0123 TÜV SÜD Product Service GmbH, Ridlerstraße 65, D-80339 München Germany Design Type Certificate No. M6A 105384 0018 Rev. 01 | |
| This declaration of conformity is issued under the sole responsibility of the manufacturer: | |
| CE Grizzly Tools GmbH & Co. KG Stockstädter Straße 20 D-63762 Großostheim, Germany 25.06.2021 | Christian Frank (Documentation Representative) |
- The object of the declaration described above satisfies the provisions of Directive 2011/65/EU of the European Parliament and the Council of 8 June 2011 on limiting the use of certain harmful substances in electrical and electronic appliances.