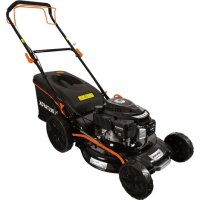
DGHLM 350 S - Lawn mower Deltafox - Free user manual and instructions
Find the device manual for free DGHLM 350 S Deltafox in PDF.

| Product Type | Manual Reel Mower |
| Brand | Deltafox |
| Model | DGHLM 350 S |
| Cutting Width | 350 mm |
| Number of Blades | 5 |
| Weight | 6.4 kg |
| Cutting Height Adjustment | Continuous from 14 to 47 mm |
| Grass Catcher | Yes, with fixing strap |
| Handle | Foldable, three-part assembly |
| Wheels | 4 wheels with height adjustment |
| Intended Use | Private lawns only |
| Safety | Danger pictograms, protection against projections |
| Cleaning | Brush or cloth, no water or solvents |
| Blade Maintenance | Adjustment of cutting clearance, regular oiling |
| Storage | Dry place, out of reach of children |
| Spare Parts | Available at www.service-deltafox.de |
| Warranty | 24 months |
| After-Sales Service | Service center indicated in the manual |
Frequently Asked Questions - DGHLM 350 S Deltafox
User questions about DGHLM 350 S Deltafox
0 question about this device. Answer the ones you know or ask your own.
Ask a new question about this device
Download the instructions for your Lawn mower in PDF format for free! Find your manual DGHLM 350 S - Deltafox and take your electronic device back in hand. On this page are published all the documents necessary for the use of your device. DGHLM 350 S by Deltafox.
USER MANUAL DGHLM 350 S Deltafox
natural_image
Top-down view of a black lawn mower with orange buttons and wheels (no text or symbols visible)DG-HLM 350 S

Translation of the original instructions for use
B
natural_image
Close-up of a mechanical component with a highlighted circular feature and an arrow pointing to it, labeled '12' (no readable text or symbols beyond label)C
natural_image
Close-up of a mechanical vehicle showing tire, spring, and brake assembly (no text or symbols visible)D
natural_image
Back cover of a black athletic backpack with a V-shaped strap, showing a compression motion (no text or symbols)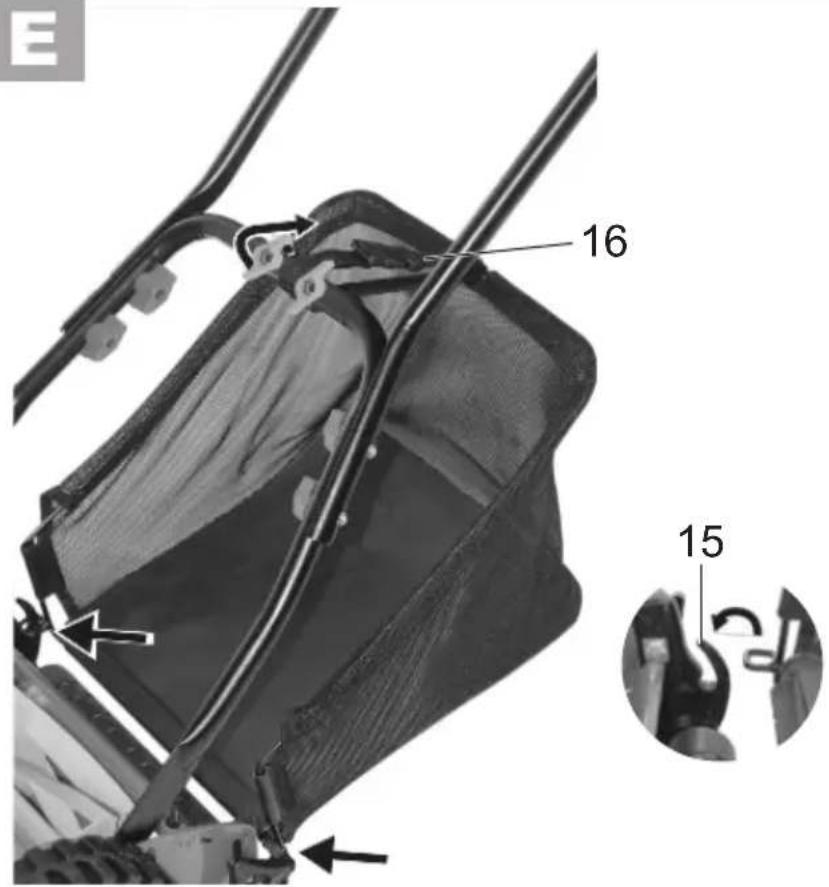
F

DE Originalbetriebsanleitung 5
GB Translation of the original instructions for use .....10
FR Traduction de la notice d'utilisation originale .....15
NL Vertaling van de originele gebruiksaanwijzing......20
IT Traduzione delle istruzioni per l'uso in originale ...25
PL Tłumaczenie oryginalnej instrukcji obsługi .....30
CZ Překlad originálního návodu k obsluze......35
LT Vertimas iš originalių eksploatavimo instrukcijoje ....40
ES Traducción del manual de instrucciones original ..45
Inhalt
Scope of Delivery 10
Functionality....10
Summary......11
Technical Specifications....11
Safety Instructions ....11
Symbols in the Instructions .....11
Symbols on the device....11
General Safety Information ......11
Assembling the handle 12
Adjusting the cut height 12
Assembling/emptying the grass bag.... 12
Working Instructions....13
Adjustingthebladeclearance......13
CleaningandMaintenance 13
Cleaning....13
Storage 13
Disposal / Environmental
Protection....14
Replacement Parts 14
Guarantee....14
Service-Center 50

Before initial use, please read the operating instructions carefully, in order to avoid incorrect handling. Keep the instructions in a safe place and pass them on to any subsequent user so the information is available at all times.
Intended Purpose
The device is intended only for mowing lawns and grass areas in the domestic domain.
This equipment is not suitable for commercial use. Commercial use will invalidate the guarantee.
The operator or user is responsible for accidents or injury to other people or damage to their property.
The manufacturer shall not be liable for damages caused by improper use or incorrect operation.
General description

The illustration how to handle the appliance can be found on page 2-3.
Scope of Delivery
Carefully unpack the appliance and check that it is complete. Dispose of the packaging material correctly.
- Mower
- Grass collection bag with strap
- Top section of the handle
- 2 lower handle parts
- 2 central sections
- 8 screws
- 8 Wing nuts
- Translation of the original instructions for use
Functionality
The lawn mower has a reel blade cylinder containing 5 bow-shaped blades. Its cutting height is infinitely adjustable, and its wheels turn smoothly.
Read the sections below to learn more about each operating element's function.
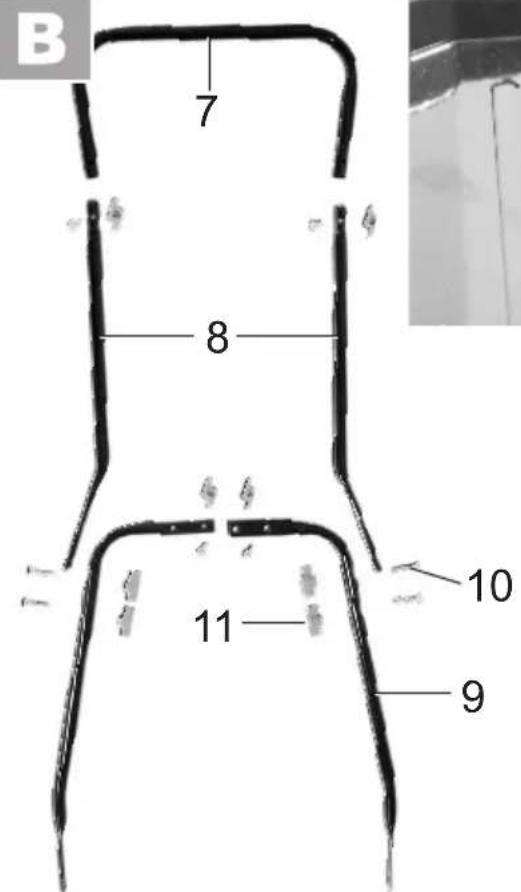
Summary

1 Bow handle
2 Rollers
3 Spindle cylinder with blade
4 Wheels
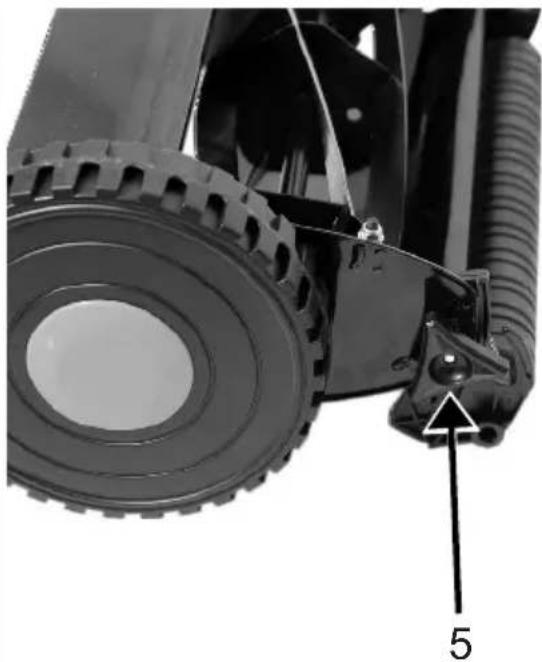
5 Wing screw for height adjustment
6 Grass collection bag

7 Upper handle
8 Centre piece
9 Lower handle part 10 Bolt
11 Wing nut
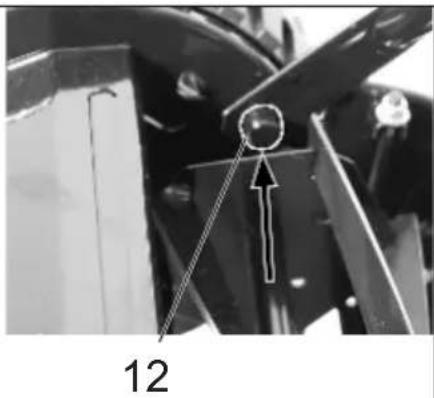
12 Bracket on lawnmower housing

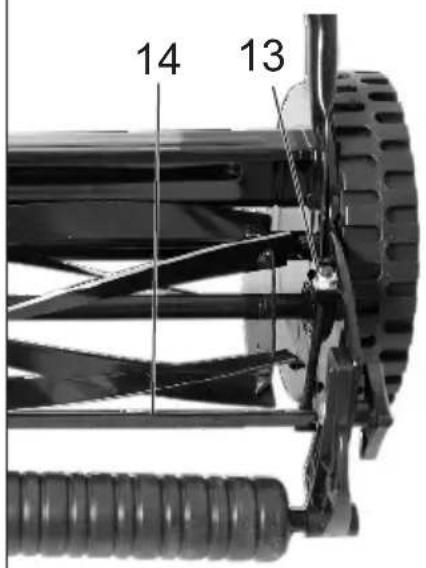
13Nut
14 Metal brace

15Attachment
16 Strap
Technical Specifications
Manual lawn mower.....DG-HLM 350 S
Batch number......B-45798
Blade width....350 mm
Number of blades 5
Weight .....approx. 6.4 kg
Safety Instructions
Symbols in the Instructions

Warning signs with information for the prevention of injuries or damage property.

Mandatory signs (instead of the exclamation mark, the command is explained) with information for the prevention of damage.

Information signs with information for better handling of the machine.
Symbols on the device

Caution!

Read the operating instructions carefully.
Risk of injury from parts being thrown up.
Keep nearby people away from the mower
Caution – Regularly adjust the blade clearance!

Caution – sharp cutting blade! Keep feet and hands away. Risk of injury!

Caution! Risk of injury from rotating blade cylinder. Keep hands and feet outside of the openings when using the equipment!

Observe the assembly instructions from the manual!
General Safety Information

Observe the noise protection and local regulations.

Caution: to avoid accidents and injuries:
- Children and young people under the age of 16 and people who are not familiar with these instructions must not work with the machine.
GB
- Never turn the machine on when people and particularly children or animals are nearby.
• People with motor disorders are not to operate the machine without supervision. - Do not use the machine with bare feet or when wearing open sandals. Only run the machine at walking pace.
- When working, ensure a firm foothold, particularly on slopes. Always work across the slope, never up or downwards. Take particular care when changing the direction of travel on the slope. Do not work on excessively steep slopes.
- When switching the machine on, avoid feet or hands being trapped between the moving blades and the fixed parts of the machine.
- Never carry the machine by the blade cylinder.
Caution! To avoid damaging the machine and potential injury as a consequence: - Check the terrain on which the machine is used and remove stones, sticks, wires or other foreign bodies that may be picked up and flung outwards.
- Ensure that the machine is in a safe operating condition. Replace worn or damaged parts.
- Protect the machine from the effects of weathering (damp, frost).

Assembling the handle

-
Place the upper handle (7) on the two centre pieces (8) and fix it with two bolts (10) and wing nuts (11).
-
Put the two lower handles (9) together and fix them with two bolts (10) and wing nuts (11).
- Fasten the centre pieces (8) to the lower handle parts (9) with two bolts (10) and wing nuts (11).
- Press the bow-type handle (1) together a little and put the bow-type handle (1) onto the bracket on the lawn mower housing (12).
Adjusting the cut height
The cut height is infinitely adjustable (14 - 47 mm) by changing the position of the rollers:

Loosen the wing screws on both sides of the equipment and set the desired cut height. Ensure that both axles are set to the same height.

Set the cut height no lower than to where the blade cylinder does not touch the ground even where it is uneven.
Assembling/emptying the grass bag

-
Hang the grass bag in the brackets provided for this.
-
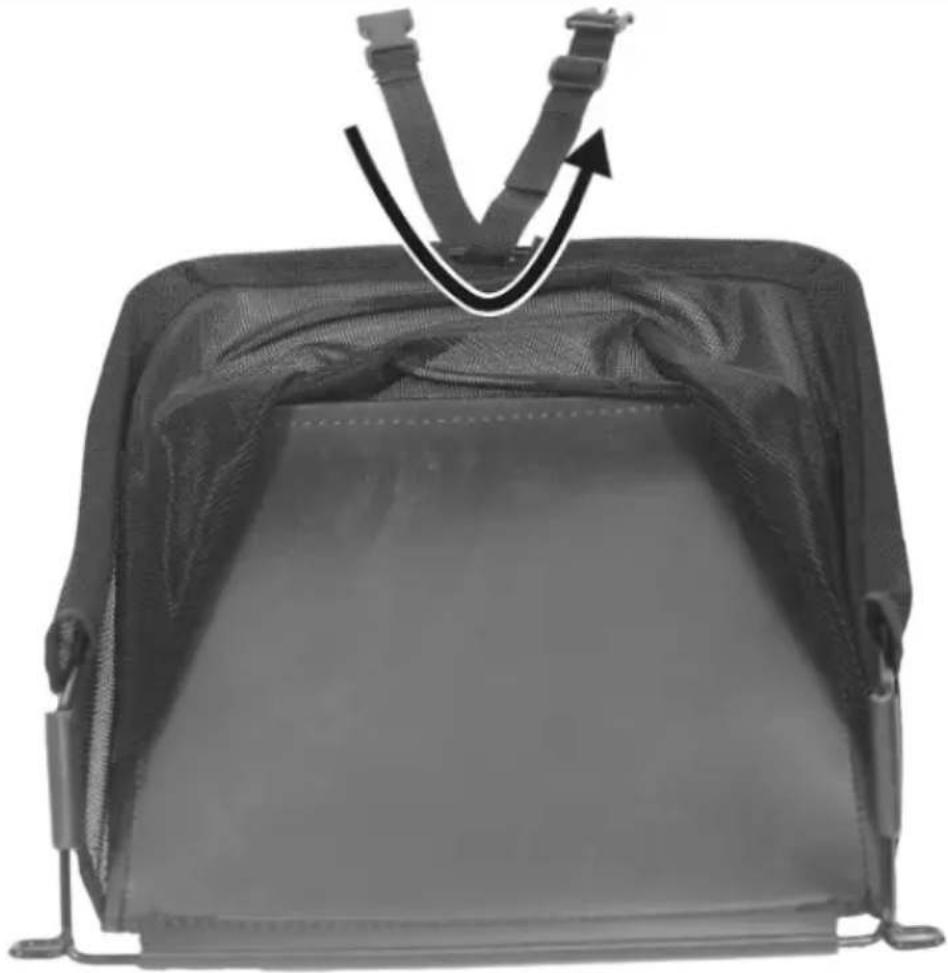
Fasten the grass collection bag (6) to the crossbar of the lower handles (9) with the strap (16).
-
To remove/empty the grass collection bag (6), loosen the strap (16) and unhook the grass collection bag.
Working Instructions

Before each use, check the machine for obvious defects, such as loose, worn or damaged parts. Check that all nuts, bolts and screws are sitting firmly.
Regular mowing stimulates the stronger formation of leaves in the grass as well as allowing weeds to die off at the same time. Thus, the lawn becomes thicker each time it is mowed and a lawn with even resilience is produced.
- Run the machine at walking pace, in strips that are a straight as possible. For seamless mowing, the strips should always overlap by a few centimetres.
- On slopes, always work across the slope.
- For the first cut of the season, choose a high the cut height and reduce the height to around 20 mm for the subsequent cuts.
Adjusting the blade clearance

The spindle cylinder blades require adjustment if the grass is no longer being cut evenly and cleanly. Turn the nuts (12) on the left and right of the equipment clockwise in small steps until the blades grind easily over the bottom metal bar (13) like a pair of scissors.
Cleaning and Maintenance

Have work that is not described in these instructions carried out by one of our authorised customer service centres. Use only original components. The following states how damage to the trimmer and possible injury to people can be avoided.

Wear gloves when dealing with the blades. Risk of cuts.
- Check covers and safety devices for damage and check that these are sitting correctly. Replace if necessary.
Cleaning

Neither hose down nor use running water to clean the mower.
• Always keep the machine clean. For cleaning, use a brush or cloth, but no cleaning agents or solvents.
• After mowing, remove any plant remains stuck to the wheels and the blade area.
- Rub the blades with an oil rag or spray them with a metal maintenance spray.
- Due to the special cutting geometry, the blade cylinder blades cannot be re-sharpened. If necessary, the blade cylinder and sub-blade must therefore be replaced as a set. Have a specialist workshop carry out the installation of the blade cylinder.
Storage
- Keep the machine dry and out of reach of children.
Disposal / Environmental Protection
Recycle the device, accessories and packaging in an environmentally friendly manner.
- Machines do not belong in domestic waste. Take the machine to a recycling point. The plastic and metal components used can be separated by type and therefore recycled. Ask your dealer about this.
- Do not dispose of cut grass in the dust-bin; use it for composting or spread it as a mulch layer under shrubs and trees.
Replacement Parts
Spare parts and accessories can be obtained at www.service-deltafox.de
If you have any other questions, contact the "Service-Center" (see „Service-Center“).
Guarantee
We guarantee this equipment for 24 months.
The guarantee does not include damages caused by natural wear, overloading or improper use. Certain parts, e.g. such as the spindle cylinder or the bottom metal bar, are subject to normal wear and not covered by the guarantee.
The guarantee is also subject to observance of the cleaning and maintenance instructions specified in the operating instructions. Damages caused by material or manufacturing defects will be rectified free of charge by replacement or repair.
This is conditional upon the equipment being returned to the dealer undismantled and with proof of purchase and guarantee.
Repairs not covered by the guarantee can be performed by our service centre for a charge. Our service centre will be pleased to issue a quotation for you.
We can handle only equipment sent with sufficient packaging and postage.
Caution: In the case of a complaint or for servicing, please submit your equipment to our service address in clean condition and with an indication of the defect.
Equipment sent carriage forward by bulky goods, express or other special freight will not be accepted.
Defective units returned to us will be disposed of for free.
Sommaire
Utilisation 15