
CL8a - Microphone SAMSON - Free user manual and instructions
Find the device manual for free CL8a SAMSON in PDF.
| Product Type | Multi-pattern studio condenser microphone |
| Brand | Samson |
| Model | CL8a |
| Element | 1.1-inch gold-sputtered dual-capsule condenser, 4-micron diaphragm |
| Polar patterns | Omnidirectional, cardioid, bidirectional (figure-8) - switchable |
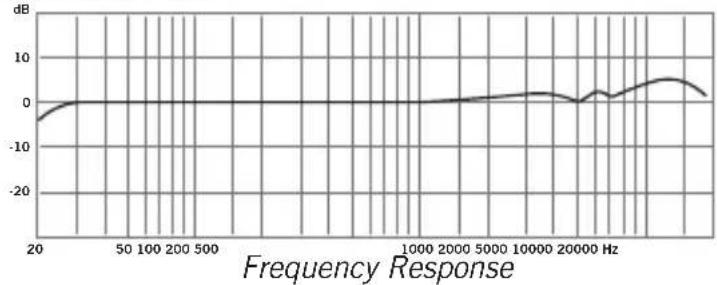
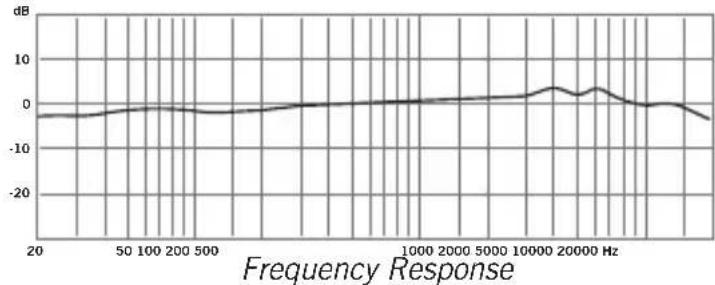
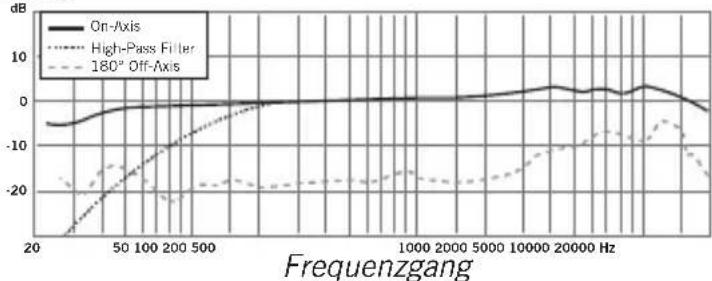
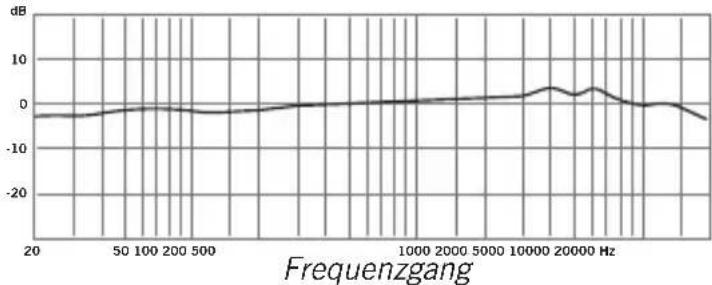
| Frequency response | 20 Hz - 20 kHz |
| Impedance | 200 ohms balanced |
| Minimum load impedance | 1,000 ohms |
| Sensitivity (cardioid) | -35 dBV/Pa |
| Maximum SPL (pad off, cardioid) | 142 dB SPL |
| Built-in attenuator | -10 dB, switchable |
| High-pass filter | 12 dB/octave at 100 Hz, switchable |
| Connector | Gold-plated 3-pin XLR |
| Power supply | 48 V DC phantom power ± 3 V |
| Dimensions | 174 x 53 mm (6.9 x 2.1 in) |
| Weight | 0.52 kg (1.14 lb) |
| Included accessories | Swivel mount adapter |
| Care | Clean the grille with a soft, dry cloth. Avoid moisture and impact. Use a pop filter to protect the capsule. |
| Safety | Do not expose to extreme temperatures or moisture. Disconnect phantom power before connecting/disconnecting the cable. |
| Repairability | Contact Samson support or an authorized dealer for repairs. Requires a Return Authorization (RA) number for warranty repairs. |
Frequently Asked Questions - CL8a SAMSON
User questions about CL8a SAMSON
0 question about this device. Answer the ones you know or ask your own.
Ask a new question about this device
Download the instructions for your Microphone in PDF format for free! Find your manual CL8a - SAMSON and take your electronic device back in hand. On this page are published all the documents necessary for the use of your device. CL8a by SAMSON.
USER MANUAL CL8a SAMSON
natural_image
Black SAMSON CL8a audio recording device with mesh grille and adjustable neck (no visible text or symbols on body)Owner's Manual
If you want to dispose this product, do not mix it with general household waste. There is a separate collection system for used electronic products in accordance with legislation that requires proper treatment, recovery and recycling.
Private household in the 27 member states of the EU, in Switzerland and Norway may return their used electronic products free of charge to designated collection facilities or to a retailer (if you purchase a similar new one).
For Countries not mentioned above, please contact your local authorities for a correct method of disposal.
By doing so you will ensure that your disposed product undergoes the necessary treatment, recovery and recycling and thus prevent potential negative effects on the environment and human health.
Copyright 2022, Samson Technologies Corp. v2
Samson Technologies Corp. 278-B Duffy Ave Hicksville, NY 11801 www.samsontech.com
Introduction
Congratulations on your purchase of the Samson CL8a Multi-pattern Studio Condenser Microphone. The CL8a features a 1.1", dual gold-sputtered capsule with a 4 micron ultra thin diaphragm which faithfully reproduces a variety of sound sources including vocals, acoustic instruments and drums. The CL8a features three switchable pickup patterns making it great for recording single sources, multiple instruments, capturing room sounds and expanding your soundfield. The extended frequency and fast transient response ensures an accurate reproduction with linear characteristics from bottom to top.
In these pages, you'll find a detailed description of the features of the CL8a Multi-Pattern Studio Condenser Microphone, as well as step-by-step instructions for its setup and use, and full specifications. If your microphone was purchased in the United States, you'll also find a registration card enclosed—don't forget to follow the instructions so that you can receive online technical support and so that we can send you updated information about this and other Samson products in the future. Also, be sure to check out our website www.samsontech.com for complete information about our full product line.
We recommend you keep the following records for reference, as well as a copy of your sales receipt.
Serial number: ____
Date of purchase: ____
If you have any questions or comments regarding the CL8a Multi-Pattern Studio Condenser Microphone or any other products from Samson, do no hesitate to contact us at support@samsontech.com.
With proper care and maintenance, your CL8a Studio Condenser Microphone will operate trouble-free for many years. Should your CL8a ever require servicing, a Return Authorization (RA) number must be obtained before shipping your unit to Samson. Without this number, the unit will not be accepted. Please visit www.samsontech.com/ra for an RA number prior to shipping your unit. Please retain the original packing materials and, if possible, return the unit in its original carton. If your CL8a Studio Condenser Microphone was purchased outside of the United States, contact your local distributor for warranty details and service information.
Powering the microphone
The CL8a is a condenser microphone and therefore requires 48V phantom power. Phantom power is provided by a mixer's preamplifier channel or if necessary, an external phantom power supply and sent to the microphone along a balanced microphone cable.
To ensure the longevity of your equipment, and is good mixing etiquette, always turn down the master fader and monitor controls to zero when switching the phantom power on or off.
Poor microphone performance can be attributed to phantom power issues. If you notice that the microphone is exhibiting reduced signal output, increased noise, or decreased headroom (distortion), there may be an issue with the phantom power supply or the microphone cables.
Setting the signal level
When connecting the CL8a to a mixer or audio interface, be sure that the input is of microphone level and be sure that the phantom power is engaged as explained in the previous section.
Most mixers and interfaces will offer a microphone input with mic trim (usually called Trim or Gain) control. The purpose of the mic trim control is to optimize the amount of good signal to any noise associated with the mixers electronics. A good mic preamp with trim also will have a PEAK or CLIP indicator.
To set a good level for the microphone, set the CL8a up in front of the desired sound source and slowly raise the mic trim control until you see the PEAK LED light up. Then, turn the mix trim control down until the LED does not light any more. On most mixers, the ideal setting is that the trim control is turned up as much as possible without lighting the PEAK LED.
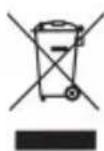
Using the pad switch (A)
The CL8a includes a 10 dB attenuation pad that can be selected with the slide switch located below the grill, which lowers the input sensitivity and is used to prevent overloading the onboard preamplifier. Setting the switch to the 0 dB position, the control is bypassed and there is no effect on the signal. When the switch is set to the -10 dB position, the input sensitivity of the microphone will be lowered by 10 dB. This is useful when close miking loud sound sources with very high transient sounds, such as drums, cymbals or brass instruments.
Before setting the attenuation pad switch to the -10 dB position, it is advisable to perform a sound check and to optimize the input signal levels using proper gain staging. If distortion is apparent when the performer is singing or playing their instrument at maximum level, work backwards through the signal chain to find out where the distortion exists. First check the microphone preamp level. If it is set to the minimum position and there is distortion, activate the preamplifier pad switch. If the signal level drops and the distortion goes away, then the microphone preamp was overloaded. If the level drops but the distortion remains, then the overload is happening at the microphone input. Set the attenuation switch to the -10 dB position. If the distortion still remains, then either have the performer lower the level of their instrument or move the microphone further away from the sound source.
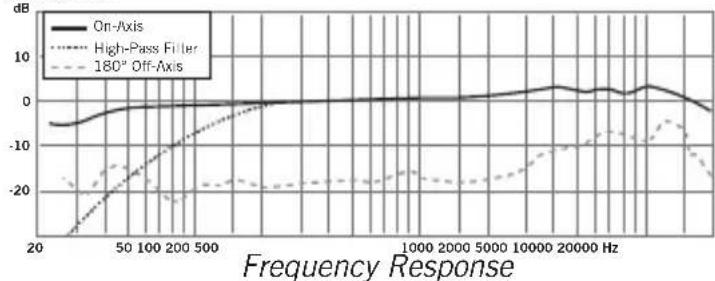
High-Pass Filter (B)
The CL8a offers a switchable high-pass, which you can use to eliminate any unwanted low frequency content. When the High-pass Filter is set to the “flat” (indicated by the straight line) position, there is no effect on the signal. When the High-pass switch is set to the “roll-off” position (indicated with the angled line), a 12 dB per octave low-cut at 100 Hz is applied to the signal.
This can be extremely useful for removing low frequency stage rumble, wind noise during outdoor use, and filtering out lows from drums when used as an overhead cymbal microphone on a drum kit.
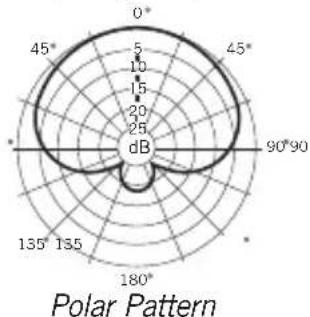
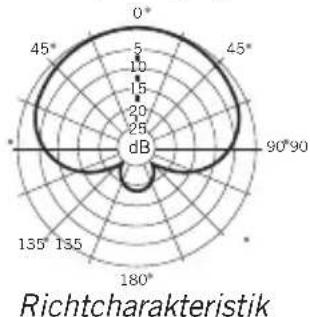
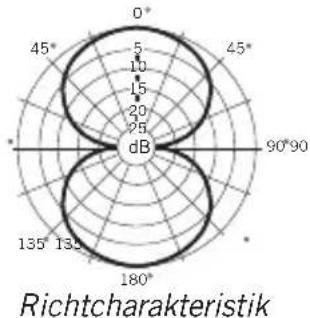
Polar Pattern
An important characteristic of any microphone is its directionality or polar pattern. The CL8a features a dual-membrane capsule allowing for a choice of three individual polar patterns: omnidirectional, unidirectional (cardioid), and bidirectional (figure-8). The microphone pattern can be selected using the three-position slide switch on the rear of the microphone. Each pattern has distinct pick-up characteristics with respect to the sensitivity and frequency response to sounds arriving from different directions. The following section discusses some of the features of each pattern, to help you choose the best setting for your application.

natural_image
Front view of a desktop microphone with grille and control buttons (no text or symbols)Omnidirectional - The omnidirectional setting reproduces sound from all directions, (including off-axis), with an even frequency response, which makes it resistant to the phenomenon known as proximity effect. It captures a greater amount of ambient sound than the other settings, and thus will include more of the room sound than when using a directional setting. The omnidirectional setting is great for recording ensemble performances including group vocals, brass, woodwind, and other instruments with the artists facing each other in a circle around the microphone. To select the omnidirectional pickup pattern, set the pattern selection switch to the left position, indicated by the circle icon.
Unidirectional (cardioid) - The cardioid pickup pattern is the most widely used for studio and live miking applications. It captures sound in front of the microphone and rejects sound from the sides and back, which allows for better separation of instruments in the studio, and picks up more of the instrument sound in relation to the sound of the room. The separation also allows for more control and more gain before feedback in live sound reinforcement situations. To select the cardioid pickup pattern, set the pattern selection switch to the center position, indicated by the “heart-shaped” icon.
Polar Pattern
Proximity Effect
Cardioid microphones, exhibit a phenomenon known as proximity effect. Proximity effect is a resulting change in the frequency response of a microphone based on the position of the mic capsule relative to the sound source. In general, as the microphone moves closer to the sound source, the bass response increases.
Bidirectional (figure-8) - This setting captures sound directly in front and back of the microphone while rejecting sound on the left and right sides, and has minimal off-axis frequency response deterioration. It is very useful in a variety of stereo microphone techniques. The figure-8 pattern can be used to simultaneously capture two instruments or vocalists by positioning the microphone directly between them, so one is addressing the front of the microphone and the other the rear. To select the figure-8 pickup pattern, set the pattern selection switch to the right position, indicated by the "8" icon.
For most vocal applications you'll want to position the microphone directly in front of the artist about 4 to 18 inches. This will pickup the voice while minimizing unwanted background or ambient noise. Slight changes to the angle of the microphone in reference to the sound source can make some pretty amazing equalization adjustments. Experimentation and experience are the best teachers in getting good sounds, so plug in and start creating!
Microphone Placement
The CL8a is a great microphone choice for many instrument miking situations. Below is a brief guide on using the CL8a in some typical applications:
Vocals
Position the microphone directly in front of the artist so that the microphone grille is between 6 to 18 inches away. The closer the artist moves to the microphone, the more the bass or low response increases; this is called proximity effect. To achieve the fullest sound, the vocalist should aim the microphone center line towards their mouth. If p-popping (turbulent bursts of air produced when uttering consonants) is occurring, use a pop filter or rotate the microphone a little bit away from the artist so that sound arrives at the microphone slightly off-center.
Acoustic Guitar
There are a variety of ways that the CL8a can be used to mic an acoustic guitar. Optimal microphone placement will depend on the type of instrument, and what kind of sound you're looking to capture. It may be necessary to experiment with various positions to achieve full and balanced tone. When miking a standard steel string acoustic, it is suggested that you begin with the microphone at a distance of 6 to 12 inches from the sound hole, positioned slightly off-axis, and pointing towards the edge of the fingerboard. From this position, moving the microphone towards the sound hole will cause the mic to capture more low frequencies. If, instead, you wish to capture more high-end, or to remove any unwanted boominess, move the microphone toward the fingerboard.
Unlike a steel string acoustic guitar, the sound of a nylon string acoustic guitar that is played by finger picking is usually naturally warmer. To record an even, full tone, it is suggested that you begin by positioning the microphone 3 to 6 inches above the center of the bridge. This will help emphasize the higher frequencies and pick up the attack sound of the finger picking. If the microphone is picking up too much low frequency from the sound hole, move the microphone so that it is slightly off-axis from the guitar. If you have a pair of CL8a microphones, try one positioned at the fingerboard and the second over the bridge of the guitar, or have one microphone positioned close to the guitar and the second a few feet away to pick up the sound of the room, blending the two sources together.
Microphone Placement
Piano
The grand piano is a very challenging instrument to capture, and can be miked in a variety of ways. For close miking the piano, position the CL8a just inside the piano, centered between the soundboard and the open lid. The closer you move the microphone toward the instrument the more low frequencies the microphone will pick up. For an ambient recording like that used in a classical performance, position the microphone outside the piano, facing into the open lid. For a more contemporary ensemble sound, place two CL8a microphones in the piano, positioning one over the low strings and one over the high strings at a distance of 6 to 12 inches apart.
When miking an upright piano with a single microphone, position the microphone just above and in front of the piano with the top open, centered over the instrument. If you have a pair of CL8a microphones, position the microphone over the open top of the piano with one microphone over the bass strings and one over the high strings. You can also position two mics in front of the kickboard area approximately 8 inches over the bass and high strings.
Guitar Amp
Placement of the microphone when recording an electric guitar can impact the tone as much as the choice of instrument and amplifier. Guitar amps are usually close-miked but consideration must be made for the type of signal the amp will produce. While condenser microphones like the CL8a have fast transient response, they cannot handle extremely high SPL. The CL8a should be placed approximately 4 inches from the grill of the amp. If the signal is distorted, activate the onboard 10dB pad.
For a brighter sound, the microphone should face the center of the amplifier's speaker cone. By moving the microphone off of the center of the speaker, the sound becomes mellow, rolling off some of the high frequencies. To add more of the room sound, the microphone can be angled away from the amplifier, or placed further away from the speaker.
Microphone Placement
Overhead Drum Kit
The CL8a performs exceptionally well when used as an overhead drum set microphone. You can position the microphone approximately centered 5 feet in front of the drum kit 12 to 24 inches above the kit.
For stereo miking, use two microphones placed over the drum set at a distance of 3 to 6 feet. Even though overhead mics are mostly for the cymbals, you can get the entire kit to sound great with just two microphones. You should experiment with the exact placement depending on the size of the room and whether you're looking for an ambient or close-miked sound.
Using the CL8a
P-Popping
Sometimes when recording vocals certain plosive consonants (like hard “P” and “B” sounds) overload the input of the microphone which causes clipping and adds distortion to your recording. It is advisable to use a pop filter to reduce the effect of the blasts of air from vocalists when pronouncing words that include these hard consonant sounds. The pop filter also helps to protect the microphone element from moisture.
You can also try placing the microphone slightly off axis (on a slight angle) from the vocalist. This can often solve the problem without using an external pop filter.
Stand Mounting the CL8a
The CL8a can be mounted to a standard microphone stand using the included swivel mount adapter. If you are using a 5/8" mic stand, you will need to remove the Euro stand adapter.
Simply screw on the swivel adapter on your mic stand or boom arm. Now, loosen the thumbscrew and adjust the microphone to the desired angle. Once set, tighten the thumbscrew to secure the microphone in place.
natural_image
Line drawing of a SAMSON audio recording device with a hand operating it, showing no text or symbols on the device itself.Optional SPO1 shockmount
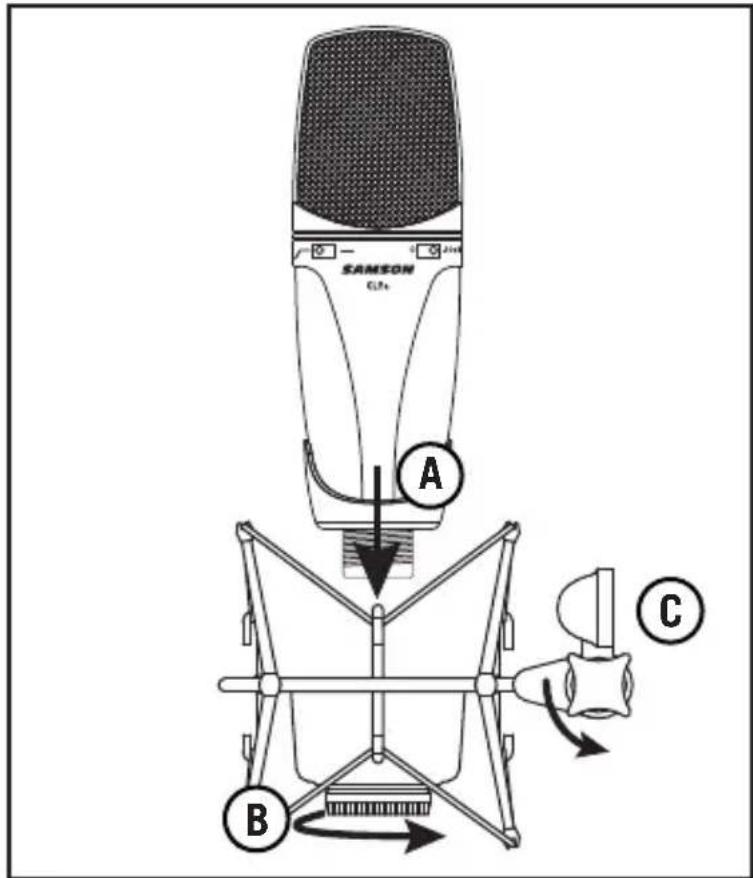
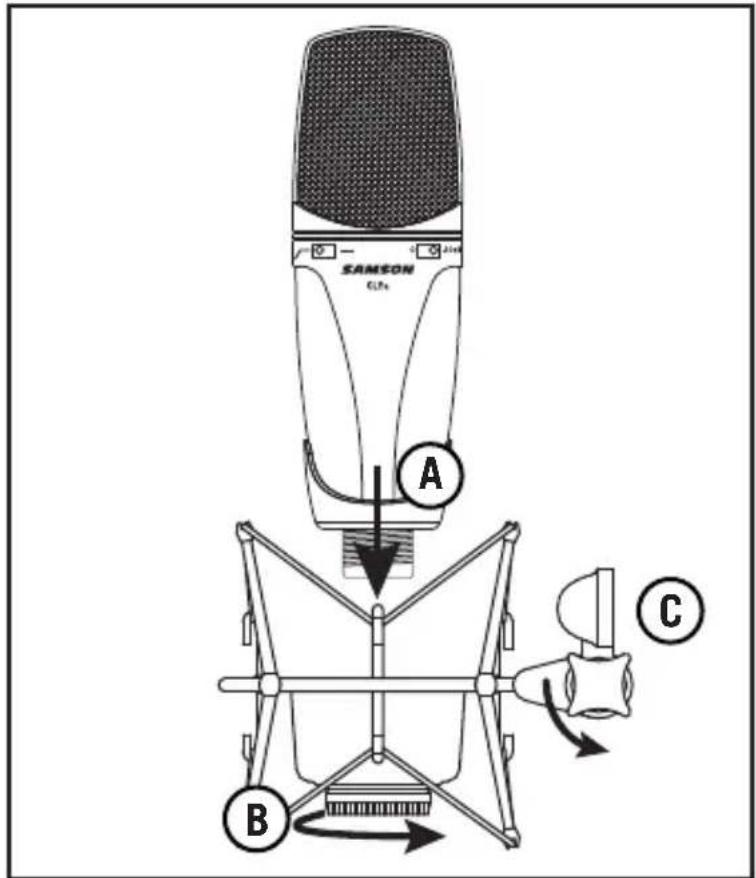
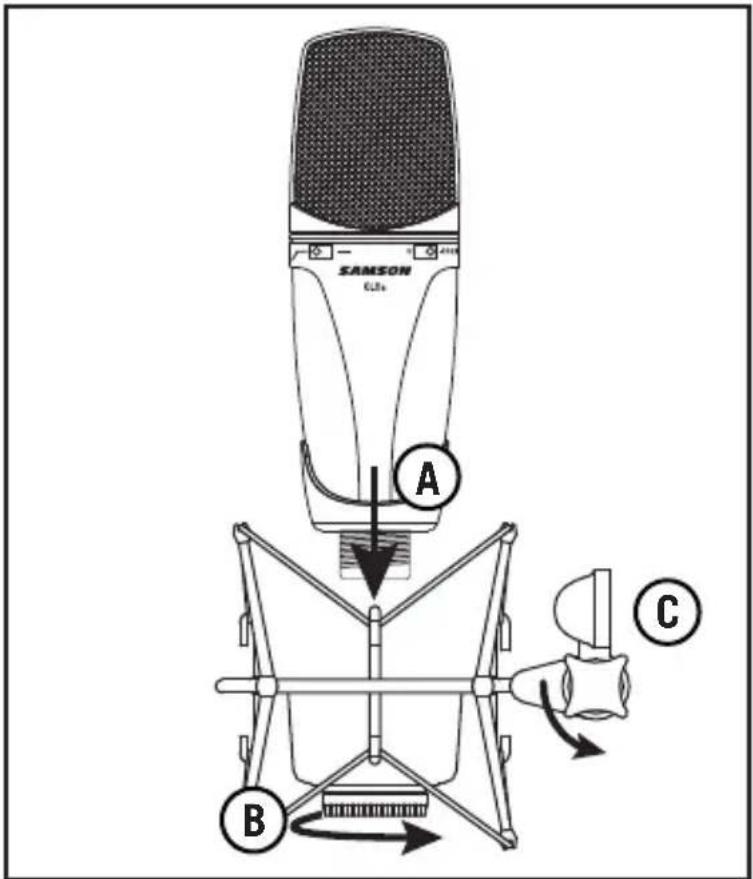
For additional isolation the CL8a can be fitted on the optional SP01 spider shockmount to isolate the microphone from vibrations and mechanical noises transmitted through the mic stand. Follow the steps below to mount the CL8a to the SP01.
Attach the SPO1 to a mic stand by screwing the shockmount onto the stand.
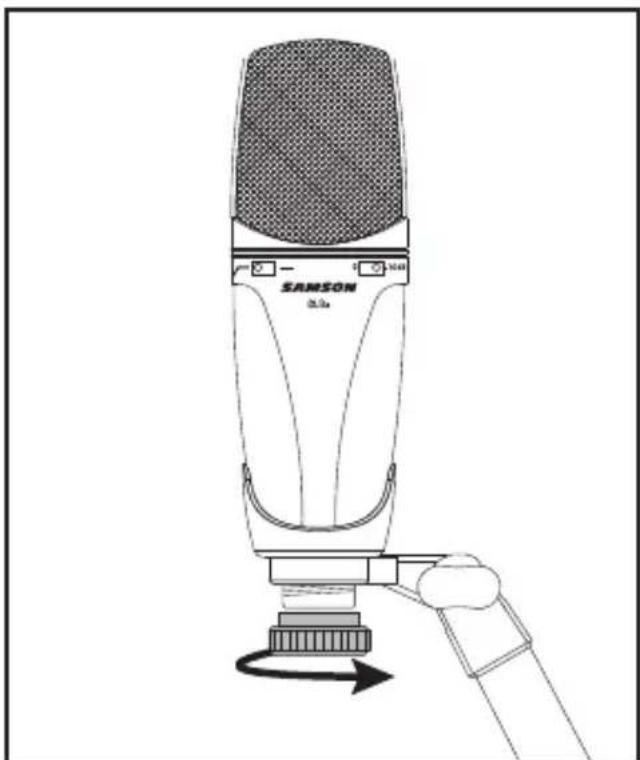
Remove the CL8a swivel mount by rotating the threaded collar counterclockwise.
Install the CL8a into the SPO1 by fitting the microphone into the center of the web, positioning the CL8a onto the bottom mounting plate (A).
Secure the SP01 by rotating the shockmount's the threaded collar clockwise until tight (B).
To adjust the angle of the CL8a, loosen the thumb screw on the SP01, position the shockmount and microphone to the desired position. Once set, tighten the thumbscrew to secure the microphone in place (C).
Note: Be careful not to cross thread or over tighten the threaded collar or thumb screw.
Specifications
Element Condenser
Diaphragm Thickness 4 microns
Frequency Response 20 Hz - 20 kHz
Polar Pattern Omnidirectional,
Unidirectional (Cardioid), Bidirectional
Impedance 200 ohms balanced
Minimum Load Impedance 1000 ohms
Sensitivity
Omnidirectional -40 dBV/Pa
Cardioid -35 dBV/Pa
Figure-8 -40 dBV/Pa
Max SPL (Pad Off)
Omnidirectional 147 dB SPL
Cardioid 142 dB SPL
Figure-8 147 dB SPL
Signal-to-Noise
Omnidirectional 77 dB
Cardioid 76 dB
Figure-8 77 dB
Equivalent Noise Level 17 dB
Microphone Connector 3-pin, gold-plated XLR
Power Supply 48 VDC ± 3 V
Accessories Mic swivel
Dimensions 6.9" x 2.1"
174mm x 53 mm
Weight 1.14 lb
0.52 kg
At Samson, we are continually improving our products, therefore specifications and images are subject to change without notice.
Specifications
Omnidirectional
line
| Frequency Response | dB | | ------------------ | ------ | | 20 | -5.0 | | 50 | 0.0 | | 100 | 0.0 | | 200 | 0.0 | | 500 | 0.0 | | 1000 | 0.0 | | 2000 | 0.0 | | 5000 | 0.0 | | 10000 | 0.0 | | 20000 | 0.0 | | 50000 | 5.0 | | 100000 | 5.0 | | 200000 | 5.0 | | 500000 | 5.0 | | 1000000 | 5.0 |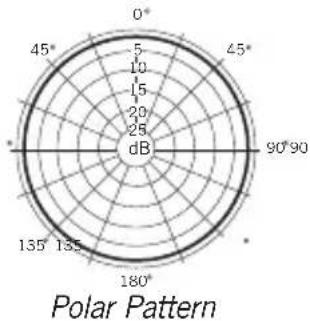
radar
| Angle | Value | |-------|-------| | 0° | 10 | | 45° | 15 | | 90° | 20 | | 135° | 25 | | 180° | 30 | | 225° | 25 | | 270° | 20 | | 315° | 15 | | 360° | 10 |Cardioid
radar
| Angle | Value | |-------|-------| | 0° | 5 | | 45° | 10 | | 90° | 25 | | 135° | 5 | | 180° | 5 |Bidirectional
line
| Frequency Response | dB | | ------------------ | ------ | | 20 | -2.0 | | 50 | -1.5 | | 100 | -1.0 | | 200 | -0.5 | | 500 | 0.0 | | 1000 | 0.5 | | 2000 | 1.0 | | 5000 | 1.5 | | 10000 | 2.0 | | 20000 | 1.5 | | 50000 | 1.0 | | 100000 | 0.5 | | 200000 | 0.0 | | 500000 | -5.0 |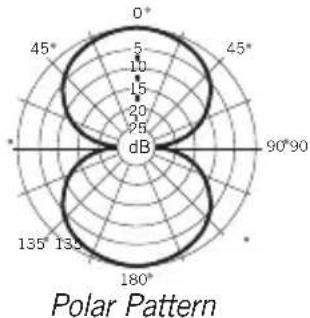
radar
| Angle | Value | |-------|-------| | 0° | 5 | | 45° | 10 | | 90° | 25 | | 135° | 10 | | 180° | 5 |
natural_image
Line drawing of a microphone with mesh grille and control knob (no text or symbols)natural_image
Line drawing of a SAMSON audio recording device with a scroll wheel and control knob (no text or symbols)Support antichoc SPO1 en option
natural_image
Line drawing of a desktop microphone with grille and control buttons (no text or symbols)natural_image
Line drawing of a SAMSON audio recording device with a hand operating it, showing no text or symbols on the device itself.Optionale SPO1-Mikrofonspinne

line
| Freqenzgang | dB | | ----------- | ------ | | 20 | -5.0 | | 50 | 0.0 | | 100 | 0.0 | | 200 | 0.0 | | 500 | 0.0 | | 1000 | 0.0 | | 2000 | 0.0 | | 5000 | 0.0 | | 10000 | 0.0 | | 20000 | 0.0 | | 50000 | 5.0 | | 100000 | 5.0 | | 200000 | 5.0 | | 500000 | 5.0 | | 1000000 | 5.0 |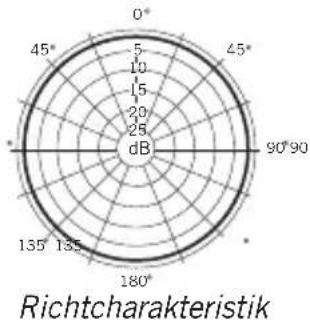
radar
Richtcharakteristik | Angle | Value | |---|---| | 0° | 5 | | 45° | 10 | | 90° | 15 | | 135° | 20 | | 180° | 25 | | 225° | 30 | | 270° | 35 | | 315° | 40 | | 360° | 45 |Niere
radar
| Angle | Value | |-------|-------| | 0° | 5 | | 45° | 10 | | 90° | 25 | | 135° | 5 | | 180° | 10 |Acht
radar
| Angle | Value | |-------|-------| | 0° | 5 | | 45° | 10 | | 90° | 25 | | 135° | 10 | | 180° | 5 |
natural_image
Line drawing of a microphone with grille and control buttons (no text or symbols)Patrón polar
natural_image
Line drawing of a SAMSON 3.5x audio recording device with a scroll wheel and adjustment knob (no text or symbols on the device itself)Soporte araña (shockmount) SPO1 opcional
Omnidirectional -40 dBV/Pa
Cardioide -35 dBV/Pa
Figura-8 -40 dBV/Pa
Máx. SPL (pad apagado)
Omnidireccional 147 dB SPL
Cardioide 142 dB SPL
Figura 8 147 dB SPL
natural_image
Front view of a desktop microphone with grille and control buttons (no text or symbols)natural_image
Line drawing of a SAMSON audio recording device with a hand operating it, showing no text or symbols on the device itself.Hicksville, NY 11801
www.samsontech.com
- Introduction
- Powering the microphone
- Setting the signal level
- Using the pad switch (A)
- High-Pass Filter (B)
- Polar Pattern
- Proximity Effect
- Microphone Placement
- Vocals
- Acoustic Guitar
- Piano
- Guitar Amp
- Overhead Drum Kit
- Using the CL8a
- P-Popping
- Stand Mounting the CL8a
- Optional SPO1 shockmount
- Specifications
- Sensitivity
- Max SPL (Pad Off)
- Signal-to-Noise
- Support antichoc SPO1 en option
- Optionale SPO1-Mikrofonspinne
- Patrón polar
- Soporte araña (shockmount) SPO1 opcional
- Máx. SPL (pad apagado)
Brand : SAMSON
Model : CL8a
Category : Microphone