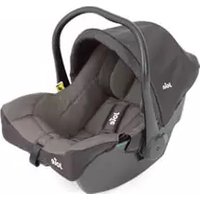
iPlenti - Car seat Joie - Free user manual and instructions
Find the device manual for free iPlenti Joie in PDF.

User questions about iPlenti Joie
0 question about this device. Answer the ones you know or ask your own.
Ask a new question about this device
Download the instructions for your Car seat in PDF format for free! Find your manual iPlenti - Joie and take your electronic device back in hand. On this page are published all the documents necessary for the use of your device. iPlenti by Joie.
USER MANUAL iPlenti Joie
enhanced child restraint
68 Instruction Manual
FF Manuel d'instructions
DE Bedienungsanleitung
NL Instructiehandleiding
IT Manuale di istruzioni
ES Manual de instrucciones
PT Manual de instruções
PL Instrukcja obsługi
Návod k obsluze
SK Návod na použitie
SL Navodila za uporabo

natural_image
Icon depicting a person sitting on a chair next to an adult, enclosed in a rounded square frame (no text or symbols)ECE R129/03: i-Size

natural_image
Line drawing of a car comfort seat with seatbelt and seat rack (no text or symbols)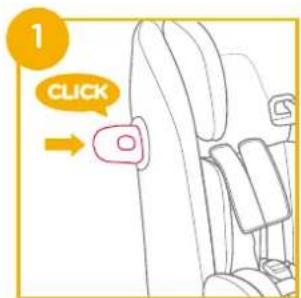
text_image
1 CLICK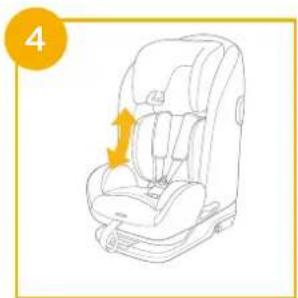
natural_image
Line drawing of a car seat with an orange arrow indicating the seatbelt direction (no text or symbols)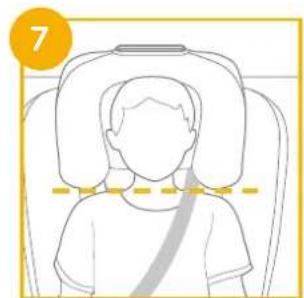
natural_image
Line drawing of a person seated in a chair with a seatbelt, no text or symbols present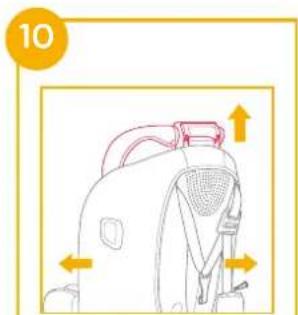
text_image
10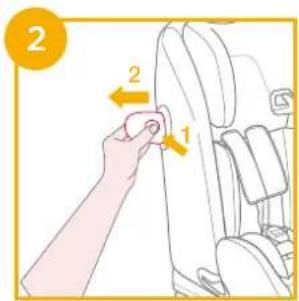
text_image
2 1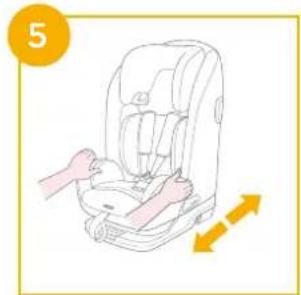
natural_image
Illustration of a baby car seat with hands adjusting seatbelt, no text or symbols present
natural_image
Line drawing of a washing machine with handle and seat (no text or symbols)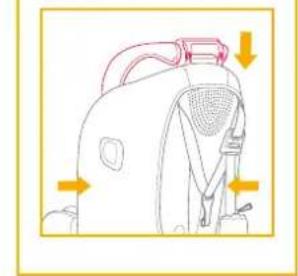
natural_image
Line drawing of a backpack with highlighted grip and yellow directional arrows indicating movement or force (no text or symbols)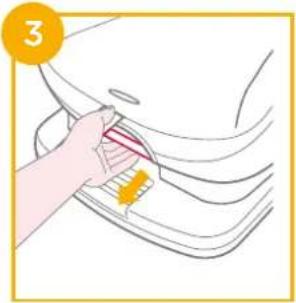
natural_image
Illustration of a hand using a tool to clean or store items on a car surface (no text or symbols visible)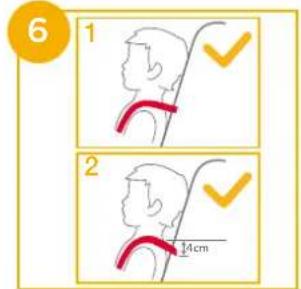
text_image
6 1 2 14cm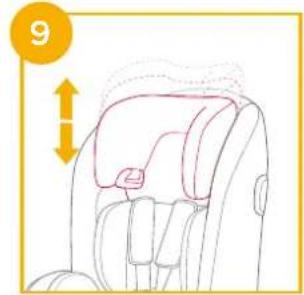
natural_image
Line drawing of a car seatbelt with a highlighted seat area and directional arrow (no text or symbols)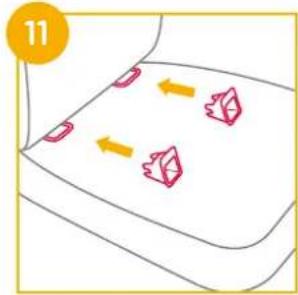
natural_image
Simple line drawing of a container with four red icons and directional arrows, no text or symbols present.
natural_image
Line drawing of a car seatbelt with a red handle and seat, no text or symbols present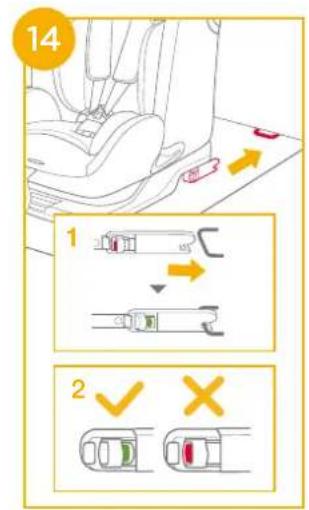
text_image
14 1 2 ✓ ✗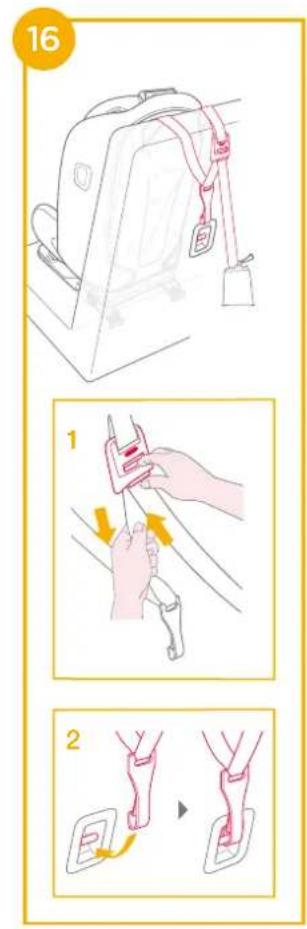
text_image
16 1 2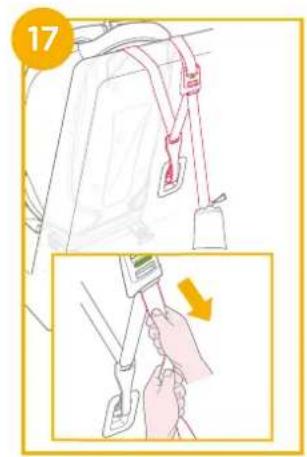
text_image
17
text_image
13 1 2 01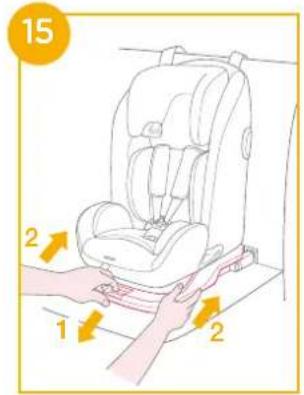
text_image
15 2 1 2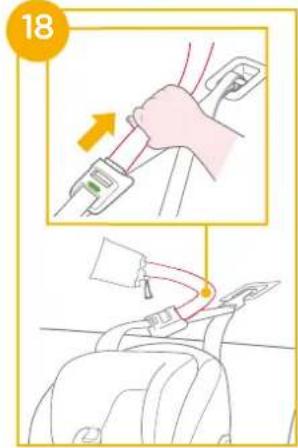
text_image
18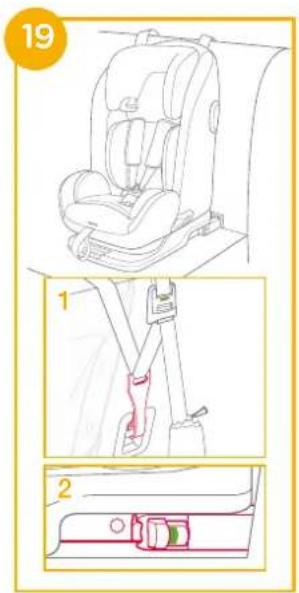
text_image
19 1 2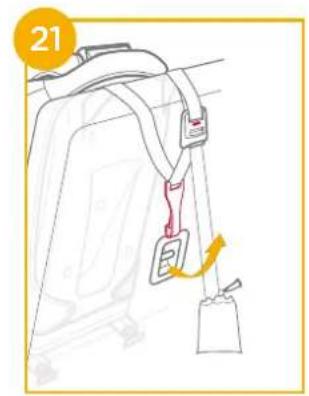
text_image
21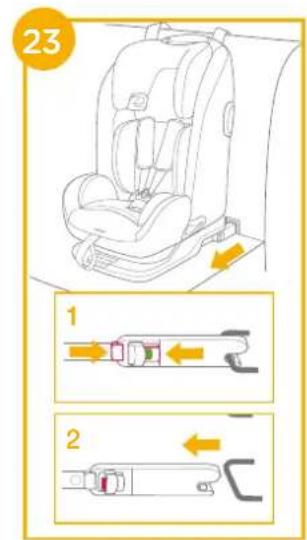
text_image
23 1 2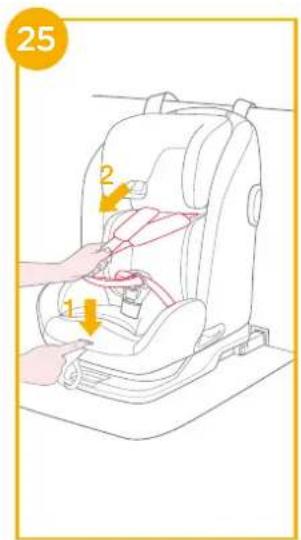
text_image
25 1 2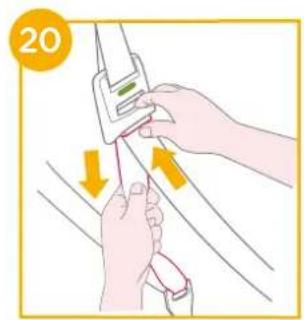
text_image
20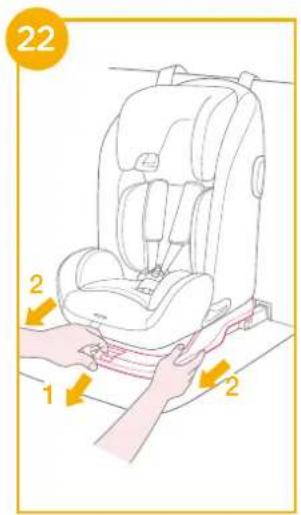
text_image
22 1 2 2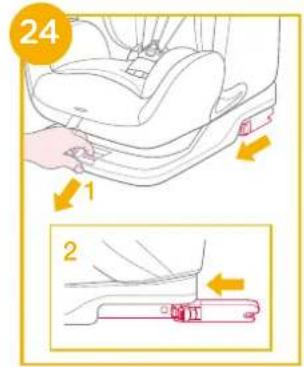
text_image
24 1 2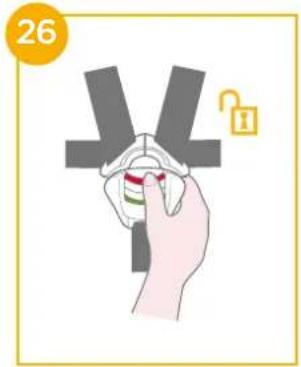
text_image
26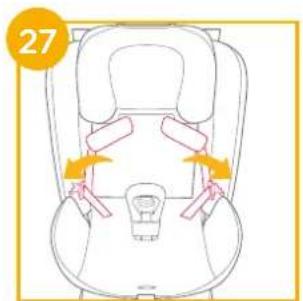
text_image
27
flowchart
graph TD
    A["Patient Placement"] --> B["Surgical Placement"]
    B --> C["Patient Position"]
    C --> D["Patient Position with Lock Icon"]
natural_image
Line drawing of a car seatbelt with a yellow arrow indicating the grip (no text or symbols)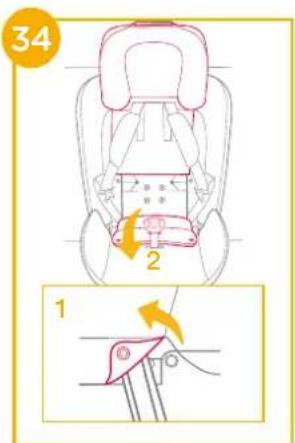
text_image
34 2 1
natural_image
Simple line drawing of a hat-like object with a circular badge showing number 28 (no text or symbols on the object itself)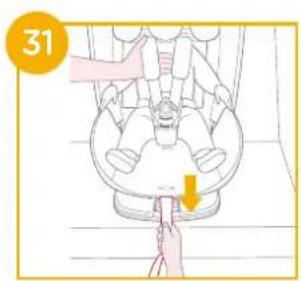
text_image
31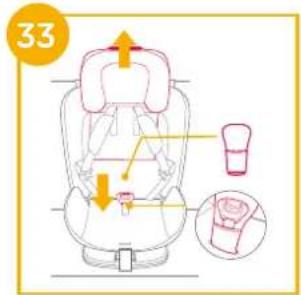
text_image
33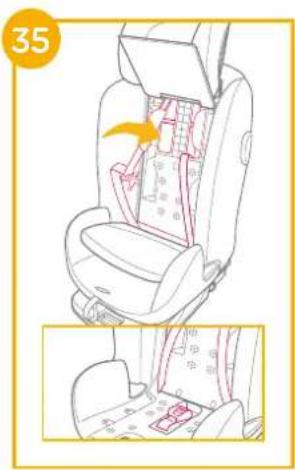
text_image
35
38
natural_image
Line drawing of a child in a car seatbelt, showing seatbelt and seatbelt buckle (no text or symbols)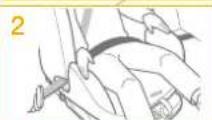
text_image
3
39
natural_image
Hand holding a small object with a red-and-white label, next to a large gray Y-shaped symbol and an open padlock icon (no text or symbols on the object itself)40
natural_image
Line drawing of a car seat with a highlighted seat area and arrow indicating rotation (no text or symbols)41

text_image
4142
natural_image
Line drawing of a car seat with two side views: front seat and rear seat (no text or symbols)
43
natural_image
Line drawing of a car comfort seat with a folded top and seatbelt, no text or symbols present
text_image
44NOTE
natural_image
Illustration of two car seats with arrows indicating seat movement (no text or symbols)GB
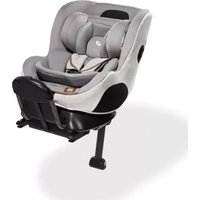
Welcome to Joie™
Congratulations on becoming part of the Joie family! We are so excited to be part of your journey with your little one. While traveling with the I-Plenti™ enhanced child restraint you are using a high quality, fully certified safety i-Size enhanced child restraint. Please carefully read this manual and follow each step to ensure a comfortable ride and best protection for your child.
To use this Joie enhanced child restraint according to the UN Regulation No.129, your child must meet the following requirements.
Child height 76cm-150cm/ Child weight 9kg-36kg (approximately 12 years old or under).
Base
Please read all the instructions in this manual before installing and using the product.
! IMPORTANT: KEEP FOR FUTURE REFERENCE. PLEASE READ CAREFULLY.
Please keep the instruction manual in the storage pocket anytime inside the seat pad as right figure.
For warranty information, please visit our website at joiebaby.com
natural_image
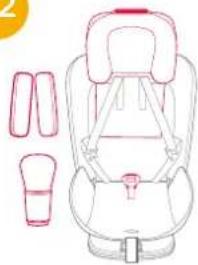
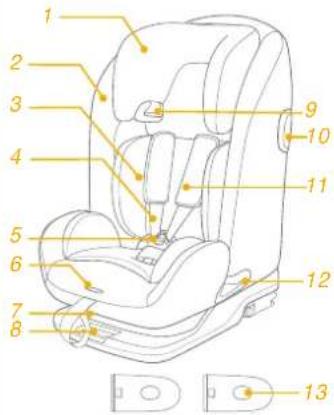
Line drawing of a mechanical device with an open book and lever mechanism (no text or symbols)Parts List
Please make sure there are no missing parts. Please contact the retailer if anything is missing.
1 Head Support
2 Lower Back Support
3 Infant Insert
4 Shoulder Strap
5 Harness Buckle
6 Webbing Adjustment Button
7 Recline Adjustment Button
8 ISOFIX Adjustment Button
9 Vehicle Shoulder Belt Guide
10 Side Impact Protection
11 Shoulder Harness Strap Cover
12 Vehicle Lap Belt Guide
13 Side Impact Protection x2 Pod (must use on door side only)
14 Head Support Adjustment Lever
15 Top Tether Strap
16 Tether Strap Adjuster
17 Tether Hook
18 Pocket
19 ISOFIX Connector
20 ISOFIX Guides
21 IM storage pocket (Please keep this IM in storage pocket anytime)
text_image
Diagram of a car safety seat with numbered parts for identification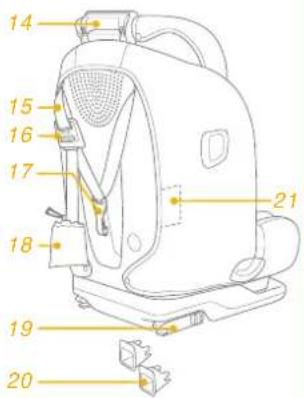
text_image
Technical diagram of a device with numbered parts labeled for identificationWARNING
! Do take care so that the rigid items and plastic parts of the enhanced child restraint system shall be so located and installed that they are not liable to become trapped by a moveable seat or in a door of the vehicle.
! To use this enhanced child restraint according to the UN Regulation No.129, your child must meet the following requirements.
Child height 76cm-150cm/ Child weight 9kg-36kg (approximately 12 years old or under).
When used for stature heights between 135cm and 150cm might not fit in all vehicles, due to a low position of the vehicle roof at the side.
! The enhanced child restraint may not fit in all approved vehicles when used in one of these positions.
! IMPORTANT - DO NOT USE BEFORE THE CHILD'S AGE EXCEEDS 15 MONTHS (Refer to instructions)
! Any straps holding the enhanced child restraint to the vehicle should be tight. Any straps restraining the child should be adjusted to the child's body, and straps should not be twisted.
! DO NOT use any load bearing contact points other than those described in the instructions and marked on the enhanced child restraint.
WARNING
! After your child is placed in this enhanced child restraint, the safety belt must be used correctly. Ensure that any lap strap is worn low down, so that the pelvis is firmly engaged, shall be stressed.
This enhanced child restraint should be replaced when it has been subject to violent stresses in an accident. An accident can cause damage to it that you cannot see.
! Concern the danger of making any alterations or additions to the device without the approval of the competent authority, and a danger of not following closely the installation instructions provided by the enhanced child restraint manufacturer.
! Please keep this enhanced child restraint away from sunlight, otherwise it may be too hot for child's skin. Always touch the enhanced child restraint before placing child in it.
! Child is not left in their enhanced child restraint system unattended.
! Any luggage or other objects liable to cause injuries in the event of a collision shall be properly secured.
! The enhanced child restraint system shall not be used without the soft goods.
WARNING
! The soft goods should not be replaced with any other than the one recommended by the manufacturer, because the soft goods constitutes an integral part of the restraint performance.
! The instructions should be retained on the enhanced child restraint for its life period or in the vehicle handbook in the case of built-in restraints. The user shall also be referred to the vehicle manufacturer's handbook.
Emergency
In case of emergency or accidents, it is most important to have your child taken care of with first aid and medical treatment immediately.
Product Information
For installation with ISOFIX system + Top Tether
-
This is an i-Size Enhanced Child Restraint System. It is approved according to UN Regulation No.129, for use in, i-Size compatible vehicle seating positions as indicated by vehicle manufacturers in the vehicle users' manual.
-
If in doubt consult either the Enhanced Child Restraint System manufacturer or the retailer.
For installation with 3-point belt
For installation with 3-point belt + ISOFIX system
- This is an i-Size booster seat Enhanced Child Restraint System. It is approved according to UN Regulation No.129, for use primarily in "i-Size seating positions" as indicated by vehicle manufacturers in the vehicle user's manual.
- If in doubt consult either the Enhanced Child Restraint System manufacturer or the retailer.
Materials Plastics, metal, fabrics
Patent No. Patents pending
Choose the Installation Mode Co
| ECE R129 | Child's Size | Installation Mode | Installation | Reference Age | Recline Position | |
| 76cm - 105cm / max. 19.5kg | Toddler mode |  |  Please use the infant insert to support the child if the child shoulders is lower than the headrest bottom edge. Please use the infant insert to support the child if the child shoulders is lower than the headrest bottom edge. | 15 months to approx 4.5 years | Position 1-3 | |
| 100cm - 150cm | Junior mode | 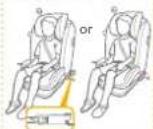 | [w8z2] | 3 years to approx 12 years | Position 1-3 | |
ns on Installation
natural_image
Interior view of a vehicle seatbelt with a yellow X mark indicating a specific seat (no text or symbols present)
natural_image
Interior view of a car seatbelt with a yellow checkmark indicating a location (no text or symbols on the belt)
natural_image
Illustration of a car seat with a red bandage and a yellow checkmark (no text or symbols)
text_image
1 2 3 4 5 6 7
natural_image
Side view line drawing of a car with two people seated inside the driver's seat (no text or symbols)Use Side Impact Protection
see images 1 2
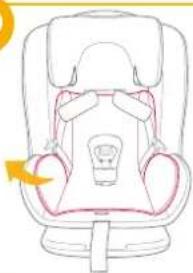
- The enhanced child restraint is delivered with removable side impact protection pod. This side impact protection pod MUST be used on the door side of the vehicle. Installation shown in ①.
- Press the release button to remove side impact protection pod.
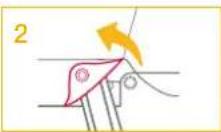
Recline Adjustment
see images 3 - 5
Squeeze the recline adjustment button ③, to adjust the enhanced child restraint to the proper position. The recline angles are shown as ④. There are 3 recline positions for forward facing mode. ④
! Please confirm that the backrest adjustment engaged in place. 5
The enhanced child restraint may not fit in all approved vehicles when used in one of these positions.
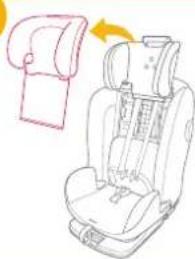
Height Adjustment for Head Support and Shoulder Harnesses
see images 6 - 10
- Please adjust the head support to proper height according to 67.
When used in toddler mode, the shoulder harness height must be even with child's shoulders. 6-1
! The maximum distance between the shoulder of baby and shoulder hole is 4 cm. 6-2
! When used in junior mode, the shoulder belt guides must be even with child's shoulders. ⑦
2. Squeeze the head support adjustment lever, meanwhile pull up or push down the head support until it snaps into one of the 9 positions. 6 9
! Before adjusting the head support height have your child lean forward slightly.
Side wings are able to gradually open while the head support is adjusted to the 4th position.
The enhanced child restraint may not fit in all approved vehicles when used in one of these positions.
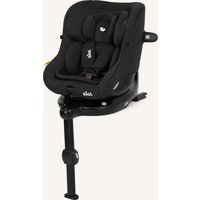
Using in the Toddler Mode (Child height 76cm-105cm/Child weight 9kg-19.5kg/15 months - 4.5 years old)
see images 11 - 32
- If required attach the ISOFIX guides onto the vehicle ISOFIX bars.
! Please recline the seat to the most upright position before assembling enhanced child restraint. - Place the top tether behind the vehicle seat. 12
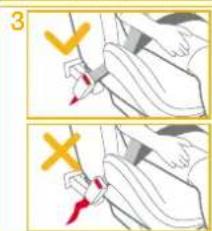
- Extend the ISOFIX connectors by depressing on the release button whilst pulling on the connector. 13
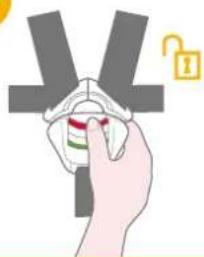
! There are multiple positions for ISOFIX. - Make sure that both ISOFIX connectors are securely attached to their ISOFIX anchor points. 14-1 The colors of the indicators on both ISOFIX connectors should be completely green. 14-2
- Press the ISOFIX release button and push the base back against the vehicle seat until tight. 15
-
To extend top tether for use, press button on tether adjuster and pull to lengthen. ^16
-
Connect the tether hook securely to the anchorage fitting. 17
! Use top tether for installation if vehicle is equipped with a tether anchorage fitting and vehicle requirements are met (see vehicle owner's manual).
8. Make sure that tether hook are securely attached to the anchorage fitting. 18 The colors of the indicators on tether strap adjuster should be completely green.
9. The child restraint system is installed as shown in 19.
! The colors of the indicators on tether strap adjuster should be completely green. 19-1
! The colors of the indicators on both ISOFIX connectors should be completely green. 19-2
Removing the enhanced child restraint
- Press the release button 20 to loosen the webbing and then detach the hook to remove the top tether. 21
- To remove base from the vehicle, press the ISOFIX release button and pull the base back from the seat. 22
- Then press and pull back on the ISOFIX connector on both sides.
- For transporting, press ISOFIX release button and move back ISOFIX connector so it is folded completely. 24
Securing your Child
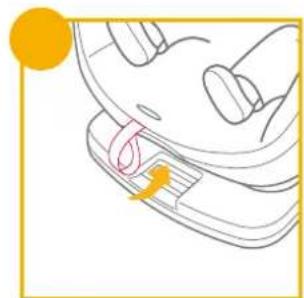
- Press the webbing adjustment button, while pulling out the shoulder harnesses to the proper length.
- Press the red button to disengage the buckle. 26
- Fix the buckles on the both sides of seat to make placing the baby more convenient.
-
Please use the infant insert to support the child if the child shoulders is lower than the headrest bottom edge. ^28
-
Place the child into the enhanced child restraint and pass both arms through the harnesses. 29
- Engage the buckle.
- Pull down the adjustment webbing and adjust it to the proper length so that your child is snugly secured.
! Make sure the space between the child and the shoulder harness is about the thickness of one hand.
8. Be able to fix the webbing under the soft goods. 32
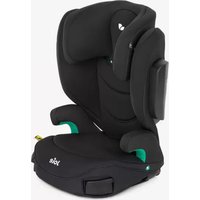
Using in the Junior Mode (Child height 100cm-150cm/Child weight 15kg-36kg/3 years - 12 years old)
see images 33 - 38
- Store the shoulder strap cover, crotch belt cover in a safe place.
- Store the buckle and harness straps in a safe place. 34 35 36
Securing your Child
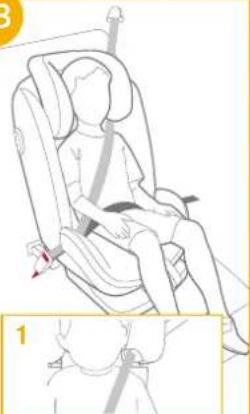
For installation with 3-point-belt
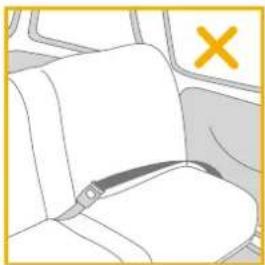
- To ensure the head support is at the correct height the bottom of the headrest MUST be even with the top of child's shoulders.
- Correctly assembled 3-point-belt is shown as 37
! Shoulder belt must pass through shoulder belt guide. 37-1
! Waist belt must pass through waist belt slots. 57-2
! The enhanced child restraint can not be used if the vehicle safety belt buckle (female buckle end) is too long to anchor the enhanced child restraint securely. 37-3
! Never use a vehicle waist-only belt across front of child.
! Do not use shoulder belt loose or positioned under arm.
! Do not use shoulder belt behind child's back.
Do not allow child to slide down in the enhanced child restraint in case of strangulation.
For installation with 3-point-belt + ISOFIX system
- Installation with ISOFIX system as 11-15.
- To ensure the head support is at the correct height the bottom of the headrest MUST be even with the top of child's shoulders.
- Correctly assembled 3-point-belt is shown as
! Shoulder belt must pass through shoulder belt guide. 38-1
! Waist belt must pass through waist belt slots. ⚙-2
! The enhanced child restraint can not be used if the vehicle safety belt buckle (female buckle end) is too long to anchor the enhanced child restraint securely. 38-3
! Make sure that both ISOFIX connectors are securely attached to their ISOFIX anchor points. The colors of the indicators on both ISOFIX connectors should be completely green. 38-4
! Check to make sure the child restraint is securely installed by pulling on the both ISOFIX connectors.
! Never use a vehicle waist-only belt across front of child.
! Do not use shoulder belt loose or positioned under arm.
! Do not use shoulder belt behind child's back.
Do not allow child to slide down in the enhanced child restraint in case of strangulation.
Detach Soft Goods
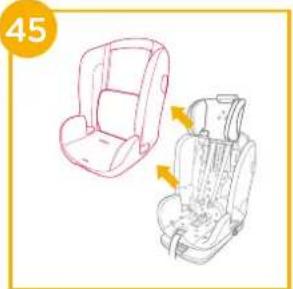
see images 39 - 45
- Press the red button to disengage the buckle. 39
- Follow steps 40 - 45 to detach soft goods.
To re-attach the soft goods please repeat the above steps in the reverse step.
Care and Maintenance
! Wash the soft goods with cold water under 30°C.
! Do not iron the soft goods.
! Do not bleach or dry clean the soft goods.
Do not use undiluted detergents gasoline or other organic solvents to wash the enhanced child restraint. It may cause damage to the product.
! Clean child restraint system with mild detergent, water and soft cloth.
! Do not twist the soft goods and inner padding to dry with great force. It may leave the soft goods and inner padding with wrinkles.
! Please hang dry the soft goods and inner padding in the shade.
! Please remove the enhanced child restraint from the vehicle seat if not in use for a long period of time. Put the enhanced child restraint in a cool, dry place and somewhere your child can not access it.


natural_image
Line drawing of a mechanical device with an open book and lever, set against a solid orange background (no text or symbols)Liste des pièces
text_image
Labeled diagram of a portable air purifier with numbered parts for identificationAVERTISSEMENT
natural_image
Interior view of a vehicle seatbelt with a yellow X mark indicating a specific seat (no text or symbols present)
natural_image
Illustration of a car seatbelt with a yellow checkmark indicating a location (no text or symbols present)
natural_image
Illustration of a car seat with a red bandage and a yellow checkmark (no text or symbols)
text_image
1 2 3 4 5 6 7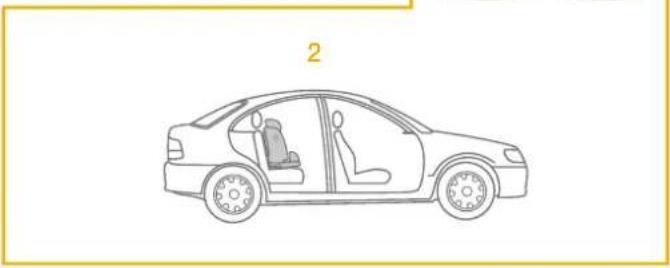
natural_image
Side view line drawing of a car showing two people seated inside the dashboard and seat (no text or symbols)natural_image
Illustration of a person reading a book with a pointer, set against an orange background (no text or symbols)Teileliste
text_image
Diagram of a car safety seat with numbered labels pointing to different compartments
text_image
Technical diagram of a device with numbered parts labeled for identificationWARNUNG
natural_image
Interior view of a vehicle seatbelt with a yellow X mark indicating a specific seat (no text or symbols present)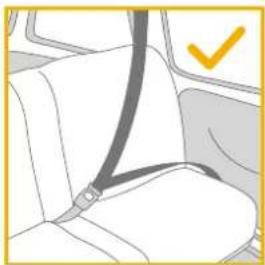
natural_image
Illustration of a car seatbelt with a yellow checkmark indicating a location (no text or symbols present)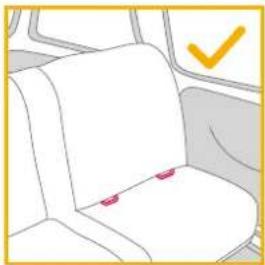
natural_image
Illustration of a car seat with a red bandage and a yellow checkmark (no text or symbols)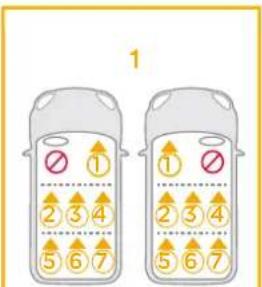
text_image
1 2 3 4 5 6 7 ① ① ② 3 4 ⑤ 6 7
natural_image
Side view line drawing of a car with two people seated inside the driver's seat (no text or symbols)natural_image
Line drawing of a backpack with an open book and a pointer arrow pointing to it (no text or symbols)Onderdelenlijst
text_image
Diagram of a car safety seat with numbered labels pointing to different compartments
text_image
Technical diagram of a device with numbered parts labeled for identificationWAARSCHUWING
natural_image
Interior view of a vehicle seatbelt with a yellow X mark indicating a specific seat (no text or symbols present)
natural_image
Interior view of a car seatbelt with a yellow checkmark indicating a location (no text or symbols on the belt)
natural_image
Illustration of a car seat with a red bandage and a yellow checkmark (no text or symbols)
text_image
1 2 3 4 5 6 7
natural_image
Side view line drawing of a car with two people seated inside the driver's seat (no text or symbols)natural_image
Illustration of a vintage mechanical device with a book and pointer, set against a solid orange background (no text or symbols)Elenco parti
text_image
Diagram of a car seat with numbered labels pointing to different compartments or features.
text_image
Technical diagram of a portable air purifier with numbered component labelsAVVERTENZA
natural_image
Interior view of a vehicle seatbelt with a yellow X mark indicating a specific seat (no text or symbols present)
natural_image
Illustration of a car seatbelt with a yellow checkmark indicating a location (no text or symbols present)
natural_image
Illustration of a car seat with a red bandage and a yellow checkmark (no text or symbols)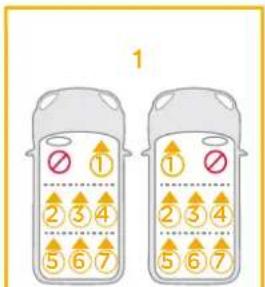
text_image
1 2 3 4 5 6 7 1 2 3 4 5 6 7
natural_image
Side view line drawing of a car with two people seated inside the driver's seat (no text or symbols)natural_image
Line drawing of a device with an open book and a pointer arrow pointing to it (no text or symbols)Lista de piezas
text_image
Diagram of a car safety seat with numbered labels pointing to different compartments
text_image
14 15 16 17 21 18 19 20ADVERTENCIA
natural_image
Interior view of a vehicle seatbelt with a yellow X mark indicating a specific seat (no text or symbols present)
natural_image
Interior view of a car seatbelt with a yellow checkmark indicating a location (no text or symbols on the belt)
natural_image
Interior view of a car seat with a yellow checkmark indicating a location (no text or symbols on the seat itself)
text_image
1 2 3 4 5 6 7 1 2 3 4 5 6 7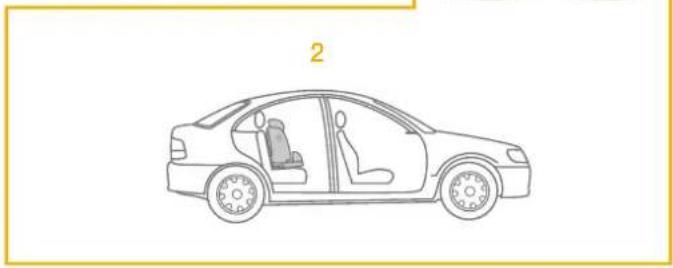
natural_image
Side-view line drawing of a car showing two people inside the dashboard and seat (no text or symbols)natural_image
Illustration of a person reading a book with a pointer, set against a solid orange background (no text or symbols)Lista de componentes
text_image
Diagram of a car safety seat with numbered labels pointing to different compartments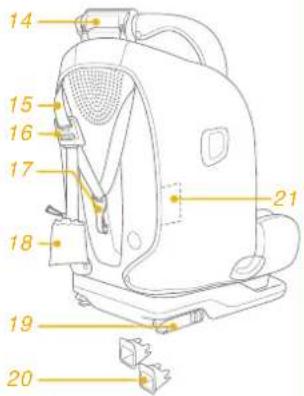
text_image
Technical diagram of a device with numbered parts labeled for identificationAVISO
natural_image
Interior view of a vehicle seatbelt with a yellow X mark indicating a specific seat (no text or symbols present)
natural_image
Illustration of a car seatbelt with a yellow checkmark indicating a location (no text or symbols present)
natural_image
Illustration of a car seat with a red bandage and a yellow checkmark (no text or symbols)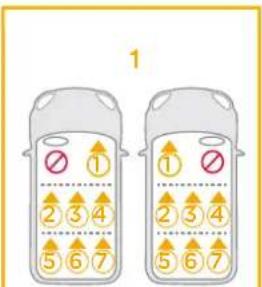
text_image
1 2 3 4 5 6 7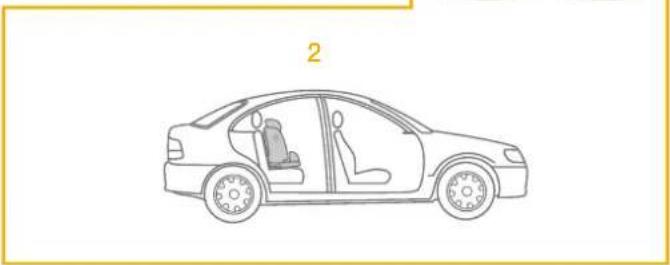
natural_image
Side view line drawing of a car with two people seated inside the driver's seat (no text or symbols)natural_image
Illustration of a person reading a book with a pointer, set against an orange background (no text or symbols)Lista części
text_image
Diagram of a car safety seat with numbered labels pointing to different compartments
text_image
Technical diagram of a device with numbered parts labeled for identificationOSTRZEŻENIE
natural_image
Interior view of a vehicle seatbelt with a yellow X mark indicating a specific seat (no text or symbols present)
natural_image
Interior view of a car seatbelt with a yellow checkmark indicating a location (no text or symbols on the belt)
natural_image
Illustration of a car seat with a red bandage and a yellow checkmark (no text or symbols)
text_image
1 2 3 4 5 6 7
natural_image
Side view line drawing of a car with two people seated inside the driver's seat (no text or symbols)natural_image
Illustration of a backpack with an open book and a diagonal line, set against a solid orange background (no text or symbols)Seznam dílů
text_image
Diagram of a car safety seat with numbered labels pointing to different compartments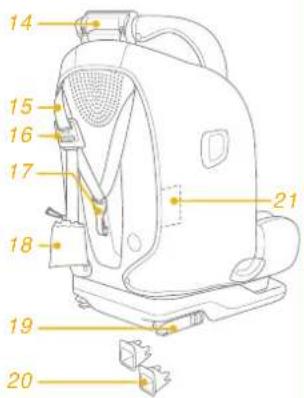
text_image
Technical diagram of a device with numbered parts labeled for identificationVAROVÁNÍ
natural_image
Interior view of a vehicle seatbelt with a yellow X mark indicating a specific seat (no text or symbols present)
natural_image
Illustration of a car seatbelt with a yellow checkmark indicating a location (no text or symbols present)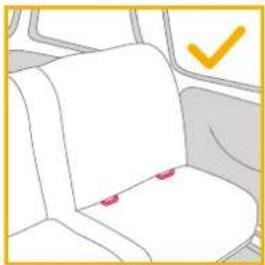
natural_image
Illustration of a car seat with a red bandage and a yellow checkmark (no text or symbols)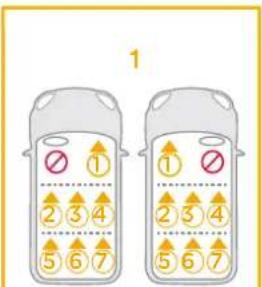
text_image
1 2 3 4 5 6 7 ① ② ③ ④ ⑤ 6 7
natural_image
Side view line drawing of a car with two people seated inside the driver's seat (no text or symbols)natural_image
Illustration of a backpack with an open book and a pointer, set against a solid orange background (no text or symbols)text_image
Diagram of a car seat with numbered labels pointing to different compartments or parts.
text_image
14 15 16 17 21 18 19 20natural_image
Interior view of a vehicle seatbelt with a yellow X mark indicating a specific seat (no text or symbols present)
natural_image
Illustration of a car seatbelt with a yellow checkmark indicating a location (no text or symbols present)
natural_image
Illustration of a car seat with a red bandage and a yellow checkmark (no text or symbols)
text_image
1 2 3 4 5 6 7
natural_image
Side view line drawing of a car with two people seated inside the driver's seat (no text or symbols)natural_image
Illustration of a person reading a book with a pointer, set against a solid orange background (no text or symbols)Seznam delov
Prepričajte se, da noben del ne manjka. Če kar koli manjka, se obrnite na prodajalca.
text_image
Diagram of a car safety seat with numbered labels pointing to different compartments
text_image
Technical diagram of a device with numbered parts labeled for identificationOPOZORILO
natural_image
Interior view of a vehicle seatbelt with a yellow X mark indicating a specific seat (no text or symbols present)
natural_image
Illustration of a car seatbelt with a yellow checkmark indicating a location (no text or symbols present)
natural_image
Illustration of a car seat with a red bandage and a yellow checkmark (no text or symbols)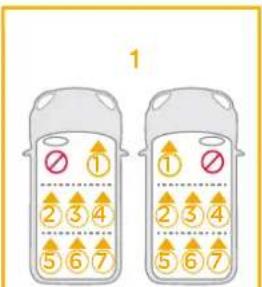
text_image
1 2 3 4 5 6 7 1 2 3 4 5 6 7
natural_image
Side view line drawing of a car with two people seated inside the driver's seat (no text or symbols)Allison Baby UK Ltd, Venture Point, Towers Business Park Rugeley, Staffordshire, WS15 1UZ
NUNA International B.V. Van der Valk Bourmanweg 178 C, 2352 JD Leiderdorp, The Netherlands