975275 - Vacuum packaging machines Hendi - Free user manual and instructions
Find the device manual for free 975275 Hendi in PDF.

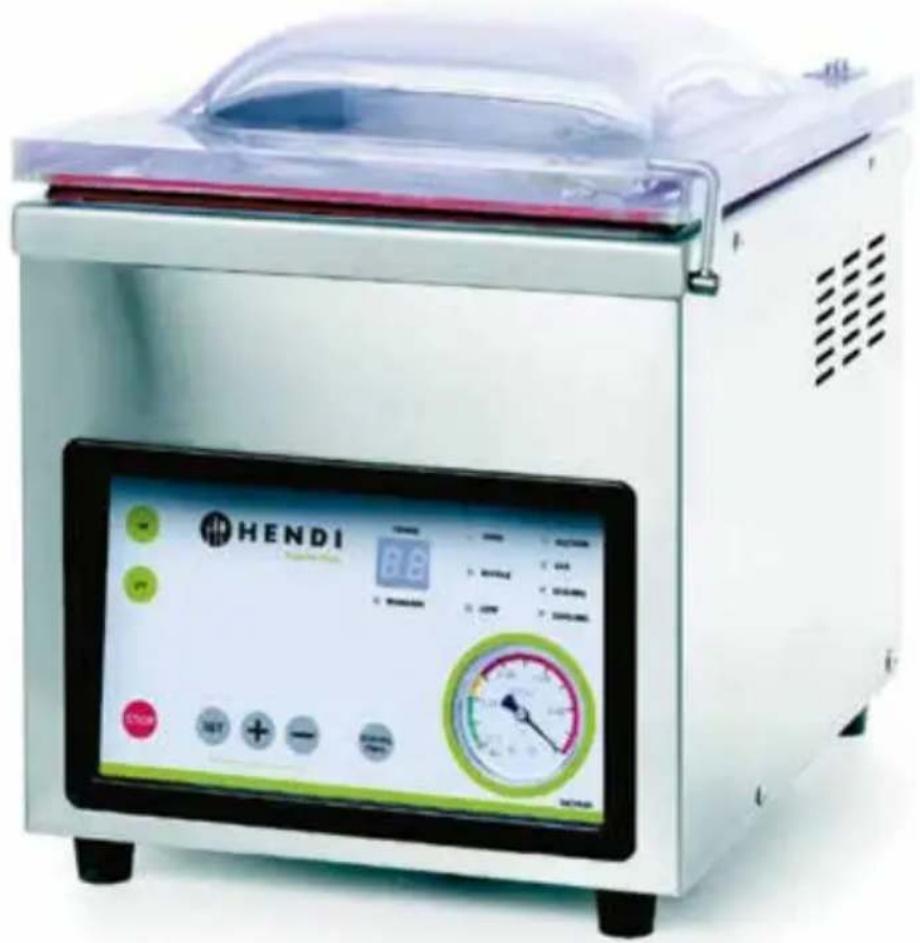
| Product type | Professional vacuum packaging machine |
| Brand | Hendi |
| Model | 975275 |
| Intended use | Vacuum packaging of food in plastic bags |
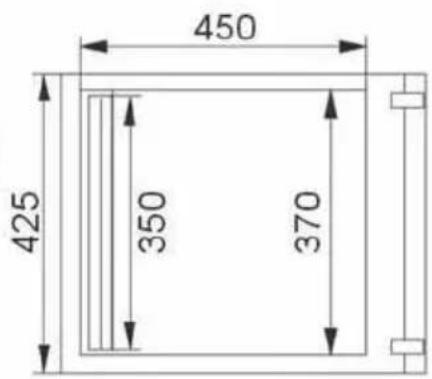
| External dimensions | 425 x 560 x 460 mm (L x P x H) |
| Chamber dimensions | 370 x 450 x 170/220 mm (L x P x H) |
| Sealing bar length | 350 mm |
| Pump capacity | 20 m³/h |
| Weight | 62 kg |
| Power | 900 W |
| Voltage / Frequency | 230 V / 50 Hz |
| Settings | Vacuum time (0-99 s), sealing time (0-3.5 s), cooling time (0-9.9 s), sealing force (High/Medium/Low) |
| Emergency stop | STOP button |
| Required oil level | Between 1/2 and 2/3 of the level window |
| Oil maintenance | Drain and replace every 6 months or if oil becomes dark brown |
| Sealing band replacement | Every 180 hours of sealing (approx. 200,000 cycles) or if damaged |
| Warranty | 12 months from date of purchase |
| Safety | Do not immerse, do not open the housing, clean regularly, risk of burns after use |
| Included accessories | Vacuum pump oil, spare sealing band, clamping bar |
Frequently Asked Questions - 975275 Hendi
User questions about 975275 Hendi
0 question about this device. Answer the ones you know or ask your own.
Ask a new question about this device
Download the instructions for your Vacuum packaging machines in PDF format for free! Find your manual 975275 - Hendi and take your electronic device back in hand. On this page are published all the documents necessary for the use of your device. 975275 by Hendi.
USER MANUAL 975275 Hendi
975251, 975268, 975275
natural_image
Exterior view of a HENDI industrial microwave oven with digital display and control buttons (no readable text or symbols)User manual | Gebrauchsanweisung | Gebruiksaanwijzing | Instrukcja obstugi | Mode d'emploi Istruzioni per l'utente | Instructiunile utilizatorului | Руководство по эксплуатации | Uživatelský manuál
You should read this user manual carefully before using the appliance.
Keep this manual with the appliance. Diese Gebrauchsanweisung bitte beim Gerät aufbewahren. Bewaar deze handleiding bij het apparaat. Zachowaj instrukcję urządzenia. Gardez ces instructions avec cet appareil. Conservate le istruzioni insieme all'apparecchio. Păstrați manualul de utilizare alături de aparat. Хранить руководство вместе с устройством. Tyto pokyny uschovejte u prístroje.

natural_image
Simple house icon with left-pointing arrow, labeled 'INDOOR' below (no other text or symbols)For indoor use only. Nur zur Verwendung im Innenbereich. Alleen voor gebruik binnenshuis. Do użytku wewnątrz pomieszczeń. Pour l'usage à l'intérieur seulement. Destinato solo all'uso domestico. Numai pentru uz casnic. Использовать только в помещениях. Pouze pro vnitřní použití.


EN
INDEX
- SAFETY REGULATIONS....3
- SPECIAL SAFETY REGULATIONS .... 4
- INTENDED USE....5
4. PREPARATIONS BEFORE USING FOR THE FIRST TIME .... 5
- TECHNICAL PARAMETERS .... 5
- PREPARATION BEFORE USE 7
7. VACUUM PACKING PROCESS DESCRIPTION .... 8
-
FAQ - ADDITIONAL INFORMATION....9
-
WARRANTY....14
-
DISCARDING & ENVIRONMENT 14
Thank you for purchasing this Hendi appliance. Read this manual carefully, paying particular attention to the safety regulations outlined below, before installing and using this appliance for the first time.
1. Safety regulations
- This appliance is intended for commercial use only.
- Only use the appliance for the intended purpose it was designed for as described in this manual.
- The manufacturer is not liable for any damage caused by incorrect operation and improper use.
- Keep the appliance and electrical plug away from water and other liquids. In the event the appliance falls into water, immediately remove the power plug from the socket. Do not use the appliance until it has been checked by a certified technician. Failure to follow these instructions will cause life threatening risks.
- Never attempt to open the housing of the appliance by yourself.
- Do not insert objects into the housing of the appliance.
- Do not touch the plug with wet or damp hands.
- Danger of electric shock! Do not attempt to repair the appliance by yourself, repairs are only to be conducted by qualified personnel.
- Never use a damaged appliance! When it's damaged, disconnect the appliance from the socket and contact the retailer.
- WARNING! Do not immerse the electrical parts of the appliance in water or other liquids.
- Never hold the appliance under running water.
- Regularly check the power plug and cord for any damage. When damaged it must be replaced by a service agent or similarly qualified person in order to avoid danger or injury.
- Make sure the cord does not come in contact with sharp or hot objects and keep it away from open fire. Never pull the power cord to unplug it from the socket, always pull the plug instead.
- Make sure that the power cord and/or extension cord do not cause a trip hazard.
- Never leave the appliance unattended during use.
- WARNING! As long as the plug is in the socket the appliance is connected to the power source.
- Turn off the appliance before unplugging it from the socket.
- Connect the power plug to an easily accessible electrical socket so that in case of emergency the appliance can be unplugged immediately.
- Never carry the appliance by the cord.
- Do not use any extra devices that are not supplied together with the appliance.
- Only connect the appliance to an electrical outlet with the voltage and frequency mentioned on the appliance label.
- Never use accessories other than those recommended by the manufacturer. Failure to do so could pose a safety risk to the user and could damage the appliance. Only use original
parts and accessories.
- This appliance should not be operated by persons with reduced physical, sensory or mental capabilities, or persons that have a lack of experience and knowledge.
- This appliance should, under any circumstances, not be used by children.
- Keep the appliance and its power cord out of reach of children.
- WARNING: ALWAYS switch off the appliance and unplug from power socket before cleaning, maintenance or storage.
2. Special Safety Regulations
- Use the appliance only as described in this manual.
- Use the supplied pump oil only. The pump oil level should be checked regularly by a qualified service technician. Do not use old pump oil.
- IMPORTANT! Make sure that the pump oil is at least over the OIL LEVEL.
- The level of oil in the container must not exceed the MAX level marked on the side wall of the container.
- Danger of burns! Never touch the sealing bar! It is very hot even after use. There is a danger of burns. Wait until the appliance has cooled down. Also, do not touch the appliance while in use.
- The appliance must be cleaned and food residues must be removed regularly. If the appliance is not maintained in a clean condition, this will lead to a detrimental effect on the service life of the appliance and can result in a dangerous condition during use.
- Do not place the appliance on a heating object (gasoline, electric, charcoal cooker, etc.) Keep the appliance away from any hot surfaces and open flames. Always operate the appliance on a level, stable, clean, heat-resistant and dry surface.
- IMPORTANT! Keep all ventilation openings in the appliance clear of obstruction.
- Danger of crushing hands! Be careful when closing the lid.
3. INTENDED USE
• This appliance is intended for professional use.
- This appliance is only intended for vacuuming and sealing plastic bags with food inside. Any other use may lead to damage to the appliance or personal injury.
- Operating the appliance for any other purpose shall be deemed as a misuse of the device. The user shall be solely liable for improper use of the device.
4. PREPARATIONS BEFORE USING FOR THE FIRST TIME
- Before use, check if the machine is not damaged. In case of any damage immediately contact your supplier and DO NOT use the machine.
- Remove all the packing material and protection film (if applicable).
-
Clean the machine using lukewarm water and soft cloth.
-
Unless recommended otherwise, place the machine on a flat and stable floor.
- Provide enough space around the machine to assure proper ventilation.
- Position the appliance in such a way that the plug is accessible at all times.
NOTE: before turning the packaging machine on, make sure that the pump is filled with oil. Any and all failures resulting from seizure of the pump shall not be covered by warranty (information on how to fill the pump with oil is included in the manual).
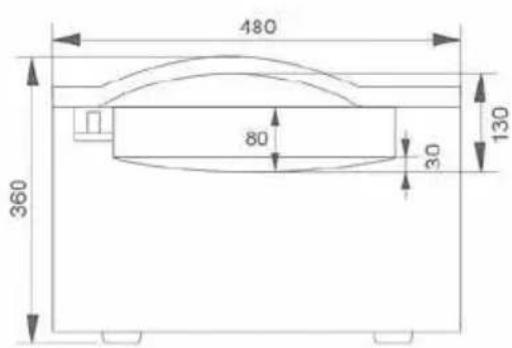
5. TECHNICAL PARAMETERS
| Code | 975251 | 975268 | 975275 |
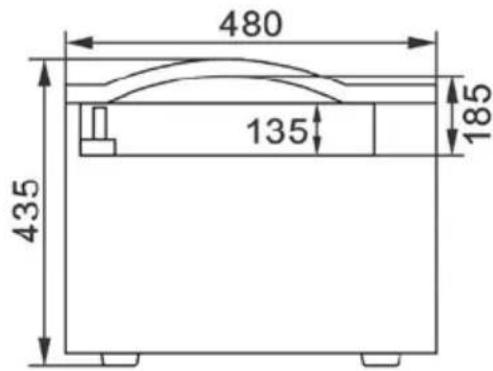
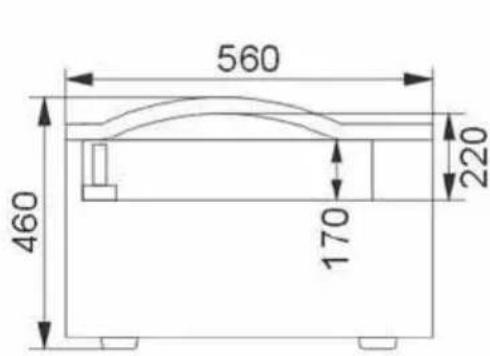
| External dimensions 330x480x(H)360 mm 370x480x(H)435 mm 425x560x(H)460 mm | |||
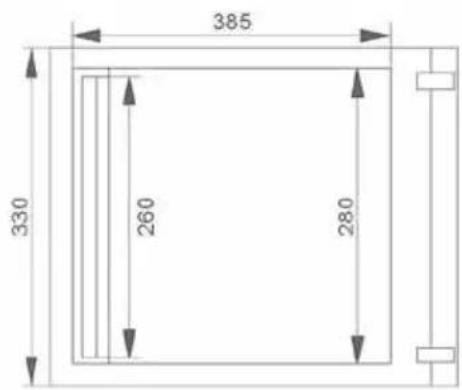
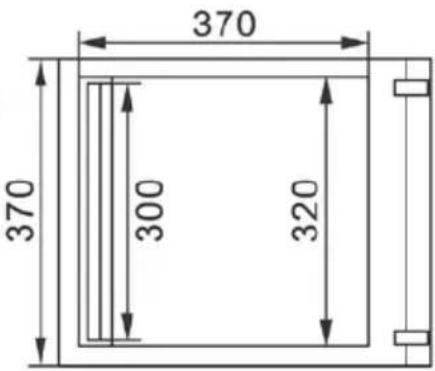
| Chamber dimensions 280x385x(H)80/130 mm 320x370x(H)135/185 mm 370x450x(H)170/220 mm | |||
| Sealing bar length 260 mm 300 mm 350 mm | |||
| Pump efficiency | 10 m^3/h | 10 m^3/h | 20 m^3/h |
| Weight | 36 kg | 38 kg | 62 kg |
| Power | 370 W | 370 W | 900 W |
| Voltage | 230 V | 230 V | 230 V |
Dimensions of model: 975251
Dimensions of model: 975268
Dimensions of model: 975275

NOTE: KEEP THE BOX FOR ANY FUTURE TRANSPORT OF THE MACHINE! POTENTIAL COMPLAINTS WILL BE CONSIDERED ONLY IF THE MACHINE HAS BEEN TRANSPORTED IN THE BOX.
6. PREPARATION BEFORE USE
- Take the machine out of the wooden box by removing the upper and one of the side walls.
- Remove consumables from the machine's chamber. Pour oil into the oil dispenser (if the pump is empty or oil level is too low).
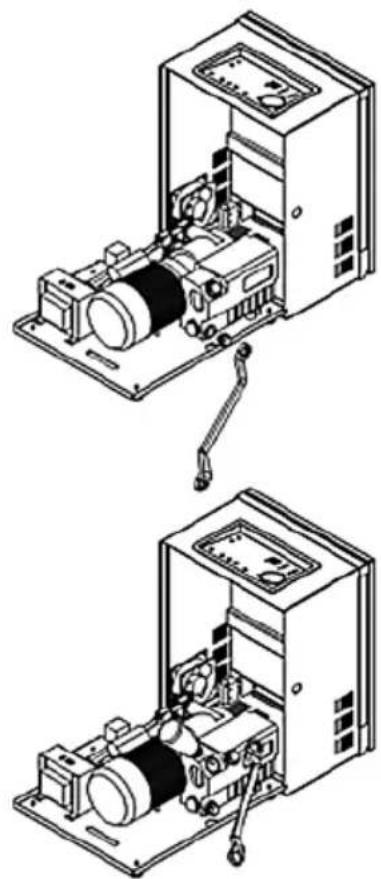
3. HENDI 975251 and 975268
Remove back panel, remove the screw under the panel and drain the used oil (afterwards insert the screw back in position), remove the screw of oil filler, pour the oil from oil container (afterwards insert the screw back in position).

natural_image
Technical line drawings of a microwave oven with open lid and internal components (no text or symbols)HENDI 975275
Remove the oil drain screw and drain the used oil (afterwards insert the screw back in position), remove the screw of oil filler, pour the oil from oil container (afterwards insert the screw back in position).
natural_image
Technical line drawing of an open industrial machine with internal components and a lever mechanism (no text or symbols)- If the machine was kept in a cold place (below 5°C), leave it for approx. 1 hour before starting
- Connect the power cable to the mains.
- Set the on/off switch (blue switch at the back of the machine) to ON position (switch raised - machine is ON).
INSTALLATION
- Before starting the machine up, please read the information on operation and safety included in the manual.
- Make sure that the oil level is at least at 1/2 or 1/3 of window height. When the appliance is working, the oil level should not drop below 1/3 of the window height. Do not overfill the ma-
chine as the oil may overflow.
-
Place the machine in a vertical position in a well ventilated and well lit room, without access of any toxic gases or dust.
-
Make sure the machine is grounded.
-
Before turning the power on always check if the top cover is open.
CONSUMABLES
- Oil - oil for the vacuum pump should be replaced at least once every 6 months. We recommend Victor Vacuum Oil available for purchase from the manufacturer or distributor.
- Teflon bar - Replace when burnt. Failure to do so may cause damage to the sealing bar. Teflon bars may be purchased from the manufacturer or distributor.
7. VACUUM PACKING PROCESS DESCRIPTION
EN
- Connect the machine to power source.
- Flip the blue switch at the back of the machine upwards.
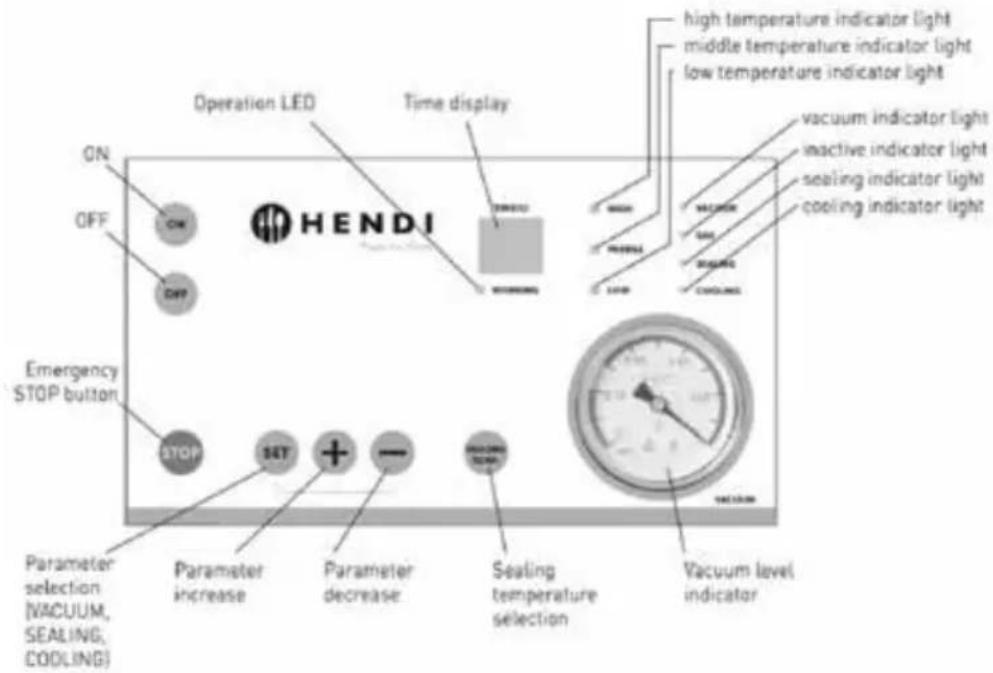
- Turn the machine using the "ON" button - "-" will light up on TIME(S) display. (for a dozen or so seconds up to a few minutes). Changing of settings will be impossible then.
- Press SET button (parameter selection) - "VACUUM" LED will light up. Set the desired vacuum value by pressing "+" button to increase or "-" to decrease vacuum level. Time range is 0-99 seconds. The result will shown on TIME(S) display.
- Press SET button again (change to another parameter) - "SEALING" LED will light up to indicate sealing time. Set the desired value by pressing "+" to increase or "-" to decrease sealing time. Time range is 0-3.5 seconds. Sealing time should be gradually increased.
- Press SET button again (change to another parameter) - "COOLING" LED will light up to indicate cooling level. Set the desired value by pressing "+" to increase or "-" to decrease cool-
ing time. Time range is 0-9.9 seconds.
- Press SET button again - parameter LEDs will switch off.
- Press SEALING TEMP button repeatedly to set the sealing power. Each press will switch on bag sealing power LEDs (HIGH, MIDDLE, LOW). Depending on bag thickness, proper sealing power will be used. The thicker the bag, the higher the power.
- Insert the bag in machine's chamber. Make sure that the whole length of the bag is placed on the sealing bar and that the bag is not folded along the seam.
- Press the bag onto the sealing bar using a metal clamp.
- Close the upper cover of the machine and hold for a while. The machine will start working automatically. The cover will be sealed shut.
- During operation the chamber will generate vacuum which will prevent accidental opening of the cover.
All processes are carried out in the state of vac-
uum, the display and timer show the current process (time remaining to generate full vacuum, sealing time and then cooling time). During operation "WORKING" LEDs will switch on.
- After completion the cover will automatically be raised and "Ed" message will be displayed.
- After completion of the cycle, the chamber is filled with air, the cover opens automatically and "Ed" is displayed. The cover will not open automatically if a locking clamp is used. Unlock the clamp to open the cover.
- To continue working at the same parameters, close the machine's cover after inserting another bag.
- After completion of work turn the machine off
NOTE
- Do not turn the machine on without any bag inside. Doing so will accelerate the wear of the heating element.
- Turn the machine off and disconnect the power cable if the machine will not be used for some time.
- The vacuum gauge/meter reading may be different in different areas. At high altitudes, the data in vacuum meter goes down.
- Do not use vacuum bags that emit poisonous vapours while sealing – use dedicated Victor Vacuum Bags.
8. FAQ - ADDITIONAL INFORMATION
Question: How much longer will my products last?
Answer: Typically shelf life of vacuum packed products may be extended three to five times. It depends, however, on the type of product, earlier handling, storage temperature, conditions before and after packing etc.
Question: What are the advantages of vacuum packaging my products?
Answer: There are many advantages of vacuum packing, e.g. longer shelf life, no changes to the product, no weight loss resulting from evaporation, easy labelling (date, weight, best before date, purpose), considerable reduction of aerobic bacteria, easier storage and control of products, reduced costs thanks to longer storage, possibility with the "OFF" switch, flip the blue switch at the back of the machine downwards and disconnect power cable from the mains.
NOTE: never obstruct air flow vent in the chamber.
NOTE: In an emergency press "STOP" to stop the vacuum packaging process. The chamber will be filled with air thus completing the process, the cover will open after the process is completed. The cover will not open automatically if a locking clamp is used. Unlock the clamp to open the cover.
NOTE: in models 975251, 975268, 975275 the GAS" parameter/function is not active.
- The machine must be transported in a horizontal position.
- The transport must proceed strictly according to the instructing marks on the shipping case.
- The machine should be stored in dry, ventilated place and room temperature.
- Please be careful during the automatic opening of the acrylic cover to avoid being hit.
- Please do not try to make any repairs without consulting professional service first.
- Please use spare parts delivered with the machine or recommended by the manufacturer.
of storing large quantities, excellent appearance of the vacuum packed product, better protection against contamination, easier transport of the product, better appreciation of product quality by customers and consumers.
Question: How does sealing temperature affect the sealing of bag?
Answer: Setting sealing temperature (HIGH, MIDDLE, LOW) is related to the sealing function, therefore if the sealing level is low (1-2 seconds), then temperature should be set at middle/high level and if the sealing parameter is high (more than 3-4 seconds), then the temperature setting should be middle/low. In each case please test the setting on a bag.
Question: How to select proper vacuum time for a specific bag and product size?
Answer: The smaller the product is, the longer vacuum generation time should be set.
Usually 30 seconds is enough to properly pack a 300 g product in a small bag (16/23 cm). Moreover, it is not always necessary to generate high vacuum, if you want to pack a product without generating high vacuum, a dozen or so or even a few seconds of vacuum time will suffice. You should always test your settings and repack the product if necessary.
Question: Can I vacuum-pack liquids/sauces?
Answer: Yes, you can vacuum-pack liquids and sauces.
Question: Can I crop the bag to adjust it to a small product?
Answer: Yes, you can cut off the open edge of the bag with scissors or a knife.
Question: If I vacuum package my food products, will I still need to refrigerate them?
Answer: Yes, vacuum packaging is not a substitute to refrigeration.

Question: Do I need to heat the machine up before turning it on?
Answer: In temperature of 18-24°C,
the machine needs max. 3 min after switching on to be ready for work. If the ambient temperature is below 18°C, we recommend starting the machine up 7 minutes after it has been turned on and setting the sealing time at 0 seconds to properly distribute oil.
Question: What products can be vacuum-packed?
Answer: You can vacuum pack products that are resistant to vacuum, i.e. any food products, metal elements, clothing, money etc.
Question: What type of bags should I use for vacuum-packing?
Answer: We recommend Victor Vacuum Bags which are dedicated for our machines. Please contact your distributor or our company.
Question: How often should I replace or replenish oil?
Answer: Oil should be replaced, i.e. drained after it turns dark brown (dirty) colour or at least once every 6 months. Before starting the machine, it is necessary to fill half of container with oil and then keep this level by replenishing oil (please check oil level every month). Oil is delivered with the machine. We recommend Victor Vacuum Oil.
Question: How often do I need to replace the sealing bar?
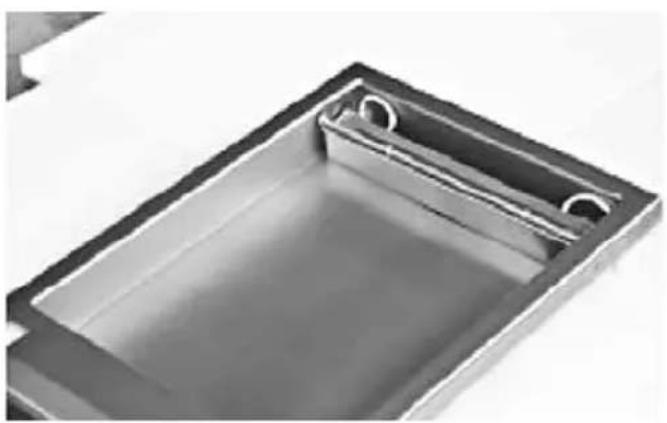
Answer: The sealing bar should be replaced after approx. 180 hours of sealing bags, i.e. approx. after sealing 200,000 bags, assuming that the sealing operation was correct (the bag was placed with its open edge on the bar, the machine was not used without any bag and the sealing time was not very long). A worn bar changes its colour to black or has visible gaps. Spare parts are delivered with the packing machine. Picture instruction below.
natural_image
Close-up of a rectangular metal tray with two circular cutouts, containing a clear liquid (no text or symbols visible)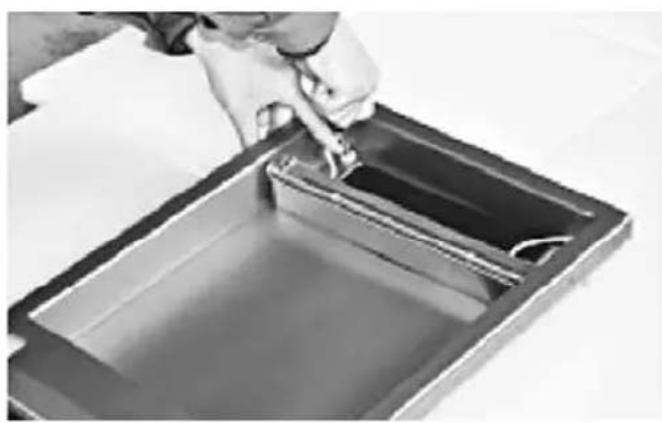
natural_image
Close-up of a hand pouring liquid into a rectangular container with liquid inside (no text or symbols visible)- Disconnect the cable from the pin, then pick the entire sealing bar from the vacuum chamber.
natural_image
Person using a tool to adjust or install a cylindrical component, no visible text or symbols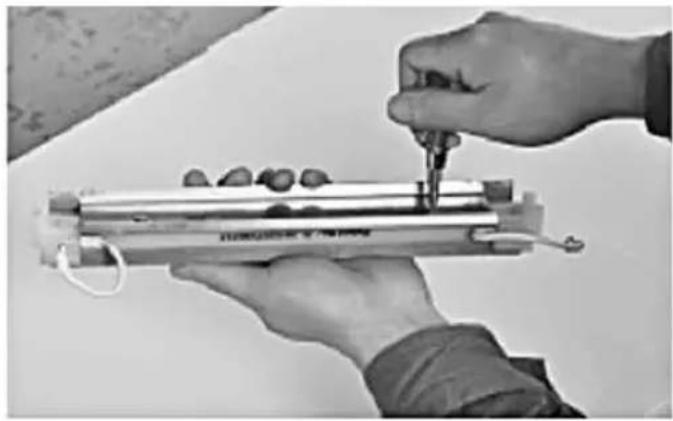
natural_image
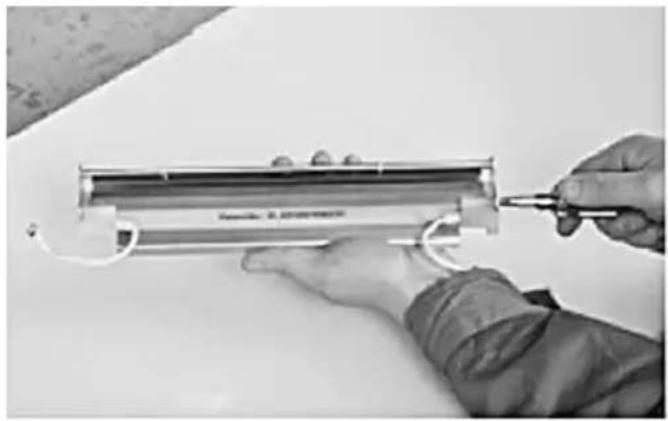
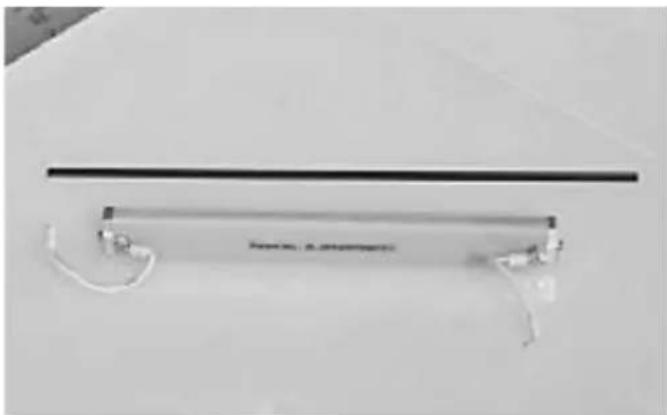
Close-up of hands using a tool to measure a cylindrical object with small objects, no visible text or symbols- Remove the pressing stick from the sealing bar using a cross screwdriver, then remove the stainless steel base (gas chamber base).

natural_image
Close-up of hands holding a cylindrical object with a transparent glass nearby (no visible text or symbols)
natural_image
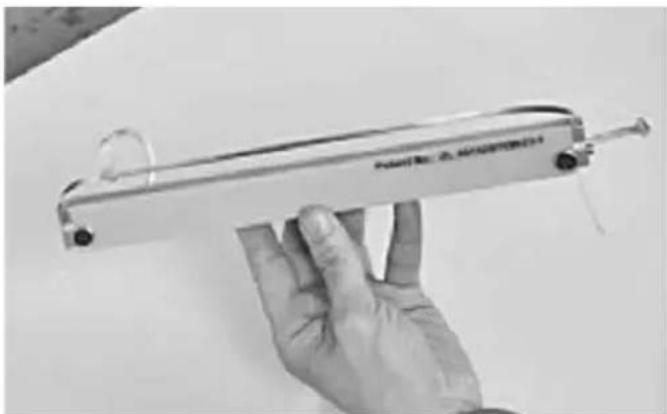
Close-up of hands holding a small metallic object with a label, on a plain surface (no readable text or symbols)- Manually dismantle plastic parts on both sides of the sealing bag and then tear off the sealing tape (Teflon-coated, high temperature resistant tape).
natural_image
Close-up of hands using a tool to adjust or install a small mechanical component (no visible text or symbols)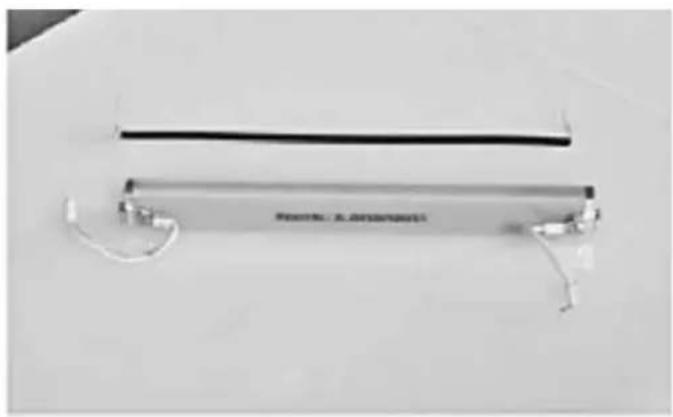
natural_image
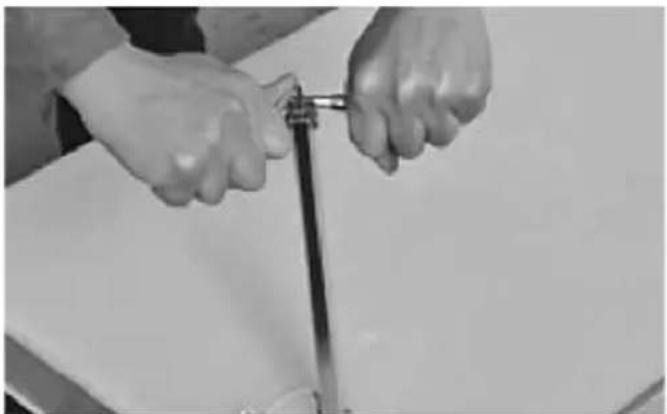
Exterior view of a modern office building (no signage)- Remove the forcing screws from both sides of the sealing bar using Allen key and then remove the heating wire.
After completion of the assembly install the elements as indicated below.
natural_image
Close-up of a thin black horizontal bar with white connectors and a label, against a plain background (no readable text or symbols)
natural_image
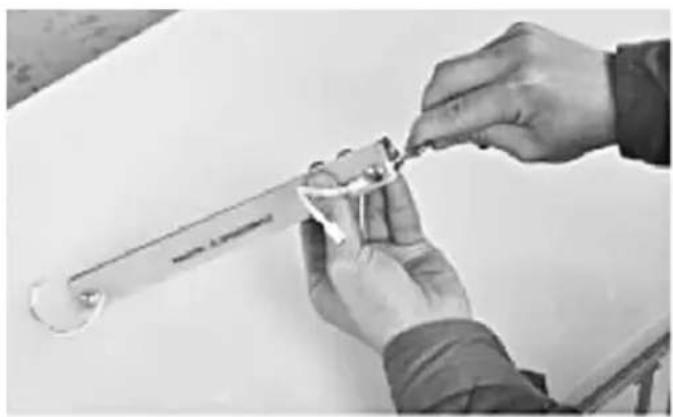
Close-up of hands using a tool to adjust or install a mechanical component (no visible text or symbols)- Insert one end of the new heating wire into the fastener groove and tighten it using a spanner.
natural_image
Hand holding a handheld electronic device with a label, no visible text or symbols on the device itself.
natural_image
Close-up of hands using a tool to apply or install a component on a white surface (no text or symbols visible)- Insert the other end of the heating wire into the other fastener groove and tighten the remaining part of the wire using a special tool.
natural_image
Close-up of hands holding a metal rod or tool, no visible text or symbols
natural_image
Close-up of hands using a tool to cut or mark a white surface, no visible text or symbols- Fasten the heating wire using an Allen key, then cut the remaining wire using a special tool.
natural_image
Black-and-white photo of a small electronic device with attached wires and a screwdriver, placed on a plain surface (no visible text or symbols)
natural_image
Metallic cylindrical object with curved metal ends, no visible text or symbols on the body- Stick the sealing tape of proper length to the heating wire.
natural_image
Metallic mechanical component with curved ends and a flat top, no visible text or symbols
natural_image
Close-up of a metallic tool with curved metal components, possibly a wire or clamp, against a plain background (no text or symbols visible)- Cut the remaining part of the sealing tape off at both ends so that it can be folded.
natural_image
Metallic clamp or bracket with two curved metal handles, no visible text or symbols
natural_image
Close-up of hands holding a tool with a curved handle, no visible text or symbols- Mount the plastic elements on both ends of the sealing bar.

natural_image
Close-up of hands installing or adjusting a metal component with wires, no visible text or symbols- Install the stainless steel base and pressing stick.

natural_image
Close-up of hands using a tool to adjust or install a transparent cylindrical component (no visible text or symbols)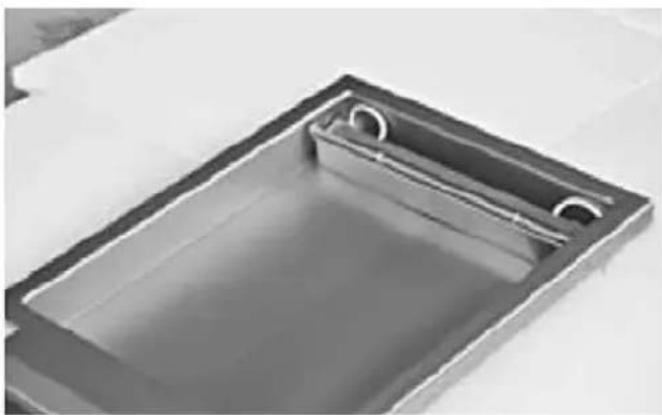
natural_image
Exterior view of a rectangular metal sink with internal channels (no text or symbols)
natural_image
Person in protective suit handling a container with liquid, no visible text or symbols- Connect the cable of the complete sealing bar to the pin, then put the sealing bar back into the vacuum chamber to finish the installation.
The new heating wire mounting is patented by our company. Copying is prohibited.
9. WARRANTY
Any defect affecting the functionality of the appliance which becomes apparent within one year after purchase will be repaired by free repair or replacement provided the appliance has been used and maintained in accordance with the instructions and has not been abused or misused in any way. Your statutory rights are not affected. If the appliance is claimed under warranty, state where and when it was purchased and include proof of purchase (e.g. receipt).
In line with our policy of continuous product development we reserve the right to change the product, packaging and documentation specifications without notice.
10. DISCARDING & ENVIRONMENT
When decommissioning the appliance, the product must not be disposed of with other household waste. Instead, it is your responsibility to dispose to your waste equipment by handing it over to a designated collection point. Failure to follow this rule may be penalized in accordance with applicable regulations on waste disposal. The separate collection and recycling of your waste equipment at the time of disposal will help conserve natural resources and ensure that it is recycled in a manner that protects human health and the environment.
For more information about where you can drop off your waste for recycling, please contact your local waste collection company. The manufacturers and importers do not take responsibility for recycling, treatment and ecological disposal, either directly or through a public system.
INHALTSVERZEICHNIS
natural_image
Technical line drawings of a two-part device with open and closed views, showing internal components and mounting brackets (no text or symbols)HENDI 975275
natural_image
Technical line drawing of an industrial machine with two views showing internal components and a tool (no text or symbols present)natural_image
Interior view of a rectangular metal sink with two circular cutouts (no text or symbols visible)
natural_image
Person pouring liquid into a rectangular container (no text or symbols visible)natural_image
Close-up of hands using a screwdriver to adjust or install a cylindrical electronic component (no visible text or symbols)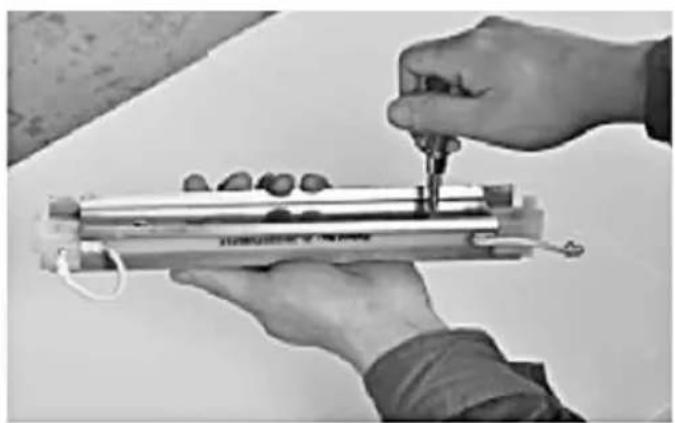
natural_image
Close-up of hands using a tool to measure a cylindrical device with a metallic frame and small components (no visible text or symbols)natural_image
Close-up of hands holding a cylindrical object with a small inset image, no visible text or symbols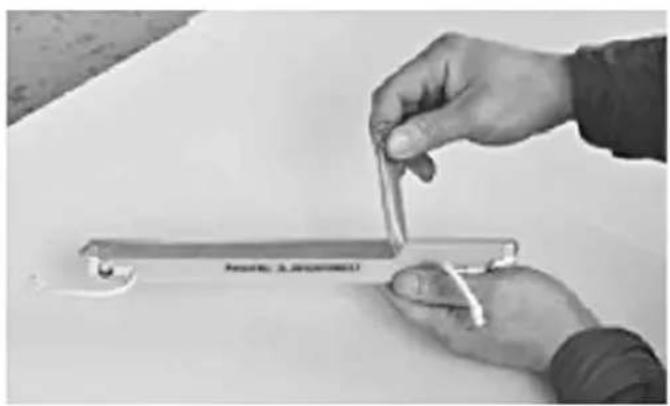
natural_image
Close-up of hands holding a metal clip with a white plastic object, no visible text or symbolsnatural_image
Close-up of hands holding a small mechanical tool or spring on a white surface (no visible text or symbols)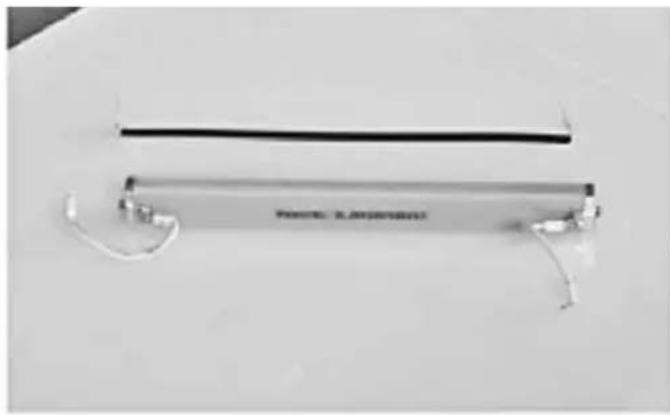
natural_image
Exterior view of a modern office building (no signage)natural_image
Exterior view of a modern office building (no signage)
natural_image
Close-up of hands using a tool to adjust or install a mechanical component (no visible text or symbols)natural_image
Hand holding a small electronic device with a label 'POTATO: A. NOODITH' on its body (no other text or symbols visible)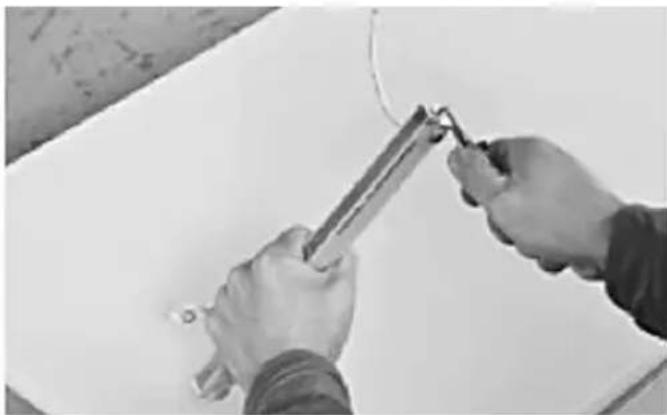
natural_image
Close-up of hands using a tool to apply or install a whiteboard (no visible text or symbols)natural_image
Close-up of hands holding a pen and a ruler on a white surface, with no visible text or symbolsnatural_image
Close-up of hands installing or adjusting a metal component with wires, no visible text or symbols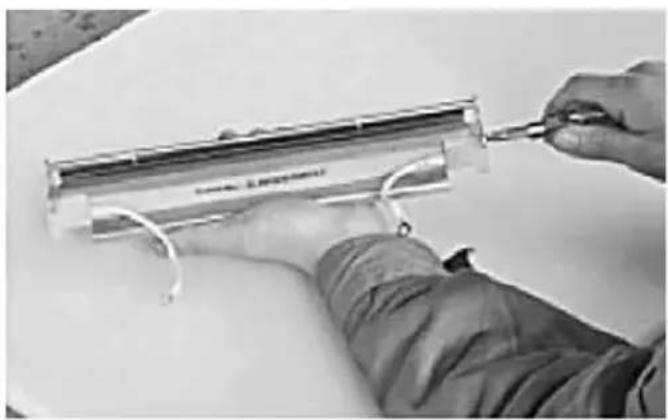
natural_image
Person using a tool to adjust or install a transparent cylindrical component (no visible text or symbols)natural_image
Person in protective suit handling a container with liquid, no visible text or symbols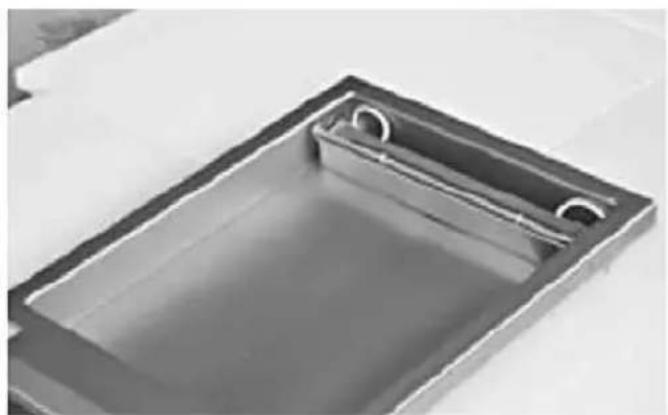
natural_image
Exterior view of a rectangular metal sink with a circular opening and side railing (no text or symbols)natural_image
Technical line drawings of a microwave oven with open lid and internal components (no text or symbols)HENDI 975275
natural_image
Technical line drawing of an industrial machine with internal components and a lever mechanism (no text or symbols)natural_image
Close-up of hands holding a cylindrical object with a transparent glass nearby (no visible text or symbols)
natural_image
Close-up of hands holding a metal tool on a white surface, no visible text or symbolsnatural_image
Close-up of hands using a tool to measure a transparent cylindrical object (no visible text or symbols)
natural_image
Exterior view of a modern office building (no signage)natural_image
Close-up of a transparent cylindrical object with a black horizontal bar and small white connectors attached, placed on a plain surface (no text or symbols visible)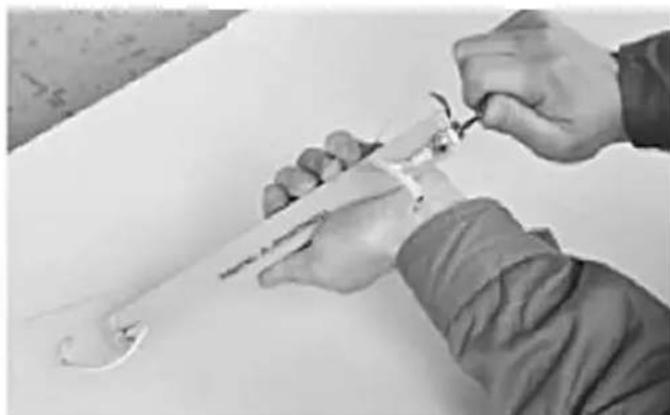
natural_image
Close-up of hands using a tool to adjust or install a mechanical component (no visible text or symbols)natural_image
Hand holding a handheld electronic device with a metallic handle and label (no readable text or symbols on the device itself)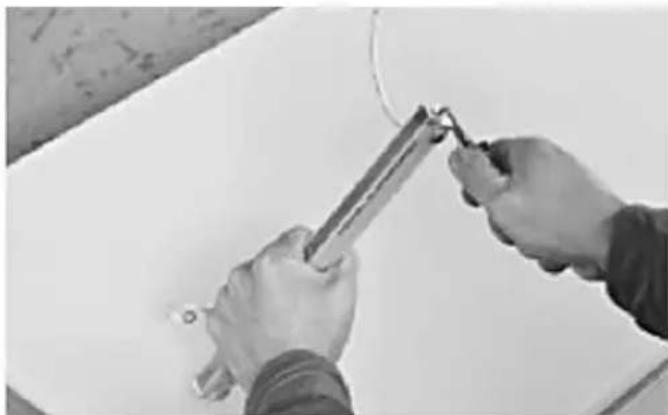
natural_image
Close-up of hands using a tool to apply or install a cable or wire on a white surface (no text or symbols visible)natural_image
Close-up of hands holding a metallic tool or pipe (no visible text or symbols)
natural_image
Close-up of hands using a tool to cut or mark a white surface, no visible text or symbolsnatural_image
Black-and-white photo of a handheld electronic device with attached wires and a screwdriver, placed on a plain surface (no visible text or symbols)
natural_image
Metallic cylindrical device with curved metal ends, no visible text or symbols on the bodynatural_image
Metallic mechanical component with two curved metal brackets and a flat top (no visible text or symbols)
natural_image
Close-up of a metallic tool with curved metal components, possibly a pen or clip, on a plain surface (no text or symbols visible)natural_image
Person holding a pen and a tool, with a curved wire and small circular components nearby (no text or symbols visible)natural_image
Close-up of hands installing or adjusting a metal component with wires (no visible text or symbols)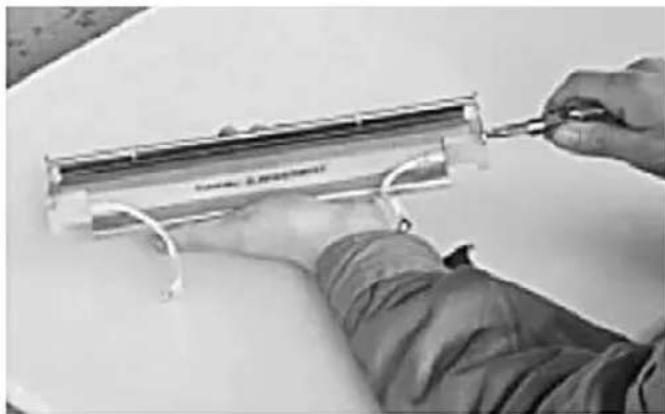
natural_image
Person using a tool to adjust or install a transparent cylindrical component (no visible text or symbols)natural_image
Person in lab coat handling a container with liquid, no visible text or symbols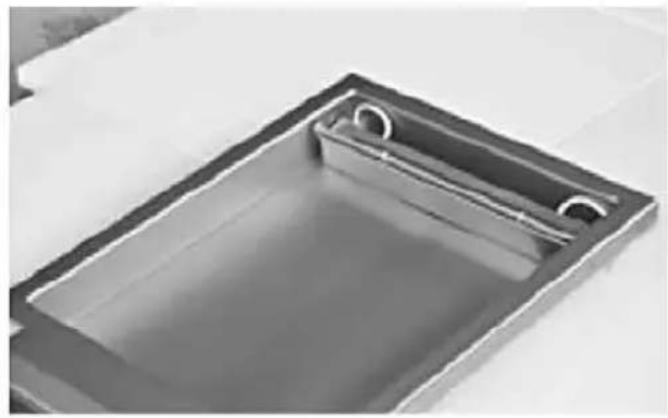
natural_image
Exterior view of a rectangular metal tray with a recessed slot (no text or symbols visible)natural_image
Technical line drawings of a microwave oven with open lid and internal components (no text or symbols)HENDI 975275
natural_image
Technical line drawing of an industrial machine with internal components and a lever mechanism (no text or symbols)INSTALACJA
natural_image
Interior view of a rectangular metal sink with two circular cutouts (no text or symbols visible)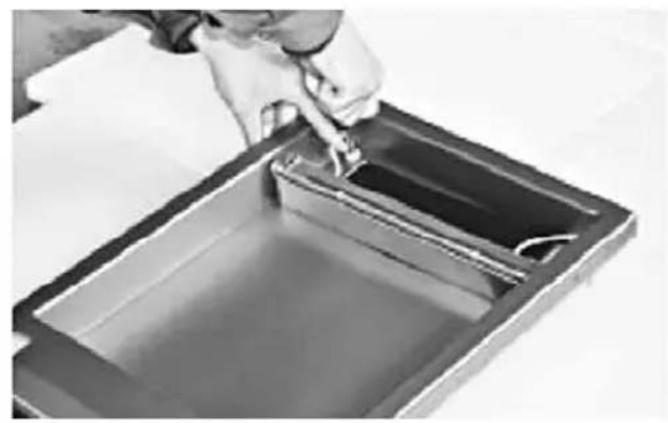
natural_image
Person pouring liquid into a rectangular container (no text or symbols visible)natural_image
Close-up of hands using a tool to adjust or install a cylindrical electronic component (no visible text or symbols)
natural_image
Close-up of hands assembling a cylindrical mechanical component with a tool (no visible text or symbols)natural_image
Close-up of hands holding a cylindrical object with a transparent glass nearby (no visible text or symbols)
natural_image
Close-up of hands holding a metal clip on a white surface, no visible text or symbolsnatural_image
Close-up of hands holding a small mechanical tool or spring on a white surface (no visible text or symbols)
natural_image
Exterior view of a modern office building (no signage)natural_image
Exterior view of a modern office building (no signage)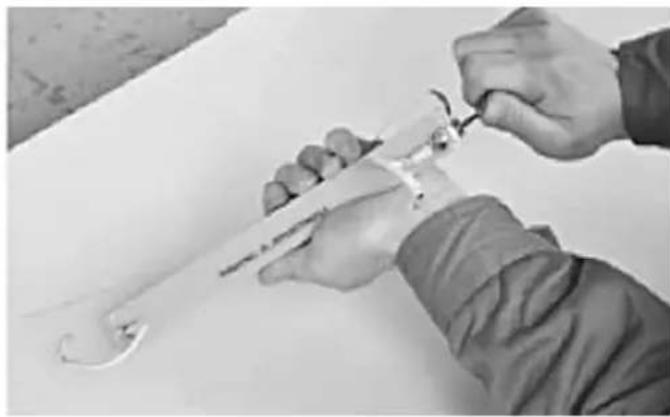
natural_image
Close-up of hands using a tool to adjust or install a mechanical component (no visible text or symbols)natural_image
Hand holding a small electronic device with a label 'POTATO: A. NOODITH' on its body (no other text or symbols visible)
natural_image
Close-up of hands using a tool to apply or install a whiteboard (no visible text or symbols)natural_image
Close-up of hands holding a metal rod or pipe, no visible text or symbols
natural_image
Close-up of hands using a tool to adjust or install a component on a white surface (no text or symbols visible)natural_image
Black-and-white photo of a tool and mechanical components on a white surface (no visible text or symbols)
natural_image
Metallic cylindrical object with curved ends, no visible text or symbols on the bodynatural_image
Metallic clamp bracket with two curved metal hooks attached (no text or symbols visible)
natural_image
Close-up of a metallic tool with curved metal components on a plain surface (no visible text or symbols)natural_image
Close-up of hands holding a pen and a tool, with no visible text or symbolsnatural_image
Close-up of hands installing or adjusting a metal component with wires, no visible text or symbols
natural_image
Close-up of hands using a tool to adjust or install a transparent cylindrical component (no visible text or symbols)natural_image
Person in lab coat handling a container with liquid, no visible text or symbols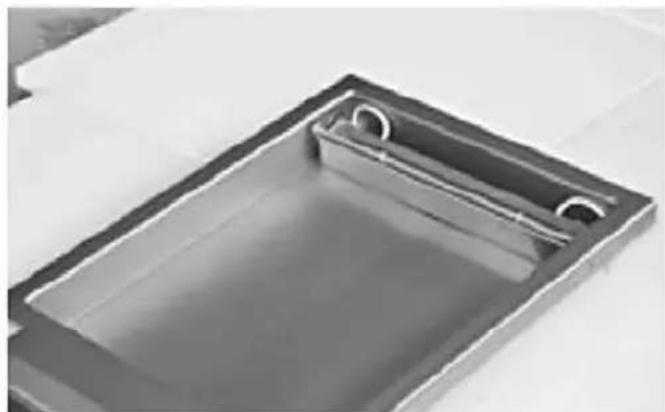
natural_image
Exterior view of a rectangular metal tray with a recessed slot and two circular cutouts (no text or symbols)natural_image
Technical line drawings of three views of a microwave oven with internal components and mounting holes (no text or labels)HENDI 975275
natural_image
Technical line drawing of an industrial machine with internal components and a lever mechanism (no text or symbols)FR
INSTALLATION
natural_image
Interior view of a rectangular metal sink with two circular cutouts (no text or symbols visible)
natural_image
Person pouring liquid into a rectangular container (no text or symbols visible)natural_image
Close-up of hands using a tool to adjust or install a transparent cylindrical component (no visible text or symbols)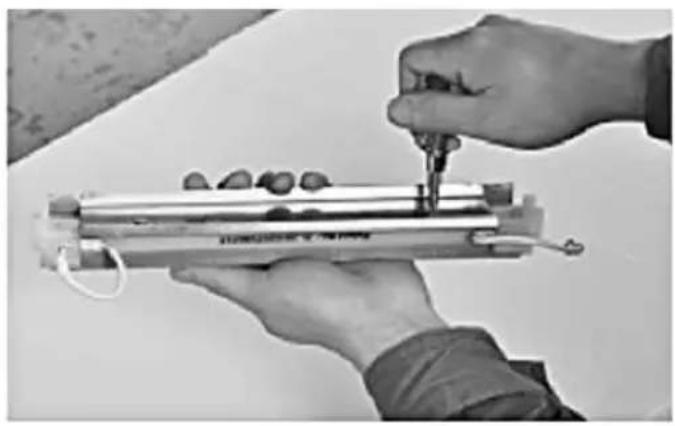
natural_image
Close-up of hands assembling a cylindrical mechanical component with a tool (no visible text or symbols)natural_image
Close-up of hands holding a cylindrical object with a transparent glass nearby (no visible text or symbols)
natural_image
Close-up of hands holding a metal clip on a white surface, no visible text or symbolsnatural_image
Close-up of hands holding a small metal tool with a loop, no visible text or symbols
natural_image
Exterior view of a modern office building (no signage)natural_image
Close-up of a thin, flexible electronic device with wires and connectors (no visible text or symbols)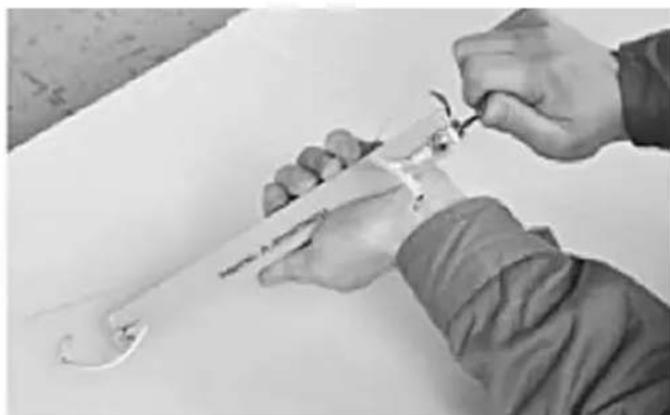
natural_image
Close-up of hands using a tool to adjust or install a mechanical component (no visible text or symbols)natural_image
Hand holding a flexible electronic device with a label, against a plain background (no readable text or symbols)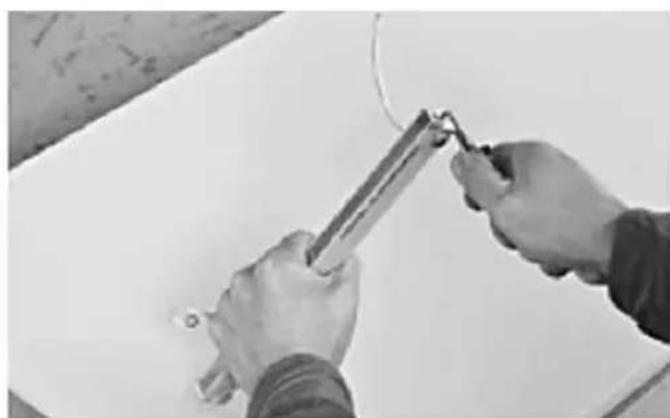
natural_image
Close-up of hands using a tool to cut or wire on a white surface (no text or symbols visible)natural_image
Close-up of hands holding a metal rod or pipe, no visible text or symbols
natural_image
Close-up of hands using a tool to adjust or install components on a white surface (no text or symbols visible)natural_image
Close-up of a small electronic device with attached wires and a screwdriver, placed on a plain surface (no visible text or symbols)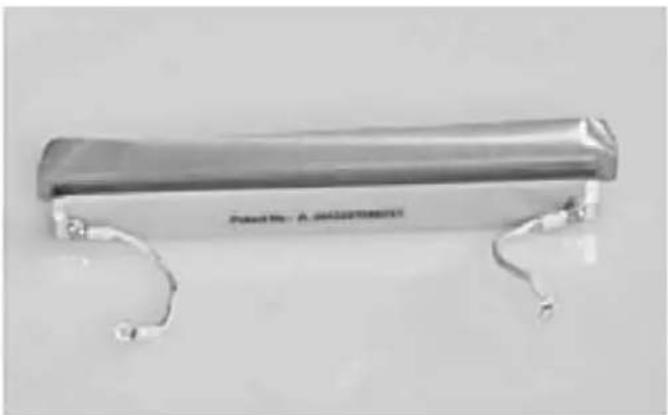
natural_image
Metallic cylindrical device with attached metal brackets and a small looped end (no visible text or symbols)natural_image
Metallic clamp bracket with two curved metal hooks attached (no text or symbols visible)
natural_image
Close-up of a metallic tool with curved metal components on a plain surface (no text or symbols visible)natural_image
Person using a tool to measure a small object on a white surface (no visible text or symbols)natural_image
Close-up of hands installing or adjusting a metal component with wires, no visible text or symbols
natural_image
Person using a tool to adjust or install a transparent cylindrical component (no visible text or symbols)natural_image
Person in protective suit handling a container with liquid, no visible text or symbols
natural_image
Exterior view of a rectangular metal sink with a circular opening and side railing (no text or symbols)natural_image
Technical line drawings of an open microwave oven with internal components and mounting holes (no text or labels)HENDI 975275
natural_image
Technical line drawing of an industrial machine with internal components and mounting base (no text or symbols)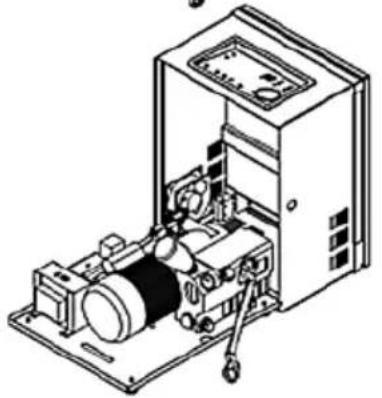
natural_image
Isometric line drawing of an industrial machine with control panel and motor (no text or symbols)INSTALLAZIONE
natural_image
Interior view of a rectangular metal sink with two circular cutouts (no text or symbols visible)
natural_image
Person pouring liquid into a rectangular container (no text or symbols visible)natural_image
Close-up of hands using a tool to adjust or install a cylindrical electronic component (no visible text or symbols)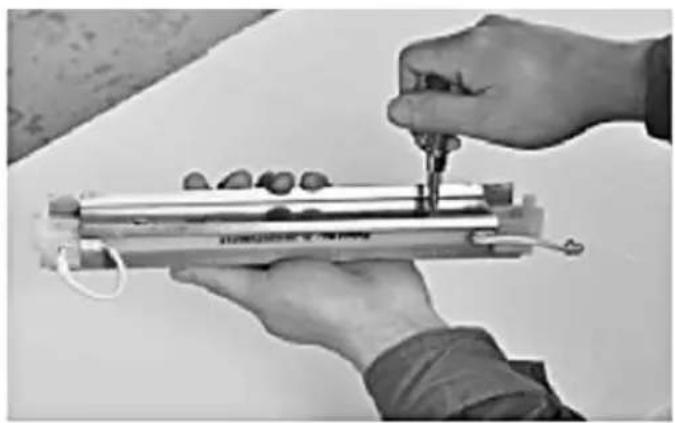
natural_image
Close-up of hands assembling a cylindrical mechanical component with a tool (no visible text or symbols)natural_image
Close-up of hands holding a cylindrical object with a transparent glass nearby (no visible text or symbols)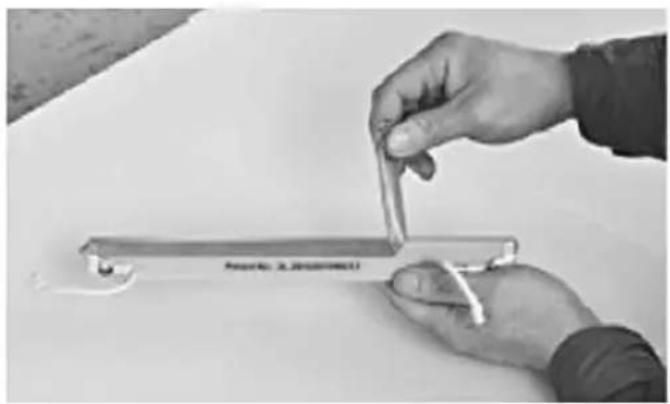
natural_image
Close-up of hands holding a metal clip on a white surface, no visible text or symbolsnatural_image
Close-up of hands holding a small mechanical tool with a loop, no visible text or symbols
natural_image
Exterior view of a modern office building (no signage)natural_image
Exterior view of a modern office building (no signage)
natural_image
Close-up of hands using a tool to adjust or install a mechanical component (no visible text or symbols)natural_image
Hand holding a small electronic device with a label reading 'POTATO: A. NOODITH' (no other text or symbols visible)
natural_image
Close-up of hands using a tool to apply or install a whiteboard (no visible text or symbols)natural_image
Close-up of hands holding a metal rod or pipe against a plain background (no text or symbols visible)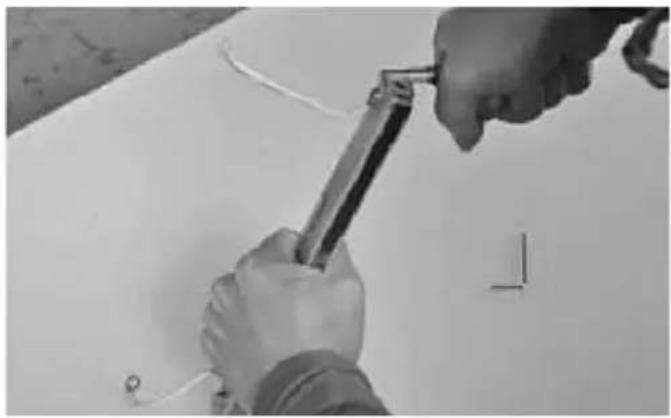
natural_image
Close-up of hands using a tool to adjust or install components on a white surface (no text or symbols visible)natural_image
Close-up of a small mechanical component with attached parts, no visible text or symbols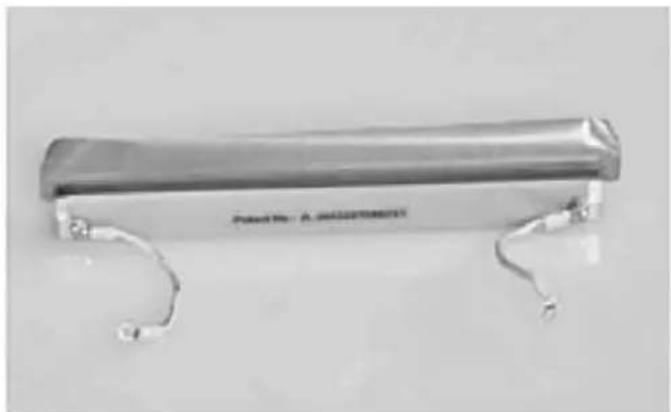
natural_image
Metallic cylindrical object with two curved metal brackets, no visible text or symbols on the body.natural_image
Metallic clamp bracket with two curved metal hooks attached (no text or symbols visible)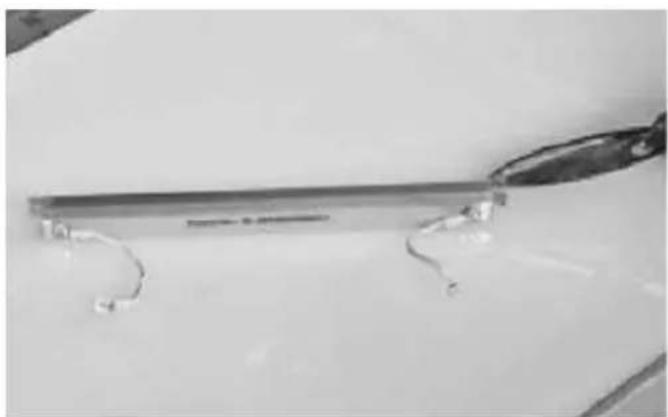
natural_image
Close-up of a metallic tool with curved metal components on a plain surface (no text or symbols visible)natural_image
Close-up of hands holding a pen and ruler on a white surface, with no visible text or symbolsnatural_image
Close-up of hands installing or adjusting a metal component with wires (no visible text or symbols)
natural_image
Person using a tool to adjust or install a transparent cylindrical component (no visible text or symbols)natural_image
Person in protective jacket handling a container with liquid, no visible text or symbols
natural_image
Exterior view of a rectangular metal sink with circular cutouts (no text or symbols)natural_image
Technical line drawings of two open industrial machines with internal components and mounting holes (no text or symbols)HENDI 975275
natural_image
Technical line drawing of an open industrial machine with internal components and a hand tool (no text or symbols)INSTALARE
natural_image
Close-up of a rectangular metal sink with two circular cutouts, no text or symbols visible.
natural_image
Person pouring liquid into a rectangular container with liquid inside (no text or symbols visible)natural_image
Close-up of hands holding a cylindrical object with a transparent glass nearby (no visible text or symbols)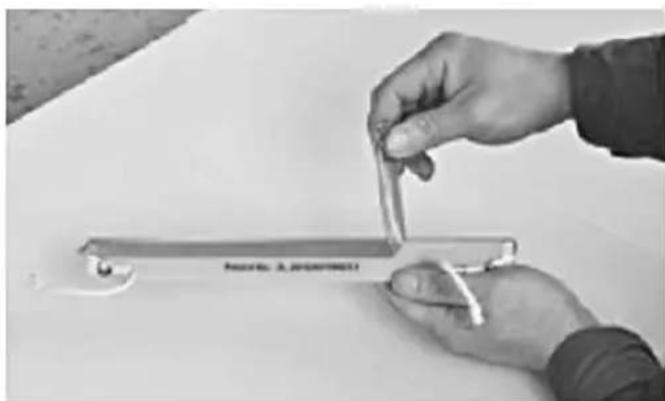
natural_image
Close-up of hands holding a metal tool with a label, no visible text or symbols on the tool or backgroundnatural_image
Close-up of hands using a tool to adjust or install a mechanical component (no visible text or symbols)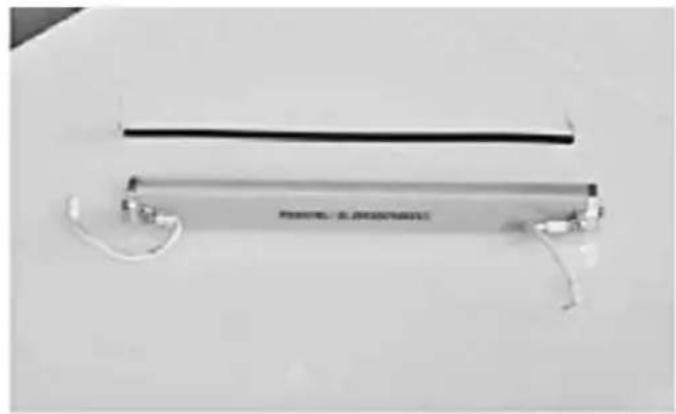
natural_image
Exterior view of a metallic cylindrical device with wires and connectors (no visible text or symbols)natural_image
Exterior view of a modern office building (no signage)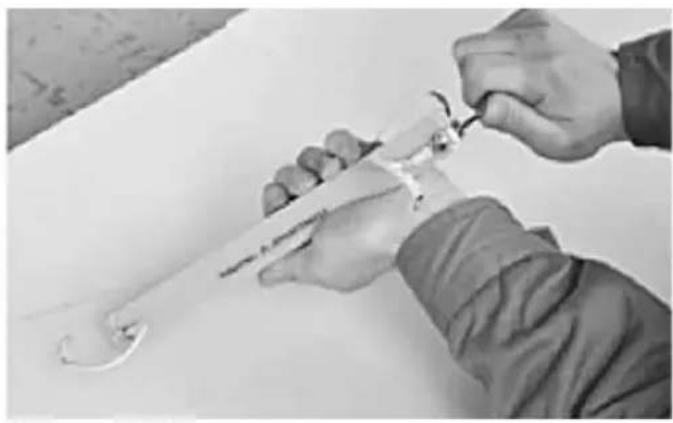
natural_image
Close-up of hands holding a small mechanical tool with a curved handle, no visible text or symbolsnatural_image
Hand holding a handheld electronic device labeled 'Poland No. 24 MANAGEMENT' (no other text or symbols visible)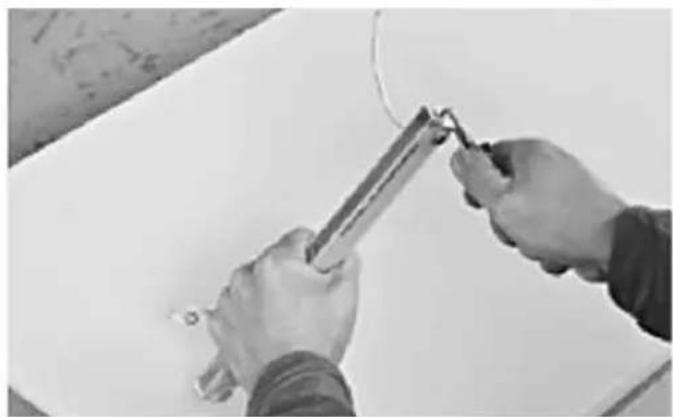
natural_image
Close-up of hands using a tool to apply or install a cable or wire on a white surface (no text or symbols visible)natural_image
Close-up of hands holding a metal rod with a small object, no visible text or symbols
natural_image
Close-up of hands using a tool to cut or install a component on a white surface (no text or symbols visible)natural_image
Close-up of a small electronic device with a curved handle and two tools on a plain surface (no visible text or symbols)
natural_image
Metallic cylindrical object with curved metal ends, no visible text or symbols on the bodynatural_image
Metallic clamp bracket with curved metal ends, no visible text or symbols
natural_image
Close-up of a metallic tool with curved metal rods, resting on a plain surface (no text or symbols visible)natural_image
Close-up of hands holding a ruler and a string, with no visible text or symbolsnatural_image
Close-up of hands installing or adjusting a metal component with wires, no visible text or symbols
natural_image
Person using a tool to adjust or install a transparent cylindrical component (no visible text or symbols)natural_image
Person in lab coat handling a container with a tool, no visible text or symbols
natural_image
Exterior view of a rectangular metal sink with circular cutouts (no text or symbols)natural_image
Technical line drawing of an open microwave oven with internal components and housing (no text or symbols)
natural_image
Technical line drawing of a mechanical device with internal components and housing (no text or symbols)HENDI 975275
natural_image
Technical line drawing of an open industrial machine with internal components and a lever mechanism (no text or symbols)RU
УСТАНОВКА
natural_image
Close-up of hands using a tool to measure a metallic cylindrical object with small round objects (no visible text or symbols)natural_image
Close-up of hands holding a cylindrical object with a small transparent container nearby (no visible text or symbols)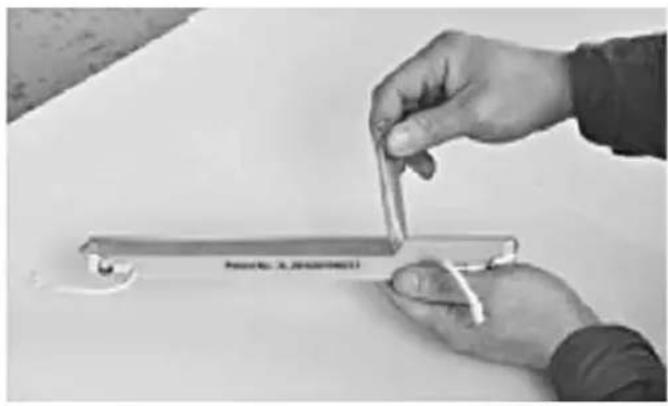
natural_image
Close-up of hands holding a small metallic object with a label, on a plain surface (no readable text or symbols)natural_image
Close-up of hands assembling a small mechanical component with a transparent rod (no visible text or symbols)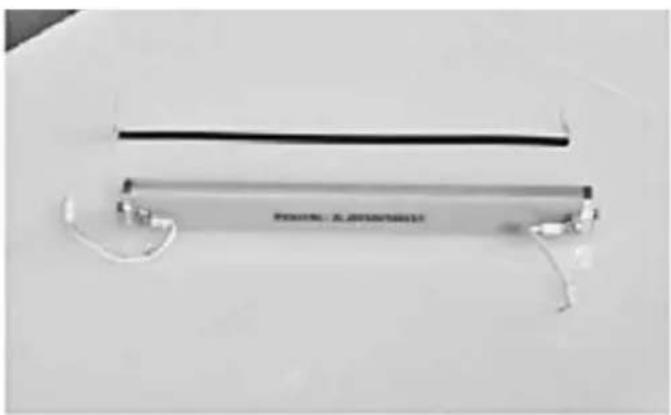
natural_image
Exterior view of a modern office building (no signage)natural_image
Exterior view of a modern office building (no signage)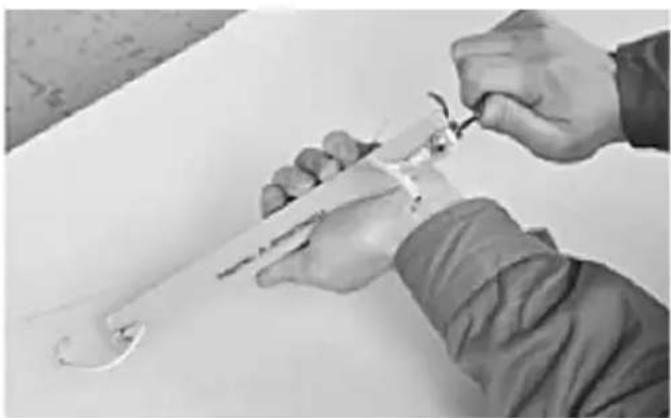
natural_image
Close-up of hands holding a tool with a curved tool, no visible text or symbolsnatural_image
Hand holding a scientific instrument labeled 'PolarTR: 20 MEADISTROPECT' (no other text or symbols visible)
natural_image
Close-up of hands using a tool to apply or install a component on a white surface (no text or symbols visible)natural_image
Close-up of hands holding a metal rod or tool, no visible text or symbols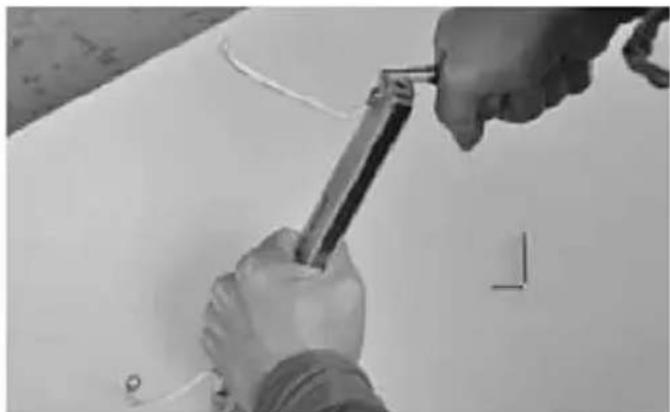
natural_image
Close-up of hands using a tool to adjust or install a white surface, no visible text or symbolsnatural_image
Black-and-white photo of a medical or laboratory device with a ruler, screwdriver, and handwritten tool on a white surface (no visible text or symbols)
natural_image
Metallic cylindrical object with two curved metal arms, no visible text or symbols on the body.natural_image
Metallic electronic component with two metal contacts and a curved base (no visible text or symbols)
natural_image
Close-up of a metallic tool with curved metal rods, resting on a plain surface (no text or symbols visible)natural_image
Close-up of a metallic cylindrical object with curved ends, no visible text or symbols
natural_image
Person using a ruler to measure a small object, no visible text or symbolsnatural_image
Close-up of hands installing or adjusting a transparent cylindrical component with wires (no visible text or symbols)
natural_image
Person using a tool to adjust or install a transparent cylindrical component (no visible text or symbols)natural_image
Person in protective suit handling a container with liquid, no visible text or symbols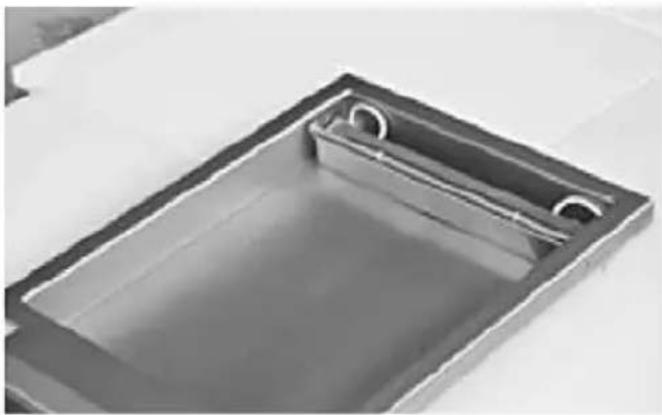
natural_image
Interior view of a rectangular metal tray with a circular recess and central slot (no text or symbols visible)natural_image
Technical line drawings of a microwave oven with open lid and internal components (no text or symbols)HENDI 975275
natural_image
Technical line drawing of an open industrial machine with internal components and a lever mechanism (no text or symbols)natural_image
Close-up of a rectangular metal tray with two circular cutouts, containing a liquid (no text or symbols visible)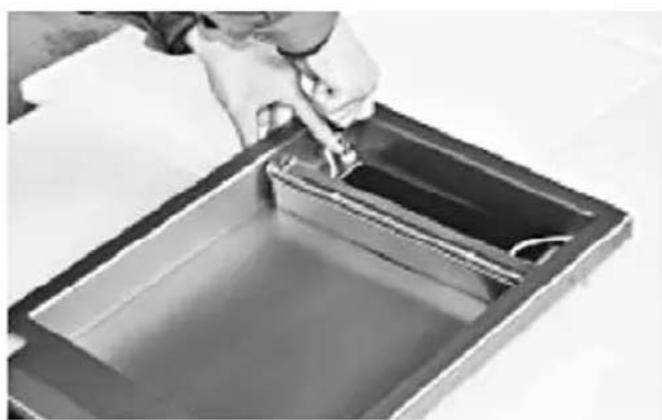
natural_image
Person pouring liquid into a rectangular container (no text or symbols visible)natural_image
Close-up of hands using a tool to adjust or install a transparent cylindrical component (no visible text or symbols)
natural_image
Close-up of hands using a tool to measure a cylindrical object with small objects, no visible text or symbolsnatural_image
Close-up of hands holding a cylindrical object with a small mark, against a plain white surface (no text or symbols visible)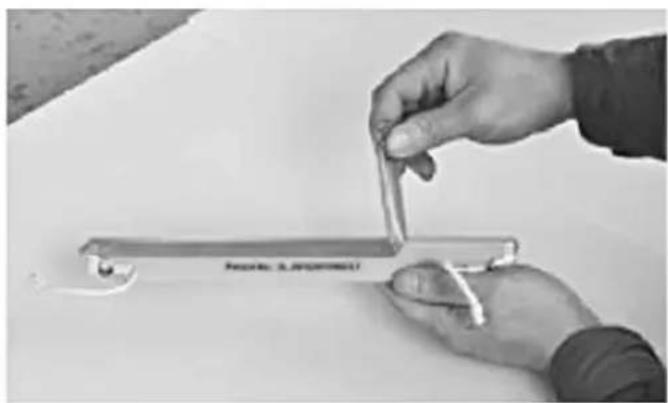
natural_image
Close-up of hands holding a metal tool with a label, no visible text or symbols on the tool itselfnatural_image
Close-up of hands assembling a small mechanical component with a glass rod (no visible text or symbols)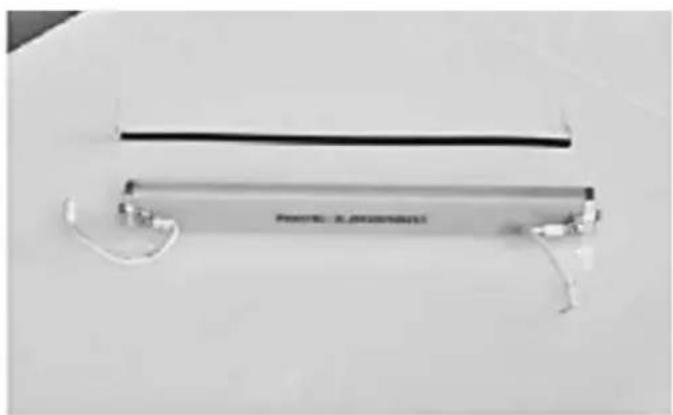
natural_image
Exterior view of a metallic cylindrical device with wires and connectors (no visible text or symbols)natural_image
Close-up of a thin, transparent cylindrical device with wires and connectors, no visible text or symbols on the body.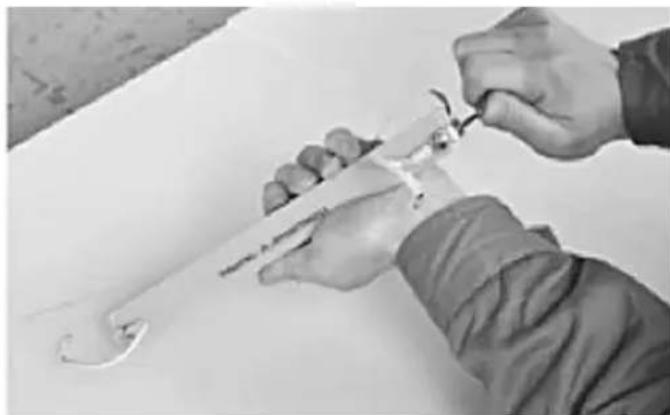
natural_image
Close-up of hands using a tool to cut or wire around a metal tool (no text or symbols visible)natural_image
Hand holding a handheld electronic device with a label, no visible text or symbols on the device itself.
natural_image
Close-up of hands using a tool to apply or install a component on a white surface (no text or symbols visible)natural_image
Close-up of hands holding a metal rod with a handle, no visible text or symbols
natural_image
Close-up of hands using a tool to adjust or install a white surface, no visible text or symbolsnatural_image
Black-and-white photo of a mechanical device with attached wires and a screwdriver, placed on a plain surface (no visible text or symbols)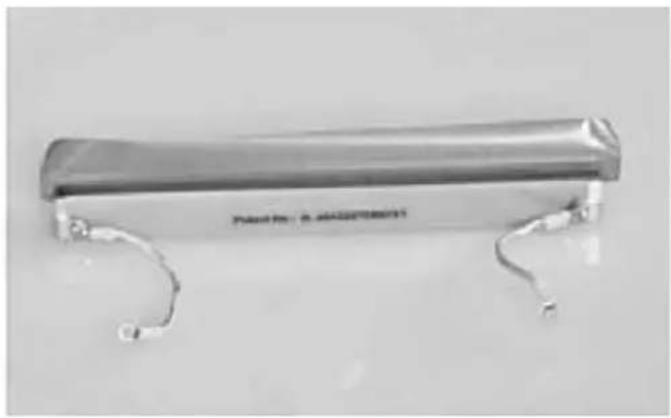
natural_image
Metallic cylindrical device with two curved metal legs and a label, no visible text or symbols on the body.natural_image
Close-up of a metallic tool with curved metal rods and a wire, resting on a plain surface (no text or symbols visible)natural_image
Metallic cylindrical object with curved ends, no visible text or symbols on the body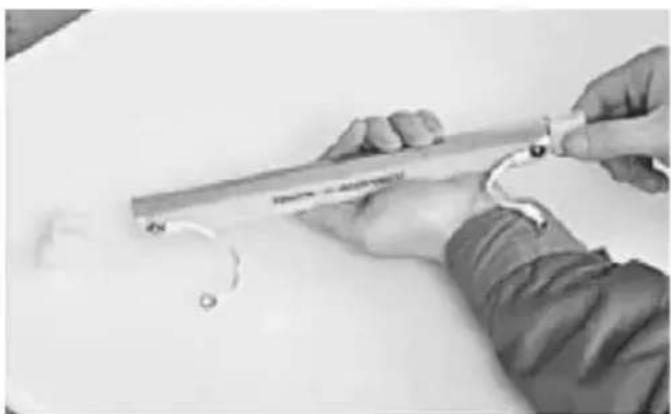
natural_image
Close-up of hands using a tool to cut a metal strip, no visible text or symbolsnatural_image
Close-up of hands installing or adjusting a metal component with wires, no visible text or symbols
natural_image
Close-up of hands using a tool to adjust or install a transparent cylindrical component (no visible text or symbols)natural_image
Person in lab coat handling a container with liquid, no visible text or symbols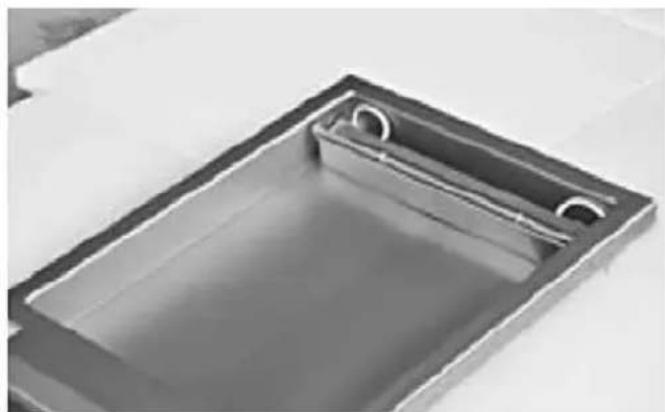
natural_image
Exterior view of a rectangular metal sink with internal channels (no text or symbols)62-023 Gądki, Poland
Tel: +48 61 6587000
Email: info@hendi.pl
Hendi Food Service Equipment GmbH
Hendi Food Service Equipment Romania Srl
PKS Hendi South East Europe SA
5 Metsovou Str.
18346 Moschato, Athens, Greece
Tel: +30 210 4839700
Email: office.greece@hendi.eu
Hendi HK Ltd.
1208, 12/F Exchange Tower
33 Wang Chiu Road, Kowloon Bay, Hong Kong
Tel: +852 2154 2618
Email: info-hk@hendi.eu
Find Hendi on internet:
www.hendi.eu
www.facebook.com/HendiToolsforChefs
www.linkedin.com/company/hendi-food-service-equipment-b.v.
www.youtube.com/HendiEquipment
- Changes, printing and typesetting errors reserved.