
MultiTool - Multitools Hammersmith - Free user manual and instructions
Find the device manual for free MultiTool Hammersmith in PDF.
| Product type | Multi-function tool |
| Brand | Hammersmith |
| Model | MultiTool |
| Power supply | Rechargeable 18 V DC lithium-ion battery |
| Battery capacity | 2.0 Ah |
| Charging time | Approx. 1 hour |
| Weight (with battery) | 1.55 kg |
| Main functions | Drill driver, oscillating head, sander, scraper, oscillating saw |
| No-load speed (drill) | 0-350 / 0-1,200 rpm (2 ranges) |
| Max tightening torque | 25 Nm |
| Max drilling diameter (wood) | 25 mm |
| Max drilling diameter (steel) | 8 mm |
| Chuck | Quick-release, 1-10 mm |
| Oscillating head: oscillation rate | 0-16,000 rpm |
| Oscillating head: oscillation angle | 3.00° |
| Sound pressure level (drill) | 81 dB(A) |
| Sound power level (drill) | 92 dB(A) |
| Sound pressure level (oscillating) | 83 dB(A) |
| Sound power level (oscillating) | 94 dB(A) |
| Vibration values (drill) | 0.98 m/s² (K=1.5 m/s²) |
| Vibration values (oscillating) | 2.92 m/s² (K=1.5 m/s²) |
| Protection class | IPX0 |
| Operating temperature | 10-35 °C, ≤65% RH |
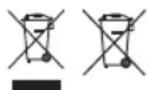
| Delivery contents | Main unit, 18V battery, charger, drill head, oscillating head, scraper, sander, 6 drill bits, bit extension, 32 bits, flexible bit holder, 9 abrasive sheets, Allen key, carrying case |
| Charger input voltage | 220-240 V, 50-60 Hz |
Frequently Asked Questions - MultiTool Hammersmith
User questions about MultiTool Hammersmith
0 question about this device. Answer the ones you know or ask your own.
Ask a new question about this device
Download the instructions for your Multitools in PDF format for free! Find your manual MultiTool - Hammersmith and take your electronic device back in hand. On this page are published all the documents necessary for the use of your device. MultiTool by Hammersmith.
USER MANUAL MultiTool Hammersmith
natural_image
Electric drill putter with green handle and black plastic case, accompanied by tools and a red sand pad (no text or symbols visible)Instructions for Use....13
Mode d'emploi....18
natural_image
Black electronic device with green display showing 18V power, no visible text or symbols on bodyReplacement battery & extensive range of accessories available separately. More info at www.mediashop.tv

Delivery contents (see Figure 1/A-0):
A. Base unit
B. 18V lithium-ion battery
C. Quick-charge battery station
D. Drill and screw attachment
E. Oscillation attachment
F. Oscillating saw blade
G. Oscillating scraper
H. Oscillating grinder
I. 6-part drill set (3 metal drills, 3 wood drills - 3, 5, 6;)
J. Bit extension
K. 32-part bit set
L. Flexible bit holder
M. 9-part sanding sheet set (grain: 3 x P60, 3 x P120, 3 x P240)
N. Allen key
- Storage case
Components
Base unit (see Figure 2):
-
Quick release chuck
-
Torque adjustment ring
-
Tool attachment unlocking switch
-
Motor unit
-
Direction of rotation switch
-
ON/OFF switch
-
Handle
-
Battery level indicator
-
Battery pack release button
Oscillation attachment (see Figure 3):
-
Attachment plate for oscillating accessories
-
Washer for oscillating accessories
-
Mounting screw for oscillating accessories
FR
natural_image
Three-panel photo showing hands holding a black cylindrical device with a digital display, no visible text or symbols

natural_image
Hand holding a green and black battery pack with three red buttons, no visible text or symbols7

natural_image
Two photos showing hands holding green and black handheld devices, labeled A and B (no text or symbols visible)8

natural_image
Three-panel photo sequence showing hands holding a green and black 3D-printed tool, labeled A, B, and C (no text or symbols on the devices themselves)DE
Read this instruction manual carefully before using the device! Follow all safety instructions to avoid damage that could result from incorrect use! Retain this instruction manual for future reference. Should the appliance be transferred to third parties, so must this instruction manual.

WARNING: Failure to follow warnings and instructions could result in electric shock, fire and/or serious injury.
SAFETY NOTICES
1. WORKPLACE SAFETY
- Always keep the workplace clean and well-lit. Cluttered and poorly lit workplaces increase the risk of accidents.
- Do not use the device in potentially explosive areas, such as in the vicinity of flammable liquids, gases,
vapours or dust. The device can generate sparks, which can ignite dust or fumes.
- Keep children and bystanders clear when operating the device. Distractions can lead to loss of control of the device.
2. ELECTRICAL SAFETY
- The plug on the device must be suited to the socket, and must not be modified in any way. Do not use adapter plugs with earthed power tools. This will avoid the risk of electric shock.
- Do not use the device in the rain or in any other damp environment. If water enters the device, this will increase the risk of electric shock.
- Always handle the cord with care. Never use the cord to carry, drag or unplug the device. Keep the cable clear from heat sources, oils, sharp edges and moving parts. Damaged or tangled cables increase the risk of electric shock.
- When using the device outdoors, only ever use an extension cable that is suitable for outdoor use.
3. PERSONAL SAFETY
- Remain alert and apply common sense when operating the device. Do not use the device when you are tired or under the influence of drugs, alcohol or medication. A brief lapse of concentration while operating the device could result in serious personal injury.
- Always use appropriate protective equipment. Wear eye protection, a dust mask, safety shoes, helmet and/or hearing protection that is required for the respective conditions; these reduce the risk of injury.
- Avoid unintentional starting of the device. Ensure that the device switch is in the OFF position before inserting the battery pack, picking up, or operating the device. Powering up the tool with the switch
turned to ON can lead to accidents.
- Remove the adjustment key before switching on the device. If a wrench or adjustment key is left on the rotating part of the power section, this can lead to injuries.
- Do not over-tighten the attachment. Always make sure that you can maintain a strong and balanced stance. This assures better control in unexpected situations.
- Do not over-estimate your capacities. Make sure you have a secure stance and balance at all times. This allows for better control over the device in unforeseen situations.
- Wear appropriate clothing. Do not wear loose clothing or jewellery. Make sure that hair, clothing and gloves cannot become caught in the moving parts.
- Never work at a higher speed than the maximum rated speed of the drill bit.
- Always start drilling at a low speed and with the drill bit in contact with the workpiece.
- Only apply pressure in a direct line with the bit, and never apply excessive pressure.
4. USE AND CARE OF THE DEVICE
- Use the correct device configuration for the respective application. A properly configured device will allow better execution of the task and is safer for the intended purpose.
- Do not use the device if the on/off switch is not working correctly. Any device that cannot be switched on and off with the switch is dangerous and must be repaired immediately by a specialist dealer.
- Remove the battery pack from the device before altering settings, replacing accessories or storing tools. These safety measures help to avoid the risk of the device switching itself on unintentionally.
- The device may only be used by children who
are 8 years of age or older and by people with limited physical, sensory or mental capabilities or a lack of experience and knowledge if they are supervised or have received appropriate instruction on how to use the device, to operate the device safely and in accordance with regulations, and have been adequately informed of all dangers that may arise from its use.
- Cleaning and user care must not be carried out by children unless they are older than 8 years of age and are supervised.
- Maintenance of the device. Make sure that moving parts are correctly attached, firmly in place, and free from damage that could impair the functionality of the device. If the device is damaged, you must have it repaired by an authorized dealer.
- Keep the cutting tools clean and fresh. Properly maintained cutting tools with sharp blades are less likely to become clogged and are easier to control.
- Use the device and accessories in accordance with these instructions, taking into account the working conditions and the task to be performed. Using the device for work for which it is not intended can lead to dangerous situations.
- Only ever charge the battery using the charger provided by the manufacturer.
- A charger designed for a different battery pack can create a fire hazard if it is used for charging.
- When the battery pack is not in use, keep it away from other metal objects as these could potentially short-circuit the poles of the battery. If the poles of the battery are connected to one another, a fire or fire may result.
- In the event of improper working and storage conditions, liquid can escape from the battery. Avoid this coming into contact with the skin under all circumstances. If you accidentally come into contact with the liquid, rinse it off immediately with water.
If the liquid comes into contact with the eyes, seek medical attention immediately. Liquids that leak from batteries can cause skin irritation and burns.
- This device is designed for household and personal use only.
5. MAINTENANCE
- Do not try to repair the device yourself, and ensure that repairs are only ever carried out by an authorized specialist dealer.
- Use only original replacement parts. This guarantees that the safety of the device is maintained.
The operation and use are entirely the responsibility of the user.
ADDITIONAL SAFETY RULES
• Always use protective goggles or glasses.
- Never use the Hammersmith MultiTool if it is wet.
- Wear hearing protection during prolonged use.
- Wear a dust mask when operating in a dusty environment.
- Before sanding, make sure that any nails, screws or other metal objects protruding from the workpiece have been removed.
- Always inspect walls and ceilings before drilling and screwing to avoid damage to potentially concealed power cables and pipes.
- Use screw clamps or other suitable clamping devices to fix the workpiece firmly to the surface and to prevent it from slipping.
- Only use attachments that are supplied for the Hammersmith MultiTool.
- Do not use broken, damaged or worn accessories or attachments. Only use attachments that are in good working condition.
- Always start the device in a suitable space, and allow
it to reach the optimum speed before introducing it to the workpiece.
- Always remove the battery pack from the device before changing attachments.
- Keep your hands out of the work area, and always cut away from yourself and other people.
- Wear hearing protection when using the percussion drill. Exposure to noise can cause hearing loss.
- Never work at a higher speed than the maximum rated speed of the drill bit.
- Always start drilling at a low speed and with the drill bit in contact with the workpiece.
- Only apply pressure in a direct line with the bit, and never apply excessive pressure.
- For applications that generate a lot of dust, such as percussion and diamond core drilling, ensure that there is sufficient dust extraction.
CHARGING, INSERTING AND REMOVING THE BATTERY PACK (see Figure 4/A-C)
The quick-charge battery station is designed in such a way that the battery set can be charged within an hour, although this depends on the respective battery set.
- Plug the charger into a suitable socket before inserting the battery pack.
- Insert the battery pack into the charger.
- A red light indicates that the battery pack is being charged.
- A green light indicates that the charging process is complete. The battery pack is now fully charged, and can be used or left on the charger.
Charge the battery set immediately after use to avoid shortening the service life of the battery. In order to extend the service life, make sure that the battery pack is never completely empty. We recommend charging the battery pack after each use. (see Figure 5)
If you want to know how much battery capacity remains in the battery pack during use, press the battery level indicator button. (see Figure 6)
LEAVING THE BATTERY PACK CONNECTED TO THE CHARGER
The battery can be left in the charger; in this case the LED display is lit green continuously. The charger keeps the battery pack in a fully charged state.
INSTALLATION AND REMOVAL OF THE BATTERY PACK IN/FROM THE DEVICE

WARNING: Make sure that the rotational direction switch is in the middle position to avoid triggering the switch while removing or installing the battery pack.
INSTALLATION
Slide the battery pack into the device until it clicks into place. Make sure that the battery pack is correctly positioned and fully engaged. (see Figure 7/A+B)
REMOVAL
Press the battery pack release button and pull the battery out of the device.
ATTACHING THE TOOLS

WARNING: TO AVOID THE RISK OF INJURY, REMOVE THE BATTERY PACK FROM THE TOOL BEFORE MAKING ANY
ADJUSTMENTS, REMOVING AN ATTACHMENT OR INSTALLING A NEW ACCESSORY.
Make sure that the lower edge of the respective tool attachment and power section of the base device are aligned horizontally and then push the attachment into the device until it clicks into place. (see Figure 8/A-C)
REMOVING THE TOOLS
Slide the locking switch down to release the tool from its docking place, then pull the attachment forward and away.
ON/OFF AND ROTATIONAL DIRECTION SWITCH
- The device is switched on and off by pressing and releasing the ON/OFF switch. The harder the ON/OFF switch is pressed, the faster the rotational speed.
- The direction of rotation switch is used to set the direction of the drill chuck forward for screwing in screws or backward for their removal. It is located above the variable ON/OFF switch.
- To select the forward direction of rotation, press the direction switch to the left (when viewed from the rear).
- To select the backward direction of rotation, press the direction switch to the right (when viewed from the rear).
NOTE: When changing the position of the rotation direction switch, make sure that the ON/OFF switch for speed control is not pressed in.
WORKING WITH THE DRILL ATTACHMENT

Secure the device against being switched on accidentally by moving the direction switch (into the middle position). There is a risk of injury if the device switches on unintentionally.
- Turn the chuck anti-clockwise until the drill opening is large enough to insert the tool (drill bit holder).
- Insert the tool as far as possible into the chuck.
- Turn the chuck clockwise to clamp the tool.
- To remove the tool, turn the chuck anti-clockwise and pull it out of the drill hole.
Selection of the desired operating mode
You can use the torque setting ring to adjust the power produced by the screwdriver.
1 - Low power
19 - High power
A. Drilling:
When ready to drill, set the torque adjustment ring to the drill setting. Insert the drill set corresponding with the material into the chuck. You can use for drilling into wood, metal, plastic, cement, ceramics or any other similar or comparable material.
B. Screwing: If you want to use for screwing, set the torque adjustment ring to the appropriate torque setting. Before choosing the setting, pay attention to the material you want to screw into. Insert the bit extension or the flexible bit holder into the chuck. You can use it to attach different screws and parts.
Setting the direction of rotation
The direction of rotation of the device can be changed using the rotational direction switch. (see Figure 2)
- Wait until the device has come to a standstill.
- Move the direction switch to the desired position: Clockwise direction of rotation: → for drilling and screwing in screws.
Anti-clockwise direction of rotation: ← for removal of screws. - When you move the direction switch to the middle position, the device is secured against being switched on unintentionally. The direction of rotation may only be changed when the machine is at a standstill.
WORKING WITH THE OSCILLATION ATTACHMENT

Secure the device against being switched on accidentally by moving the direction switch (into the middle position).
Note: The oscillating attachment is suitable for cutting wood or plasterboard but not for cutting stone or concrete walls.
- Select the desired angle for the application.
- Position the holes of the oscillating accessory over the fixing pins of the mounting plate.
- Make sure that the accessory lies flat on the surface of the mounting plate.
- Place the washer in the inner opening of the oscillation accessory.
Note: Make sure that the flat side of the washer that holds the oscillating accessory faces the accessory.
- Insert the fastening screw through the washer into the rotary spindle of the oscillating attachment.
- Use the Allen key to tighten the fastening screw by turning it clockwise. Do not overtighten
A. Sanding
The Delta sanding plate is fitted with Velcro fabric for quick attachment of the sanding sheets. Clean the sanding plate before attaching the sanding sheet.
- Attaching the sanding sheet: Press the sanding sheet evenly onto the sanding plate. Make sure that the punched holes in the sanding sheet match up with the holes in the sanding plate.
- Removing the sanding sheet: Simply pull the sanding sheet off the sanding plate.
Note: Always wear suitable clothing and protective equipment when working with the device. Ensure that the device works correctly before every use. Personal protective equipment and a correctly functioning device reduce the risk of injuries and accidents.
After switching on, move the device so that it comes into contact with the workpiece. In order to achieve optimal sanding results, only ever work with sanding sheets that are in perfect condition. Apply light and even pressure while working. This protects the device and sanding sheet. Do not use the same sanding sheet to sand different materials (e.g. metal and then wood).
Selection of the sanding sheet
(95 mm x 95 mm x 95 mm)
P60 for rough sanding
P120 for finishing
P240 for fine sanding
B. Sawing with the oscillating saw blade
Always wear eye protection. Use only undamaged saw blades that are in full working order. Make sure that you have a secure footing and hold the device firmly with both hands at a sufficient distance from your body. Before you saw the workpiece, first check that no foreign objects such as nails and screws are present. These must be removed before starting work. It is only intended for cutting soft materials, such as wood or plasterboard.
THE OSCILLATING SAW IS NOT SUITABLE FOR CUTTING INTO STONE OR CONCRETE WALLS.
C. Scraping with the oscillating scraper
Old carpet adhesive and wallpaper residues can be removed smoothly with the help of the oscillating scraper. Always work at the correct angle, so as not to damage the carrier material.
This symbol means that such electrical equipment or batteries must not be disposed of with normal household
waste. You are legally obliged to hand in such items - free of charge - to a public collection point or distributor-created collection point for the recycling of electrical devices and expired bulbs and batteries within the scope of the Electrical and Electronic Equipment Act that are not encapsulated by or fixed into the appliance, and can be removed or separated from the appliance non-destructively, for disposal at the end of their service life. Use rechargeable batteries instead of single-use batteries wherever possible. The recovery and recycling of old appliances makes an important contribution to protecting our environment. Improper disposal can result in toxic substances being released into the environment, which can have harmful effects upon people, animals and plants. Batteries with an increased pollutant content are also marked with the following symbols: Cd = cadmium, Hg = mercury, Pb = lead. Consumers are themselves responsible for deleting any personal data from appliances.
CE This product complies with the European directives.

Protection rating II
SPECIFICATIONS:
The product must be stored in a dry place and must not be exposed to direct sunlight during transport.
Operating temperatures and humidity: 10 - 35°C ≤ 65% relative humidity
Temperature and humidity for storing the tool:
10 - 25°C ≤ 65% relative humidity
Average shelf life: 500 cycles
Protection class: IPX0
Motor voltage: 18 V DC
Idling n _0 : 20,000 rpm
Drill attachment
Speed rpm: n_0 : 0 - 350/0 - 1,200 rpm
Tightening torque: max. 25 Nm
Dimensions of the drill opening: 1.0 - 10 mm
Drilling diameter
for wood: max. 25 mm
for steel: max. 8 mm
Motor speed with no load: n_0 20,000 rpm
Weight 0.55 kg (1.55 kg multi-functional tool with battery pack)
DRILL/SCREWDRIVER
NOISE:
Sound pressure level Lpa: 81 dB - relative
fuzziness Kpa: 3 dB, sound power level
Lwa: 92 dB - relative fuzziness
Fuzziness Kwa: 3 dB
VIBRATION
Screwdriver mode:
Vibration value ah = 2.03 m/s2 - uncertainty k = 1.5 m/s2
Drill mode:
Vibration value ah, ID = 0.98 m/s2 - uncertainty k = 1.5 m/s2
Multifunctional tool
Oscillation rate n_0 : 0 - 16,000 rpm
Oscillation angle: 3.00
Weight 0.29 kg (1.27 kg multi-functional tool with battery pack)
Sound pressure level Lpa: 83 dB - relative
fuzziness Kpa: 3 dB, sound power level Lwa: 94
dB - relative fuzziness Kwa: 3 dB,
Vibration value = 2.92 m/s2 - uncertainty k = 1.5 m/s2
Battery (Li ion)
Nominal voltage .... 18 V DC
Capacity .... 2.0 Ah
Charge time .... approximately 1 hr
Charger (PLCP-001A)
Nominal power consumption .... 70 W
Input voltage .... AC 220-240V, 50-60Hz, 70W
Output voltage .... 14.4-18V = 2.4A
Made in China
FR
Caricabatterie (PLCP-001A)
Nabíječka (PLCP-001A)
Nabíjačka (PLCP-001A)
Cargador (PLCP-001A)
Importeur | Importer | Importateur | Importatore | Importeur Importör | Dovozce | Dodávatel' | Importator | Importador:
CH: Mediashop Schweiz AG | Leuholz 14 | 8855 Wangen | Switzerland EU: MediaShop GmbH | Schneiderstraße 1, Top 1 | 2620 Neunkirchen | Austria Forgalmazó: Telemarketing International Kft. | 9028 Győr | Fehérvári út 75. | Hungary
DE | AT | CH: 0800 376 36 06 - Kostenlose Servicehotline ROW: +423 388 18 00 | CZ: +420 234 261 900 | SK: +421 220 990 800 RO: +40 318 114 000 | HU: +36 96 961 000
office@mediashop-group.com | www.mediashop.tv


- Delivery contents (see Figure 1/A-0):
- Components
- Base unit (see Figure 2):
- Oscillation attachment (see Figure 3):
- FR
- DE
- SAFETY NOTICES
- WORKPLACE SAFETY
- ELECTRICAL SAFETY
- PERSONAL SAFETY
- USE AND CARE OF THE DEVICE
- MAINTENANCE
- ADDITIONAL SAFETY RULES
- CHARGING, INSERTING AND REMOVING THE BATTERY PACK (see Figure 4/A-C)
- LEAVING THE BATTERY PACK CONNECTED TO THE CHARGER
- INSTALLATION AND REMOVAL OF THE BATTERY PACK IN/FROM THE DEVICE
- INSTALLATION
- REMOVAL
- ATTACHING THE TOOLS
- REMOVING THE TOOLS
- ON/OFF AND ROTATIONAL DIRECTION SWITCH
- WORKING WITH THE DRILL ATTACHMENT
- Selection of the desired operating mode
- Drilling:
- Setting the direction of rotation
- WORKING WITH THE OSCILLATION ATTACHMENT
- Note: The oscillating attachment is suitable for cutting wood or plasterboard but not for cutting stone or concrete walls.
- Note: Make sure that the flat side of the washer that holds the oscillating accessory faces the accessory.
- Sanding
- Note: Always wear suitable clothing and protective equipment when working with the device. Ensure that the device works correctly before every use. Personal protective equipment and a correctly functioning device reduce the risk of injuries and accidents.
- Selection of the sanding sheet
- Sawing with the oscillating saw blade
- THE OSCILLATING SAW IS NOT SUITABLE FOR CUTTING INTO STONE OR CONCRETE WALLS.
- Scraping with the oscillating scraper
- SPECIFICATIONS:
- Drill attachment
- Drilling diameter
- DRILL/SCREWDRIVER
- VIBRATION
- Screwdriver mode:
- Drill mode:
- Multifunctional tool
- Battery (Li ion)
- Charger (PLCP-001A)
- Caricabatterie (PLCP-001A)
- Nabíječka (PLCP-001A)
- Nabíjačka (PLCP-001A)
- Cargador (PLCP-001A)
Brand : Hammersmith
Model : MultiTool
Category : Multitools