
HydroBlast Pro - Ladder Hammersmith - Free user manual and instructions
Find the device manual for free HydroBlast Pro Hammersmith in PDF.

| Product Type | Cordless High Pressure Washer |
| Brand | Hammersmith |
| Model | HydroBlast Pro |
| Power Supply | 21V Rechargeable Lithium-Ion Battery |
| Battery Voltage (Max) | 21 V |
| Battery Voltage (Nominal) | 18.5 V |
| Motor Power | 350 W |
| Maximum Pressure | 13 bar |
| Rated Flow (Without Long Range Nozzle) | 250 L/h |
| Rated Flow (With Long Range Nozzle) | 210 L/h |
| High Pressure Hose Length | 5 m |
| Charging Time | 4 hours |
| Charger Voltage/Frequency | 100-240 V ~ 50/60 Hz |
| Charging Current | 2.6 A |
| Sound Pressure Level (Lp) | 69 dB |
| Sound Power Level (Lw) | 77 dB |
| Use | Domestic |
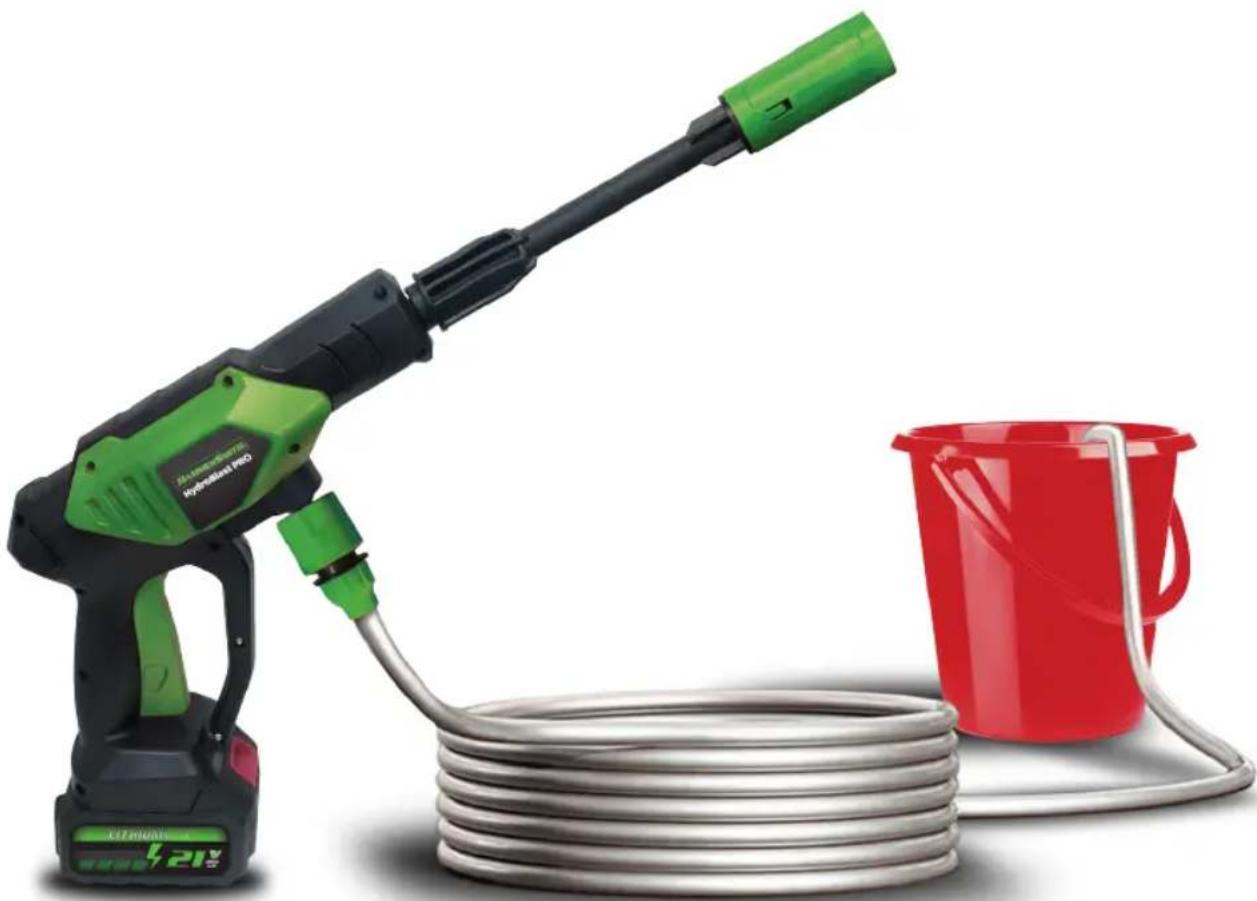
| Main Functions | Adjustable jet, foam sprayer, use with bucket or garden hose |
| Safety | Safety switch, do not direct at people |
| Maintenance | Clean the filter regularly, recharge the battery every 3 months if unused |
| Included Accessories | 5m high pressure hose, nanofilter, adapter, foam bottle, charger |
Frequently Asked Questions - HydroBlast Pro Hammersmith
User questions about HydroBlast Pro Hammersmith
0 question about this device. Answer the ones you know or ask your own.
Ask a new question about this device
Download the instructions for your Ladder in PDF format for free! Find your manual HydroBlast Pro - Hammersmith and take your electronic device back in hand. On this page are published all the documents necessary for the use of your device. HydroBlast Pro by Hammersmith.
USER MANUAL HydroBlast Pro Hammersmith
HAMMERSMITH®
HydroBlast PRO
natural_image
Electricity gun with green and black components connected to a coiled cable, next to a red bucket (no visible text or symbols)Instructions for Use....10
Mode d'emploi....14
Read the operating instructions before attempting to use the device. It is very important that you read these operating instructions in their entirety. Make sure you are familiar with its operation, safety and precautions.
FR
natural_image
Green and black electric vehicle fuel gun labeled A and B (no text or symbols on body)
natural_image
Green plastic mechanical component with black base (no text or symbols visible)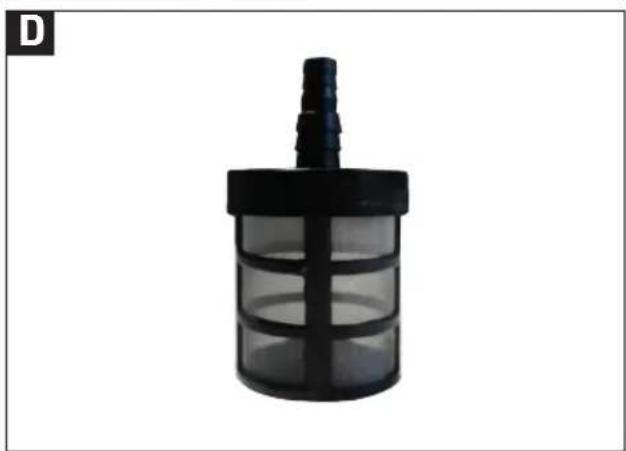
natural_image
Black plastic cylindrical container with a pipette and side cover, no visible text or symbols
natural_image
Black electronic device with a power plug and cable, no visible text or symbols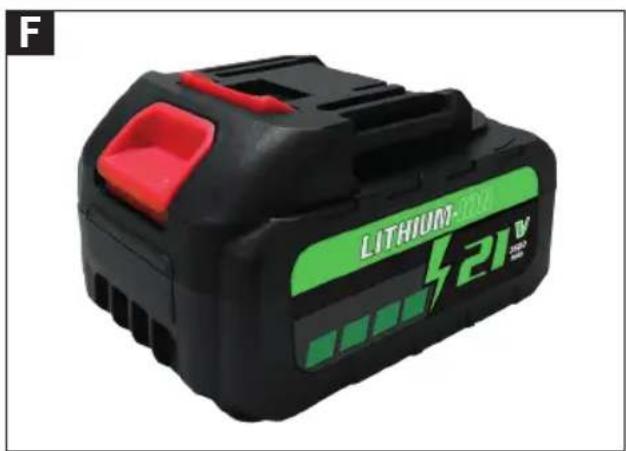
natural_image
Lithium 21V battery with red and green casing (no visible text or symbols beyond branding)
natural_image
Close-up of a black and green screwdriver tool (no text or symbols visible)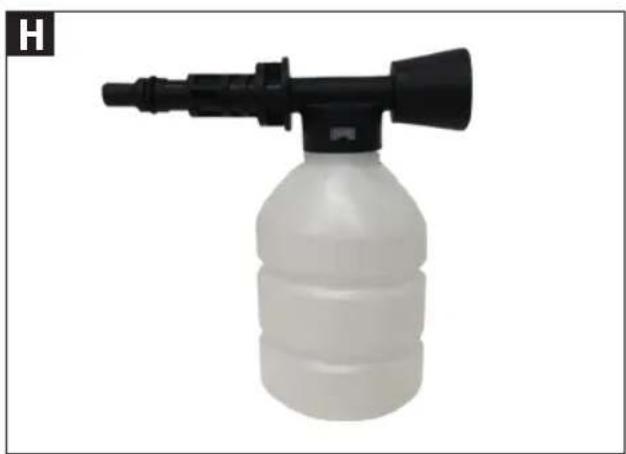
natural_image
White plastic water dispenser with black hose and bulb (no text or symbols visible)
natural_image
Coiled metal spring or coiled wire, no text or symbols visiblenatural_image
Two batteries connected to a wall-mounted power outlet, one with red arrow indicating direction (no text or symbols on device)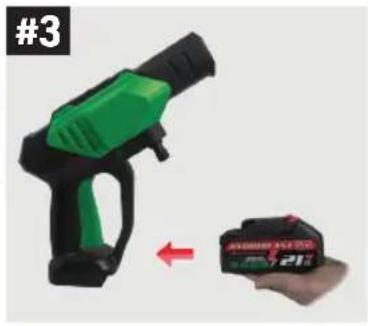
natural_image
Green and black handheld electric gun with a hand holding a battery case (no visible text or symbols)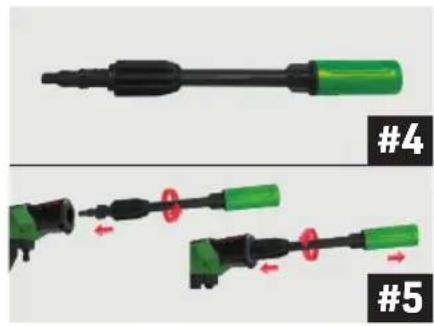
natural_image
Two green electrical plug connectors with a cable, one being compressed and the other showing a red valve (no text or symbols)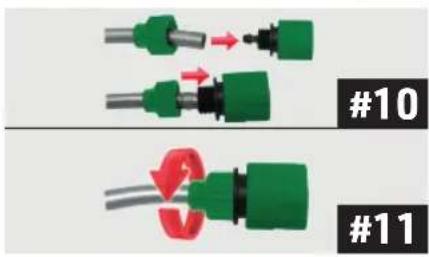
natural_image
Illustration of a green water spray gun connected to a blue bucket with a coiled cable, labeled #12 (no text or symbols on the diagram itself)
natural_image
Green hairless spray gun with coiled hose and water tap, no visible text or symbols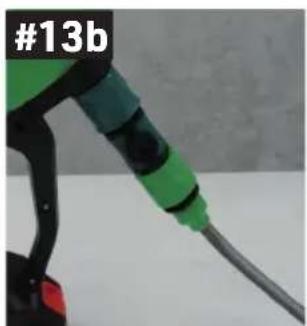
natural_image
Close-up of a green and black electric vehicle fuel nozzle with a cable, labeled #13b (no other text or symbols visible)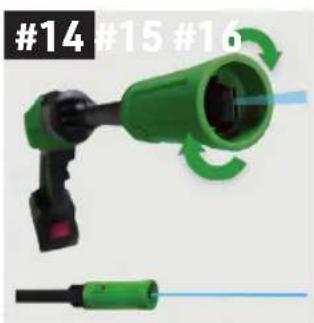
natural_image
Green electric vehicle charging plug with blue cable, no visible text or symbols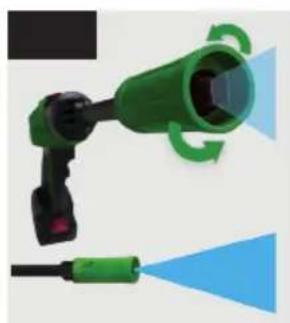
natural_image
Green electric plug with blue airflow indicators, no text or symbols present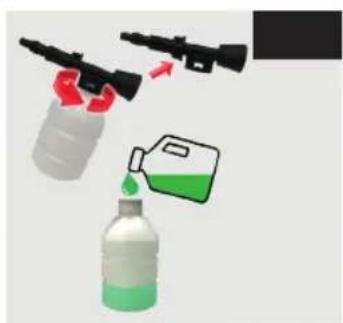
natural_image
Illustration of spray bottle, spray gun, and container with colored liquid (no text or symbols)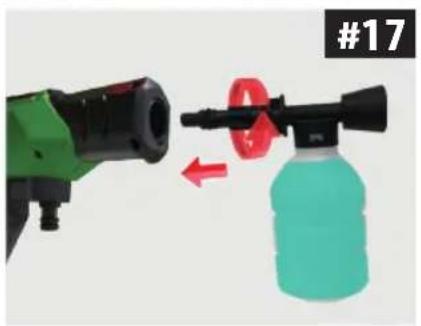
natural_image
Two different spray bottles: a green gas gun and a cyan water bottle, with a red ring arrow indicating motion (no text or symbols)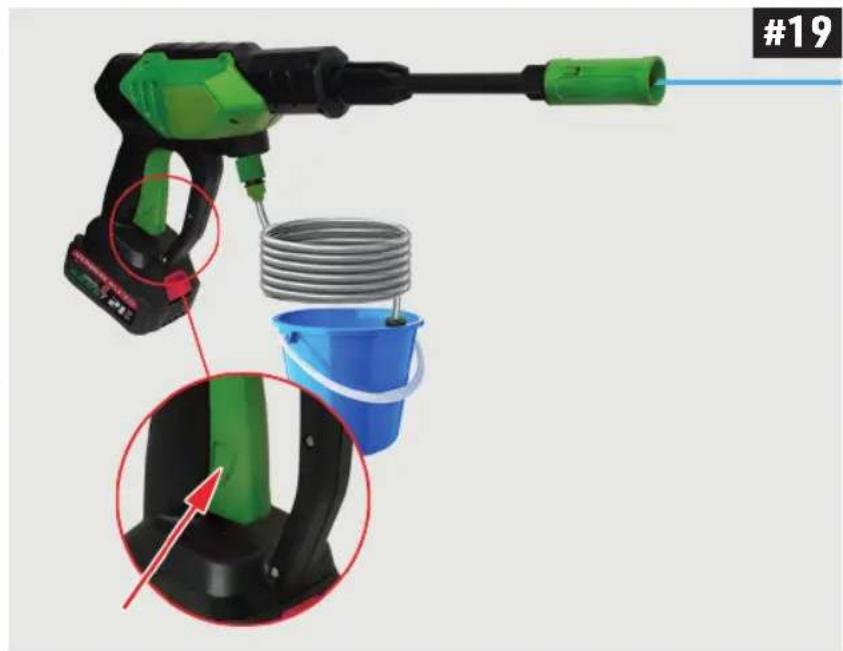
natural_image
Close-up of a green and black hairdryer with a coiled cable and bucket, showing mechanical components (no text or symbols)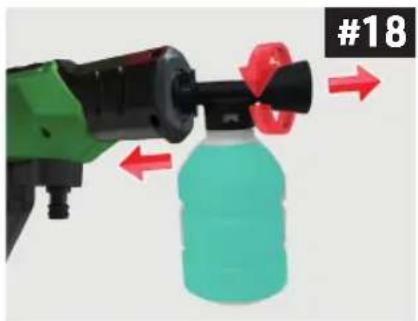
natural_image
Close-up of a green and black spray gun applying a blue plastic bottle with red directional arrows (no text or symbols)5
DE
- In some countries/regions, the use of cleaning products on outdoor private property is not permitted. Please check the applicable rules for your country/region.
- Do not use water over 50^ .
- Do not spray objects that contain substances or materials that are hazardous to health (e.g. asbestos).
- Operate the device in accordance with applicable regulations and never without a circuit breaker.
- The device is not a toy; keep it out of the reach of children. The device must not be operated by children.
- Product performance may vary depending on water pressure.
- Do not drop the product on hard surfaces, as this may damage it.
- The battery must only ever be charged indoors.
- The charger power cord must be replaced if it is damaged. Consult a qualified electrician, and never attempt to replace the cable yourself.
- Accessories that are not included in the scope of delivery must not be used.
- Unplug the battery's power cable when not in use or when cleaning.
- This device may only be used by people with reduced physical, sensory or mental capabilities or a lack of experience and knowledge if they are supervised or
instructed in the safe use of the device and understand the dangers associated with its use. Children must not be allowed to play with the device.
- Children should be supervised to ensure that they do not play with this device.
- Be careful not to immerse electrical parts in water.
- This pressure washer is intended for domestic use only, and is intended to clean: cars, bicycles, patios, grills, plastic furniture, pond areas and gardens.
- Do not place the pressure washer near sources of fire or other high-temperature locations.
- Do not expose the lithium battery to sources of heat or fire, and avoid storing it in direct sunlight.
- Do not subject the lithium battery to mechanical shocks.
- Avoid short-circuiting the lithium battery. To avoid them short-circuiting one another or being short-circuited by other metal objects, do not place battery packs in boxes or drawers.
- Never attempt to disassemble or open the lithium battery.
- Do not charge the lithium-ion battery for an overly long period of time.
- It is recommended that you charge the lithium battery every three months if not used for an extended period of time.
- Cease use of the product if it accidentally falls to the ground and has visible damage or failure.
- The lithium battery performs best at normal temperatures (20°C ± 5°C).
- Only use a dry cloth to clean the products.
Do not use water, petrol, alcohol or other chemical solvents. The water inlet filter and the water pipe filter should be cleaned regularly.
- Used batteries should be recycled and not simply disposed of in the bin.
- Do not use the included charger for any other appliance.
- Do not charge at high temperatures.
- Only ever charge indoors, and avoid the device getting wet in the rain.
- If the power cord is damaged, it must be replaced by the manufacturer, its maintenance department or similar professionals, in order to avoid any danger.
- Before charging, please ensure that the charger is in good operating condition.
- Improper use of a high-pressure jet lance can be dangerous. Do not aim the high-pressure jet directly at people, animals, electrical devices or the cleaner itself.
- Do not splash water on devices that contain electrical components.
- The device must not be used if it has been dropped, has visible signs of damage, or is leaking.
CHARGING THE BATTERY (#2)
To charge, connect the battery to the charger and firmly insert the plug into the socket. It takes 4 hours to fully charge the battery. During charging, the LED on the charger lights up red, when charging is complete, the LED lights up green. After charging, unplug the charger.
INSERTING THE BATTERY (#3)
To insert a fully charged battery into the device, simply insert it into the device base as shown in Figure #3, and press until it clicks into place. To remove, press the red button on the battery pack, and pull it out.
INSTALLING THE LONG-RANGE NOZZLE (#4-5)
- Take the long-range nozzle and mount it on the device.
- To assemble, firmly insert the end of the nozzle into the opening on the device (you will feel resistance), and then turn it to the left so that the barrel locks firmly into place.
Note: Only hand-tighten.
Removing the long-range nozzle: To remove the long-range nozzle, gently push it inward towards the gun, and quickly turn it to the right to loosen and remove it.
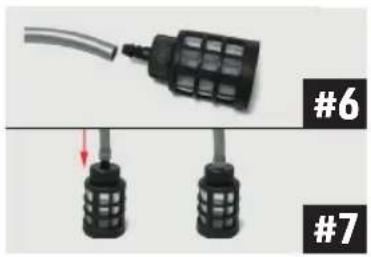
INSTALLING A MICRO-SCREEN NANOFILTER (#6 + #7)
Note: The nanofilter and pressure hose adapter are already pre-installed on the device when it is delivered. Hold the flexible pressure hose and the nanofilter micro-sieve.
Insert the tip of the flexible pressure hose into the socket of the nanofilter micro-sieve. Make sure the filter is seated correctly and tightly.
Tip: If the hose is difficult to insert, take a cup of hot water, dip the tip of the hose into the hot water, and leave it there for a few minutes. This loosens-up the flexible rubber hose and allows it to expand, making it easier to insert and connect.
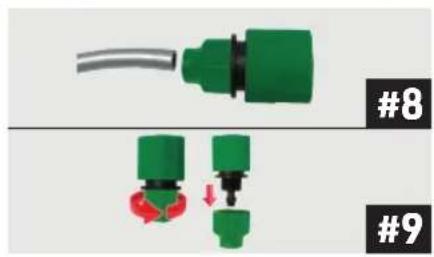
INSTALLING THE PRESSURE FLEXIBLE HOSE ADAPTER (#8-11)
- Take the other end of the flexible 5-metre pressure hose and the hose adapter.
- Turn the bottom cover of the hose adapter anticlockwise to expose the tip of the adapter.
- Thread the end of the flexible hose through the bottom adapter cover, and insert the tip of the adapter into the end of the hose. Make sure the adapter is secure.
- Place the adapter cover back onto the thread of the adapter, and tighten everything in a clockwise direction.
USE WITH A BUCKET OR GARDEN HOSE
Note: the device is fitted with a safety switch. In order to be able to press the on/off button, you must turn the safety switch inwards/press it to the left.
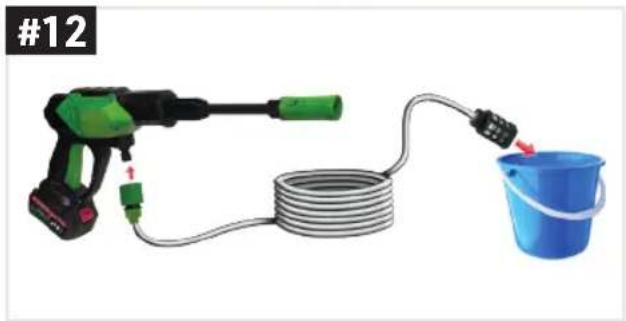
- a) with pressure hose and bucket (#12): Connect the pressure hose to the main unit. You will hear a clicking sound. Place the other end of the hose, including the nanofilter micro-sieve, in a bucket with clean water. Hold the main unit firmly, press the safety switch on the handle to the left, and press the power button on the handle. Keep the button pressed while using. You need to keep the button pressed for around 15 seconds until the pressure builds up and pressurized water comes
out of the device. As soon as you release the button, the device switches off.
- with a garden hose (#13a+b): Your garden hose requires a standard quick-coupler (not included in delivery contents). Connect one end of the garden hose directly to the main unit and the other to the tap. Then turn on the tap. As soon as the tap is opened, water comes out of the device. This is not a defect, the device does not have a water start-stop regulator. You can purchase a commercially available regulator valve (not included in delivery contents) for the garden hose or pressure hose. Attach the regulator valve directly to the device and connect your garden hose or pressure hose to the this (#13b). Hold the main device firmly and press the on/off button on the handle. Keep the button pressed while using. As soon as you release the button, the device switches off. If necessary, turn off the water supply at the regulating valve.
SPRAY NOZZLE SETTINGS (#14+15)
To control the spray jet, simply turn the nozzle clockwise or anti-clockwise. When you turn the nozzle anti-clockwise the jet becomes wider, and when you turn it clockwise the jet becomes more concentrated. You can adjust the jet during operation.
ATTACHING & FILLING THE SOAP FOAM BOTTLE (#16-18)
- Twist off the top cap of the soap foam bottle in an anti-clockwise direction to open the bottle. Fill the bottle to the top with the desired soap or shampoo.
- Then put the top cap back on, and turn it clockwise to seal the bottle.
- Remove the long-range nozzle from the pressure cleaning gun.
- To attach the filled soap foam bottle to the gun, insert the tip of the soap foam bottle cap into the opening on the device (bottle facing left), press firmly into the device, and turn the bottle to the right until it locks. Note: Only hand-tighten.
- To remove the soap foam bottle, gently press inward toward the gun and twist the bottle to the left to loosen and remove.
USING (#19)
Please follow the installation instructions to assemble the pressure cleaner and get it ready for use. After assembly, ensure that the flexible hose with the nanofilter is submerged in water and that the barrel and accessories are correctly assembled and secured.
- To operate: Point the device at the floor and press the on/off button on the handle to start the pressure washer. The device must first be primed to remove any pockets of trapped air in the pump system. To remove any air build-up, simply press the trigger while moving the hose with the filter in the bucket of water at the same time. It may take approximately 20 seconds for water to be emitted from the cleaner. Once you have a continuous flow of water, you are good to go. Release the trigger to stop.
- To prevent an automatic switch-on of the device, press the safety switch to the right. To unlock, press the safety switch to the left.
TROUBLESHOOTING
| Description Possible cause Solution | ||
| Weak lithium-ion battery or no power. | Low battery power | Remove the battery from the device and charge it for 4 hours. |
| The battery is not charging | The battery is not connected to the charger. | Re-insert the battery into the charger to ensure the connection is secure. |
| No or low water flow | There is an accumulation of air in the suction and pump system | Bleed the system: Remove the hose adapter from the main unit. Turn the device upside down. Fill the pistol with a cup of water through the water inlet, and turn it on at the same time. Once the water has flowed into the system, reattach the hose adapter. |
| Air has accumulated inside the flexible hose system. | To release the air accumulated in the hose, immerse the filter in the bucket of water and stir vigorously while turning on the device. If water begins to flow, you can continue using it. | |
| The filter is clogged. The hose is kinked. | Clean the filter of any debris that may have obstructed the flow. Unfold and straighten the hose. | |
| The water is contaminated with impurities. | Replace it with clean water | |
| Clogged nozzle or barrel | Remove any debris and make sure the barrel is connected properly. | |
| Loose connection of hose, hose adapter and water inlet. | Securely reconnect the hose adapter to the device's water inlet. | |
| The nanofilter is not completely submerged in the water | Submerge the nanofilter in the bottom of the water bucket. Make sure that the bucket is filled with clean water. | |
| Water leakage between the tip of the device and the barrel | The barrel is not installed correctly. | Remove the barrel and inspect it for blockages, contamination and damage. If it is clogged, clean it. Re-attach it and make sure it is installed correctly. |
FR
CONSIGNES DE SÉCURITÉ MERCI DE LIRE LE PRÉSENT MANUEL EN TOTALITÉ AVANT LA PREMIÈRE UTILISATION ET DE LE CONSERVER POUR CONSULTATION ULTÉRIEURE
MONTÁŽ DÁLKOVÉ TRYSKY (#4-5)
Charging current: 2600 mA
Charge time: 4 hours
Nominal voltage: 21V max. (18.5V Nominal voltage)
Motor power: 350 W
RPM: 22,000 RPM
Pressure (bar): 13
Rated flow: 250 l/h (without long-range nozzle)
210 l/h (with long-range nozzle)
Max. rated flow: 250 l/h (without long-range nozzle)
210 l/h (with long-range nozzle)
High-pressure flexible hose length: 5 m
Sound pressure level Lp: 69.02 dB
Sound power level Lw: 77 dB
FR
CARACTÉRISTIQUES TECHNIQUES
- Charge your batteries correctly and fully to maximize their lifespan. If necessary, fully discharge it using a suitable appliance before recharging it.
- Consider the possibility of using rechargeable batteries. These can be reused and recharged multiple times, reducing the quantity of battery waste.
- Always use the correct type of batteries for your devices. Improper use may shorten battery life and potentially give rise to harmful effects.
CH: MediaShop Schweiz AG | Leuholz 14 | 8855 Wangen | Switzerland
office@mediashop-group.com | www.mediashop.tv


- HAMMERSMITH®
- HydroBlast PRO
- FR
- DE
- CHARGING THE BATTERY (#2)
- INSERTING THE BATTERY (#3)
- INSTALLING THE LONG-RANGE NOZZLE (#4-5)
- INSTALLING A MICRO-SCREEN NANOFILTER (#6 + #7)
- INSTALLING THE PRESSURE FLEXIBLE HOSE ADAPTER (#8-11)
- USE WITH A BUCKET OR GARDEN HOSE
- SPRAY NOZZLE SETTINGS (#14+15)
- ATTACHING & FILLING THE SOAP FOAM BOTTLE (#16-18)
- USING (#19)
- CONSIGNES DE SÉCURITÉ MERCI DE LIRE LE PRÉSENT MANUEL EN TOTALITÉ AVANT LA PREMIÈRE UTILISATION ET DE LE CONSERVER POUR CONSULTATION ULTÉRIEURE
- MONTÁŽ DÁLKOVÉ TRYSKY (#4-5)
- CARACTÉRISTIQUES TECHNIQUES
Brand : Hammersmith
Model : HydroBlast Pro
Category : Ladder