
VS3190X - Vacuum packaging machines FOODSAVER - Free user manual and instructions
Find the device manual for free VS3190X FOODSAVER in PDF.

| Product type | Vacuum packaging machine |
| Brand | FoodSaver |
| Model | VS3190X |
| Main functions | Vacuum sealing, welding, Dry, Moist, Impulse modes, Sous vide cooking, integrated manual suction accessory |
| Compatible accessories | FoodSaver bags and rolls, jars, caps, food containers |
| Power supply | Mains (standard plug) |
| Safety | Automatic shut-off, overheating protection, household use only, do not immerse |
| Maintenance | Removable drip tray, removable gaskets, removable accessory reservoir, clean with damp cloth |
| Spare parts available | Gaskets, drip tray, reservoir, manual suction accessory |
| After-sales service | France: 0805 542 055, email: foodsavereurope@newellco.com |
| Warranty | Under warranty - contact the store of purchase |
| Material | Plastic and metal |
| Usage | Household only |
| Max temperature for reheating | 75°C (simmering water), 70°C (microwave at 180W max) |
Frequently Asked Questions - VS3190X FOODSAVER
User questions about VS3190X FOODSAVER
0 question about this device. Answer the ones you know or ask your own.
Ask a new question about this device
Download the instructions for your Vacuum packaging machines in PDF format for free! Find your manual VS3190X - FOODSAVER and take your electronic device back in hand. On this page are published all the documents necessary for the use of your device. VS3190X by FOODSAVER.
USER MANUAL VS3190X FOODSAVER
natural_image
Exterior view of a food-saver appliance with control knobs and a flat-screen tool (no visible text or symbols)EN REFERENCE GUIDE
FR GUIDE DE RÉFÉRENCE
B
A

C
D
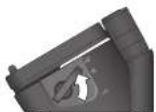

Fig.4
A
●
The image is too blurry to recognize any text content.
●
●
F

Important Safeguards
This appliance can be used by children aged from 8 years and above and persons with reduced physical, sensory or mental capabilities or lack of experience and knowledge if they have been given supervision or instruction concerning use of the appliance in a safe way and understand the hazards involved. Children shall not play with the appliance. Cleaning and user maintenance shall not be made by children without supervision.
If the supply cord is damaged, it must be replaced by the manufacturer, or its service agent or a similarly qualified person in order to avoid a hazard.
• Always use the appliance on a stable, secure, dry and level surface.
- CAUTION: THIS SEALER IS NOT FOR COMMERCIAL USE. Never use this appliance for anything other than its intended use. This appliance is for household use only. Do not use this appliance outdoors.
- Never immerse the appliance or power cord and plug in water or any other liquid.
- Do not use the appliance if it has been dropped or if there are any visible signs of damage.
- Ensure the appliance is switched off and unplugged from the supply socket after use, before cleaning.
- To disconnect, unplug the power cord from the electrical outlet. Do not disconnect by pulling on the cord.
- Do not use an extension cord with the appliance.
- Use only accessories or attachments recommended by the manufacturer.
- When reheating foods in FoodSaver ^® bags make sure to place them in water at a low simmering temperature below 75°C (170°F).
- FOODS INSIDE BAG CAN BE DEFROSTED BUT NOT REHEATED IN A MICROWAVE OVEN. When defrosting foods in the microwave in FoodSaver® bags make sure not to exceed maximum power of 180 watts (defrost setting), maximum time of 2 minutes and maximum temperature of 70°C (159°F).
SAVE THESE INSTRUCTIONS
The FoodSaver® System
Why Vacuum Package?
Exposure to air causes food to lose nutrition and flavour, and also causes freezer burn and enables many bacteria, mould and yeast to grow. The FoodSaver® vacuum packaging system removes air and seals in flavour and quality. With a full line of FoodSaver® bags, and censors to expand your options, you can now enjoy the benefits of a scientifically proven food storage method that keeps food fresh up to five times longer.
The FoodSaver® System Saves Time and Money
- Spend less money. With the FoodSaver ^® system, you can buy in bulk or buy on sale and vacuum package your food in desired portions without wasting food.
- Save more time. Cook ahead for the week, preparing meals and saving them in FoodSaver ^® bags.
- Make entertaining easy. Make your signature dish and holiday treats in advance so you can spend quality time with your guests.
- Enjoy seasonal or specialty foods. Keep highly perishable or infrequently used items fresh longer.
- Control portions for dieting. Vacuum package sensible portions and write calories and/or fat grams on the bag.
- Protect non-food items. Keep camping and boating supplies dry and organised for outings. Protect polished silver from tarnishing by minimising exposure to air.
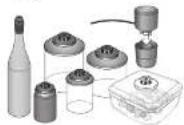
FoodSaver® Accessories
Get the most out of your FoodSaver® appliance with easy-to-use FoodSaver® bags, canisters and accessories.
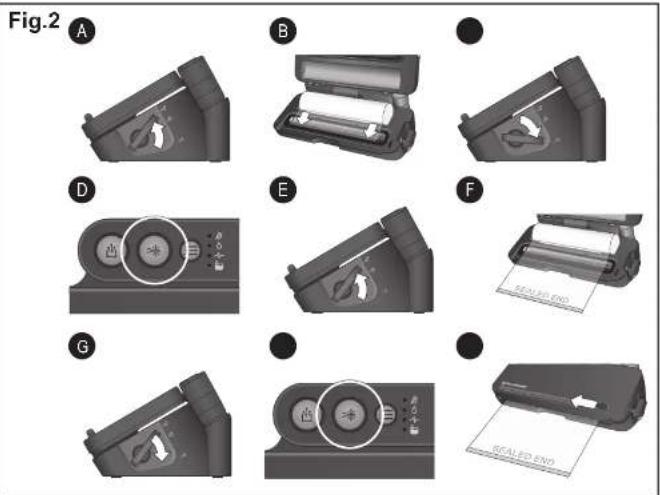
FoodSaver® Bags and Rolls
FoodSaver ^6 bags and rolls feature special channels that enable the efficient removal of air. The multi-ply construction makes them an especially effective barrier to oxygen and moisture and helps to prevent freezer burn. FoodSaver ^6 bags and rolls came in a variety of sizes.
FoodSaver ^® Containers
FoodSaver ^® containers are simple to use and ideal for vacuum packaging delicate items such as muffins and other baked goods, liquids and dry goods. Use to marinate in minutes rather than hours with Marinate Mode.
FoodSaver® Bottle Stopper
Use FoodSaver® bottle stoppers to vacuum package wine. non-carbonated liquids and oils. This will extend the life of the liquid and preserve the flavour. Don't use the bottle stopper on plastic bottles.

Parts
See FIG. 1
A Control Panel
Built-In Hardheld Sealar
© Latch
D Bag Cutter
E Cutter Stabilizer Profile
f Bag Cutter
G Appliance Ltd
H Upper Seal Profile
I Upper Foam Gasket
Roll Storage
Lower Foam Gasket
Extra Wide Sealing Strip
M Vacuum Channel
Removable Drip Tray
Using FoodSaver® accessories
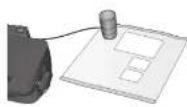
Your new FoodSaver® Appliance includes a Built-In Handheld Sealer for accessories.
FOR ZIPPER BAGS & CONTAINERS
- Turn Latch to Operate position and pull Handheld Sealer from appliance.
- Place Built-In Handheld Sealer on zipper bag or container valve.
- Press Mode Button: Until the Indicator light next to Vacuum is illuminated. Then press Handheld Button to vacuum.
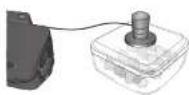
FOR CANISTERS
- Turn Latch to Operate position and pull Handheld Sealer from appliance.
- Disassemble Handheld Sealer to remove bottom portion from top handle. Insert tip into port on accessory.
- Press Mode Button: Until the Indicator light next to Vacuum is illuminated. Then press Handheld Button to vacuum.
Control Panel
The user-friendly, intuitive control panel makes it easy for you to get the most out of your FoodSaver® System:
Heat Seal Controls
- Vacuum Bullen
Press to vacuum seal food airtight. Appliance shuts off
automatically.
Seal Button
This button as three uses:
i. Press button to create a seal when making bags using a
FoodSaver® Roll.
ii. Press to immediately stop vacuum process and begin sealing bag.
iii. Press to create a seal on film bags (such as a potato chip and cereal bags) to keep food sealed airlight.
Mode Button
Press Mode Button to select custom setting. Indicator light will
illuminate next to the custom setting that is initiated.
3a Dry
For optimal vacuuming and sealing of dry foods. This is the
default selling.
3b.Moist
For optimal vacuuming and sealing of moist or juicy foods.
3c.Pulse
Press and hold to manually control the vacuum function. Press Seal Button when ready to seal bag.
3d. Sous Vide
For optimal vacuuming and sealing of bags to use in Sous Vide cooking.

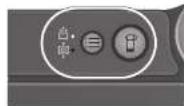
Handheld Sealer Controls
- Mode Button (available on select models)
Press Mode Button to select setting. Indicator light will illuminate next to the custom setting that is initiated.
4a. Vacuum For use with FoodSaver® Zipper Bags, Containers, Bottle Stoppers, and other accessories using built-in Handheld Sealer.
4b. Marinate (available on select models) For use with FoodSaver® Marinator Containers using built-in Hardheld Sealer. Vacuum pulse sequence takes 12 minutes or less. It allows for optimum flavour infusion in less time. Appliance will vacuum and release three times.
- Handheld Button
Press for use with FoodSaver® accessories using Built-In Handheld Sealer.
- Latch Operate - Adjust Down to put unit in Operate Mode. This turns unit on for vacuuming and sealing.
Store - Adjust Centre to Store
Open - Adjust Up to Open
Storage
Push in the vacuum and seal bar and make sure that the latch Ⓐ is in the store position ♂
Make sure that the appliance is clean and store upright on a flat, level surface, away from the edge and where it cannot be easily knocked over.
Storage Guide. Hints and Tips
Vacuum Packaging and Food Safety
The vacuum packaging process extends the life of foods by removing most of the air from the sealed container, thereby reducing oxidation, which affects nutritional value, flavour and overall quality. Removing air can also inhibit growth of microorganisms, which can cause problems under certain conditions:
To preserve foods safely, it is critical that you maintain low temperatures. You can significantly reduce the growth of microorganisms at temperatures of 4°C or below.
Freezing at -17^ C does not kill microorganisms, but stops them from growing. For long-term storage, always freeze perishable foods that have been vacuum packaged, and keep refrigerated after thawing. It is important to note that vacuum packaging is NOT a substitute for canning and it cannot reverse the deterioration of foods. It can only slow down the changes in quality. It is difficult to predict how long foods will retain their top-quality flavour, appearance or texture because it depends on age and condition of the food on the day it was vacuum packaged.
Important: Vacuum packaging is NOT a substitute for refrigeration or freezing. Any perishable foods that require refrigeration must still be refrigerated or frozen after vacuum packaging. To avoid possible illness, do not reuse bags after storing raw meals, raw fish or greasy foods. Do not reuse bags that have been microwaved or simmered.
Thawing and Reheating Vacuum Packaged Foods

Always thaw foods in a refrigerator or a microwave oven — do not thaw perishable foods at room temperature.
Foods Inside a bag can be defrosted but not rehealed in a microwave oven. When defrosting foods in the microwave in FoodSaver® bags make sure not to exceed maximum power of 100 walls (defrost setting), maximum lime of 2 minutes and maximum temperature of 70°C (158°F).
You can also reheat foods in FoodSaver® bags by placing them in water at a low simmer below 75°C (170°F). Follow any specific instructions that come with the FoodSaver® specialty bags.
Preparation Guidelines
Meat and Fish


For best results, pre-freeze meal and fish for 1-2 hours before vacuum staying in a FoodSaver Bag. This helps retain the juice and shape, and guarantees a better seal. If it's not possible to pre-freeze, place a forced paper towel between meat or fish and top of bag, but below seal area.
Leave a paper towel in bag to absorb excess moisture and juices during the vacuum sealing process.
Note: Beef may appear darker after vacuum sealing due to the removal of oxygen. This is not an indication of spoilage.
Hard Cheeses

To keep cheese fresh, vacuum seal I after each use. Make your FoodSave® Bag extra-long, allowing 25mm of bag material for each time you plan to open and reveal, in addition to the 75mm room you normally leave between contents and seal.
Simply cut sealed edge and remove cheese. When you
are ready to reseal the cheese, just drop it in bag and reseal. Important: Due to the risk of anaerobic bacteria, soft cheeses should never be vacuum sealed.
Vegetables

Vegetables need to be blanched before vacuum sealing. This process stops the enzyme action that could lead to loss of favour, colour and texture.
To blanch vegetables, place them in boiling water or in the microwave until they are cooked, but still crisp. Blanching times range from 1 to 2 minutes for early greens and peas. 3 to 4 minutes for snap peas, sliced cochelle or brocol; 5 minutes for carrots, and 7 to 11 minutes for corn on the coo. After blanching, Immense vegetables in cold water to stop the cooking process. Finally dry vegetables on a travel before vacuum sealing. Note: All vegetables (including brocol). Brussels sprouts cabbage, cauliflower, lats, lunips) naturally emit gases during storage. Therefore, after blanching, they must be stored in freezer only.

When freezing vegetables, it is best to pre-freeze them for 1–2 hours or until solidy frozen. To freeze vegetables in individual servings, first place on a baking sheet and spread them out as they are not touching. The prevents them from freezing together in a block. Once they are frozen, remove from baking sheet and vacuum seal vegetables in a FoodSaver® Bag. After they have been vacuum sealed, return them to the freezer.
Important: Due to the risk of anaerobic bacteria, fresh mushrooms, onions and garlic should never be vacuum sealed.
Leafy Vegetables

For host results, use a canister to store leafy vegetables. First wash the vegetables, and then dry with a towel or salad sooner. After they are dried, put them in a canister and vacuum seal as normal. Store in the refrigerator
Fruits

When freezing soft fruits or berries, it is best to pre-freeze them for 1-2 hours or until solely frozen. To freeze fruit in individual servings, first place on a baking sheet and spread them out so they are not touching. This prevents them from freezing together in a block. Once they are frozen, remove from baking sheet and vacuum soap fruit in a FoodSaver Bag.
After they have been vacuum sealed, return them to the freezer. You can vacuum seal portions for baking or in your favourite combinations for easy fruit salad all year round. If storing in the refrigerator, we recommend using a FoodSaver® Canister.
Baked Goods

To vacuum salt, salt or airy baked goods, we recommend using a FoodSaver® Canister so they will hold their shape. If using a bag, pro-freeze for 1-2 hours or until solidly frozen. To save time, make cookie dough, pie shots, whole pies, or mix dry ingredients in advance and vacuum salt for later use.
Coffee and Powdery Foods

To prevent food particles from being drawn into vacuum pump, place a coffee filter or paper towel at top of bag or canister before vacuum sealing. You can also place the food in its original bag inside a FoodSaver Bag, or use a FoodSave® Universal Ltd with the original container to vacuum seal.
Liquids

Before you vacuum seal liquids such as soup stock, pre-freeze in a casserole dish, leaf pan or ice cube tray and sole. Remove frozen liquid from pan and vacuum seal in a FoodSave® Bag. You can stack these 'frozen bricks' in your freezer.
When you are ready to use, just cut corner of bag and place in a dish in microwave or drop into water at a low simmer, below 75°C (170°F).
To vacuum seal non-carbonated bottled liquids, you can use a FoodSaver® Bottle Stopper with the original container.
Remember to leave at least 25mm of room between contents and the bottom of the Bottle Stopper. You can reseal bottles after each use.
Pre-Made Meals, Leftovers and Sandwiches
Efficiently store your pre-made meals, leftovers and sandwiches in the slackable, lightweight FoodSaver® Containers. They are microwaveable, top rack dishwasher safe and come with a custom adaptor.
The lightweight containers will be ready to head off in the office, to school or the great outdoors whenever you are!
Snack Foods

Your snack foods will maintain their freshness longer when you vacuum seal them. For best results, use a FoodSavor Caristor for crushable items like crackers.


Troubleshooting
| Problem Solution | |
| Seal LED flashing | • Unit is overheated. Always allow 20 seconds between seals. Under heavy usage, appliance will shut off automatically and Seal Light will flash. Wait for 20 min. for unit to cool off.• Always wall 20 seconds between seals.• Latch has been left in Operate position: Gaskets may be compressed. Turn Latch to Open or Store position and allow 10 to 20 minutes for Gaskets to expand.• Vacuum pump running more than 120 seconds. Under heavy usage, appliance will shut off automatically and Seal Light will flash. See next section Vacuum Pump is running, but bag is not evacuating.• Latch was left in On position for 5 minutes and not being used reminding user to turn Latch to Open or Store position. |
| Vacuum Pump is running, but bag is not evacuating | • If making a bag from a roll, make sure one end of bag is sealed. See How to Make a Bag from a FoodSaver® Vacuum Sealing Roll.• Adjust the bag and try again. Make sure the open end of the bag is down inside the Drip Tray.• Check for wrinkles in bag along Sealing Strip. To prevent wrinkles in the seal, gently stretch bag flat while inserting bag into Drip Tray.• Open unit and make sure Gaskets are inserted properly and there are no foreign objects, dirt or debris on the Upper or Lower Gasket.• Latch has been left in Operate position: Gaskets may be compressed. Turn Latch to Open or Store position and allow 10 to 20 minutes for Gaskets to expand.• Make sure the lid is latched down all the way. If the Latch does not catch the lid and bring it down, there will be a leak between the Gaskets. |
| Gasket is loose or has a tear | • Take out the gasket, clean it and re-insert the Gasket into the Gasket Channel.• If Gasket has minor damage remove, flip over and reinstall.• Visit website for replacement. |
| Bag is not sealing properly | • Too much liquid in bag, freeze before vacuuming.• Check for food debris around seal area. If present, take out the gasket, clean it and re-insert the Gasket into the Vacuum Channel.• Bag has wrinkles: To prevent wrinkles in the seal, gently stretch bag flat while inserting bag into Gasket Channel. |
| No lights on the control panel | • Make sure unit is plugged in.• Make sure wall outlet is functional.• Make sure lid is all the way down, and the Latch is in the Operate position. |
| Nothing happens when Latch is closed and Button is pressed | • Make sure unit is plugged in.• Make sure wall outlet is functional.• Open Latch, make sure lid is all the way down, re-latch lid. |
| Cannot insert bag into machine | • Make sure there is enough bag material to reach centre of drip tray. Always allow three inches (7.82 cm) extra space to allow the bag to seal tightly around food contents.• Gently scratch bag flat while inserting. Insert bag curl down into Drip Tray. |
| Problem Solution | |
| Air was removed from the bag, but now air has re-entered | Examine the seal. A wrinkle along the seal may cause air to re-enter the bag. To prevent wrinkles in the seal, gently stretch bag fail while inserting bag into Drip Tray.Sometimes moisture or food material (such as juices, grease, crumbs, powders, etc.) along seal prevents bag from sealing properly. Cut bag open, wipe 'top inside of bag and re-seal.Sharp food items may have punctured bag. Use a new bag if there is a hole. Cover sharp food items with a soft cushioning material, such as a paper towel, and re-seal.Fermentation or the release of natural gases from inside the foods may have occurred. When this happens, food may have begun to spoil and should be discarded.Faulty bag. Bag could be punctured. Try another bag. |
| Bag melts | Sealing Strip may have become too hot. Always wait at least 20 seconds for appliance to cool down before you vacuum seal another item.Use FoodSaver® brand bags. Our FoodSaver® Bags and Rolls are specially designed for FoodSaver® units. |
| Container does not vacuum | The lid of the container must be correctly placed on and aligned to the container.Make sure you press the Handheld Button.Make sure lid is closed securely on all 4 sides.Make sure rubber packet on inside of lid is free from food residues.Examine rim of container for cracks or scratches. Make sure container valve is clean. |
Care and Cleaning of your Vacuum Sealer
To Clean Appliance:
CAUTION: Remove Power Cord from electrical outlet. Do not immerse in liquid.
Check Gaskets and around Drip Tray to make sure they are free from food materials. Wipe off Gasket with warm soapy cloth if needed. Upper and Lower Gaskets may be removed for cleaning. Clean with warm, soapy water and allow gaskets to dry before reinserting in machine.
natural_image
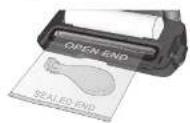
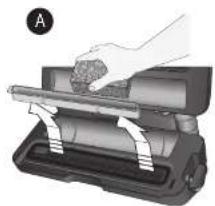
Illustration of a hand pressing down on a mechanical device (no text or symbols visible)Lift Drip Tray out
The Removable Drip Tray makes clean-up easy when small amounts of liquids are pulled into Vacuum Channel during vacuum process. Empty Drip Tray after each use. Wash in warm soapy water or place in top rack of dishwasher. Check for food residues in Drip Tray Slot. Clean if needed. Dry thoroughly before reinserting into appliance.
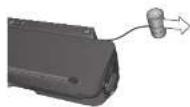
To Clean Built-in Handheld Sealer Reservoir:
Empty Reservoir after each use. To remove Reservoir from Handheld Sealer, holding too portion (black upper pieces) firmly, pull Lower Reservoir down and off B. Wash in warm soapy water. Air dry before replacing.
Note: Always clean after each use when fluid is visible.
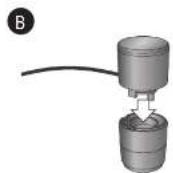
Full Reservoir off
Care and Cleaning of your Vacuum Sealer
To Store Appliance:
Clean unit thoroughly as detailed in "Care & Cleaning" section. After unit has been cleaned and allowed to fully dry, close lid and push Latch into Store (middle) position A. This setting will keep lid closed but prevents any undue pressure from being applied to internal sealing Caskets of unit.
Always leave Latch in Store position when not in use. Never store List in Operate position as Gaskets may become compressed and unit will not vacuum bag.

Push Latch into Store position to store.

Fitting of a plug - for U.K. and Ireland only
This appliance must be earned.
If the plug is not suitable for the socket outlets in your home, it can be removed and replaced by a plug of the correct type.
If the fuse in a moulded plug needs to be changed, the fuse cover must be refilled. The appliance must not be used without the fuse cover filled.
If the plug is unsuitable, it should be dismantled and removed from the supply cord and an appropriate plug fitted as detailed. If you remove the plug it must not be connected to a 13 amp socket and the plug must be disposed of immediately.
If the plug fuse requires replacement, a fuse of the same rating as that fitted by the manufacturer must be used. In order to prevent a hazard do not fill a fuse of a lower or higher rating.
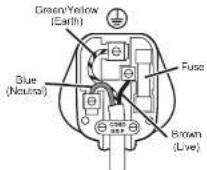
Ensure that the outer sheath of the cable is firmly held by the cord grip
After sales service
In the case the appliance does not operate but is under warranty, return the product to the place it was purchased for a replacement. Please be aware that a valid form of proof of purchase will be required. For additional support, please contact our Consumer Service Department at: United Kingdom: 0800 028 7154 | Spain: 0900 81 65 10 | France: 0805 542 055. For all other countries, please call +44 800 028 7154. International rates may apply. Alternatively, e-mail: foodsavereurope@newelco.com
Waste Disposal
Waste electrical products should not be disposed of with household waste. Please recycle where facilities exist. E-mail us at foodsavoreurope@newelco.com for further recycling and WEEE information.
Consignes importantes
natural_image
Illustration of a hand pressing down on a mechanical device (no text or symbols visible)natural_image
Illustration of a hand pressing down on a mechanical device (no text or symbols visible)natural_image
Illustration of a hand pressing down on a mechanical device with a granular material inside (no text or symbols visible)natural_image
Illustration of a hand pressing down on a mechanical device (no text or symbols visible)Levante a retire a bandeja ascorredora
natural_image
Illustration of a hand pressing down on a mechanical device with rollers (no text or symbols visible)I Brvensle schuimnüber
afdichting
J Bergvak voor rollen
K. Ongierste schulmrubber
aflichting
Extra breda sealstrip
M Vacumaerslauf
N Uitneembasr jeibakie
The Ground Truth image displays a single, solid horizontal line. According to Rule 2 (UNDERSCORE & LINE RULES), this is a stylistic or background line, not a placeholder underscore. Therefore, the OCR result must ignore it and output nothing or only meaningful text. The provided OCR content is "____", which consists of four underscores. This is an incorrect interpretation of the line as a placeholder, violating the rule that stylistic lines must be ignored. The OCR has hallucinated underscores where none should exist based on the GT's visual context. Hence, the OCR result is inconsistent with the Ground Truth.
natural_image
Illustration of a hand pressing down on a mechanical device with rollers (no text or symbols visible)natural_image
Illustration of a hand pressing down on a mechanical device (no text or symbols visible)Lyft ut dropporicken
natural_image
Illustration of a hand pressing down on a mechanical device (no text or symbols visible)Nosta keruastia ulce.
• Use for settings, flow
Abning – Draj op for at abne
Opbevaring
natural_image
Illustration of a hand pressing down on a mechanical device (no text or symbols visible)Løft dryptalken ud
natural_image
Illustration of a hand pressing down on a mechanical device with a cloth (no text or symbols visible)Left drypebrellet ut
natural_image
Illustration of a hand pressing down on a mechanical device (no text or symbols visible)natural_image
Illustration of a hand pressing down on a mechanical device with rollers (no text or symbols visible)natural_image
Illustration of a hand pressing down on a mechanical device with rollers (no text or symbols visible)natural_image
Illustration of a hand pressing down on a mechanical device with a tool, labeled 'A' in the corner (no text or symbols on the device itself)natural_image
Illustration of a hand pressing down on a mechanical device (no text or symbols visible)Поздигнета и изведете ваничиата
natural_image
Illustration of a hand pressing down on a mechanical device with a tool, labeled 'A' in the corner (no text or symbols on the device itself)UK: Jarden Consumer Solutions (Europe) Limited
5400 Lakeside, Cheadle Royal Business Park,
Cheadle, SK8 3GQ, United Kingdom
e-mail: foodsavereurope@newellco.com
Tel: +44 (0) 800 028 7154
FR: Jarden Consumer Solutions (Europe) Limited
92705 Colombes, France
e-mail: foodsavereurope@newellco.com
Tel: +33 (0) 805 542 055
ES/PT: Oster Electrodomésticos Ibérica, S.L.
C/ Basauri 17 Edificio Valrealty
B Planta Baja Derecha 28023
La Florida (Aravaca)
Madrid, España
e-mail: foodsavereurope@newellco.com
Tel: +34 (0) 900 81 65 10
EMEA: Newell Poland Services Sp.z o.o.
Plac Andersa 7
Poznan,61-894,
Poland
IT: NITAL S.p.A.
For Customer Service details, please see the website.
© 2020 Jarden Consumer Solutions (Europe) Limited. All rights reserved.
Jarden Consumer Solutions (Europe) Limited, 5400 Lakeside, Cheadle Royal Business Park, Cheadle, Cheshire, SK8 3GQ, United Kingdom.
Newell Poland Services Sp. z o.o., Plac Andersa 7, Poznan, 61-894, Poland.
Jarden Consumer Solutions (Europe) Limited and Newell Poland Services Sp. z o.o. are subsidiaries of Newell Brands Inc.
The product you buy may differ slightly from the one shown on this carton due to continuing product development.
Printed In China
Jarden Consumer Solutions (Europe) Limited e Newell Poland Services Sp. z o.o. são subsidiárias da Newell Brands Inc.

- Important Safeguards
- SAVE THESE INSTRUCTIONS
- The FoodSaver® System
- Why Vacuum Package?
- The FoodSaver® System Saves Time and Money
- FoodSaver® Accessories
- FoodSaver® Bags and Rolls
- FoodSaver ® Containers
- FoodSaver® Bottle Stopper
- Parts
- Using FoodSaver® accessories
- Control Panel
- Storage
- Storage Guide. Hints and Tips
- Vacuum Packaging and Food Safety
- Thawing and Reheating Vacuum Packaged Foods
- Preparation Guidelines
- Care and Cleaning of your Vacuum Sealer
- Fitting of a plug - for U.K. and Ireland only
- After sales service
- Waste Disposal
- Consignes importantes
- Opbevaring
Brand : FOODSAVER
Model : VS3190X
Category : Vacuum packaging machines