
Lui - Baby monitors Neno - Free user manual and instructions
Find the device manual for free Lui Neno in PDF.
| Product type | Wi-Fi Baby Monitor |
| Brand | Neno |
| Model | Lui |
| Camera dimensions | 65 x 65 x 55 mm |
| Silicone case dimensions | 120 x 80 x 50 mm |
| Camera weight | 76 g |
| Weight with silicone case | 189 g |
| Power supply | USB-C, 5V 1A |
| Video resolution | 1080p (1920x1080) |
| Viewing angle | 100° |
| Night vision | 3 hidden IR LEDs, automatic |
| Wi-Fi | 802.11 b/g/n, 2.4 GHz |
| Two-way audio | Yes, speaker and microphone |
| Motion detection | Yes, with push notifications |
| Sound detection | Yes, with push notifications |
| Night light | Yes, adjustable brightness |
| Lullabies | 3 lullabies + white noise |
| Room temperature | Display and alerts |
| Storage | MicroSD card up to 128 GB or cloud |
| App | TuyaSmart (iOS/Android) |
| Privacy mode | Yes, puts camera to sleep |
| Operating temperature | -10°C to 50°C |
| Warranty | 24 months |
Frequently Asked Questions - Lui Neno
User questions about Lui Neno
0 question about this device. Answer the ones you know or ask your own.
Ask a new question about this device
Download the instructions for your Baby monitors in PDF format for free! Find your manual Lui - Neno and take your electronic device back in hand. On this page are published all the documents necessary for the use of your device. Lui by Neno.
USER MANUAL Lui Neno
natural_image
Green cartoon character with bear ears and camera lens, no visible text or symbols on bodyTable of contents
Spis treści
natural_image
Line drawing of a cartoon bear-shaped robot with a circular head and circular body, no text or symbols presentPL
INSTRUKCJA OBSŁUGI
Pobierz w App Store
Thank you for purchasing our product!
With the help of this device, you can monitor your baby's sleep in a different room using a phone App. This manual contains all the information necessary for the correct use of the device. Before start using, we recommend resetting the camera with a sharp object (such as a pin). Please read the safety before installing the devices.
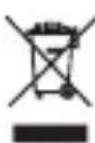
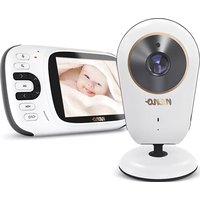
01. THE SET CONTAINS:
- Electric nanny IP Neno Lui
- Silicone case
- Flexible handle
- Power supply + USB Cable
- User Manual
- Reset pin
02. MAIN FEATURES:
- Wi-Fi remote controlled through App
- Night vision
- Motion detection
- Sound detection
- Dimmable night light
- Two-way audio
- Live video
- Video recording
- Detects temperature in a room
- Plays 3 different lullabies and white noise
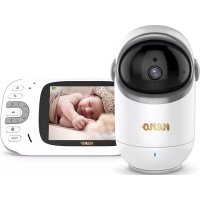
03. DESCRIPTION OF THE PRODUCT SEE FIG. A
- Micro SD card slot
- Reset
-
Light sensor
-
Microphone
- Lens
- LED
- Night light
- USB-C socket
- Tripod
- Speaker
- Case
04. SAFETY MEASURES
- Warning!
This device complies with all applicable standards electromagnetic fields and is safe to use provided use it as described in the usage manual. Declarations of conformity in full, they are available for download on the importer's website: www.neno.pl.
- Before using the device, always read carefully the instructions given in this user manual.
- Installation by adults is required. Children should keep away from the small parts of the device during the assembly.
- The baby monitor is not a substitute for responsible adult supervision.
- Do not allow children to play with the camera or accessories. Do not let your child put the components in their mouths.
- Do not place the monitoring unit or cables in the child's cot or within the reach of the baby (at least 1 meter away).
- If you are mounting on a cot, keep a sufficient distance from the baby's reach.
- Keep the cables out of the reach of children.
- Do not use the device near water or a heat source.
- Use only the power adapters included with the device.
- Do not touch the power outlet terminals with sharp or metal objects.
05. GETTING STARTED
- Download app
Android/iOS: download "TuyaSmart" app on Google Play or App Store.

Download in Google Play

Download in App Store
2. Registration and login
Run the "TuyaSmart" app from your smart phone. Register and log in.
3. Add device
- Plug in the camera and wait for the red light to blink rapidly and you hear a chime.
- Press the reset button for 3-6 seconds with the included pin, then release and wait for the red light to blink rapidly. Light will start blinking and you will then hear a chime sound. The Camera is now ready to be set up.
- Make sure the phone is connected to the 2.4 GHz Wi-Fi you want to connect the camera to
- Press the (+) symbol in the top right corner of the app or "Add Device" in the middle of the main screen, and select the Smart Camera from the list of devices to add.
- Make sure the phone is connected to the Wi-Fi network that the device will be connected to. Enter your password for the Wi-Fi network.
• Follow the directions in the app. - The connecting process is started. Do not turn off Wi-Fi Camera or phone while connecting. Wait for connection process to be completed.
• After successfully adding the device, name it whatever you want it to be named in the app. The Wi-Fi camera is ready for use.
4. Push notification
Press the "Settings" button -> "Detection alarm settings. Turn on/off notifications you desire.
5. Remove a device
- On the home screen, click the device you want to remove.
- Then click on the “...” symbol on the top right of the screen.
- From there, click on the „Remove Device" button at the bottom of the screen.
06. APP FUNCTIONSN
1. Video recording/ taking a photo
- To record video press the "camera" button at the top of the control panel. To
end recording, press the "camera" button again.
- To take a photo, press "camera" button. To view the photos, press the "gallery" button.
The photo and the video will be saved in the APP (iOS) or the photos and video section (Android). To view recordings, press the “gallery” button.
Noted: If you don't have a Micro SD Card in the camera, Cloud Storage Can be purchased by pressing the "Cloud" button on the bottom of the main screen.
2. Infrared Night Mode
You can set the night mode automatically, turn it on or off completely. To change the mode, press the „Night mode” icon. The default setting „Auto” means the night vision is automatically controlled by the camera. When the area around the camera becomes too dark, the mode will start automatically. When the area around the camera is bright again, the mode will be turned off automatically.
3. Two-way Audio
To activate the two-way audio, press the „Speak” button. When the button is orange, you can communicate with the person who is in the monitoring area of the camera. At the same time, you can also hear any sounds in the live camera video.
4. Motion and Sound Detection
The camera uses infrared sensors when someone/something appears within its detection area. It also detects sound so you can hear if your baby is crying. Push notifications will be sent to your phone once motion or sound is detected. To access controls of the detection alarm settings, press the camera setting button at the top right. You can also press the “Motion Detection” or “Sound Detection”. Moreover, you can also set the time period of the day that the alarms will go off by pressing „Schedule” on this page. To view the videos recorded via motion detection, press “Playback” on the main screen. You must have a Micro SD Card in the camera or have cloud storage enabled to view these saved videos.
5. Theme Color
The control panel can be set to "Light Mode" or "Dark Mode". To change this, press "Theme Color" and a pop-up menu will let you select light or dark mode.
6. Private Mode
The camera has a private mode. The camera goes into sleep mode when private mode is turned on. You can activate this mode from the home screen by pressing „Private mode”.
7. Night Light
The camera has a night light feature that is dimmable. From the main camera screen, press „Light“ and the night lighting control options will appear. You can adjust the dimmer from this screen or set a timer for it.
8. Lullaby's and White Noise
The camera can play 3 different lullaby songs along with the option of just
playing white noise. To control this feature, on the main camera screen, scroll to the bottom and press "lullaby". From there, you can control the volume, have the song set on repeat and pick which song you would like the camera to play.
9. Viewing Temperature in Room
The camera can determine the temperature of the room in which it is located. To get to this feature, scroll to the bottom on the main camera screen and press "Temperature". From there, you can view the temperature and have the camera send an alert if the temperature gets to an undesired level. You can also change the temperature to Celsius or Fahrenheit.
10. Hub controls (sound, video quality, zoom in /out)
You can control the functions from the live video feed. There is a volume button to mute and unmute live. There is also a video quality button that can be used to switch between standard and fine definition. There is also a button in the upper right corner that you can use to zoom in or out on the material.
11. Sharing the Device
To share access to your camera with someone else's TuyaSmart account, press the camera settings button and hit "Share Device". Enter the email on the person's TuyaSmart account that you would like to share the camera with. They will get a notification to accept and after that the other person will have access to view your camera through the TuyaSmart app on their phone.
07. SPECIFICATIONS
Resolution: 1080P (1920x1080)
Mobile application: TuyaSmart
Frames per second: 1920x1080 15fps, 640x360 15fps
Viewing angle: 100°
Codec: H.264
Power supply: USB-C, 5V 1A
Lens type: F3.6mm, F2.2
Wi-Fi: 802.11 b / g / n, 2.4GHz
Night mode: 3 hidden IR LEDs
Working temperatures: -10 to 50 °C
MicroSD card support: max 128GB
Weight: 76g (camera), 189g (camera with silicone case)
Dimensions: 65x65x55mm (camera), 120x80x50mm (silicone case)
08. WARRANTY CARD
The product is covered by a 24-month warranty. The terms of the guarantee can be found at: https://neno.pl/gwarancja
Details, contact and website address can be found at: https://neno.pl/kontakt Specifications and contents of the kit are subject to change without notice. We apologise for any inconvenience.
KGK Trend declares that this device Neno Lui is compliant with significant requirements of directive 2014/53/EU. The text of this declaration may be found on the website: https://neno.pl/download/DOC/deklaracja-CE-Neno-Lui.pdf
DE
BEDIENUNGSANLEITUNG
01. DAS SET ENTHÄLT:
In Google Play herunterladen

Stáhnout v Google Play

Stáhnout v App Store
06. FUNKCE APLIKACESN
Stiahnite si na Google Play

Stiahnutie v obchode App Store
Ladda ner i Google Play

Ladda ner i App Store
Lataa Google Playsta

Lataa App Storesta
01. SETTET INNEHOLDER:
Last ned i Google Play

Last ned i App Store
Last ned i Google Play

Last ned i App Store
Downloaden via Google Play

Downloaden in App Store
Scarica in Google Play

Scarica in App Store
Dimensioni: 65x65x55mm (fotocamera), 120x80x50mm (custodia in silicone)
08. CARTA DI GARANZIA
Application mobile: TuyaSmart
The crossed out trash can symbol indicates that unusable electrical or electronic devices, its accessories (such as power supplies, cords) or components (for example batteries, if included) cannot be disposed of alongside with household waste. In order to dispose of the devices or its components (for example, batteries) deliver the device to the collection point, where it will be accepted free of Disposal is subject to the recast version of the WEEE Directive 19/ EU) and the Directive on batteries and accumulators (2006/66 / oper disposal of the device prevents degradation of the natural ment. Information about the collection points of the facilities is by the competent local authorities. Incorrect disposal of waste is to penalties provided for by the law in force in the given area.
DE
KGK TREND Sp. z o.o.
ul. Ujastek 5b, 31-752 Kraków, Polska.
Wyprodukowano w PRC
Manufacturer:
KGK TREND Sp. z o. o.
Ujastek 5b, 31-752 Cracow, Poland.
Made in PRC


- Table of contents
- Spis treści
- PL
- INSTRUKCJA OBSŁUGI
- THE SET CONTAINS:
- MAIN FEATURES:
- DESCRIPTION OF THE PRODUCT SEE FIG. A
- SAFETY MEASURES
- GETTING STARTED
- Registration and login
- Add device
- Push notification
- Remove a device
- APP FUNCTIONSN
- Video recording/ taking a photo
- Infrared Night Mode
- Two-way Audio
- Motion and Sound Detection
- Theme Color
- Private Mode
- Night Light
- Lullaby's and White Noise
- Viewing Temperature in Room
- Hub controls (sound, video quality, zoom in /out)
- Sharing the Device
- SPECIFICATIONS
- WARRANTY CARD
- DE
- BEDIENUNGSANLEITUNG
- DAS SET ENTHÄLT:
- FUNKCE APLIKACESN
- SETTET INNEHOLDER:
- CARTA DI GARANZIA
- Manufacturer:
Brand : Neno
Model : Lui
Category : Baby monitors