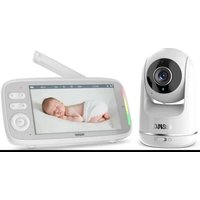
Vista - Baby monitors Neno - Free user manual and instructions
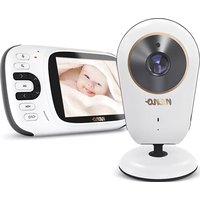
Find the device manual for free Vista Neno in PDF.


| Brand | Neno |
| Model | Vista |
| Product type | Video baby monitor |
| Monitor dimensions (receiver) | 162 x 86 x 22 mm |
| Monitor weight | 200 g |
| Power supply | USB-C 5V 1A (power adapter included x2) |
| Monitor screen | 5-inch IPS LCD, resolution 1280x720 pixels |
| Camera resolution | 720p |
| Night vision | Up to 5 m (infrared LEDs) |
| Camera rotation (horizontal) | 165° left / 165° right |
| Camera rotation (vertical) | 90° up / 45° down |
| Maximum range | 300 m in open space |
| Monitor battery | Lithium-ion 3050 mAh |
| Battery life (screen on) | 8 hours (brightness level 3) |
| Battery life (VOX mode) | 16 hours (volume level 3) |
| Main features | VOX, talk-back (PTT), lullabies, alarm, temperature detection, multi-camera pairing (up to 4) |
| Operating temperature | -10 °C to +45 °C |
| Allowable humidity | < 85% |
| Radio frequency | 2408-2468 MHz |
| Max RF power | 19 dBm |
| Safety | Keep out of reach of children, secure cables, use original charger |
| Warranty | 24 months |
| Cleaning | Soft dry cloth; do not use chemicals |
| Spare parts | Additional cameras (Neno Vista), power adapters |
Frequently Asked Questions - Vista Neno
User questions about Vista Neno
0 question about this device. Answer the ones you know or ask your own.
Ask a new question about this device
Download the instructions for your Baby monitors in PDF format for free! Find your manual Vista - Neno and take your electronic device back in hand. On this page are published all the documents necessary for the use of your device. Vista by Neno.
USER MANUAL Vista Neno
natural_image
Two electronic devices: a white remote camera and a white digital display with a screen (no visible text or symbols)Table of contents
Spis treści
natural_image
Diagram of a device with ports and connections, no text or symbols present2
natural_image
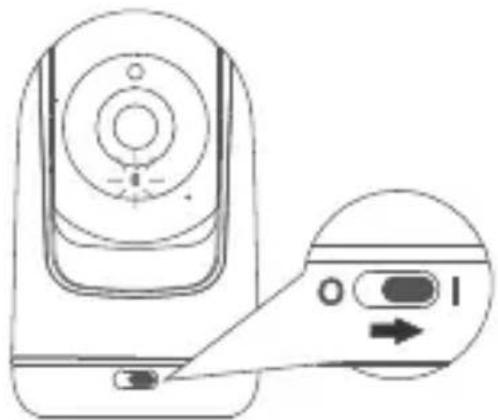
Line drawing of a remote control device with an open button labeled 'I' and a circular inset showing the right side (no text or symbols on the device itself)3
natural_image
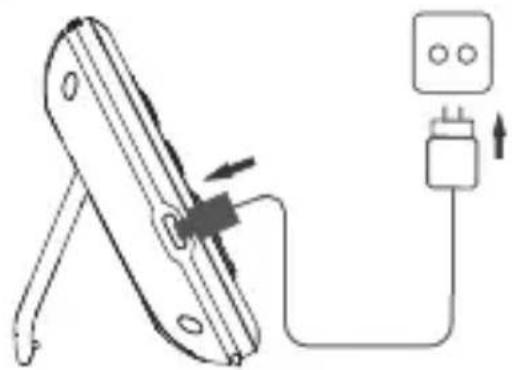
Simple line drawing of a handheld device connected to an electrical outlet (no text or symbols)4
natural_image
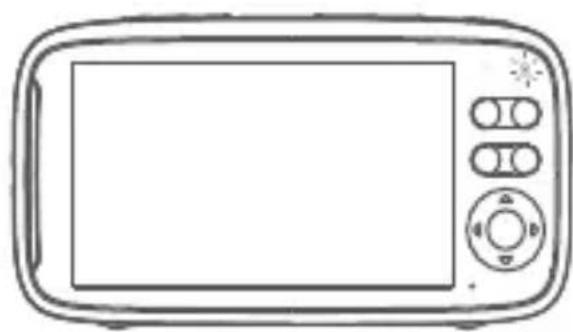
Line drawing of a flat-screen microwave oven with control panel (no text or symbols)5
natural_image
Line drawing of a microwave oven with control panel and display (no text or symbols)PL
INSTRUKCJA OBSŁUGI
Szanowny Kliencie,
natural_image
Illustration of a person with a megaphone and exclamation mark, symbolizing attention or urgency (no text present)07. ROZPOCZĘCIE PRACY Z URZĄDZENIEM
Wymiary: 71x71x116 mm
Waga: 190 g
11. KARTA GWARANCYJNA
Thank you for purchasing the baby monitor Neno Vista with wireless receiver. With this device, you can monitor your child's sleep or play in another room in real time. This user manual contains all the information you need to use it correctly. Please read it and keep it in case you need to use it again.
01. WARNINGS
- This equipment complies with all relevant EMF standards and is safe to use provided it is used as described in the operating instructions.
- Assembly of the unit must be carried out by an adult.
- To avoid injury, make sure children are at a safe distance when assembling the product.
- This product is not a toy. Do not allow children to play with the device.
- An electronic nanny cannot fully replace responsible adult supervision.
- Do not place the camera or cables in the baby's cot or within reach (place at least 1 metre away).
- Keep cables out of the reach of children.
- Do not store the unit near water or a heat source.
- Use only the power supply supplied with the device.
- Do not touch the contacts of the power socket with sharp or metallic objects.
- Do not use the product if any component is damaged or missing.
- Do not use accessories or spare parts other than those approved by the manufacturer.
- Keep children away from the working charger.
ATTENTION: The range of the device is affected by external factors (e.g. walls, high-voltage lines, other electrical equipment), so the actual range may be less than specified.
02. CONTENTS OF THE KIT
- Camera (transmitter)
- Monitor (receiver)
-
Power supply x2
-
Wall mounting kit
- Flexible handle
- Operating instructions
03. DESCRIPTION OF THE CAMERA (TRANSMITTER)
SEE FIG. A
- Light sensor
- Camera lens
- Power LED
- Microphone
- On/off switch
- Infrared LEDs
- Loudspeaker
- USB-C charging socket
- Temperature sensor
- Pairing button
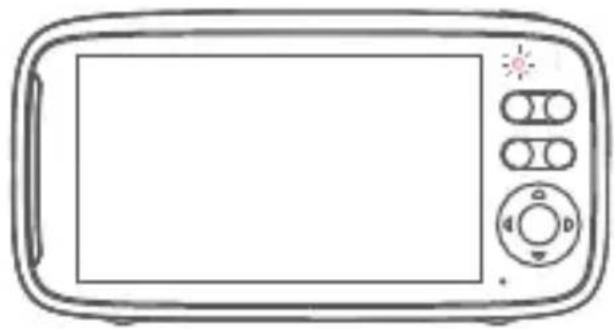
04. DESCRIPTION OF THE MONITOR (RECEIVER)
SEE FIG. B
- Antenna
- Brightness adjustment button
- Volume control button
- On/Off/VOX button
- LED charging light (blue light - charging; no light - device fully charged)
- Lullaby on/off button
- Return
- Camera control buttons
- Menu/OK
- Power LED (red LED - camera connected; flashing red LED - waiting for pairing)
- Voice transmission button (PTT)
- Zoom
- Microphone
- LCD display
- Sound detection LED indicator
- Loudspeaker
- Battery compartment
- Stand
- USB-C charging socket
05. ICONS ON THE MONITOR DISPLAY
SEE FIG. C
- Signal strength indicator
- Viewing indicator for selected camera
- Temperature at camera site
- Approximation level
- VOX mode active
- Active alarm
- Time
- Battery level
- Voice transfer function (PTT) activated
- Camera control indicator
- Brightness level
- Volume level
06. MONTAGE
Method 1: Place the camera on a flat, dry surface.
Method 2: The product comes with a kit with which you will mount the camera on the wall. Using screws and dowels, screw the cap onto the wall and then screw the camera onto the thread. Check that the camera is correctly fixed and will not fall out of the thread.
Method 3: A flexible bracket is included with the product, with which you mount the camera in the location of your choice. Wind the bracket and then screw the camera onto the thread. Check that the camera is correctly attached and will not fall out of the thread.
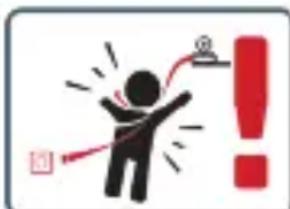
CAUTION: Leave the charging cable in a safe place (position) out of the reach of the child. Failure to do so may put the child at risk of suffocation or other dangerous situations (e.g. electric shock).
natural_image
Illustration of a person with a red exclamation mark and exclamation mark, symbolizing attention or warning (no text present)07. GETTING STARTED
- Connect the power supply to the camera (transmitter) and electrical outlet. SEE FIG. D.1.
- Slide the power button to the right to switch on the camera (transmitter). The blue power LED will light up. SEE FIG. D.2.
- Connect the power supply to the monitor (receiver) and the electrical outlet.
SEE FIG. D.3.
- The blue charging LED will light up. SEE FIG. D.4.
- Press the power button for 3 seconds. The display and the red power LED will light up. SEE FIG. D.5.
CAUTION: Use only the original charger for the original set. Failure to follow the instructions may result in damage or other dangerous situations.
08. USE OF THE DEVICE
Preparation of the device
Place the camera (transmitter) in a convenient location (e.g. on a table) and point its lens towards the area you wish to monitor. Adjust the camera until you are satisfied with the image displayed by the monitor.
CAUTION: Do not place the camera within the reach of a child! If there is interference with the picture or sound, move the units to other locations and make sure they are not near other electrical equipment.
Camera pairing
The attached camera (transmitter) has already been paired at the factory, you do not need to re-register it with the monitor (receiver) unless the devices lose connection. If you need to re-pair the camera or pair an additional camera, please follow the steps below:
- Switch on the camera (transmitter) and hold down the pairing button.
-
On the monitor (receiver), press „OK“ and then under Camera, select Add camera and confirm with „OK”.
-
The monitor (receiver) will display the message „Registration successful”. Up to four cameras can be paired with the monitor (kit includes one camera). If you want to take full advantage of the multi-camera pairing feature we suggest purchasing an additional Neno Vista camera.
VOX
Press the 'OK' button on the monitor to enter the menu and then select the VOX item. By activating the VOX mode, you can also set the sensitivity level for sound detection. In this mode, the screen automatically switches off to save power. The screen reactivates automatically when noise is detected at the camera site.
Voice transfer function (PTT)
Hold down the voice transfer button (PTT) on the monitor (receiver) to speak to the child via the camera speaker. The corresponding symbol will appear in the centre of the screen.
Lullaby playback
Press the lullaby start button to turn the lullaby playback on. Press the same button again to switch off the lullaby playback.
Audio alerts
Press the ,OK' button to enter the menu and then select Alerts. The monitoring unit (receiver) alert warns the user when the unit:
a. has a low battery level
b. is out of reach.
It is possible to select the alert sound and adjust the volume.
Alarm
Press the ,OK' button to enter the menu, then select Alarm. Then use the up/down buttons to change the time. Press „OK" to confirm.
09. MENU OPTIONS
Main menu
Press the ,OK' button to enter the main menu, which contains 5 items:
- VOX
- Alarm
- Camera
- Alerts
- Settings
Use the UP/DOWN arrows to move the cursor to the appropriate position and confirm by pressing „OK”. To return to the main screen, press the „RETURN” button.
10. TECHNICAL SPECIFICATIONS
GENERAL
Operating temperature: -10 to +45°C
Permissible humidity: <85%
Range: up to 300m (open space)
Power supply: USB-C 5V 1A
Frequency range: 2408-2468 MHz
Maximum RF power emitted in the frequency range: 19 dBm
MONITOR
Screen: 5" IPS LCD
Resolution: 1280x720 px
Battery: Lithium-ion 3050 mAh
Battery life (screen on): 8 hours (third brightness level)
Battery life (VOX mode - audio only): 16 hours (third volume level)
Dimensions: 162x86x22 mm
Weight: 200 g
CAMERA
Resolution: 720 px
Range in night mode: 5 m
Sensors: light, temperature
Horizontal camera rotation angle: left 165°, right 165°
Vertical camera rotation angle: top 90°, bottom 45°
Dimensions: 71x71x116 mm
Weight: 190 g
11. WARRANTY CARD
The product comes with a 24-month warranty. Warranty terms and conditions can be found at: https://neno.pl/gwarancja
Details, contact and service address can be found at: https://neno.pl/kontakt
Specifications and contents are subject to change without notice. We apologise for any inconvenience.
KGK Trend declares that the Neno Vista complies with the essential requirements of Directive 2014/53/EU.
The text of the declaration can be found at the link:
natural_image
Illustration of a person with a megaphone and exclamation mark, symbolizing attention or urgency (no text present)07. ERSTE SCHRITTE
natural_image
Illustration of a person with a megaphone and exclamation mark, symbolizing urgency or attention (no text present)07. ZAČÍNÁME
natural_image
Illustration of a person with an exclamation mark and warning symbol (no text or numbers present)07. KEZDETBEN
natural_image
Illustration of a person with a megaphone and exclamation mark, symbolizing attention or urgency (no text present)07. ZAČÍNAME
- Pripojte napájací zdroj ku kamere (vysielaču) a do elektrickej zásuvky. POZRI OBR. D.1.
- Posunutím tlačidla napájania doprava zapnete fotoaparát (vysielač). Rozsvieti
sa modrá kontrolka napájania. POZRI OBRÁZOK D.2.
- Pripojte napájací zdroj k monitoru (prijímaču) a k elektrickej zásuvke. POZRI OBR. D.3.
- Rozsvieti sa modrá kontrolka nabíjania. POZRI OBRÁZOK D.4.
- Stlačte tlačidlo napájania na 3 sekundy. Rozsvieti sa displej a červená kontrolka napájania. POZRI OBRÁZOK D.5.
natural_image
Illustration of a person with a megaphone and exclamation mark, symbolizing alert or warning (no text present)07. ATT KOMMA IGÅNG
natural_image
Illustration of a person shouting with a megaphone and exclamation mark (no text or symbols)07. ALKUUN PÄÄSEMINEN
02. INNHOLDET I SETTET
07. KOMME I GANG
02. INDHOLD AF SÆTTET
natural_image
Illustration of a person with a red exclamation mark and exclamation mark, symbolizing attention or warning (no text present)07. KOM GODT I GANG
natural_image
Illustration of a person with a megaphone and exclamation mark, no text or symbols present07. AAN DE SLAG
natural_image
Illustration of a person with a red exclamation mark and exclamation mark, symbolizing attention or surprise (no text present)07. CÓMO EMPEZAR
natural_image
Illustration of a person with a megaphone and exclamation mark, symbolizing stress or urgency (no text present)07. INIZIARE A LAVORARE
natural_image
Illustration of a person with a megaphone and exclamation mark, symbolizing attention or warning (no text present)07. POUR COMMENCER
Dimensions: 71x71x116 mm
Poids: 190 g
11. CARTE DE GARANTIE
natural_image
Illustration of a person holding a magnifying glass with an exclamation mark, no text or symbols present07. PENTRU A ÎNCEPE
The crossed out trash can symbol indicates that unusable electrical or electronic devices, its accessories (such as power supplies, cords) or components (for example batteries, if included) cannot be disposed of alongside with household waste. In order to dispose of the devices or its components (for example, batteries) deliver the device to the collection point, where it will be accepted free of
charge. Disposal is subject to the recast version of the WEEE Directive (2012/19/ EU) and the Directive on batteries and accumulators (2006/66 / EC). Proper disposal of the device prevents degradation of the natural environment. Information about the collection points of the facilities is issued by the competent local authorities. Incorrect disposal of waste is subject to penalties provided for by the law in force in the given area.
DE

KGK TREND Sp. z o.o.
ul. Ujastek 5b, 31-752 Kraków, Polska.
Wyprodukowano w PRC
Manufacturer:
KGK TREND Sp. z o. o.
Ujastek 5b, 31-752 Cracow, Poland.
Made in PRC
- Table of contents
- Spis treści
- PL
- INSTRUKCJA OBSŁUGI
- Szanowny Kliencie,
- ROZPOCZĘCIE PRACY Z URZĄDZENIEM
- KARTA GWARANCYJNA
- WARNINGS
- CONTENTS OF THE KIT
- DESCRIPTION OF THE CAMERA (TRANSMITTER)
- SEE FIG. A
- DESCRIPTION OF THE MONITOR (RECEIVER)
- SEE FIG. B
- ICONS ON THE MONITOR DISPLAY
- SEE FIG. C
- MONTAGE
- GETTING STARTED
- SEE FIG. D.3.
- USE OF THE DEVICE
- Preparation of the device
- Camera pairing
- VOX
- Voice transfer function (PTT)
- Lullaby playback
- Audio alerts
- Alarm
- MENU OPTIONS
- Main menu
- TECHNICAL SPECIFICATIONS
- GENERAL
- MONITOR
- CAMERA
- WARRANTY CARD
- ERSTE SCHRITTE
- ZAČÍNÁME
- KEZDETBEN
- ZAČÍNAME
- ATT KOMMA IGÅNG
- ALKUUN PÄÄSEMINEN
- INNHOLDET I SETTET
- KOMME I GANG
- INDHOLD AF SÆTTET
- KOM GODT I GANG
- AAN DE SLAG
- CÓMO EMPEZAR
- INIZIARE A LAVORARE
- POUR COMMENCER
- CARTE DE GARANTIE
- PENTRU A ÎNCEPE
- DE
- Manufacturer:
Brand : Neno
Model : Vista
Category : Baby monitors