
Vera - Baby monitors Neno - Free user manual and instructions
Find the device manual for free Vera Neno in PDF.

| Product type | Baby monitor |
| Brand | Neno |
| Model | Vera |
| Frequency | 2.4 GHz |
| Maximum range | Up to 260 m (open space) |
| Monitor screen | 3.2" IPS LCD |
| Monitor video resolution | 320x240p |
| Camera resolution | 720p |
| Night vision | Range up to 5 m, infrared LEDs |
| Power supply | USB-C 5V-1A (adapters included) |
| Monitor battery | Lithium polymer 1150 mAh (built-in, replaceable) |
| VOX function | Power saving mode with automatic reactivation on noise |
| Lullabies | 8 built-in lullabies, loop playback possible |
| Talk function | Voice transfer from monitor to camera |
| Zoom | Digital zoom |
| Alarm | Programmable alarm |
| Sensors | Light and temperature on camera |
| Operating temperature | -10°C to 50°C |
| Acceptable humidity | <85% |
| Safety | Do not place in the crib, cables out of reach |
| Maintenance | Clean with a soft, dry cloth |
| Warranty | 24 months |
Frequently Asked Questions - Vera Neno
User questions about Vera Neno
0 question about this device. Answer the ones you know or ask your own.
Ask a new question about this device
Download the instructions for your Baby monitors in PDF format for free! Find your manual Vera - Neno and take your electronic device back in hand. On this page are published all the documents necessary for the use of your device. Vera by Neno.
USER MANUAL Vera Neno
natural_image
White and white digital camera with a screen displaying a sleeping child, no visible text or symbols on the device or background.Table of contents
Spis treści
C
PL
INSTRUKCJA OBSŁUGI
Wymiary: 124x72x17mm
Waga: 110g
Thank you for purchasing our product! With the help of this device, you can monitor your baby's sleep in a different room. This manual contains all the information necessary for the correct device use. We recommend inserting before using the baby monitor and the battery is fully charged in the monitor so that it continues to work if you disconnect the power supply to transfer it to another room. Read the
instructions before installing the devices regarding security.
WARNING: Leave the charging cable in a safe place (position) out of children's reach. Failure to comply with the recommendation may threaten to strangle your child or cause other dangerous situations (e.g. electric shock).
01. THE SET CONTAINS
- Camera
- Monitor
- Power supply x2
- Operating instructions
WARNING: Only original chargers should be used. Do not connect directly to 220/230V power supply. Failure to follow the instructions may cause damage to the device or other dangerous situations.
02. DESCRIPTION OF THE CAMERA
SEE FIG. A
- Light sensor
- Camera lens
- Infrared LEDs
- Power LED
- Microphone
- Temperature sensor
- Loudspeaker
- Pairing button
- USB-C socket
03. DESCRIPTION OF THE MONITOR
SEE FIG. B
- LCD display
- Microphone
- Power LED / LED signal
- Increase the volume/ up
- Voice transfer key / music player on/ off key
- Zoom
- Key for reducing screen brightness / left
- OK / Menu button
- Screen brightness-up / right key
- VOX
- POWER button (switch) / back key
- Decrease the volume / down key
- Speaker
- USB-C socket
04. SAFETY MEASURES
- This device complies with all relevant field standards electromagnetic and it is safe to operate as long as it is used in as described in the user manual. Compliance declarations in full version are available for download on the importer's website: www.neno.pl. Always read the instructions carefully before using the device given in this manual.
- Adult assembly is required. Hold during assembly small parts away from children.
- This product is not a toy. Do not allow children to play with the appliance.
- The baby monitor is not a substitute for responsible adult supervision.
- Do not place the monitoring unit and cables within the baby's cot or within range baby (at least 1 meter away).
- If you are mounting on a cot, keep a sufficient distance from the baby's reach.
- Keep the cables out of the reach of children.
- Do not use the device near water or heat sources.
- Use only the power adapters provided with the device.
- Do not touch the contacts of the power socket with sharp or metal objects.
WARNING: The range of the device is influenced by external factors (e.g. walls, high voltage lines, other electrical devices) therefore the real range may be much lower than specified in the specification.
05. GETTING STARTED
1. Camera Power Supply
a) Connect the small plug of the power adapter to the camera's power connector and the other end for 220V mains socket.
NOTE: Use only the included power supply.
b) A steady blue LED diode indicates if the camera is working.
2. Monitor Power Supply
a) It is recommended to fully charge the battery of the parent unit before the first use. This will allow for uninterrupted operation even in the event of a failure of a power supply.
b) The charging LED will light up, which means that the battery charging has started.
06. USING THE DEVICE
Preparation of the device
Place the monitoring unit in a convenient place (e.g. on a table) and point the lens camera towards the area you want to monitor. Adjust the camera, until you are satisfied with the image displayed by the monitor.
NOTE: Do not place the monitoring unit within the reach of a child! If the picture
or sound is disturbed, move the units to another place and make sure that they are not located near other electrical appliances.
Pairing the camera with the monitor
The attached camera has already been paired by default, you do not need to do it again. Register with the receiver (LCD), unless it loses connection with the monitor.
Vox Function
Press the VOX button to turn on the VOX mode. In this mode, the screen automatically turns off to save energy. The screen is reactivated automatically in case of noise in the child's room.
Lullabies Display
Press the music playback control button to turn on the player music and play the lullaby through the built-in camera speaker. Press the same button again to turn off the lullaby playback.
Voice Transfer Function
Press and hold the talk transfer button on the monitor device to speak to the child via the camera speaker. The talk transfer symbol will appear at the bottom of the screen.
Volume Control
During playback, press the DOWN button to decrease the volume or the UP key to increase the volume. The current volume will be visible on the display for 5 seconds.
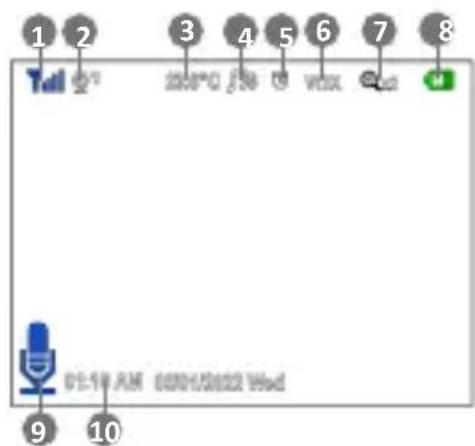
07. SCREEN ICONS
SEE FIG. C
- Signal strength indicator
- First or second camera view
- temperature at camera location
- Lullaby playback
- Alarm active
- VOX mode active
- Zoom
- Battery indicator
- Audio streaming function activated
- Date and time
08. MENU
Main menu
Press the MENU button to enter the main menu. It contains 6 items:
- Camera
- Alarm
-
Settings
-
VOX function
- Languages
- System information
Press the UP or DOWN button to move the cursor to select the desired option. Then use the OK button to enter the submenu of the selected item. Press the back button to return to the main screen.
Camera registration
- Add camera
Press the OK button to access the add camera function, then press the pairing (connection) button on the back of the monitoring unit within 10 seconds. If you want to add another camera, select CAMERA2. Proceed as you did with the first camera. - Camera preview
The function informs you about the preview from the first or second camera. - Switch camera view
If the monitor is paired with two cameras, you can switch to view camera 1/ view camera 2/ scan (the image will automatically loop from camera 1 to camera 2). - Delete camera
Allows you to delete a previously added camera.
Power LED
Select whether the camera LED should be switched off/on automatically.
• Intercom volume
Select the volume level of the audio transmitted by the monitor.
• Lullabies
a) Select one of the eight available lullabies or enable loop playback.
b) Set the volume low/medium/high
Alarm
Press the MENU button to move to the alarm option, then use the up/down buttons to change the time. Press OK to confirm.
Settings
-
Date & Time
This menu contains two items:- Set date/time- Set date/time format. Use the arrows to move the cursor and to change the value. -
Temperature Unit
Choose from the option: Celsius/Fahrenheit.
- Image Shutter Reduction
You can adjust the image refresh mode (50/60Hz) to match display parame-
ters to eliminate image flicker.
4. Keyboard sound
Use the arrows to select ON/OFF or keyboard sound.
5. Alert sound
Use the arrows to select ON/OFF or sound of the alerts.
6. Monitor the LED light
Use the arrows to turn off or adjust the brightness of the LED light on the monitor.
7. LCD backlighting
You can adjust the degree of backlighting of the LCD screen.
09. REMOVING THE BATTERY
-
Lift the stand
-
Slide your finger to remove the cover that covers the battery.
-
Remove the battery.
-
Carefully pull the plug from the port.
10. TECHNICAL DATA
OVERAL
Frequency:2.4 GHz D
Working temperature: -10 to 50°C
Acceptable humidity:<85%
Range: up to 260m (open space)
Power supply: USB-C 5V-1A
MONITOR
Screen: 3.2" IPS LCD
Video resolution: 320x240p
Battery: built-in, lithium-polimer, 1150mAh
Dimensions: 124x72x17mm
Weight: 110g
Maximum RF power emitted in the frequency range: 15 dBm
CAMERA
Minimal illumination: 0 lux (IR diode on)
Resolution: 720p
Night vision range: 5 meters
Sensors: Light, temperature
Dimensions: 115x62x62mm
Weight: 81g
Maximum RF power emitted in the frequency range: 17 dBm
11. WARRANTY/CLAIMS
The product is covered by a 24-month warranty. Warranty conditions available on the website: https://neno.pl/gwarancja
Details, contact and service address can be found at:
https://neno.pl/contact/?lang=en
Specifications and contents of the kit are subject to change without notice, we apologize for any inconvenience.
KGK Trend declares that this device Neno Vera is compliant with significant requirements of directive 2014/53/EU. The text of this declaration may be found on the website: https://neno.pl/download/DOC/deklaracja-CE-Neno-Vera.pdf
DE
BEDIENUNGSANLEITUNG
01. SETTET INNEHOLDER
- Kamera
- Skjerm
- Strømforsyning x2
- Bruksanvisning
Dimensions: 124x72x17mm
Poids: 110g
Dimensions: 115x62x62mm
Poids: 81g
The crossed out trash can symbol indicates that unusable electrical or electronic devices, its accessories (such as power supplies, cords) or components (for example batteries, if included) cannot be disposed of alongside with household waste. In order to dispose of the devices or its components (for example, batteries) deliver the device to the collection point, where it will be accepted free of Disposal is subject to the recast version of the WEEE Directive 19/ EU) and the Directive on batteries and accumulators (2006/66 / oper disposal of the device prevents degradation of the natural ment. Information about the collection points of the facilities is by the competent local authorities. Incorrect disposal of waste is to penalties provided for by the law in force in the given area.
DE

KGK TREND Sp. z o.o.
ul. Ujastek 5b, 31-752 Kraków, Polska.
Wyprodukowano w PRC
Manufacturer:
KGK TREND Sp. z o. o.
st. Ujastek 5b, 31-752 Cracow, Poland.
Made in PRC


- Table of contents
- Spis treści
- PL
- INSTRUKCJA OBSŁUGI
- THE SET CONTAINS
- DESCRIPTION OF THE CAMERA
- SEE FIG. A
- DESCRIPTION OF THE MONITOR
- SEE FIG. B
- SAFETY MEASURES
- GETTING STARTED
- Camera Power Supply
- Monitor Power Supply
- USING THE DEVICE
- Preparation of the device
- Pairing the camera with the monitor
- Vox Function
- Lullabies Display
- Voice Transfer Function
- Volume Control
- SCREEN ICONS
- SEE FIG. C
- MENU
- Main menu
- Camera registration
- Alarm
- Settings
- Keyboard sound
- Alert sound
- Monitor the LED light
- LCD backlighting
- REMOVING THE BATTERY
- TECHNICAL DATA
- OVERAL
- MONITOR
- CAMERA
- WARRANTY/CLAIMS
- DE
- BEDIENUNGSANLEITUNG
- SETTET INNEHOLDER
- Manufacturer:
Brand : Neno
Model : Vera
Category : Baby monitors