ELM 1434 U - Lawn mower IKRA - Free user manual and instructions
Find the device manual for free ELM 1434 U IKRA in PDF.

| Product type | Corded electric lawn mower |
| Brand | IKRA |
| Model | ELM 1434 U |
| Rated voltage | 230-240 V ~ |
| Rated power | 1400 W |
| No-load speed | 3600 min⁻¹ |
| Cutting width | 340 mm |
| Cutting heights | 25 / 35 / 45 / 55 / 65 mm |
| Cutting height adjustment | Centralized, 5 positions |
| Grass catcher capacity | 35 L |
| Weight | 10.6 kg |
| Sound pressure level | 81 dB(A) (K=3.0 dB(A)) |
| Sound power level | 96 dB(A) |
| Vibration | 3.3 m/s² (K=1.5 m/s²) |
| Protection class | II (double insulation) |
| Protection rating | IPX4 (protected against water splashes) |
| Motor type | Electric, brush |
| Safety devices | Safety button + control lever, motor cut-off protection |
| Handle folding | Yes, for compact storage |
| Included accessories | Grass catcher, cable guide, cable clips |
Frequently Asked Questions - ELM 1434 U IKRA
User questions about ELM 1434 U IKRA
0 question about this device. Answer the ones you know or ask your own.
Ask a new question about this device
Download the instructions for your Lawn mower in PDF format for free! Find your manual ELM 1434 U - IKRA and take your electronic device back in hand. On this page are published all the documents necessary for the use of your device. ELM 1434 U by IKRA.
USER MANUAL ELM 1434 U IKRA
Operating Instructions - Translation of the original Operating Instructions
Read operating instructions before use!
natural_image
Two black-and-white illustrations of a lawn mower, shown from top and side views (no text or symbols visible)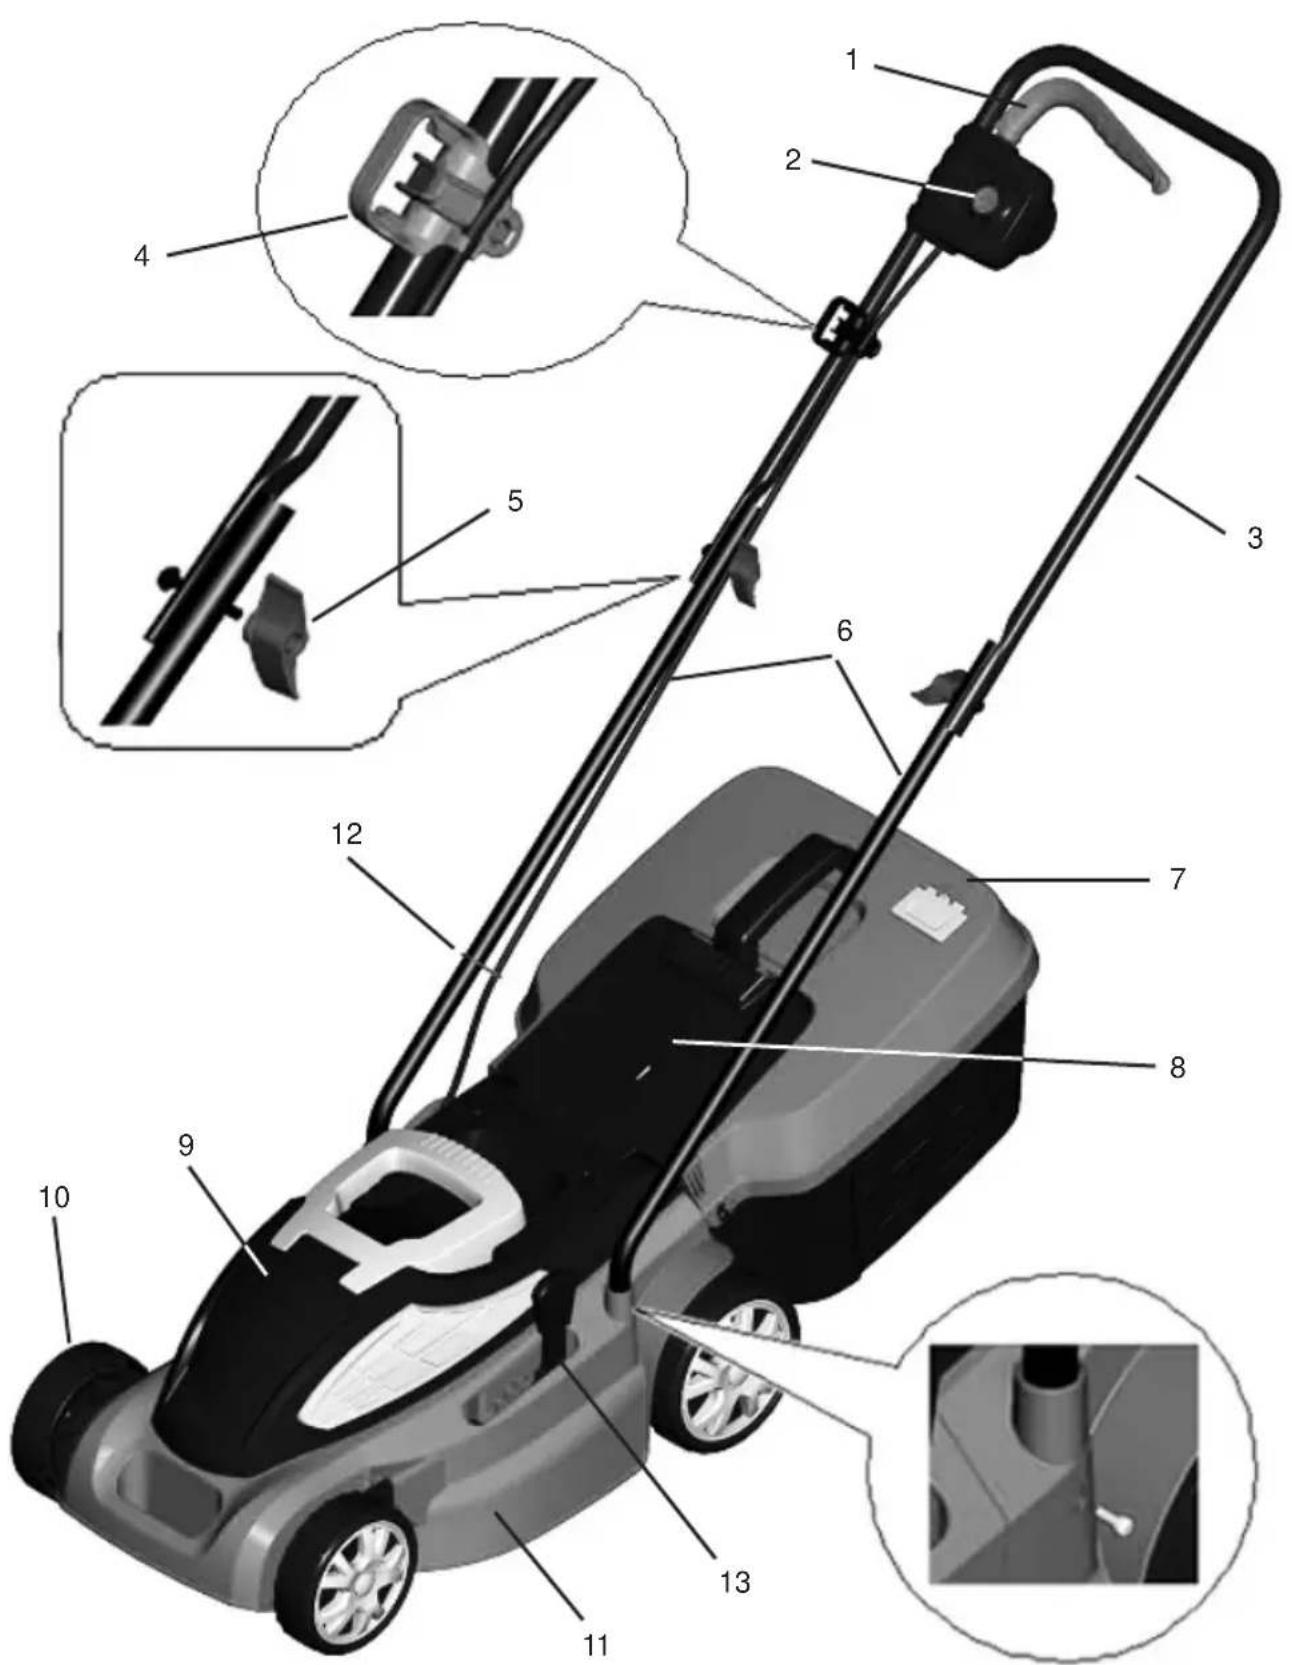
text_image
Labeled diagram of a lawn mower with numbered parts and mechanical components shown in insetsGB - Names of the parts
- Switch lever
- Safety Button
- Upper handle
- Cable strain relief
- Thumb screw
- Lower handle
natural_image
Close-up of a hand holding a black plastic component with a white curved tube extending from it (no text or symbols visible)
natural_image
Close-up of a mechanical component with a directional arrow indicating movement (no text or symbols)
text_image
3 clips
natural_image
Close-up of a metallic pipe joint with a black arrow pointing to a crack (no text or symbols visible)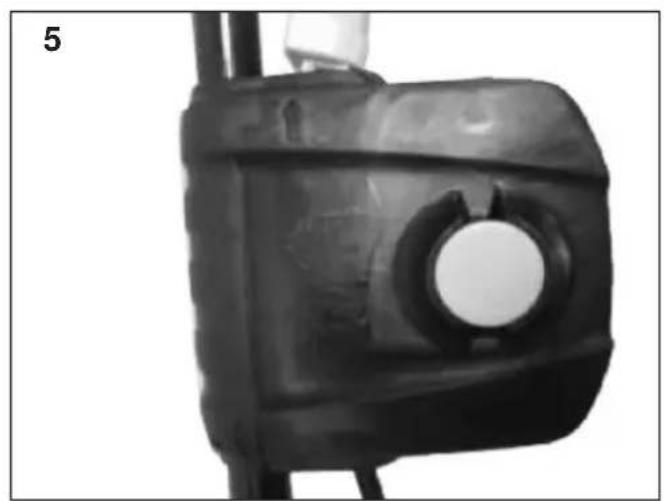
natural_image
Close-up of a black plastic container with a circular opening and a white circular hole, mounted on a pole (no text or symbols visible)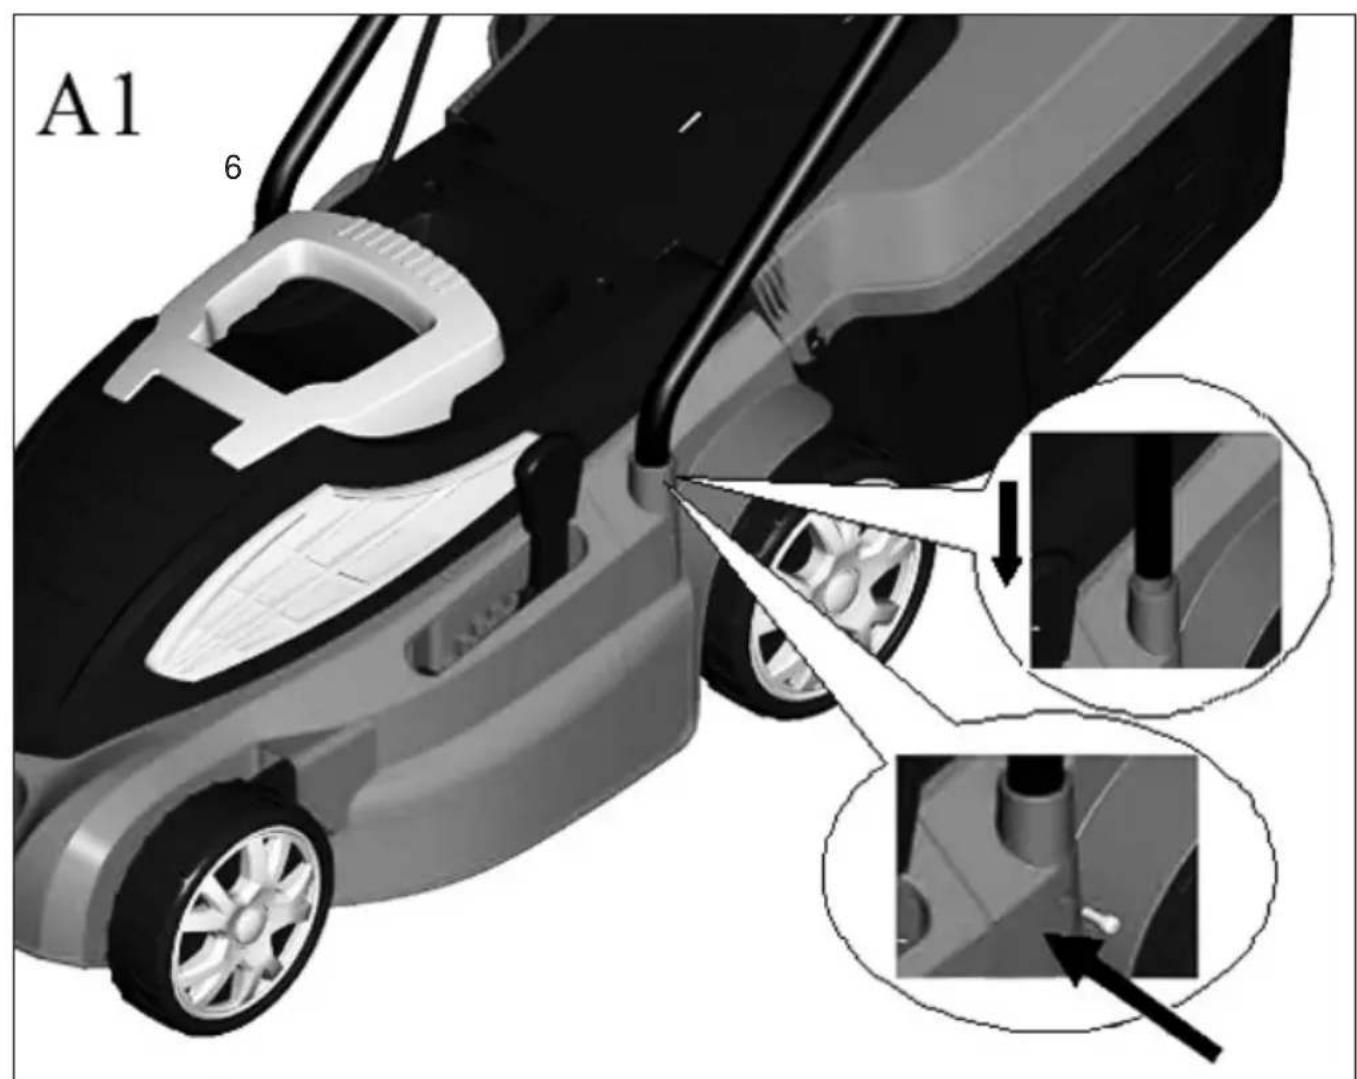
text_image
A1 6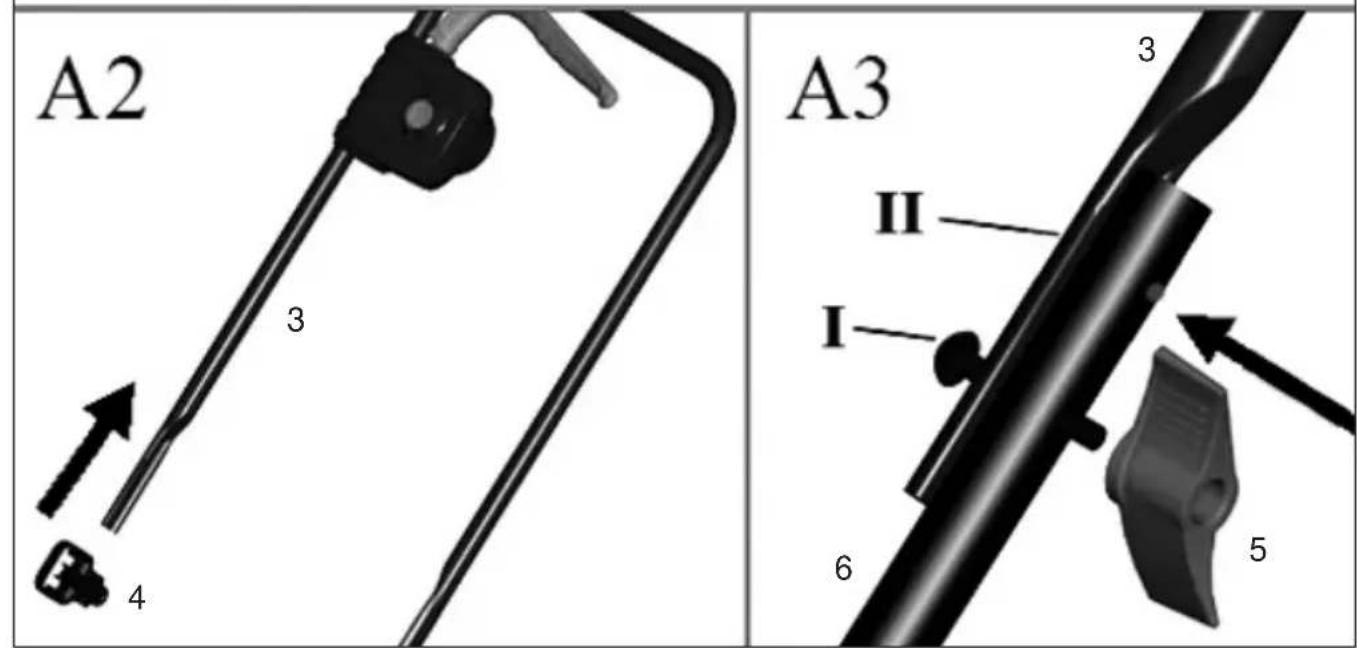
text_image
A2 3 4 A3 3 II I 6 5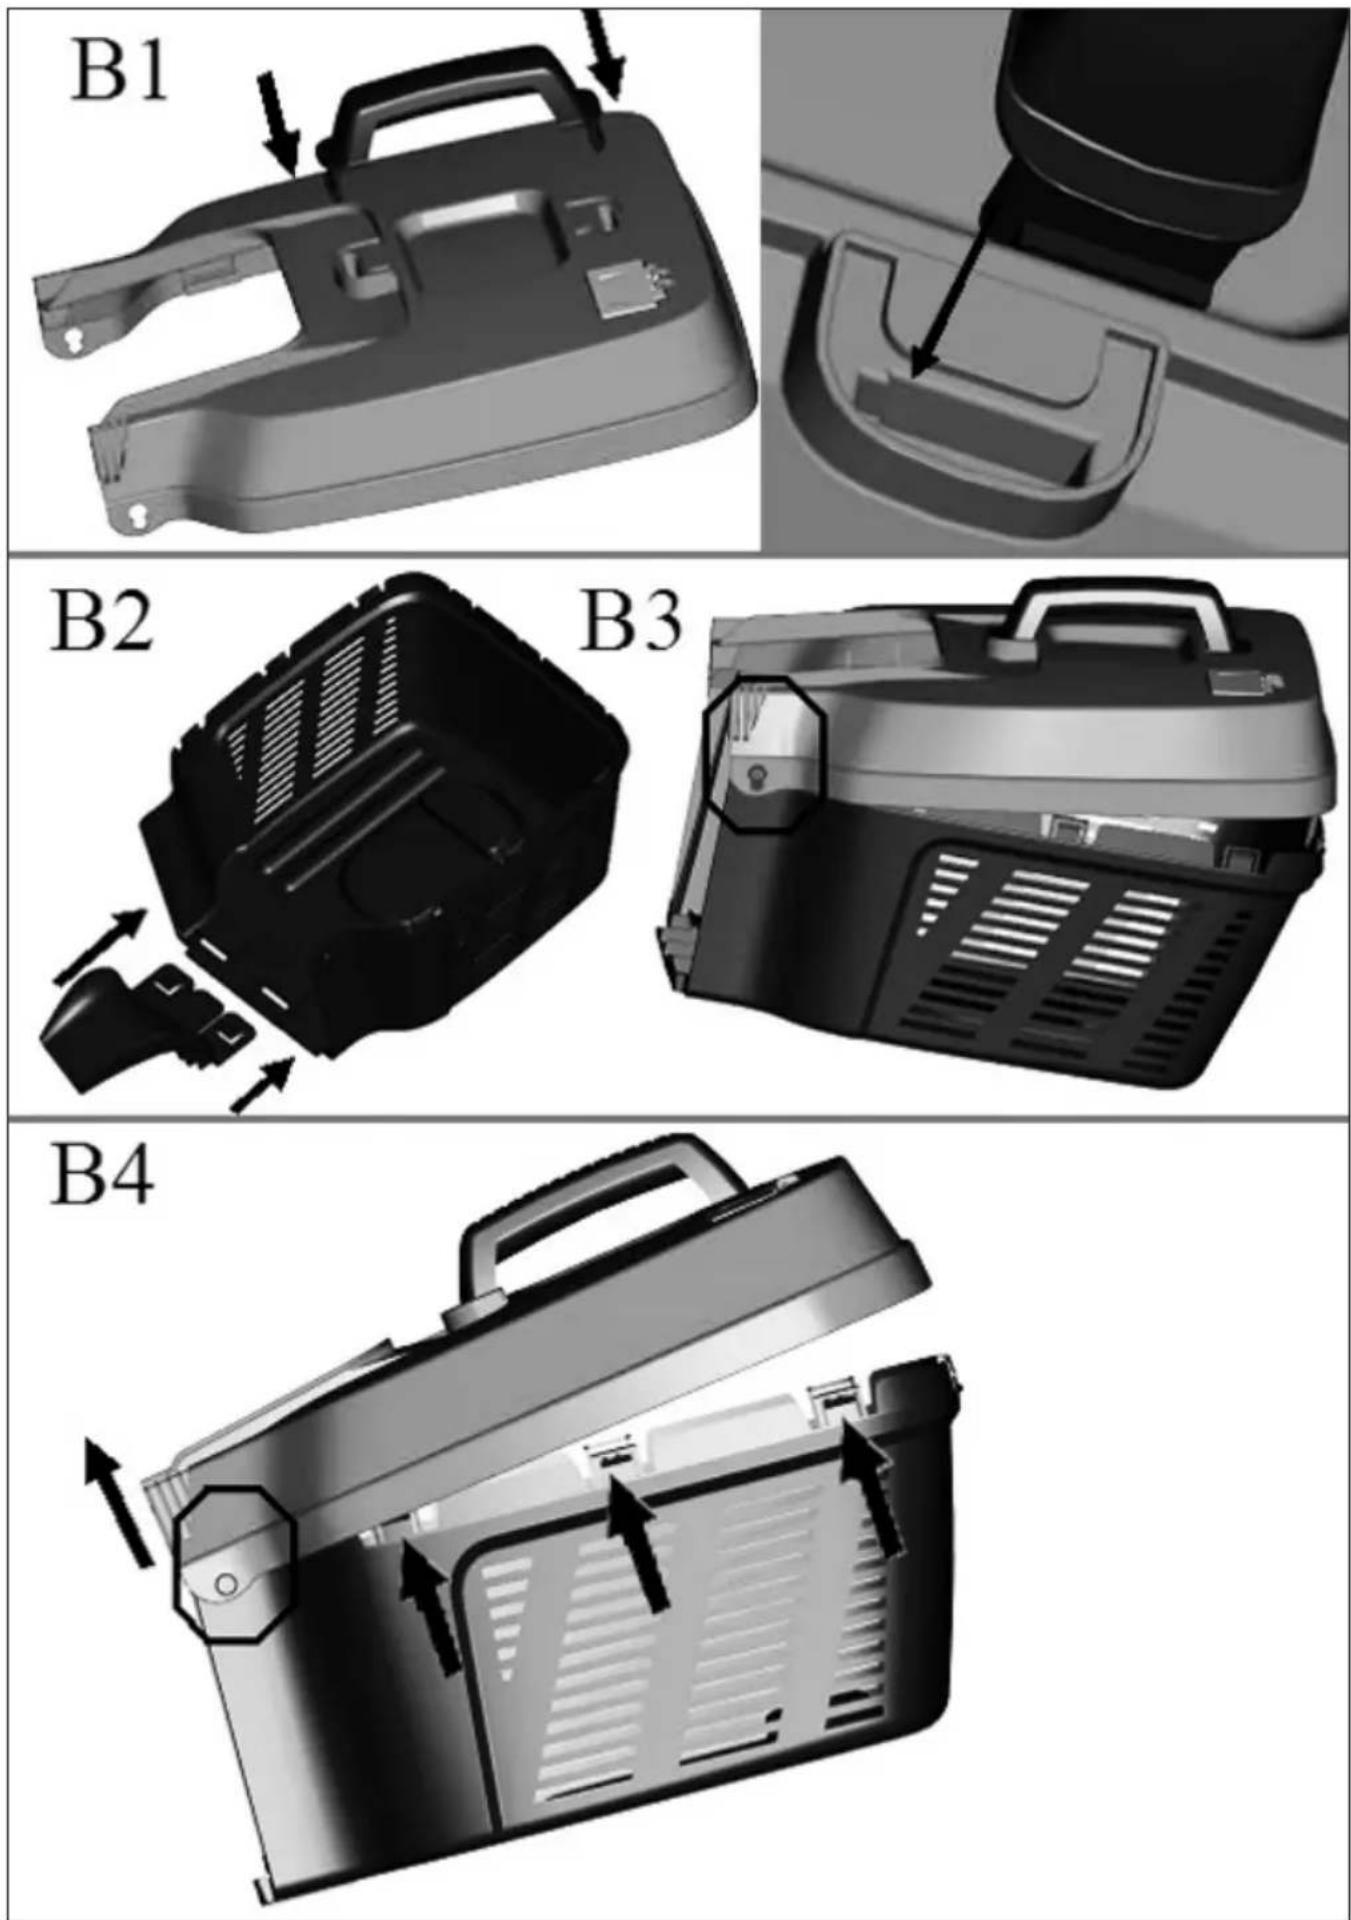
text_image
B5 a b 7 8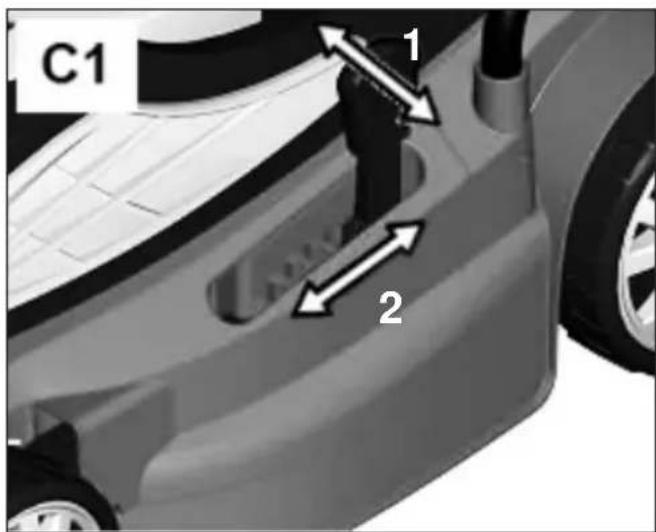
text_image
C1 1 2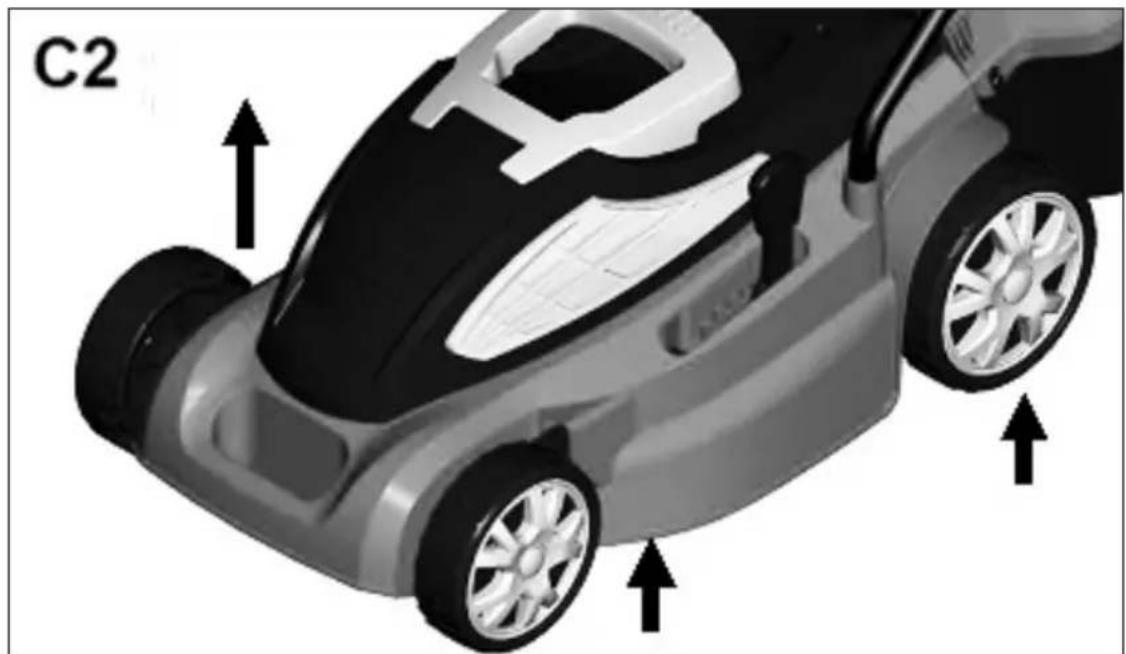
text_image
C2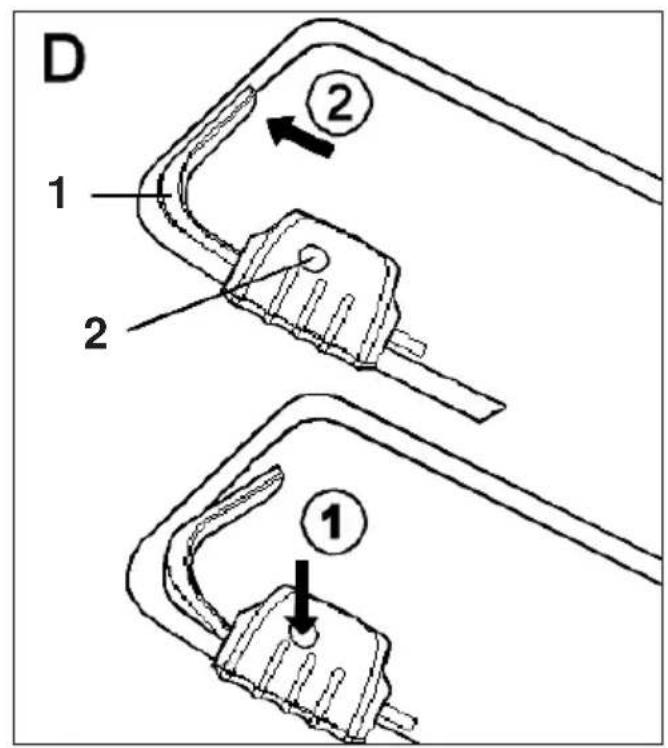
text_image
D 1 2 ② ①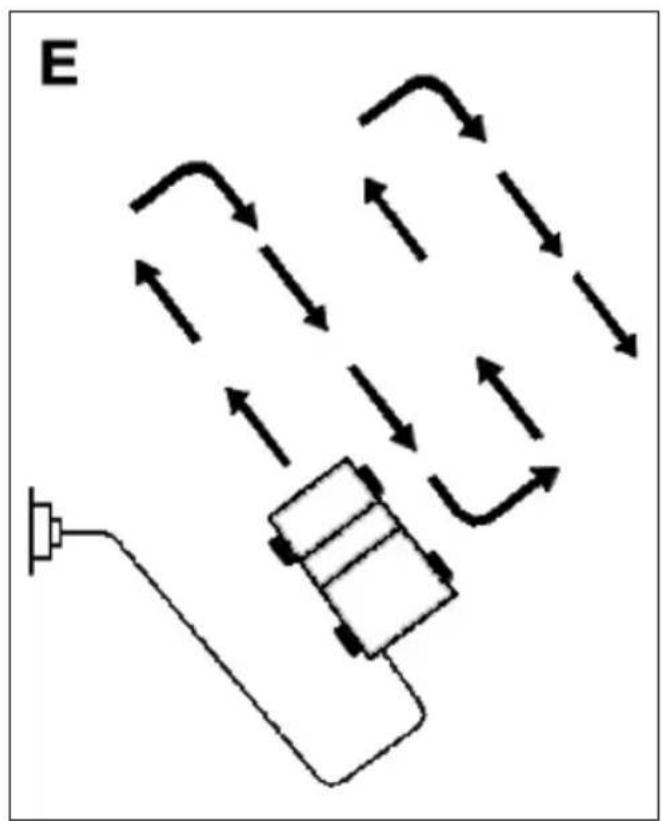
flowchart
graph TD
    A["Start"] --> B["Vehicle"]
    B --> C{Direction}
    C -->|Upward Arrow| D["Top Left"]
    C -->|Downward Arrow| E["Top Right"]
    C -->|Leftward Arrow| F["Bottom Left"]
    C -->|Rightward Arrow| G["Bottom Right"]
    style A fill:#f9f,stroke:#333
    style D fill:#ccf,stroke:#333
    style E fill:#ccf,stroke:#333
    style F fill:#ccf,stroke:#333
    style G fill:#ccf,stroke:#333
GB | Operating Instructions
Content Page
Names of the parts 1 - 2
Pictures
3 - 7
General safety information for power tools GB-2
Intended use GB-3
Symbols
GB-3
Product Specification GB-4
Assembly GB-5
- Delivered Items
- Assembly of switch box
- Montage
• Assembly of Grass box
Adjusting the Cutting Height GB-5
Starting and Stopping GB-5
Mowing GB-6
Maintenance GB-6
Storage GB-6
Fault Finding GB-7
EC Declaration of Conformity GB-8
GB | Operating Instructions
General safety information for power tools

Warning! Read all safety-related information and safety instructions!
Failure to observe the safety information and instructions may result in electric shock, burns and/or severe injury.
Keep the safety information and instructions for future reference.
If not used properly this lawn mower can be dangerous! This lawn mower can cause serious injury to the operator and other, the warning and safety instruction must be followed to ensure reasonable safety and efficiency in using this lawn mower. The operator is responsible for following the warning and safety instruction in this manual and on the lawn mower. Never use the mover unless the grass box or guards are correctly positioned.
Training
a) Read the instructions carefully. Be familiar with the controls and the proper use of the equipment;
b) Never allow children or people unfamiliar with these instructions to use the lawn mower. Local regulations can restrict the age of the operator;
c) Never mow while people, especially children, or pets are nearby;
d) Keep in mind that the operator or user is responsible for accidents or hazards occurring to other people or their property.
Preparation
a) While mowing, always wear substantial footwear and long trousers. Do not operate the equipment when barefoot or wearing open sandals;
b) Thoroughly inspect the area where the equipment is to be used and remove all objects which can be thrown by the machine;
c) WARNING: Before using, always visually inspect to see that the blades, blade bolts and cutter assembly are not worn or damaged. Replace worn or damaged blades and bolts in sets to preserve balance;
Operation
a) Move only in daylight or in artificial light;
b) Avoid operating the equipment in wet grass, where feasible;
c) Always be sure of your footing on slopes;
d) Walk, never run;
e) For wheeled rotary machines, mow across the face of slopes, never up and down;
f) Exercise extreme caution when changing direction on slopes;
g) Do not mow excessively steep slopes;
h) Use extreme caution when reversing or pulling the lawn mower towards you;
i) Stop the blade(s) if the lawn mower has to be tilted for transportation when crossing surfaces other than grass, and when transporting the lawn mower to and from the area to be mowed.
j) Never operate the lawn mower with defective guards, or without safety devices, for example defectors and/or grass catchers, in place;
k) Switch on the motor carefully according to instructions and with feet well away from the blade(s);
I) Do not tilt the lawn mower when switching on the motor, except if the lawn mower has to be tilted for starting in the case, do not tilt more than absolutely necessary and lift only the part which is away from the operator;
m) Do not put hands or feet near or under rotating parts. Keep clear of the discharge opening at all times;
n) Never pick up or carry a lawn mower while the engine is running;
o) Stop the engine before clearing blockages or unclogging chute;
- before checking, cleaning or working on the lawn mower;
- after striking a foreign object, inspect the lawn mower for damage and make repairs before restarting and operating the lawn mower;
- If lawn mower starts to vibrate abnormally (check immediately);
p) Stop the engine
- Whenever you leave the lawn mower.
Maintenance and storage
a) Keep all nuts, bolts and screws tight to be sure the equipment is in safe working condition;
b) Check the grass catcher frequently for wear or deterioration;
c) Replace worn or damaged parts for safety.
Safety warnings for the lawn mower:
a) Not to use the lawn mower if the cords are damaged or worn.
b) Not to connect a damaged cord to the supply or touch a damaged cord before it is disconnected from the supply. A damaged cord can lead to contact with live parts.
c) Not to touch the blades before the machine is disconnected from the supply and the blades have come to a complete stop.
d) To keep extension cords away from the blades. The blades can cause damage to the cords and lead to contact with live parts.
e) To disconnect the supply (i.e, pulling the plug from the socket)
- when ever leaving the machine unattended,
- before cleaning a blockage,
- before checking, cleaning or working on the machine,
- after striking a foreign object,
- whenever the machine starts vibrating abnormally.
f) To carefully read the instructions for the safe operation of the machine;
g) Recommendations:
To connect the machine only to a supply circuit protected by a residual current device (RCE) with a tripping current of not more than 30 mA.
h) If the supply cord is damaged, it must be replaced by a special cord or assembly available from the manufacturer or its service agent.
i) This appliance is not intended for use by persons (including children) with reduced physical, sensory or mental capabilities, or lack experience and knowledge, unless they have been given supervision or instruction
GB | Operating Instructions
concerning use of the appliance by a person responsible for their safety.
j) Children should be supervised to ensure that they do not play with the appliance.
INTENDED USE
The lawn mower is designed for use in private gardens.
Lawn mowers for use in private gardens are mowers whose annual use does not generally exceed 50 hours and that are primarily used for tending GRASS OR LAWN AREAS, but not in public facilities, parks or sports grounds and not for agricultural or forestry use.
Compliance with the operating manual supplied by the manufacturer is a prerequisite for the proper usage of the lawn mower. The operating manual contains servicing and maintenance instructions as well as directions for use.
Important
The lawn mower must not be used to trim bushes, hedges and shrubs, to cut or shred climbing plants or lawns on roof gardens or in balcony boxes or to clean footpaths, nor must it be used as a chopper for shredding tree or hedge cuttings.
Furthermore, the lawn mower must not be used as a cultivator or to level off uneven areas of ground, e.g. molehills.
SYMBOLS
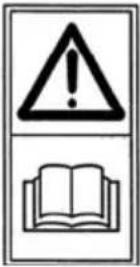
Read instruction handbook before operation this machine.
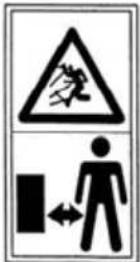
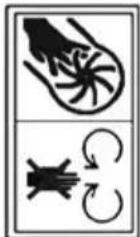
Keep bystanders away.
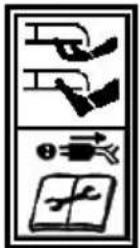
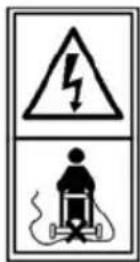
Beware of sharp blades. Blades continue to rotate after the motor is switched off. Remove plug from mains before maintenance or if cord is damaged.
Keep the supply flexible cord away from the blades.
Warning! Do not put hands or feet under the cover of the machine when it is running

Caution! Rotating electrical too!
Protection class II
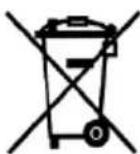
This device may not be disposed of with general/household waste. Dispose of only at a designated collection point.
GB | Operating Instructions
Product Specification
| Lawn Mower | ELM 1434 U ELM 1638 U | ||
| Rated voltage V~ 230-240 230-240 | |||
| No-load Speed n0 | min-1 | 3600 3500 | |
| Rated power W 1400 1600 | |||
| Cutting width | mm 340 380 | ||
| Height of cut | mm 25/35/45/55/65 25/35/45/55/65 | ||
| Grassbox capacity | L | 35 | 45 |
| Weight | Kg 10,6 | 12 | |
| Sound pressure level | dB (A) | 81 [K3,0 dB(A)] | 80 [K3,0 dB(A)] |
| Sound power level | dB (A) | 96 | 96 |
| Vibration | 2 | m/s3,3 [K1,5 m/s2] | 3,4 [K1,5 m/s2] |
Class of Protection: ☐ / IPX4
Emissions
- The specified vibration emission value was measured by a standardized test methods and can compare with other power tools are used.
- The specified vibration emission value can also be necessary for the assessment of work breaks are used.
- The specified vibration emission value can vary during the actual use of the electric tool by specifying the value, depending on the way how to use the power tool.
• Note: You create the privilege against vascular pulsations of the hands in time breaks
Keep the development of noise and vibration to a minimum!
- Only use properly functioning machines.
- Maintain and clean the machine regularly.
- Adapt your working method to the machine.
- Do not overstress the machine.
• If necessary, have the machine inspected. - Switch the machine off when it is not in use.
- Wear work gloves.

Wear hearing protection. The influence of noise can cause hearing loss.
Noise emission information in accordance with the German Product Safety Act (ProdSG) and the EC Machine Directive: the noise pressure level at the place of work can exceed 80 dB(A). In such cases the operator will require noise protection (e.g. wearing of ear protectors).
Attention: Noise protection! Please observe the local regulations when operating your device.
GB | Operating Instructions
Assembly
This manual gives instructions on the correct assembly and safe use of your machine. It is important that you read these instructions carefully. When fully assembled the machine weighs approximately 10kg. If necessary, obtain assistance to remove from packaging, Take care when carrying the mower to the lawn, as the blades are sharp.
Delivered Items
Carefully remove the machine from its packaging and check that you have all the following items:
Lawnmower with handle assembly
- 2 Handles bottom
- 2 Bolts
• 2 Knob module (Thumb screw) - 2 Screws
- Grass box
- Grass box cover
- Tongue
- 2 Cable clips
If bolts parts are missing or damaged, please contact the consumer care hotline for assistance.
Assembly of switch box (fig. 1 - 5)
- Before using the lawn mower, you need to assemble the switch box on handle lever as show in photo 5.
- Align the groove of switch box to the guide rail, slide the switch box toward the rear handle. (fig. 2 + 4)
- Only with clips on switch box (fig. 3) located in position to lock the switch box on handle lever as well as the assembly indication line (fig. 4) aligned, then the switch box assembled.
- After fixing, move the switch box in reverse direction to check if the switch box assembled in position or not.
Assembly (fig. A)

Important! Before you assemble the lawn mower, check the accessories according above information, make sure the accessories are completed.
- Insert the lower handles 6 into the holes provided in the deck, secure with the screws (A1).
- Attach the cable strain relief 4 to the upper handle 3 (A2).
- Attach the upper handle 3 with bolts and knob module 5 to the lower handles 6 (A3).
- The upper handle 3 is height adjustable. Handles can be fixed in desired position I or II (A3).
Note: Ensure that the cable clips 12 are used to fix the cable to the handle
Attach cable to cable strain relief 4 ensuring that sufficient cable slack is available. (not for GB models)
Ensure cables are not trapped when folding/unfolding top handles. Do not drop the handles.
Assembly of Grass box (fig. B)
- Assemble the grip onto the upper cover of the catcher (B1)
- Slide the grass box tongue into the slots in the grass box lower until it clicks securely into position. (B2)
- Starting at the rear of the grass box, locate the grass box cover into the grass box by aligning the clips. Ensure all clips are correctly located. (B3 + B4)
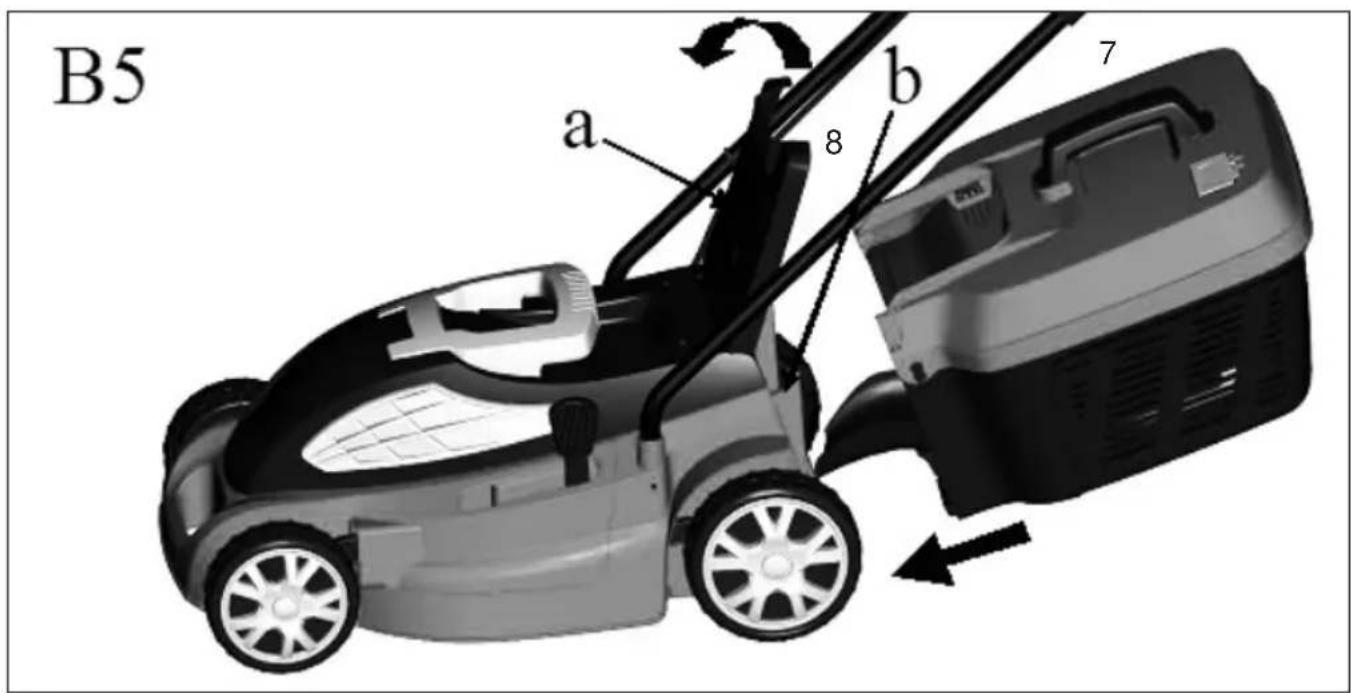
- Fitting assembled grass box to lawn mower (B5):
a) Lift the safety guard 8 (B5-a).
b) Make sure the discharge chute is clean and free from debris.
c) Locate fully assembled grass box 7 onto location points at the rear of the deck as illustrated (B5-b).
d) Locate safety flap onto the top of the grass box. Ensure the grass box is easy located.
Note: For non grass collection the mower can be used without the grass box in position, with the safety guard 8 in the down position.
Adjusting the Cutting Height (fig. C)

Warning: release switch lever 1 and wait until the motor stops before adjusting height. The blades continue to rotate for a few seconds after the machine is switched off, a rotating blade can cause injury.
Height of cut is adjusted by raising or lowering the Front and Rear wheels. (C1&C2)
Confirm lock and simultaneously set the required height by either pulling or pressing on the lever 13. When releasing the lock, the setting selected snaps into place.
There are five heights of cut on this product.
NOTE
A medium height of cut is recommended for most lawns.
The quality of your mowing will suffer and collection will be poor if you cut too low.
| HEIGHT OF CUT | WHEELS POSITION |
| Low | 25 mm |
| Low to Medium | 35 mm |
| Medium | 45 mm |
| Medium to High | 55 mm |
| High | 65 mm |
Starting and Stopping (fig. D)

Make sure the blade stopped rotating before switching "on" again. Do not rapidly switch on and off.
Start:
- Press and hold the safety button 2. Squeeze the switch lever 1 towards the handle (D).
- Release the safety button 2.
Stopp:
- Release the switch lever 1.
GB | Operating Instructions
Warning: Blade continues to rotate after the machine is switch off. Wait until all machine components have completely stopped before touching them.
Mowing (fig. E)
For cutting convenience, it may be best to start mowing at a point close to the power supply and to work your way away from the supply. Mow the lawn at a right angle from the power supply and place the power cable to side which has already been cut (E).

Warning: When mowing do not allow the motor to labour particularly in heavy conditions. When the motor labours the speed of the motor drops and you will hear a change in the motor sound, when this occurs stop mowing, release the switch lever and raise the height of cut. Failure to do so could damage the machine
NOTE: the motor is protected by a safety cut out which is activated when the blade becomes jammed or if the motor is overloaded. When this occurs, stop the machine and remove the plug from the power supply. The safety cut out will only reset when the switch lever 10 is released. Clear any obstruction and wait for a few minutes for the safety cut out to reset before continuing to mow At this time do not operate the switch lever 10 as this will prolong the reset time of the safety cut out. If the mower cuts out again, increase the height of cut to reduce the load on the motor.
Maintenance

Warning: Stop the mower and remove the plug from the power supply before remove the grass box.
Note: To ensure long and reliable service, carry out the following maintenance regularly:
Check for obvious defects such as a loose, dislodged or a damaged blade, loose fittings, and worn or damaged components.
Check that the covers and guards are all undamaged and are correctly attached to mower.
Carry out any necessary maintenance or repairs before operating mower.
If the mower should happen to fail despite regular maintenance, please call our service helpline for advice.

Warning: Make sure to turn to professional maintenance agency when replacing the blade.

Warning: Never carry out any assembly operations or adjustments with the power connected to the mower. Always ensure that the power button is in the off position and that the power plug is disconnected from the supply.
Storage
Clean the exterior of the machine thoroughly using a soft brush and cloth. Do not use water, solvents or polishes. Remove all grass and debris, especially from the ventilation slots.
Turn the machine on its side and clean the blade area. If grass cuttings are compacted in the blade area, remove with a wooden or plastic implement.
Store the machine in a dry place. Do not place other objects on top of the machine.
Release the knob module 5 and fold the upper handles 3.
Ensure cables are not stuck or entangled when folding or unfolding top handles. Do not drop the handles.
GB | Operating Instructions
Fault Finding
The following table gives checks and actions that you can perform if you machine does not operate correctly. If these do not identify/remedy the problem, contact your Service Agent.
| Warning: Switch off and remove plug from mains before investigating fault. | ||
| Symptom Possible Remedy | ||
| Machine fails to operate Power turned off Turn power on | ||
| Mains socket faulty Use another socket | ||
| Extension cable damaged Inspect cable, replace if damaged. | ||
| Fuse faulty/blown Replace fuse | ||
| Mower in long grass Increase height of cut and tilt mower | ||
| Motor protector has activated Allow to cool for a few minutes and increase height of cutAt this time do not operate the switch lever 1 as this will prolong the reset time of the safety cut out | ||
| Machine functions intermittently | Extension cable damaged Inspect cable, replace if damaged. | |
| Machines internal wiring damaged Contact your service agent. | ||
| Motor protector has activated Allow to cool for a few minutes and increase height of cut.At this time do not operate the switch lever 1 as this will prolong the reset time of the safety cut out. | ||
| Machine leaves lagged finish of motor labours | Height of cut too low Increase height of cut (see height of Cut Adjustment) | |
| Cutting blade blunt Replace blade (see Blade Maintenance) | ||
| Underside of machine badly clogged Clean machine (see After Mowing/Storage) | ||
| Blade fitted upside down Refit blade correctly (see Blade Maintenance) | ||
| Cutting blade not rotating | Cutting blade obstructed | Clear obstruction |
| Blade nut/bolt loose. Tighten blade nut/bolt | ||
| Excessive vibration/noise | Blade nut/bolt loose. Tighten blade nut/bolt | |
| Cutting blade damaged | Replace blade | |
GB | Operating Instructions
EC Declaration of Conformity

We, Ikra GmbH, Schlesier Straße 36, D-64839 Münster, declare under our sole responsibility that the products Lawn Mower ELM 1434 U and ELM 1638 U, to which this declaration relates correspond to the relevant basic safety and health requirements of Directives 2006/42/EC (Machinery Directive), 2004/108/EC (EMV-Guideline), 2011/65/EU (RoHS-Guideline) and 2000/14/EC (noise directive) incl. modifications. For the relevant implementation of the safety and health requirements mentioned in the Directives, the following standards and/or technical specification(s) have been respected:
2006/42/EC; EN 60335-1:2002+A11, A1:04+A12, A2:06+A13:08+A14:10
| ELM 1434 U | ELM 1638 U | |
| measured acoustic capacity level | 90,6 dB(A) | 91,8 dB (A) |
| guaranteed acoustic capacity level | 96,0 dB (A) | 96,0 dB (A) |
Competent institution: Intertek Testing & Certification Ltd. (Notified Body 0359)
Conformity assessment method to annexe V / Directive 2000/14/EC
The year of manufacture is printed on the nameplate and can be additionally retrieved via the consecutive serial number.
Münster, 07.10.2014
Gerhard Knorr, Technical Management Ikra GmbH

Maintenance of technical documentation: Gerhard Knorr, Kärcherstraße 57, DE-64839 Münster
Niveau sonore garanti 96,0 dB (A) 96,0 dB (A)
Service de contôle: Intertek Testing & Certification Ltd. (Notified Body 0359)
For this tool, the company provides the end user - independently from the retailer's obligations resulting from the purchasing contract - with the following warranties:
The warranty period is 24 months beginning from the hand-over of the device which has to be proved by the original purchasing document. For commercial use and use for rent, the warranty period is reduced to 12 months. Wearing parts, rechargeable batteries and defects caused by the use of non fitting accessories, repair with parts that are not original parts of the manufacturer, use of force, strokes and breaking as well as mischievous overloading of the motor are excluded from this warranty. Warranty replacement does only include defective parts, not complete devices. Warranty repair shall exclusively be carried out by authorized service partners or by the company's customer service. In the case of any intervention of not authorized personnel, the warranty will be held void.
All postage or delivery costs as well as any other subsequent expenses will be borne by the customer.
FR
Conditions de garantie
DE Ikra Mogatec - Service
2 Lui Ayer Str., 6th floor
Sofia 1404
+359 2 958 81 39
+359 2 958 12 51
11 Othellos Street, Dali Industrial Zone
2540 Nicosia
Tel.: +357 22667908
+357 22667157
CZ Drupol
Unit E, Clayton Works Business Centre
Midland Road
Leeds, LS10 2RJ
+44 113 385 1100
+44 113 385 1115
GR Panos Vrontanis & Co
3 Molas Street
13671 Aharnes
+30 210 2402020
+30 210 2463300
HR VAR - ERCO d.o.o.
Stipana Vilova 14A
10090 ZAGREB
+385 91 571 3164
+385 1 3454 906
HU Tooltechnic Kft.
Nagytétényi út 282.
1225 Budapest
+36 1 330 4465
+36 1 283 6550
IN Agritech Floritech Inc.
206 - B Rajindera Arihant Tower
B-1 Community Centre Janak Puri
New Delhi - 110058 / India
① +91 11 45662679
+91 11 25597432
IR J&M Distribution Systems Ltd
Unit E, Clayton Works Business Centre
Midland Road
Leeds, LS10 2RJ
+353 1890 8823 74
+44 113 385 1115
IT Ikra Service Italia, by BRUMAR
Loc. Valgera 110/B
14100 ASTI (AT)
+39 0141 477309
+39 0141 440385
JO Taha & Qashou Agri Co. (LLC)
205 Mekka Street
Amman 11821, Jordan
+962 6 585 0251
+962 6 582 5728
LTUAB GOTAS
Linkmenu g. 38
08217 Vilnius
+370 52300680
+370 52361996
LU Bobinage Georges Back
53, Rue Nic. Meyers
4918 Bascharage
+352 507622
+352 504889
MD OLSOM S.R.L.
Mateevici Str., 38/1
2009 Chisinau
+373 22 214075
+373 22 225009
MK FEROELEKTRO D.O.O.
Str.Nikola Parapunov br.35A/3
1000 Skopje
+389 2 3063190
+389 2 3063190
NL Muldertechniek
Noorderkijl 1
9571 AR 2 e Exloermond
+31 599 671570
+31 599 672650
Timetable: 09:00 to 12:30 and
14:00 to 18:30 (except Friday that is 18:00)
RO BRONTO COMPROD S.R.L.
Str. Corneliu Coposu nr. 35-37
400235 Cluj-Napoca
+40 264 435 337
+40 264 406 703
RU САД и КОлесо
SE ikra Service Sweden
Stallbergavägen 1B
57361 Sommen
+46 763 268982
@ ikrawinbladh@gmail.com
SI BIBIRO d.o.o.
Trzaska cesta 233
1000 Ljubljana
+386 1 256 4868
+386 1 256 4867
SK AGF Invest s.r.o.
Hlinikova 365/39
95201 Vrable 1
+421 02 62 859549
+421 02 62 859052