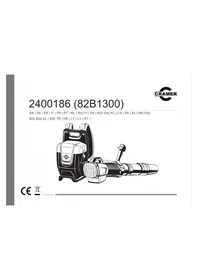
82B900 - Blower Cramer - Free user manual and instructions
Find the device manual for free 82B900 Cramer in PDF.

User questions about 82B900 Cramer
0 question about this device. Answer the ones you know or ask your own.
Ask a new question about this device
Download the instructions for your Blower in PDF format for free! Find your manual 82B900 - Cramer and take your electronic device back in hand. On this page are published all the documents necessary for the use of your device. 82B900 by Cramer.
USER MANUAL 82B900 Cramer
natural_image
Line drawing of a handheld electronic device with no visible text or symbols on the bodyEN DE ES IT FR PT NL RU FI SV NO DA PL CS SK SL HR HU RO BG EL AR TR HE LT LV ET
English (original instructions)
SPECIFICATIONS
| Type 82B900 | |
| Voltage 82V DC | |
| AIR volume 14.5 m3/min | |
| Air speed 200 KM/H | |
| Weight (Without Battery) | 2.7 kg |
| Battery Pack | 82V220G/82V430G82V220/82V430 |
| Charger 82C1G/82C2/82C6 | |
| Sound pressure level | 88 dB(A), k:3.0 dB(A) |
| Sound power level | 100 dB(A) |
| Vibration level | Ah: 2.5 m/s2, k= 1.5 m/s2 |
| Double-insulated construction. | |
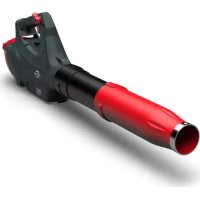
DESCRIPTION
See Figure 1.
- BLOWER TUBE
- TRIGGER
- BATTERY RELEASE BUTTON
ASSEMBLY
UNPACKING
■ Carefully remove the product and any accessories from the box.
■ Inspect the product carefully to make sure no breakage or damage occurred during shipping.
■ Do not discard the packing material until you have carefully inspected and satisfactorily operated the product.
If any parts are damaged or missing, please call your Cramer service centre for assistance.
PACKING LIST
See Figure 2.
Blower Tube
Blower
Operator's Manual
WARNING
Do not use this product if any parts on the Packing List are already assembled to your product when you unpack it. Parts on this list are not assembled to the product by the manufacturer and require customer installation. Use of a product that may have been improperly assembled could result in serious personal injury.
ASSEMBLING THE BLOWER TUBE
WARNING
To prevent accidental starting that could cause serious personal injury, always remove the battery pack from the tool when assembling parts.
■ Align either of the grooves (4) in the tube with the tabs (5) on the blower housing. Push the tube into the blower housing until the tab engages the grooves. See Figure 3.
■ Turn the tube in the direction of the arrow until both of the tabs slide into the lock positions. See Figure 4.
TO REMOVE/INSTALL BATTERY PACK
See Figure 5.
IMPORTANT! The battery pack is not charged when it is purchased. Before using the blower for the first time, place the battery pack in the battery charger and charge. Make sure to read all safety precautions, and follow the instructions in the Battery Charger manual.
TO REMOVE BATTERY PACK
■ Press and hold the battery release button with firm grip.
- Grasp the trigger handle firmly. Pull the battery pack out of the handle.
TO INSTALL BATTERY PACK
■ Align the tongue of the battery pack with the cavity in the handle housing.
■ Grasp the trigger handle firmly.
■ Insert the battery into the battery opening until the battery release button (3) locks into place.
■ Push the battery pack into the handle until both sides lock. The latch button will click when locked into place.
■ Do not use force when inserting the battery pack. It should slide into place and click.
WARNING
Follow these instructions in order to avoid injury and to reduce the risk of electric shock or fire:
- Replace the battery pack or the charger immediately if the battery case or charger cord is damaged.
- Verify that the switch is in the OFF position before inserting or removing the battery pack.
- Verify that the battery pack is removed and the switch is in the OFF position before inspecting, adjusting, or performing maintenance on any part of the blower.
- Read, understand, and follow the instructions contained in the section entitled Charging Procedure.
EN DE ES IT FR PT NL RU FI SV NO DA PL CS SK SL HR HU RO BG EL AR TR HE LT LV ET
English (original instructions)
WARNING
The battery pack fits into the backpack snugly in order to prevent accidental dislodging. It may require a strong pull to remove it.
WARNING
Always take care of your feet, children, or pets around you when pressing the battery release button. Serious injury could result if the battery pack falls. NEVER remove the battery pack when in a high location.
OPERATION
WARNING
Do not allow familiarity with this product to make you careless. Remember that a careless fraction of a second is sufficient to inflict serious injury.
WARNING
Always wear eye protection with side shields marked to comply with ANSI Z87.1, along with hearing protection. Failure to do so could result in objects being thrown into your eyes and other possible serious injuries.
WARNING
Do not use any attachments or accessories not recommended by the manufacturer of this product. The use of attachments or accessories not recommended can result in serious personal injury. Before each use, inspect the entire product for damaged, missing, or loose parts, such as screws, nuts, bolts, caps, etc. Tighten securely all fasteners and caps and do not operate this product until all missing or damaged parts are replaced.
CHARGE BEFORE FIRST USE.
WARNING
Always remove battery pack from the product when you are assembling parts, making adjustments, cleaning, or when not in use. Removing battery pack will prevent accidental starting that could cause serious personal injury.
STARTING / STOPPING THE BLOWER
Before start-up, make sure that the blower is in perfect condition to guarantee safe operation.
■ Ensure that the battery is installed in the blower.
■ Squeeze the trigger to start the blower.
■ Release the trigger to stop.
WARNING
To avoid serious personal injury, wear goggles or safety glasses at all times when operating this unit. Wear a face mask or dust mask in dusty locations.
WARNING
To prevent serious personal injury or damage to the unit, make sure the blower tube is in place before operating the unit.
WARNING
To avoid serious personal injury, do not wear loose-clothing or articles such as scarves, strings, chains, ties, etc., that could be drawn into the air vents. Tie back long hair to make sure it does not get drawn into the air vents.
■ To keep from scattering debris, blow around the outer edges of a debris pile. Never blow directly into the center of a pile.
■ To reduce sound levels, limit the number of pieces of equipment used at any one time.
■ Use rakes and brooms to loosen debris before blowing. In dusty conditions, slightly dampen surfaces when water is available.
■ Conserve water by using power blowers instead of hoses for many lawn and garden applications, including areas such as gutters, screens, patios, grills, porches, and gardens.
■ Watch out for children, pets, open windows, or freshly washed cars, and blow debris safely away.
■ After using blowers or other equipment, clean up. Dispose of debris properly.
EN DE ES IT FR PT NL RU FI SV NO DA PL CS SK SL HR HU RO BG EL AR TR HE LT LV ET
English (original instructions)
AIR VENTS
Never cover air vents. Keep them free of obstructions and debris. They must always remain clear for proper motor cooling.
MAINTENANCE
WARNING
In order to avoid personal injury and the risk of fire and electric shock, remove the battery pack before adjusting, inspecting, or cleaning the blower.
CLEANING
Remove the battery pack.
■ Brush or blow dust and debris out of the air vents using compressed air or a vacuum. Keep the air vents free of obstructions, sawdust, and wood chips. Do not spray, wash, or immerse the air vents in water.
■ Wipe off the housing and the plastic components using a moist, soft cloth. Do not use strong solvents or detergents on the plastic housing or plastic components. Certain household cleaners may cause damage, and may cause a shock hazard.
BATTERY PACK
■ Store the battery pack charged.
■ Once the charging light turns green, remove the battery from the charger and disconnect the charger from the outlet.
■ Recharge the battery pack anytime you have notice there is less power. Never let the battery pack become completely discharged.
■ After charging, the battery pack may be stored in the charger as long as the charger is not plugged in.
WARNING
When servicing use only identical replacement parts. Use of any other parts may create a hazard or cause product damage.
Avoid using solvents when cleaning plastic parts. Most plastics are susceptible to damage from various types of commercial solvents and may be damaged by their use. Use clean cloths to remove dirt, dust, oil, grease, etc.
WARNING
Do not at any time let brake fluids, gasoline, petroleum based products, penetrating oils, etc. come in contact with plastic parts. They contain chemicals that can damage, weaken or destroy plastic.
WARNING
To avoid serious personal injury, always remove the battery pack from the tool when cleaning or performing any maintenance.
STORING THE BLOWER
Clean the blower thoroughly before storing. Store the blower in a dry, well-ventilated place that is inaccessible to children. Keep away from corrosive agents such as garden chemicals and de-icing salts.
■ Store and charge your batteries in a cool area. Temperatures above or below normal room temperature will shorten battery pack life.
■ Once the light on the charger turns solid green, remove the battery from the charger and disconnect the charger from the outlet.
■ Do not store the battery pack on the tool.
■ Never store batteries in a discharged condition. Wait for battery pack to cool and fully charge immediately.
All batteries gradually lose their charge. The higher the temperature, the quicker they lose their charge. If you store your unit for long periods of time without using it, recharge the batteries every month or two. This practice will prolong battery pack life.
TROUBLESHOOTING
| PROBLEM POSSIBLE CAUSE | SOLUTION | |
| Motor fails to start when switch is depressed. | Battery is not secure. | Check to ensure the latches are tightly secured into place on the back of the blower and the battery. |
| Battery is not charged. | Charge the battery pack according to the instructions included with your battery. | |
| Unit will not start. | Defective speed switch. | Have the defective parts replaced by an authorized service center. |
| Defective motor. | ||
| Defective PCB board. | ||
| Unit will not blow. | Blocked tube. | Clear the blockage. |
Before start-up, make sure that the blower is in perfect condition to guarantee safe operation.
CARACTÉRISTIQUES PRODUIT
BESCHRIJVING (AFB.1)
- BLAZERBUIS
- VARIABELE SNELHEIDSHENDEL
- BATTERIJONTGRENDELKNOP
MONTAGE
TUOTTEEN TEKNISET TIEDOT
ROZWIĄ ZYWANIE PROBLEMÓW
To avoid serious personal injury, always remove the battery pack from the tool when cleaning or performing any maintenance.
СЪХРАНЕНИЕ НА УРЕДА ЗА ОБДУХВАНЕ
Do not use this product if any parts on the Packing List are already assembled to your product when you unpack it. Parts on this list are not assembled to the product by the manufacturer and require customer installation. Use of a product that may have been improperly assembled could result in serious personal injury.
YAPRAK ÜFLEME MAKİNESİ BORUSUNUN MONTAJI
! UYARI
Remove the battery pack.
,הכלההוּרָה,הכלההוּרָה,הכלההוּרָה,הכלההוּרָה,הכלההוּרָה,הכלההוּרָה,הכלההוּרָה,הכלההוּרָה,הכלההוּרָה,הכchia
EC DECLARATION OF CONFORMITY
Manufacturer Name: Changzhou Globe Co., Ltd.
Address: No.65 Xinggang Road Zhonglou Zone Changzhou, Jiangsu 213000
P.R.China
Name and address of the person authorised to compile the technical file
Name: Peter Söderström
Address: Propellergatan 1
211 15 Malmö
Sweden
Herewith we declare that the product
Category ......CORDLESS BLOWER
It is used to propel air out of a tube to move yard debris such as leaves.
Model 2400086
Serial Number ...... See product rating label
Year of Construction ...... See product rating label
■ is in conformity with the relevant provisions of the Machinery Directive (2006/42/EC)
■ is in conformity with the provisions of the following other EC-Directives EMC Directive (2014/30/EU),
Noise Emission Directive (2000/14/EC amended by 2005/88/EC)
And furthermore, we declare that
■ The following (parts/clauses of) European harmonised standards have been used EN 60335-1, EN 50636-2-100;
EN 62233, EN ISO 3744; EN 55014-1;
EN 55014-2
Measured sound power level 96.2 dB(A)
Guaranteed sound power level 100 dB(A)
Conformity assessment method to Annex V / Directive 2000/14/EC
Place, date: Changzhou, 22/07/2017
Signature: Ted Qu Haichao
Quality Director
Ted Qu
FR DÉCLARATION DE CONFORMITÉ EC
Endereço: No.65 Xinggang Road Zhonglou Zone Changzhou, Jiangsu 213000
P.R.China
Adress: No.65 Xinggang Road Zhonglou Zone Changzhou, Jiangsu 213000
P.R.China
Adress: Propellergatan 1
211 15 Malmö
Sweden
It is used to propel air out of a tube to move yard debris such as leaves.
Μοντέλο 2400086
Adrese: No.65 Xinggang Road Zhonglou Zone Changzhou, Jiangsu 213000 P.R.China