RSC 18 - Saw FESTOOL - Free user manual and instructions
Find the device manual for free RSC 18 FESTOOL in PDF.

| Product type | Cordless sabre saw |
| Brand | Festool |
| Model | RSC 18 |
| Motor voltage | 18 V |
| Stroke rate | 0 - 3000 strokes/min |
| Stroke length | 32 mm |
| Max. orbital stroke | 3 mm |
| Max. material thickness (wood) | 230 mm |
| Max. material thickness (metal) | 20 mm |
| Max. cutting depth (pipes) | ∅ 175 mm |
| Weight without battery | 4.3 kg |
| Sound pressure level | LPA = 87 dB(A) |
| Sound power level | LWA = 98 dB(A) |
| Vibration emission value (wood) | ah = 11 m/s², K = 3 m/s² |
| Stroke rate control | Continuous via trigger and limitation by switch |
| Adjustable orbital stroke | Yes (0 to MAX) |
| LED light | Yes, lights up during use |
| Power supply | Festool BP series battery (18 V) |
| Tool change | Tool-free, automatic ejection |
| Maintenance and cleaning | Clean ventilation slots with compressed air; lubricate tool holder; keep contacts clean |
| Safety | Anti-start button, overloading and overheating protection, warning sound signal |
| Recommended accessories | Original Festool saw blades and accessories |
| Repairability | Repairs only by the manufacturer or approved workshops |
Frequently Asked Questions - RSC 18 FESTOOL
User questions about RSC 18 FESTOOL
0 question about this device. Answer the ones you know or ask your own.
Ask a new question about this device
Download the instructions for your Saw in PDF format for free! Find your manual RSC 18 - FESTOOL and take your electronic device back in hand. On this page are published all the documents necessary for the use of your device. RSC 18 by FESTOOL.
USER MANUAL RSC 18 FESTOOL
natural_image
Exterior view of a black and gray power tool with saw cutting edge, no visible text or symbols
natural_image
Technical illustration of a sewing machine tool with a cutting tool, showing the blade and base (no text or symbols)RSC 18 10674085
We as the manufacturer declare under our sole responsibility that the product(s) fulfill(s) all the relevant provisions of the following UK Regulations and are manufactured in accordance with the following designated standards:
S.I. 2008/1597 Supply of Machinery (Safety) Regulations 2008
S.I. 2016/1091 Electromagnetic Compatibility Regulations 2016
S.I. 2021/422 Restriction of the Use of Certain Hazardous Substances in Electrical and Electronic Equipment Regulations 2012
BS EN 62841-1:2015
BS EN 62841-2-11:2016 + A1:2020
BS EN IEC 55014-1:2021
BS EN IEC 55014-2:2021
BS EN IEC 63000:2018
Signed on behalf of and in name of
Festool GmbH
Wertstr. 20, 73240 Wendlingen, GERMANY
Place and date of declaration: Wendlingen, 2022-08-24
Head of Product Development

Denis Drobner
Head of Product Conformity
^11 in the specified serial number range (S-Nr.) from 40000000 - 49999999
| Akku-Säbelsäge | Seriennummer * |
| Cordless reciprocating saw | Serial number * |
| Scie-sabre sans fil | N° de série *(T-Nr.) |
RSC 18 10674085
de EU-Konformitätserklärung. Wir erklären in alleiniger Verantwortung, dass dieses Produkt mit allen relevanten Anforderungen folgender EU-Richtlinien übereinstimmt, und folgende Normen oder normative Dokumente zugrunde gelegt wurden:
en EU Declaration of Conformity. We declare under sole responsibility that this product complies with all the relevant requirements in the following EU Directives, and following standards or normative documents were applied:
fr Déclaration de conformité de l'UE. Nous déclarons, sous notre seule responsabilité, que ce produit satisfait à toutes les exigences pertinentes des directives UE suivantes et repose sur les normes ou documents normatifs suivants :
es Declaración UE de conformidad. Declaramos bajo nuestra responsabilidad que este producto cumple todos los requisitos relevantes de las siguientes directivas de la UE y que se han tomado como base las siguientes normas o documentos normativos:
it Dichiarazione di conformità UE. Dichiariamo sotto nostra unica responsabilità che il presente prodotto sia conforme a tutti i requisiti di rilevanza definiti dalle seguenti Direttive UE e che siano stati applicati le seguenti norme o i seguenti documenti normativi:
nl EU-conformiteitsverklaring. Wij verklaren en stellen ons ervoor verantwoordelijk dat dit product volledig voldoet aan alle volgende EU-richtlijnen en volgende normen of normatieve documenten daaraan ten grondslag gelegd werden:
SV EU-försäkran om överensstämmelse. Vi för- klarar på eget ansvar att denna produkt uppfyller alla relevanta krav enligt följande EU-direktiv och baseras på följande normer eller normgivande dokument:
fi EU-vaatimustenmukaisuusvakuutus. Vakuutamme yksinomaisella vastuulla, että tämä tuote täyttää seuraavien EU-direktiivien kaikki olennaiset vaatimukset ja se on seuraavien standardien tai standardiasia-kirjojen mukainen:
da EU-overensstemmelseserklæring. Vi erklærer med eneansvar, at dette produkt er i overensstemmelse med alle relevante krav i følgende EU-direktiver, og at følgende standarder eller normative dokumenter danner grundlag for det:
nb EU-samsvarserklæring. Vi erklærer under eneansvar at dette produktet oppfyller alle relevante krav i følgende EU-direktiver og at følgende standarder eller normative dokumenter er blitt lagt til grunn:
Head of Product Development

Denis Drobner
Head of Product Conformity
1 Symbols....15
2 Safety warnings....15
3 Intended use 16
4 Technical data.... 16
5 Parts of the device....17
6 Battery pack.... 17
7 Transport and storage.... 17
8 Commissioning....17
9 Settings....17
10 Working with the electric power tool.....19
11 Warning signals....20
12 Service and maintenance....20
13 Accessories.... 20
14 Environment....21
15 General information....21
1 Symbols

Warning of general danger

Warning of electric shock

Read the operating instructions and safety instructions.

Wear a dust mask.

Wear ear protection.

Wear protective goggles.

Wear protective gloves.

Remove the battery pack.

Inserting the battery pack.

CE marking: Confirms the conformity of the power tool with the European Community directives.

UKCA marking: The United Kingdom Conformity Assessed symbol is a marking for products being placed on the market in the United Kingdom. It is a manufacturers indication that the product is in conformance with the relevant regulations in the UK.

Tool contains a chip which stores data. See section 15.1

Do not dispose of it with domestic waste.

Tip or advice

Handling instruction
2 Safety warnings
2.1 General power tool safety warnings

WARNING! Read all safety warnings, instructions, illustrations and specifications provided with this power tool. Failure to follow all instructions listed below may result in electric shock, fire and/or serious injury.
Save all warnings and instructions for future reference.
The term "power tool" in the warnings refers to your mains-operated (corded) power tool or battery-operated (cordless) power tool.
Follow the operating manual for the charger and the battery pack.
2.2 Safety instructions for reciprocating saws
- Hold the power tool by insulated gripping surfaces, when performing an operation where the cutting accessory may contact hidden wiring. Cutting accessory contacting a "live" wire may make exposed metal parts of the power tool "live" and could give the operator an electric shock.
- Use clamps or another practical way to secure and support the workpiece to a stable platform. Holding the workpiece by hand or against your body leaves it unstable and may lead to loss of control.
2.3 Further safety instructions
- Wait until the power tool has come to a complete halt before placing it down. The insertion tool can get caught and lead to a loss of control of the power tool.
- Deformed or cracked saw blades and saw blades with blunt or broken cutting edges must not be used.
- Use appropriate detection devices to look for any hidden supply lines or consult your local utility company. If the insertion tool makes contact with live cables, it can result in fire and electric shock. Damage to a gas pipe can lead to an explosion. Penetration of a water pipe can result in damage to property.
English
- Keep the handle dry, clean and free of oil and grease. Never cut into unknown materials and keep the cutting line above and below the workpiece free from obstacles. If the saw blade hits an object, kickback can occur on the power tool.
- Keep your hands away from the sawing area. Do not reach under the workpiece. There is a risk of injury in the event of contact with the saw blade.
- Keep your working area clean. Material mixtures are particularly dangerous. Light metal dust may burn or explode.
- Improve the blood circulation in your fingers by relaxing your hands and exercising your fingers in the breaks between working. Vibrations during long periods of work can result in blood vessel disorders and disorders of the nervous system in fingers, hands and wrists.
- Harmful/poisonous dust may be produced when working (e.g. paint products containing lead and some types of wood).
Contact with or inhalation of this dust may pose a risk for the operating personnel or persons in the vicinity. Comply with the safety regulations that apply in your country. Connect the power tool to a suitable dust extractor.
- Do not use power supply units or third-party battery packs to operate cordless power tools. Do not use third-party chargers to charge the battery packs. The use of accessories not expressly authorised by the manufacturer can result in electric shocks and/or serious accidents.


Wear suitable personal protective equipment: Ear protection, protective goggles, dust mask for work that generates dust, protective gloves for changing tools.
- Only for AS/NZS: The tool shall always be supplied via residual current device with a rated residual current of 30 mA or less.
2.4 Emission levels
The levels determined in accordance with EN 62841 are typically:
Sound pressure level L
$$ _ {\mathrm{PA}} = 8 7 \mathrm{dB(A)} $$
Sound power level L
$$ _ {W A} = 9 8 \mathrm{dB(A)} $$
Uncertainty K = 5 dB


CAUTION
Noise generated when working Risk of damage to hearing
▶ Use ear protection.
Vibration emission level a_h (vector sum for three directions) and uncertainty K measured in accordance with EN 62841:
Sawing chipboard / wooden beams
$$ a _ {h} = 1 1 \mathrm{m} / \mathrm{s} ^ {2} $$
$$ K = 3 \mathrm{m} / \mathrm{s} ^ {2} $$
The specified emission levels (vibration, noise)
- are used to compare machines.
- They are also used for making preliminary estimates regarding vibration and noise load during operation.
- They represent the primary applications of the power tool.

CAUTION
The emission values may deviate from the specified values. This is dependent on how the tool is used and the type of workpiece being machined.
▶ The actual load during the entire operating cycle must be evaluated.
▶ Depending on the actual load, suitable protective measures must be defined in order to protect the operator.
3 Intended use
The cordless reciprocating saw is designed to saw wood, plastic, metal and construction materials. It is suited to straight and curved cuts. Flush-mounted separation is possible if corresponding suitable bimetal saw blades are used. Materials containing asbestos must NOT be processed.
- intended for use with BP Festool battery packs of the same voltage class.

The user is liable for improper or non-in-tended use.
4 Technical data
Cordless reciprocating saw RSC 18
| Motor voltage 18 V | --- |
| Stroke rate | 0-3000 rpm |
| Stroke length 32 mm |
Cordless reciprocating saw RSC 18
Max. pendulum stroke 3 mm
Max. material strength Wood 230 mm
Metal 20 mm
Max. cutting depth in tubes ∅ 175 mm
Weight excl. battery pack 4.3 kg
5 Parts of the device
[1-1] Tool holder
[1-2] Pendulum stroke switch
[1-3] Slide switch for stroke rate control
[1-4] Safety lock
[1-5] Variable speed trigger
[1-6] Rear gripping surface
[1-7] Battery pack
[1-8] Buttons for releasing the battery pack
[1-9] Capacity indicator button on battery pack
[1-10] Capacity indicator
[1-11] Front gripping surface
[1-12] Saw table locking/unlocking device
[1-13] LED lighting
[1-14] Saw table
[1-15] Extraction adapter
[1-16] Scaffold hook
Accessories shown or described are not always included in the scope of delivery.
The specified illustrations appear at the beginning of the Operating Instructions.
6 Battery pack
Before using the battery pack, check that the battery interface is clean. Any contamination of the battery interface may impair correct contact and lead to the contacts being damaged.
A faulty contact may result in the machine overheating or being damaged.
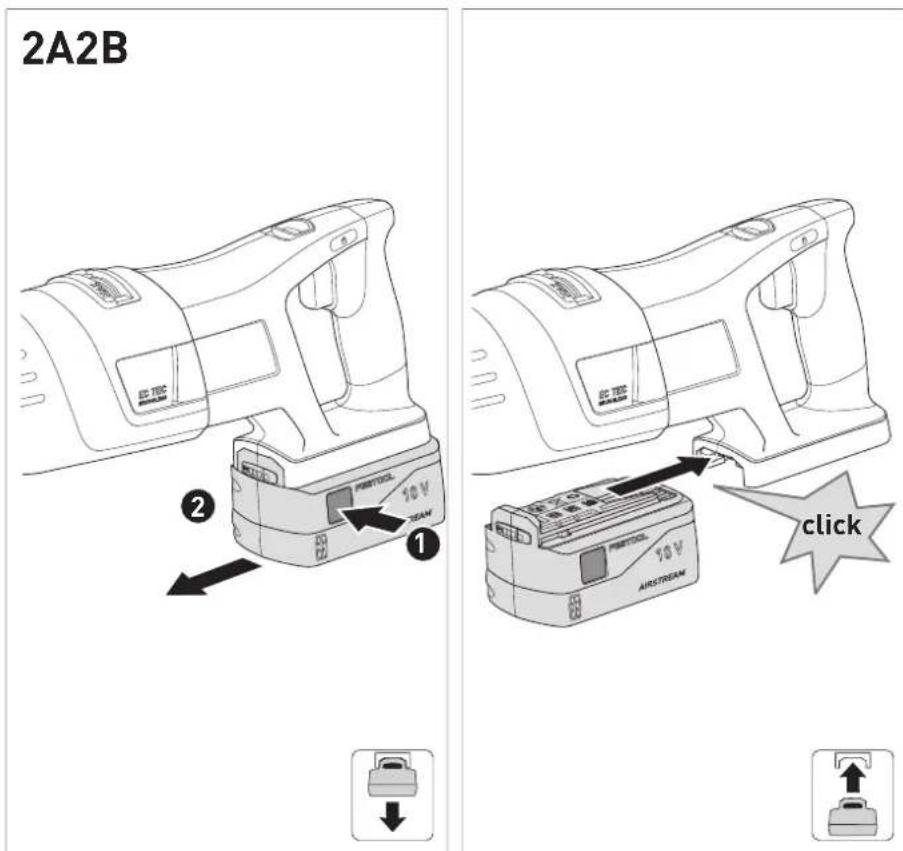
[2A]
[2B]

Remove the battery pack.
Insert the battery pack – until it clicks into place.
i Further information about the charger and battery pack with capacity indicator can be found in the corresponding operating manual.
7 Transport and storage

CAUTION
Risk of fire due to short circuit
Risk of injury
▶ Transport and storage of the power tool with ejected saw blade and disconnected from the battery pack.
▶ Remove the battery pack [1-7] (see section 6).
▶ Remove the saw blade (see section 9.3).
▶ Push in the scaffold hook [1-16].
▶ Transport and store the power tool in a Systainer.
8 Commissioning
8.1 Switching on/off
CAUTION! Do not press the variable speed trigger [1-5] until the power tool has been moved into the working position.
▶ Deactivate the safety lock [1-4] .
▶ Press the variable speed trigger = ON
Release the variable speed trigger = OFF
The LED lighting [1-13] lights up when the variable speed trigger is pressed.
The stroke rate can be continuously adjusted, relative to the pressure applied to the variable speed trigger.
9 Settings

WARNING
Risk of injury
▶ Activate the safety lock [1-4] and remove the battery pack from the power tool before performing any work on the power tool.
9.1 Electronics
Stroke rate control
You can use the variable speed trigger [1-5] to continuously adjust the stroke rate in the stroke rate range (see section 4). If necessary, the upper stroke rate can be limited using a slide switch [1-3] . This enables you to optimise the cutting speed to suit each application.
English
The stroke rate level depends on the material and can be determined using practical tests.
A lower stroke rate is recommended when placing the saw blade on the workpiece and when sawing in plastic and aluminium
CAUTION! When working for long periods with a low stroke rate, the power tool may get very hot and switch off (see Temperature cut-out).
Recommended stroke rate levels per material
Plastic, metal Level 1 0-1900 rpm
Construction material, Level 2 0-3000 rpm wood
Overload safety device
The power supply is restricted if the power tool is overloaded to extremes. The power supply is disconnected completely if the motor jams for some time. You will need to remove the load and/or switch off the power tool before you can use it again.
Temperature cut-out
To avoid the motor overheating, the power consumption is limited at an excessive motor temperature (e.g. if the pressure is too high while working). If the temperature continues to rise, the power tool switches off. It can only be switched on again once the motor has cooled sufficiently.
9.2 Setting the type of pendulum stroke
The pendulum stroke on the power tool can be adjusted to machine different materials with the correct rate of advance. Select the required setting using the pendulum stroke switch [1-2] :
Position 0 - pendulum stroke switched off
Horizontal sawing movements
- for machining thin or hard materials, e. g. sheet metal, steel.
- for achieving cleaner cutting edges.
Position MAX - stroke rate activated
Horizontal and vertical sawing movements (pendulum movements)
- for machining materials with average strength, e. g. non-ferrous metals, hardwood, plastics.
- for machining soft materials, e. g. light construction materials, insulating material, softwood, timber.
9.3 Changing tools


CAUTION
Risk of injury from hot and sharp insertion tool
- Do not use any blunt or faulty insertion tools.
- Wear protective gloves when handling an insertion tool.
Selecting the saw blade
Only use saw blades that are suitable for the relevant application. The saw blade should not be longer than that required for the intended cut.
You can find an overview of recommended saw blades in your Festool catalogue or online at www.festool.co.uk.
Only saw materials for which the saw blade in question has been designed.
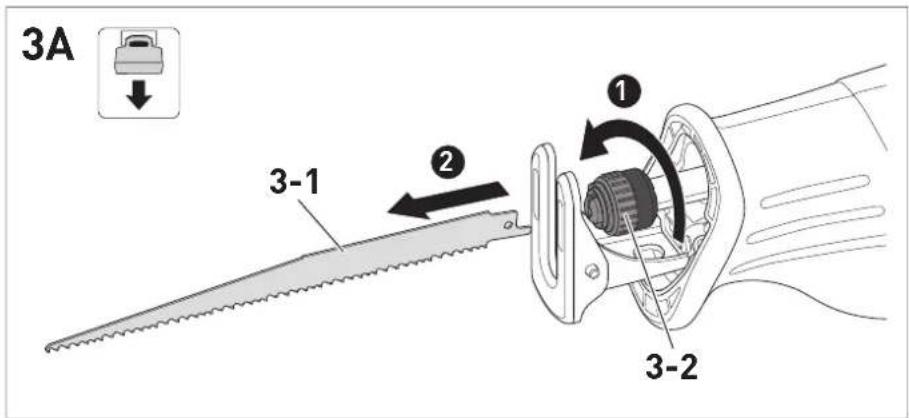
Ejecting the saw blade [3A]
▶ ① Unlock the tool holder [3-2].
▶ A ^2 automatic ejection of the saw blade [3-1].
The tool holder remains unlocked.
If the saw blade is not ejected, pull the saw blade out of the tool holder towards the front.
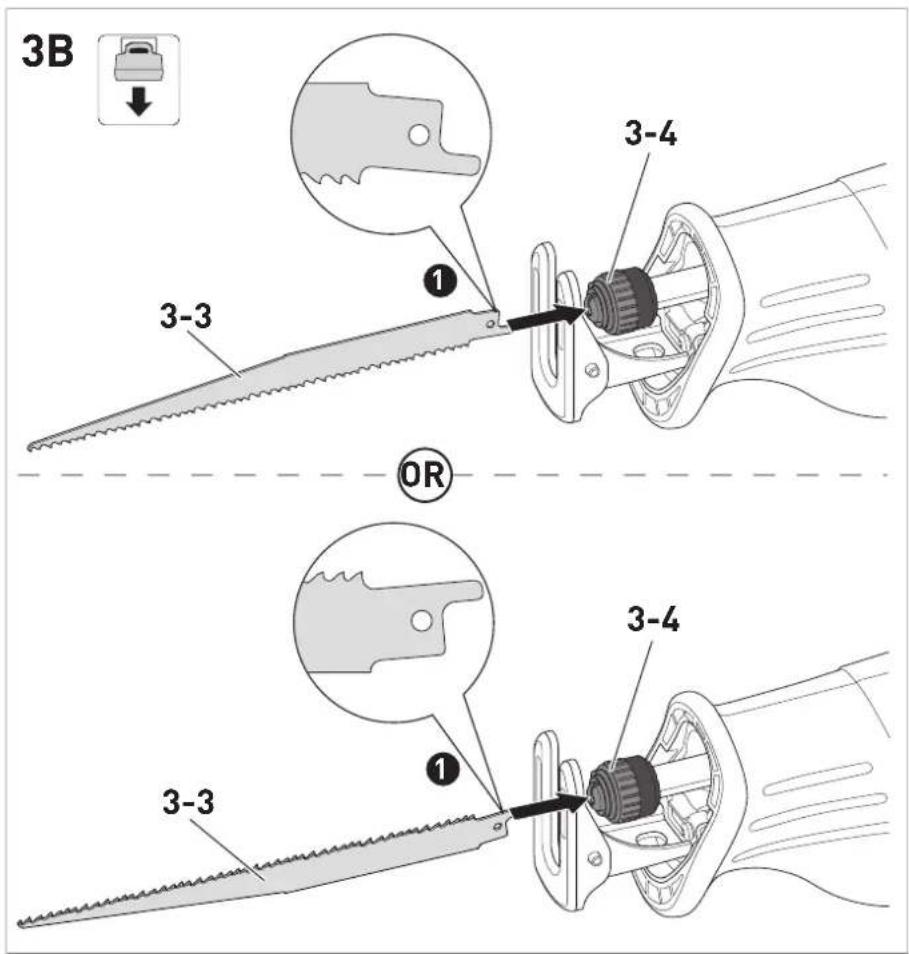
Inserting the saw blade [3B]
- Remove all the chips or foreign objects adhered to the saw blade [3-3] and to the tool holder [3-4]. Otherwise the blade cannot be sufficiently tightened.
▶ ① Insert the saw blade.
The tool holder locks automatically.
CAUTION! Whenever you replace a saw blade, always check that it is securely in place. A loose saw blade can fall out and cause injuries.
If the automatic locking/unlocking device on the tool holder does not close properly, clean the tool holder (see section 12) and close it manually after inserting the saw blade by turning it clockwise.
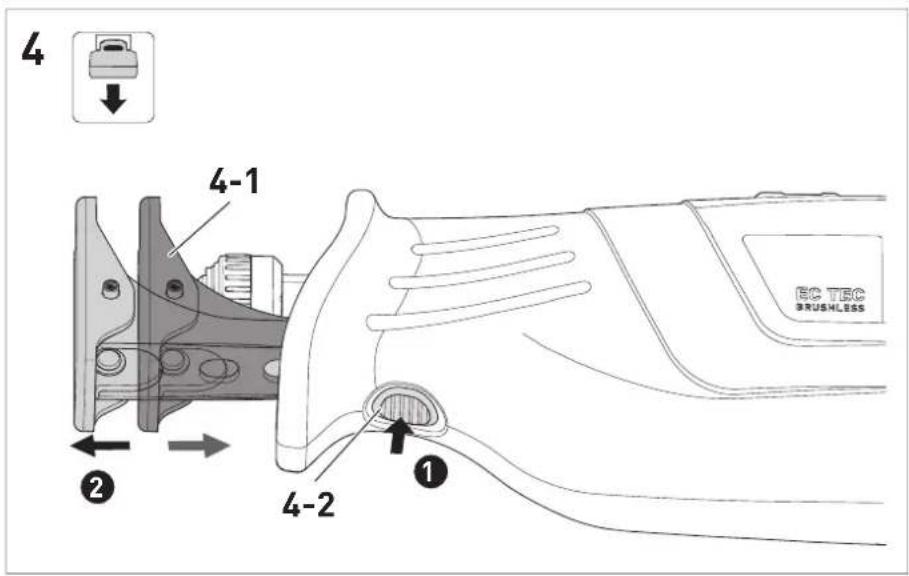
9.4 Adjusting the saw table [4]
When sawing, the saw table [4-1] should always be in contact with the material in order to avoid excessive vibrations.
By adjusting the saw table, the cutting depth of the saw blade can be limited, for example.
▶ Press and hold the locking/unlocking saw table device [4-2].
▶ Move the saw table or remove it for cleaning.
CAUTION! Do not work without the saw table.
▶ Release the locking/unlocking saw table device.
9.5 Dust extraction

WARNING
Hazardous dust
Damage to the respiratory passage
▶ When carrying out work that produces dust, use a dust extraction system.
▶ Comply with national regulations.
▶ Wear a suitable dust mask.
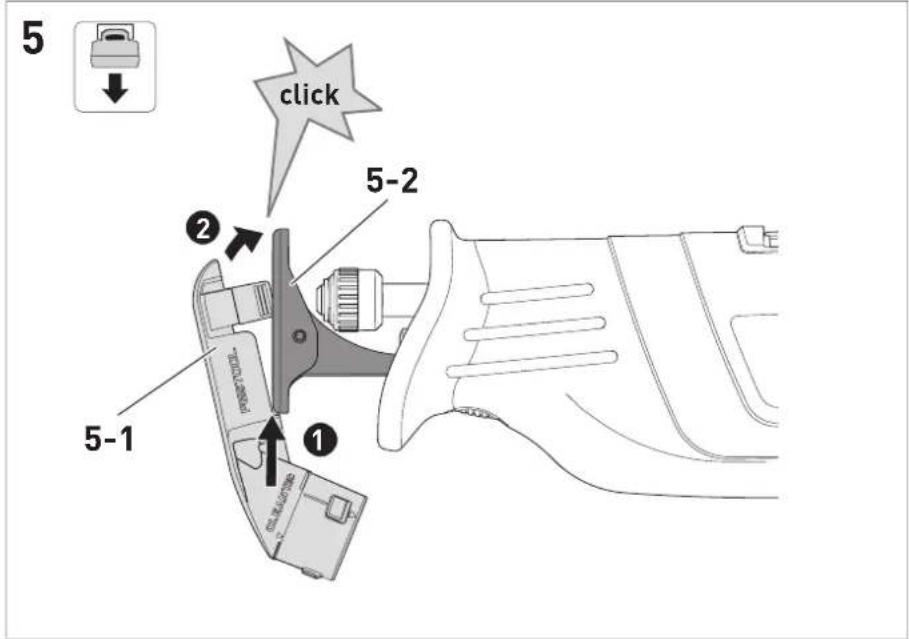
Fitting the extraction adapter [5]
▶ Position the extraction adapter [5-1] on the saw table [5-2] from the front.
② Swivel the extraction adapter up towards the saw table until the extraction adapter clicks into place.
▶ Connect the suction hose.
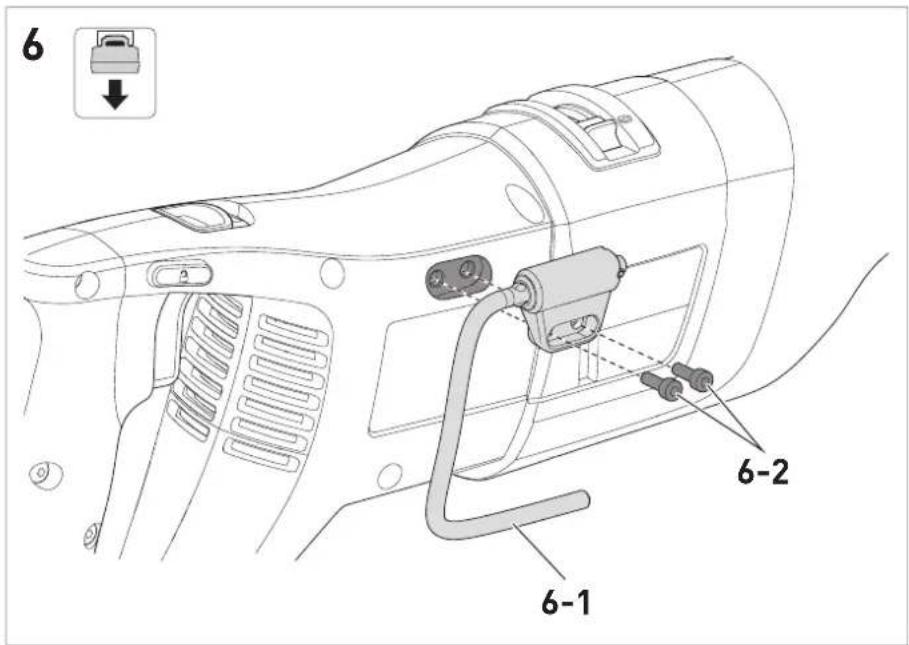
9.6 Removing/fitting the scaffold hook [6]
The power tool has a scaffold hook [6-1] pre-fitted ex works by which the power tool can be hung.
WARNING! Risk of injury. A power tool that is dropped may injure yourself and others. Before starting work, check whether the scaffold hook is secure.
Removing the scaffold hook
▶ Undo the screws [6-2].
▶ Remove the scaffold hook [6-1] and store it.
▶ For storage purposes, replace the screws and tighten them.
Fitting the scaffold hook
▶ Screw the scaffold hook [6-1] securely to the power tool with screws [6-2].
10 Working with the electric power tool
Before starting
- Always secure the workpiece in such a way that it cannot move during machining.
-
Hold the power tool by the gripping surface [1-6] + [1-11] with both hands to ensure safe guidance and maintain a stable stance.
-
Do not cover the cooling air openings with your hands. Otherwise there is a risk of the power tool overheating.
- Make sure that the saw table is always in full contact with the workpiece when sawing. The saw blade can get caught and lead to a loss of control of the power tool.
After finishing work
- Wait for the saw blade to come to a halt and cool down.
- Activate the [1-4] safety lock to prevent unintentional starting.
- Clean the power tool (see section 12) and store it in a Systainer in a dry location.
10.1 Metal processing

When processing metal, the following sures must be taken for safety reasons:
- Connect the machine to a suitable dust extractor.
- Regularly blow out the motor housing of the machine to remove dust deposits.

Wear protective goggles.
- When sawing metal, use lubricant along the cutting line. This prevents the material from getting too hot.
10.2 Woodworking
- Position the power tool at a right-angle to the workpiece.
▶ Pass the power tool through the wood with an even pressure by pushing the saw table against the workpiece.
10.3 Flush-mounted separation
Due to the elasticity of bimetal saw blades, it is possible to separate flush-mounted tubes, for example, from the wall.
▶ Use a saw blade that is longer than the tube diameter. Position the saw blade flush with the wall so that the kink point is beyond the workpiece to be sawed.
▶ Position the saw blade flush with the wall so that the kink point is beyond the workpiece to be sawed.
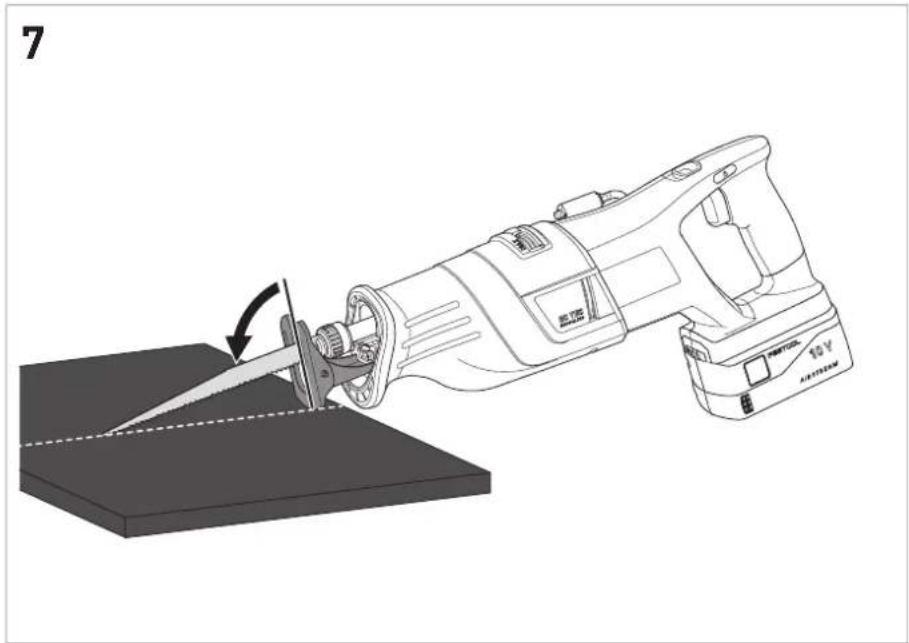
10.4 Plunge cuts [7]
The power tool is suitable for plunge cuts in soft materials such as wood, plasterboard and similar.
CAUTION! Do not make plunge cuts in metal.
English
When plunge-cutting, apply the corresponding safety measures to the reverse of the work-piece.
CAUTION! Only use short blades ( ≤ 150 mm).
With longer saw blades, the saw table cannot be attached and the power tool does not have the necessary support.
- Position the power tool on the workpiece using the underside of the saw table so that the saw blade does not touch the workpiece.
▶ Switch on (see section 8.1).
- Press the saw table firmly against the workpiece and swivel the power tool forwards. Plunge the saw blade into the workpiece slowly.
▶ If the saw table is fully in contact with the workpiece, continue sawing along the required cutting line.
11 Warning signals
Warning signals occur and the power tool switches off in the following operating states:
Signal Cause Action
Beeps once. Battery pack is empty. Charge the battery pack.

Power tool has overheated. Once it has cooled down, restart the power tool.
Battery pack has overheated. Once the battery pack has cooled down, restart the power tool or change the battery pack.
Power tool has overloaded. Reduce the load on the power tool.
The power tool is faulty. Contact the manufacturer to rectify the fault.
12 Service and maintenance
WARNING
Risk of injury, electric shock
▶ Always remove the battery pack from the power tool before performing any maintenance or service work.
▶ All maintenance and repair work which requires the motor housing to be opened should always be carried out by an authorised service workshop.

Customer service and repairs must only be carried out by the manufacturer or service workshops. Find the nearest address at:
www.festool.co.uk/service
Always use original Festool spare parts. Order no. at:
www.festool.co.uk/service
- After machining metal: Blow out the inside of the power tool through the vents using dry, oil-free compressed air. Otherwise, conductive dust deposits may build up inside the power tool. This can cause a short-circuit.
- To ensure constant air circulation, always keep the cooling air openings in the motor housing clean and free of blockages.
- Always keep the tool holder clean and free from chips and foreign objects. Remove the saw blade from the power tool (see section 9.3) and clean the tool holder (e.g. with a brush or compressed air).
Keep the tool holder in good working order by using suitable lubricant (e.g. tool lubricant). - Always keep the contacts on the power tool and battery pack clean.
13 Accessories
Always use original Festool tools and accessories. Using low-quality tools or accessories from other manufacturers may increase the risk of injury and seriously unbalance the machine, decreasing the quality of the working results and accelerating power tool wear.
Refer to the Festool catalogue for the order numbers of accessories and tools or find them online at www.festool.co.uk.
14 Environment

Do not dispose of the device in the household waste! Recycle devices, accessories and packaging. Observe applicable national regulations.
Before disposal, users must remove discharged batteries, accumulators that are not enclosed by the device and lights that can be removed from the old device without causing damage, if these are present. The old batteries and rechargeable batteries can then be recycled systematically.
In accordance with the European Directive on waste electrical and electronic equipment and implementation in national law, used power tools must be collected separately and handed in for environmentally friendly recycling.
Information about collection points for correct disposal is available at www.festool.co.uk/recycling.
Information on REACH: www.festool.co.uk/reach
15 General information
15.1 Information on data privacy
The power tool contains a chip which automatically stores machine and operating data. The data saved cannot be traced back directly to an individual.
The data can be read in a contactless manner using special devices and shall only be used by Festool for fault diagnosis, repair and warranty processing and for quality improvement or enhancement of the power tool. The data shall not be used in any other way without the express consent of the customer.
Imported into the UK by
Festool UK Ltd
1 Anglo Saxon Way
Bury St Edmunds
IP30 9XH
Great Britain
Sommaire
construction, courses/min bois
Limiteur de charge
Accureciprozaag RSC 18
Afzuigadapter monteren [5]
| Motorspenning 18 V | --- |
| Slagtall 0-3000 o/min |
| Slaglengde 32 mm |
| maks. pendling 3 mm |
| maks. materialtyk- | Treverk 230 mm |
| kelse |
| Metall 20 mm |
10.1 Metallbearbeiding