
HG06954 - Inflatable paddleboard MISTRAL - Free user manual and instructions
Find the device manual for free HG06954 MISTRAL in PDF.

| Product type | Inflatable paddle board (Stand Up Paddle) |
| Brand | Mistral |
| Model | HG06954 |
| Dimensions (inflated) | Approx. 320 x 84 x 15 cm (L x W x H) |
| Weight (board only) | Approx. 10.8 kg |
| Maximum load | 150 kg |
| Maximum air pressure | 1 bar (15 psi) |
| Number of users | 1 adult |
| Safety distance | Up to 150 m from shore |
| Material | Inflatable PVC (drop-stitch) |
| Delivery contents | Board, universal paddle, air pump with pressure gauge, foot rest, seat, backpack, waterproof bag, leash, repair kit (glue + patches), US fin, decorative stickers, manual |
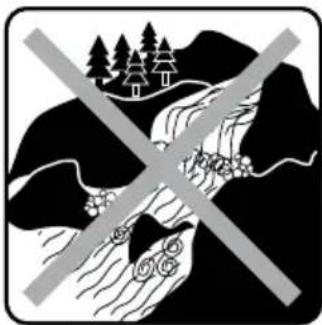
| Intended use | Coastal areas up to 150 m, sheltered waters (small bays, lakes, rivers, narrow canals). Not for strong winds, breaking waves, nature reserves. |
| Safety pictograms | Does not protect against drowning; read instructions; do not use in offshore wind or coastal currents; not recommended for under 14 years; max pressure 1 bar; 1 user; distance from shore 150 m; for good swimmers only; max load 150 kg; do not use in rapids or breaking waves. |
| Inflation | Double chamber valve; recommended pressure 0.8-1 bar; use the supplied pump or a pump with pressure limiter |
| Maintenance and cleaning | Clean with fresh water and mild soap; dry thoroughly; avoid harsh chemicals; regularly check valve tightness |
| Repairability | Repair kit included for small holes; seams not repairable by user; valve removable with special key |
| Storage | Store flat, slightly inflated, away from frost and sun; out of reach of children |
| Transport | Do not transport inflated on vehicle; use the supplied backpack |
| After-sales service France | Tel: 0800904879; Email: owim@lidl.fr |
Frequently Asked Questions - HG06954 MISTRAL
User questions about HG06954 MISTRAL
0 question about this device. Answer the ones you know or ask your own.
Ask a new question about this device
Download the instructions for your Inflatable paddleboard in PDF format for free! Find your manual HG06954 - MISTRAL and take your electronic device back in hand. On this page are published all the documents necessary for the use of your device. HG06954 by MISTRAL.
USER MANUAL HG06954 MISTRAL
natural_image
Top-down view of a skates surfboard with 'ALL @ ROUND' branding and a logo, no readable text or symbols beyond the label.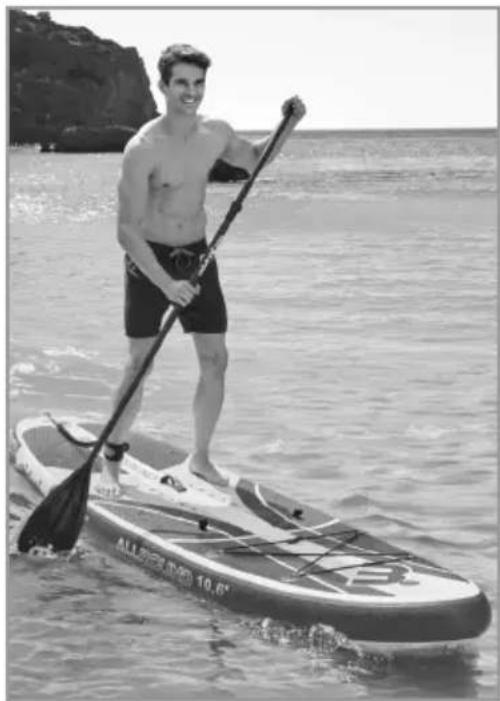
natural_image
Black-and-white photo of a man paddleboarding on a small boat in the ocean, with a rocky coastline in the background (no text or symbols visible)ALLROUND-SUP, AUFBLASBAR / INFLATABLE STAND UP PADDLEBOARD / STAND UP PADDLE POLYVALENT - GONFLABLE
DE AT CH
ALLROUND-SUP,AUFBLASBAR
Assembly, operating and safety instructions
NL BE
ALLROUND-SUP,OPBLAASBAAR

natural_image
Simple black stick figure drawing a bow with waves above, enclosed in a rounded square frame (no text or symbols)
natural_image
Silhouette of a person using a laptop (no text or symbols)
natural_image
Symbolic warning sign with no text, featuring a person rowing a boat and a flag on water (no text present)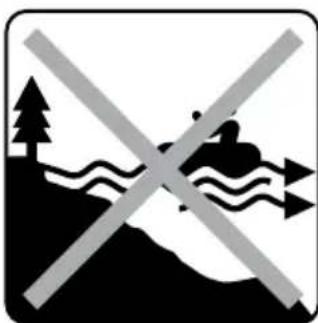
natural_image
Symbolic warning sign with mountain, water, and crossing lines (no text)Luft ablassen (Abb. C):
Intended use Page 20
Parts description Page 20
Scope of delivery Page 20
Technical data......Page 20
General safety notes......Page 21
User-defined safety instructions....Page 21
Product-specific safety notes......Page 22
Pictograms Page 22
Before first use....Page 24
Unrolling the board....Page 24
Inflating the board Page 25
Installing the US fin Page 26
Assembling the single blade paddle ......Page 26
Assembling the double-bladed paddle Page 26
Disassembling the product ......Page 26
Using the product......Page 27
Adjusting the paddle length Page 27
Using on the water....Page 27
Transport Page 28
Storage Page 28
Cleaning and care....Page 29
Repair and maintenance......Page 29
Repairing the valve Page 29
Repairing the board....Page 30
Maintaining the air pump Page 30
Disposal Page 30
Service Page 30
Inflatable Stand Up Paddleboard
- Introduction
We congratulate you on the purchase of your new product. You have chosen a high quality product. Familiarise yourself with the product before using it for the first time. In addition, please carefully refer to the operating instructions and the safety advice below. Only use the product as instructed and only for the indicated field of application. Keep these instructions in a safe place. If you pass the product on to anyone else, please ensure that you also pass on all the documentation with it.
Intendeduse
This product is intended as a stand-up paddle board for use in protected shore areas up to 150 m, never in nature reserves with breeding places for animals. This product is intended for paddling in protected near-shore coastal water, small bays, small lakes, small rivers and canals. Never use the product in high wind and /or breaking waves. This product is not a personal flotation device, it must not be used as a water toy or for winter sports. It may only be used by persons able to swim. Not suitable for children under age 14 years. Before using this product, you should attend a suitable course, a certified school or receive instruction from an experienced athlete. This product is only intended for private use, not for commercial use.
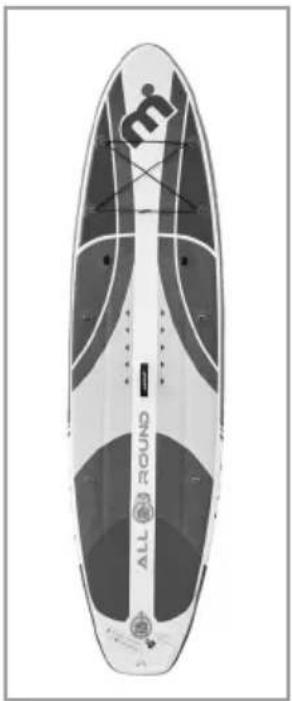
Partsdescription
| 1 | Board |
| 1a | Valve |
| 1b | Valve needle |
| 1c | D-ring |
| 1d | Board transport handle |
| 1e | Valve cap |
| 2a | Paddle blade |
| 2b | Secondpaddleblade |
| 3 | Paddle shaft |
| 4 | Extension |
| 4a | Locking lever |
| 5 | Box with repair kit |
| 6 | Glue |
| 7 | Repair patches |
| 8 | Drybag |
| 9 | Leash |
| 9a | Leash strap |
| 9b | Leash loop |
| 10 | Backpack |
| 11 | Valve wrench |
| 12 | US fin |
| 12a | Metal plate |
| 12b | Screw |
| 13 | Air pump (with pressure gauge) |
| 13a | Male thread |
| 14 | Hose |
| 14a | Threadedcoupler |
| 14b | Hoseconnection |
| 15 | Fin protector |
| 16 | Seat |
| 17 | Strap |
| 18 | Foot rest |
| 19 | Loop |
| 20a | 20b Mistral decoration sticker |
- Scope of delivery
1 Inflatable Stand-Up paddle board (HG06954)
1 Universal paddle (HG05822 / HG08753)
1 Air pump with pressure gauge (HG06968)
1 Foot rest (HG06962 / HG08758)
1 Seat (HG06961 / HG08757)
1 Backpack (HG06960/HG08756)
1 Drybag (HG05824/HG08755)
1 Leash (HG05756(B)/HG08754)
1 Repair kit (HG06963 / HG08759)
1 US fin (HG05756(D))
2 Mistral decoration stickers
1 Set of installation instructions and instructions for use
- Technical data
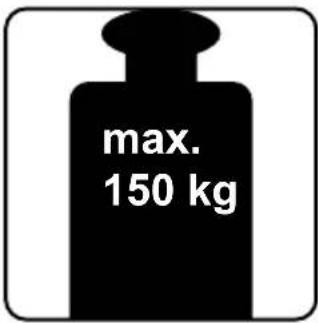
Max. load: 150 kg
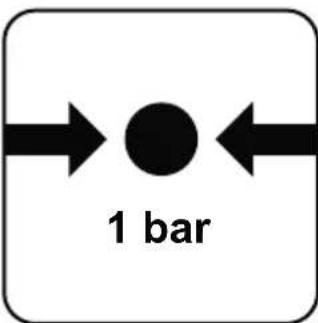
Max. air pressure: 1 bar (15 PSI)
Dimensions:(inflated):
approx. 320 × 84 × 15 cm
(L × W × H)
Pack size: drybag:
approx. 49 × 31 × 20.5 cm
(H x W x ∅ bottom);
Volume: approx. 10L
Backpack: approx. 95 x 44 x 25 cm
Weight: approx. 10.8 kg (Board)

Generalsafety notes
FAILURE TO OBSERVE THE SAFETY INFORMATION IN THE INSTRUCTIONS FOR USE MAY RESULT IN RISKS SUCH AS INJURIES AND DEATH, E.G. FROM DROWNING! KEEP ALL SAFETY INFORMATION AND INSTRUCTIONS FOR FUTURE REFERENCE!
ATTENTION! Prudence and self-assessment on water are extremely important. Never overestimate your strength and steersmanship! Always stay near shore! Be aware of the weather, storm warnings or possible flares!
⚠️ATTENTION! Always observe the safety rules and relevant ordinances for lakes and open waters, and always wear an approved life jacket for your own safety.
Always use the product as specified in these instructions and the information on labels and in the instructions for use. Never exceed the maximum load, air pressure of 1 bar (15 PSI) and the number of persons specified on the product and in the instructions for use. Always wear a life jacket.
■ Never modify the product. Any modifications affect the functionality of the product and will void the warranty.
Do not modify the basic design of the product, as this can affect safety.
Observe the information on the manufacturer label on the product.
By using this product you acknowledge your obligation to acquire the necessary knowledge and skills required for water sports and navigating waters. This also applies to observing the relevant rules and laws. Safety on water is a result of the synergy between user, weather and water conditions. By using this product you accept, understand and acknowledge the risks associated with paddling.
The inflated board, the paddle and the blades are rigid and may cause injuries.
Please watch for bystanders when transporting the product.
■

DANG RACING!
LIFE AND RISK OF ACCIDENT FOR INFANTS AND CHILDREN!
Never leave children unattended with the packaging material or the product. The packaging material presents a suffocation hazard and there is a risk of death from strangulation and / or drowning. Children frequently underestimate the dangers. Always keep children away from the product.
This device is not intended to be used by persons (including children) with restricted physical, sensory or mental abilities or with insufficient experience and / or knowledge, unless they are supervised by a person who is responsible for their safety or they have received instruction on how to use the device from such a responsible person. Children must be supervised to ensure they do not play with the product.
●User-defined safety instructions
■ Wear a life jacket when using the product on water.
Be careful and prudent on waters.
Do not use this product under the influence of drugs, medication or alcohol.
Never overestimate your strength, steersmanship and skills. Be aware of your limits. Paddling can be dangerous and physically strenuous. Always stay as close as possible to the shore and coast.
Do not use the product in floods. Only paddle in safe weather conditions.
Obtain information about current weather conditions and check the weather forecast. Be aware of severe weather warnings or possible flares.
Never use the product in offshore wind (wind from the land blowing toward the water). You could easily be swept away.
Check the water for rocks, docks, ripples and other hazards before paddling. Be careful in offshore wind and currents, tidal change, river water levels and obstacles in and above water. Stay in protected shore areas up to 150 m.
- Keep a safe distance from rapids, whirlpools, flotsam and other obstacles.
■ Always observe local navigation rules.
If necessary, wear a protective helmet.
Always use a leash to prevent the board from floating away from you.
■ Wear clothing suitable for the weather and water conditions. Wear a wetsuit when paddling in cool weather. There is a risk of hypothermia! - Attach the leash to yourself and the board. When using the leash, you could be tossed against the board if you lose control. Be careful the leash does not entangle around your body or feet.
Always paddle together with others, never alone. - Notify others before you go paddle boarding. Keep identification on you.
When using the product outside of designated swim areas, be sure another person is watching you. - Watch for others in the water when paddle boarding.
Do not use the product near boat traffic, other watercrafts, dams, locks and other hazards.
Do not use the product in situations where you may injury others, e.g. people in the water or on the beach.
Uneven weight distribution of cargo or persons on the board affects the stability, balance and product characteristics. This can also cause the product to tip. Always be sure to distribute your weight as evenly on the board as possible.
Any change in the distribution of the cargo or persons on the board (such as adding fishing equipment, a radar, a folding mast, motor, etc.) can significantly affect stability, balance and the characteristics of the board.
Inflate the product at a pressure of 0.8 bar (12 PSI) up to a maximum pressure of 1 bar (15 PSI).
Do not attempt to inflate the product with a compressor without a functioning compressor pressure switch, which shall stop inflating the product once the pressure gauge reads 1 bar (15 PSI).
If the air pressure inside the product rises in direct sunlight, it must be balanced out accordingly by releasing air.
If the pressure exceeds 1 bar (15 PSI), open the valve and release air until the operating pressure is in the safe operating range again.
Be sure the product – particularly when inflated – does not come into contact with stones, gravel or sharp objects and does not rub or scrape against rough surfaces, as this can cause damage.
Do not let the product sit in the sun for extended periods; always set it down in the shade. If the product will not be used for extended periods, e.g. in winter, store it slightly inflated and away from frost.
Only insert the included or suitable pump adapters in the safety valves. Other adapters can damage the valves.
Do not overinflate the product or the welded seams may rupture. Close the valve properly after inflating.
Avoid contact with hot, sharp, pointy or dangerous objects, chemicals or liquids. If this does occur, thoroughly check the product for leaks or other damages. Do not carry sharp or pointy objects on the board.
- Keep the product away from fire and hot objects (e.g. lit cigarettes).
Do not transport the inflated board on vehicles.
Product-specific safety notes
Inflatable products are sensitive to low temperatures. Never fold and inflate the product in temperatures under 15 °C.
Pictograms
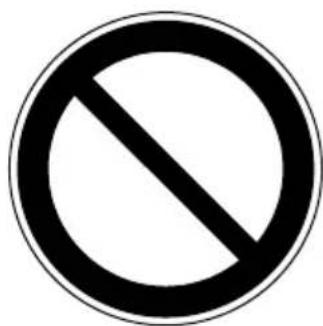
WARNING! Please note the pictograms on the product before use. Injuries and / or property damage may otherwise occur.
 | General warning sign | 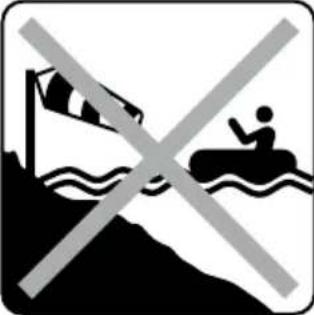 | Do not use in offshore wind. |
 | General mandatory action symbol | 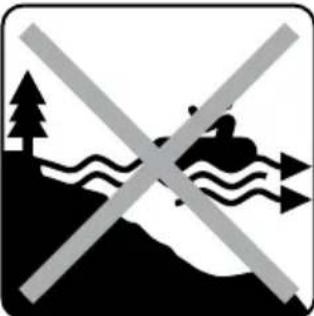 | Do not use in offshore currents. |
 | General prohibition sign |  | Not suitable for children under 14 years. |
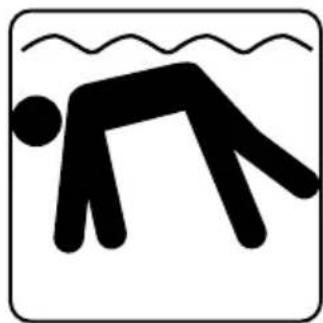
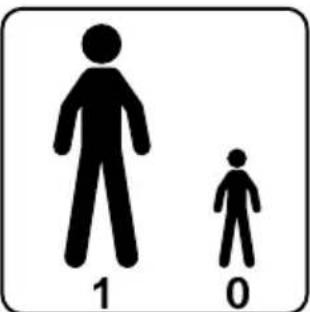
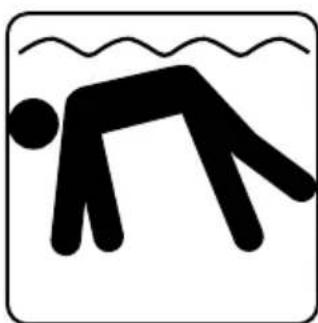
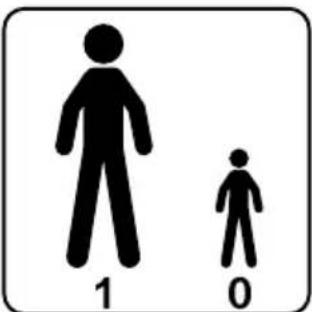
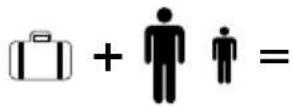
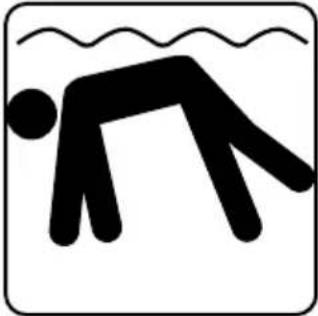 | Does not prevent drowning. | 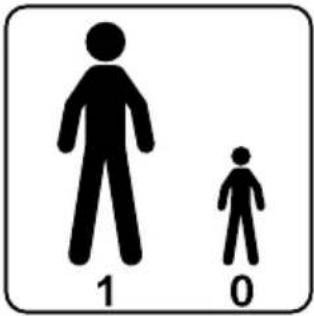 | Number of users: 1 adult, 0 children |
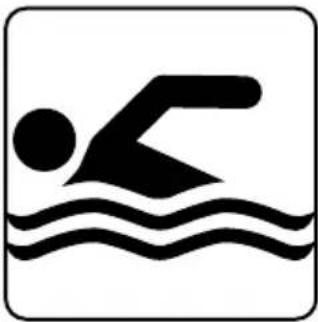
 | Read the instruc- tions for use first. | 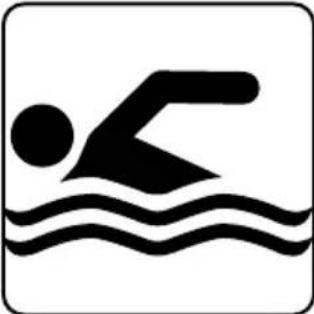 | For swimmers only! |
| 150 kg (330 lbs.) | Maximum weight capacity. |
| max. 150 kg | Maximum weight capacity |
| 1 bar | Operating pressure: 1 bar, 15 PSI |
| 150 m | Safe distance from shore: 150 m |
| 100% | Fully inflate air chambers. |
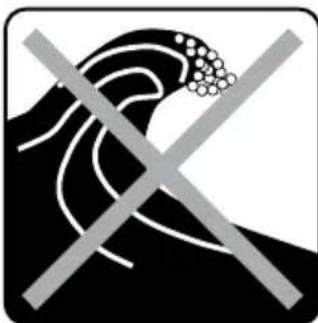
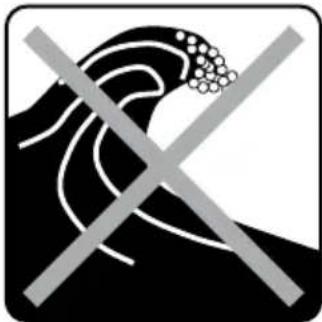 | Do not use in breaking waves. |
 | Do not use in white water. |
- Before first use
Before using this product, you should attend a suitable course, a certified school or receive instruction from an experienced athlete.
The load on the product must not exceed 150 kg. Ensure weight is distributed evenly. Failure to observe this advice may result in injury and / or product damage.
Check all parts of the product for damage such as wear, leaks, tears or other damages before every use.
Do not use the product if it is damaged.
Check the air pressure inside the board. Also verify the valve is closed tight and the valve cap 1e is attached to prevent sand and dirt from entering the valve. Watch for any pressure loss in the board.
■ Never leave the product in the water unattended. A current can quickly sweep the product away so that a swimmer cannot retrieve it.
- Unrolling the board
Select an even, clean surface with enough room to unpack and unfold the product.
☐ Remove all product packaging.
☐ Verify that all parts are present and in good condition.
☐ When unrolling the board, ensure there are no sharp objects such as shards of glass, loose gravel or glowing charcoal or cigarette butts are on the ground.
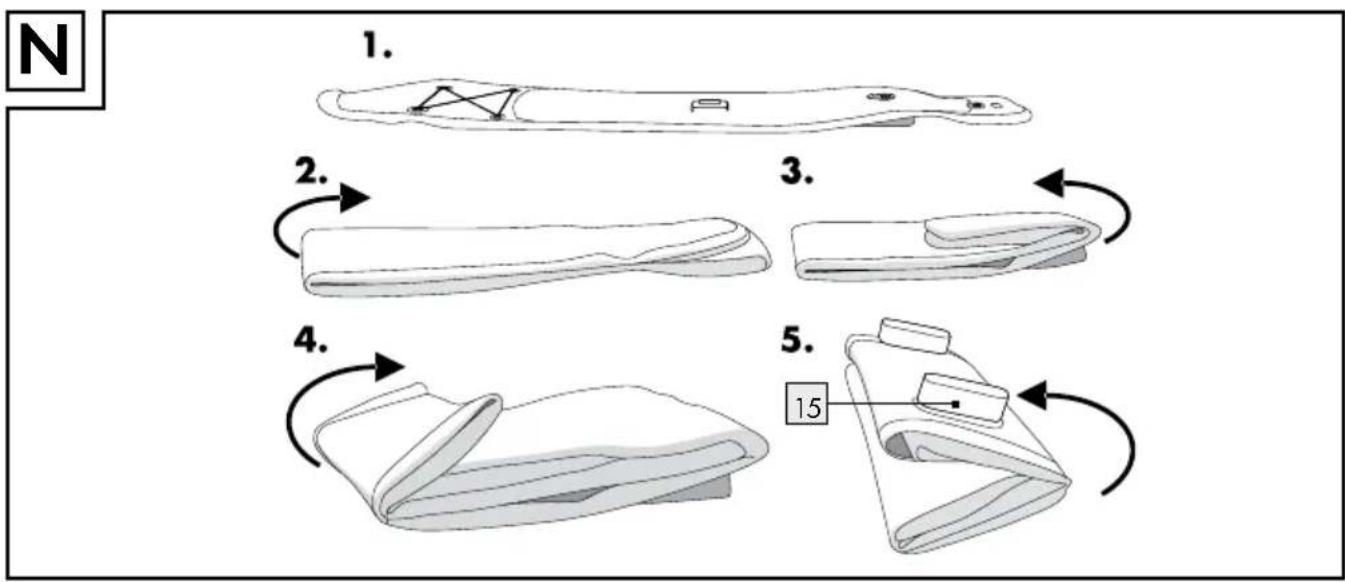
Note: Check the board for any damage such as holes and tears the second time it is assembled or sooner. Please refer to chapter "Repair and maintenance" how to repair these. Damage cannot be repaired once you are on the water.
☐ Unroll the board and remove the plastic foam fin protector 15 from the two fins.
Note: Do not throw away the fin protector. These are required to protect the fixed fins when rolling up the board 1 after use.
- Inflating the board
- Avoid overinflating to prevent the welded seams from over-expanding or even rupturing. Only inflate up to a pressure of 1 bar (15 PSI).
The air pressure will increase when the product heats up from the sun. In this case, reduce the air pressure by releasing air from the board 1.
Inflate the board with the included air pump 13. You can alternatively use a standard foot pump or twin stroke piston pump with the corresponding attachments and a pressure gauge.
Only open the valve needle lb to inflate or release air. They can otherwise become dirty.
The area around the valve must always be dry and clean. Check the valve 1a for dirt particles.
■ Ensure sand or other dirt does not enter the valve 1a.
You may also use hand pump or electric pumps with a compressor that has an automatic switch-off function. These pumps are pre-set to 15 PSI; the pump automatically shuts off when this air pressure is reached.
Regular compressors without a automatic switch-off function should not be used to pump up SUP boards.
Screw the threaded coupled of the hose onto the male thread of the connector on the air pump. Be sure to screw the hose onto the thread marked "INF" (Fig. B).
Set the air pump to twin stroke by moving the front lever to the right (Fig. F1). Now inflate the board 1.
Once you notice a lot of force is required, set the air pump 13 to single stroke by moving the front lever to a vertical position. You can now continue inflating with considerably less force.
Note: Do not pull the handle on the air pump 13 all the way up, only far enough so your arms remain straight (Fig. F2). Now use the weight of your body to inflate the product by simply bending at the knees. Keep your arms straight. This way you are not inflating with your arm muscles but the weight of your body (Fig. F3).
☐ Inflate the board with the air pump 13 to the recommended pressure of 1 bar (15 PSI). Use the pressure gauge to check the pressure.
☐ Stop inflating the product once the pressure gauge reads 1 Bar (15 PSI).
Inflate in the following order:
- First inflate the air chamber with valve number 1. The valves are marked 1 and 2.
- Turn the valve head clockwise so it comes out upward (Fig. C1).
-
Then open valve 2 and turn the valve head anti-clockwise whilst pushing down (Fig. C4). Your board 1 is now ready to inflate.
-
Start with valve 1 by inserting the hose connection 14b into the valve 1a and securing it all the way clockwise (Fig. C2).
Note: The valve head must be in the closed position.
-
Then inflate the second air chamber via valve 2. To do so, turn the valve head clockwise so it comes out upward (Fig. C1), insert the pump hose the same as with valve 1 and start inflating. Since the inner air chamber is small, leave the front lever on the air pump 13 vertical to inflate using little force.
-
Unscrew the hose end anti-clockwise from the valve 1a and attach the valve cap 1e to the valve 1a.
-
Tighten the valve cape, turning clockwise.
- Installing the US fin (Fig. E)
Insert the metal plate in the hole in the middle of the slot and slide forward.
Note: You can use the screw to slide the plate along the slot.
Insert the back of the US fin in the fin box and slide back. Insert the front of the US fin in the fin box and slide the US fin forward until the hole in the fin is located over the hole in the metal plate 12a.
Insert the screw 12b in the hole in the fin and screw it in along with the metal plate 12a to secure the US fin 12.
Note: Always ensure the fins are facing toward you when carrying the board 1. Be particularly careful not to injure others with the board 1 in windy conditions.
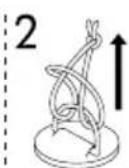
- Assembling the single blade paddle (Fig. K)
☐ Loosen the locking lever 4a on the extension 4. ☐ Insert the paddle shaft in the extension 4. ☐ Extend the paddle shaft to the desired length.
Note: For information about the recommended paddle length, please see chapter "Adjusting the paddle length".
Press in the locking lever 4a on the extension 4 to lock the paddle shaft 3.
Insert the paddle blade ^2a in the opening on the extension 4. Ensure the locking pin is inserted all the way in the pinhole on the paddle blade 2a. You must hear the pin on the extension 4 click into place when it locks into the pinhole of the paddle blade 2a.
- Assembling the double-bladed paddle (Fig. K)
☐ Loosen the locking lever 4a on the extension 4. ☐ Insert the second paddle blade in the end of the extension 4 with the locking lever 4a.
Turn the second paddle blade 2b to the desired angle.
☐ Push in the locking lever on the extension 4 to lock the second paddle blade 2b in place.
Insert the paddle blade in the opening on the extension 4. Ensure the locking pin in inserted all the way in the pinhole. You must hear the pin on the extension 4 click into place when it locks into the pinhole.
• Disassembling the product
Select a clean, even surface with adequate space to disassemble the product.
☐ Disassembly requires the following steps:
- Removing the US fin 12 and other accessories (foot rest 18, seat 16)
- Releasing air from the board 1
- Rolling up the board 1
• Disassembling the paddle into the individual parts
Note: Remove the US\$12 before releasing air from the board 1.
Removing the US fin:
Remove the US [fi2] per chapter "Installing the US fin" in reverse order.
Disassembling the paddle:
Disassemble the paddle per chapter "Assembling the single blade paddle" or "Assembling the double-bladed paddle" in reverse order.
Releasing air (Fig. C):
Place the dry board flat on the ground and open the two valve caps 1e by pushing in the valve needle 1b whilst turning clockwise.
Only push the valve needle in slightly so air can escape slowly.
Release the air.
You can alternatively use the air pump to fold the board 1 as flat as possible by attaching the hose 14 backwards on the air pump 13 (Deflate). Connect the hose 14 to one of the valves 1a. The valve head must be down. Turn the valve head to the right (Fig. C4), pump and
extract the remaining air from the board 1 until it is completely flat.
Then turn the valve head anti-clockwise so it comes out upward (Fig. C1).
Now place the board flat on the ground (Fig. N1).
Then fold the board once and place the nose over the tail (Fig. N2).
Then fold the tail and nose again, making sure the external fins under the board 1 do not buckle (Fig. N3).
Do not fold the board 1 along the outside edges of the fin box. This will cause excessive tension in the board 1.
Now fold the opposite side to about the middle (Fig. N4).
Then fold the board once more onto the opposite side so the external fins are on top (Fig. N5).
Use the strap to lash up the board.
Attach the fin protect to the fins so they remain straight whilst packed.
● Using the product
- Adjusting the paddle length
Stand straight and raise one arm up; bend your palm to about a right angle (Fig. J).
Open the locking level on your paddle and slide the extension up until the paddle handle fits below your bent palm.
Note: For optimal handling, the second paddle blade 2b / paddle shaft 3 must be firmly attached to the extension 4 using the locking lever 4a. If necessary, you have to adjust the screws of the locking lever 4a to ensure that the second paddle blade 2b / paddle shaft 3 is firmly seated.
Close the lock on the locking level. Your paddle is now set to the correct length.
Important: Do not extend the paddle shaft 3 past the "STOP" mark. The paddle will otherwise become unstable and could break.
• Using on the water
Note: Be careful not to hurt others when carrying the board 1 in windy conditions. Always keep the fins toward you.
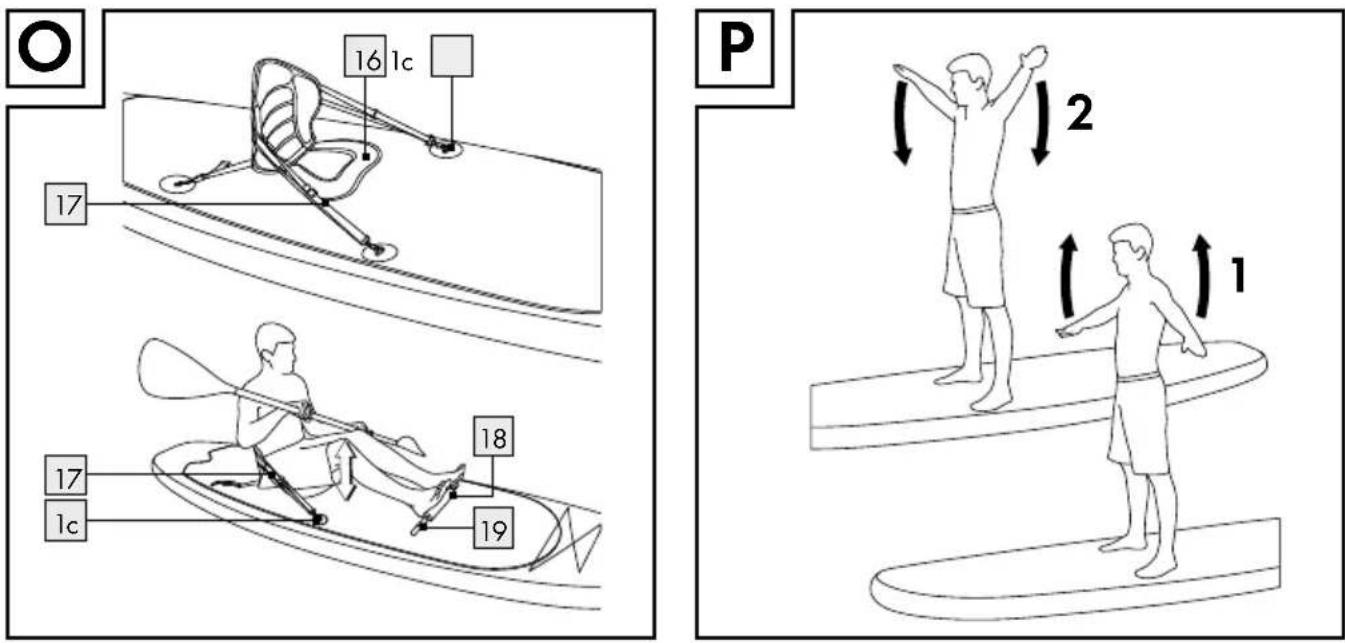
Note: You can use the board 1 standing up or sitting.
Standing up:
In this position, use the leash as an additional safety measure.
Do not attach the leash to your ankle when using the board 1 on flowing water, e.g. water with rapids such as streams and rivers.
Always attach the leash to your ankle in offshore winds.
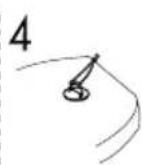
If you find yourself in distress, always stay on the board 1. Never abandon the board 1 in strong offshore winds, or you may drown. In this case, use the international distress signal to draw attention to yourself: stand or sit on the board 1 and slowly and clearly raise and lower your straight arms at your side (Fig. P).
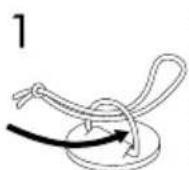
Attach the leash as shown in figure G:
- Attach the leash 9 to the rear D-ring 1c.
- Pull the loop on the leash 9b through the D-ring 1c.
- Pull the leash strap 9a through the loop on the leash 9b.
- When standing to use the board 1 in deeper waters, attach the leash 9 to the leg/ankle (Fig. H/I).
Seated:
To use the board 1 in a seated position, you will need to install the foot rest 18 and the seat 16 (Fig. O). Proceed as follows:
Installing the foot rest 18:
Insert the tube end of the foot re18 through the first loop 19 from the side.
☐ Insert the opposite end through the second loop 19 until both are in the middle of the board 1.
Installing the seat 16:
Place the set on the board 1 so your legs are slightly bent when your heels are touching the foot rest 18.
Note: The distance to the foot rest is very important. Ensure it is correct so you can use the foot rest 18 well.
Sit down, lift yourself up with both hands and slide your bottom into the seat 16. Adjust the backrest so you are sitting straight.
Secure the set by attaching the snap hooks on the four adjustable straps 17 to the D-rings 1c on the board 1.
Set the seat on the board, the inside of the backrest must always face toward the foot rest 18.
Secure the backrest by attaching the four straps 17 with snap hooks to the four D-rings 1c at the back of the board 1.
☐ Position the set so your legs are slightly bent when touching the foot rest 18.
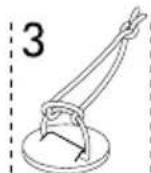
Mounting the board (Fig. L):
Stand next to the board (Fig. L1).
Place the paddle on the board perpendicular to the centreline of the board, slightly in front of the board transport handle 1d (Fig. L2).
Now kneel on the board, behind the paddle, in shallow water (Fig. L3). Grab the paddle but do not pick it up. Your hands are far apart.
Now move one foot forward and position it on the board 1 at about the level of the board transport handle 1d (Fig. L4). Place the other foot next to the board transport handle 1d.
Stand on the board with your legs apart, preferably to the right and left of the board transport handle 1d.
Now kneel all the way down, slightly back, whilst picking the paddle up horizontally (Fig. L5).
Now slowly stand up; the paddle will help you maintain your balance. You are standing on the board with your legs apart (Fig. L6) and can start to paddle.
Correct paddling technique (Fig. M):
Note: The top arm holding the paddle handle should always remain straight whilst paddling.
☐ Insert the paddle in the water directly next to the board 1 as far forward as possible (Fig. M1). The lower arm holding the paddle at about shoulder width is also straight (Fig. M2).
☐ With the top arm straight, pull the paddle toward you with the bottom arm (Fig. M3). Bend the bottom arm in the process. Pull the paddle out of the water at about your feet (M4). Repeat the process.
- Transport
Do not transport the inflated board on vehicles.
Backpack 10:
☐ All accessories can be stored in the backpack 10 for transport or storage.
Disassemble the product per chapter Disassembling the product".
☐ Ensure it is completely clean, dry and rolled up.
Place the board and all individual parts and accessories stored inside the drybag 8 in the backpack 10 (maximum weight capacity: 25 kg).
Drybag 8:
Note: Please note, the drybag 8 is not water-proof. Do not store delicate objects, e.g. cameras, in it.
Store the smaller accessories in the drybag 8.
☐ Close the hook-and-loop fastener.
☐ Fold the hook-and-loop fastener twice.
☐ Close the drybag tight with the strap and buckle.
Storage
Store the product in a dry, dust-free location, protected from direct sunlight, where it will not be exposed to extreme temperature fluctuations.
If the product will not be used for extended periods, we recommend possibly storing the board 1 flat and slightly inflated.
■ Store the product in a safe location, out of the reach of children.
Do not place heavy or sharp objects on the board 1.
Do not drag the product over hard and abrasive surfaces before storing it.
Ensure there is no sand or gravel in the folds of the board 1. This could cause abrasion or holes during storage.
Check the product for wear or ageing after it has been stored for an extended period.
Storing the board rolled up in cold weather for extended periods can cause tears in the material.
- Cleaning and care
Do not use aggressive cleaning agents, brushes with metal or nylon bristles or sharp or metal objects such as knives.
Only use mild cleaning agents.
□ Clean the board after every use, with the valve needle 1b closed.
Remove the US [fiə] per chapter "Removing the US fin".
Place the board on a clean, dry and even surface.
☐ Rinse the board and US fin 12 with fresh water and mild soap to remove salt crystals, grains of sand and other particles.
Wipe the board down with a dry, soft cloth. Then allow the board 1 and US fin 12 to dry thoroughly.
● Repair and maintenance
■ For your pay repairs in
a well ventilated location and avoid inhaling toxic fumes. Avoid contact with the skin or the eyes. Keep all repair supplies (glue, solvent, etc.) out of the reach of children.
■ A WARNING of the seams. The seams can only be repaired by the manufacturer of the board 1.
■ Never repair large holes yourself. You can repair small holes with the included repair kit.
Check the board for pressure loss, holes or tears before every use. If air escapes from the board 1, it may be due to a leaking valve 1a, defective valve 1a or a hole in the actual board 1.
- Repairing the valve
Proceed as follows to check valves 1a for leaks:
Turn the valve ddp anti-clockwise and remove it from the valve 1a.
☐ Ensure there is no sand or other foreign objects in the valve 1a.
Close the valve needle.
Turn the valve code anti-clockwise and remove it from the valve 1a.
Place the valve wrench over the valve 1a until it covers the entire valve 1a.
Tighten the valve cdp, turning clockwise.
☐ Close the valve with the valve cap 1e.
□ Fully inflate the board.
Close the valve.
Pour soapy water over the area around the valve 1a. If bubbles do not form, the valve 1a is tight. If bubbles form around the valve 1a, air is escaping. The valve 1a either needs to be tightened or replaced.
Tightening the valve 1a (Fig. D):
WARNING! Never use the valve wrench 11 to tighten the valve 1a if the board 1 is pressurised. Injuries may otherwise occur.
Place the valve wrench over the valve 1a until it covers the entire valve 1a. Tighten the valve 1a, turning clockwise.
Repeat the bubble test.
If bubbles form around the valve after tightening, it needs to be replaced.
Replacing the 1a valve (Fig. D):
Place the valve wrench over the valve 1a until it covers the entire valve.
□ Unscrew the valve cdp anti-clockwise and remove the defective valve 1a from the valve seat.
Insert a new valve in the valve seat. For the best seal, we recommend applying a small amount of silicone grease or petroleum jelly around the valve 1a.
Place the valve wrench over the valve 1a and tighten, turning clockwise.
Note: If the valve leaks and tightening with the valve wrench 11 does not help, completely remove the top of the valve 1a with the valve wrench 11. Remove any dirt from the valve membrane. Verify the valve 1a is tight after screwing it in.
- Repairing the board
Before using the product on water after making repairs, verify the repair patch 7 is air tight and seals properly. Never attempt to repair large damaged areas yourself. Take the product to a speciality shop.
Detecting holes:
Coat the area on the board you suspect has a hole with soapy water. Bubbles will form where air is escaping the board 1.
☐ Mark the respective area.
☐ Rinse the board with clear water and wipe dry before starting the repair.
Patching holes:
Only repair holes with suitable glue. Glue is included. Using the wrong adhesive for repairs can cause further damage. You can also purchase suitable adhesive from speciality retailers.
Once you have located the hole(s), release all of the air from the board 1.
☐ Thoroughly clean the area to be repaired.
Dry the cleaned area.
☐ Measure and cut a repair patch 7 large enough to cover 1.5 cm around the damaged area.
Note: If you're able to, ensure the surface around the damaged area and the repair patch 7 is absolutely free from grease.
Apply an even coat of glue to the surface around the damaged area and the actual repair patch 7.
Allow the glue to dry for approx. 3-4 minutes (at temperatures of about 20-25 °C).
Place the repair patch on the surface of the board with the adhesive surfaces facing.
Press the repair patch onto the board 1 with a heavy object.
Note: Be sure to work on an even surface without kinks or creases. Use a rounded object to carefully smooth out any bubbles, working from the middle outward.
Allow the glue to dry for at least 12 hours.
Once dry, apply more adhesive along the edge of the repair patch 7. The glue only needs to dry for approx. 4 hours along this seam.
● Maintaining the air pump
■ Ensure the air pump is greased well before and after use.
To grease the air pump, open the cap at the top and apply a thin coat of oil or grease to the sealed areas and lines. Be sure to use acid-free silicone oil.
●Disposal
The packaging is made entirely of recyclable materials, which you may dispose of at local recycling facilities.
Contact your local refuse disposal authority for more details of how to dispose of your worn-out product.
●Service
GB Service Great Britain
Tel.: 08000569216
E-Mail: owim@lidl.co.uk
IE Service Ireland
Tel.:1800200736
E-Mail: owim@lidl.ie
Introduction......Page 32
Leeg laten lopen (afb. C):
DE nader moment WAARSCHUWING!
natural_image
Gray circular warning symbol with an exclamation mark in the center (no text or symbols)Ogólne znaki nakazu
Ogólne znaki zakazu
natural_image
Simple black stick figure drawing a bow with wavy lines above, enclosed in a rounded square frame (no text or symbols)natural_image
Prohibition sign with a person on a boat crossing over water, no text or symbols present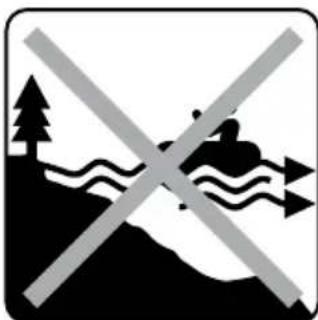
natural_image
Symbolic warning sign with a cross over a landscape featuring trees and water (no text or numbers present)
natural_image
Prohibition sign with a person on water and a flag, crossed by a diagonal line (no text or symbols)
natural_image
Symbolic warning sign with a cross over a landscape featuring trees, water, and a person (no text or numbers present)

natural_image
Simple black stick figure drawing a bow with water ripple above (no text or symbols)
natural_image
Silhouette of a person using a laptop (no text or symbols)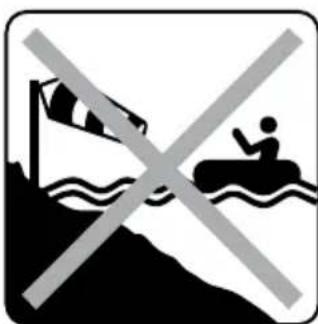
natural_image
Symbolic warning sign with no text, featuring a person in a boat crossing over water and a flag (no text present)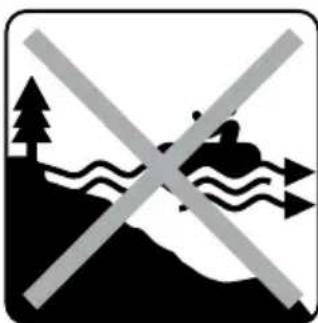
natural_image
Symbolic warning sign with crossed lines and landscape elements (no text)Vaciar el aire (fig. C):
natural_image
Black and white graphic with a crossed-out 'X' symbol over a wave-like shape, no text or symbols present.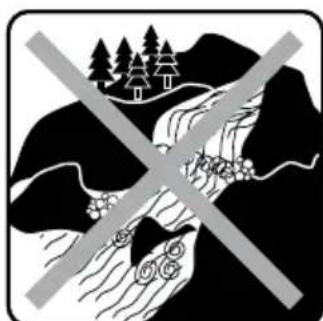
natural_image
Black-and-white pictogram showing a cross over a river with pine trees in the background (no text or symbols)Tømme for luft (afb. C):
natural_image
Silhouette of a person in a boat navigating water with a flag, marked with a 150 m scale indicator (no text or symbols beyond the scale)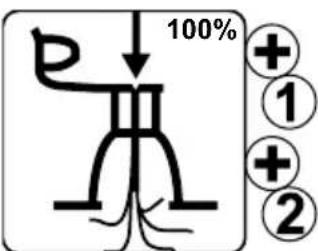
natural_image
Black and white graphic with a crossed-out wave and a cross symbol (no text or numbers)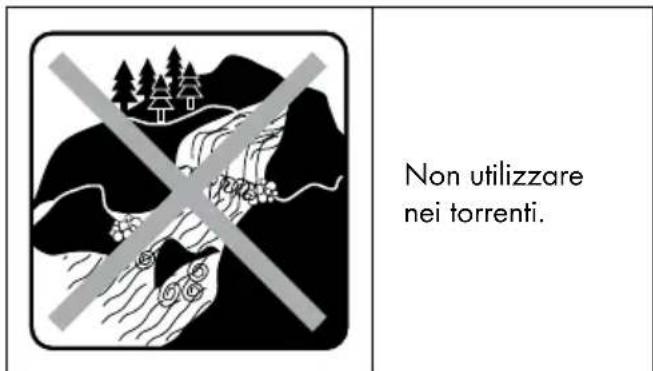
Scaricare l'aria (Fig. C):
natural_image
Prohibition sign with a person in a boat crossing over water, no text or symbols present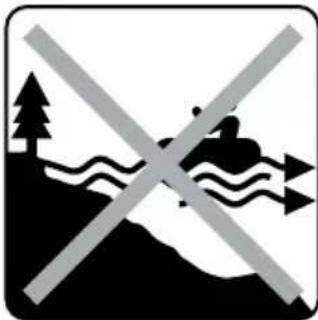
natural_image
Symbolic warning sign with a cross over a landscape featuring trees, water, and a person (no text or numbers present)

natural_image
Prohibition sign with a person on a boat crossing over water, no text or symbols present
natural_image
Symbolic warning sign with crossed-out arrow and landscape elements (no text)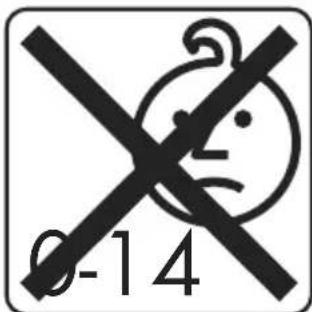
 | Samo za plavalce! |
 150 kg (330 lbs.) 150 kg (330 lbs.) | Maksimalna nosilnost. |
 | Maksimalna nosilnost |
 | Dovoljen delovni tlak: 1 bar, 15 psi |
 | Varna razdalja do obale: 150 m |
flowchart
graph TD
    A["1. Laparoscopic"] --> B["2. Rectangular Placement"]
    B --> C["3. Folded Back"]
    C --> D["4. Rear view"]
    D --> E["5. Top-down view with 15th place"]
OWIM GmbH & Co. KG
Stiftsbergstraße 1
74167 Neckarsulm
GERMANY
Model-No.: HG06954
Version: 01 / 2022
MISTRAL is the owner of the Mistral Trademarks;
Mistral Trademarks are used with the permission
of MISTRAL under a license www.mistral.com