
AC09BK - Air conditioner LG - Free user manual and instructions
Find the device manual for free AC09BK LG in PDF.
| Product Type | Wall-mounted air conditioner |
| Brand | LG |
| Model | AC09BK |
| Refrigerant Type | R32 (flammable) |
| Operating Modes | Cooling, Heating (depending on model), Dehumidification, Fan, Auto |
| Jet Mode Function | Rapid cooling or heating for 30 minutes |
| Comfort Air Function | Airflow deflection to avoid direct draft |
| UVnano Function | Reduction of bacteria inside the unit (depending on model) |
| Air Purification Function | Ionizer or plasma (depending on model) |
| Quiet Mode Function | Reduction of outdoor unit noise (depending on model) |
| Energy Control | Reduction of power consumption (steps 1 to 3) |
| Timer | Programmable on/off, sleep |
| Remote Control | Wireless, AAA batteries, time setting |
| Air Filter Cleaning | Every 2 weeks (washable with warm water) |
| Anti-allergen Filter Cleaning | Every 6 months (vacuum or brush, do not wash) |
| Ionizer Cleaning | Every 6 months (dry cotton) |
| Smartphone App | LG ThinQ (Wi-Fi 2.4 GHz) |
| Smart Diagnosis | Diagnosis via app or sound |
| Safety | Flammable refrigerant – precautions for use |
| Power Supply | Dedicated outlet with grounding, circuit breaker |
Frequently Asked Questions - AC09BK LG
User questions about AC09BK LG
0 question about this device. Answer the ones you know or ask your own.
Ask a new question about this device
Download the instructions for your Air conditioner in PDF format for free! Find your manual AC09BK - LG and take your electronic device back in hand. On this page are published all the documents necessary for the use of your device. AC09BK by LG.
USER MANUAL AC09BK LG
In order to use the product safely and conveniently, please read the owner's manual before using the product.
ENGLISH
TYPE: WALL MOUNTED
TABLE OF CONTENTS
This manual may contain images or content that may be different from the model you purchased.
This manual is subject to revision by the manufacturer.
SAFETY INSTRUCTIONS
READ ALL INSTRUCTIONS BEFORE USE....3
WARNING INSTRUCTIONS ....4
CAUTION INSTRUCTIONS 9
OPERATION
Before Use 11
Product Overviews....12
Preparation before Operation....13
Wireless Remote Control Overview 15
Using Wireless Remote Control 19
Special Functions Overview ....31
Using Special Functions ....32
SMART FUNCTIONS
LG ThinQ Application....34
Diagnosis Using LG ThinQ 35
MAINTENANCE
Cleaning 37
TROUBLESHOOTING
Before Calling for Service....42
SAFETY INSTRUCTIONS
READ ALL INSTRUCTIONS BEFORE USE
The following safety guidelines are intended to prevent unforeseen risks or damage from unsafe or incorrect operation of the appliance. The guidelines are separated into 'WARNING' and 'CAUTION' as described below.
Safety Messages
This symbol is displayed to indicate matters and operations that can cause risk.
Read the part with this symbol carefully and follow the instructions in order to avoid risk.
This indicates that the failure to follow the instructions can cause serious injury or death.
This indicates that the failure to follow the instructions can cause the minor injury or damage to the product.


WARNING

CAUTION
Notes for Flammable Refrigerant
The following symbols are displayed on units.

This symbol indicates that this appliance uses a flammable refrigerant. If the refrigerant is leaked and exposed to an external ignition source, there is a risk of fire.

This symbol indicates that the Owner's Manual should be read carefully.

This symbol indicates that service personnel should be handling this equipment with reference to the Installation Manual.

This symbol indicates that information is available in the Owner's Manual or Installation Manual.
WARNING INSTRUCTIONS

WARNING
- To reduce the risk of explosion, fire, death, electric shock, injury or scalding to persons when using this product, follow basic precautions, including the following:
Technical Safety
- This appliance can be used by children aged from 8 years and above and persons with reduced physical, sensory or mental capabilities or lack of experience and knowledge if they have been given supervision or instruction concerning use of the appliance in a safe way and understand the hazards involved. Children shall not play with the appliance. Cleaning and user maintenance shall not be made by children without supervision.
- Installation or repairs made by unauthorized persons can pose hazards to you and others.
- The information contained in the manual is intended for use by a qualified service technician who is familiar with the safety procedures and equipped with the proper tools and test instruments.
- Failure to read and follow all instructions in this manual can result in equipment malfunction, property damage, personal injury and/or death.
- The refrigerant and insulation blowing gas used in the appliance require special disposal procedures. Consult a service agent or a similarly qualified person before disposing of them.
- When the power cord is to be replaced, the replacement work shall be performed by authorized personnel using only genuine replacement parts.
- If the supply cord is damaged, it must be replaced by the manufacturer, its service agent or similarly qualified person in order to avoid a hazard.
- The appliance shall be installed in accordance with national wiring regulations.
- Means for disconnection must be incorporated in the fixed wiring in accordance with the wiring rules.
- This appliance must be properly grounded to minimize risk of electric shock.
- Do not cut or remove the grounding prong from the power plug.
- Attaching the earth wire to the power outlet cover screw does not ground the appliance unless the cover screw is metal, uninsulated, and the power outlet is grounded through house wiring.
- If you have any doubt whether the air conditioner is properly grounded, have the power outlet and circuit checked by a qualified electrician.
Installation
- Contact an authorized service centre when installing or relocating the air conditioner.
-
Do not install the air conditioner on an unstable surface or in a place where there is danger of it falling.
-
Do not install the unit in potentially explosive atmospheres.
- Do not install the air conditioner in a place where flammable liquids or gases such as gasoline, propane, paint thinner, etc., are stored.
• Install the panel and the cover of the control box safely.
• Install a dedicated electric outlet and circuit breaker before using the air conditioner. - Use standard circuit breaker and fuse that conform to the rating of the air conditioner.
- Make sure that the pipe and the power cable connecting the indoor and outdoor units are not pulled too tight when installing the air conditioner.
- The indoor/outdoor wiring connections must be secured tightly, and the cable should be routed properly so that there is no force pulling the cable from the connection terminals. Improper or loose connections can generate heat or cause a fire.
- Do not connect the ground wire to a gas pipe, a lightning rod, or a telephone ground wire.
- Use non-flammable gas (nitrogen) to check for leaks and to purge air; using compressed air or flammable gas may cause fire or explosion.
Operation
- Do not modify or extend the power cable. Scratches or peeling insulation on the power cables may result in fire or electric shock, and should be replaced.
- Make sure that the power cable is neither dirty, loose, nor broken.
- Do not place any objects on the power cable.
- Do not place a heater or other heating appliances near the power cable.
• Take care to ensure that the power cable could not be pulled out or damaged during operation. - Never touch, operate, or repair the air conditioner with wet hands.
-
Do not insert hands or other objects through the air inlet or outlet while the air conditioner is operating.
-
Make sure that children do not climb on or hit the outdoor unit.
- Be sure to use only those parts listed in the service parts list. Never attempt to modify the equipment.
- Do not touch the refrigerant pipe, water pipe or any internal parts while the unit is operating or immediately after operation.
- Do not leave flammable substances such as gasoline, benzene, or thinner near the air conditioner.
- Do not use the air conditioner for an extended period of time in a small place without proper ventilation.
- Be sure to ventilate sufficiently when the air conditioner and a heating appliance such as a heater are used simultaneously.
- Do not block the inlet or outlet of airflow.
- Cut off the power supply if there is any noise, smell, or smoke coming from the air conditioner.
- Contact an authorized service centre when the air conditioner is submerged by flood waters.
- In the event of a gas leak (such as Freon, propane gas, LP gas, etc.) ventilate sufficiently before using the air conditioner again.
- Cut off the power supply immediately in the event of a blackout or a thunderstorm.
Remote Control
- Remove the batteries if the remote control is not to be used for an extended period of time.
- Never mix different types of batteries, or old and new batteries for the remote control.
- Do not recharge or disassemble the batteries.
- Stop using the remote control if there is a fluid leak in the battery. If your clothes or skin is exposed to the leaking battery fluid, wash off with clean water.
- If the leaking battery fluid has been swallowed, rinse the inside of the mouth thoroughly and consult a doctor.
- Dispose of the batteries in a place where there is no danger of fire.
Maintenance
- Before cleaning or performing maintenance, disconnect the power supply and wait until the fan stops.
- Do not clean the appliance by spraying water directly onto the product.
Refrigerant
General
- Use only the refrigerant specified on the air conditioner label.
- Do not use uncertified refrigerants.
- Do not input air or gas into the system except the specified refrigerant.
- Do not touch the leaking refrigerant during installation or repair.
- Be sure to check for refrigerant leaks after installing or repairing the air conditioner.
- The appliance shall be stored so as to prevent mechanical damage from occurring.
R32 Only
- Any person who is involved with working on or breaking into a refrigerant circuit should hold a current valid certificate from an industry-accredited assessment authority, which authorizes their competence to handle refrigerants safely in accordance with an industry recognized assessment specification.
- Servicing shall only be performed as recommended by the equipment manufacturer. Maintenance and repair requiring the assistance of other skilled personnel shall be carried out under the
supervision of the person competent in the use of flammable refrigerants.
- The appliance shall be stored in a well-ventilated area where the room size corresponds to the room area as specified for operation.
- Keep any required ventilation openings clear of obstruction.
- The appliance shall be stored in a room without continuously operating open flames (for example an operating gas appliance) and ignition sources (for example an operating electric heater).
CAUTION INSTRUCTIONS
CAUTION
- To reduce the risk of minor injury to persons, malfunction, or damage to the product or property when using this product, follow basic precautions, including the following:
Installation
- Transport the air conditioner with two or more people or use a forklift.
• Install the outdoor unit such that it is protected from direct sunlight. Do not place the indoor unit in a place where it is directly exposed to sunlight via the windows. - Do not install the air conditioner in an area where it is directly exposed to sea wind (salt spray).
- Install the drain hose properly for the smooth drainage of water condensation.
• Install the air conditioner in a place where the noise from the outdoor unit or the exhaust fumes will not inconvenience the neighbours. Failure to do so may result in conflict with the neighbours. - Safely dispose of packing materials such as screws, nails, plastic bags or batteries using proper packaging after installation or repair.
• Exercise caution when unpacking or installing the air conditioner.
Operation
- Make sure that the filter is installed before operating the air conditioner.
- Do not drink the water drained from the air conditioner.
- Do not place any object on the air conditioner.
- Do not let the air conditioner run for a long time when humidity is very high or when a door or a window has been left open.
- Do not expose people, animals, or plants to the cold or hot wind from the air conditioner for extended periods of time.
- Do not use the product for special purposes, such as preserving foods, works of art, etc. the air conditioner is designed for consumer purposes, and is not a precision refrigeration system. There is risk of damage or loss of property.
Maintenance
- Use a sturdy stool or ladder when cleaning, maintaining, or repairing the air conditioner at a height.
- Never use strong cleaning agents or solvents or spray water when cleaning the air conditioner. Use a soft cloth.
- Never touch the metal parts of the air conditioner when removing the air filter.
• To clean the interior, contact an authorized service centre or dealer. Using harsh detergents may cause corrosion or damage to the unit.
OPERATION
Before Use
Notes for Operation
- Adjust the direction of the airflow vertically or horizontally to circulate indoor air.
- Speed up the fan to cool or warm indoor air quickly, within a short period of time.
- Turn off the appliance and periodically open windows for ventilation. The indoor air quality may deteriorate if the appliance is used for long durations.
- Clean the air filter once every 2 weeks. Dust and impurities collected in the air filter may block the airflow or reduce the appliance performance.
Suggestions for Energy Saving
- Do not over-cool the space. This may be harmful for your health and may consume more electricity.
- Block sunlight with blinds or curtains while you are operating the appliance.
- Keep doors or windows closed tightly while you are operating the appliance.
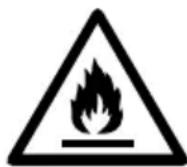
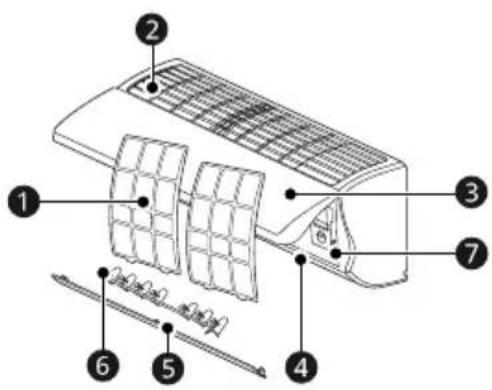
Product Overviews
Wall Mounted
Type 1 Type 2
1 Air Filter
② Air Intake Vents
3 Front Cover
4 Air Outlet Vents
⑤ Air Deflector (Up-Down Vane)
6 Air Deflector (Left-Right Louver)
⑦ Power Button
NOTE
- The number and location of parts may vary depending on the model of the appliance.
- Features may change depending on the model type.
Preparation before Operation
Inserting the Batteries into the Wireless Remote Control
Insert AAA (1.5 V) batteries into the wireless remote control.
- Remove the battery cover, then insert the new batteries and make sure that the + and - terminals of the batteries are installed correctly.

natural_image
Diagram showing a battery cell being placed on its left and then on its right, with no text or symbols present.NOTE
- When the wireless remote control display begins to fade, replace AAA (1.5 V) batteries.
- Do not use old and new batteries together.
- Do not use batteries other than alkaline.
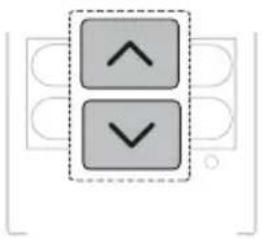
Setting the Current Time on the Wireless Remote Control
1 Insert batteries.
- The icon below flashes at the bottom of the display screen.
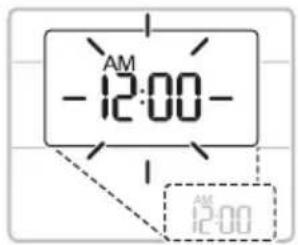
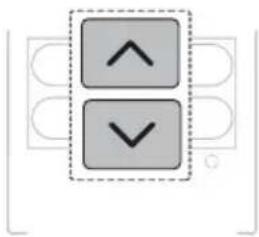
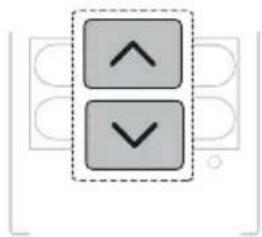
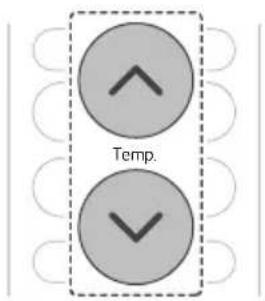
2 Press the ▲ or ▼ button to set the correct time.

natural_image
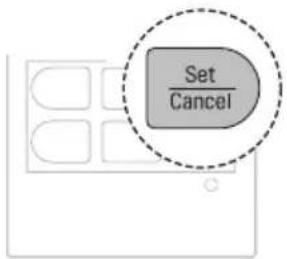
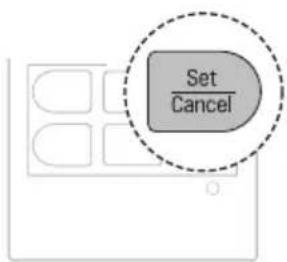
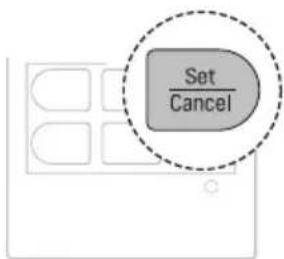
Two gray directional arrows (up and down) inside a dashed box, no text or symbols present.3 Press the Set/Cancel button to stop the flashing.
NOTE
- The On Timer and Off Timer is available after setting the current time.
- If you have already inserted the battery, reinsert it or use the Reset button to set the current time.
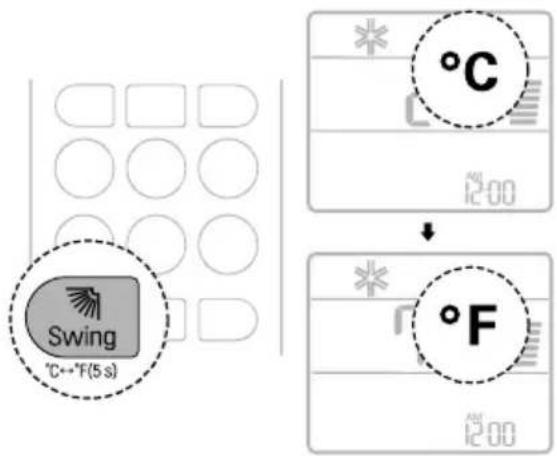
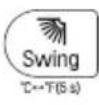
Selecting Fahrenheit or Celsius (On Some Models)
Set the temperature display to show either Fahrenheit (°F) or Celsius (°C) units.
1 Turn the appliance on.
2 Press and hold the Up-Down Swing button for about 5 seconds, to change units between °C and °F
Wireless Remote Control Overview
Wireless Remote Control
You can operate the appliance more conveniently with the wireless remote control.
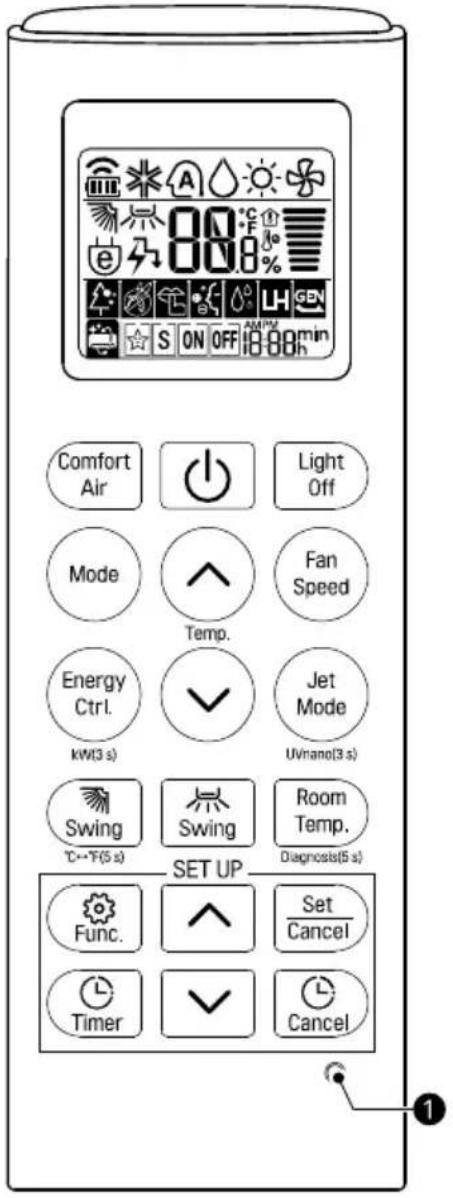
Buttons
| Image Description | Available Function | ||
| Single Split Multi | |||
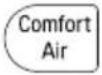 | Comfort Air | ○ | ○ |
 | |||
| Adjusts the airflow to deflect wind. You can avoid direct winds. | |||
 | POWER | ○ | ○ |
| Turns the appliance on or off. | |||
 | Light Off | ○ | ○ |
| Turns the indoor unit display on or off. | |||
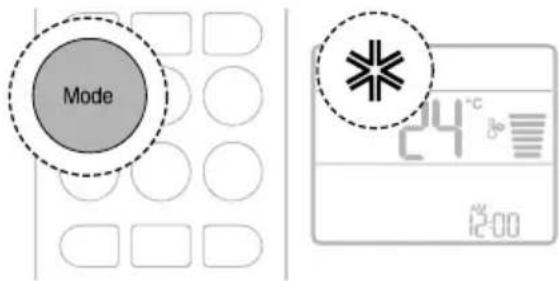
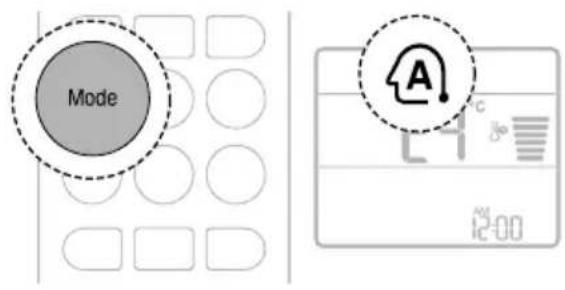
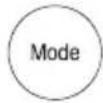 | Mode | ○ | ○ |
| Selects the desired operating mode. | |||
 | |||
| [2×4×2] Cooling mode | |||
| [5×20T] Auto changeover mode / Auto operation mode *1 It automates the process of choosing the right settings for your space. | |||
| [SAD0] Dehumidification mode | |||
| [S×2×N] Heating mode (on some models) | |||
| [×0×0] Fan mode | |||
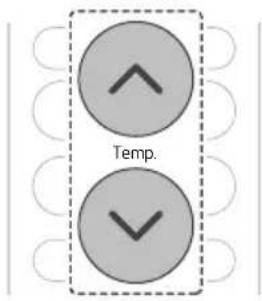
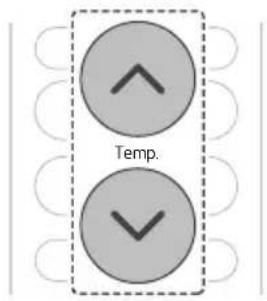
 | Temperature Adjust | ○ | ○ |
| Adjusts the desired room temperature. | |||
 | |||
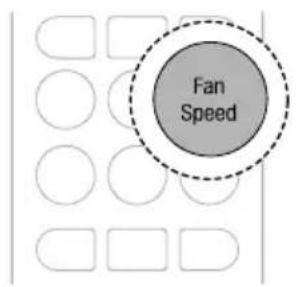
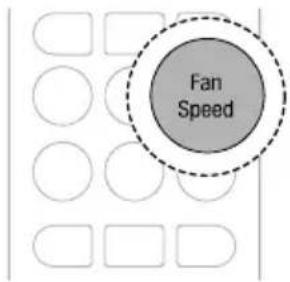
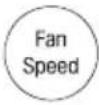 | Fan Speed | ○ | ○ |
 | |||
| Adjusts the fan speed. | |||
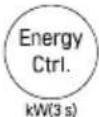 | Energy Ctrl. | ○ | |
 | |||
| Decrease the power input. You can control energy consumption. | |||
| kW(3 s) | ○ | ||
| Press and hold the Energy Ctrl. button for about 3 seconds to set whether or not to display information regarding energy. | |||
 | Jet Mode | ○ | ○ |
| Changes the room temperature quickly. | |||
| UVnano(3 s) | ○ | ○ | |
| Press and hold the Jet Mode button for about 3 seconds to keeps the fan clean. | |||
 | Up-Down Swing | ○ | ○ |
| Adjusts the airflow direction up and down. | |||
| °C← °F(5 s) | ○ | ○ | |
| Press and hold the Up-Down Swing button for about 5 seconds, to change units between °C and °F | |||
 | Left-Right Swing | ○ | ○ |
| Adjusts the airflow direction left and right. | |||
 | Room Temp. | ○ | ○ |
| Displays the room temperature. | |||
| Diagnosis(5 s) | ○ | ||
| Press and hold the Room Temp. button for about 5 seconds, to easily check the maintenance information of an appliance. | |||
 | Func. | ○ | ○ |
| Selects the desired function. | |||
| Time Adjust | ○ | ○ | |
 | Adjusts the time of day or set time on the display. | ||
 | |||
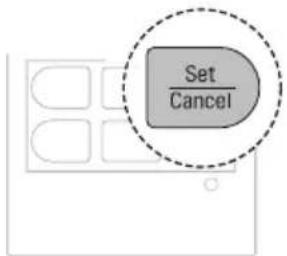
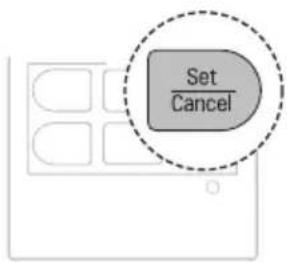
| Set/Cancel | ○ | ○ | |
 | Sets or cancels the special functions and timer. | ||
| Timer | ○ | ○ | |
 | Automatically turns the appliance on or off at a desired time. | ||
| Cancel | ○ | ○ | |
 | Cancels the timer settings. | ||
| 1 RESET | ○ | ○ | |
| Resets the wireless remote control settings. | |||
NOTE
- Some functions may not be supported, depending on the model.
- When connected to the Multi Outdoor unit, the Energy Display, Energy Control, Silent and Smart Diagnosis functions may not be supported.
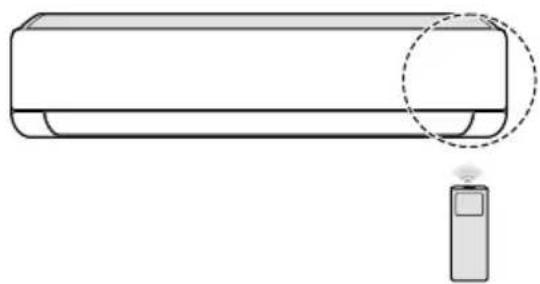
Using Wireless Remote Control
Operating with the Wireless Remote Control
Point the wireless remote control towards the signal receiver at the right side of the appliance to operate it.
natural_image
Line drawing of a car air conditioner with a sensor attached (no text or symbols)NOTE
- The wireless remote control may operate other electronic devices if it is directed towards them. Make sure to point the wireless remote control towards the appliance signal receiver.
- For proper operation, use a soft cloth to clean the signal transmitter and receiver.
- If a function included on the remote is not supported on the appliance, the appliance may not indicate this by buzzing. Exceptions include the Adjusting the Left-Right Direction, Energy Display and Air Purification functions.
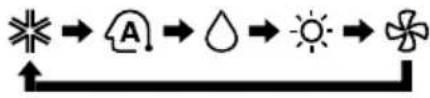
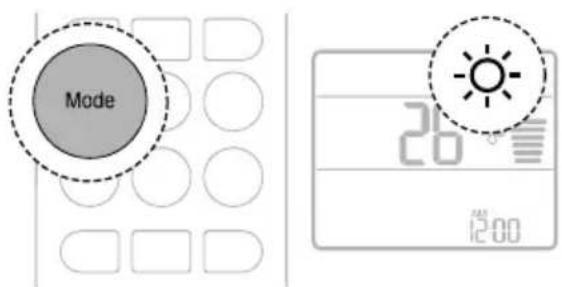
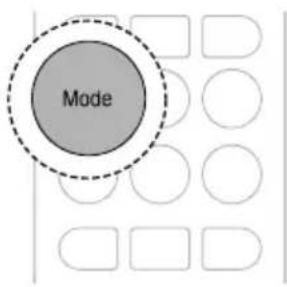
Operating Mode
You can change the operating mode when the appliance is turned on.
1 Turn the appliance on.
2 Press the Mode button repeatedly to change the operating mode.
Cooling Only Model
Cooling and Heating Model
flowchart
graph LR
    A["★"] --> B[" hat "]
    B --> C[" droplet "]
    C --> D[" sun "]
    D --> E[" flower "]

Cooling mode

Auto operation mode / Auto changeover mode
*1 It automates the process of choosing the right settings for your space.

Dehumidification mode

Heating mode

Fan mode
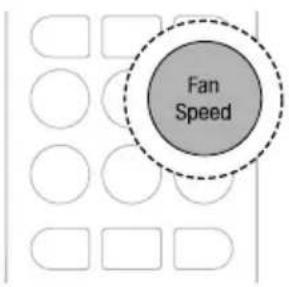
Adjusting the Fan Speed
You can adjust the fan speed by pressing the Fan Speed button repeatedly.
| Speed | Wireless Remote Control Icon | Indoor Unit Icon |
| High |  | F5 |
| Medium - High |  | F4 |
| Medium |  | F3 |
| Medium - Low |  | F2 |
| Low |  | F1 |
| Auto - |  |
NOTE
- The Auto fan speed setting adjusts the speed automatically.
- The indoor unit icons are displayed on some indoor units.
- The indoor unit display shows the fan speed icons for only 5 seconds and returns to the set temperature.
Cooling Mode
1 Turn the appliance on.
2 Press the Mode button repeatedly to select the Cooling mode.
3 Press the ⏻ or ⏻ button to set the target temperature.
Auto Mode
Auto Operation (Artificial Intelligence) Mode
[Cooling Only Model]
You can keeps the room temperature closer to the set temperature. The appliance will automatically change the temperature and fan speed.
1 Turn the appliance on.
2 Press the Mode button repeatedly to select the Auto Operation mode.
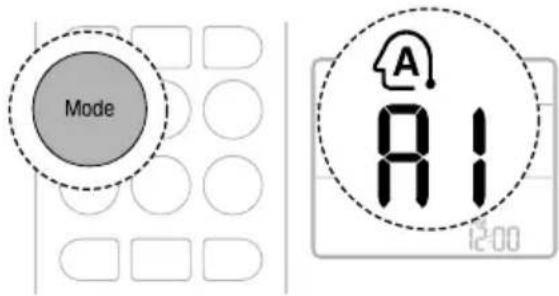
3 Press the ⬤ or ⬇ button to select the desired operation code if the temperature is higher or lower than the target temperature.
| Code Description | |
| 2 | The appliance sets the target temperature to a level higher than the current temperature. |
| 1 | The appliance sets the target temperature to a level slightly higher than the current temperature. |
| 0 | The appliance maintains the current temperature. |
| -1 | The appliance sets the target temperature to a level slightly lower than the current temperature. |
| -2 | The appliance sets the target temperature to a level lower than the current temperature. |
NOTE
- You cannot adjust the fan speed, but you can set the air deflector to rotate automatically.
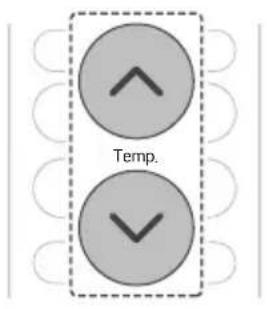
Auto Changeover Mode
[Cooling and Heating Model]
The appliance will automatically set the operation mode to Cooling or Heating depending on the room temperature. You can set the target temperature and fan speed. The temperature is maintained the target temperature within ±2 ^ .
1 Turn the appliance on.
2 Press the Mode button repeatedly to select Auto Changeover mode.
3 Press the ⏻ or ⏻ button to set the target temperature.
4 Press the Fan Speed button to adjust the fan speed.
Dehumidification Mode
You can reduce excess moisture from a highly humid environment or during the rainy season, in order to prevent mildew from setting in. The appliance will automatically change the temperature and the fan speed to maintain the optimal level of humidity.
1 Turn the appliance on.
2 Press the Mode button repeatedly to select the Dehumidification mode.
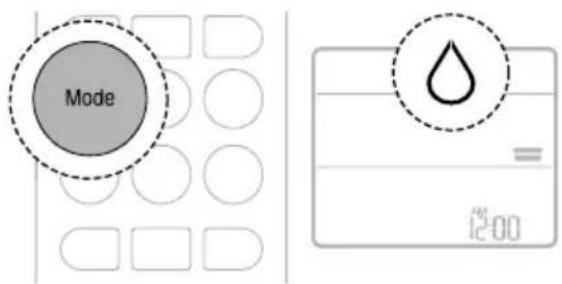
NOTE
- You cannot adjust the room temperature. It is adjusted automatically.
- The room temperature is not displayed on the display screen.
- In the Dehumidification mode, compressor and indoor fan may not operate, to prevent excessive cooling.
Heating Mode (On Some Models)
1 Turn the appliance on.
2 Press the Mode button repeatedly to select the Heating mode.
3 Press the ⬇ or ⬇ button to set the target temperature.

NOTE
- ♂ will be displayed on some indoor unit under the following conditions:
- When the outdoor unit is Defrosting mode.
- When the outdoor unit is Preheating mode.
- When the room temperature has reached the set temperature.
Fan Mode
You can circulate the indoor air without changing the room temperature.
1 Turn the appliance on.
2 Press the Mode button repeatedly to select the Fan mode.
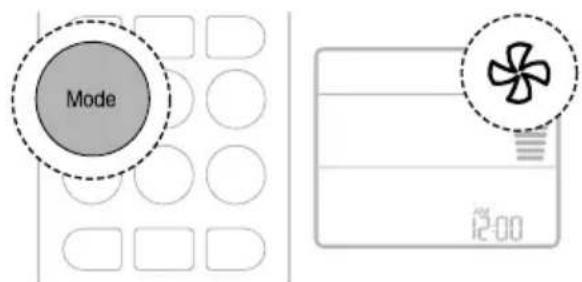
3 Press the Fan Speed button to adjust the fan speed.
NOTE
- On or ⏻ is displayed on some indoor units.
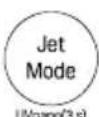
Jet Mode
You can change the room temperature quickly.
- Cooling Only model
The Jet mode is available with the Cooling, Dehumidification, Fan, Auto Operation modes and Air Purification function.
• Cooling & Heating model
The Jet mode is available with the Cooling, Heating and Dehumidification modes.
1 Turn the appliance on.
2 Press the Modebutton repeatedly to select the desired mode.
3 Press the Jet Mode button.
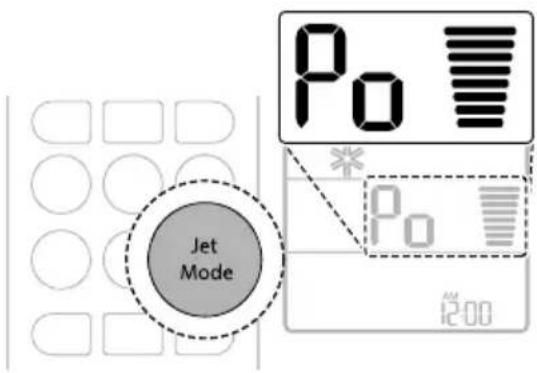
NOTE
- Jet Cooling Mode
The strong cool air blows out for 30 minutes. After 30 minutes, the temperature is maintained at 18 °C by default.
- To change the temperature, press the ⬤ or ⬇ button to set the target temperature.
- Jet Heating Mode
The strong warm air blows out for 30 minutes. After 30 minutes, the temperature is maintained at 30 °C by default.
- To change the temperature, press the ⬤ or ⬇ button to set the target temperature.
- The Jet Heating mode is not available on some models.
- Jet mode may operate differently from the wireless remote control display.
Adjusting the Airflow Direction
You can adjust the direction of the airflow vertically or horizontally.
Adjusting the Up-Down Direction
- Press the Up-Down Swing button repeatedly to adjust airflow direction.

- Select 📄 to adjust the up-down direction of the airflow automatically.
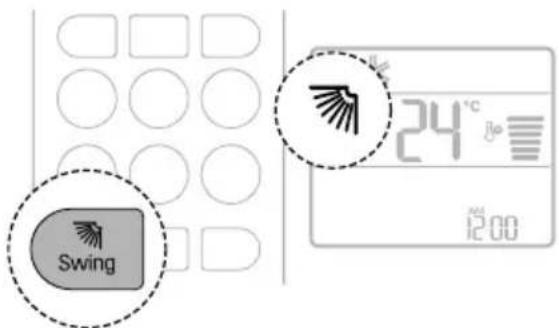
Adjusting the Left-Right Direction
- Press the Left-Right Swing button repeatedly to adjust airflow direction.

- Select 是 to adjust the left-right direction of the airflow automatically.

NOTE
- Adjusting the Left-Right Direction function may not be supported, depending on the model.
- Adjusting the air deflector arbitrarily may cause appliance failure.
- When restarted, the appliance uses the last set airflow direction. The position of the air deflector may not match the icon displayed on the wireless remote control. When this occurs, press the Up-Down Swing or Left-Right Swing button to adjust the direction of the airflow again.
- This function may operate differently from the wireless remote control display.
Comfort Air Function (On Some Models)
You can conveniently set the vane to a preset position to deflect the supply air away from blowing directly onto the occupants in the room.
1 Turn the appliance on.
2 Press the Comfort Air button repeatedly and select the desired direction.
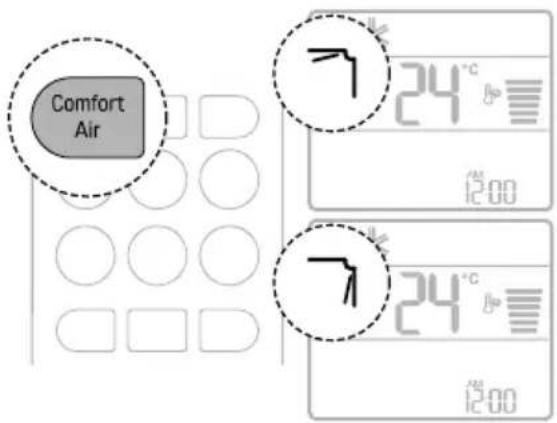
NOTE
- ^7 or L_- is displayed on some indoor units.
- This function is disabled when you press the Mode or Jet Mode button.
- This function is disabled and Adjusting the Up-Down Direction function is set up when you press the Up-Down Swing button.
- When this function is off, the up-down vane operates automatically depending on the set mode.
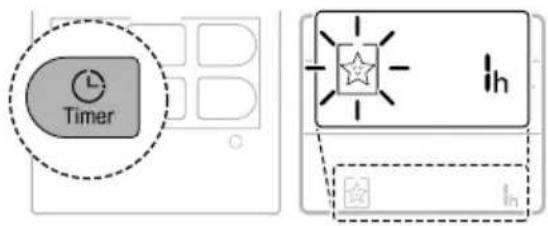
On and Off Timer
You can set the appliance to turn on and off automatically at a desired time.
The On Timer and Off Timer can be set together.
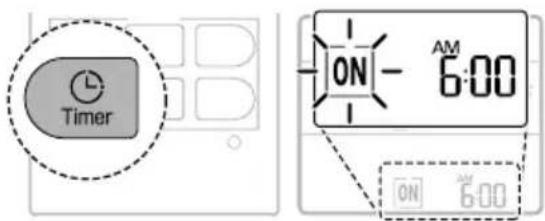
Setting the On Timer
This function can be set when the appliance is turned on or off.
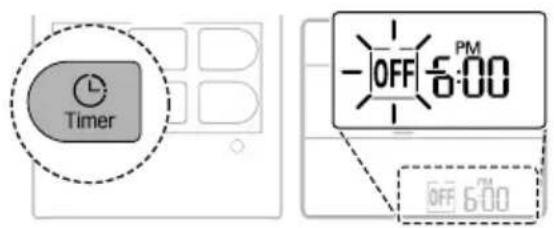
1 Press the Timer button repeatedly.
- The icon below flashes at the bottom of the display screen.
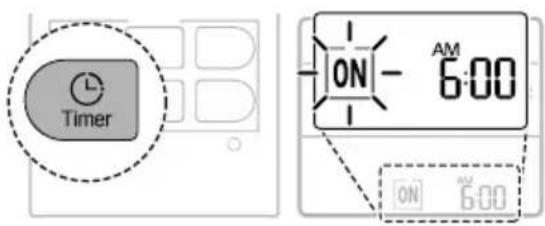
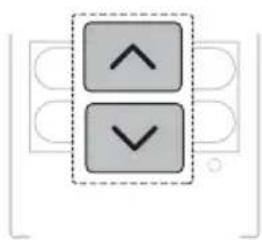
2 Press the □ or ▼ button to set the desired time.
natural_image
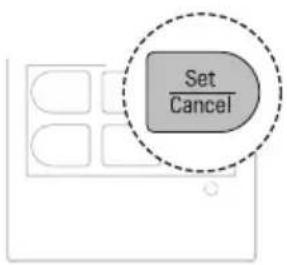
Two gray directional arrows (up and down) inside a dashed box, no text or symbols present3 Press the Set/Cancel button to stop the icon from flashing.
- After setting the timer, the current time and On Timer icon are displayed on the display screen indicating that the desired time is set.
Cancelling the On Timer
1 Press the Timer button repeatedly.
- The icon below flashes at the bottom of the display screen.
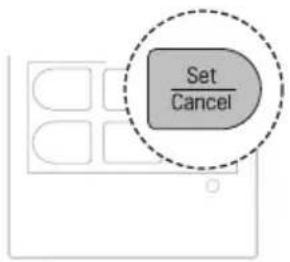
2 Press the Set/Cancel button to cancel the setting.

Setting the Off Timer
This function can be set when the appliance is turned on or off.
1 Press the Timer button repeatedly.
- The icon below flashes at the bottom of the display screen.
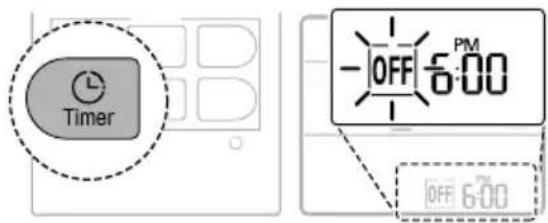
2 Press the ▲ or ▼ button to set the desired time.
natural_image
Two gray square buttons with upward and downward arrows, enclosed in a dashed border (no text or symbols)3 Press the Set/Cancel button to stop the icon from flashing.
- After setting the timer, the current time and Off Timer icon are displayed on the display screen indicating that the desired time is set.
Cancelling the Off Timer
1 Press the Timer button repeatedly.
- The icon below flashes at the bottom of the display screen.
2 Press the Set/Cancel button to cancel the setting.
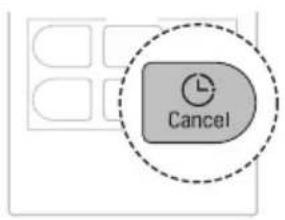
Cancelling the Timer Setting
- Press the Cancel button to cancel all timer settings.
Sleep Function (On Some Models)
You can set the appliance to turn off automatically after a set time. The appliance will automatically change the temperature and fan speed.
This function can be set when the appliance is turned on.
1 Turn the appliance on.
2 Press the Timer button repeatedly.
- The icon below flashes at the bottom of the display screen.
3 Press the ▲ or ▼ button to set the desired time.
• The time can be set up to 7 hours.
natural_image
Two gray square buttons with upward and downward arrows, enclosed in a dashed border (no text or symbols)4 Press the Set/Cancel button to stop the icon from flashing.
- The Sleep function icon is displayed on the display screen.
NOTE
• IH is displayed on some indoor units.
- Indoor unit display shows the set time from 1H to 7H for only 5 seconds and then returns to the set temperature on some indoor units.
- In the Cooling and Dehumidification mode, the temperature increases by 1 °C after 30 minutes and an additional 1 °C after another 30 minutes for a more comfortable sleep. The temperature increases up to 2 °C from the preset temperature.
- Although the remark for fan speed on the display screen may be changed, the fan speed is adjusted automatically.
Light Off Function (On Some Models)
You can set the brightness of the indoor unit display screen.
- Press the Light Off button.
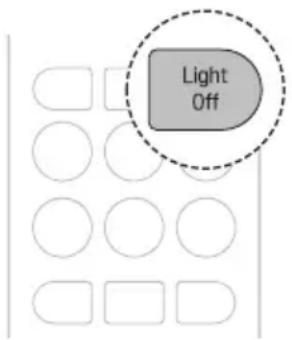
NOTE
- The button turns the display screen on or off.
- If the brightness of an indoor unit's display is set to off, pressing a button on the wireless remote control automatically turns the display on for a while.
- This function may operate differently depending on the model.
Energy Display Function (On Some Models)
You can see the amount of electricity generated on the indoor display as the appliance operates.
Display the Current Energy Usage
The instantaneous power consumption is displayed for a while on some indoor units, depending on the model.
1 Turn the appliance on.
2 Press and hold the Energy Ctrl. button for about 3 seconds.
- The button name varies by model.
Display the Cumulative Energy Usage
The cumulative power consumption is displayed for a while on some indoor units, depending on the model.
1 Turn the appliance on.
2 Press and hold the Energy Ctrl. button for about 3 seconds twice.
- The button name varies by model.
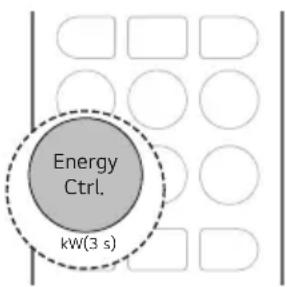
NOTE
- The unit of the displayed value is kW.
- It is not displayed on the wireless remote control.
- kW refers to instantaneous power consumption.
- kWh refers to cumulative power consumption.
- Values above 99 kW(h) are displayed as 99 kW(h) due to display limitations.
• Power off resets its value. - Wattage under 10 kW(h) displays in 0.1 kW(h) units and over 10 kW(h) in 1 kW(h) units.
NOTE
- The actual power may differ from the power displayed.
Energy Control Function (On Some Models)
You can decrease the power input.
1 Turn the appliance on.
2 Press the Energy Ctrl. button repeatedly to select the desired step.
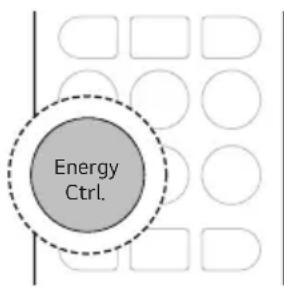
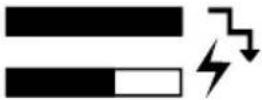
| Step | Display Screen | Description |
| 1 |  | The power Input is decreased by 20% compared to rated power input. |
| 2 |  | The power Input is decreased by 40% compared to rated power input. |
| 3(on some models) |  | The power Input is decreased by 60% compared to rated power input. |
NOTE
- 80, 60, 40 or L (step 1), LL (step 2) is displayed on some indoor units.
-
This function is available with Cooling mode.
-
Capacity may decrease when the Energy Control function is selected.
- The target temperature is displayed for about 5 seconds if you press the Fan Speed, ⏠ or ⏰ button.
- The room temperature is displayed for about 5 seconds if you press the Room Temp. button.
UVnano Function (On Some Models)
UVnano is a compound word of UV (ultraviolet rays) and nanometer (length unit).
This function reduces various bacteria inside the appliance.
Model name: LTPL-G35UV275GS-JA LTPL-G35U275GS-TWA CUD7GF1A
- Press and hold the Jet Mode button for about 3 seconds.
NOTE
- UV is displayed on some indoor units, depending on the model.
- The UV LED operates at regular intervals to keep the fan clean.
- The UVnano function stops when the air conditioner is turned off.
- When Auto Clean Function starts, UVnano Function works together to keep the fan clean.
- This function is disabled with Heating Mode.
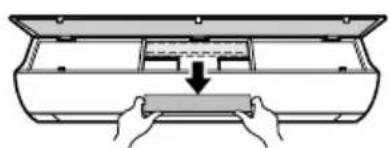
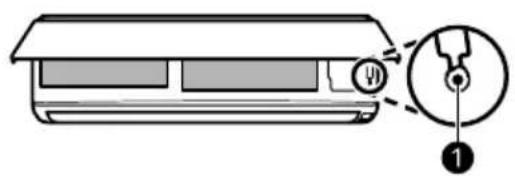
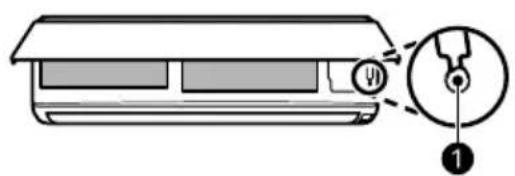
Manual Operation
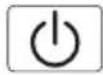
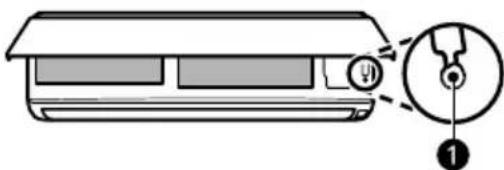
If your wireless remote control is unavailable, you can turn the appliance on and off by pressing the Power button ① on the indoor unit.
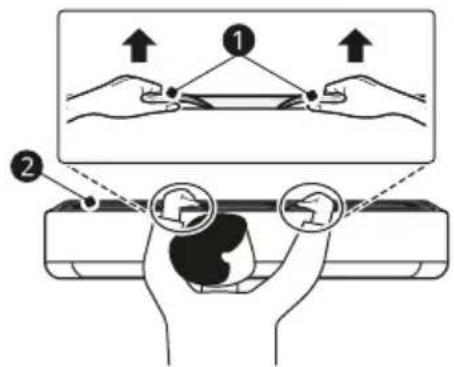
1 Open the up-down vane (Type 1) or front cover (Type 2).
2 Press the Power button ①.
Type 1
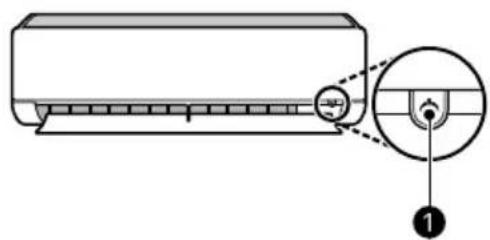
Type 2
NOTE
- The stepping motor may be broken, if the up-down vane opens rapidly.
• The fan speed is set to high by default. - Features may change depending on the model type.
- The temperature cannot be altered when using the Power button ①.
- For Cooling-Only models, the temperature is set to 22 °C by default.
- For Cooling and Heating models, the temperature is set between 22 °C and 24 °C by default.
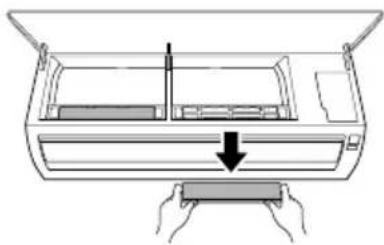
Restoring the Previous Settings
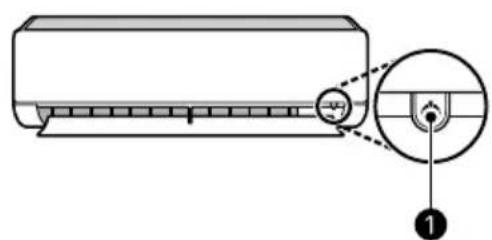
When the air conditioner is turned on again after a power failure, Auto Restart function restores the previous settings.
When using the appliance for the first time, Auto Restart function is set. You can cancel and set this function by pressing the Power button ① on the indoor unit.
Cancelling Auto Restart
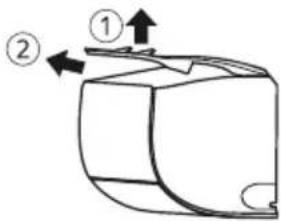
1 Open the up-down vane (Type 1) or front cover (Type 2).
2 Press and hold the Power button ① for 6 seconds.
3 When the appliance beeps twice, release the Power button ①. The lamp will flash twice. This repeats 4 times.
Setting Auto Restart
1 Open the up-down vane (Type 1) or front cover (Type 2).
2 Press and hold the Power button ① for 6 seconds.
3 When the appliance beeps twice, release the Power button ①. The lamp will flash. This repeats 4 times.
Type 1
Type 2

NOTE
- The feature may change depending on the model type.
- If you press and hold the Power button ① for 3 – 5 seconds, instead of 6 seconds, the appliance will switch to the test operation. In the test operation, the appliance blows out strong cooling air for 18 minutes and then returns to factory default settings.
Special Functions Overview
Special Functions

| Icon Description | |
 | Air Purification FunctionsThe Ion generator uses millions of ions to help improve indoor air quality. |
 | Silent FunctionReduces noise from outdoor units. |
 | Auto Clean FunctionReduces moisture generated inside the indoor unit. |
NOTE
- Some functions may not be supported, depending on the model.
- Some functions may operate differently from the wireless remote control display.
Using Special Functions
Setting and Cancelling Special Functions
Setting the Special Functions
1 Turn the appliance on.
2 Press the Func. button repeatedly to select the desired function.
3 Press the Set/Cancel button to finish.
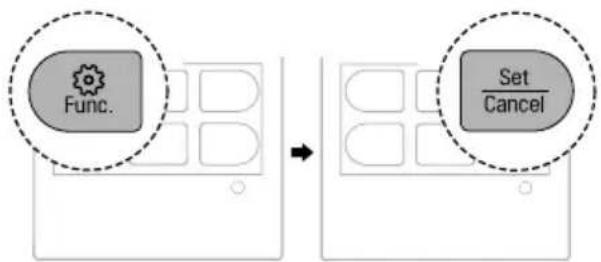
flowchart
graph LR
    A["Func."] --> B["Set/Cancel"]
Cancelling the Special Functions
1 Press the Func. button repeatedly to select the desired function.
2 Press the Set/Cancel button to cancel the function.
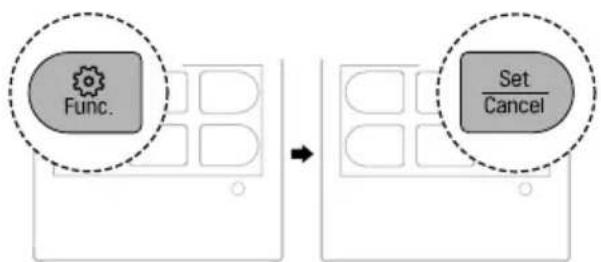
flowchart
graph LR
    A["Func."] --> B["Set/Cancel"]
Air Purification Functions (On Some Models)
You can supply clean and fresh air using ion particles and the filter.

Function Description
| Ionizer | Ion particles from Ionizer reduce the surface bacteria and other harmful substances. |
| Plasma | Reduces microscopic contaminants from the intake air completely to supply clean and fresh air. |
WARNING
- Do not touch the ionizer during operation.
NOTE
- You can use this function without turning the appliance on.
- Both the plasma lamp and the cooling lamp light up on some models.
- This function may operate differently from the wireless remote control display.
Silent Function (On Some Models)
You can reduce the noise of the outdoor unit so that it will not inconvenience neighbours.
NOTE
- This function is disabled when you press the Mode, Energy Ctrl. or Jet Mode button.
- This function is available with the Cooling, Heating, Auto Changeover and Auto Operation modes.
Auto Clean Function (On Some Models)
In the Cooling and Dehumidification modes, moisture is generated inside the indoor unit. You can reduce that moisture.
NOTE
- Some functions cannot be used while the Auto Clean function is in operation.
- When UVnano function is set, Auto Clean function works together.
- If you turn off the appliance, the fan continues to run for 30 minutes to clean the inside of the indoor unit.
- is displayed on some indoor units, depending on the model.
SMART FUNCTIONS
LG ThinQ Application
This feature is only available on models with Wi-Fi. The LG ThinQ application allows you to communicate with the appliance using a smartphone.
LG ThinQ Application Features
Common features
Communicate with the appliance from a smartphone using the LG ThinQ application.
- Smart Diagnosis
- If you experience a problem while using the appliance, this smart diagnosis feature will help you diagnose the problem.
Additional features
More features are available if your appliance is connected to Wi-Fi.
- Settings
- Allows you to set various options on the appliance and in the application.
NOTE
- In the following cases, you must update the network information for each appliance in the LG ThinQ application under Device Cards → Settings → Change Network.
- wireless router is changed
- wireless router password is changed
-
Internet service provider is changed
-
The application is subject to change for appliance improvement purposes without notice to users.
- Functions may vary by model.
Installing LG ThinQ Application and Connecting an LG Appliance
Models with QR Code
Scan the QR code attached to the product using the camera or a QR code reader application on your smartphone.

Models without QR Code
1 Search for and install the LG ThinQ application from the Google Play Store or Apple App Store on a smartphone.
2 Run the LG ThinQ application and sign in with your existing account or create an LG account to sign in.
3 Touch the add (+) button on the LG ThinQ application to connect your LG appliance. Follow the instructions in the application to complete the process.
NOTE
- To verify the Wi-Fi connection, check that the Wi-Fi indicator on the control panel is lit.
-
The appliance supports 2.4 GHz Wi-Fi networks only. To check your network frequency, contact your Internet service provider or refer to your wireless router manual.
-
LG ThinQ is not responsible for any network connection problems or any faults, malfunctions, or errors caused by network connection.
- The surrounding wireless environment can make the wireless network service run slowly.
- If the distance between the appliance and the wireless router is too far, the signal strength becomes weak. It may take a long time to connect or installation may fail.
- If the appliance is having trouble connecting to the Wi-Fi network, it may be too far from the router. Purchase a Wi-Fi repeater (range extender) to improve the Wi-Fi signal strength.
- The network connection may not work properly depending on the Internet service provider.
- The Wi-Fi connection may not connect or may be interrupted because of the home network environment.
- The appliance cannot be connected due to problems with the wireless signal transmission. Unplug the appliance and wait about a minute before trying again.
- If the firewall on your wireless router is enabled, disable the firewall or add an exception to it.
- The wireless network name (SSID) should be a combination of English letters and numbers. (Do not use special characters.)
- Smartphone user interface (UI) may vary depending on the mobile operating system (OS) and the manufacturer.
- If the security protocol of the router is set to WEP, you may fail to set up the network. Please change it to other security protocols (WPA2 is recommended) and connect the product again.
Radio Equipment Specifications
| Module Name LCWB-001 | |
| Wireless LAN Frequency Range | 2412 MHz - 2472 MHz |
| Wireless LAN Output Power (Max) | 18.14 dBm |
| Module Name LCWB-001 | |
| Bluetooth Frequency Range | 2402 MHz - 2480 MHz |
| Bluetooth Output Power (Max) | 7.03 dBm |
Wireless function S/W version: V 1.0
For consideration of the user, this device should be installed and operated with a minimum distance of 20 cm between the device and the body.
Open Source Software Notice Information
To obtain the source code that is contained in this product, under GPL, LGPL, MPL, and other open source licenses that have the obligation to disclose source code, and to access all referred license terms, copyright notices and other relevant documents, please visit https://opensource.lge.com.
LG Electronics will also provide open source code to you on CD-ROM for a charge covering the cost of performing such distribution (such as the cost of media, shipping, and handling) upon email request to opensource@lge.com.
This offer is valid to anyone in receipt of this information for a period of three years after our last shipment of this product.
Diagnosis Using LG ThinQ
Use this feature to help you diagnose and solve problems with your appliance.
NOTE
- For reasons not attributable to LGE's negligence, the service may not operate due to external factors such as, but not limited to, Wi-Fi unavailability, Wi-Fi disconnection, local app store policy, or application unavailability.
- The feature may be subject to change without prior notice and may have a different form depending on where you are located.
Using LG ThinQ to Diagnose Issues
If you experience a problem with your Wi-Fi equipped appliance, it can transmit troubleshooting data to a smartphone using the LG ThinQ application.
- Launch the LG ThinQ application and select the Smart Diagnosis feature in the menu. Follow the instructions provided in the LG ThinQ application.
Using Audible Diagnosis to Diagnose Issues
Follow the instructions below to use the audible diagnosis method.
- Launch the LG ThinQ application and select the Smart Diagnosis feature in the menu. Follow the instructions for audible diagnosis provided in the LG ThinQ application.
1 Plug the power plug in the outlet properly.
2 Place the mouthpiece of your smartphone close to the appliance.
3 Press and hold the Room Temp. button for 5 seconds or longer while holding the smartphone mouthpiece to the appliance until the data transfer is complete.
- Keep the smartphone in place until the data transfer has finished.
4 After the data transfer is complete, the diagnosis will be displayed in the application.
NOTE
- For best results, do not move the phone while the tones are being transmitted.
- Be sure to keep ambient noise to a minimum or the phone may not correctly receive the buzzer beeps from the indoor unit.
MAINTENANCE
Cleaning
WARNING
- Before cleaning or performing maintenance, disconnect the power supply and wait until the fan stops.
Cleaning Interval
Cleaning the Appliance
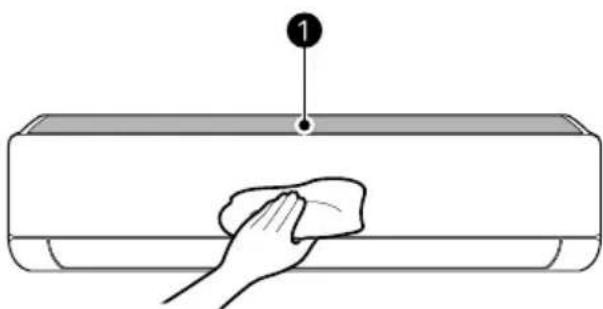
If the appliance will not be used for an extended period of time, dry the appliance to maintain it in the best condition. Clean the appliance regularly to maintain optimal performance and to prevent possible breakdown.
- Dry the appliance in Fan mode for 3 to 4 hours and disconnect the power. There may be internal damage if moisture is left in the appliance's components.
- Before using the appliance again, dry the inner components of the appliance in Fan mode for 3 to 4 hours. This will help to reduce the odour generated from moisture.
natural_image
Line drawing of a hand cleaning a rectangular appliance with a cloth (no text or symbols)① Air Filter
NOTE
- The feature may vary depending on the model type.
Type Description Interval
Indoor unit Clean the surface of the indoor unit using a soft, dry cloth. Regularly
Have a professional clean the condensate drain pan. Once a year
Have a professional clean the condensate drain pipe. Every 4 months
Replace the wireless remote control batteries. Once a year
| Type Description Interval | ||
| Outdoor unit Have a professional clean the heat exchanger coils and the panel vents. (Consult with technician.) | Once a year | |
| Have a professional clean the fan. Once a year | ||
| Have a professional clean the condensate drain pan. Once a year | ||
| Have a professional verify that all the fan assembly is firmly tightened. | Once a year | |
| Clean the electrical components with compressed air. Once a year | ||
Cleaning the Filter and Other parts
| Type Description Interval | ||
| Air filter Clean with a vacuum or hand wash. 2 weeks | ||
| Allergy filter Clean with a vacuum or brush. Every 6 months | ||
| Ionizer (on some models) | Use a dry cotton ball to reduce dust. | Every 6 months |
NOTE
- Never use water that is higher than 40 °C when you clean the filters. It may cause deformation or discolouration.
- Never use volatile substances when you clean the filters. They may damage the surface of the appliance.
- Do not wash the Allergy filter with water, because the filter can be damaged (on some models).
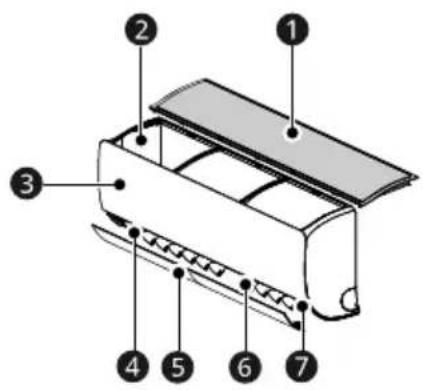
Removing and Replacing the Air Filter
NOTE
- Do not bend the air filter, as it may break.
- Assemble the air filter properly to prevent dust and other substances from entering the appliance.
- The number and location of hooks may vary depending on the model of the appliance.
Type 1
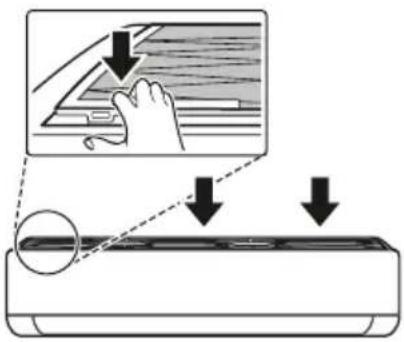
1 Turn off the power to the appliance.
2 Locate the knobs of the air filter on the top front of the appliance.
① Knobs
② Air Filter
3 Pull the knobs upward slightly and then lift the entire filter to remove it.
4 Insert the hooks on the air filter into the slots on the back of the front panel.

5 Push the hooks down until they click into place.

6 To make sure the filter is assembled properly, press down along the entire front length of the filter.
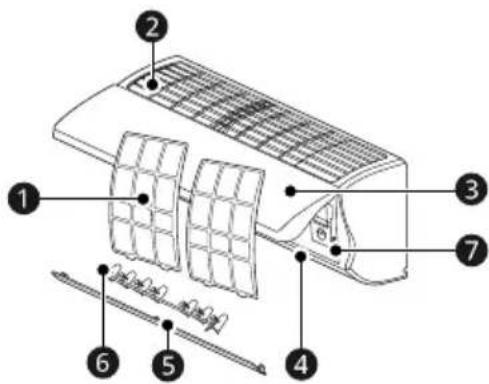
Type 2
1 Turn off the power to the appliance.
2 Open the front cover.
- Lift up both sides of the cover slightly.
3 Holding the knobs of the air filters, pull them down slightly and remove them from the indoor unit.
natural_image
Diagram of a car air conditioner unit with hand and down arrows indicating airflow direction (no text or symbols)4 Insert the hooks on the air filters into the front cover.

natural_image
Diagram of an air conditioner unit with airflow direction indicated by arrows (no text or symbols)5 Check the side of the front cover to make sure that the air filters are assembled correctly.
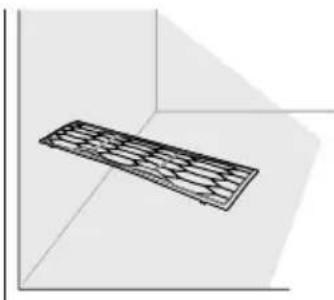
Cleaning the Air Filter
Clean the air filter once every 2 weeks, or more if needed.
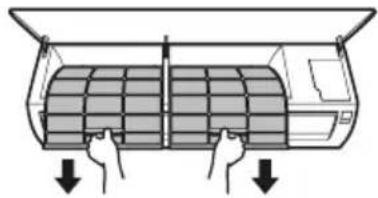
1 Remove the air filter from the appliance.
2 Clean the air filter with a vacuum cleaner or wash it with lukewarm water and a mild detergent.
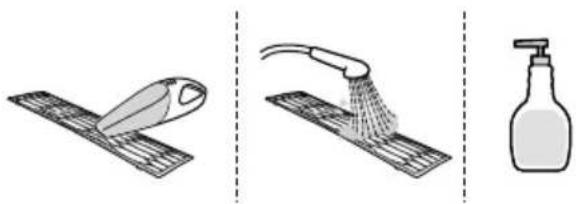
natural_image
Three-step illustration showing a hairpin, a showerhead spraying water, and a spray bottle (no text or symbols)3 Dry the filter in the shade.

natural_image
3D diagram of a rectangular prism with internal grid pattern, no text or symbols presentNOTE
- Do not operate the appliance without the filter in place.
Cleaning the Air Cleaning Filter (On Some Models)
NOTE
- The number and location of parts may vary depending on the model of the appliance.
- Features may change depending on the model type.
Type 1
1 Turn off the power to the appliance.
2 Remove the air filter from the indoor unit.
3 Remove the air cleaning filter from the indoor unit.
natural_image
Diagram showing hands installing a component into a device casing (no text or symbols present)4 Clean the filter using a vacuum cleaner.
5 Insert the air cleaning filter.

natural_image
Diagram of hands pressing a rectangular object into a container (no text or symbols)6 Assemble the air filter.
7 Check the side of the front cover to make sure that the air filter are assembled correctly.
Type 2
1 Turn off the power to the appliance.
2 Remove the air filters from the indoor unit.
3 Remove the air cleaning filter from the indoor unit.
natural_image
Diagram of hands installing a component into an air conditioner unit (no text or symbols)4 Clean the filter using a vacuum cleaner.
5 Insert the air cleaning filter.

natural_image
Diagram of a printer or printer with hands holding a rectangular object, showing internal components and an upward arrow (no text or symbols)6 Assemble the air filters.
7 Check the side of the front cover to make sure that the air filters are assembled correctly.
TROUBLESHOOTING
Before Calling for Service
Please check the following before you contact the service centre. If the problem persists, contact your local service centre.
NOTE
- Some functions may not be supported, depending on the model.
Self-Diagnosis Function
This appliance has a built-in self-diagnosis function. If an error occurs, the lamp of the indoor unit will flash in 2-second intervals. If this occurs, contact your local dealer or service centre.
Operation
| Symptoms Possible Cause & Solution | |
| The appliance does not work normally. | Burning smell and strange sounds are coming from the appliance.Turn off the appliance, switch off or disconnect the power supply, and contact the service centre. |
| Water leaks from the indoor unit even when the humidity level is low.Turn off the appliance, switch off or disconnect the power supply, and contact the service centre. | |
| The power cable is damaged or it is generating excessive heat.Turn off the appliance, switch off or disconnect the power supply, and contact the service centre. | |
| A switch, a circuit breaker (safety, ground) or a fuse is not operating properly.Turn off the appliance, switch off or disconnect the power supply, and contact the service centre. | |
| The appliance generates an error code from its self-diagnosis.Turn off the appliance, switch off or disconnect the power supply, and contact the service centre. | |
| The fan speed cannot be adjusted. | The Jet mode or Auto Operation mode is selected.In some operating modes, you cannot adjust the fan speed. Select an operating mode in which you can adjust the fan speed. |
| The temperature cannot be adjusted. | The Fan mode or Jet mode is selected.In some operating modes, you cannot adjust the temperature. Select an operating mode in which you can adjust the temperature. |
| The appliance stops during operation. | The appliance is suddenly turned off.The Off Timer function may have timed out, which turns the appliance off. Check the timer settings. |
| A power failure has occurred during operation.Wait for the power to come back on. If you have the Auto Restart function enabled, your appliance will resume its last operation several minutes after power is restored. | |
| The appliance does not work. | The appliance is unplugged.Check whether the power cord is plugged into the outlet or the power isolators are switched on. |
| A fuse exploded or the power supply is blocked.Replace the fuse or check if the circuit breaker has tripped. | |
| A power failure has occurred.Turn off the appliance when a power failure occurs.When the power is restored, wait 3 minutes, and then turn on the appliance. | |
| The voltage is too high or too low.Check if the circuit breaker has tripped. | |
| The appliance was turned off automatically at a preset time.Turn the appliance on. | |
| The battery setting in the wireless remote control is incorrect.Make sure that the batteries are inserted correctly in your wireless remote control.If the batteries are placed correctly, but the appliance still does not operate, replace the batteries and try again. | |
| The appliance does not emit cool air. | Air is not circulating properly.Make sure that there are no curtains, blinds, or pieces of furniture blocking the front of the appliance. |
| The air filter is dirty.Clean the air filter once every 2 weeks.See Cleaning the Air Filter" for more information. | |
| The room temperature is too high.In summer, cooling the indoor air fully may take some time. In this case, select the Jet mode to cool the indoor air quickly. | |
| Cold air is escaping from the room.Make sure that no cold air is escaping through the ventilation points in the room. | |
| The appliance does not emit cool air. | The target temperature is higher than the current temperature.· Set the target temperature to a level lower than the current temperature. |
| There is a heating source nearby.· Avoid using heat generators like electric ovens or gas hobs while the air conditioner is in operation. | |
| Fan mode is selected.· During Fan mode, air blows from the appliance without cooling or heating the indoor air.· Switch the operating mode to cooling operation. | |
| Outside temperature is too high.· The cooling effect may not be sufficient. | |
Performance
| Symptoms Possible Cause & Solution | |
| The indoor unit is still operating even when the appliance has been turned off. | The Auto Clean function is being operated.Allow theAuto Cleanfunction to continue since it reduces any remaining moisture inside the indoor unit. If you do not want this function, you can turn the indoor unit off. |
| The air outlet on the indoor unit is discharging mist. | The cooled air from the appliance makes mist.When the room temperature decreases, this phenomenon will disappear. |
| Water leaks from the outdoor unit. | In the heating operations, condensed water drops from the heat exchanger.This requires that a drain hose should be installed under the base pan.Contact the installer. |
| There is noise or vibration. | A clicking sound can be heard when the appliance starts or stops due to movement of the reversing valve.Creaking sound: The plastic parts of the indoor unit creak when they shrink or expand due to sudden temperature changes.Flowing or blowing sound: This is the flow of refrigerant through the appliance.Noise is normal during or after operation. It is not a sign of malfunction. |
| The indoor unit gives off an odour. | Odour (such as cigarette smoke) may be absorbed into the indoor unit and discharged with airflow.If the smell does not disappear, you need to wash the filter. If this does not work, contact the service centre to clean your heat exchanger. |
| The appliance does not emit warm air. | When the Heating mode starts, the vane is almost closed, and no air comes out, even though the outdoor unit is operating.This is normal. Please wait until the appliance has generated enough warm air to blow through the indoor unit. |
| The outdoor unit is in Defrosting mode, the vane is almost closed, and no air comes out, even though the outdoor unit is operating.InHeatingmode, ice and frost is built up on the coils when the outside temperature falls. TheDefrostingmode reduces a layer of frost on the coil, and it should finish in approximately 15 minutes. | |
| Outside temperature is too low.The heating effect may not be sufficient. | |
Wi-Fi
| Symptoms Possible Cause & Solution | |
| Your home appliance and smartphone are not connected to the Wi-Fi network. | The password for the Wi-Fi that you are trying to connect to is incorrect.· Find the Wi-Fi network connected to your smartphone and remove it, then register your appliance on LG ThinQ. |
| Mobile data for your smartphone is turned on.· Turn off the Mobile data of your smartphone and register the appliance using the Wi-Fi network. | |
| The wireless network name (SSID) is set incorrectly.· The wireless network name (SSID) should be a combination of English letters and numbers. (Do not use special characters.) | |
| The router frequency is not 2.4 GHz.· Only a 2.4 GHz router frequency is supported. Set the wireless router to 2.4 GHz and connect the appliance to the wireless router. To check the router frequency, check with your Internet service provider or the router manufacturer. | |
| The distance between the appliance and the router is too far.· If the distance between the appliance and the router is too far, the signal may be weak and the connection may not be configured correctly. Move the location of the router so that it is closer to the appliance. | |
Memo
Memo

LG
natural_image
Diagram showing a battery casing being placed on its side, with an arrow indicating the process (no text or symbols present)ЗАБЕЛЕЖКА
natural_image
Two gray directional arrows (up and down) inside a dashed box, no text or symbols present.ЗАБЕЛЕЖКА
natural_image
Diagram of a horizontal air conditioner with a remote control unit shown, no text or symbols presentЗАБЕЛЕЖКА
ЗАБЕЛЕЖКА
natural_image
Two gray square buttons with upward and downward arrows, enclosed in a dashed border (no text or symbols)natural_image
Simple diagram with two gray arrows pointing up and down, enclosed in a dashed box (no text or symbols)ЗАБЕЛЕЖКА
ЗАБЕЛЕЖКА
Тип 2

ЗАБЕЛЕЖКА
Тип 2

ЗАБЕЛЕЖКА
flowchart
graph LR
    A["Func."] --> B["Set/Cancel"]
flowchart
graph LR
    A["Func."] --> B["Set/Cancel"]
natural_image
Illustration of a hand cleaning a rectangular appliance with a cloth (no text or symbols)① Въздушен филтър
ЗАБЕЛЕЖКА
Тип 2
natural_image
Diagram of a car air conditioner unit with hand placement arrows indicating cooling zone (no text or symbols)natural_image
Diagram of an air conditioner unit with airflow direction indicated by arrows (no text or symbols)natural_image
Three-step illustration showing a kitchen tool, a shower spraying water, and a spray bottle (no text or symbols)natural_image
3D diagram of a rectangular object with internal grid pattern, placed in a corner (no text or symbols)ЗАБЕЛЕЖКА
natural_image
Diagram of hands installing a component into a tray inside a container (no text or symbols)natural_image
Diagram of hands pressing a rectangular object into a container (no text or symbols)natural_image
Diagram of hands installing a component into a device (no text or symbols visible)natural_image
Diagram of a hand pressing down on a device component with an arrow indicating motion (no text or symbols present)natural_image
Diagram showing two views of a battery pack before and after assembly, with no visible text or symbols.NAPOMENA
- Kada displej bežičnog daljinskog upravljača počne blijediti, zamijenite AAA (1,5 V) baterije.
- Nemojte istovremeno koristiti stare i nove baterije.
- Ne koristite baterije osim alkalnih.
2 Za postavljanje tačnog vremena pritisnite dugme ▲ ili ▼.
natural_image
Two gray square buttons with upward and downward arrows, enclosed in a dashed border (no text or symbols)3 Pritisnite dugme Set/Cancel (Postavi/otkaži) kako biste zaustavili bljeskanje.
NAPOMENA
- Tajmer za uključivanje i Tajmer za isključivanje su dostupni nakon podešavanja trenutnog vremena.
- Ako ste već stavili bateriju, izvadite je i ponovo stavite ili pomoću dugmeta Reset postavite trenutno vrijeme.
Biranje Farenhajte ili Celizujusa (na nekim modelima)
natural_image
Diagram of a car air conditioner with a sensor attached, showing no text or symbolsNAPOMENA
3 Za postavljanje ciljana temperature pritisnite dugme ⬆ ili ⬆.
4 Pritisnite dugme Fan Speed (Brzina ventilatora) da biste podesili brzinu ventilatora.
Režim Odvlaživanja
natural_image
Simple diagram of two gray directional arrows (up and down) inside a dashed box, with no text or symbols.3 Pritisnite dugme Set/Cancel (Postavi/otkaži) kako biste zaustavili bljeskanje ikonice.
- Nakon postavljanja tajmera, trenutno vrijeme i ikonica Tajmer za uključivanje se prikazuju na ekranu pokazujući da je postavljeno željeno vrijeme.
Otkazivanje vremena uključivanja tajmera
1 Pritisnite dugme Timer nekoliko puta.
Postavljanje vremena isključivanja tajmera
Ova funkcija se može postaviti kada je uređaj uključen ili isključen.
1 Pritisnite dugme Timer nekoliko puta.
natural_image
Two gray square buttons with upward and downward arrows, enclosed in a dashed border (no text or symbols)3 Pritisnite dugme Set/Cancel (Postavi/otkaži) kako biste zaustavili bljeskanje ikonice.
- Nakon postavljanja tajmera, trenutno vrijeme i ikonica Tajmer za isključivanje se prikazuju na ekranu pokazujući da je postavljeno željeno vrijeme.

Otkazivanje isključivanja tajmera
1 Pritisnite dugme Timer nekoliko puta.
natural_image
Two gray square buttons with upward and downward arrows, enclosed in a dashed border (no text or symbols)4 Pritisnite dugme Set/Cancel (Postavi/otkaži) kako biste zaustavili bljeskanje ikonice.
NAPOMENA
- Na nekim unutrašnjim jedinicama se prikazuje IH.
- Ekran unutrašnje jedinice prikazuje podešeno vrijeme od 1 sat do 7 sati samo 5 sekundi, a zatim se vraća na postavljenu temperaturu na nekim unutrašnjim jedinicama.
- U režimuHlađenjei Odvlaživanje, temperatura se povećava za 1 °C nakon 30 minuta i dodatnih 1 °C nakon još 30 minuta, radi ugodnijeg sna. Temperatura se povećava do 2 °C od prethodno podešene temperature.
- Iako se oznaka za brzinu ventilatora na ekranu za prikaz može promijeniti, brzina ventilatora se podešava automatski.
NAPOMENA
• Dugme uključuje ili isključuje ekran.
- Ako je svjetlo ekrana unutrašnje jedinice isključeno, pritiskom na dugme na bežičnom daljinskom upravljaču automatski se uključuje ekran na neko vrijeme.
- Ova funkcija može raditi drugačije, u zavisnosti od modela.
Funkcija prikazivanja energije (na nekim modelima)
Možete vidjeti količinu generirane električne energije na unutrašnjem ekranu kada uređaj radi.
Prikaži trenutnu potrošnju energije
Trenutna potrošnja energije se neko vrijeme prikazuje na nekim unutrašnjim jedinicama, u zavisnosti od modela.
1 Uključite uređaj.
2 Pritisnite i držite dugme Energy Ctrl. oko 3 sekundi.
- Naziv dugmeta se razlikuje od jednog do drugog modela.

Prikaži kumulativnu potrošnju energije
Kumulativna potrošnja energije se neko vrijeme prikazuje na nekim unutrašnjim jedinicama, u zavisnosti od modela.
1 Uključite uređaj.
2 Pritisnite i držite dugme Energy Ctrl. oko 3 sekunde dva puta.
- Naziv dugmeta se razlikuje od jednog do drugog modela.
NAPOMENA
• Jedinica prikazane vrijednosti je kW.
- Ne prikazuje se na bežičnom daljinskom upravljaču.
- kW se odnosi na trenutnu potrošnju energije.
- kWh se odnosi na kumulativnu potrošnju energije.
- Vrijednosti iznad 99 kW(h) se prikazuju kao 99 kW(h) zbog ograničenosti prostora na ekranu.
- Isključivanjem se poništavaju njene vrijednosti.
- Snaga u vatima ispod 10 kW(h) prikazuje se u jedinicama od 0,1 kW(h) a preko 10 kW(h) u jedinicama od 1 kW(h).
- Stvarna električna energija može se razlikovati od prikazane.
Funkcija Upravljanje energijom (na nekim modelima)
Možete smanjiti ulaznu snagu.
1 Uključite uređaj.
| Korak | Prikaz na ekranu | Opis |
| 1 | 80% | Ulazna snaga je smanjena za 20% u poređenju sa nominalnom ulaznom snagom. |
| 2 | 60% | Ulazna snaga je smanjena za 40% u poređenju sa nominalnom ulaznom snagom. |
| 3 (na nekim modelima) | 40% | Ulazna snaga je smanjena za 60% u poređenju sa nominalnom ulaznom snagom. |
NAPOMENA
- Na nekim unutrašnjim jedinicama se prikazuje 80, 60, 40 ili L (1. korak), LL (2. korak).
- Ova funkcija je dostupna u režimu Hlađenje.
- Kada se izabere funkcija Upravljanje energijom, moguće je smanjenje kapaciteta.
- Ciljana temperatura se prikazuje oko 5 sekundi ako pritisnite dugme Fan Speed, ⬤ ili ⬤.
- Temperatura prostorije se prikazuje oko 5 sekundi ako pritisnete dugme Room Temp. (Temperatura prostorije).
Funkcija UVnano (na nekim modelima)
natural_image
Diagram of a car air conditioner unit with a close-up view showing internal components (no text or labels)Tip 2

NAPOMENA
- Ako se krilca lopatica gore-dolje otvaraju brzo, možda je koračni motor u kvaru.
- Brzina ventilatora fabrički je postavljena previsoko.
- Funkcije mogu biti drugačije na različitim tipovima modela.
- Nije moguće mijenjati temperaturu pomoću dugmeta Uključivanje/Isključivanje ①.
- Za modelšamo hlađenje fabrički temperatura je postavljena na 22 °C.
- Za modeldHlađenje i grijanje, fabrički temperatura je postavljena od 22 °C do 24 °C.
Vraćanje prethodnih postavki
Kada se klima uređaj ponovo uključi nakon nestanka struje, funkcija Automatsko ponovo pokretanje vraća prethodne postavke.
Prilikom prvog korištenja uređaja, postavlja se funkcija, Automatsko ponovo pokretanje. Ovu
Tip 2
NAPOMENA
flowchart
graph LR
    A["Func."] --> B["Set/Cancel"]
natural_image
Illustration of a hand cleaning a rectangular appliance with a cloth (no text or symbols)① Zračni filter
NAPOMENA
- Ova funkcija može se razlikovati od jednog do drugog tipa modela.
① Drškice
② Zračni filter
3 Blago povucite ručice nagore a zatim podignite cijeli filter da biste ga izvadili.

4 Uvucite kuke sa zračnog filtera u ureze na poleđini prednje ploče.

Tip 2
1 Isključite napajanje uređaja.
2 Otvorite prednji poklopac.
• Malo podignite obje strane poklopce.
3 Držeći drškice zračnih filtera, malo ih gurnite nadolje i uklonite iz unutrašnje jedinice.
natural_image
Diagram of a car air conditioner unit with hands inserting or adjusting the panel (no text or symbols)4 Umetnite kukice na zračnim filterima u prednji poklopac.

natural_image
Diagram of an air conditioner unit with airflow direction indicated by arrows (no text or symbols)natural_image
Three-step diagram showing a kitchen tool, a shower spraying water onto a surface, and a spray bottle (no text or symbols)3 Filter osušite u hladu.

natural_image
3D diagram of a rectangular object with internal grid pattern, placed in a corner within a corner frame (no text or symbols)NAPOMENA
- Nemojte puštati uređaj u rad bez namještenog filtera.
natural_image
Diagram of hands placing a rectangular object into a container with an arrow indicating direction (no text or symbols)4 Očistite filter usisivačem.
5 Umetnite filter za pročišćavanje zraka.

natural_image
Diagram of hands pressing a rectangular object into a container (no text or symbols)natural_image
Diagram of a hand pressing down on a rectangular device with a downward arrow indicating compression or disassembly (no text or symbols present)4 Očistite filter usisivačem.
5 Umetnite filter za pročišćavanje zraka.
natural_image
Diagram of a printer or printer with hands holding a rectangular block, showing internal components and an upward arrow (no text or symbols)① Filtre d'aire
② Reixetes d'entrada d'aire
③ Coberta frontal
4 Reixetes de sortida d'aire
natural_image
Diagram showing a battery casing being placed on its side, with arrows indicating motion (no text or symbols present)NOTA
- Quan la pantalla del control remot sense fil comenci a esvair-se, substituiu les piles AAA (1,5 V).
- No utilitzeu piles velles i noves a la vegada.
- No utilitzeu bateries que no siguin alcalines.
natural_image
Two gray square buttons with upward and downward arrows, no text or symbols presentNOTA
natural_image
Diagram of a car air conditioner with a sensor attached, showing no text or symbolsNOTA
NOTA
NOTA
natural_image
Two gray square buttons with upward and downward arrows, no text or symbols presentNOTA
NOTA
natural_image
Diagram of a car air conditioner unit with a close-up view showing internal components (no text or labels)Tipus 2
NOTA
natural_image
Diagram of a car air conditioner unit with a close-up view showing internal components (no text or labels)Tipus 2

NOTA
flowchart
graph LR
    A["Func."] --> B["Set/Cancel"]
natural_image
Illustration of a hand cleaning a rectangular appliance with a cloth (no text or symbols)① Filtre d'aire
NOTA
Tipus 2
natural_image
Diagram of a car air conditioner unit with hand and down arrows indicating airflow direction (no text or symbols)natural_image
Diagram of an air conditioner unit showing airflow path and panel layout (no text or symbols)natural_image
Three-step diagram showing a kitchen tool, a shower spraying water, and a spray bottle (no text or symbols)natural_image
3D diagram of a rectangular prism with internal grid pattern, no text or symbols presentNOTA
natural_image
Diagram of hands holding a rectangular object inside a container (no text or symbols)natural_image
Diagram of hands installing a component into a rectangular housing (no text or symbols)natural_image
Diagram of a hand pressing down on a device component with an arrow indicating compression (no text or symbols present)natural_image
Diagram of a hand holding a rectangular object with an arrow indicating upward motion (no text or symbols)SOLUCIONAR PROBLEMES
natural_image
Diagram showing a battery cell being placed on its left and then on its right, with arrows indicating the process (no text or symbols present)POZNÁMKA
natural_image
Two gray square buttons with upward and downward arrows, enclosed in a dashed border (no text or symbols)POZNÁMKA
natural_image
Diagram of a car air conditioner with a sensor attached, showing no text or symbolsPOZNÁMKA
Automatický režim
POZNÁMKA
natural_image
Two gray directional arrows (up and down) inside a dashed box, no text or symbols presentnatural_image
Two gray square buttons with upward and downward arrows, enclosed in a dashed border (no text or symbols)natural_image
Two gray square buttons with upward and downward arrows, enclosed in a dashed border (no text or symbols)POZNÁMKA
POZNÁMKA
Typ 2

POZNÁMKA
Typ 2

natural_image
Diagram of a device with a magnified inset showing a circular component labeled 1 (no text or symbols present)POZNÁMKA
flowchart
graph LR
    A["Func."] --> B["Set/Cancel"]
flowchart
graph LR
    A["Func."] --> B["Set/Cancel"]
natural_image
Illustration of a hand cleaning a rectangular appliance with a cloth (no text or symbols)① Vzduchový filtr
POZNÁMKA
Typ 2
natural_image
Diagram of a car air conditioner unit with hand and down arrows indicating airflow direction (no text or symbols)natural_image
Diagram of an air conditioner unit with a grid panel and directional arrow (no text or symbols)natural_image
Three-step illustration showing a tool on a metal tray, a shower spraying water onto a surface, and a spray bottle (no text or symbols)3 Filtr sušte ve stínu.
natural_image
3D diagram of a rectangular grid structure with no text or symbolsPOZNÁMKA
natural_image
Diagram of hands installing a rectangular component into a plastic housing (no text or symbols)natural_image
Diagram of hands installing a component into a container with an upward arrow (no text or symbols)natural_image
Diagram of hands installing a component into a device (no text or symbols visible)natural_image
Line drawing of a printer with hands holding a rectangular object, no text or symbols presentnatural_image
Diagram showing two battery cell configurations with arrows indicating movement (no text or symbols)HINWEIS
natural_image
Two gray square buttons with upward and downward arrows inside a dashed border (no text or symbols)HINWEIS
natural_image
Diagram of a car air conditioner with a sensor emitting smoke (no text or symbols)HINWEIS
HINWEIS
HINWEIS
natural_image
Two gray square buttons with upward and downward arrows inside a dashed box (no text or symbols)natural_image
Two gray square buttons with upward and downward arrows inside a dashed border (no text or symbols)HINWEIS
HINWEIS
natural_image
Diagram of a car air conditioner unit with a close-up inset showing internal components (no text or labels)Type 2
HINWEIS
Type 2

HINWEIS
flowchart
graph LR
    A["Func."] --> B["Set/Cancel"]
natural_image
Illustration of a hand cleaning a rectangular appliance with a cloth (no text or symbols)① Luftfilter
HINWEIS
① Griffe
② Luftfilter
Type 2
natural_image
Diagram of a car air conditioner unit with hand placement arrows indicating cooling zone (no text or symbols)natural_image
Diagram of an air conditioner unit with a grid and airflow direction arrow (no text or symbols)natural_image
Three-step illustration showing a kitchen tool, a shower spraying water onto a surface, and a spray bottle (no text or symbols)natural_image
3D diagram of a rectangular object with internal grid pattern, placed in a corner (no text or symbols)HINWEIS
natural_image
Diagram of hands holding a rectangular object inside a container (no text or symbols)natural_image
Diagram of hands pressing a rectangular object into a container (no text or symbols)natural_image
Diagram of hands installing a component on an air conditioner panel (no text or symbols)natural_image
Diagram of a printer or printer with hands holding a paper, showing internal structure and an upward arrow (no text or symbols)natural_image
Diagram showing a battery component being placed on its side, with arrows indicating direction (no text or symbols present)ΣΗΜΕΙΩΣΗ
natural_image
Two gray square buttons with upward and downward arrows, no text or symbols presentΣΗΜΕΙΩΣΗ
natural_image
Line drawing of a car air conditioner with a small remote control unit attached (no text or symbols)ΣΗΜΕΙΩΣΗ
ΣΗΜΕΙΩΣΗ
natural_image
Two gray square buttons with upward and downward arrows, enclosed in a dashed border (no text or symbols)natural_image
Two gray square buttons with upward and downward arrows inside a dashed border (no text or symbols)natural_image
Two gray square buttons with upward and downward arrows inside a dashed border (no text or symbols)ΣΗΜΕΙΩΣΗ
ΣΗΜΕΙΩΣΗ
Τύπος 2
ΣΗΜΕΙΩΣΗ
Τύπος 2

ΣΗΜΕΙΩΣΗ
flowchart
graph LR
    A["Func."] --> B["Set/Cancel"]
flowchart
graph LR
    A["Func."] --> B["Set/Cancel"]
natural_image
Illustration of a hand cleaning a rectangular appliance with a cloth (no text or symbols)① Φίλτρο αέρα
ΣΗΜΕΙΩΣΗ
Τύπος 2
natural_image
Diagram of a car air conditioner unit with hand placement arrows indicating cooling or ventilation (no text or symbols)natural_image
Diagram of an air conditioner unit with airflow direction indicated by arrows (no text or symbols)natural_image
Three-step illustration showing a kitchen tool, a shower bath, and a spray bottle (no text or symbols)natural_image
3D diagram of a rectangular object with internal grid pattern, placed in a corner within a corner (no text or symbols)ΣΗΜΕΙΩΣΗ
natural_image
Diagram of hands installing a component into a box (no text or symbols)natural_image
Diagram of hands inserting a rectangular object into a container (no text or symbols)natural_image
Diagram of a hand pressing down on a device component with an arrow indicating compression (no text or symbols present)natural_image
Diagram of hands holding a rectangular object with an arrow indicating upward motion (no text or symbols)HOIATUSE JUHISED....4
ETTEVAATUSE JUHISED....9
KASUTAMINE
natural_image
Diagram showing a battery cell being placed on its left and on its right, with no text or symbols present.TÄHELEPANU
natural_image
Two gray square buttons with upward and downward arrows, no text or symbols presentTÄHELEPANU
natural_image
Diagram of a car air conditioner with a sensor emitting smoke (no text or symbols)TÄHELEPANU
natural_image
Two gray directional arrows (up and down) inside a dashed box, no text or symbols presentnatural_image
Two gray square buttons with upward and downward arrows, enclosed in a dashed border (no text or symbols)TÄHELEPANU
TÄHELEPANU
Tüüp 2
TÄHELEPANU
Tüüp 2
natural_image
Diagram of a device with a circular inset showing a pin or connector (no text or symbols)TÄHELEPANU
flowchart
graph LR
    A["Func."] --> B["Set/Cancel"]
natural_image
Illustration of a hand cleaning a rectangular appliance with a cloth (no text or symbols)① Öhufilter
TÄHELEPANU
① Nupud
② Öhufilter
Tüüp 2
natural_image
Diagram of a car air conditioner unit with hands holding the panel, showing internal grid layout and airflow direction arrows (no text or symbols)natural_image
Diagram of an air conditioner unit with a grid panel and directional arrow (no text or symbols)natural_image
Three-step illustration showing a kitchen tool, a showerhead spraying water onto a surface, and a spray bottle (no text or symbols)3 Kuivatage filtrit varjus.

natural_image
3D diagram of a rectangular object with internal grid pattern, placed in a corner (no text or symbols)TÄHELEPANU
natural_image
Diagram of hands installing or adjusting a component inside a container (no text or symbols)4 Puhastage filter tolmuimejaga.
natural_image
Diagram of hands installing a component into a device casing (no text or symbols)natural_image
Diagram of hands holding a rectangular object with an arrow indicating direction (no text or symbols)natural_image
Diagram of a hand pressing down on a rectangular device with an arrow indicating motion (no text or symbols present)6 Paigaldage õhufiltrid.
VEA SELGITAMINE
Enne teenindusse helistamist
INSTRUCTIONS D'ATTENTION 9
UTILISATION
INSTRUCTIONS D'ATTENTION
ATTENTION
natural_image
Diagram showing two battery cell designs with arrows indicating movement, no text or symbols presentREMARQUE
natural_image
Two gray square buttons with upward and downward arrows inside a dashed border (no text or symbols)REMARQUE
natural_image
Line drawing of a car air conditioner with a small icon emitting smoke (no text or symbols)REMARQUE
REMARQUE
natural_image
Two gray square buttons with upward and downward arrows, enclosed in a dashed border (no text or symbols)natural_image
Two gray directional buttons with upward and downward arrows, enclosed in a dashed border (no text or symbols)REMARQUE
REMARQUE
natural_image
Diagram of a car air conditioner unit with a close-up view showing internal components (no text or labels)Type 2
REMARQUE
Type 2
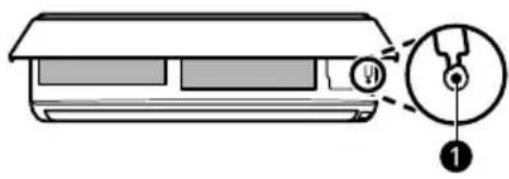
REMARQUE
flowchart
graph LR
    A["Func."] --> B["Set/Cancel"]
flowchart
graph LR
    A["Func."] --> B["Set/Cancel"]
Application LG ThinQ
natural_image
Illustration of a hand cleaning a rectangular appliance with a cloth (no text or symbols)① Filtre à air
REMARQUE
Type 2
natural_image
Diagram of a car air conditioner unit with hand placement arrows indicating cooling zone (no text or symbols)natural_image
Diagram of an air conditioner unit with airflow direction indicated by arrows (no text or symbols)natural_image
Three-step illustration showing a kitchen tool, a shower bath, and a spray bottle (no text or symbols)natural_image
3D diagram of a rectangular object with internal grid pattern, placed in a corner (no text or symbols)REMARQUE
natural_image
Diagram showing hands installing a rectangular component into a container (no text or symbols)natural_image
Diagram of hands placing a component into a rectangular housing with an upward arrow (no text or symbols)natural_image
Diagram of hands holding a rectangular object with an arrow indicating direction (no text or symbols)natural_image
Diagram of a printer or printer with hands holding a paper, showing internal structure and an upward arrow (no text or symbols)① Scagaire Aeir
② Gaothairí Aer-iontógála
③ Clúdach Tosaigh
4 Eití Asraoin Aeir

⑤ Sraonaire Aeir (Eite Suas-Síos)
6 Sraonaire Aeir (Lúvar Clé-Deas)
⑦ Cnaipe Cumhachta
NÓTA
natural_image
Diagram showing two battery cell designs with arrows indicating movement, no text or symbols presentNÓTA
2 Brúigh an cnaipe ▲ nó ▼ chun an t-am ceart a shocrú.
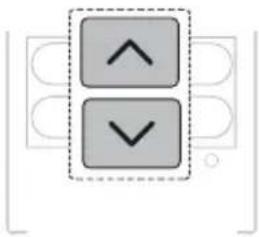
natural_image
Two gray square buttons with upward and downward arrows inside a dashed border (no text or symbols)3 Brúigh an cnaipe Set/Cancel chun an splancáil a stopadh.

NÓTA
natural_image
Diagram of a car air conditioner with a sensor attached, showing no text or symbolsNÓTA
Uathmhód
3 Brúigh an cnaipe ⬇ nó ⬇ chun an teocht sprioc a shocrú.
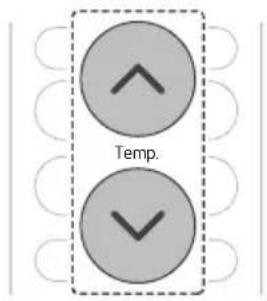
NÓTA
natural_image
Two gray square buttons with upward and downward arrows inside a dashed border (no text or symbols)3 Brúigh an cnaipe Set/Cancel chun an deilbhín splancáilte a stopadh.
natural_image
Two gray square buttons with upward and downward arrows, no text or symbols present3 Brúigh an cnaipe Set/Cancel chun an deilbhín splancáilte a stopadh.
natural_image
Two gray square buttons with upward and downward arrows, enclosed in a dashed border (no text or symbols)4 Brúigh an cnaipe Set/Cancel chun an deilbhín splancáilte a stopadh.
NÓTA
NÓTA
NÓTA
natural_image
Diagram of a car air conditioner unit with a close-up view showing internal components (no text or labels)Cineál 2
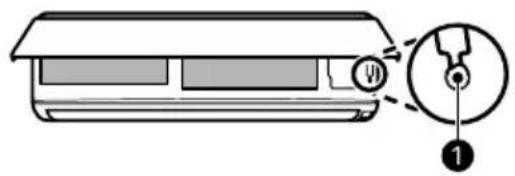
NÓTA
Cineál 2
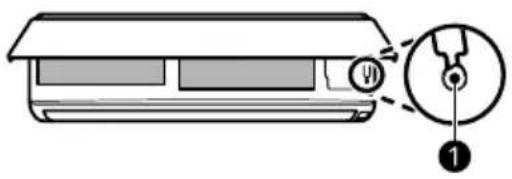
NÓTA
flowchart
graph LR
    A["Func."] --> B["Set/Cancel"]
flowchart
graph LR
    A["Func."] --> B["Set/Cancel"]
Feidhm Íonaithe Aeir (Ar Roinnt Cineálacha)
natural_image
Line drawing of a hand cleaning a rectangular appliance with a cloth (no text or symbols)① Scagaire Aeir
NÓTA
① Cnaipí
② Scagaire Aeir
4 Cuir na crucai ar an scagaire aeir isteach sna sliotáin ar chúl an phainéil tosaigh.

Cineál 2
1 Cas an chumhacht don ghléas as.
2 Oscail an clúdach tosaigh.
- Ardaigh an dá thaobh den chlúdach de bheagán.
natural_image
Diagram of a car air conditioner unit with hand placement arrows indicating cooling system (no text or symbols)4 Cuir na crucíá atá ar na scagairí aeir isteach sa chlúdach tosaigh.
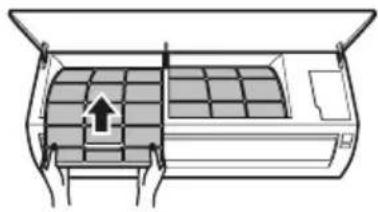
natural_image
Diagram of an air conditioner unit with airflow direction indicated by arrows (no text or symbols)natural_image
Three-step illustration showing a hairpin, a showerhead spraying water, and a spray bottle (no text or symbols)3 Triomaigh an scagaire sa scáth.

natural_image
3D diagram of a rectangular object with internal grid pattern, placed in a corner (no text or symbols)NÓTA
natural_image
Diagram showing hands inserting a rectangular object into a container (no text or symbols)natural_image
Diagram of hands placing a component into a tray inside a container (no text or symbols)natural_image
Diagram of hands holding a rectangular object inside a container, with an arrow indicating direction (no text or symbols)natural_image
Diagram of a printer or printer with hands holding a paper, showing internal structure and an upward arrow (no text or symbols)① Filtar zraka
② Otvori za ulaz zraka
③ Prednja strana
4 Otvori za izlaz zraka

natural_image
Diagram showing two battery cell designs with arrows indicating process (no text or symbols)NAPOMENA
- Kada zaslon bežičnog daljinskog upravljača počne blijediti, zamijenite baterije AAA (1,5 V).
- Ne upotrebljavajte zajedno stare i nove baterije.
- Ne koristite baterije osim alkalnih.
natural_image
Two gray square buttons with upward and downward arrows, enclosed in a dashed box (no text or symbols)3 Pritisnite gumb Set/Cancel za zaustavljanje bljeskanja.
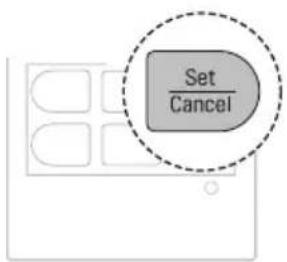
NAPOMENA
- Funkcije Mjerač vremena uključen i Mjerač vremena isključen dostupne su nakon postavljanja točnog vremena.
- Ako ste već umetnuli bateriju, ponovno je umetnite ili upotrijebite gumb Ponovno postavljanje da biste namjestili točno vrijeme.
Odabir Fahrenheitovih ili Celzijevih stupnjeva (na nekim modelima)
Postavite temperaturni prikaz za prikazivanje Fahrenheitovih (°F) ili Celzijevih (°C) stupnjeva.
1 Uključite uređaj.
2 Pritisnite i približno 5 sekundi držite tipku Up-Down Swing radi promjene jedinica između °C i °F

natural_image
Diagram of a car air conditioner with a sensor emitting smoke (no text or symbols)NAPOMENA
3 Pritisnite gumb ⬇ ili ⬇ za postavljanje ciljne temperature.

Otkazivanje postavke brojača vremena
- Pritisnite gumbCancel za otkazivanje svih postavki brojača vremena.
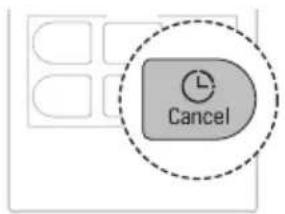
Funkcija za spavanje (na nekim modelima)
Možete postaviti automatsko isključivanje uređaja nakon zadanog vremena. Na uređaju se automatski mijenjaju temperatura i brzina ventilatora.
Funkcija se može postaviti dok je uređaj uključen.
1 Uključite uređaj.
2 Više puta pritisnite gumb Timer.
natural_image
Two gray square buttons with upward and downward arrows, enclosed in a dashed border (no text or symbols)4 Pritisnite gumb Set/Cancel za zaustavljanje bljeskanja ikone.
- Ikona funkcije za spavanje prikazuje se na zaslonu prikaza.
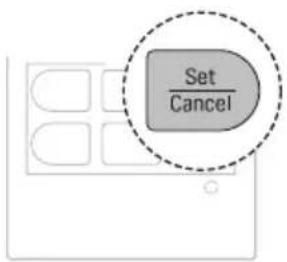
NAPOMENA
- Na nekim se unutarnjim jedinicama prikazuje IH.
- Zaslon unutarnje jedinice na samo pet (5) sekundi prikazuje se zadano vrijeme od jednog do sedam sati (1H do 7H), a zatim se na nekim unutarnjim jedinicama prikaz vraća na postavljenu temperaturu.
- U načinima rada zhladenje i odvlaživanje temperatura se povećava za 1 °C nakon trideset (30) minuta i za dodatni 1 °C nakon još trideset (30) minuta za udobnije spavanje. Temperatura se povećava za do 2 °C u odnosu na unaprijed zadanu temperaturu.
- Iako se napomena za brzinu ventilatora na zaslonu prikaza može promijeniti, brzina ventilatora namješta se automatski.
NAPOMENA
natural_image
Diagram of a car air conditioner unit with a close-up view showing internal components (no text or labels)Vrsta 2
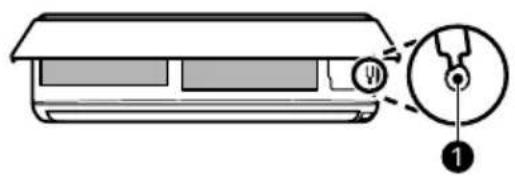
NAPOMENA
- Koračni je motor možda u kvaru ako se krilo za pomicanje gore-dolje brzo otvara.
- Brzina ventilatora zadano se postavlja na visoku vrijednost.
- Značajke se mogu mijenjati ovisno o vrsti modela.
- Nije moguće mijenjati temperaturu pri uporabi gumba za Napajanje ①.
- Za modele namijenjene samo za hlađenje temperatura se zadano postavlja na 22 °C.
- Za modele namijenjene za hlađenje i grijanje temperatura se zadano postavlja na vrijednost između 22 °C i 24 °C.
Vraćanje prethodnih postavki
Kada se klimatizacijski uređaj ponovno uključi nakon prekida dovoda napajanja, funkcijom za automatsko ponovno pokretanje vraćaju se prethodne postavke.
natural_image
Diagram of a car air conditioner unit with a close-up inset showing internal components (no text or labels)Vrsta 2

NAPOMENA
- Značajka se može promijeniti ovisno o vrsti modela.
- Ako pritisnite gumb za Napajanje ① i držite ga pritisnutim od tri (3) do pet (5) sekundi, umjesto šest (6) sekundi, uređaj se prebacuje na testni rad. U testnom radu uređajem se ispuhuje jak rashladni zrak osamnaest (18) minuta, a zatim se vraća na tvornički zadane postavke.
flowchart
graph LR
    A["Func."] --> B["Set/Cancel"]
Otkazivanje posebnih funkcija
flowchart
graph LR
    A["Func."] --> B["Set/Cancel"]
Funkcija za pročišćavanje zraka (na nekim modelima)
natural_image
Illustration of a hand cleaning a rectangular appliance with a cloth (no text or symbols)① Filtar zraka
NAPOMENA
- Značajka se može razlikovati ovisno o vrsti modela.
① Ručice
② Filtar zraka
3 Malo povucite ručice prema gore, a zatim podignite cijeli filtar da biste ga uklonili.

4 Umetnite kukice na filtru zraka u utore na stražnjoj strani prednje ploče.
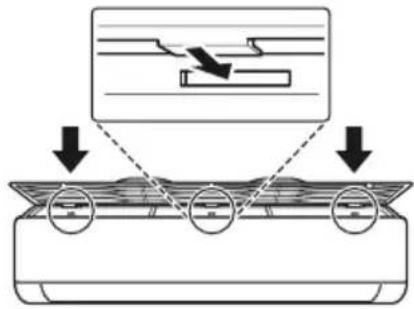
5 Gurajte kukice prema dolje dok ne začujete zvuk klika.

6 Da biste bili sigurni da ste pravilno sastavili filtar, pritisnite duž cijele prednje dužine filtra.
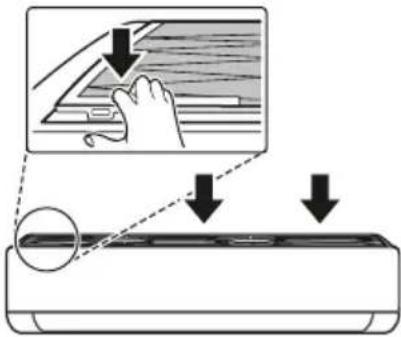
Vrsta 2
natural_image
Diagram of a car air conditioner unit with hands inserting or removing the panel (no text or symbols)4 Umetnite kukice na filtrima zraka u prednji poklopac.

natural_image
Diagram of an air conditioner unit with airflow direction indicated by arrows (no text or symbols)natural_image
Three-step illustration showing a kitchen tool, a showerhead spraying water, and a spray bottle (no text or symbols)3 Osušite filtar u sjeni.

natural_image
3D diagram of a rectangular object with internal grid pattern, placed in a corner (no text or symbols)NAPOMENA
- Nemojte upotrebljavati uređaj dok filtar nije na svom mjestu.
Čišćenje filtra za pročišćavanje zraka (na nekim modelima)
NAPOMENA
- Broj i položaj dijelova mogu se razlikovati ovisno o modelu uređaja.
- Značajke se mogu mijenjati ovisno o vrsti modela.
Vrsta 1
natural_image
Diagram of hands installing or adjusting a component inside a container (no text or symbols visible)4 Filtar očistite usisavačem.
5 Umetnite filtar za pročišćavanje zraka.

natural_image
Diagram of hands pressing a rectangular object into a container (no text or symbols)natural_image
Diagram of hands installing a component into an air conditioner unit (no text or symbols)natural_image
Diagram of a printer or printer with hands holding a rectangular object, showing internal components and an upward arrow (no text or symbols)6 Postavite filtre zraka.
natural_image
Diagram showing a battery component being placed on its side, with arrows indicating direction (no text or symbols present)MEGJEGYZÉS
natural_image
Two gray directional arrows (up and down) inside a dashed box, no text or symbols presentMEGJEGYZÉS
natural_image
Diagram of a car air conditioner with a sensor attached, showing no text or symbolsMEGJEGYZÉS
MEGJEGYZÉS
natural_image
Two gray square buttons with upward and downward arrows, enclosed in a dashed border (no text or symbols)MEGJEGYZÉS
MEGJEGYZÉS
natural_image
Diagram of a car air conditioner unit with a close-up view showing internal components (no text or labels)- típus
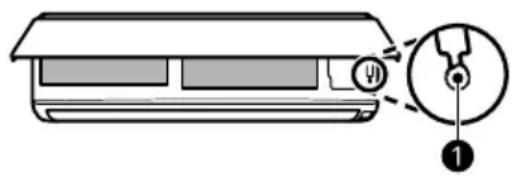
MEGJEGYZÉS
natural_image
Diagram of a car air conditioner unit with a close-up view showing internal components (no text or labels)2. típus

MEGJEGYZÉS
flowchart
graph LR
    A["Func."] --> B["Set/Cancel"]
natural_image
Illustration of a hand cleaning a washing machine with a cloth (no text or symbols)① Levegőszűrő
MEGJEGYZÉS
2. típus
natural_image
Diagram of a car air conditioner unit with hands inserting or adjusting the panel (no text or symbols)natural_image
Diagram of an air conditioner unit with airflow direction indicated by arrows (no text or symbols)natural_image
Three-step diagram showing a kitchen tool, a shower spraying water, and a spray bottle (no text or symbols)natural_image
3D diagram of a rectangular object with internal grid pattern, placed in a corner (no text or symbols)MEGJEGYZÉS
natural_image
Diagram of hands installing or adjusting a rectangular object inside a container (no text or symbols visible)natural_image
Diagram of hands installing a component into a device casing (no text or symbols)natural_image
Diagram of a printer or printer with hands holding a rectangular object, showing internal components and a downward arrow indicating compression (no text or symbols present)natural_image
Diagram of a printer or printer with hands holding a paper, showing internal structure and an upward arrow (no text or symbols)natural_image
Diagram showing two battery cell configurations with arrows indicating movement (no text or symbols)NOTA
natural_image
Two gray square buttons with upward and downward arrows, enclosed in a dashed border (no text or symbols)NOTA
natural_image
Diagram of a car air conditioner with a sensor emitting smoke (no text or symbols)NOTA
NOTA
natural_image
Two gray square buttons with upward and downward arrows, enclosed in a dashed border (no text or symbols)natural_image
Two gray square buttons with upward and downward arrows, enclosed in a dashed border (no text or symbols)natural_image
Two gray square buttons with upward and downward arrows, enclosed in a dashed border (no text or symbols)NOTA
NOTA
natural_image
Diagram of a car air conditioner unit with a close-up view showing internal components (no text or labels)Tipo 2

NOTA
natural_image
Diagram of a car air conditioner unit with a close-up inset showing internal components (no text or labels)Tipo 2

NOTA
flowchart
graph LR
    A["Func."] --> B["Set/Cancel"]
flowchart
graph LR
    A["Func."] --> B["Set/Cancel"]
natural_image
Illustration of a hand cleaning a rectangular appliance with a cloth (no text or symbols)① Filtro dell'aria
NOTA
Tipo 2
natural_image
Diagram of a car air conditioner unit with hand placement arrows indicating cooling zone (no text or symbols)natural_image
Diagram of an air conditioner unit with airflow direction indicated by arrows (no text or symbols)natural_image
Three-step diagram showing a kitchen tool, a shower spraying water, and a spray bottle (no text or symbols)natural_image
3D diagram of a rectangular object with internal grid pattern, placed in a corner (no text or symbols)NOTA
natural_image
Diagram of hands placing a rectangular object into a container with an arrow indicating downward motion (no text or symbols)natural_image
Diagram of hands installing a component into a rectangular housing (no text or symbols)natural_image
Diagram of a hand pressing down on a device component with an arrow indicating compression (no text or symbols present)natural_image
Diagram of a hand holding a rectangular object with an arrow indicating upward motion (no text or symbols)1 Oro filtras
② Oro ¡leidimo angos
③ Priekinis dangtis
4 Oro išleidimo angos
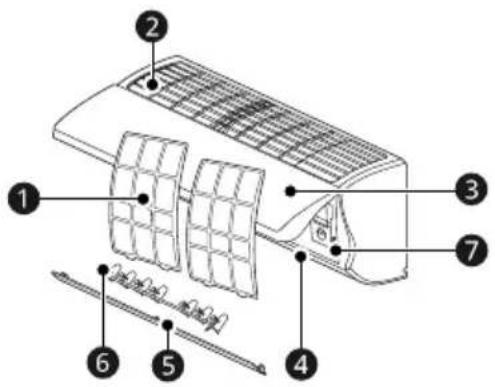
natural_image
Diagram showing a device being processed into a battery, with no visible text or symbolsPASTABA
natural_image
Two gray square buttons with upward and downward arrows inside a dashed border (no text or symbols)PASTABA
natural_image
Diagram of a car air conditioner with a sensor attached, showing no text or symbolsPASTABA
PASTABA
natural_image
Two gray square buttons with upward and downward arrows, enclosed in a dashed border (no text or symbols)natural_image
Two gray square buttons with upward and downward arrows, enclosed in a dashed border (no text or symbols)natural_image
Two gray square buttons with upward and downward arrows inside a dashed border (no text or symbols)PASTABA
PASTABA
2 tipas

PASTABA
natural_image
Diagram of a mechanical component with a magnified inset showing a detail (no text or symbols)2 tipas
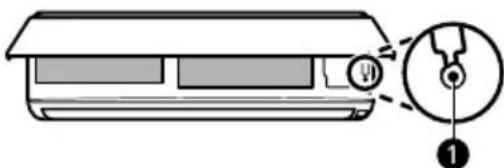
PASTABA
flowchart
graph LR
    A["Func."] --> B["Set/Cancel"]
natural_image
Illustration of a hand cleaning a rectangular appliance with a cloth (no text or symbols)① Oro filtras
PASTABA
① Rankenèlès
② Oro filtras
2 tipas
natural_image
Diagram of a car air conditioner unit with hand placement arrows indicating cooling zone (no text or symbols)natural_image
Diagram of an air conditioner unit with airflow direction indicated by arrows (no text or symbols)natural_image
Three-step illustration showing a tool, a shower, and a spray bottle (no text or symbols)natural_image
3D diagram of a rectangular object with internal grid pattern, placed in a corner (no text or symbols)PASTABA
natural_image
Diagram of hands installing a component into a tray inside a container (no text or symbols)natural_image
Diagram of hands pressing a rectangular object into a container (no text or symbols)natural_image
Diagram of a hand pressing down on a rectangular device with a downward arrow indicating compression or disassembly (no text or symbols present)natural_image
Diagram of a printer or printer with hands holding a paper, showing internal structure and an upward arrow (no text or symbols)VEIDS: PIESTIPRINÃMS PIE SIENAS
SATURA RĀDĪTĀJS
natural_image
Diagram showing a battery cell being placed on its left and then on its right, with arrows indicating direction (no text or symbols present)PIEZIME
natural_image
Two gray square buttons with upward and downward arrows, no text or symbols present3 Lai apturētu mirgošanu, nospiediet pogu Set/Cancel.
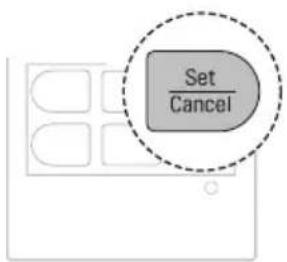
PIEZIME
natural_image
Line drawing of a car air conditioner with a smokestack emitting vapor (no text or symbols)PIEZIME
[Cooling Only Model]
natural_image
Two gray square buttons with upward and downward arrows inside a dashed border (no text or symbols)3 Lai apturētu ikonas mirgošanu, nospiediet pogu Set/Cancel.
natural_image
Two gray square buttons with upward and downward arrows inside a dashed border (no text or symbols)3 Lai apturētu ikonas mirgošanu, nospiediet pogu Set/Cancel.
natural_image
Two gray square buttons with upward and downward arrows, enclosed in a dashed border (no text or symbols)4 Lai apturētu ikonas mirgošanu, nospiediet pogu Set/Cancel.
PIEZIME
PIEZIME
2. tips
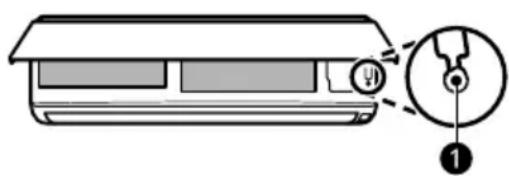
PIEZİME
2. tips

PIEZIME
flowchart
graph LR
    A["Func."] --> B["Set/Cancel"]
īpašo funkciju atcelšana
1 Nospiediet Func. pogu atkārtoti, lai izvēlētos vajadzīgo funkciju.
2 Lai atceltu funkciju, nospiediet pogu Set/Cancel.
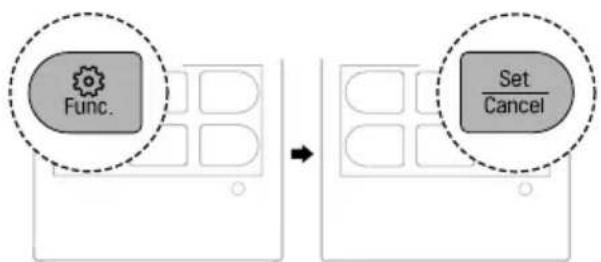
flowchart
graph LR
    A["Func."] --> B["Set/Cancel"]
natural_image
Illustration of a hand cleaning a rectangular appliance with a cloth (no text or symbols)① Gaisa filtrs
PIEZIME
① Kloki
② Gaisa filtrs
2. tips
natural_image
Diagram of a car air conditioner unit with hand placement arrows indicating cooling zone (no text or symbols)natural_image
Diagram of an air conditioner unit with airflow direction indicated by arrows (no text or symbols)natural_image
Three-step illustration showing a kitchen tool, a showerhead spraying water, and a spray bottle (no text or symbols)natural_image
3D diagram of a rectangular object with internal grid pattern, placed in a corner (no text or symbols)PIEZIME
natural_image
Diagram of hands installing or adjusting a component inside a container (no text or symbols visible)natural_image
Diagram of hands pressing a rectangular object into a container (no text or symbols)6 Salieciet gaisa filtru.
natural_image
Diagram of a hand pressing down on a rectangular device with a downward arrow indicating compression or disassembly (no text or symbols present)natural_image
Diagram of a printer or printer with hands holding a rectangular object, showing internal components and an upward arrow (no text or symbols)natural_image
Diagram showing a battery component being placed on its side, with an arrow indicating the process (no text or symbols present)НАПОМЕНА
natural_image
Two gray square buttons with upward and downward arrows, enclosed in a dashed border (no text or symbols)НАПОМЕНА
natural_image
Line drawing of a car with a sensor emitting smoke, no text or symbols presentНАПОМЕНА
natural_image
Two gray directional arrows (up and down) inside a dashed box, no text or symbols present.natural_image
Two gray square buttons with upward and downward arrows, enclosed in a dashed border (no text or symbols)НАПОМЕНА
НАПОМЕНА
Тип 2

НАПОМЕНА
Тип 2
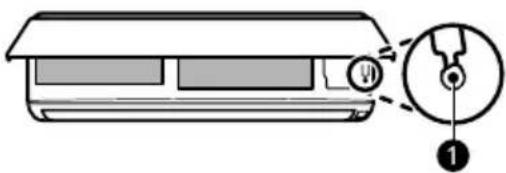
НАПОМЕНА
flowchart
graph LR
    A["Func."] --> B["Set/Cancel"]
flowchart
graph LR
    A["Func."] --> B["Set/Cancel"]
natural_image
Illustration of a hand cleaning a rectangular appliance with a cloth (no text or symbols)① Филтер за воздух
НАПОМЕНА
Тип 2
natural_image
Diagram of a car air conditioner unit with hand placement arrows indicating cooling zone (no text or symbols)natural_image
Diagram of an air conditioner unit with airflow direction indicated by arrows (no text or symbols)natural_image
Illustration of three different cleaning methods: a tool, a shower, and a spray bottle (no text or symbols present)natural_image
3D diagram of a rectangular object with internal grid pattern, placed in a corner (no text or symbols)НАПОМЕНА
natural_image
Diagram of hands installing a rectangular object into a container (no text or symbols)natural_image
Diagram of hands placing a rectangular object into a container with an upward arrow (no text or symbols)natural_image
Diagram of hands holding a rectangular object inside a container, with an arrow indicating downward motion (no text or symbols)natural_image
Diagram of a printer or printer with hands holding a paper, showing internal structure and an upward arrow (no text or symbols)① Filtru tal-Arja
② Ventijiet tad-Dhul tal-Arja
③ Kopetura ta' Quddiem
4 Ventijiet tal-Hrug tal-Arja

5 Diflettur tal-Arja (Paletta 'l Fuq u 'l Isfel)
6 Diflettur tal-Arja (Louver Xellug-Lemin)
⑦ Tast tal-Potenza
NOTA
natural_image
Diagram showing a battery cell being placed on its left and on its right, with arrows indicating direction (no text or symbols present)NOTA
2 Aghfas it-tast ▲ jew ▼ biex tissettja l-ħin it-tajjeb.
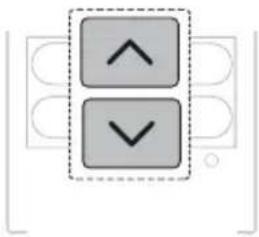
natural_image
Two gray square buttons with upward and downward arrows inside a dashed border (no text or symbols)3 Aghfas it-tast Set/Cancel biex twaqqaf l-ikona milli tteptep.

NOTA
- It-Timer Mixghul u t-Timer Mitfi huma disponibbli wara li tissettja l-hin attwali.
- Jekk digà daħhalt il-batterija, daħhalha mill-ġdid jew uża t-tast tar-Reset biex tissettja l-ħin attwali.
Biex tagħżel Fahrenheit jew Celsius (Fuq Xi Mudelli)
Issettja d-displej tat-temperatura biex turi unitajiet ta' Fahrenheit (°F) jew Celsius (°C).
1 Ixghel it-taghmir.
natural_image
Diagram of a car air conditioner with a sensor emitting smoke (no text or symbols)NOTA
3 Aghfas it-tast ⬇ jew ⬇ biex taghżel il-kodići tat-thaddim mixtieq jekk it-temperatura tkun oghla jew inqas mit-temperatura fil-mira.

| Kodiči Deskrizzjoni | |
| 2 | L-apparat jissettja t-temperatura fil-mira għal livell oħla mit-temperatura attwali. |
| 1 | L-apparat jissettja t-temperatura fil-mira għal livell kemmxejn oħla mit-temperatura attwali. |
| 0 | L-apparat iżomm it-temperatura attwali. |
| -1 | L-apparat jissettja t-temperatura fil-mira għal livell kemmxejn aktar baxxa mit-temperatura attwali. |
| -2 | L-apparat jissettja t-temperatura fil-mira għal livell aktar baxxa mit-temperatura attwali. |
NOTA
- Ma tistax taggusta l-velocità tal-fann, iżda tista' tissettja d-diflettur tal-arja biex idur awtomatikament.
3 Aghfas it-tast ⬇ jew ⬇ biex tissettja t-temperatura fil-mira.
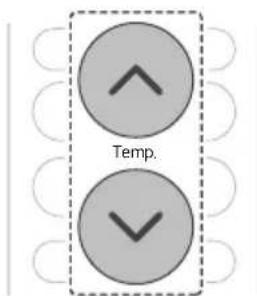
4 Aghfas it-tast Fan Speed biex tissettja l-velocità tal-fann.
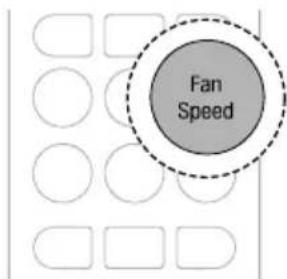
NOTA
natural_image
Two gray square buttons with upward and downward arrows, enclosed in a dashed border (no text or symbols)3 Aghfas it-tastSet/Cancel biex twaqqaf l-ikona milli tteptep.
- Wara li tissettja t-timer, il-hin attwali u l- ikona tat-Timer Mixghul jidher fuq l-iskrin tad-displej li jindika li l-hin mixtieq gie ssettjat.
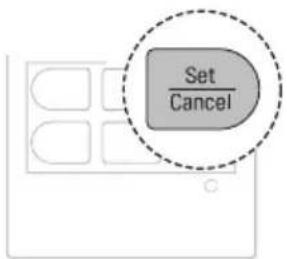
Biex thassar it-Timer Mixghul
1 Aghfas it-tast Timer ripetutament.
Kif tissettja t-Timer Mitfi
Din il-funzjoni tista' tiği ssettjata meta t-taghmir ikun mixghul jew mitfi.
1 Aghfas it-tast Timer ripetutament.
natural_image
Two gray square buttons with upward and downward arrows inside a dashed border (no text or symbols)3 Aghfas it-tast Set/Cancel biex twaqqaf l-ikona milli tteptep.
- Wara li tissettja t-timer, il-hin attwali u l-ikona tat-Timer Mitfi jidher fuq l-iskrin tad-displej li jindika li l-hin mixtieq gie ssettjat.
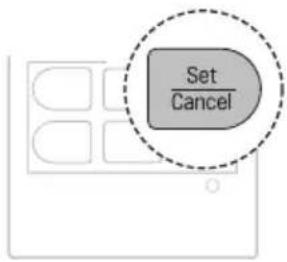
Kif tikkancella t-Timer Mitfi
1 Aghfas it-tast Timer ripetutament.
natural_image
Two gray square buttons with upward and downward arrows, no text or symbols present4 Aghfas it-tast Set/Cancel biex twaqqaf l-ikona milli tteptep.
- L-ikona tal-funzjoni tal- Modalità Rieqed tigi murija fuq l-iskrin tad-displej.
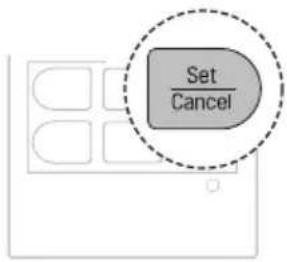
NOTA
- Aghfas it-tast Light Off.
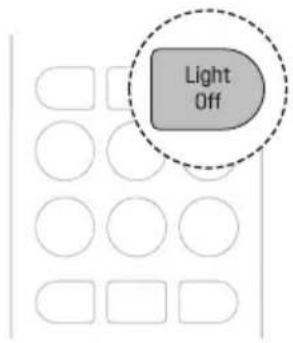
NOTA
| Stadju | Skrin tad-Displej | Deskrizzjoni |
| 1 | 80% | Id-dħul tal-enerġija jitnaqqas b'20 % meta mqabbel mad-dħul tal-enerġija kklassifikat. |
| 2 | 60% | Id-dħul tal-enerġija jitnaqqas b'40 % meta mqabbel mad-dħul tal-enerġija kklassifikat. |
| 3(fuq xi mudelli) | 40% | Id-dħul tal-enerġija jitnaqqas b'60 % meta mqabbel mad-dħul tal-enerġija kklassifikat. |
NOTA
natural_image
Diagram of a car air conditioner unit with a close-up view showing internal components (no text or labels)Tip 2
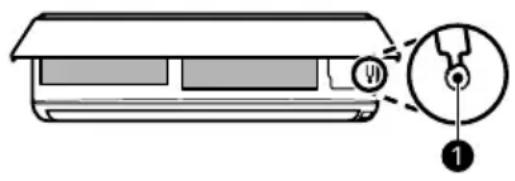
NOTA
- Il-mutur tal-ingranaggi jista'jkun tkisser, jekk il-paletta li titla'u tinżel tinfetaħ malajr.
- Il-velocita tal-fann hija ssettjata għal għolja b'mod awtomatiku.
- Il-karatteristici jistghu jinbidlu skont it-tip tal-mudell.
- It-temperatura ma tistax titbiddel meta jintuža t-tast tal-Potenza ①.
- Ghal mudelli tat-Tkessih Biss it-temperatura hija ssettjata fuq 22 °C b'mod awtomatiku.
- Għal mudelli tat-Tkessiħ u t-Tishin, it-temperatura hija ssettjata bejn 22 °C u 24 °C b'mod awtomatiku.
Tip 2
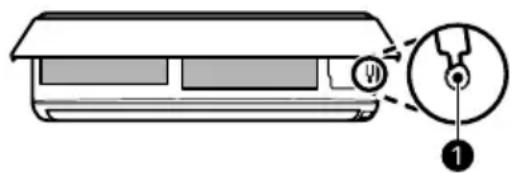
NOTA
flowchart
graph LR
    A["Func."] --> B["Set/Cancel"]
flowchart
graph LR
    A["Func."] --> B["Set/Cancel"]
natural_image
Illustration of a hand cleaning a rectangular appliance with a cloth (no text or symbols)① Filtru tal-Arja
NOTA
- Il-karatteristika tista' tinbidel skont it-tip tal-mudell.
| Tip Deskrizzjoni Intervall | ||
| Unità ta' ğewwa | Naddaf il-wić tal-unita ta' ğewwa permezz ta' bicca ratba u niexfa. | Regolarment |
| Ara li jkollok professjonista li jnaddaf il-kontenitur fejn jingabar l-ilma kkondensat. | Darba fis-sena | |
| Ara li jkollok professjonista li jnaddaf il-pajp fejn jingabar l-ilma kkondensat. | Kull 4 xhur | |
| Ibdel il-batteriji tar-remote control minghajr fili. | Darba fis-sena | |
① Pumi
② Filtru tal-Arja
3 Igbed il-pumi ftit 'il fuq u mbaghad l-filtru kollu biex tnehih.
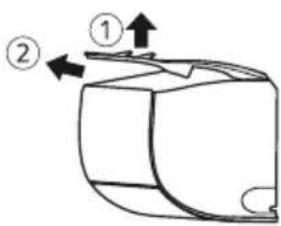
5 Imbotta l-gancijiet 'l isfel sakemm jidhlu f'posthom.

6 Sabiex tara li l-filtru gie mmontat sew, agħfas'l isfel tul it-tul kollu tal-filtru.
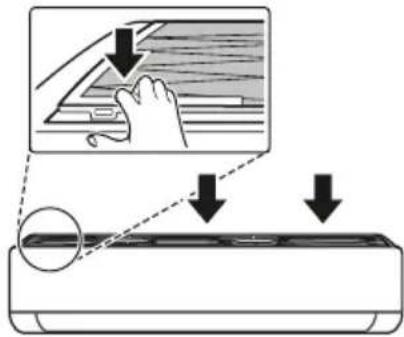
Tip 2
natural_image
Diagram of a car air conditioner unit with hand placement arrows indicating cooling zone (no text or symbols)natural_image
Diagram of an air conditioner unit with a grid and airflow direction arrow (no text or symbols)5 Iččekkja l-ğenb tal-ghata ta' quddiem biex tižgura li l-filtri tal-arja huwa mmuntat sew.
Tindif tal-Filtru tal-Arja
natural_image
Three-step illustration showing a tool, a shower, and a spray bottle (no text or symbols)3 Ixxotta l-filtru fid-dell.
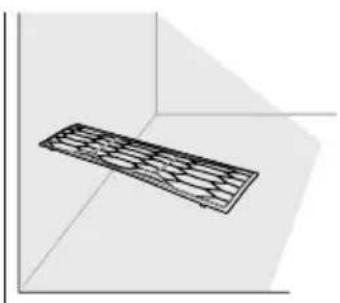
natural_image
3D diagram of a rectangular object with internal grid pattern, placed in a corner (no text or symbols)NOTA
• Thaddimx it-taghmir minghajr il-filtru.
Biex Tnaddaf il-Filtru tat-Tindif tal-Arja (Fuq Xi Mudelli)
NOTA
natural_image
Diagram of hands installing a rectangular component into a container (no text or symbols)4 Naddaf il-filtru b'vacuum cleaner.
5 Dahhal il-filtru tat-tindif tal-arja.

natural_image
Diagram of hands pressing a rectangular object into a container (no text or symbols)7 Iččekkja l-ğenb tal-ghata ta' quddiem biex tižgura li l-filtri tal-arja huwa mmuntat sew.
6 Immonta l-filtru tal-arja.
7 Iččekkja l-ğenb tal-ghata ta' quddiem biex tižgura li l-filtru tal-arja huwa mmuntat sew.
Tip 2
natural_image
Diagram of hands installing a component into a device (no text or symbols visible)4 Naddaf il-filtru b'vacuum cleaner.
5 Daħħal il-filtru tat-tindif tal-arja.
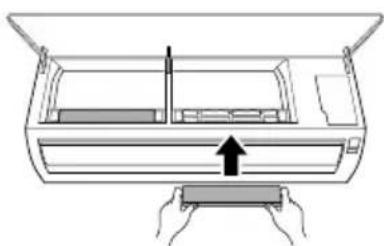
natural_image
Diagram of a printer with hands holding a paper, showing internal structure and an upward arrow (no text or symbols)6 Immonta l-filtru tal-arja.
KIF ISSOLVI PROBLEMI
WAARSCHUWINGSINSTRUCTIES....4
WAARSCHUWINGSINSTRUCTIES

WAARSCHUWING
natural_image
Diagram showing a device being processed into a battery, with no visible text or symbolsOPMERKING
natural_image
Two gray directional arrows (up and down) inside a dashed box, no text or symbols present.OPMERKING
natural_image
Line drawing of a car air conditioner with a small remote control unit (no text or symbols)OPMERKING
natural_image
Two gray square buttons with upward and downward arrows inside a dashed border (no text or symbols)De Inschakeltimer annuleren
natural_image
Two gray square buttons with upward and downward arrows, enclosed in a dashed border (no text or symbols)De timerinstelling annuleren
OPMERKING
OPMERKING
Type 2

OPMERKING
Type 2

OPMERKING
flowchart
graph LR
    A["Func."] --> B["Set/Cancel"]
flowchart
graph LR
    A["Func."] --> B["Set/Cancel"]
natural_image
Line drawing of a hand cleaning a rectangular appliance with a cloth (no text or symbols)① Luchtfilter
OPMERKING
① Knoppen
② Luchtfilter
5 Duw de haken omlaag tot ze vastklikken.
Type 2
natural_image
Diagram of a car air conditioner unit with hand placement arrows indicating cooling zone (no text or symbols)natural_image
Diagram of an air conditioner unit with airflow direction indicated by arrows (no text or symbols)natural_image
Three-step illustration showing a hairpin, a showerhead spraying water, and a spray bottle (no text or symbols)natural_image
3D diagram of a rectangular object with internal grid pattern, placed in a corner (no text or symbols)OPMERKING
natural_image
Diagram of hands installing a component into a tray inside a container (no text or symbols)natural_image
Diagram of hands placing a component into a rectangular housing (no text or symbols)natural_image
Diagram of hands installing a component into a device (no text or symbols visible)natural_image
Diagram of a hand pressing down on a rectangular device with an arrow indicating motion (no text or symbols present)PROBLEEMOPLOSSING
natural_image
Diagram showing a battery cell being placed on its left and then placed on its right, with no text or symbols present.UWAGA
natural_image
Two gray square buttons with upward and downward arrows, no text or symbols presentUWAGA
natural_image
Diagram of a car air conditioner with a sensor emitting smoke (no text or symbols)UWAGA
UWAGA
UWAGA
natural_image
Two gray square buttons with upward and downward arrows inside a dashed border (no text or symbols)natural_image
Two gray square buttons with upward and downward arrows, enclosed in a dashed border (no text or symbols)natural_image
Two gray square buttons with upward and downward arrows inside a dashed border (no text or symbols)UWAGA
UWAGA
natural_image
Diagram of a car air conditioner unit with a close-up view showing internal components (no text or labels)Typ 2

UWAGA
natural_image
Diagram of a car air conditioner unit with a close-up view showing internal components (no text or labels)Typ 2
UWAGA
flowchart
graph LR
    A["Func."] --> B["Set/Cancel"]
flowchart
graph LR
    A["Func."] --> B["Set/Cancel"]
natural_image
Illustration of a hand cleaning a rectangular appliance with a cloth (no text or symbols)① Filtr powietrza
UWAGA
Typ 2
natural_image
Diagram of a car air conditioner unit with hand and down arrows indicating airflow direction (no text or symbols)natural_image
Diagram of an air conditioner unit with airflow direction indicated by arrows (no text or symbols)natural_image
Three-step diagram showing a kitchen tool, a shower spraying water, and a spray bottle (no text or symbols)natural_image
3D diagram of a rectangular object with internal grid pattern, placed in a corner within a coordinate system (no text or symbols)UWAGA
natural_image
Diagram showing hands holding a rectangular object inside a container with an arrow indicating downward motion (no text or symbols)natural_image
Diagram of hands inserting a component into a device casing (no text or symbols)natural_image
Diagram of hands installing a component on an air conditioner panel (no text or symbols)natural_image
Diagram of a printer or printer with hands holding a paper, showing internal structure and an upward arrow (no text or symbols)natural_image
Diagram showing a battery cell being placed on its left and then placed on its right, with arrows indicating the process (no text or symbols present)OBSERVAÇÃO
natural_image
Two gray directional arrows (up and down) inside a dashed box, no text or symbols present.OBSERVAÇÃO
natural_image
Diagram of a car air conditioner with a sensor emitting smoke (no text or symbols)OBSERVAÇÃO
natural_image
Two gray square buttons with upward and downward arrows, enclosed in a dashed border (no text or symbols)natural_image
Two gray square buttons with upward and downward arrows inside a dashed border (no text or symbols)OBSERVAÇÃO
OBSERVAÇÃO
natural_image
Diagram of a car air conditioner unit with a close-up view showing internal components (no text or labels)
OBSERVAÇÃO
OBSERVAÇÃO
flowchart
graph LR
    A["Func."] --> B["Set/Cancel"]
flowchart
graph LR
    A["Func."] --> B["Set/Cancel"]
natural_image
Illustration of a hand cleaning a rectangular appliance with a cloth (no text or symbols)① Filtro de ar
OBSERVAÇÃO
① Manípulos
② Filtro de ar
natural_image
Diagram of a car air conditioner unit with hand and down arrows indicating airflow direction (no text or symbols)natural_image
Diagram of an air conditioner unit with airflow direction indicated by arrows (no text or symbols)natural_image
Three-step illustration showing a tool, a showerhead spraying water, and a spray bottle (no text or symbols)natural_image
3D diagram of a rectangular prism with internal grid pattern, no text or symbols presentOBSERVAÇÃO
natural_image
Diagram of hands installing a component into a container (no text or symbols)natural_image
Diagram of hands pressing a rectangular object into a container (no text or symbols)6 Monte os filtros de ar.
natural_image
Diagram of a printer or printer with hands holding a rectangular object, showing internal components and a downward arrow indicating compression (no text or symbols present)natural_image
Diagram of a printer or printer with hands holding a paper, showing internal structure and an upward arrow (no text or symbols)- TABLE OF CONTENTS
- SAFETY INSTRUCTIONS
- OPERATION
- SMART FUNCTIONS
- MAINTENANCE
- TROUBLESHOOTING
- READ ALL INSTRUCTIONS BEFORE USE
- Safety Messages
- WARNING
- CAUTION
- Notes for Flammable Refrigerant
- WARNING INSTRUCTIONS
- Technical Safety
- Installation
- Remote Control
- Refrigerant
- General
- R32 Only
- CAUTION INSTRUCTIONS
- Before Use
- Notes for Operation
- Suggestions for Energy Saving
- Product Overviews
- Wall Mounted
- NOTE
- Preparation before Operation
- Inserting the Batteries into the Wireless Remote Control
- Setting the Current Time on the Wireless Remote Control
- Selecting Fahrenheit or Celsius (On Some Models)
- Wireless Remote Control Overview
- Wireless Remote Control
- Using Wireless Remote Control
- Operating with the Wireless Remote Control
- Operating Mode
- Adjusting the Fan Speed
- Cooling Mode
- Auto Mode
- Auto Operation (Artificial Intelligence) Mode
- Auto Changeover Mode
- [Cooling and Heating Model]
- Dehumidification Mode
- Heating Mode (On Some Models)
- Fan Mode
- Jet Mode
- Adjusting the Airflow Direction
- Adjusting the Up-Down Direction
- Adjusting the Left-Right Direction
- Comfort Air Function (On Some Models)
- On and Off Timer
- Setting the On Timer
- Press the Timer button repeatedly.
- Press the □ or ▼ button to set the desired time.
- Press the Set/Cancel button to stop the icon from flashing.
- Cancelling the On Timer
- Press the Set/Cancel button to cancel the setting.
- Setting the Off Timer
- Press the ▲ or ▼ button to set the desired time.
- Cancelling the Off Timer
- Cancelling the Timer Setting
- Sleep Function (On Some Models)
- Turn the appliance on.
- Press the Timer button repeatedly.
- Press the ▲ or ▼ button to set the desired time.
- Press the Set/Cancel button to stop the icon from flashing.
- Light Off Function (On Some Models)
- Energy Display Function (On Some Models)
- Display the Current Energy Usage
- Press and hold the Energy Ctrl. button for about 3 seconds.
- Display the Cumulative Energy Usage
- Press and hold the Energy Ctrl. button for about 3 seconds twice.
- Energy Control Function (On Some Models)
- UVnano Function (On Some Models)
- Manual Operation
- Restoring the Previous Settings
- Cancelling Auto Restart
- Setting Auto Restart
- Type 2
- Special Functions Overview
- Special Functions
- Using Special Functions
- Setting and Cancelling Special Functions
- Setting the Special Functions
- Cancelling the Special Functions
- Air Purification Functions (On Some Models)
- Silent Function (On Some Models)
- Auto Clean Function (On Some Models)
- LG ThinQ Application
- LG ThinQ Application Features
- Common features
- - Smart Diagnosis
- Additional features
- Installing LG ThinQ Application and Connecting an LG Appliance
- Models with QR Code
- Models without QR Code
- Open Source Software Notice Information
- Diagnosis Using LG ThinQ
- Using LG ThinQ to Diagnose Issues
- Using Audible Diagnosis to Diagnose Issues
- Cleaning
- Cleaning Interval
- Cleaning the Appliance
- ① Air Filter
- Type Description Interval
- Removing and Replacing the Air Filter
- Type 1
- Cleaning the Air Filter
- Cleaning the Air Cleaning Filter (On Some Models)
- Before Calling for Service
- Self-Diagnosis Function
- Memo
- LG
- ЗАБЕЛЕЖКА
- Тип 2
- NAPOMENA
- Biranje Farenhajte ili Celizujusa (na nekim modelima)
- Režim Odvlaživanja
- Otkazivanje vremena uključivanja tajmera
- Postavljanje vremena isključivanja tajmera
- Otkazivanje isključivanja tajmera
- Funkcija prikazivanja energije (na nekim modelima)
- Prikaži trenutnu potrošnju energije
- Prikaži kumulativnu potrošnju energije
- Funkcija Upravljanje energijom (na nekim modelima)
- Funkcija UVnano (na nekim modelima)
- Vraćanje prethodnih postavki
- Tip 2
- NOTA
- Tipus 2
- SOLUCIONAR PROBLEMES
- POZNÁMKA
- Automatický režim
- Typ 2
- HINWEIS
- ΣΗΜΕΙΩΣΗ
- Τύπος 2
- KASUTAMINE
- TÄHELEPANU
- Tüüp 2
- ① Öhufilter
- VEA SELGITAMINE
- Enne teenindusse helistamist
- UTILISATION
- INSTRUCTIONS D'ATTENTION
- ATTENTION
- REMARQUE
- Application LG ThinQ
- NÓTA
- Uathmhód
- Cineál 2
- Feidhm Íonaithe Aeir (Ar Roinnt Cineálacha)
- ① Scagaire Aeir
- Odabir Fahrenheitovih ili Celzijevih stupnjeva (na nekim modelima)
- Otkazivanje postavke brojača vremena
- Funkcija za spavanje (na nekim modelima)
- Vrsta 2
- Otkazivanje posebnih funkcija
- Funkcija za pročišćavanje zraka (na nekim modelima)
- ① Filtar zraka
- Čišćenje filtra za pročišćavanje zraka (na nekim modelima)
- Vrsta 1
- MEGJEGYZÉS
- típus
- Tipo 2
- PASTABA
- tipas
- ① Oro filtras
- SATURA RĀDĪTĀJS
- PIEZIME
- Lai apturētu ikonas mirgošanu, nospiediet pogu Set/Cancel.
- tips
- PIEZİME
- īpašo funkciju atcelšana
- ① Gaisa filtrs
- НАПОМЕНА
- Biex tagħżel Fahrenheit jew Celsius (Fuq Xi Mudelli)
- Biex thassar it-Timer Mixghul
- Kif tissettja t-Timer Mitfi
- Kif tikkancella t-Timer Mitfi
- Tindif tal-Filtru tal-Arja
- Biex Tnaddaf il-Filtru tat-Tindif tal-Arja (Fuq Xi Mudelli)
- KIF ISSOLVI PROBLEMI
- WAARSCHUWINGSINSTRUCTIES
- WAARSCHUWING
- OPMERKING
- De Inschakeltimer annuleren
- De timerinstelling annuleren
- ① Luchtfilter
- PROBLEEMOPLOSSING
- UWAGA
- OBSERVAÇÃO
Brand : LG
Model : AC09BK
Category : Air conditioner