Heritage PG9100 - Lawn mower REMINGTON - Free user manual and instructions
Find the device manual for free Heritage PG9100 REMINGTON in PDF.
User questions about Heritage PG9100 REMINGTON
0 question about this device. Answer the ones you know or ask your own.
Ask a new question about this device
Download the instructions for your Lawn mower in PDF format for free! Find your manual Heritage PG9100 - REMINGTON and take your electronic device back in hand. On this page are published all the documents necessary for the use of your device. Heritage PG9100 by REMINGTON.
USER MANUAL Heritage PG9100 REMINGTON
natural_image
Close-up of a modern hairbrush with a black top and silver body, no visible text or symbols.Heritage Personal Groomer PG9100
Thank you for buying your new Remington® product. Please read these instructions carefully and keep them safe. Remove all packaging before use.

IMPORTANT SAFEGUARDS
- This appliance can be used by children aged from 8 years and above and persons with reduced physical, sensory or mental capabilities or lack of experience and knowledge if they have been supervised/instructed and understand the hazards involved. Children shall not play with the appliance. Cleaning and user maintenance shall not be done by children unless they are older than 8 and supervised. Keep the appliance and cable out of reach of children under 8 years.
- The adaptor contains a transformer. Do not cut off the adaptor to replace it with another plug, as this causes a hazardous situation.

Suitable for cleaning under an open water tap.
- WARNING: Detach the device from the charging adapter before cleaning it in water.
- Do not use the product with a damaged cord.
- WARNING: For recharging the battery, only use the charger supplied with the appliance - type reference PA-0510U (UK).
• Always replace a damaged adaptor with one of the original type. - The battery in this device is not replaceable.
- Do not use the appliance if it is damaged or malfunctions.
- Do not use attachments other than those we supply.
- This appliance should never be left unattended when plugged into a power outlet, except when charging.
- Keep the power plug and cord away from heated surfaces.
- Do not plug or unplug the appliance with wet hands.
- Do not twist or kink the cable, or wrap it round the appliance.
- This appliance is not intended for commercial or salon use.
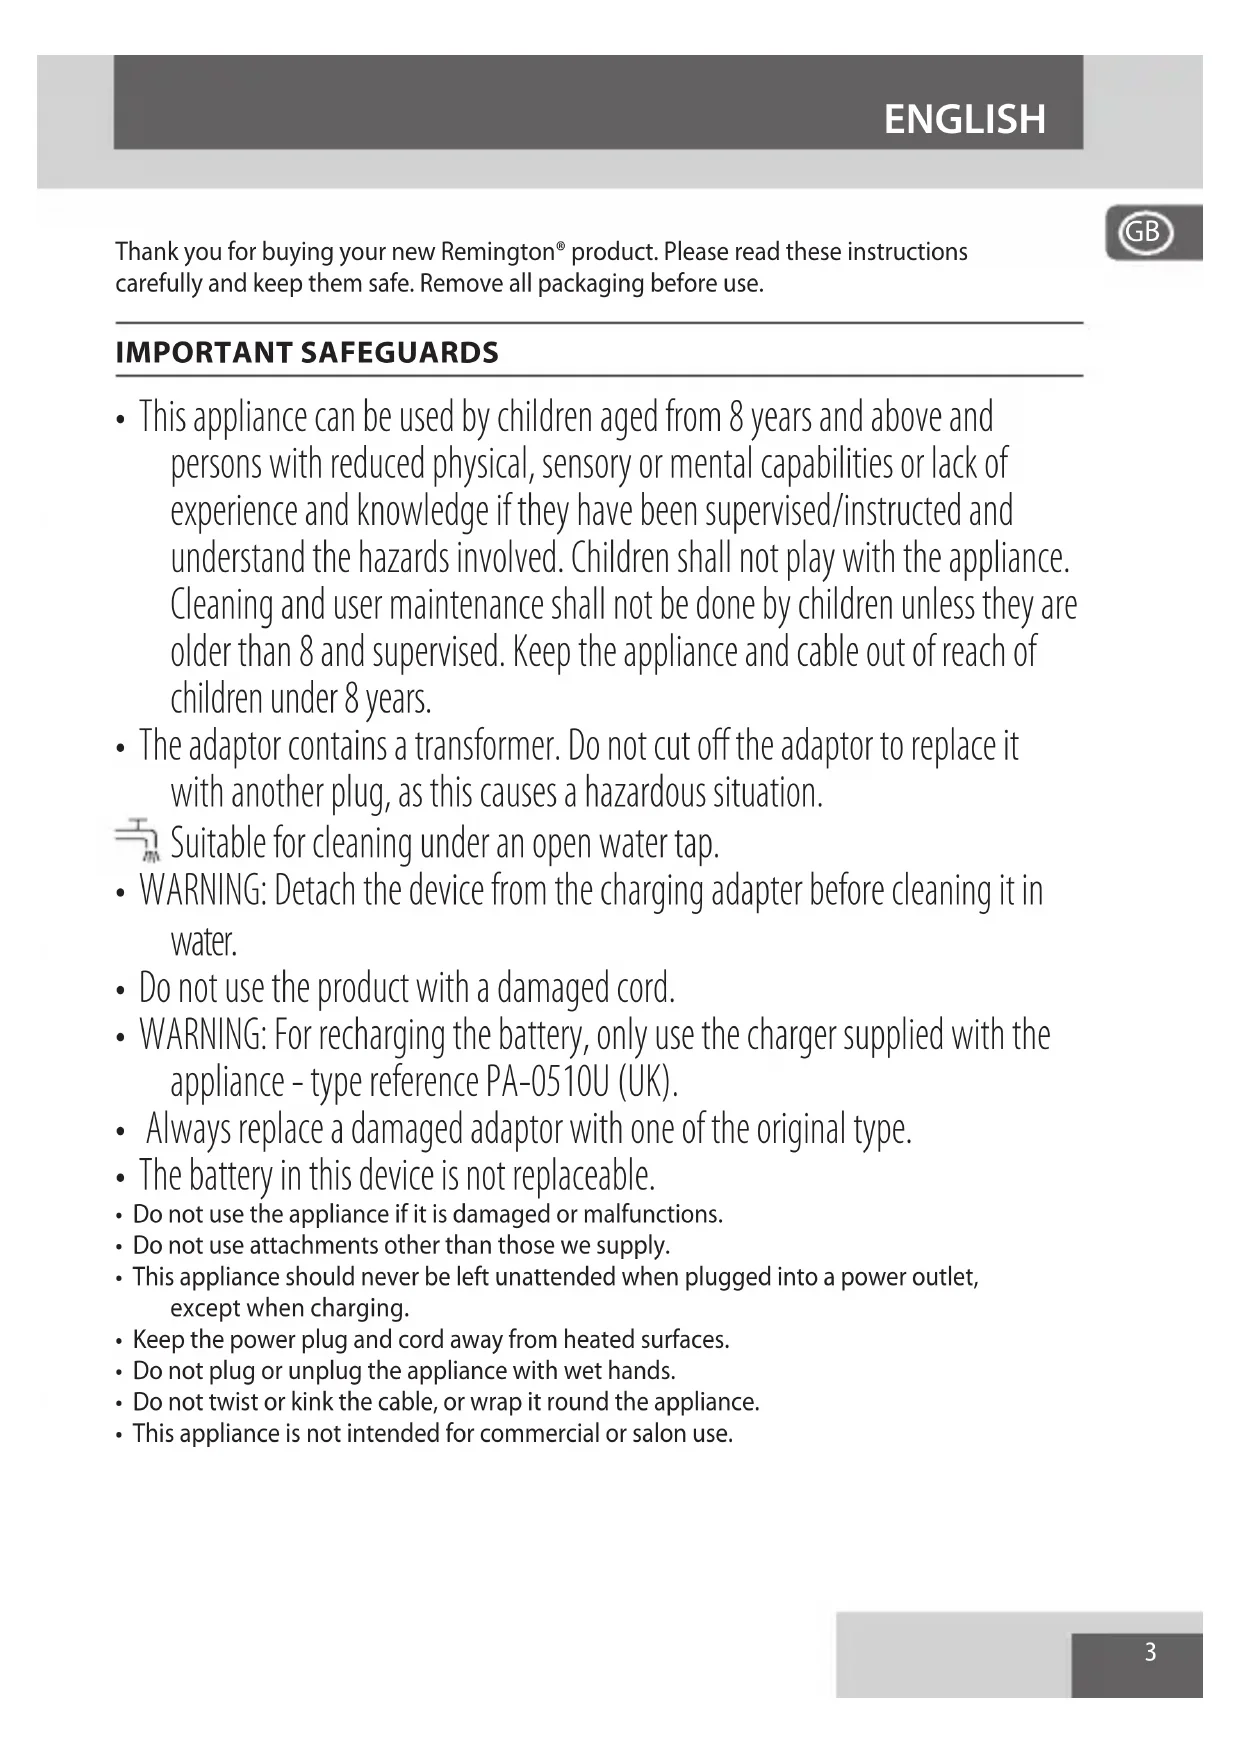
PARTS
- Precision T-blade
- On/off switch
- Charging indicator lights
- Charger connector
- Micro detail blade
- Adjustable stubble comb (1.5 - 5mm)
- Foil release buttons
-
Foil shaver
-
Release button
-
Fixed combs (3 - 25 mm)
Not shown:
- Adaptor
- Cleaning brush
- Oil bottle
- Storage pouch
CHARGING YOUR APPLIANCE
This appliance can be used ‘cordless’ by powering it from its internal rechargeable battery, or ‘corded’ by connecting it to the charging adaptor and then the mains power supply.
Powering the appliance from the charging adaptor is useful if the rechargeable battery does not have enough charge. Be aware however, that frequent use of the corded mode will reduce the life of the rechargeable battery.
Before using your trimmer for the first time, charge for 4 hours.
- Ensure the product is switched off.
- Connect the charging adaptor to the product and then to the mains.
- When fully charged, unplug the charge adapter from the power outlet.
CHARGE REMAINING INDICATOR LIGHTS
| Charge Level Indicator Light | |
| Charging Blue LED will flash | |
| Fully Charged Blue LED will light up continuously | |
| Battery charge is low Red LED will flash | |
- Your trimmer cannot be overcharged. However, if it is not going to be used for an extended period of time (2-3 months), unplug it from the mains and store.
• To preserve the life of your batteries, recharge them for 4 hours at least every 6 months. - On a full charge, your trimmer will run for up to 60 minutes of cordless usage.
CORDED USE
- Connect the charging adaptor to the product then to the mains.
ATTACHMENTS
TO FIT AND REMOVE T-BLADE ATTACHMENT (FIG. A)
Ensure that the device is switched off before fitting or removing attachments.
- To remove, slide the attachment forwards with your thumb. The foil shaver has a release button which must be pressed before it can be slid off.
- To fit, slide the attachment onto the body until it clicks into place.
FITTING AND REMOVING FIXED GUIDE COMBS (FIG. B)
To Fit
- Hook the front of the guide comb over the teeth of the T-blade.
- Press the back of the guide comb down until it clicks into place.
To Remove
- Lift the tab on the back of the guide comb upwards until it comes free from the T-blade.
ADJUSTABLE STUBBLE COMB
- Fit the adjustable stubble comb in the same way as you would fit a fixed guide comb.
- The 1.5 - 5 mm comb can be adjusted by turning the wheel to the desired setting. Turn the wheel clockwise for longer length and anticlockwise for shorter length.
- The indicator on the wheel will point to the chosen setting.
- Use the trimmer without the adjustable comb for trimming hair close to the skin. This will trim hair to 1.0 mm, holding the blades perpendicular to the skin will trim hair to 0.5 mm.
INSTRUCTIONS FOR USE
- Comb facial hair with a fine comb before you start trimming.
- Comb your hair in the direction that it grows so that the hairs are at their maximum height and facing in the same direction.
- After trimming, lightly go over the trimmed areas with the foil to get a smooth clean finish.
- Since all hairs do not grow in the same direction, you may want to try different trimming positions (i.e. upwards, downwards or across) for better results.
- Hair should be dry and free from any waxes or lotions.
- If hair builds up during use, switch the unit off, remove any attachment in use and clean any excess hair clippings from the attachment and groomer.
TO THIN AND TAPER THE BEARD/MOUSTACHE
- Attach the adjustable stubble comb or a fixed guide comb to the T-blade. If you are trimming for the first time start with the maximum trimming length setting.
- Turn the unit on.
- Start trimming under the chin following the line of the jaw.
- Place the flat top of the trimmer comb against the skin.
- Slowly slide through the hair. Work upwards towards the ear and upper beard line. Repeat from different directions as necessary.
- Tidy the beard edges using the T-blade. Use slow controlled movements to create contoured lines.

- If hair builds up in the trimmer comb during the trimmer process, switch the unit off, pull the comb and brush the hair off.
FINE DETAILING AND EDGING
- Fit the micro detail blade.
- Hold the device with the cutting blade (teeth) facing you and at 90 degrees to the skin.
- Start with the blades resting lightly against your skin, use motions towards edge of beard line to trim to desired locations in facial area.
- Shape as desired.
CONTOUR EDGING AND CLOSE HAIR CUTTING
Contour edging:
- Hold the device with the cutting blade (teeth) facing you and at 90 degrees to the skin.
- Start with the edge of the beard/moustache line and, with the blade resting lightly against the skin, use slow controlled movements to create contoured lines.
Close hair cutting:
- Use the fingers of one hand to lift the hair at the base of your head up off your neck.
- Your index finger should be covering the roots of the hairs you are lifting to prevent them from being accidentally cut.
- Hold the trimmer to the base of your neck with the blade facing up. Move the trimmer up the neck until it touches your index finger which is protecting the hair roots.
- Move your trimmer slowly and keep the hair roots at the base of your head out of the way of the trimmer.
BODY HAIR MAINTENANCE
Trimming to length
- Select the desired comb.
- Place the flat side of the attachment against the skin.
- Slowly slide the trimmer through the hair in the direction of hair growth.
- Use slow, well-controlled movements.
Removal
- Remove the comb and go over the areas where you want to remove the body hair.
- Stretch the skin with your free hand to make the hairs stand upright.
- Use light pressure and shave against the direction of hair growth.
HAIR CLIPPING
Step 1: Nape of the neck
- Attach the 3mm or 6mm fixed comb.
- Hold the trimmer with the blade teeth pointing upwards. Start at the centre of the head at the base of the neck.
- Slowly lift the trimmer, working upwards and outwards through the hair trimming just a little at a time.
Step 2: Back of the head
- With the 12mm or 18mm guide comb attached, cut the hair at the back of the head.
Step 3: Side of the head
- With the 3mm or 6mm guide comb attached, trim sideburns. Then change to the longer 9mm or 12mm guide comb and continue to cut the top of the head.
Step 4: Top of the head
- Use the longer length fixed combs of 18mm or 25mm to cut hair on top of the head against the direction in which the hair normally grows.
• Always work from the back of the head.
Step 5: The finishing touches
- Use the trimmer without a comb for close trimming around the base and sides of the neck.
- To produce a clean straight line at the sideburns, place the trimmer at right angles to the head, tips of the blades lightly touching the skin and then work downwards.
USING THE FOIL SHAVER
• Fit the foil shaver attachment.
- Use short, well-controlled linear movements. Use your free hand to stretch your skin. This encourages the hair to stand upright, making it easier to shave.
- Note: always trim your facial hair before shaving.
CLEANING AND MAINTENANCE
Care for your appliance to ensure a long lasting performance. We recommend that you clean it after each use.
AFTER EACH USE
- Brush any accumulated hairs from the trimmer and attachment heads.
- The easiest and most hygienic way to clean the trimmer is under the tap.
- Place one or two drops of oil on the blades. Turn the appliance on to distribute the oil evenly, wipe off any excess oil.
REPLACING THE FOILS AND CUTTERS
To ensure continued high quality performance from your shaver, we recommend the foils and cutters are replaced regularly.
Signs that your foils and cutters need replacing
- Irritation: as foils get worn, you may experience skin irritation.
- Pulling: as the cutters wear, your shave may not feel as close and you may feel the cutter pulling your hair.
- Wear through: you may notice that the cutters have worn through the foils.
TO REPLACE THE FOIL
- Remove the shaving head assembly by pressing the buttons on both sides of the shaver.

- Insert a flat bladed screwdriver between the sides of the foil screen and the head assembly and pull away from the notches.
- To reassemble, slide the foil into the shaving head and click into position. Hold the foil by the plastic frame to prevent damage.
REPLACING THE CUTTERS
- Remove the shaving head assembly by pressing the buttons on both sides of the shaver.
- Grasp the cutter between your thumb and forefinger and pull upwards.
- Snap the new cutter into the oscillator tip.
- Note: DO NOT press on the cutter ends as this may cause damage.
BATTERY REMOVAL
We strongly recommend that a professional removes the rechargeable battery. Parts of the shaver case, and tools have sharp edges and may cause injury if not handled correctly.
- The rechargeable battery must be removed from the appliance before it is scrapped.
-
Disconnect the charging adapter before removing the battery.
-
Ensure the device is discharged of all power. To do this, switch it on and allow it to run until it stops.
-
Remove the T-blade.
-
Pry and remove the top decorative panel and top housing.
-
Unscrew the 2 screws on the inner housing, and take off the top inner housing.
-
Take out the assembly of battery and printed circuit board.
-
Disconnect he battery from the circuit board.
- Used batteries must be removed from the appliance and disposed of at an appropriate official recycling/collection point.
RECYCLING
To avoid environmental and health problems due to hazardous substances, appliances and rechargeable and non-rechargeable batteries marked with one of these symbols must not be disposed of with unsorted municipal waste. Always dispose of electrical and electronic products and, where applicable, rechargeable and non-rechargeable batteries, at an appropriate official recycling/collection point.
ADAPTER SPECIFICATIONS
| Manufacturer address and registration number | Spectrum Brands (UK) Limited, Regent Mill, Fir Street, Failsworth, Manchester M35 0HSCompany number: 02394603 |
| Adapter model number PA-0510U | |
| Input voltage 100 - 240 V~ | |
| Input AC Frequency 50/60Hz | |
| Output voltage | 5.0 V --- |
| Output current 1.0 A | |
| Output power 5.0 W | |
| Average active efficiency ≥73.7% | |
| Efficiency at 10% - | |
| No load power consumption ≤0.1 W | |

REEMPLACER UNE GRILLE
natural_image
Two identical diagrams of a trash bin with cross-bracing, no text or symbols presentUŻYWANIE Z PRZEWODEM SIECIOWYM
natural_image
Two identical diagrams of a trash bin with cross-bracing, no text or symbols presentARANJAREA ȘI SCURTAREA BĂRBII/MUSTAȚEI
Remington ^® is a Registered Trade Mark of Spectrum Brands, Inc.,
or one of its subsidiaries
VARTA Consumer Batteries GmbH & Co. KGaA, Alfred-Krupp-Str. 9, 73479 Ellwangen, Germany
www.remington-europe.com