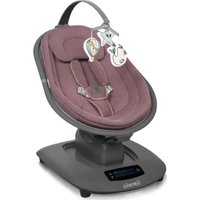
Margareet Wave - Baby swing Lionelo - Free user manual and instructions
Find the device manual for free Margareet Wave Lionelo in PDF.
User questions about Margareet Wave Lionelo
0 question about this device. Answer the ones you know or ask your own.
Ask a new question about this device
Download the instructions for your Baby swing in PDF format for free! Find your manual Margareet Wave - Lionelo and take your electronic device back in hand. On this page are published all the documents necessary for the use of your device. Margareet Wave by Lionelo.
USER MANUAL Margareet Wave Lionelo
Ergonomic baby carrier
Should you have any remarks or questions concerning the product, please do not hesitate to contact us: help@lionelo.com
The product complies with the standard CEN TR 16512:2015.
Producer:
BrandLine Group Sp. z o. o.
ul. A. Kriegewskiego 1, 61-248 Poznań, Poland
1. How to use
IMPORTANT! KEEP FOR FUTURE REFERENCE
Before you use the product for the first time, please read this manual.
WARNING:
- Constantly monitor your child and ensure the mouth and nose are unobstructed.
- For pre-term, low birthweight babies and children with medical conditions, seek advice from a health professional before using this product.
- Ensure your child's chin is not resting on its chest as its breathing may be restricted which could lead to suffocation.
- To prevent hazards from falling ensure that your child is securely positioned in the sling.
- The product is intended for children aged 4 months upwards and up to 20kg heavy.
- Only one child is allowed in the carrier.
- When carrying a child in the product, be aware of hazards in the household, e.g. sources of heat (iron, hot drink).
- Parent's movements in combination with child's movements may affect stable use.
- Be careful when bending and leaning forward and sideways.
-
Do not use the product when doing sports (e.g. running, cycling, swimming).
-
Please be advised that the falling risk rises as the child gets more active.
- Regularly check the product for potential damage or wear. Contact the manufacturer's authorized service center if you have found any irregularities.
- If you do not use the carrier, keep it out of reach of children.
- If your child cannot keep its head on its own, adjust the carrier in a way that child's head is supported by the carrier's upper panel, and then zip the hood which serves as an additional protection.
2. Product description (fig. 1)
- Shoulder belts
- Shoulder belts adjustment buckle
- Hood fastener
- Upper panel
- Hood
- Hip belt
- Front panel width adjustment button
- Hip belt buckle with adjustment
- Buckle which connects shoulder belts to adjustment
- Double buckle protection against undoing
- Strap which connects shoulder belts to adjustment
The child's chin should never rest on the parent's chest because it leads to partial closure of child's respiratory tract. The carrier user must always make sure the child's respiratory tract is unhindered and the child breathes properly.
Place the child in the carrier properly and pay attention to proper position of legs. Regularly check the child's position so that you are sure it is correct - in the center of the carrier, with broadly separated legs and straight head which does not fall down or sideways. It is necessary to monitor child's hands, legs and feet on a regular basis to be sure they are not squeezed by the carrier.
To avoid child's injuries when learning how to place it in the carrier, it is necessary to take relevant actions on the bed or other soft surface with the assistance of another adult. When possible, always put the carrier on and off near a safe surface and in the safe place.
Pay special attention when you carry the child on the back.
The carrier must not be used by a person with health issues which may affect safe use of the product. If the carrier user feels shoulder ache, backache or neck ache, he/she should stop using the product and consult a doctor.
3. AGE AND DEVELOPMENT STAGES - GENERAL GUIDELINES
NOTE! Maximum weight of the child is 20kg , it applies to all positions.
NOTE! Applies to all carrying positions: when putting the product on, always hold your child with one hand and do not let it go until you have fastened all belts and guards.
A. Carrying in front with a face in an inward position
Child's age at least 4 months
Child's weight at least 5,5 ~kg
In this position the front panel should be wide - the front panel width adjustment button (7) fastened on the hip belt.
- Fasten the hip belt (6). Lock the hip belt buckle with a double protection button (10). Adjust the hip belt to your waist (fig. 2a). The carrier's front panel should be centered in front of you.
Important: before you take another step, make sure the hip belt has been fixed properly!
- Take your child on your hands and hug in frontal position so that it wraps its legs around you (fig. 2c).
- Hold your child all the time and put one shoulder arm by pulling the hand and shoulder (fig. 2d and 2e). Pull the carrier's panel over the child's back. Do the same with another hand (fig. 2f).
NOTE! Hold your child all the time.
- Pull both palms to the back, fasten the shoulder belts buckle (9) and adjust its length (fig. 2g).
- Adjust the shoulder belts with the use of shoulder belt adjustment buckle (2). The child should be wrapped properly and belts tightened properly so that they do not squeeze the child's body too much (fig. 2h).
B. Carrying in front with a face in an outward position
Child's age at least 6 months
Child's weight at least 7,8 kg
This position is intended solely for children who are able to keep their head straight. In this position the product can be used in two variants of front panel width:
- Wide position - front panel width adjustment button (7) fastened on the hip belt.
-
Narrow position - front panel width adjustment button (7) fastened at the front of the carrier.
-
Adjust the front panel width so that the child can sit comfortably (narrow position for smaller children, wide for bigger ones).
- Fasten the hip belt (6). Lock the hip belt buckle with the use of the double protection button (10). Adjust the hip belt to your waist (fig. 2a). The carrier's front panel should be centered in front of you (fig. 3a).
Important: before you take another step, make sure the hip belt has been fixed properly!
- Take the child on your hands and hold its chest firmly, then pull its legs between the carrier (fig. 3b).
- Holding your child firmly, lift the carrier's panel and cover your child with it.
- Pull your hands through shoulder belts (fig. 3c and 3d).
NOTE! Hold your child all the time.
- Pull both palms to the back, fasten the shoulder belt buckle (9) and adjust its length (fig. 3e).
- Adjust the shoulder belts with the use of the shoulder belt adjustment buckle (2). The child should be wrapped properly and belts tightened up so that they do not squeeze the child's body too much.
C. Carrying on the back with the face in an inward position
Child's age at least 6 months
Child's weight at least 7,8kg
This position is intended solely for children who can sit straight on their own (and do not swing to the front and back).
In this position the front panel should be wide - the front panel width adjustment button (7) fastened on the hip belt.
Note! For the sake of safety, if you wish to place your child in this position, ask another person for help!
- Fasten the hip belt (6). Lock the hip belt buckle with the use of the double protection button (10). Adjust the hip belt to your waist (fig. 4a). The carrier's front panel should be centered behind you.
Important: before you take another step, make sure the hip belt has been fixed properly! - Bend forward, ask your partner to put the child on your back gently.
NOTE! The child must be held until the carrier has been secured fully. - Child's legs must wrap around the parent's waist (fig. 4b).
- Ask your partner to lift the carrier's panel and wrap the child's back with it (holding it all the time and securing against falling with another hand (fig. 4c).
- Use your partner to pull the left and right hand through shoulder belts (fig. 4d).
- Link the shoulder belts (fig. 4e) and adjust them (4).
- Adjust the shoulder belts with the use of the shoulder belts adjustment buckle (2). The child must be wrapped properly and belts tightened up so that they do not squeeze the child's body too much.
Monitor your child permanently to make sure its position is comfortable and its breath is not hindered.
4. Accessories
A. Hood
NOTE! If you use the hood, make sure it DOES NOT cover child's entire face. Check the child regularly. Make sure the hole allows a sufficient flow of air. The product is equipped with a hood which secures the child's head (e.g. when it sleeps, against wind and sunlight). To use it, take the hood out through the hole (4) and put both fasteners in the designated spot on the shoulder belt (marked as 3 in the fig. 1). The hood must not cover the child's face; it must protect the back of the head.
B. Belt guards (pads)
The product is equipped with cotton belt guards with snap fasteners. They protect the shoulder belts against dirt and child's saliva. The cotton guards can be easily removed and washed.
Fasten them in the lower area of shoulder belts (near child's head). The snap fasteners should be on the external side of the shoulder belts so that they do not irritate the child's skin.
5. How to clean and maintain
Check the product for potential damage or rips on a regular basis. Do not repair the product on your own; if you detect any irregularities, contact the manufacturer's authorized service center. Wash the product manually at the temperature of max. 30 degrees of Celsius.
Illustrations are for informational purposes only. The actual appearance of the products may differ from the pictures.
PL
Drogi Kliencie!
I3dJIy BceIa IepKInTe pe6eHka OJHO pyKOi H He OTnysKaITe, Noka BCEpeMHn I 3aCTeJkN He 6yDyT 3aKpeJIeHbl.
A. HoiheHne cpeepn JIuom BHytpb
Bo3pacT pe6eHka He MeHee 4 MecaeeB
Bec pe6eHka MInHmym 5,5 K
B ətOM noloxhen nepednay naheIb doJxHa 6bITb shipoko - KhOpka peylnopOBKn shinpHbI nepednei naheI (7) 3aCteRhyTa Ha 6eDpeHHom pemHe.
- 3acteHnTe 6epeHHbI peMeHb (6). 3aΦNKcnpyIte BO3MOxKHOCTb paCCTeRnBaHnI npJxKn 6epeHHoro peMnC nOMoUIO DBOHOr KHOPIKn 6e3OpacHoCTn (10). OtperyIpyIte 6epeHHbI peMeHb, yTo6bl OH
COOTBETCTBOBaI BaSei TaIIu (pnc. 2a). IpeeHnay naneIb IpeHocKn DoJIkHa HaxoIITbcr B ceHTpe IpeeD Bamn.
BaxkHo: nepei BbIOpHeHem cIeDyUoJero Wara y6eIHTecb, yTo 6edpeHHbI peMeHb npaBnIbHO 3akpePJIeH!
- Bo3bMnte pe6eHka Ha rykn i depxnte ero Inuom K ce6e, YTo6bl HoxkN o6xbatnIi Bac (Pnc. 2c).
- Дерossa робенka Bce Время, надени Te Odnн п leveBoi peMeHb, подев руку и п levo (pnc. 2d n 2e). Habinte NaheIb Дяп repeHockn Ha cInHy pe6enka. Пobtopinte с дpyroйсторь (pnc. 2f).
BHHMAHNE! Bce BpeM npndepknaTe pe6eHa.
- ПоложиTe obe ryкн ha3aД, зakpenITE npяжky, coeINHIOUyIO nIeueBbie pemn (9), n otpergylnipuYe ee, otpergyInpOBaB dInHy pod ce6y (Pnc. 2g).
- Štrpeулірійті піechіевіе ремні, Incnoь3уя peуліровочую пражкіru pпачевoro ремн('2). Pe6eHOKdoJxKeH 6bIbПLOTHO 3aBepHyT, a peMHn ПLOTHO npIneRaTb, yTO6bl OHH He CInuKOM cnIbHo cKOBbIbAln erO TeLo (pnc. 2h).
B. HôseHne cπepei liuom hapxky
Bo3pact pe6eHka He MeHee 6 MecaTeB MnHMaJIbHbI BeC pe6eHka: 7,8 Kr
этабиця прднзнayeha Только дя.DeTei, KOTOpbIe MOrTuT DepeKaTb TOLOBy BepTKkaJIbHO.
B 3TOM nOLOJKeHn n3dJIe Me MoKET nCnOJIb3OBaTbcS B DByx KOHΦnIpyaIqnx WnprHbI nepeDHei paHei:
-Ширokая поизмен - Конь регули探测никшириньпсядень панели (7), 3астгунта на посом рем He.
- Y3Koe noLoXeHne - KHOJa peRyInpOBKn 7npiNbI nepeDHei paHei (7), 3aCTeRHyTa Ha nepeDHei yactn nepeHocKn.
- Řte ynpitye npinhy nepdne nahei TaK, tO6bpe6eHok ydo6ho cnIeBcnden (y3Koe pIoJxHne Ira MaJeHbKnx DeTei, wipokoe 60nbux)
- 3acteHnTe 6epeHHbI peMeHb (6). 3aΦNKcnpyIte BO3MOxKHOCTb paCCTeRnBaHnI npJkKn peMn 6ePa c NOMOuBIO DBOHON KHOPIKNI
6e3oNaChocTn (10). OTrpeRyIpyIte 6eIpeHbI peMeHb, YTo6bI OH COOTBeTcTBoBaI BaIeI TaIIIN (pnc. 2a). IpePeHra paHeIb IpeHocKn DOLJHa HaxOITbcB B cHTpe IpeE Bamn (pnc. 3a).
Baxho: nepei BbIIOJIHeHem cIeIyUoJero Wara y6eIHTecb, yTo 6eIpeHHbI peMeHb HaJeXHo 3aCTeRHyT!
- Bo3bMnte pe6eHka Ha rykn i KpeNko Depxknte ero 3a rpydb, 3aTe m npOdeHbTe HoxKn MeJdy nepeHocKo (Pnc. 3b).
- Bcerda kpeknko depxknte pe6eHka, depxkacb 3a naHeIb nepeHocKn, n 3akpoiTe eNo pe6eHka.
- Праздени руки черп п leчевые ремн (Pnc. 3c n 3d).
BHIMAHNE! Bce BpeM npIepKnBaIte pe6eHka.
BrandLine Group Sp. z o.o.
A. Krieglewskiego 1, 61-248 Poznań, Polen
1. Het gebruik
BELANGRIJK! BEWAAR VOOR TOEKOMSTIG GEBRUIK
Detailed warranty conditions are available on the website: