Eco Control + Video 10256296 - Baby products NUK - Free user manual and instructions
Find the device manual for free Eco Control + Video 10256296 NUK in PDF.
| Product type | Video baby monitor |
| Brand | NUK |
| Model | Eco Control + Video 10256296 |
| Indoor range | Up to 50 meters |
| Outdoor range | Up to 300 meters |
| Frequency | 2.4 GHz, digital frequency hopping (FHSS) |
| Parent unit screen | 2.8 inch color LCD, QVGA 320x240 pixels |
| Parent unit power supply | 6V DC 800mA power adapter or 3.7V 950mAh Li-Polymer battery |
| Parent unit battery life | Up to 8 hours (low brightness) / 5 hours (high brightness) |
| Baby unit power supply | 6V DC 800mA power adapter or 4 AA 1.5V batteries (not included) |
| Night vision | 8 infrared LEDs, range approx. 1 meter |
| Main functions | Audio, video, thermostat, lullabies, intercom, zoom, Full Eco mode, vibration |
| Operating temperature | 0°C to 45°C |
| Temperature sensor | Range 11°C to 30°C, accuracy ±2°C |
| Operating modes | Normal and Full Eco (radiation reduction) |
| Package contents | Parent unit, baby unit, 2 power adapters, rechargeable battery, quick start guide, instruction manual |
| Care and cleaning | Clean with a damp cloth, do not use chemical products |
| Spare parts and repairability | Replaceable Li-Polymer battery; repair by a specialist after warranty |
| Warranty | 2 years from date of purchase |
Frequently Asked Questions - Eco Control + Video 10256296 NUK
User questions about Eco Control + Video 10256296 NUK
0 question about this device. Answer the ones you know or ask your own.
Ask a new question about this device
Download the instructions for your Baby products in PDF format for free! Find your manual Eco Control + Video 10256296 - NUK and take your electronic device back in hand. On this page are published all the documents necessary for the use of your device. Eco Control + Video 10256296 by NUK.
USER MANUAL Eco Control + Video 10256296 NUK
natural_image
Two NUN-branded mobile phone devices, one displaying a sleeping photo and the other with antenna (no visible text or symbols)Please see inside cover fold-out page
F Français ....52
natural_image
White electronic device with a black cover and two labeled parts (16 and 17), no visible text or symbols on the body.12
Congratulations – you have selected a high-quality product from NUK!
NUK Eco Control + Video is a wireless audio and video monitoring system mostly used for the supervision of babies and young children. It is equipped with the latest technology to ensure a day and night high-quality transmission between the baby and the parent unit. It complies with the state of the art technology and often even exceeds the standards required.
NUK Eco Control + Video is ready to use - just connect the baby monitor to a power supply and switch it on! The baby monitor will operate on default settings. Use the Quick Start Guide for help. You can easily adjust the default settings to your needs. Use these operating instructions for help.
The baby monitor provides Full Eco Mode which guarantees safe and efficient supervision on the lowest high-frequency radiation possible. Additional features are a room thermometer to continually monitor the temperature in the baby's room and 5 different lullabies. The design of the baby monitor supports the usage for all people requiring additional care or supervision regardless of their age.

Read the operating instructions carefully and follow them. Store the operating instructions safely and accessible. Pass on the operating instructions to the next user.
CONTENT
1 OVERVIEW 30
1.1 SAFETY INSTRUCTIONS 30
1.2 DELIVERY 31
1.3 PARENT UNIT 32
1.3.1 SCREEN ON THE PARENT UNIT 33
1.4 BABY UNIT 34
2 NUK ECO CONTROL + VIDEO 35
2.1 OPERATING MODES 35
3 POWER SUPPLY 36
3.1 PARENT UNIT 36
3.1.1 MAINS ADAPTER 36
3.1.2 BATTERY 36
3.1.3 HANDLING INSTRUCTIONS FOR THE BATTERY 37
3.1.4 CHARGING THE BATTERY 37
3.2 BABY UNIT 38
3.2.1 MAINS ADAPTER 38
3.2.2 BATTERIES.... 38
4 TRANSMISSION OF DATA 39
4.1 FREQUENCY RESTRICTIONS 39
4.2 RANGE 39
4.3 INTERFERENCE 39
4.4 EAVESDROPPING/INTERCEPTION 39
4.5 DELAYS IN VIDEO AND AUDIO 39
5 GETTING STARTED 39
5.1 CONNECTION CHECK 40
5.2 CONNECTIONS RECEPTION STRENGTH INDICATOR 40
5.3 BATTERY INDICATOR 40
5.4 POSITIONING 41
5.4.1 TILTING THE CAMERA 41
6 OPERATION 41
6.1 DEFAULT SETTINGS.... 42
6.2 FULL ECO MODE 42
6.2.1 SWITCHING FULL ECO MODE ON/OFF 42
6.2.2 FORCED VIEWING 43
6.2.3 OUT OF RANGE INDICATION WITH FULL ECO MODE ON 43
7 PARAMETER 43
7.1 PARENT UNIT 43
7.1.1 MENU 43
LANGUAGE 43
LULLABIES 43
SENSITIVITY 44
TEMPERATURE 44
VIBRATION......44
ALERT 45
BRIGHTNESS 45
FULL ECO MODE 45
7.1.2 VOLUME 45
7.1.3 ZOOM IN 46
7.1.4 TALKBACK 46
7.2 BABY UNIT 46
7.2.1 VOLUME 46
7.2.2 LULLABIES 46
7.2.3 TEMPERATURE INDICATOR 46
7.2.4 AUTOMATIC NIGHT VISION 46
8 HANDLING INSTRUCTIONS FOR THE BABY MONITOR 47
8.1 TRANSPORTATION 47
8.2 CLEANING 47
8.3 MAINTENANCE 47
8.4 DISPOSAL 47
9 PROBLEM SOLVING 48
10 TECHNICAL SPECIFICATION 50
11 GUARANTEE/WARRANTY 50
1 OVERVIEW
1.1 SAFETY INSTRUCTIONS
Below you will find a list of all safety instructions which must be followed for a safe usage of your NUK Eco Control + Video. They are ordered content wise. In the operating instructions you will find the safety instructions in the sequence of the numbers, marked with the symbol! and the number. Hints for an effective and better use are marked Note.
| Safety instructions | Chapter | No. |
| Your baby monitor is designed to be an aid. It must not be used as a substitute for responsible and proper adult supervision. | 2 1 | |
| Protect the personality rights of others. 2 2 | ||
| Do not install the baby monitor during a thunderstorm. 5 15 | ||
| Position the baby unit at a minimum distance of 1 meter (3 ft.) from your baby to reduce hazard of radiation. | 5.4 18 | |
| WARNING! Strangulation hazard! Keep cords out of reach of children. Do not use the units with an extension cable. | 5.4 17 | |
| Protect the baby monitor from out-of-range temperatures, moisture, water, dust, sand, or similar. | 2 3 | |
| Never cover the units (e.g. with clothes, towels or blankets). 5.4 20 | ||
| Only use the supplied mains adapter. | 3.1.13.2.1 | 411 |
| Never use a damaged mains adapter. | 3.1.13.2.1 | 512 |
| Before connecting the mains adapter: Make sure the voltage shown on the nameplate of the mains adapter corresponds to the local mains power. | 3.1.13.2.1 | 613 |
| If you are not using the baby monitor for a long period of time: Disconnect the mains adapter from the wall socket. Remove batteries to avoid damage due to battery leakage. | 3.1.43.2.2 | 1014 |
| Do not install the battery with force. 3.1.2 7 | ||
| Only use the supplied Li-Polymer battery or replace it with a Li-Polymer battery of the same type and specification. | 3.1.2 8 | |
| Improper use of the battery may cause heat, fire, rupture, damage, or capacity deterioration of the battery. Please read and follow the handling instructions before use. | 3.1.3 9 | |
| Do not dispose empty batteries in normal household waste. Take them to your local chemical waste recycling centre. | 8.4 27 | |
| Check the connection between the units each time before using. 5.4 19 | ||
| Check the connection regularly during normal operation. 5.1 16 | ||
| Check the range of your baby monitor before you use Full Eco Mode. Make sure you are within range. | 6.2 21 | |
| In Full Eco Mode the connection check is disabled and the connection indicator will remain off. | 6.2.3 22 | |
| Clean the baby monitor with care. Use a damp cloth only. Do not use chemical cleaning products. Before cleaning: Make sure that the mains adapters are disconnected. | 8.2 23 | |
| Never dismantle the mains adapters. 8.3 24 | ||
| During the out of warranty period, repairs on the parent unit or the baby unit must only be carried out by specialists for electronic devices. Never repair mains adapters, mains cables or batteries. | 8.3 25 | |
| Do not throw this product away with the normal household waste. Take it to any official collection point for recycling. | 8.4 26 |
1.2 DELIVERY
Your NUK Eco Control + Video contains one item of each of the following:
- parent unit (fig. 1)
- mains adapter for the parent unit (country specific) (fig. 4 and Note)
- rechargeable battery for the parent unit
- baby unit (fig. 5)
- mains adapter for the baby unit (country specific) (fig. 9 and Note)
- Quick Start Guide
• operating instructions
Note The mains adapters' plugs for the parent unit and the baby unit have a specific size for each unit, so you can't mix them up.
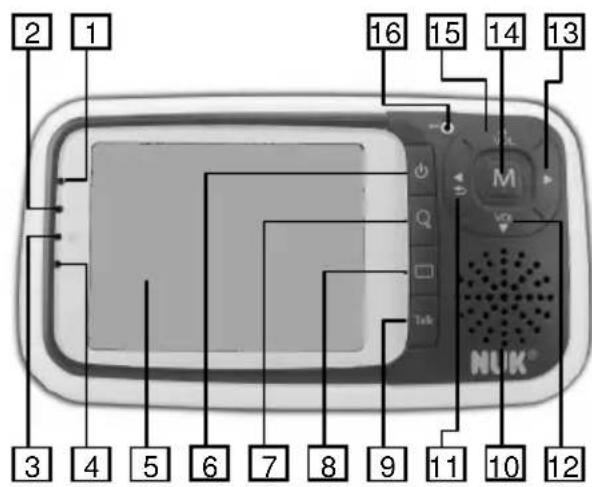
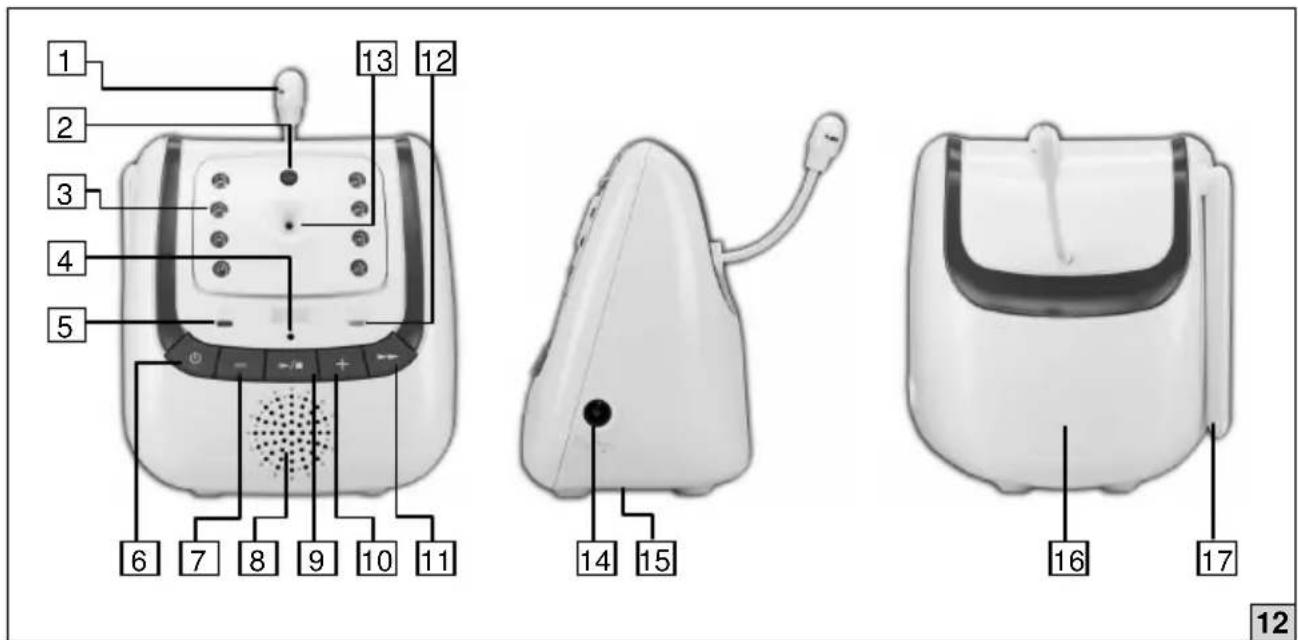
1.3 PARENT UNIT
text_image
2 1 16 15 14 13 M NLUK® 3 4 5 6 7 8 9 10 11 12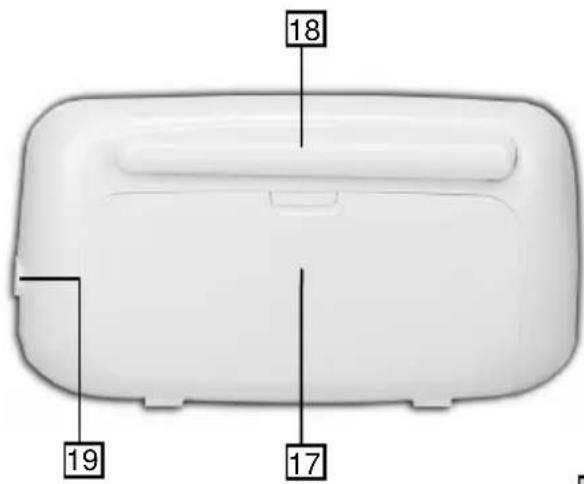
text_image
18 19 1710
1 connection indicator ( ):
- green light: very good connection to the baby unit
• flashes slowly: good connection to the baby unit
• flashes quickly: no connection to the baby unit
2 battery indicator ( □):
- unit powered by mains → battery loading indicator: loading: red light loading finished: no light
- unit powered by batteries → power on/off indicator: on: red light off: no light
3 speaker indicator ( ):
- on: no light
- off: blue light
4 Full Eco Mode indicator ( ECO):
- on: yellow light
- off: no light
5 screen (for further details chapt.1.3.1)
6 button: power on/off
7 button: zoom in on/off
8 button: video on/off
9 TALK button: talkback on/off
10 built-in speaker
11 button:
standard: no function
zoom in: move left
menu: back
12 Vol Button:
standard: decrease volume
zoom in: move down
menu: scroll
13 button:
standard: no function
zoom in: move right
menu: no function
14 M button: menu
15 ▲ button:
standard: increase volume
zoom in: move up
menu: scroll
16 built-in microphone
17 battery compartment
18 antenna
19 mains adapter jack
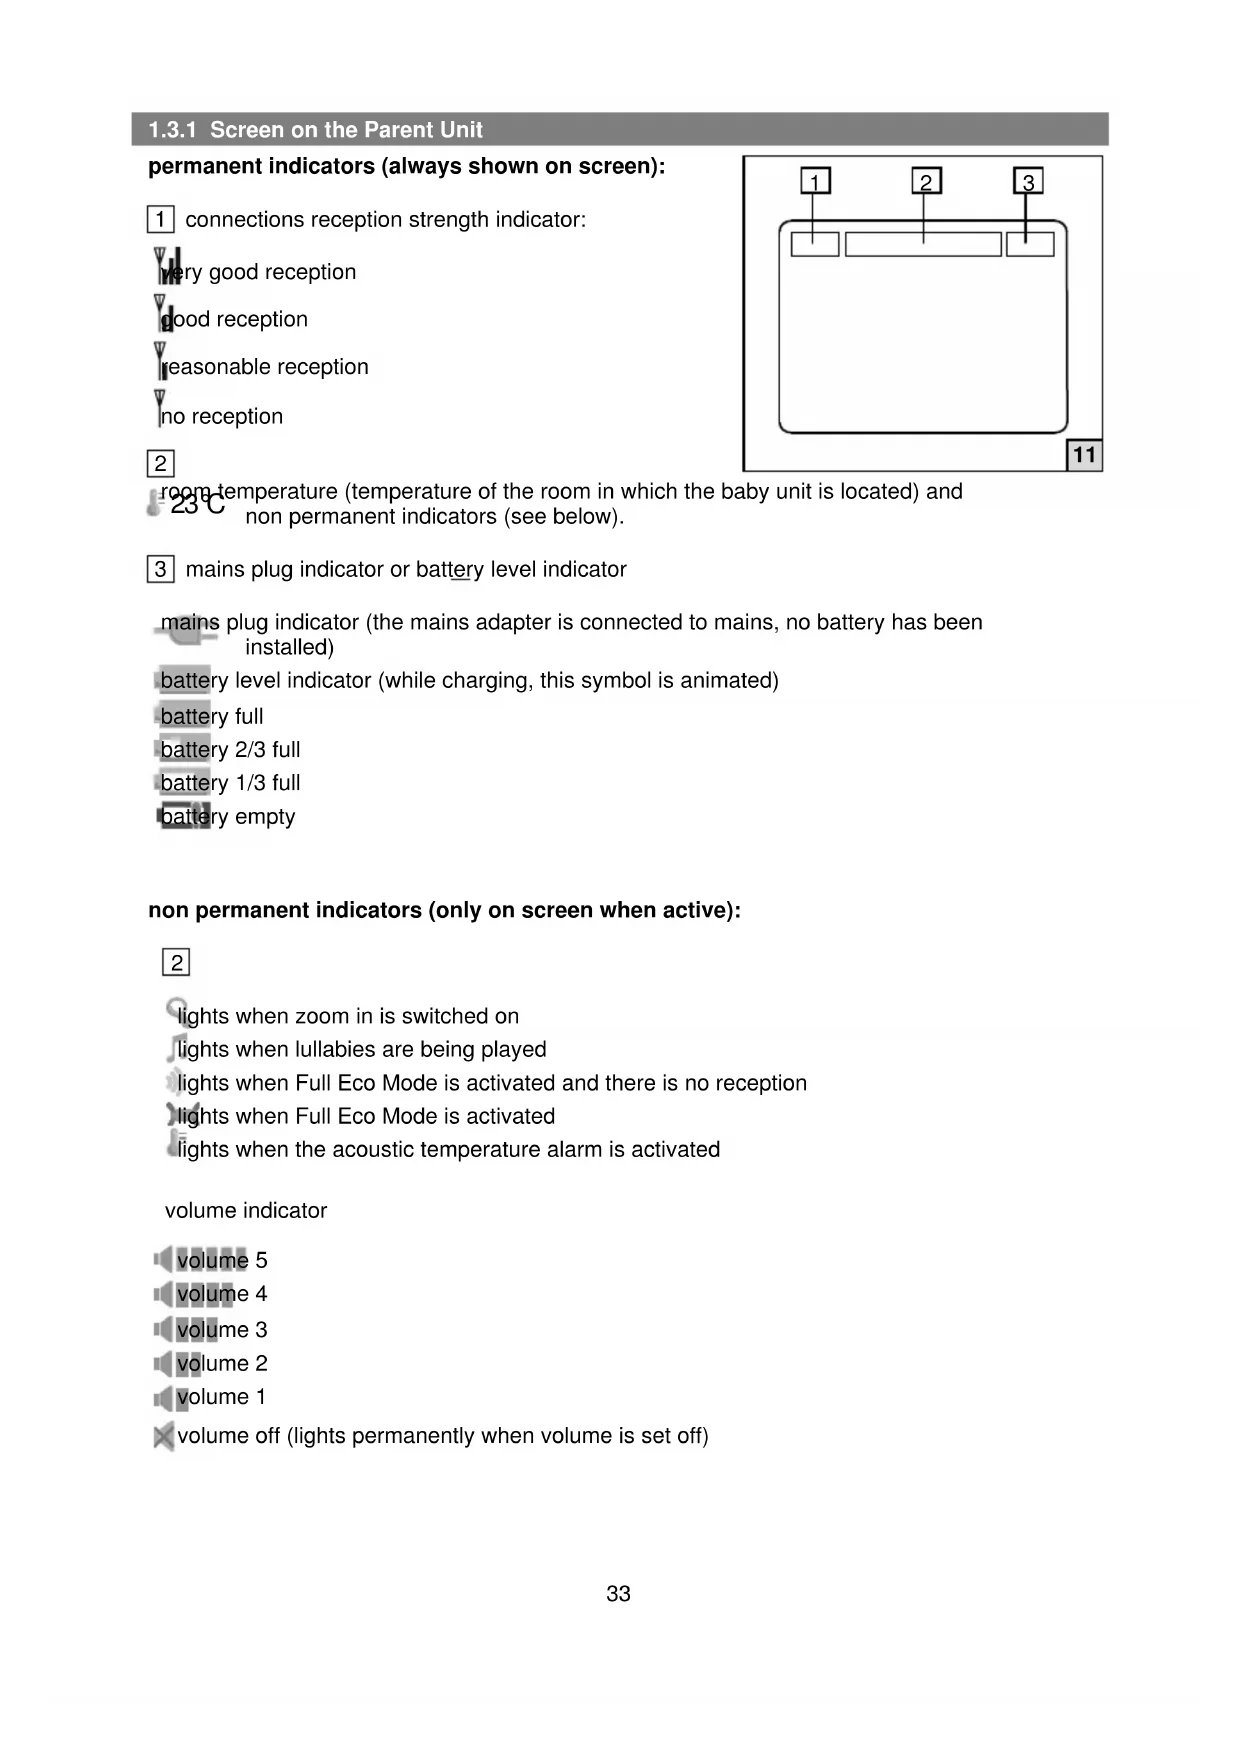
1.3.1 Screen on the Parent Unit
permanent indicators (always shown on screen):
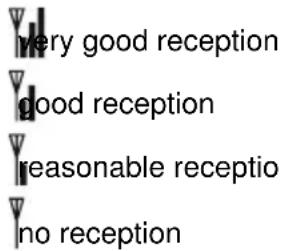
1 connections reception strength indicator:
text_image
very good reception good reception reasonable reception no reception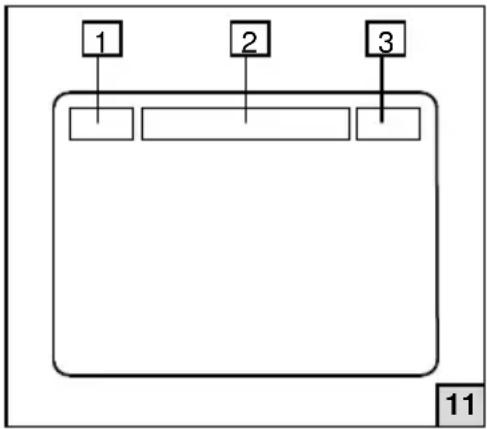
flowchart
graph TD
    A["1"] --> B[" "]
    C["2"] --> D[" "]
    E["3"] --> F[" "]
2 room temperature (temperature of the room in which the baby unit is located) and non permanent indicators (see below).
3 mains plug indicator or battery level indicator
mains plug indicator (the mains adapter is connected to mains, no battery has been installed)
battery level indicator (while charging, this symbol is animated)
battery full
battery 2/3 full
battery 1/3 full
battery empty
non permanent indicators (only on screen when active):
2
lights when zoom in is switched on
lights when lullabies are being played
lights when Full Eco Mode is activated and there is no reception
lights when Full Eco Mode is activated
lights when the acoustic temperature alarm is activated
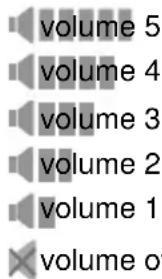
volume indicator
text_image
volume 5 volume 4 volume 3 volume 2 volume 1 volume ofvolume 5
volume 4
volume 3
volume 2
volume 1
× volume off (lights permanently when volume is set off)
1.4 BABY UNIT
text_image
1 2 3 4 5 6 7 8 9 10 11 12 13 14 15 16 17 121 temperature sensor
2 light sensor (technical feature for automatic detection of night vision)
3 Infrared LEDs (for night vision)
4 built-in microphone
5 power on/off indicator ( ): on/red light off: no light
6 button: power on/off
7 - button: decrease volume
8 built-in speaker
9 button/start/stop for lullabies
10 + button: increase volume
11 button. next lullaby
12 battery indicator ( ): unit powered by mains: green light
unit powered by batteries: no light - batteries full
green light flashes - batteries low
13 camera
14 mains adapter jack
15 screw connection for tripod (chapt. 5.4)
16 battery compartment
17 antenna
2 NUK ECO CONTROL + VIDEO
NUK Eco Control + Video is a baby monitor designed to detect sounds and video. Baby monitors are mostly used for monitoring babies and young children. However, this baby monitor is designed in a way that you can use it for all people requiring additional care regardless of their age.

Your baby monitor is designed to be an aid. It must not be used as a substitute for responsible and proper adult supervision.
The baby monitor is designed to be used by adults with all physical, sensory and mental abilities, sufficient experience and knowledge in supervising babies, young children or persons requiring additional care. You shall read the operating instructions of the baby monitor before use.
If the baby monitor is used by other persons they should either be supervised by someone responsible for their safety or receive instructions on how to use the equipment safely and effectively. Children shall be supervised to ensure they do not play with the baby monitor.
The baby monitor consists of two units: the baby unit and the parent unit (for details see fig. 10, 11, 12). The baby unit detects sounds, video and temperature data and transmits it wireless to the parent unit presenting the data received. It depends on the settings of the baby monitor which data is transmitted at which time.
Any other individuals who are or might be present in the room being monitored must be notified of the presence of the baby monitor

Protect the personality rights of others.
The baby monitor is designed for indoor use. It needs to be operated at room temperature and normal humidity. For further details see the technical specification (chapt. 10).

Protect the baby monitor from out-of-range temperatures, moisture, water, dust, sand, or similar.
2.1 OPERATING MODES
The baby monitor complies with the state of the art technology and often even exceeds the standards required - independent from the settings you choose. Feel free to check out the technological possibilities to find the right settings for your situation, senses and environment.
When connected to a power supply the baby monitor is ready to use – just switch it on. It then works based on default settings (chapt. 6.1). The settings can be adapted to your needs intuitively or with the help of the operating instructions. The baby monitor may be operated in two modes:
1. Normal mode
In normal mode the parent unit automatically checks the connection to the baby unit. To ensure connection it also does so when the baby is quiet. Normal mode is recommended in environments where you are unsure if the parent and the baby unit have a connection.
2. Full Eco Mode
In Full Eco Mode a connection between the parent and the baby unit is assumed as existing. When the baby is quiet the baby monitor is 100% free from high-frequency radiation. If you use the baby monitor in an environment with known reception conditions (e.g. at home) try out Full Eco Mode (chapt. 6.2) to reduce radiation.
In both modes you can vary the sensitivity of the baby monitor to adjust the bandwidth of sounds (chapt. 7.1.1). If you wish to hear very quiet sounds from the baby (= maximum sensitivity) the baby unit might even transmit sounds from the baby's environment.
3 POWER SUPPLY
3.1 PARENT UNIT
The parent unit may be powered by mains using the mains adapter with the thin plug (fig. 4) or by a rechargeable battery. When using the battery the parent unit is mobile.
3.1.1 Mains Adapter
Installation of the mains adapter with the thin plug (for specification see chapt. 10):
- Connect the mains adapter with the thin plug to the jack on the right-hand side of the parent unit (chapt. 1.3 [19]).
- Plug the mains adapter into a mains plug.
For your own safety comply with the above described order. Disconnect the unit vice versa: First disconnect the mains adapter from the wall socket and then from the unit.
Only use the supplied mains adapter.
Incorrect adapter types can cause damage to the unit. Before using the mains adapter, check if it is damaged or if there are uninsulated cables. Replace the mains adapter in case of any damage with the original part only (chapt. 8.3).
5 Never use a damaged mains adapter.
Before connecting the mains adapter: Make sure the voltage shown on the nameplate of the mains adapter corresponds to the local mains power.
3.1.2 Battery
In the parent unit the delivered rechargeable battery may be installed.
Specifications:
- Type BYD SCD530-1
- Material: Lithium Polymer battery, rechargeable, made by BYD
• Output: 3.7 V, 950 mAh (3.5 Wh)
With brightness set to low the battery lasts up to 8 hours*, with brightness set to high up to 5 hours* (*chapt. 10).
Installation of battery (fig. 3):
- Open the battery compartment of the parent unit by sliding off the battery cover on the back of the parent unit.
- Insert contact side of the battery first so that it has complete contact to the terminals of the parent unit.
- Push other side of the battery downwards slightly until it clicks into place.

Do not install the battery with force.
Note The battery slides in easily, if you feel resistance you have not followed the order of installation or positioned the battery incorrectly. Start from the beginning.
- Slide the battery cover back on to the parent unit.
Note If no battery is inserted into the parent unit, the unit can still be powered using the mains adapter (chapt. 3.1.1).

Only use the supplied Li-Polymer battery or replace it with a Li-Polymer battery of the same type and specification.
The use of any other battery can cause damage to the device.
Note If the battery level indicator (chapt. 1.3.1) shows battery empty the parent unit will switch off in approximately 5 minutes* (*chapt. 10).
3.1.3 Handling Instructions for the Battery

Improper use of the battery may cause heat, fire, rupture, damage, or capacity deterioration of the battery. Please read and follow the handling instructions before use.
Handling instructions:
- Neither put the battery into a fire nor heat the battery. Do not store the battery in high temperature environment.
- Insert the battery correctly so that the battery contact completely touches the terminals of the parent unit.
- Do not let the battery contacts or parent unit terminals contact a wire or any metal (like a metal necklace, keys or a hairpin) with which it is carried or stored together. It may cause short-circuit.
- Do not drive a nail in, hit with a hammer, or stamp on the battery. Do not strike the battery in other ways.
- Do not disassemble or alter the battery's outside structure.
- Do not submerge the battery in water. Do not wet the battery when stored.
- The battery was inspected carefully before shipment to conform with the specifications. However, in case any abnormality (bad smell, heat etc.) arises after purchase, bring the battery back (chapt. 11).
3.1.4 Charging the Battery
As soon and as long as you connect the parent unit to the mains adapter and plug the adapter into a mains plug, the battery is being charged.
There is a battery indicator on the parent unit (chapt. 1.3). When the mains adapter is connected to mains: It lights up when and as long as the battery is being charged. It turns off when the battery is full. With a disconnected mains adapter the battery indicator is a power on/off indicator: Then the light turns on when the parent unit is turned on, the light turns off when the parent unit is turned off.
Moreover, there is a battery level indicator on the top right position of the screen of the parent unit (chapt. 1.3.1). It shows the remaining power of the battery. The battery level indicator is animated while the battery is being charged.
Note If instead of the battery level indicator the symbol of a mains plug lights up, the battery has not been inserted.
Before using the unit for the first time or after a long period of time: Charge the battery for at least 15 hours, even if the indicator shows that the battery is full. When the parent unit is
connected to the mains the charging time for the parent unit battery (whether the parent unit is switched on or off) is up to 6 hours* (*chapt. 10).
The charging circuit for the battery is controlled electronically: There is no danger of overloading the battery. You can leave the mains adapter continuously connected.

If you are not using the baby monitor for a long period of time: Disconnect the mains adapter from the wall socket. Remove batteries to avoid damage due to battery leakage.
3.2 BABY UNIT
The baby unit may be powered by mains using the mains adapter with the thick plug (fig. 9) or by batteries. When using the batteries the baby unit is mobile.
3.2.1 Mains Adapter
Installation of the mains adapter with the thick plug (for specification see chapt. 10):
- Connect the mains adapter with the thick plug to the jack on the right-hand side of the baby unit (chapt. 1.4 [14]).
- Plug the mains adapter into a wall socket.
For your own safety comply with the above described installation order. Disconnect the unit vice versa: First disconnect the mains adapter from the wall socket and then from the unit.

Only use the supplied mains adapter.
Incorrect adapter types can cause damage to the unit. Before using the mains adapter, check if it is damaged or if there are uninsulated cables. Replace the mains adapter if any damage is found (chapt. 8.3).

Never use a damaged mains adapter.

Before connecting the mains adapter: Make sure the voltage shown on the nameplate of the mains adapter corresponds to the local mains power.
3.2.2 Batteries
In the baby unit batteries may be installed with the following specifications:
- Type: AA (R6)
• Material: high quality alkaline - Output: 1.5 V
• Quantity: 4 pieces
The batteries are not included in the pack. It is possible to insert rechargeable batteries, but since the baby unit is not equipped with a charging device, rechargeable batteries must be charged in an external battery charger when empty.
Note
Use the mains adapter when mains is available.
Note
When the green light of the battery indicator (chapt. 1.4) flashes, the baby unit will switch off in approximately 30 seconds* (*chapt. 10).
Installation of batteries (fig.7):
-
Unlock the battery cover of the baby unit by placing a flat, blunt object in the slot on the bottom of the baby unit.
-
Insert batteries in the battery compartment as indicated (+ battery contact with + baby unit terminal, - battery contact with - baby unit terminal).
- Replace the battery cover on the baby unit and snap it in place.

If you are not using the baby monitor for a long period of time: Disconnect the mains adapter from the wall socket. Remove batteries to avoid damage due to battery leakage.
4 TRANSMISSION OF DATA
The baby monitor uses the frequency of 2.4 GHz to transmit data between the baby and the parent unit. The baby monitor complies with the state of the art technology (see attached declaration of conformity) and in certain values even exceeds the standards required.. The use of this frequency with the baby monitor is license-free for indoor and outdoor.
4.1 FREQUENCY RESTRICTIONS

In France, Russia, Ukraine only for indoor use.
4.2 RANGE
Range is the distance between the units in which the wireless communication operates. The maximum range of the baby monitor is up to 300 meters (984 ft.) outdoors and 50 meters (164 ft.) indoors; the range is dependent on local circumstances. Please be aware that large buildings, metal constructions, atmospheric disturbances and other wireless devices may affect the operating range. For a better reception fold out the antennas of the parent unit (fig. 2) and the baby unit (fig. 6). Pay attention to the recommendations for positioning (chapt. 5.4).
If the units move out of range of each other, the image first freezes for a few seconds (no motion), followed by the message 'NO LINK', after which the screen goes black.
4.3 INTERFERENCE
The transmitted data of the baby monitor is digitally encoded. You should therefore never receive data from other equipment, nor will the data from your baby unit appear on, for example, your neighbour's parent unit.
4.4 EAVESDROPPING/INTERCEPTION
It is virtually impossible to eavesdrop on/intercept the transmitted audio or video data. Not only would one need to be in range of the baby monitor, also very expensive equipment would be required.
4.5 DELAYS IN VIDEO AND AUDIO
The baby unit transmits the video and audio data to the parent unit in digital blocks. The parent unit recreates a recognizable image and a comprehensible sound from this data. This may mean that there is a short delay between the movement or sound taking place and seeing/hearing it on the parent unit. In addition, the video and sounds on the parent unit may not be exactly synchronized with each other.
5 GETTING STARTED

Do not install the baby monitor during a thunderstorm.
-
Install the mains adapters (chapt. 3.2.1) or the batteries (chapt. 3.2.2) at the baby unit.
-
Install the mains adapters (chapt. 3.1.1) or the battery (chapt. 3.1.2) at the parent unit.
- Switch on the baby unit by briefly pressing the ⏻ button. (Keep this button pressed for 2 to 3 seconds to switch the baby unit off.)
- Switch on the parent unit by briefly pressing the ⏻ button. (Keep this button pressed for 2 to 3 seconds to switch the parent unit off.)
As soon as the parent unit is switched on, the connection indicator (chapt. 1.3) flashes rapidly and the parent unit starts searching for the baby unit. Once the baby unit has been found, this indicator will light continuously or will start flashing at a slow pace.
If you do not comply with the above described order the parent unit will show the message 'NO LINK' on the screen.
5.1 CONNECTION CHECK
The connection is checked regularly by the baby monitor. When (and as long as) the parent unit is in contact with the baby unit, the connection indicator on the parent unit will be lit steadily. When the baby unit gets out of range (or is switched off) the connection indicator on the parent unit will start flashing. If the connection is not restored within 30 seconds, an alarm will sound every 10 seconds. Once the connection between the parent unit and the baby unit is restored, the connection indicator will be lit steadily again.

Check the connection regularly during normal operation.
5.2 CONNECTIONS RECEPTION STRENGTH INDICATOR
In the upper left-hand corner of the screen on the parent unit (chapt. 1.3.1) is an indication of the strength of the signal being received from the baby unit.
: very good reception, good reception, : reasonable reception
In all three cases, audio and video data is shown with the same quality. As soon as the strength of the signal being received from the baby unit is insufficient to receive audio and video data the indicator lights up. At the same time the message 'NO LINK' appears on the screen. After a few seconds the screen goes black, and the connections reception strength indicator starts flashing rapidly. If any button on the parent unit is pressed, the screen lights up with the message 'WAITING FOR CONNECTION...'. After approximately 10 seconds, the screen goes black again. As soon as the parent unit and the baby unit are back in range of each other, the screen lights up again continuously.
Note The connections reception strength indicator also starts flashing and the 'NO LINK' message appears on the parent unit screen when the baby unit is switched off or the batteries of the baby unit are empty.
5.3 BATTERY INDICATOR
Both, the parent and the baby unit have indicators to show the power status of the batteries.
The parent unit has a battery indicator on the unit (chapt. 1.3). On the screen it has a battery level indicator (chapt. 1.3.1). The position and functionality of those indicators are described in these chapters, but also in chapt. 3.1.4. An additional Note is found in chapt. 3.1.2.
The baby unit has a battery indicator on the unit. Its position and functionality is described in chapt. 1.4. An additional Note is found in chapt. 3.2.2.
In addition there are messages on the parent unit screen signaling low battery: 'BATTERY LOW' if the battery of the parent unit is empty and 'BATTERY LOW AT BABY UNIT' when the battery of the baby unit is empty. Replace batteries of the respective unit or connect the unit with the mains adapter to mains.
5.4 POSITIONING
Set the units on a firm, level, dry and non-flammable surface. The bottom of the baby unit is equipped with a tripod attachment point (chapt. 1.4). You can use it to screw the unit onto a stand or tripod (not included in the pack, contact your retailer).
Make sure the power cable of the mains adapters are safely tucked away to prevent your baby or child from strangulation and others from tripping and falling. Never place the baby unit inside the baby's cot, bed or playpen.

WARNING! Strangulation hazard! Always keep cable out of children's reach. Do not use the units with an extension cord.

Position the baby unit at a minimum distance of 1 meter (3 ft.) from your baby to reduce hazard of radiation.
For optimal connection position the parent and baby unit as high and as far away from metal surfaces as possible.

Check the connection between the units each time before using.

Never cover the units (e.g. with clothes, towels or blankets).
5.4.1 Tilting the Camera
If the video on the parent unit's screen is not adjusted as you wish, you may tilt the camera on the baby unit. Unlock the camera by pulling it forward at the top (fig. 7). You can angle the camera approximately 45 degrees downwards. Push the camera back in the housing to fix it in position again.

It is not possible to rotate the camera to the left or to the right. You need to move the entire baby unit.
6 OPERATION
Once you have started your baby monitor it operates based on the default settings (chapt. 6.1). That means video is transmitted continuously. Sounds are transmitted when the baby cries (sensitivity level 3). You will hear an alarm if the batteries are low. You will not hear an alarm if there is no connection between the units, but the connection indicator and connections reception strength indicator are working (chapt. 5.1 and 5.2). You will not hear an alarm when the temperature exceeds the minimum or maximum limit.
The video settings do not affect the transmission of sounds. The transmission of sounds depends on the sensitivity level. It triggers how often the baby unit searches for the parent unit to transmit sounds. If you wish to hear very quiet sounds from the baby (= maximum sensitivity) set sensitivity level to 5 (chapt. 7.1.1.).
6.1 DEFAULT SETTINGS
The default settings of the baby monitor are the following:
| Menu options | Items | Parent unit | Baby unit |
| LANGUAGE GERMAN - | |||
| LULLABY LULLABY 1 LULLABY 1 | |||
| SENSITIVITY LEVEL 3 - | |||
| TEMPERATURE FORMAT CELSIUS - | |||
| TEMPERATURE ALERT OFF - | |||
| TEMPERATURE | Low | 14°C (57°F) | - |
| TEMPERATURE | High | 30°C (86°F) | - |
| VIBRATION | OFF - | ||
| ALERT | LOW BATTERY | ON | - |
| ALERT | NO LINK ALERT | OFF - | |
| BRIGHTNESS | LEVEL 4 - | ||
| ECO MODE | OFF - | ||
| volume ^(1) | LEVEL 4 | LEVEL 3 |
^(1) This parameter shall be set on the parent unit directly (chapt. 7.1.2). All other parameters are set on the parent unit using the on-screen menu (chapt. 7.1.1)
6.2 FULL ECO MODE
The baby monitor provides Full Eco Mode which guarantees safe and efficient supervision on the lowest high-frequency radiation possible. The baby monitor transmits video and audio data when the microphone picks up a sound, otherwise it goes into sleep mode. In sleep mode the baby monitor is 100% free from high-frequency radiation.
As soon as the baby unit detects a sound that exceeds the set sensitivity level, the baby unit is switched on and establishes a connection to the parent unit. This may take a few seconds. Both video and audio data are now transmitted. A few seconds after the sounds near the baby unit stop, the message 'ECO MODE ACTIVATED' appears and the baby monitor returns to sleep mode. The screen goes black again.

The connection indicator light flashes rapidly to indicate that there is no connection once the baby monitor goes into sleep mode. In this case, this is not a warning, but a confirmation that the baby monitor is in Full Eco Mode.
In Full Eco Mode sound and video data is transmitted according to the set sensitivity level. If volume is switched off (chapt. 7.1.2) you will hear no sound.

Check the range of your baby monitor before you use Full Eco Mode. Make sure you are within range.
6.2.1
Switching Full Eco Mode On/Off
- press the M button at the parent unit to open the menu
- use the ▲ or ▼ buttons to scroll to ECO MODE
- press the M button
- use the ▲ or ▼ buttons to set the function ON or OFF
- press the M button to confirm your choice
- press the ↕ button to close the menu
For further information to the parent unit's on-screen menu see chapt. 7.1.1.
6.2.2 Forced Viewing
Forced viewing allows to view the room even if the baby is asleep and Full Eco Mode is activated. Just switch on the baby unit from the parent unit:
- press the button at the parent unit
- the message 'ECO MODE ACTIVATED' appears on the screen
- press the button again to activate the baby unit
- you see the video if the baby monitor functions correctly
- after around 10 seconds the baby unit switches itself off again
6.2.3 Out of Range Indication with Full Eco mode On
When Full Eco Mode is activated, the units go into sleep mode and there is no connection between them.

In Full Eco Mode the connection check is disabled and the connection indicator will remain off.
7 PARAMETER
7.1 PARENT UNIT
7.1.1 Menu
The NUK Eco Control + Video has several settings that you can easily adjust via the parent unit using a simple on-screen menu.
- press the M button at the parent unit to open the menu
- use the ▲ or ▼ buttons to scroll through the menu options
- press the M button to select the option (the selected option changes the colour from light blue to dark blue and the items appear)
- use the ▲ or ▼ buttons to select a setting (you will hear 2 beeps when you reach the start or end of the list)
- press the M button to save the change
- press the button to close the menu
Note If you do not press any button for 10 seconds* (*chapt. 10) the menu is closed.
You can go one step back in the menu structure at any time by pressing the button.
Apply these steps and you are able to adjust the following settings:
Language
With the on-screen menu you can set the language in which messages and menu entries are shown on the screen:
- press the M button to open the menu
- scroll to LANGUAGE
- select and confirm the desired language
Lullabies
With the on-screen menu you can start and stop playing lullabies on the baby unit.
- press the M button to open the menu
-
scroll to LULLABY
-
select and confirm the desired lullaby or select ALL to play all the lullabies one after another
If one lullaby is selected it is played repeatedly for 15 minutes* (*chapt. 10) and than stops automatically. If you want to stop it earlier, repeat the instructions above, but set STOP to stop the playing.
If the setting ALL is selected, all the lullabies are played one after another. The playing lasts in total around 3 minutes* (*chapt. 10). It stops automatically.
Note If Full Eco Mode is enabled, first press the M button two times in order to switch the lullabies on or off from the parent unit.
Note Lullabies may also be played directly on the baby unit (chapt. 7.2.2).
Sensitivity
With the on-screen menu you can set the sensitivity with which the baby unit's microphone picks up the sounds and transmits them to the parent unit:
- press the M button to open the menu
- scroll to SENSITIVITY
- select and confirm your desired sensitivity
Level 1: activated by loud sounds ..... Level 5: activated by quiet sounds
Note You need to determine the ideal level for your needs by trial and error.
Temperature
At the top of the screen on the parent unit the temperature of the room in which the baby unit is located is displayed (chapt. 1.3.1). It can be shown in degrees Celsius or degrees Fahrenheit. With the on-screen menu you may set a minimum and a maximum temperature limit. An alarm sounds whenever one of those limits is exceeded.
- press the M button to open the menu
- scroll to TEMPERATURE
- select FORMAT, MINIMUM, MAXIMUM or ALERT
- with FORMAT set CELSIUS or FAHRENHEIT with MINIMUM set the minimum temperature limit with MAXIMUM set the maximum temperature limit with ALARM set the temperature alarm ON or OFF
When the temperature alarm is switched on, the indicator ^1 appears in the middle of the top of the parent unit screen (chapt. 1.3.1). The alarm sounds even if the volume has been set off. The alarm sounds once and a message 'TEMPERATURE TOO HIGH' or 'TEMPERATURE TOO LOW' appears repeatedly on the screen.
Note You cannot disable the indication of the temperature and the visual warning.
Note The displayed temperature is merely indicative and not a precise value.
Vibration
With the on-screen menu you can set the parent unit to alert you with vibration. If the baby unit detects a sound, the screen is switched on and the parent unit vibrates 3 times in quick succession (independent if Full Eco Mode is switched on or off). It also works with volume set to "volume off" at the parent unit.
- press the M button to open the menu
- scroll to VIBRATION
- set vibration ON or OFF
When you have set on the vibration function, it is activated once as a confirmation.
Note If the volume on the parent unit is turned on, the vibration function is automatically not active.
Alert
With the on-screen menu you can set an alarm as a warning that the batteries in the baby unit are low or that the connection between the baby unit and the parent unit has been lost.
- press the M button to open the menu
- scroll to ALERT
- select LOW BATTERY or NO LINK ALERT
- set the relevant alarm ON or OFF
Note The alarm sounds even if the volume has been set to off. There are specifics in Full Eco Mode for NO LINK ALERT (chapt. 6.2.3).
Brightness
With the on-screen menu you can set the brightness of the video as follows:
- press the M button to open the menu
- scroll to BRIGHTNESS
- select and confirm your desired brightness
Note A low brightness consumes less power.
Full Eco Mode
With the on-screen menu you can set Full Eco Mode on or off:
- press the M button to open the menu
- scroll to ECO MODE
- set the function ON or OFF
Full Eco Mode is described in chapt. 6.2 in full detail.
7.1.2 Volume
The settings of the volume define the loudness of played sounds. The volume is increased by repeatedly pressing the ▲ button, decreased by repeatedly pressing the ▼ button. When the maximum or minimum value is reached, 3 short beeps will be heard.
If the screen of the parent unit is switched on, the volume level is shown in the middle of the top line (chapt. 1.3.1):
= max volume, min volume, volume off (you can hear no sound)
If you have switched off the volume, the speaker indicator lights up on the parent unit (chapt. 1.3). This gives you an indication that you have turned off the volume, even if the video is switched off.
Note If zoom in (chapt. 7.1.3) is enabled, you cannot adjust the volume. Switch zoom in off first.
7.1.3 Zoom In
Press the 🔊 button to see a close-up of the image on screen. Press the button again for normal view. You are able to magnify parts of the image on the screen. Use the ▲ or ▼ or ◀ or ▶ buttons to move up, down, left or right to the image part you want to magnify.
7.1.4 Talkback
Press the TALK button (chapt. 1.3) to talk back to the baby unit. You can talk for as long as you hold the button pressed down. If required adjust the volume on the baby unit (chapt. 7.2.1).
Note If you have activated the lullabies, they will be temporarily interrupted during the talkback.
7.2 BABY UNIT
7.2.1 Volume
On the baby unit, you can adjust the volume by pressing the + and - buttons. The + button will increase the volume. The - button will decrease it. The set volume is used for playing the lullabies or your voice when you use talkback (chapt. 7.1.4).
7.2.2 Lullabies
You can play lullabies from the baby unit. You can start and stop these lullabies directly on the baby unit or via the parent unit (chapt. 7.1.1).
- Press the button to start the lullabies.
- Lullaby 1 is played repeatedly for 15 minutes.
- Press the button to select the next lullaby.
The lullaby stops playing automatically after 15 minutes. You can stop it before that time by pressing the ▶ button at the baby unit.
You can select for playing only one song at a time. If you want to select all songs for playing one after another: Start the lullabies from the parent unit (chapt. 7.1.1).
7.2.3 Temperature Indicator
The temperature sensor is located on the back of the baby unit (fig. 8). To ensure an accurate reading you should not cover this sensor or place the unit in direct sunlight. You should also avoid placing the unit next to a heating appliance (e.g. light bulbs). The temperature range is from 11°C to 30°C (52°F to 86°F).
Note The temperature indication is merely indicative and not a precise value.
7.2.4 Automatic Night Vision
The baby unit includes 8 built-in infrared LEDs. These LEDs are automatically switched on when it becomes dark around the baby unit. They are automatically switched off when it becomes light. The LEDs illuminate objects up to a distance of approximately 1 meter (3 ft.).
Note When the night vision LEDs are switched on, the image on the screen of the parent unit will appear in black and white.
Infrared light cannot be perceived by the human eye. A red glow may, however, be visible.

The built-in infrared LEDs comply with EN 62471 and do not represent a photobiological hazard.
8 HANDLING INSTRUCTIONS FOR THE BABY MONITOR
8.1 TRANSPORTATION
We recommend you retain the packaging of the baby monitor. So the equipment can be adequately packed when it is being transported.
8.2 CLEANING

Clean the baby monitor with care. Use a damp cloth only. Do not use chemical cleaning products. Before cleaning: Make sure that the mains adapters are disconnected.
8.3 MAINTENANCE
The baby monitor does not require maintenance. If you have any problem with your device, check chapt. 9. The instructions described in the corresponding row of the column Solution helps you to solve it. The baby monitor should then work as described in these operating instructions. If not, please contact your retailer or – if available - the repair helpline number for your country (see NUK Contact Addresses)

Never dismantle the mains adapters.
Any claim under warranty and liability will be declared null and void if you repair the baby monitor yourself, if you do not use original parts for replacement, or if you use accessories which are not recommended in this operating instructions.
If repair is required after warranty has expired use specialists for electronic devices only – for your own safety.

During the out of warranty period, repairs on the parent unit or the baby unit must only be carried out by specialists for electronic devices. Never repair mains adapters, mains cables or batteries.
8.4 DISPOSAL
Dispose the packaging of the baby monitor in regard of the environment and use available recycling systems.

Do not throw this product away with the normal household waste. Take it to any official collection point for recycling.

The batteries used with the baby monitor contain environmentally hazardous substances.

Do not dispose empty batteries in normal household waste. Take them to your local chemical waste recycling centre.
9 PROBLEM SOLVING
| Problem | Possible cause | Solution |
| Connection indicator on parent unit does not light up. | Parent unit is switched off. | Press the button to switch on parent unit (chapt. 1.3). |
| Battery of parent unit is not installed correctly. | Install battery (chapt. 3.1.2). | |
| Battery of parent unit is empty. | Recharge parent unit by connecting it to mains (chapt. 3.1.1). | |
| No battery is installed in parent unit. | Connect parent unit to mains or install battery (chapt. 3.1.2). | |
| Mains adapters or mains cables are defective or batteries are drained. | Replace with original parts. Ask your retailer (chapt. 8.3). | |
| Connection indicator on parent unit flashes. | Parent unit and baby unit are out of range with each other. | Reduce distance between units (chapt. 3.2.1). |
| Baby unit is switched off. | Press the button to switch it on (chapt. 1.4). | |
| Battery indicator on baby unit flashes. | Alkaline batteries in baby unit are running low. | Replace alkaline batteries or connect baby unit to mains (chapt. 3.2.1). |
| Low battery icon on parent unit screen flashes. | Battery in parent unit is running low. | Recharge parent unit by connecting it to mains (chapt. 3.1.4). |
| Battery in parent unit is drained or damaged. | Replace with original parts. Ask your retailer (chapt. 8.3). | |
| Parent unit beeps. | Lost connection with baby unit. | Reduce distance between units (chapt. 3.2.1). |
| Baby unit is switched off. | Press the button to switch it on (chapt. 1.4). | |
| Battery in parent unit is running low. | Recharge parent unit by connecting it to mains (chapt. 3.1.4). | |
| Temperature alert is triggered. | Check temperature in baby's room. | |
| Cannot see video on screen. | Screen is turned off. Turn on screen by pressing the button (chapt. 6.2.2). | |
| Parent unit and baby unit are out of range with each other. | Reduce distance between units (chapt. 3.2.1). | |
| Battery in parent unit is running low. | Recharge parent unit by connecting it to mains (chapt. 3.1.4). | |
| Full Eco Mode is activated. Check whether Full Eco Mode is activated or not (chapt. 6). | ||
| Mains adapters or mains cables are defective or batteries are drained. | Replace with original parts. Ask your retailer (chapt. 8.3). | |
| Cannot hear sound or baby cry. | Volume of parent unit is too low. | Increase volume of parent unit (chapt. 7.1.2). |
| Sensitivity of baby unit is too low. | Increase sensitivity of baby unit (chapt. 7.1.1). | |
| Parent unit and baby unit are out of range with each other. | Reduce distance between units (chapt. 3.2.1). | |
| Mains adapters or mains cables are defective or batteries are drained. | Replace with original parts. Ask your retailer (chapt. 8.3). | |
| Parent unit is too sensitive to room sounds. | Sensitivity of baby unit is too high. | Decrease sensitivity of baby unit (chapt. 7.1.1). |
| Parent unit cannot vibrate. | Vibration is switched off. Switch vibration on (chapt. 7.1.1). | |
| Volume of parent unit is not switched off. | Switch off volume of parent unit (chapt. 7.1.2). | |
| Baby's voice is not exceeding sensitivity set on parent unit. | Increase sensitivity of baby unit (chapt. 7.1.1). | |
| Mains adapters or mains cables are defective or batteries are drained. | Replace with original parts. Ask your retailer (chapt. 8.3). | |
| Baby monitor produces a high-pitched noise. | Parent unit and baby unit are too close to each other. | Widen distance between units (chapt. 3.2.1). |
| Volume of parent unit is too high. | Decrease volume of parent unit (chapt. 7.1.2). | |
| Alkaline batteries in baby unit are running low quickly. | Sensitivity of baby unit is too high which causes baby unit to transmit more often. | Decrease sensitivity of baby unit (chapt. 7.1.1) or use mains (chapt. 3.2.1). |
| Volume level of baby unit is too high. | Decrease volume of baby unit (chapt. 7.2.1) to save power when playing lullabies or using talkback. | |
| Rechargeable battery in parent unit is running low quickly. | Volume of the parent unit is set high which consumes power. | Decrease volume of parent unit (chapt. 7.1.2) or use mains (chapt. 3.1.1). |
| Battery in parent unit is drained or damaged. | Replace with original parts. Ask your retailer (chapt. 8.3). | |
| Talkback is not working. | Baby unit is switched off. | Press the button to switch it on (chapt. 1.4). |
| Lost connection with baby unit. | Reduce distance between units (chapt. 3.2.1). | |
| Volume of baby unit is too low. | Increase volume of baby unit (chapt. 7.2.1). | |
| Mains adapters or | mains cables are defective or batteries are drained. | Replace with original parts. Ask your retailer (chapt. 8.3). |
10 TECHNICAL SPECIFICATION
Range: up to 50 m (164 ft.) indoors up to 300 m (984 ft.) outdoors
Power consumption parent unit: 1.2 W (charging); 1.0 W (fully charged)
Mains adapter parent unit: 6 V DC 800 mA mains adapter
model: S006MV0600080 / MOSO MSP-C0800IC6.0-5W-
DE / HONRADS-5Q-0606005GPG
Battery parent unit: 3.7 V 950 mAh (3.5 Wh) Lithium Polymer battery
model: BYD SCD530-1
Power consumption baby unit: baby asleep: 0.5W
baby cries: 1.1W
Mains adapter baby unit: 6 V DC 800mA mains adapter
model: S006MV0600080 / MOSO MSP-C0800IC6.0-5W-
DE / HONRADS-5Q-0606005GPG
Batteries baby unit: 4 x 1.5 V AA batteries (not included in delivery)
Frequency: 2.4 GHz, digital frequency hopping (FHSS)/52 channels
Screen: 2.8" colour LCD display
QVGA 320 x 240 pixels
up to 25 frames/sec, Dynamic Frame Rate
Operating temperature: 0 °C - 45 °C (32°F - 113°F)
Operating humidity: 20% - 95% relative humidity
Protection class: III
Charging time for parent unit battery: < 6 hours* (whether the parent unit is switched on or off)
Battery life span
Parent unit: > 8 hours* (brightness set to low)
5 hours* (brightness set to high)
Baby unit (alkaline batteries): > 5 hours*
Range of temperature sensor: 11^ C - 30^ C ( 52^ F - 86^ F)
Temperature accuracy: ±2^ (at 25^ ) ±2K (at 77^ )
*: all time data given in the operating instructions are approximate and are dependent on usage and settings and on the condition and quality of the batteries.
11 GUARANTEE/WARRANTY
With careful handling of the device and use in consideration of the operating instructions the manufacturer issues a guarantee for two (2) years from the date of purchase. We agree to repair the device free of charge, provided the fault is either a material or design fault. All other claims are excluded.
Any damage arising from improper use of the device will not be rectified. Mains cables and mains adapters are excluded from the guarantee if the fault is caused by wear. Within the first two years from the date of purchase, we will rectify any faults recognized as being justified without additional charges. All costs must be confirmed in advance. NUK contact addresses can be found at the end of this manual.
When returning the device, the warranty certificate or proof of purchase must be enclosed at all times. Without warranty certificate or proof of purchase you will be charged for the repair. The goods will be returned via COD (Cash on delivery). Batteries are excluded from the guarantee.
Please fill out the warranty certificate immediately after your purchase, and keep it in a safe place. Lost warranty certificates will not be replaced. The warranty certificate can be found at the end of this manual.
4 TRANSFERT DE DONNÉES 63
4.1 RESTRICTIONS SUR LA FRÉQUENCE 63
4.2 PORTÉE 63
4.3 INTERFÉRENCE 63
4.4 ÉCOUTE ILLICITE/INTERCEPTION 63
4.5 DÉCÉLÉRATIONS DE VIDÉO ET D'AUDIO 64
5 MISE EN SERVICE....64
5.1 CONTRÔLE DE LA CONNEXION 64
5.2 INDICATEUR DE LA PUISSANCE DE RÉCEPTION.... 64
5.3 INDICATEUR DE BATTERIE 65
5.4 POSITIONNEMENT 65
5.4.1 INCLINER LA CAMERA 65
6 OPÉRATION 66
6.1 CONFIGURATIONS PAR DÉFAUT 66
6.2 MODE FULL ECO 66
6.2.1 ACTIVER/DESACTIVER LE MODE FULL ECO 67
6.2.2 OBSERVATION FORCEE 67
6.2.3 INDICATION DE DEPASSEMENT DE LA PORTEE EN MODE FULL ECO ACTIVE 67
7 PARAMÈTRES....67
7.1 UNITÉ PARENTS 67
7.1.1 MENU 67
LANGUE 67
BERCEUSE 68
SENSIBILITE 68
TEMPERATURE 68
VIBREUR 69
ALARME 69
LUMINOSITE 69
MODE FULL ECO 69
7.1.2 VOLUME 69
7.1.3 ZOOMER 70
7.1.4 FONCTION D'INTERPHONE 70
7.2 UNITÉ BÉBÉ 70
7.2.1 VOLUME 70
7.2.2 BERCEUSES 70
7.2.3 INDICATEUR DE TEMPERATURE 70
7.2.4 VISION NUIT AUTOMATIQUE 71
8.1 TRANSPORT 71
8.2 NETTOYAGE 71
8.3 MAINTENANCE 71
8.4 ÉVACUATION 71
8 INSTRUCTIONS D'EMPLOI POUR LE BABY ALARM 71
9 SOLUTION DES PROBLÈMES 72
10 SPÉCIFICATION TECHNIQUE 74
11 GARANTIE/OBLIGATION DE RÉSULTAT 75
1.1 INSTRUCTIONS DE SÉCURITÉ
flowchart
graph TD
    A["1"] --> B["2"]
    B --> C["3"]
    style A fill:#fff,stroke:#000
    style B fill:#fff,stroke:#000
    style C fill:#fff,stroke:#000
    subgraph Box
        D[" "] --> E[" "]
        F[" "] --> G[" "]
    end
    subgraph Column
        H[" "] --> I[" "]
        J[" "] --> K[" "]
    end
    subgraph Label
        L["11"]
    end
natural_image
White plastic container with a U-shaped groove and two labeled points (16 and 17) on its side, no text or symbols present.12
4 TRANSFERT DE DONNÉES
natural_image
White plastic container with a curved lid and two labeled points (16 and 17) on its side, no text or symbols on the body.12
natural_image
White electronic device with a black cover and two labeled parts (16 and 17), no visible text or symbols on the body.12
Monitor: 2.8" ecrã LCD a cores
QVGA 320 x 240 píxeis
natural_image
White plastic container with a U-shaped lid and two numbered labels (16 and 17) pointing to its side (no text or symbols on the container itself)12
6.2 MODALITÀ FULL ECO
natural_image
White plastic container with a U-shaped groove and two labeled points (16 and 17) on its side, no text or symbols present.12
natural_image
White electronic device with a black cover and two labeled parts (16 and 17), no visible text or symbols on the body.12
natural_image
White electronic device with a black cover and two labeled parts (16 and 17), no visible text or symbols on the body.12
KARAKA PROMET D.O.O.
Blizanci bb
88260 Citluk
karaka@karaka-promet.com
BG - BULGARIA
Bebolino Ltd
Dechko Yordanov str.36
Sofia 1618
02 955 75 00
CL - CHILE
Acam S.A.
Av. Ricardo Lyon
1343 Providencia
Santiago de
(+562) 2046633 / (+562) 2696330
Fax: (+562) 341 71 03
e-mail: nukchile@nuk.cl
www.nuk.cl
CZ - CZECH REPUBLIC
MAPA SPONTEX VOLF s.r.o.
Prodašice 4
29404 Dolní Bousov
DK - DENMARK
Tolico A/S
Kragevej 8
2970 Horsholm
(+45) 45 42 53 11
EE - ESTONIA
German Products Estonia OÜ
Tartu mnt 80c
10112 Tallinn
www.gpestonia.ee / www.nuk.ee
ES - SPAIN
Roche Diagnostics, SL
Avda. de la Generalitat, 171-173
Berkeley Business Park
Wainwright Road
Worcester WR4 9ZS
0845 300 2467
GE - GEORGIA
GiSi Ltd
Tsereteli 115a
Tbilis 0119
e-mail: info@gisi.ge
GR - GREECE (South)
Intrapharma Consumer Health
Magna Business Park, Citywest Road
Dublin 24
United Drug House
IT - ITALY
MAPA GmbH
German Products Baltics SIA
Silzemnieki 1, Garupe
Carnikavas novads
Latvija
67299994
MK - MACEDONIA
Euroalba Skopje d.o.o.
Bul. Partizanski Odredi 64 g 3/6
1000 Skopje
+389 2 30 65 717
NO - NORWAY
Simba-Dickie Nordic AS
Hauganveien 293
3178 Vale
e-mail: mail@simbatoys.no
Babycare AS
Postboks 5524, Voiebyen
4677 Kristiansand
www.babycare.no
PE - PERU
Artemis Natural Products (PTY) Ltd.
P.O. Box 130782
Bryanston 2074
+2711 8851124
Fax: +2711 8851184
SE - SWEDEN
GB Barnartiklar AB
Fågelviksvägen 18
145 53 NORSBORG
08 556 35 825
Fax 08 464 98 48
info@gbab.com; www.gbab.com
SI - SLOVENIA
Euroalba Ljubljana d.o.o.
Celovska 172
1000 Ljubljana
0386 15 14 22 10
SK - SLOVAKIA
MAPA SPONTEX VOLF s.r.o
Prodašice 4
29404 Dolní Bousov
Czech Republic
SR-SERBIA
P.P.YUGLOB d.o.o.
Zrenjaninski put bb (121t)
11211 Beograd, Borca
+381 11 2960-783, 2960-784
e-mail:yuglob@eunet.yu
TR - TURKEY
ATAK DIŞ TİC. A.Ş.
Maya Akar Center K:20 Esentepe
İstanbul
212 211 74 00
UA - UKRAINE
Імпортер в Україну:
Please observe conditions of guarantee on page 50
F GARANTIE
Respecter les dispositions de la garantie de la page 75
E GARANTÍA
NUK is a registered trademark of MAPA GmbH/Germany
Rev. 301