Eco Smart Control 300 - Baby monitors NUK - Free user manual and instructions
Find the device manual for free Eco Smart Control 300 NUK in PDF.
| Technical Features | Digital video monitor with 3.5-inch LCD screen, range up to 300 meters outdoors, infrared night vision, two-way communication function. |
|---|---|
| Usage | Ideal for remotely monitoring babies, with the ability to adjust volume and select microphone sensitivity levels. |
| Maintenance and Repair | Regularly clean the device with a soft cloth, check for firmware updates, replace batteries if necessary. |
| Safety | Certified compliant with safety standards for electronic children's devices, BPA-free, with data encryption to protect privacy. |
| General Information | Operates with rechargeable batteries, 10 hours standby time, 2-year warranty, compatible with other NUK devices. |
Frequently Asked Questions - Eco Smart Control 300 NUK
User questions about Eco Smart Control 300 NUK
0 question about this device. Answer the ones you know or ask your own.
Ask a new question about this device
Download the instructions for your Baby monitors in PDF format for free! Find your manual Eco Smart Control 300 - NUK and take your electronic device back in hand. On this page are published all the documents necessary for the use of your device. Eco Smart Control 300 by NUK.
USER MANUAL Eco Smart Control 300 NUK
Please see inside cover fold-out page
Frangois 38
1.Description of device 21
2. Safety information. 22
3. Components of the baby phone 23
4.Description of function 24
5. Starting the device 25
6. Using the Android app 27
7. Videos. 31
8. Function of Powerline network (Powerline Communication) 32
9. Connecting an external loudspeaker 33
10. Cleaning and maintaining the device 33
11. Faults and how to remedy them 34
13.Disposal 36
14.Warranty. 36
15.Declaration of conformity. 37
Note: The screenshots used in these instructions may deviate slightly from the actual design if you are using a newer operating system. The functions shown are the same, however.
1. Description of device
1.1 Proper use
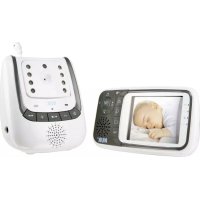
This baby phone with audio and video functions enables you to monitor your baby or small children in their room or nursery. A smartphone or tablet is used to receive the camera and microphone signals.
The signal is transmitted using either WiFi or the Internet.
This device is only intended for use in dry, indoor rooms.
This device is intended for use in private households. It is not intended for commercial use.
1.2 Contents of pack
- Baby phone :
- 1 video camera (for the nursery)
- 1 silicone ring (for setting up and positioning the camera)
-1 power cable -
Powerline accessories:
-
1 LAN cable (for Internet router or modem)
-
1 Powerline adapter (plug for LAN cable)
-
1 set of operating instructions
- Not included in this pack:
-SD card - Smartphone
1.3 Function of Powerline adapter
The Powerline technology (also known as dLAN direct Local Area Network) uses the existing electric supply system to transmit data.
The images and sounds captured by the video camera are modulated, encrypted and fed into the electric supply system via the power cable.
By encrypting the data with a password, interception by any third party is prevented.
The data transmitted can be received at another plug socket on the same electric supply network. This is where the Powerline Adapter comes in. In this adapter, the data is encrypted again and forwarded to a modem or router via cable. With a Powerline
Adapter, several senders (baby phone) can be received.
The transmission of data using Powerline technology is quick and safe. Through modulation of the signals, there is no interference between electric supply network and data transmission.
2. Safety information
- Please read these instructions for use carefully before using the baby phone. These instructions form part of the device and must be kept to hand at all times.
- Use the device and its accessories only for the proper use described (see "1.1 Proper use").
- Use only the accessories supplied with the device or expressly permitted in these instructions.
- Do not expose the device to direct sunlight or extreme heat as UV rays and overheating may make the plastic brittle and the electronics could become damaged.
- In order to prevent overheating, the baby phone should not be placed near any sources of heat and should also not be covered.
- Never use the baby phone in damp or wet surroundings.
- Never use the baby phone in dusty surroundings. This could shorten the life of the device.
- Make sure the cable is tucked away neatly to prevent anyone from tripping over it.
- Do not carry out any repairs on the camera or Powerline adapter. Both devices must only be opened by trained personnel.
-
If the camera, Powerline adapter and cable show any sign of damage they should not be used.
Children are often poor judges of hazards and this results in them sustaining injuries, so: -
This device is not designed to be used by people (including children) with physical, sensory or mental disabilities or with insufficient experience and/or knowledge, unless a person responsible for their safety is supervising them or instructing them on how to use the device.
- Children should be supervised to ensure that they do not play with the device.
- Warning! The optional Micro SD card for inserting into the baby phone is a small part which could easily be swallowed by children.
- Ensure that the plastic packaging does not become a lethal trap for children. There is a risk of suffocation. Plastic packaging is not a toy.
- Never use sharp or abrasive cleaning agents as these could damage the device.
- The video connection is made via the public Internet network. The connection is safe by today's standards, however it could still be intercepted using advanced technology. We accept no liability in such cases. We recommend that you change your standard password immediately and use a combination of letters, numbers and special characters for the new one (see "Password settings:" on page 29).
3. Components of the baby phone
1 Reset button
2 Slot for MicroSD card
- for MicroSD cards with up to 32GB
3 Audio outlet
- socket for 3.5 mm phone jack of an external loudspeaker
4 Microphone
5 Network security button
6 Infrared LEDs (IR-LEDs)
- illuminates a dark room with infrared light invisible to people
7 Yellow LED

- lights up when there is a connection to the P2P server (network connection)
8 Red LED

- lights up when the video camera is working correctly
9 Blue LED

- lights up when there is a connection to the receiving dLAN AV adapter (Powerline adapter)
10 Green LED
- lights up when the camera is getting power.
11 Camera
12 Brightness sensor
- determines whether the IR-LEDs need to be switched on
13 Label with QR code and MAC address
14 Thread for camera tripod
15 Electric supply
16 Silicone ring
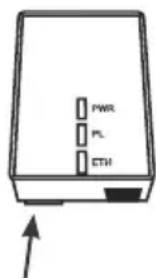
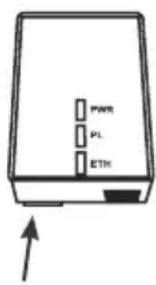
17 Powerline adapter
18 LED

- On: Active electric supply
-Off:No electric supply - Flashing: Standby mode
19 LED

connection to electricity (work)
- Red: Data transmission slow
- Orange: Data transmission normal
- Green: Data transmission fast
- Off: No connection
20 LED

connection to PC net-rnet)
- Green: Active network connection
- Off: No network connection
4. Description of function
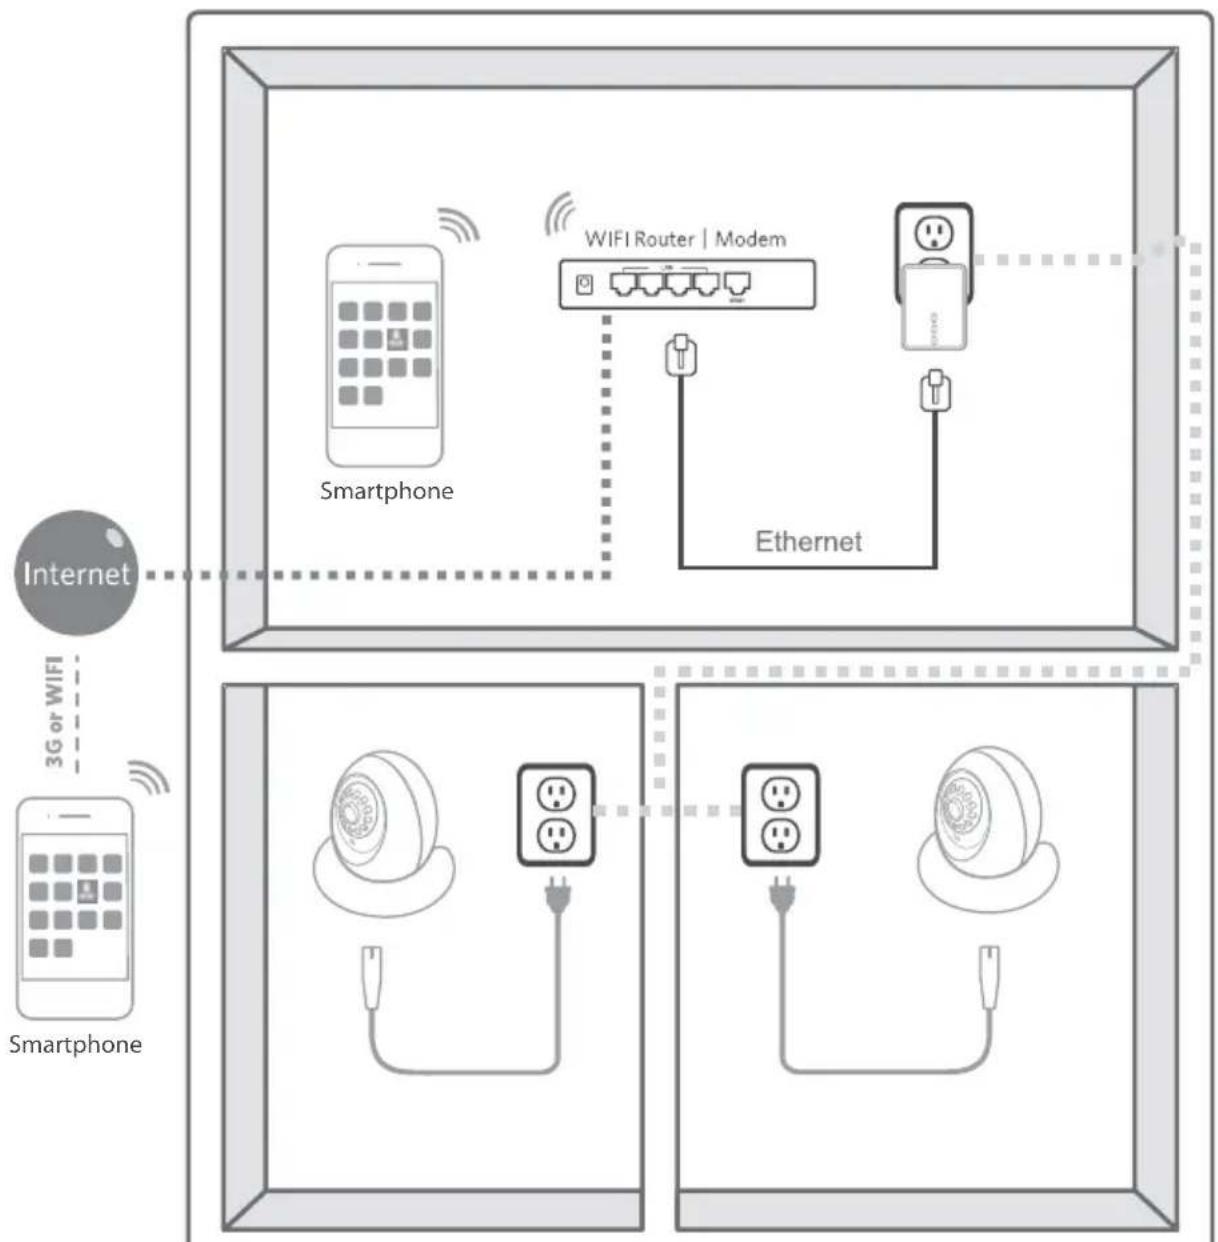
The camera 11 is set up in the room that will be monitored. It can transmit images and sounds.
The camera comes equipped with infrared lights which light up objects within two metres of the camera when the room is dark.
The camera is activated when noise or movement is detected, transmitting the live image directly to the smartphone (tablet). If an SD card is installed in the camera, it will record the video signal. A message (Push Notification) is also sent to the smartphone.
The camera can either be placed in the pedestal 16 or mounted to a camera tripod with the thread 14.
The camera is connected to the electric supply network using the power cable. It can be connected to any plug socket within the home.
The camera has a programme (Powerline AV) that encrypts image and sound and feeds the signals to the power line via the supply cable.
The Powerline adapter 17 is plugged into a socket in the home that is located close to the WiFi (WLAN) router, which then reads out the signals from the electric supply
network. Please make sure that both plug sockets (camera and Powerline adapter) are connected to related phases, which is generally the case anyway when plug sockets are connected to the same electricity meter.
Up to four cameras can be operated using the same Powerline adapter.
The signals are transmitted using the Powerline adapter, which is connected to
the router or modem using the power cable supplied.
Your WiFi (WLAN) router transmits the signals directly to your smartphone (tablet) once you are located within the transmission range.
If you are located outside the transmission range of your local WiFi router, the signals can also be transmitted via mobile radio (G3/UMTS) or an external WiFi access point on your smartphone.
5. Starting the device
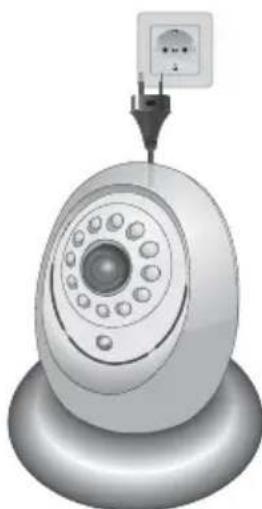
5.1 Connecting the camera
Please note
-
Do not install the camera during a storm.
-
Connect the power cable provided to the electric supply 15.
- Insert the plug into a power socket that conforms to the technical data (see "12. Technical data" on page 35).
- Position the camera 11 somewhere in the nursery where your baby will not be able to reach it.
Radio waves:
- The camera works without wireless transmission. Your child is thus not exposed to any wireless radiation.
Infrared operation
If the room to be monitored is too dark, the camera will automatically switch to infrared operation. Here, the infrared LEDs (IR-LEDs) 6 switch on automatically to illuminate the room with infrared light. The image transmitted is then black and white.
Note: The range of the infrared light is approx. 3-4 m.
5.2 Connecting the WLAN router
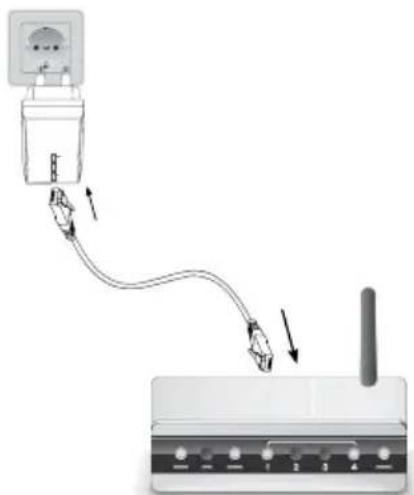
- Insert the power cable provided into a suitable connection on your router (modem).
- Insert the other end of the power cable into the Powerline adapter 17.
- Insert the Powerline adapter 17 into a electric supply socket.
Notes:
Always connect the cables before inserting the Powerline adapter into the socket.
- Multiple socket outlets with overheating cutout may not be used. These block the signal.
- The camera and Powerline adapter must be connected to related phases. This will generally be the case when both plug sockets are connected to the same electricity meter.
5.3 Preparing the smartphone/tablet
- Connect your smartphone/tablet to your wireless network. Further information on connecting to a wireless network can be found in the instructions for your smartphone/tablet.
-
If you do not have an app for reading QR codes on your smartphone:
-
Connect with Google Play.
-
Download and install the app for reading QR codes, e.g. "Barcode Scanner".
-
Download the free app "NUK LiveCam" from the Google PlayStore.
- Start the NUK LiveCam App.
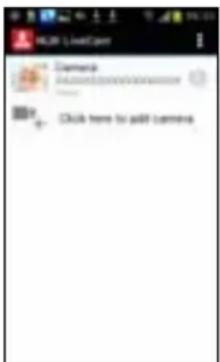
-
Press "Click to add camera".
-
Activate the camera. To do this, there are three options:
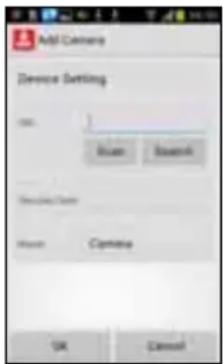
Option 1:
- Press "Scan";
- Scan the QR code (UIC code) on the reverse side of the camera.
Option 2 (only works if the smartphone is connected to the same wireless network as the Powerline adapter):
- Press "Search":
All the cameras that have been found will appear in a pop-up window;
- Select a camera.
Option 3 (manual entry):
- Click on the empty field beside "UID";
-
Manually enter the UID number of the required camera. This can be found on the reverse of the camera.
-
Click on the empty field beside "Passport".
- Enter the password. The factory setting is "888888".
Note: For security reasons, you should immediately change the password to protect your data (see "Password settings:" on page 29).
- Tap the empty field beside "Name".
10.Give the camera a name, e.g. "Nursery".
11.Complete the entry by pressing "OK". The camera will now be connected.
When searching for the camera, the following will appear in the display: "Connecting...".
As soon as the connection is made, the display will show "Connected".
12.To display the camera signals, tap the name of the required camera and the camera image will appear on the smartphone.
13.If the message "Unknown device" or "Connection failed" appears, start the search again:
- Press the button

- Press the button

connect
The search for a camera will start again.
6. Using the Android app
6.1 Starting the app and viewing the live image
- To start the NUK LiveCam app, press the corresponding symbol on your smartphone. The start screen will appear.


If there is no camera connected yet, the NUK camera will not appear in the list. In this case, carry out the steps as described in "5.3 Preparing the smartphone/tablet" on page 26.
- To view the live image, tap the NUK camera.

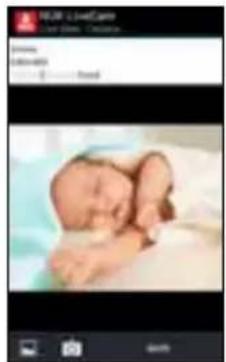
The live image will provide the following information (not with tablets):
- Connected: Shows that there is an active connection to the camera.
- 640 x 480: The resolution of the video image transmitted.
- Connected 1: The number of smartphones (tablets) that are connected with the camera.
- Quality: The quality of the connection or image signal.
Under the live image (at the upper edge of tablets), you will find the most important functions:
- Press the snapshot button to take a snapshot of the live image.

- Press the album button to display the photo album with all snapshots.

- In the album, briefly tap the images to enlarge them or delete them by pressing and holding.
-
The Back button from Android will take you back to the live image.
-
Press MUTE to open a pop-up window for managing sound:
-
When activating the app, the sound will always be set to mute.
- Mute: No sound transmitted.
- Listen: Listen to the sounds recorded by the camera.
- Speak: Speak to your child. In order for your child to hear what you are saying into the smartphone, you will need to connect an external loudspeaker to the camera (see "9. Connecting an external loudspeaker" on page 33).
6.2 Functions of the start screen, closing the app
- When you see the live image, press the Back button from Android. The start screen will appear.

-
Press and hold the field for the camera or briefly tap the symbol to the far right of the camera field. A pop-up menu will appear:
-
Connect again: The smartphone (tablet) will re-attempt to establish a connection to the camera.
- Change camera: Allows you to choose another camera, if available (see
"5.3 Preparing the smartphone/tablet" on page 26).
- View recordings: Shows all video recordings from the last 12 hours (see "7. Videos" on page 31).
- View snapshot: Shows the album with all saved snapshots.
-
Remove camera: Disconnects the current camera and removes it from the list of cameras.
-
Press the Back button from Android. A pop-up menu will appear:
-
Cancel: Cancels any process and returns to the start screen.
-
Background: The app keeps running in the background. Incoming messages/alertifications are displayed.
-
Exit: Closes the app.
-
Tap the symbol beside "NUK LiveCam".
A pop-up menu will appear:
- Add: For connecting to a camera.
- About: Information about the software version.
- Exit: Ends the app.s
6.3 Camera settings
In a special camera menu, you can apply all settings for the camera.
Note: Don't forget to press OK after changing a setting. Otherwise, the changes made will not be saved.
- When you see the live image, press the Back button from Android.
The start screen will appear.

- Press and hold the field for the camera or briefly tap the symbol to the far right of the camera field.
A pop-up menu will appear.
- Select "Change camera".
The camera menu will appear.
- Tap the name of the camera.
The camera data will be read out. This may take a few minutes.
When complete, the "Advanced" button will appear.
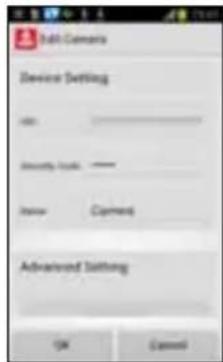
- Press the "Advanced" button.
The settings menu for the camera will appear.
You can scroll through this menu to view and call up all setting options.
-
To change settings, tap the field in question and select the required setting in the pop-up menu that appears.
-
Confirm the settings with "OK".
Password settings:
The factory setting is 888888. We recommend changing this password to prevent unauthorised access to the camera:
-
Click on "Change password".
-
Click on the field for the old password "Old:" and enter the old password.
-
Click on the field "New:" for the new password and enter the new password.
Note: The new password must be between 1 and 15 characters long. You may not use special characters; only letters and numbers.
-
Click on the field "Confirmation" and enter the new password again.
-
Click on "OK".
If there are other smartphones or tablets connected with the camera when changing this setting, this connection remains in place until the app is closed on the respective device.
Setting up a new connection with the camera is only possible if the password for this device has also been changed to the new one.
Video settings:
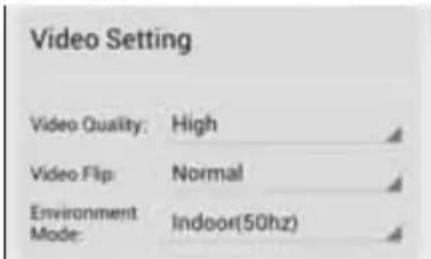
Video quality: Resolution and data compression are set here. The setting here is generally "maximum". A lower setting should only be selected if the data connection is slower.
Video alignment: Here, you can choose how the image is represented.
Surroundings mode: The camera can be adapted to the lighting conditions:
- Inside (50 Hz): for artificial lighting conditions with a 50 Hz power network.
- Inside (60 Hz): for artificial lighting conditions with a 60 Hz power network.
- Outside: for natural lighting.
- Night: no light. The infrared function on the camera is used here.
Noise detection:
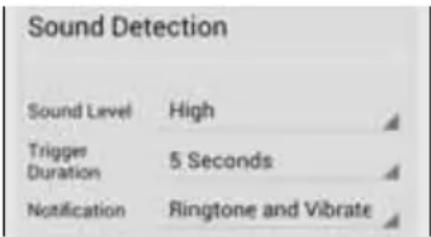
Volume: Here, you can set the sensitivity of the noise detection setting, i.e. at what level the camera should be automatically activated and send a message/notification to the smartphone.
Trigger detection: Here, you can set the length of time a noise must be audible before it automatically activates the camera and sends a message/notification to the smartphone.
Notification: Here, you can set the type of notification you wish to receive when the camera is activated by a noise. Choose from Silent, Ring Tone and Vibration.
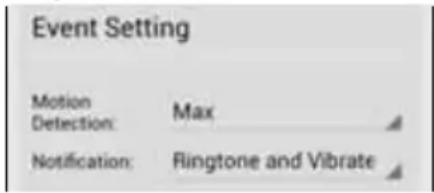
Event detection:
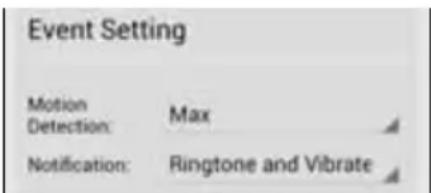
The camera is not only activated by noises, but also movements in the image.
Motion detection: Here, you can set the sensitivity of the motion detection setting, i.e. w h a t k i n automatically activate the camera and send a message/notification to the smartphone.
Notification: Here, you can set the type of notification you wish to receive when the camera is activated by a noise. Choose from Silent, Ring Tone and Vibration.
Receiving notifications:
Depending on the Android version, a notification can be sent via the notification server. This function can be activated or deactivated in the user settings (latest versions of Android). It is activated as standard. This means that if the application is closed and an alarm signal is created because the camera has detected movement or a noise, a notification will be sent. If you click on this notification, the overview screen of the camera will be shown and you can view the live image. If the app is running in the background and a notification is sent, click on it and the window with the image will appear. This will only happen if you have inserted an SD card into the camera.
Recording settings:
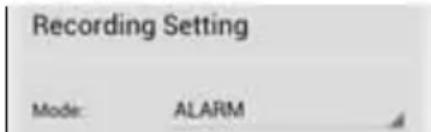
The camera is equipped for the use of a Micro SD card (see "7. Videos" on page 31), with which it can record videos.
Mode: Here, you can decide whether you wish to record a video always (Always), never (Off) or only if a noise or movement is detected (Alarm).
If the "Alarm" mode is set, any noise or movement made will be recorded. At the end of the recording, a notification will be sent to the smartphone (tablet) and you can view the video (see "Receiving notifications:" on page 30).
d of mo v e m e n t
Formatting the SD card:

A newly inserted SD card will need to be formatted. Any existing data will be deleted in the process.
You can also use this function to purposefully delete all data from the SD card.
Time zone:

Here, you can select the time zone applicable to you.
Device information:
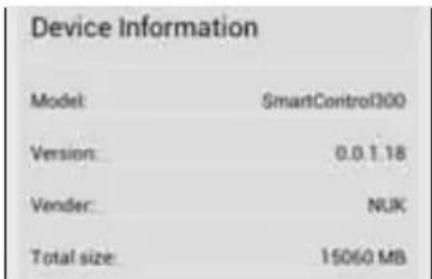
No settings can be changed here, there is only information on the app in question.
6.4 Changing the connection
Once the camera is correctly registered to the smartphone, the NUK LiveCam will automatically search for the most convenient connection:
If the smartphone is located within the coverage area of the WLAN router to which it was registered, this connection will be chosen.
If you are not within range of the WLAN router and have registered to a WiFi access point, this connection will be chosen.
If there is no WiFi network available, the app will use the Internet to connect to the camera. Your smartphone must be able to connect to the Internet quick enough for this to be possible (3G/UMTS required at a minimum). Please note here that the transmission quality may be restricted and you may incur costs from your provider if you do not have a sufficient flat rate.
7. Videos
The camera is able to record live images. A MicroSD card must be inserted for this purpose (not included in this pack).
- Push the MicroSD card into the slot for the MicroSD card 2.
Notes:
-
The SD card slot is designed in such a way that there is only one correct way to insert the SD card.
-
Push the SD card far enough into the slot 2 that it clicks into place and disappears completely into the camera housing.
-
Start the camera again by pulling out the plug for the camera cable and then establishing the connection again.
-
Format the SD card (see " Formatting the SD card:" on page 31).
-
Save the preferred recording settings (see "Recording settings:" on page 30).
-
To view the videos recorded, press "View recording" on the start screen.

Note: The recordings can only be viewed on your smartphone/tablet if your device is connected with the camera and this is active.
A list of recordings will appear.
-
To view a recording, select the corresponding row.
-
By pressing "Search", a new menu will appear in which you can set the search period.
If you select "Custom period", you can enter the date and time for the search period.
-
To view the recordings on a PC, you will need the following:
-
a USB adapter to connect the MicroSD card with the PC, a reader or a MicroSD slot on your PC;
-
video playback software that can read and playback the camera's HD264 format (a codec may need to be retrofitted) or video converter software that converts the HD264 video camera format to a well-established format, such as mp4.
-
To delete all videos, the MicroSD card will need to be reformatted (see " Formatting the SD card:" on page 31). It is not possible to delete videos individually.
8. Function of Powerline network (Powerline Communication)
8.1 Basic functions
A Powerline adapter 17 is integrated into your electric supply network via a socket. The power cable is used to connect the adapter to the Internet via your router or modem.
A Powerline adapter is also installed in the camera, which exchanges data with the Powerline adapter 17 via your supply cable.
The Powerline adapter 17 creates its own WiFi/WLAN network which your smartphone uses to access up to 4 connected cameras from home or on the go (see "5.3 Preparing the smartphone/tablet" on page 26).
The Powerline network comes with a standard encryption.
8.2 Setting up a second network
Normally (with just one camera 11 and a Powerline adapter 17), the standard, factory-provided encryption is unproblematic. It is identical for both the camera and the Powerline adapter 17 to ensure they work successfully with each other.
A second network only needs to be set up if the installation is an elaborate one, involving several cameras and Powerline adapters that need to work independently of each other.
As both networks use the same supply cables, you will need to have different encryptions.
To set up a new encryption for the second network, proceed as follows:
-
Separate the cameras and the Powerline adapter for the first network from the electric supply.
-
Set up the second network, comprising one or several cameras and a Powerline adapter with the standard encryption (see "5. Starting the device" on page 25).
-
Press and hold the button on the underside of the Powerline adapter 17 for between 1 and 3 seconds.
-
The Powerline adapter will now create a new encryption.
-
Press the Network security button 5 for all cameras on the second network within 120 seconds.
The cameras will assume the new key from the Powerline adapter and will now work together with it.
For safety reasons, the transfer time is restricted to 120 seconds. If you are not immediately successful at setting all cameras to the new key within this time, start again at point 3.
- Connect the Powerline adapter and cameras on the first network to the electric supply once again.
As both networks are now working with different encryptions, they can be operated independently of each other.
8.3 Resetting the encryption
To reset the encryption for the second network to the standard encryption, proceed as follows:
- Press and hold the button on the underside of the Powerline adapter 17 for at least 15 seconds.
The encryption for the Powerline adapter will then be reset to the standard encryption.
- Press and hold the Network security button 5 on the cameras for at least 15 seconds.
The encryption for the camera will then be reset to the standard encryption.
9. Connecting an external loudspeaker
In order to be able to speak with your child, fluctuating WLAN or mobile data via your smartphone, an external transmission rates.
loudspeaker needs to be connected to the video camera. PC loudspeakers are particularly suitable here.
Note: Under certain circumstances, your words may be transmitted at a delay due to
The loudspeaker is connected to the socket 3 with a 3.5mm phone jack.
Technical data:
- Impedance: 8 Ohm or active loudspeaker
- Connection: 3.5 mm stereo phone jack
10. Cleaning and maintaining the device
10.1 Cleaning

Warning! To avoid the risk of electric shock, injury or damage:
- Always disconnect the camera supply cable from the power socket before cleaning the device.
- Never immerse the individual parts in water.
Caution! Under no circumstances use abrasive, corrosive or scratching cleaning agents, as these could damage the device.
- If necessary, wipe the individual parts with a damp cloth.
-
Only use the baby phone again when all the parts have fully dried out.
-
Carefully clean the camera lens when necessary with a soft cloth, e.g. tissue for cleaning spectacles.
11. Faults and how to remedy them
| Fault Cause | Remedy | |
| Camera is not displaying an image and not producing any sound | Camera is not connected “5.1 Conne | necting the camera” on page 25 |
| Powerline adapter is not correctly connected | “5.2 Connecting the WLAN router” on page 25 | |
| Camera is not registered to the smartphone (tablet) | “5.3 Preparing the smartphone/tablet” on page 26 | |
| No reaction from camera software | Separate camera from network, wait 10 seconds and connect again | |
| Password is incorrect “Password settings:” on page 29 | ||
| Camera encryption is faulty Reset e | ncryption (see “8.3 Resetting the encryption” on page 33). | |
| Smartphone software has crashed | Turn the smartphone off and then on again. Reestablish connection to camera (see “6.1 Starting the app and viewing the live image” on page 27) | |
| WiFi/WLAN connection not working | Set up WiFi/WLAN connection (see Instructions for Use included with your smartphone/tablet). | |
| Mobile phone data transmission not working | Set up mobile phone data transmission (see Instructions for Use included with your smartphone/tablet). | |
| Camera and Powerline adapter are not connected to the same current phase | An electrician may need to reconnect the plug sockets used to the same current phase (this may only be carried out by an expert). | |
| Image is flickering L | lighting in monitored room is unfavourable | Increase or reduce the lighting |
| Image is in black and white | Light is too weak and the infrared function has switched on automatically. | The infrared function is always in black and white. To return to colour, the room will need to be made brighter (see “Infrared operation” on page 25). |
| Image or sound are not sharp | The type of data transmission is too slow | Reduce the image resolution (see “Recording settings:” on page 30) |
| Image and sound are delayed on the smartphone | The coding and decoding of the video signals always takes some time | Cannot be rectified, this is the way the system operates. |
| The volume of data is too high when accessing the device via the Internet | Image resolution too high Reduce the image resolution (see “Recording settings:” on page 30) | |
| If possible, use the WiFi network. | ||
12. Technical data
| Camera | |
| Image sensor 1/4" progressive | scan CMOS sensor |
| Lens F1.2 6.0mm | |
| Min. viewing angle 56 degrees | diagonally |
| Video lighting 2 metres distance | for IR lighting |
| Compression H.264 | |
| Resolution 640X480 | |
| Audio Two-way (full-duplex) via microphone and audio-out via camera | |
| Camera memory Micro SD / SDHC card slot (up to 32GB) | |
| Users 4 simultaneous users | |
| Standards Powerline AV | |
| Network interface An RJ-45 (10V/100BASE-T Ethernet) via PN928-EB 200Mbps power cable port to PN928-EB and PC10g each 128-Bit-AES link encryption with key management | |
| Modulation process OFDM symbol modulation on line synchronisation 1024/256/64/16/8 - QAM, QPSK, BPSK, ROBO carrier modulation | |
| Frequency band 2 ~ 28 MHz | |
| Operating range Estimated range of 300 metres in wall cables | |
| Cabling | 100Base-T, Cat. 5 UTP cable on PN928-EB to router |
| Operating temperature | 0°C to 40°C ambient temperature |
| Storage temperature | -20°C to 70°C ambient temperature |
| Air humidity | Maximum 10 to 90% (non-condensing) |
| Power input | 100 ~ 240V 50/60Hz Inside |
| Network connection | EU standards |
| Certification | Homeplug-AV Powerline Certification / CE 0680 Certification / ROHS-, ECO-Design-, REACH-, WEEE-Certification |
| dLAN AV adapter (Powerline adapter) | |
| Electric supply | 100 - 240V / 50/60Hz |
| Main chip set | Broadcom BCM60321 |
| Computer interface | IEEE802.3 IEEE802.3u |
| Standards Powerline AV | |
| Network interface 1x RJ-45 (10V/100BASE-T Ethernet) 1x power cable 200 Mbps connection supports the coexistence with HomePlug 1.0 (14/85mbps) | |
| Security | 128-Bit-AES link encryption with key management |
| PHY data rate | 200 Mbps via Powerline and Ethernet 10/1000Mbps on OFDM symbol |
| Modulation process Modulation on line synchronisation 1024/256/64/8. QAM, QPSK, BPSK, ROBO carrier modulation | |
| Frequency band 2 - 28 MHz | |
| Additional protocols | Mix of TDMA and CSMA / CA channel access diagram, CO device generations a periodic beacon carrier for channel access diagram |
| Operating range Maximum 300 metres in wall cables | |
| Cabling 100Base-T, Cat. 5 cables | |
| Operating temperature 0 °C to | 40 °C ambient temperature |
| Storage temperature -20 °C to | 70 °C ambient temperature |
| Relative humidity Maximum 10 | to 90% (non-condensing) |
| Type PN928-EBg | |
| AV 1-Port nano Broadcom BC | M60321 |
| Ultra compact (64x46.5x24.5 mm) | |
| Optimised for satellite and IPTV installations, DVR networking | |
| Safety push-button for software-free configuration | |
| 128-bit AES security | |
| CSMA/CA, TDMA | |
| QoS | |
| 2 - 28 MHz | |
| Certification Homeplug-AV Powerline Certification / CE 0680 Certification / ROHS-, ECO-Design-, REACH-, WEEE-Certification | |
13. Disposal
13.1 Equipment

The symbol of the crossed-through wheelie bin means, within the European Union, that the product is subject to a separate waste collection. This
applies to the product and all accessories marked with this symbol. Products labelled as such must not be disposed of normal household waste collections; they
must be taken to a recycling bank for electrical and electronic equipment. Recycling helps to reduce the use of raw materials and is eco-friendly.
13.2 Packaging
When you wish to dispose of the packaging, please observe the relevant environmental regulations for your country.
14. Warranty
In addition to the seller's warranty obligations arising from the contract to purchase, we as the manufacturers provide a warranty of 24 months from purchase of the appliance as long as the appliance is used properly and the operating instructions are followed. Evidence of the date of purchase and the type of appliance should be provided by means of a receipt.
The purchaser's statutory rights are unaffected by this manufacturer warranty.
During the warranty period, we undertake to remedy any defects attributable to poor materials or workmanship. Worn parts are excluded from the warranty.
Minor deviations from specified quality which do not affect the value or usability of the appliance are not covered by the warranty. We are likewise unable to accept the warranty if the defects on the appliance are due to transport damage for which we are not responsible, if they are attributable to misuse or lack of care or if the appliance has been interfered with by persons not authorized by us to do so.
The warranty service will involve repair, replacement of parts or replacement of the appliance at our discretion. The warranty period will be neither extended nor restarted by the performance of warranty services. The warranty period for any spare parts
fitted will expire with the warranty period for the appliance as a whole.
Extended or different claims, especially those relating to the making good of damage sustained outside the appliance, are excluded unless liability is compulsory in law.
We will not accept the costs or risks of transport.
An appliance sent in without evidence of the purchase date will be treated as a repair. The appliance will only be repaired following discussion with the customer.
Please keep this address and article number in case of any queries.
14.1 Service Centres
Addresses for service can be found in "Contact addresses" on page 99.
Article No. 10.256.351
14.2 Supplier
Please note that this address is not an address for service. Contact one of the service centres mentioned above.
MAPA GmbH
15. Declaration of conformity
The device meets all applicable European directives, as well as the relevant national laws implementing them. These are shown in the EU declaration of conformity which can be requested from the manufacturer. The Declaration of Conformity can be found at www.nuk.com.
Contenu
KARAKA PROMET D.O.O.
Blizanti bb
88260 Citluk
karaka@karaka-promet.com
BG-BULGARIA
Bebolino Ltd
Str. Hristo Ivanov Golemiya str.9
Sofia 1618
029557500
CZ-CZECH REPUBLIC
MAPA Spontex Volf & Co. s.r.o.
Prodašice 4
29404 Dolni Bousov
DK - DENMARK
MAPA GmbH
German Products Estonia OÜ
Laki 14a-609
10621 Tallinn - Estonia
www.gpestonia.ee
www.nuk.ee
ES - SPAIN
Roche Diagnostics, SL
Avda.de la Generalitat,171-173
Berkeley Business Park
Wainwright Road
Worcester WR4 9ZS
08453002467
GE-GEORGIA
GiSi Ltd
Tsereteli 115a
Tbilis 0119
info@gisi.ge
GR - GREECE
ΦAPMANO EE-X.TZHMO & ΣIA
T.Θ.291-KAOXΩP157009
QEEZAONIKH
2310751525
: 2310789621
E-mail: info@nuk.gr
HR-CROATIA
Euroalba d.o.o.
Obrtnicka 2
10000 Zagreb
+385 12406488
HU - Hungary
For Baby Kft.
Szoloskert u. 5,
2092 Budakeszi
+36 23 454 867
info@forbaby.hu
IE - IRELAND
Intrapharma Consumer Health
Magna Business Park, Citywest
Road
Dublin 24
United Drug House
IT-ITALY
MAPA GmbH
German Products Baltics SIA
Silzemnieki 1, Garupe
Carnikavas novads - Latvija
67299994
MK-MACEDONIA
Euroalba Skopje d.o.o.
Bul. Partizanski Odredi 64 g 3/6
1000 Skopje
+38923065717
NO-NORWAY
Simba-Dickie Nordic AS
Hauganveien 293
3178 Vale
e-mail: mail@simbatoys.no
Babycare AS
Postboks 5524, Voiebyen
4677 Kristiansand
www.babycare.no
PL-POLAND
(dias uteis das 9h as 18h)
RO - ROMANIA
Biochefarm International SRL
Str. Balta Albina nr. 133L, Sector 3
032622 Bucuresti, Romania
Tel.: 021 2233164,
Fax: 021 2223088
E-mail: office@biochefarm.ro
Web: www.biochefarm.ro
RU - RUSSIA
A.K. Xaa3e
Octxahdenebcre3ebwaΦT M6x
MockOBCKOE npedCTabNTenbCTBO
yI.Дмитриya YIbHAHOBa I.16 KOpn.2
oΦnc 391-392
117292 MockBa / Pocn
www.nuk-baby.ru / medi
cal@achaase.ru
SE - SWEDEN
GB Barnartiklar AB
Fagelviksvagen 18
145 53 NORSBORG
0855635825
Fax 084649848
info@gbab.com; www.gbab.com
SI-SLOVENIA
Euroalba Ljubljana d.o.o.
Celovska cesta 172
1000 Ljubljana
0386 15 14 22 10
SK-SLOVAKIA
MAPA Spontex Volf & Co. s.r.o.
Prodašice 4
29404 Dolni Bousov
Czech Republic
SR-SERBIA
YUGLOB d.o.o.
Zrenjaninski put bb (121t)
11211 Beograd, Borca
+381 11 2960-784
e-mail: office@yuglob.rs
TR-TURKEY
ATAK DIS TIC.A.S.
Maya Akar Center K:20 Esentepe
Istanbul
202122117400
UA - UKRAINE
Imnoptep B YkpaHy:
TOB «MouapT ImnpoT»
M.Ondeca,65074
Byn. Raɪdapa, 14,
TeN. (0482) 305-454
Kontaktstellen in Europa Contact Information in Europe
NUK is a registered trademark of MAPA GmbH/Germany
REV 401/01-2015