Eco Control Audio 500 - Baby monitors NUK - Free user manual and instructions
Find the device manual for free Eco Control Audio 500 NUK in PDF.
| Technical features | Audio monitor with range up to 300 meters, 2.4 GHz frequency, rechargeable battery, sound level indicator. |
|---|---|
| Usage | Easy to use with a single button for power on and off, volume adjustment, and standby function. |
| Maintenance and repair | Clean with a soft cloth, avoid moisture, regularly check the battery status. |
| Safety | Compliant with European safety standards, BPA-free, recommended for use from birth. |
| General information | Lightweight, compact design, compatible with NUK accessories, 2-year warranty. |
Frequently Asked Questions - Eco Control Audio 500 NUK
User questions about Eco Control Audio 500 NUK
0 question about this device. Answer the ones you know or ask your own.
Ask a new question about this device
Download the instructions for your Baby monitors in PDF format for free! Find your manual Eco Control Audio 500 - NUK and take your electronic device back in hand. On this page are published all the documents necessary for the use of your device. Eco Control Audio 500 by NUK.
USER MANUAL Eco Control Audio 500 NUK
Please note inner coverage
Francais 35
This manual can be downloaded in other languages from our website www.nuk-service.com.
Inhalt
11.1 Service-Center NUK
11.2 Service-Center Babyphone
1.Description of device 20
1.1 Proper use. 20
1.2 Description of function 20
1.3 Approval 20
1.4 Contents of package 20
2. Safety information. 21
2.1 General information. 21
2.2 Protection against electric shock 21
2.3 For your child's safety 21
2.4 Protection from injury 21
2.5 Material damage 22
2.6 Using LiPo rechargeable batteries 22
3. Components of the baby monitor 23
3.1 Brief overview of messages 24
4. Starting the device 24
4.1 Connecting the parent unit 24
4.2 Connecting the baby unit 25
4.3 Connecting baby unit and parent unit. 25
4.4 Power supply. 26
4.5 Eco-Mode 26
5. Operating the baby unit 27
5.1 Switching the baby unit on and off 27
5.2 Indicator LEDs.. 27
6. Operating the parent unit 27
6.1 Switching the parent unit on and off 27
6.2 Indicator LEDs 27
6.3 Using the VOX function to adjust the transmission sensitivity 28
6.4 Adjusting the volume control 29
6.5 Mute setting 29
6.6 Talk-Back function 29
7. Cleaning and care 29
7.1 Cleaning 29
7.2 Changing the battery. 30
8. Faults and how to remedy them 30
9. Technical data 31
9.1 FHSS Technology 31
10. Disposal 32
10.1 Equipment 32
10.2 Packaging 32
10.3 Disposable/rechargeable batteries 32
11. Warranty 32
11.1 Service Centres NUK 33
11.2 Service Centres Babyphone 33
11.3 Supplier 33
12.Declaration of conformity. 33
1. Description of device
1.1 Proper use
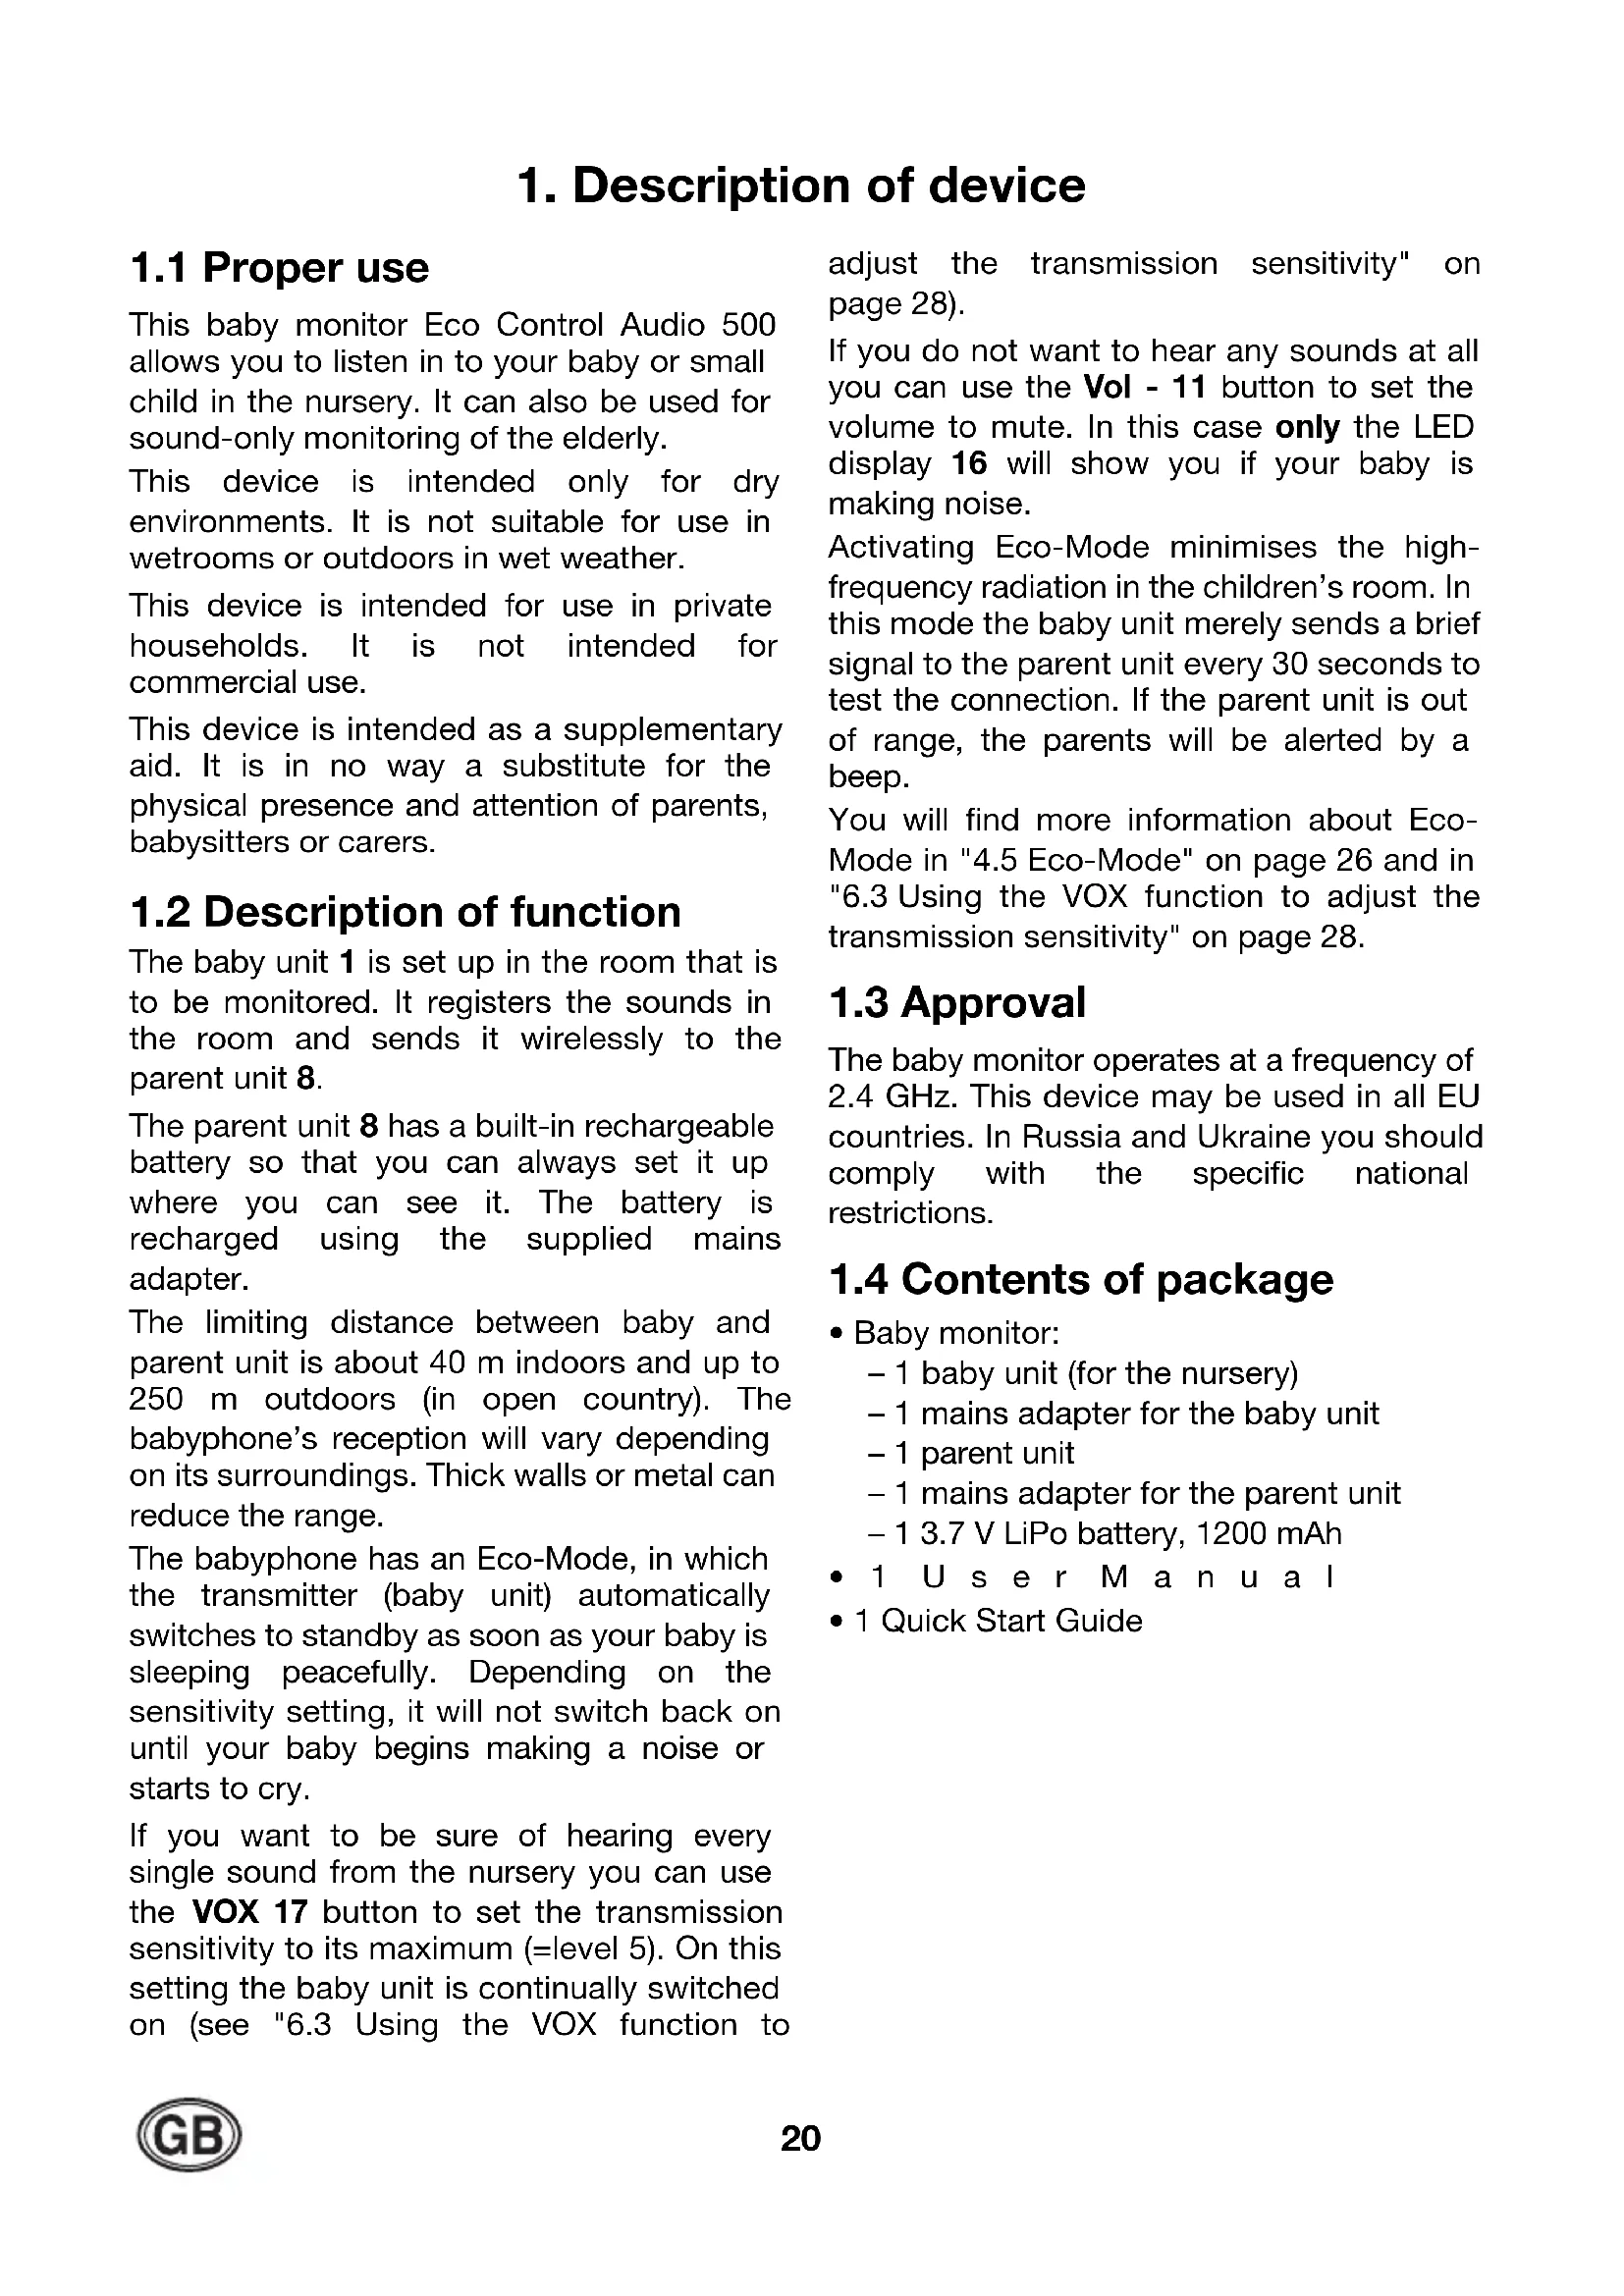
This baby monitor Eco Control Audio 500 allows you to listen in to your baby or small child in the nursery. It can also be used for sound-only monitoring of the elderly.
This device is intended only for dry environments. It is not suitable for use in wetrooms or outdoors in wet weather.
This device is intended for use in private households. It is not intended for commercial use.
This device is intended as a supplementary aid. It is in no way a substitute for the physical presence and attention of parents, babysitters or carers.
1.2 Description of function
The baby unit 1 is set up in the room that is to be monitored. It registers the sounds in the room and sends it wirelessly to the parent unit 8.
The parent unit 8 has a built-in rechargeable battery so that you can always set it up where you can see it. The battery is recharged using the supplied mains adapter.
The limiting distance between baby and parent unit is about 40m indoors and up to 250 m outdoors (in open country). The babyphone's reception will vary depending on its surroundings. Thick walls or metal can reduce the range.
The babyphone has an Eco-Mode, in which the transmitter (baby unit) automatically switches to standby as soon as your baby is sleeping peacefully. Depending on the sensitivity setting, it will not switch back on until your baby begins making a noise or starts to cry.
If you want to be sure of hearing every single sound from the nursery you can use the VOX 17 button to set the transmission sensitivity to its maximum (=level 5). On this setting the baby unit is continually switched on (see "6.3 Using the VOX function to
adjust the transmission sensitivity" on page 28).
If you do not want to hear any sounds at all you can use the Vol - 11 button to set the volume to mute. In this case only the LED display 16 will show you if your baby is making noise.
Activating Eco-Mode minimises the high-frequency radiation in the children's room. In this mode the baby unit merely sends a brief signal to the parent unit every 30 seconds to test the connection. If the parent unit is out of range, the parents will be alerted by a beep.
You will find more information about EcoMode in "4.5 Eco-Mode" on page 26 and in "6.3 Using the VOX function to adjust the transmission sensitivity" on page 28.
1.3 Approval
The baby monitor operates at a frequency of 2.4 GHz. This device may be used in all EU countries. In Russia and Ukraine you should comply with the specific national restrictions.
1.4 Contents of package
Baby monitor:
- 1 baby unit (for the nursery)
- 1 mains adapter for the baby unit
-1 parent unit - 1 mains adapter for the parent unit
- 13.7V LiPo battery, 1200mAh
1 User Manual
1 Quick Start Guide
2. Safety information
2.1 General information
- Please read these operating instructions carefully before using the device. These instructions form part of the device and must be kept to hand at all times.
- The device should only be used intended purpose, as described (see "1.1 Proper use" on page 20).
- Use only accessories supplied with the device or expressly permitted in these instructions.
Each time you use the device, first check that it is working properly. As well as checking the range and the connection, we recommend always checking that the device is audible when in use.
These devices may be used only for the transmission of sound within your personal environment. Everybody in a room that could be overheard must be informed that you are using the device. - Please note that transmission will always depend on the surroundings. Electronic devices, insulation, walls, moisture or trees can seriously interfere with reception.
2.2 Protection against electric shock

Warning! The following safety instructions are intended to protect you from electric shock.
- Do not attempt to repair the device yourself. The device may be opened only by qualified technicians.
- The device may not be used if it is damaged.
- If you are travelling, please always make sure that the available voltage matches that given in the technical data.
2.3 For your child's safety
Warning! Children cannot recognise the dangers associated with using such devices. They should therefore be kept away from
for the them.
-
Make sure that the unit and its accessories are always kept out of baby's reach. The unit and its accessories should always be at least 1 m way.
Children are often poor judges of hazard and are liable to injure themselves. You should therefore note: -
This device is not designed to be used by people (including children) with physical, sensory or mental disabilities or with insufficient experience and/or knowledge, unless a person responsible for their safety is supervising them or instructing them on how to use the device.
-
Children should be supervised to ensure that they cannot play with the device.
- Make sure that the plastic packaging does not become a lethal trap for children. There is a risk of suffocation. Plastic packaging is not a toy.
-
To avoid the possibility of strangulation, the power cable must always be out of baby's reach.
-
Use the unit only to give you additional safety. It can never serve as a substitute for a human carer.
2.4 Protection from injury

Warning! Follow the instructions below to prevent injuries.
- Make sure the power supply cable is tucked away neatly to prevent anyone from tripping over it.
2.5 Material damage
Caution! To prevent material damage, follow the instructions below.
- Do not expose the device to direct sunlight or extreme heat as UV rays and overheating may make the plastic brittle and the electronics could become damaged.
- The baby monitor should not be placed near to a source of heat and the device should also not be covered, to prevent it overheating.
- Never use the baby monitor in damp or wet surroundings.
- Never use the baby monitor in dusty surroundings. This could shorten the life of the device.
- Never use sharp or abrasive cleaning agents as these could damage your device.
- When the device is not in use, always switch it off using the On/Off button.
2.6 Using LiPo rechargeable batteries

Warning!
To avoid potential hazards that could cause injuries or damage the equipment, always note the following:
- Avoid short circuits.
The battery poles should never be allowed to come into contact with any metal objects, as this could cause a short circuit. A short circuit can cause the battery to overheat, in which case it could leak electrolyte and possibly cause an explosion or fire.
If electrolyte does leak out, avoid any contact with skin, eyes and mucous membranes in order to prevent injuries. In the event of any contact with the electrolyte, rinse the affected areas with plenty of clean fresh water and immediately seek medical attention.
- The built-in battery may be replaced only by a genuine replacement battery. If the battery is defective, please contact one of our service addresses (see "Contact addresses NUK" on page 115).
- To avoid the risk of explosion, normal batteries should not be recharged, heated up or disposed of by incineration.
- Never try to open the battery, bend the contacts or pull them off. Do not throw the battery onto the floor or knock nails into it.
Damaging the battery could cause an internal short circuit, in which case it could leak electrolyte and possibly cause an explosion or fire.
- Use only the supplied mains adapter to charge the battery.
Using the wrong mains adapter could overcharge it, causing it to overheat and explode. - LiPo batteries may be charged or stored only on heatproof, non-combustible surfaces.
- LiPo batteries may be charged only under supervision so that you can intervene in good time in the event of a failure.
- LiPo batteries contain toxic substances. For this reason always observe the regulations for its disposal given in "10.3 Disposable/rechargeable batteries" on page 32.
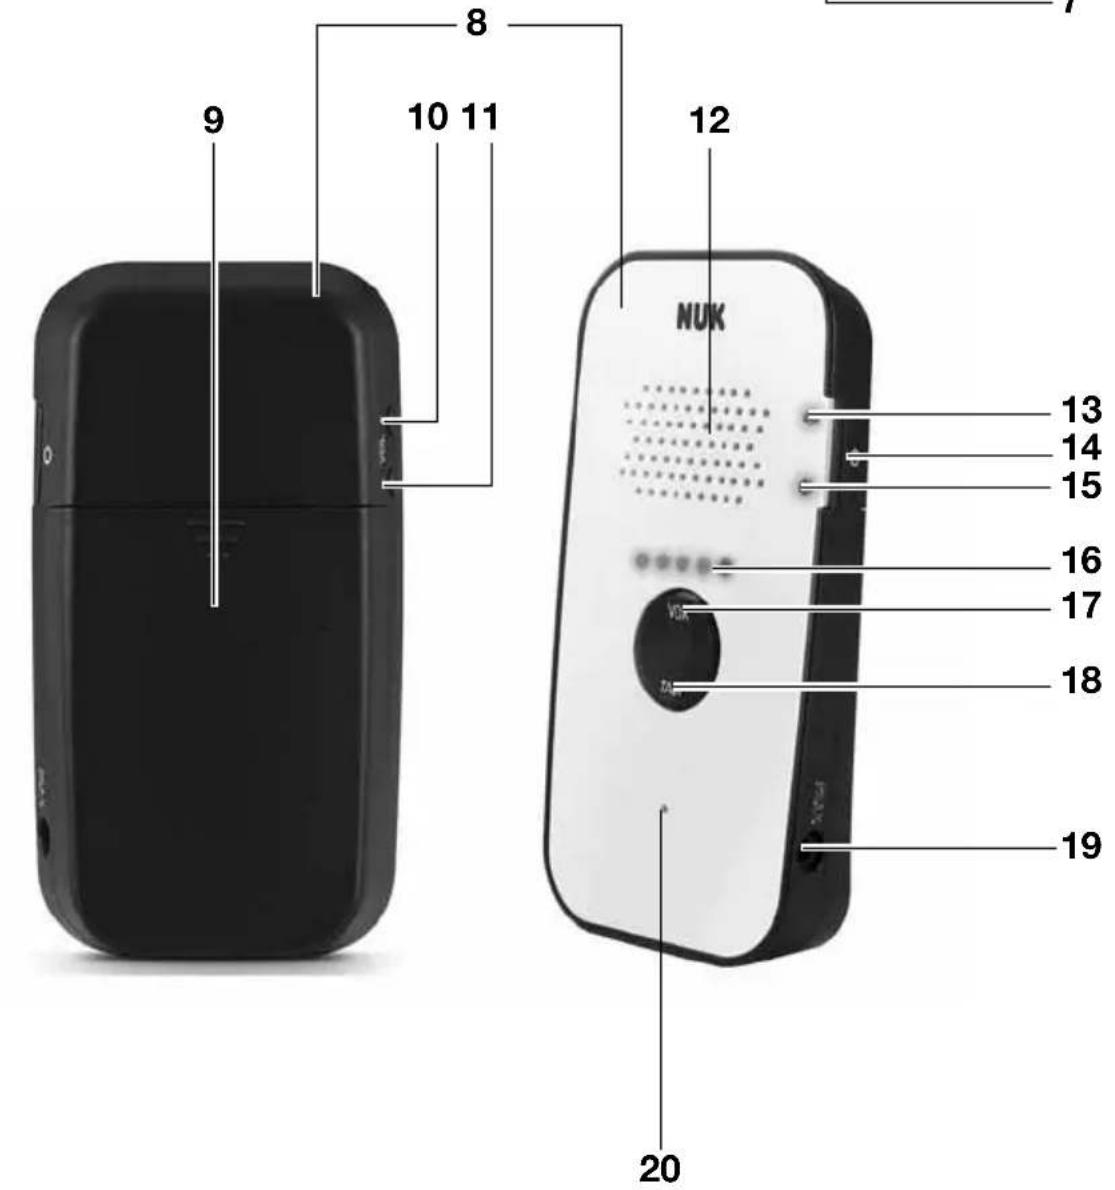
3. Components of the baby monitor
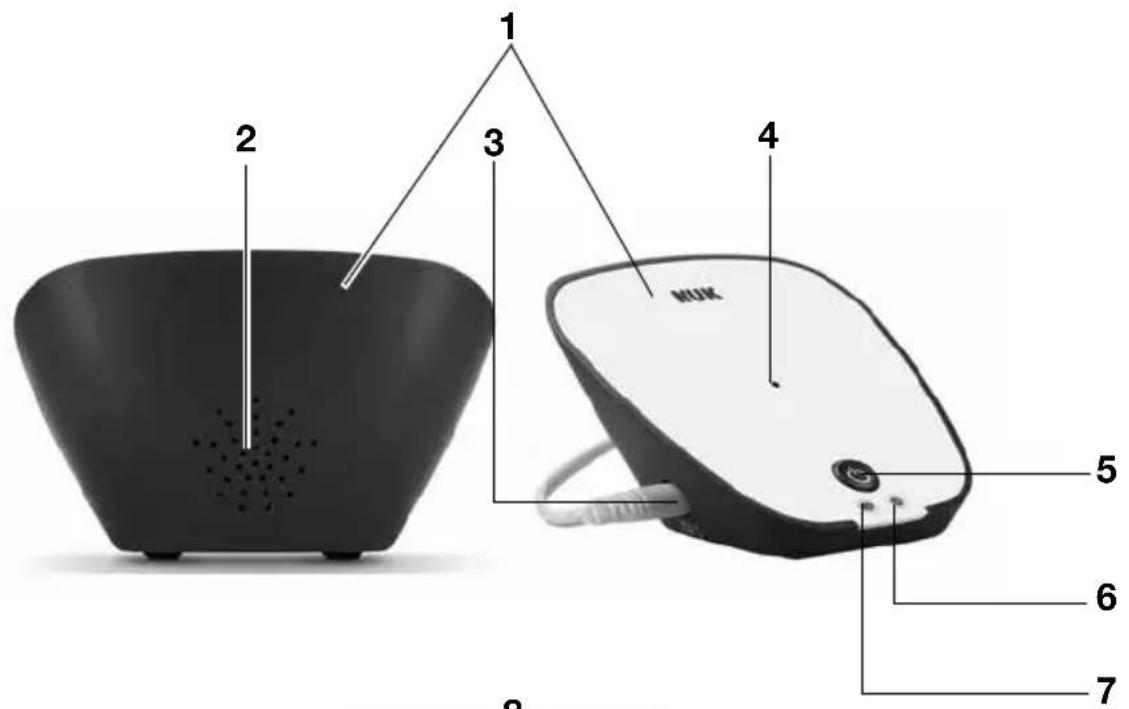
1 B a b y u n i t
2 Speaker
3 Mains adapter socket
4 Microphone
5 On/Off button:
-brief press: switches on;
long press: switches off.
6 Power LED
7 VOX LED
- lights up green when it has set up a connection to the parent unit;
- switches off if the connection to the parent unit is lost.
8 Parent unit
9 Battery cover
10 The Vol + button:
increases the volume.
11 The Vol - button:
- reduces the volume.
- Switches to mute on the lowest setting. Sounds are then indicated only by the LEDs 16.
12 Speaker
13 Connection indicator
- lights up green when it has a connection;
- flashes green: if there is a working connection but Eco-Mode is activated;
- lights up red if the connection is lost.
14 On/Off button
15 The power supply indicator POWER
- lights up green: the device is switched on and the battery is fully charged;
- flashes green: the battery is currently being charged;
- lights up red and beeps at one minute intervals: low battery warning. Within about 15 - 20 minutes the parent unit will switch off automatically.
16 Indicator LEDs
- indicates the noise level in the nursery. The more LEDs are lit, the louder are the noises;
- indicates the different levels when you are adjusting the volume. The more LEDs are lit, the louder the sound from the loudspeaker;
- indicates the different levels when you are adjusting the VOX sensitivity. The more LEDs are flashing, the sooner the device will react to sounds. If 5 LEDs are lit the device will switch to continuous transmission.
17 Press the VOX button
- press briefly and use Vol +/- to set the transmission sensitivity.
18 Hold down the TALK button:
- Holding down this button activates the function "talk to baby";
- while the baby unit is in Eco-Mode, the Talk-Back function is disabled and this is indicated by two consecutive beeps.
19 Mains adapter socket
20 Microphone
3.1 Brief overview of messages
| Baby unit | ||
| Light Display Meaning | ||
| Power-LED 6 green Baby unit is switched on | ||
| VOX LED 7 | green Link ok (non | Eco-Mode) |
| OFF Link ok (Eco-Mode) | ||
| Link not ok | ||
| Parent unit | ||
| Light Display Meaning | ||
| Connection indicator 13 | green Link ok (non | Eco-Mode) |
| green blinking Link ok (Eco-Mode) | ||
| red blinking 1 beep every 30 s | Link not ok | |
| Power-LED 15 | green The parent unit is switched on and the battery is fully charged | |
| red 1 beep every 60 s | Low battery warning. The parent unit will switch off within the next 15 min without additional warning. | |
| green blinking Charge battery indicator | ||
| Indicator LEDs 16 | 1 - 5 LEDs blinking Sensitivity (VOX) setting. The more LEDs are flashing, the sooner the device will react to sounds. If 5 LEDs are lit the device will switch to continuous transmission. | |
| 1 - 5 LEDs 1 - 5 beeps | Volume regulation. The more LEDs are lit, the louder the sound from the loudspeaker. | |
| 1 - 5 LEDs Visual baby sound indication. The more LEDs are lit, the higher the noise level in the nursery. | ||
| None single beep | Talk-Back on parent unit | |
| None | double beep | Talk-Back on parent unit during Eco-Mode |
4. Starting the device
Note: Always connect the cables before inserting the mains adapter into the socket.
4.1 Connecting the parent unit
The parent unit is powered by the supplied rechargeable LiPo battery. This can be charged using the supplied mains adapter.
Caution! To prevent malfunctions, first insert the battery into the parent unit and then connect the mains adapter to the parent unit.
-
Remove the battery cover 9 on the back of the parent unit 8, by sliding it downwards.
-
Put the battery in its compartment as indicated on the unit. Make sure you insert it with the correct polarity (+ and -).
- Slide the battery cover 9 back onto the parent unit 8.
- Insert the small plug of the mains adapter into the mains adapter socket 19 of the parent unit.
- Insert the plug into a power socket that matches the rating given in the technical data (see "9. Technical data" on page 31).
- Initially, charge the parent unit continuously for 10 hours to activate the full battery capacity.
Subsequently the battery will take only about 5 hours to charge. It can also be charged while the unit is in operation.
The POWER 15 LED indicates that charging is in progress. If it:
- flashes green: the battery is currently being charged;
- lights up green: the battery is fully charged;
- lights up red and beeps at one minute intervals: low battery warning. Within about 15 - 20 minutes the parent unit will switch off automatically.
4.2 Connecting the baby unit
Note: Don't install the baby unit 1 until the battery of the parent unit 8 is fully charged.
- Put the baby unit 1 somewhere in the nursery where your baby will not be able to reach it.
An optimal distance between baby and the baby unit is from 1 to 2m - Insert the mains adapter plug into the socket 3 of the baby unit 1.
- Insert the plug into a power socket that matches the rating given in the technical data (see "9. Technical data" on page 31).
4.3 Connecting baby unit and parent unit
- Use the On/Off button 5 to switch the baby unit 1 on. Keep the button pressed for a moment until the Power LED 6 lights up.
- Use the On/Off button 14 to switch the parent unit 8 on. Keep the button pressed for a moment until the LED 15 lights up a steady green.
The connection will be set up automatically. While this is being done the connection indicator 13 will light up red.
As soon as the connection has been established, the connection indicator on the parent unit 13 and the VOX LED on the baby unit 7 will light up green.
If the connection indicator 13 begins to flash green, this means that there is a connection between the parent unit and the baby unit, but your baby is currently asleep and therefore the device has automatically activated Eco-Mode to reduce the high-frequency radiation in the children's room and save energy.
In the event that the connection between the parent unit and the baby unit breaks down, the devices will automatically attempt to establish a new one.
If a new connection is not established within 30 seconds, the parent unit 8 will emit a regular beep and the connection indicator 13 will light up red. You may need to move the parent unit to a different location before a new connection can be established.
- First go and check on baby to make sure everything is OK.
- Then try to set up a new connection by moving about.
The connection will be automatically re-established as soon as you are within range.
As soon as the connection has been set up the connection indicator 13 will again light up green.
4.4 Power supply
- The power supply for the baby unit 1 works only via the mains adapter.
- The parent unit 8 can be operated with no mains connection using the battery.
The state of the battery is indicated by the POWER 15 LED. If it:
- lights up green: the device is switched on and the battery is fully charged;
- flashes green: the battery is currently being charged;
- lights up red and beeps at one minute intervals: low battery warning. Within about 15 - 20 minutes the parent unit will switch off automatically.
During these 15 minutes you can still activate and deactivate any functions you wish. Please be aware that using e.g. the Talk-Back function and/or maximising the volume control will increase the unit's power consumption and therefore reduce the remaining time you have available. You should connect the mains adapter to your mains supply as soon as the POWER 15 LED begins to flash red.
- The parent unit can be connected to the mains via the mains adapter and receive power from there, while at the same time recharging the battery. If the parent unit is switched on, recharging the battery will take somewhat longer. While the battery is charging, the LED 15 flashes green.
Notes:
-
With a fully charged battery you can operate the parent unit for up to 18 hours. The exact time will depend on how the unit is used (whether the parent unit frequently switches on, whether the two-way speaking function is much used, how high the volume is set, etc.).
-
Charging an empty battery takes about 5 hours.
4.5 Eco-Mode
Description of function
This babyphone has an Eco-Mode setting, which not only saves electric power but also minimises the high-frequency radiation in the nursery.
At VOX levels 1, 2, 3 and 4, (see "6.3 Using the VOX function to adjust the transmission sensitivity" on page 28) Eco-Mode is activated automatically about 10 seconds after your baby goes to sleep and no longer makes any noise.
You can see when this happens because the connection indicator 13 will begin to flash green. In Eco-Mode, not only the baby unit is automatically set to standby, but also the parent unit.
While Eco-Mode is activated, any functions that might wake the baby are automatically deactivated. For example, you cannot use the Talk-Back function, but even in Eco-Mode you are always connected to your baby and always know if you are still within range.
This babyphone has a range checker that also works in Eco-Mode. If you are out of range, you will automatically receive a warning even if Eco-Mode is activated, because even in standby mode, the baby unit sends a signal to the parent unit every 30 seconds to check the connection.
If the connection indicator 13 lights up green, there is a functioning connection between the baby unit and the parent unit. If the connection indicator 13 flashes green, Eco-Mode has been activated. If the connection indicator 13 changes to red, this means that you are out of range and/or the two units are no longer communicating.
Note: Check the range of your baby monitor before using Eco-Mode. Make sure that the two units are always within range, so that you can hear your baby.
The device automatically switches to transmission mode as soon as you
makes a noise that exceeds your selected sound threshold (VOX levels 1 - 4). EcoMode is deactivated immediately and the connection indicator 13 stops flashing.
At VOX level 5 the device transmits continuously and Eco-Mode is deactivated. If you want to check that everything is OK while Eco-Mode is activated (although this
already indicates that your baby is sleeping peacefully), you can deactivate Eco-Mode by switching to permanent transmission mode:
-
press the VOX button 17on the parent unit 8.
-
Then press the Vol+ button 10 repeatedly until all 5 LEDs 16 are lit.
5. Operating the baby unit
5.1 Switching the baby unit on and off
The baby unit 1 will switch on automatically as soon as you have connected the mains adapter and plugged it into the power supply. You can subsequently switch the baby unit on or off at any time:
- To switch the baby unit 1 on or off, press the On/Off button 5.
5.2 Indicator LEDs
-
The Power LED 6 lights up the baby unit is switched on.
-
The VOX LED 7 on the baby unit lights up green when there is an established connection between it and the parent unit.
-
The VOX LED 7 will not be lit while the baby unit 1 is switched to Eco-Mode or if it was not possible to set up a connection to the parent unit.
6. Operating the parent unit
6.1 Switching the parent unit on and off
To switch the parent unit 8 on or off, press and hold the On/Off button 14:
- when you hear a beep and the Power LED 15 lights up, the parent unit is switched on;
- when you hear a beep and the Power LED 15 goes out, the parent unit is switched off.
6.2 Indicator LEDs
The connection indicator 13 on the parent unit 8 shows the state of the connection to the baby unit 1. It:
- lights up green when it has a connection;
-
flashes green when the baby unit is in Eco-Mode and indicates that your baby is sleeping peacefully;
-
lights up red if the connection has broken down or the baby unit is switched off.
Notes:
- If the baby unit 1 is in Eco-Mode and the parent unit moves out of range, the connection indicator 13 will light up red. You will also hear a beep every 30 seconds.
- As soon as the parent unit 8 comes back into range, or the reason for the breakdown in communications is eliminated, the connection indicator 13 lights up green again indicating that the units are able to communicate.
- When the units are first switched on, the connection indicator 13 will initially be red. The parent unit and baby unit will set up a connection. As soon as the connection is set up the display will turn green.
The power supply indicator POWER 15:
- lights up green: the device is switched on and the battery is fully charged;
- flashes green: the battery currently being charged;
- lights up red and beeps at one minute intervals: low battery warning. Within about 15 - 20 minutes the parent unit will switch off automatically. Please be aware that this interval may be reduced, depending on how you use the device (for example, VOX level 5 uses more power than level 1).
- The display 16 with the 5 functions. The LEDs are only visible when in use.
- indicates the noise level in the nursery. The more LEDs are lit, the louder the noises;
- indicates the different levels when you are adjusting the volume. The more LEDs are lit, the louder the sound from the loudspeaker;
- indicates the different levels when you are adjusting the VOX sensitivity. The more LEDs are flashing, the sooner the device will react to sounds. If 5 LEDs are lit the device will switch to continuous transmission.
6.3 Using the VOX function to adjust the transmission sensitivity
Babies make a lot of different noises. These can range from loud breathing through babbling to calling or loud crying. The VOX function can be set up in such a way that only loud sounds such as crying or calling are transmitted while quieter sounds are not registered.
The VOX function sets up the transmission sensitivity of the microphone. The higher the VOX level the more sensitive the device is to noises.
- You activate the VOX function by briefly pressing the VOX button 17.
The LEDs 16 indicate the sensitivity of the current setting by flashing.
-
You can increase or decrease the transmission sensitivity by pressing one of the buttons VOL + 10 or VOL - 11. The number of flashing LEDs 16 corresponds to the selected level:
-
VOX level 1 = extremely low sensitivity, reacts only if baby screams really loudly;
- VOX level 2 = low sensitivity, reacts if baby screams loudly;
- VOX level 3 = normal sensitivity, reacts as has three if baby cries normally;
- VOX level 4 = high sensitivity, reacts even to slight sounds;
- VOX level 5 = Eco-Mode is switched off. The unit is set to transmit continuously.
You can set up the volume at which the parent unit should output the transmitted sounds using the two buttons VOL + 10 and VOL - 11 (see "6.4 Adjusting the volume control" on page 29).
Note: After activating the VOX function, you have about two seconds to alter the transmission sensitivity. The device will then automatically switch back to transmitting sounds. You can see this has happened because the LEDs 16 will no longer be flashing, and the VOL + 10 and VOL - 11 buttons now only modify the volume.
Caution! In continuous transmission mode at VOX level 5, all sounds are transmitted continuously. When the baby is sleeping peacefully, the volume is automatically reduced to its lowest level after a few seconds to minimise background noise. As soon as the child begins to make a noise, the volume automatically returns to its previous setting.
6.4 Adjusting the volume control
- You can use the VOL + 10 and VOL - 11 buttons to set the volume at which you hear the sounds emitted by the parent unit. Each time you press one of the buttons you will hear a beep at the volume that is currently set up and it will show you with the accordance of lit LEDs 16. The louder your chosen setting, the louder any beeps will be and the more LEDs will light up.
Note: When the VOX function is set to low sensitivity (see "6.3 Using the VOX function to adjust the transmission sensitivity" on page 28), then quiet sounds will not be transmitted regardless of the volume setting. This means that turning up the volume will not enable you to hear anything more. If you want to hear more of the sounds from the nursery you will need to increase the transmission sensitivity by selecting a higher VOX level.
6.5 Mute setting
The parent unit can be "MUTED". Sounds from the nursery will then transmitted.
-
Press the VOL - 11 button repeatedly until you can no longer hear beeping. No sounds will now be transmitted.
-
The LEDs 16 will continue to indicate the noise level in the nursery. The more LEDs
are lit the louder are the noises in the nursery.
- You can cancel the mute setting by pressing the VOL + 10 key.
- If the parent unit is muted and you activate the Talk-Back function, the volume will automatically return to the first level.
6.6 Talk-Back function
You can use the "Talk-Back" function to speak to your baby.
- Hold down the TALK 18 button on the parent unit.
When you hear a beep, this means that voice connection is established.
- At the same time, speak into the microphone 20 on the parent unit.
Your baby can now hear your voice from the loudspeaker 2 on the baby unit.
- Release the TALK 18 button in order to hear the baby's reaction.
Notes:
- If the baby unit 1 is in Eco-Mode, this function is deactivated so that you do not inadvertently wake your baby. In
no longer be this case, two consecutive beeps will remind you that the Talk-Back function is currently not available.
- If the volume of the parent unit is set to "MUTE" (see "6.4 Adjusting the volume control" on page 29), it will automatically be increased to level 1 as soon as you press the TALK 18 button.
7. Cleaning and care
7.1 Cleaning
Waming! To avoid the risk of electric shocks, injuries and damage:
- Always disconnect the mains adapter from the power socket before cleaning the device.
- Never immerse the individual parts in water.
Caution! Under no circumstances use abrasive, corrosive or scratching cleaning agents, as these could damage the device.
- If necessary, wipe the individual parts with a damp cloth.
- Only use the baby monitor again when all the parts have fully dried out.
7.2 Changing the battery
The installed 3.7V 1200 mAh lithium polymer battery (LiPo) may be replaced only by a genuine replacement battery as used by us. If necessary please contact our Product Service (see "Product service babyphone in Europe" on page 116).
-
Remove the battery cover 9 on the back of the parent unit 8, by sliding it downwards.
-
Remove the defective battery.
- Put the new battery in its compartment as indicated on the unit. Make sure you insert it with the correct polarity (+ and -).
- Slide the battery cover 9 back onto the parent unit 8.
-
Initially, charge the parent unit continuously for 10 hours to activate the full battery capacity (see "4.1 Connecting the parent unit" on page 24).
-
Faults and how to remedy them
| Fault Cause | Remedy | |
| Baby unit or parent unit does not work | No power supply Set up the power supply" on page 26) | supply (see "4.4 Power supply" on page 26) |
| Battery of parent unit is empty Charge the battery (see "4.4 Power supply" on page 26) | ||
| The unit is not switched on Switch it on (see "4.1 Connecting the parent unit" on page 24 and "4.2 Connecting the baby unit" on page 25) | ||
| The baby unit and parent unit are too far apart, or the signal is being blocked by solid walls or other electrical equipment | Reduce the distance or place the parent unit somewhere else | |
| Loud whistling Feed back due to the parent unit and baby unit being too close together | Increase the distance to at least 2 - 3 m | |
| Reduce the volume and the VOX level on the parent unit if you are in the immediate vicinity of the baby unit (see "6.3 Using the VOX function to adjust the transmission sensitivity" on page 28 and "6.4 Adjusting the volume control" on page 29). | ||
| Parent unit is beeping | Connection to the baby unit has been lost | Set up the connection (see "4.3 Connecting baby unit and parent unit" on page 25) |
| Problem with the power supply Check the power supply (see "4.4 Power supply" on page 26) | ||
| Connection indicator 13 has lit up red | The parent unit is out of range Set up the connection (see "4.3 Connecting baby unit and parent unit" on page 25) | |
| No sound from the parent unit | Volume is muted Increase the volume (see "Mute setting" on page 29) | |
| VOX function is set too low Increase the transmission sensitivity (see "6.3 Using the VOX function to adjust the transmission sensitivity" on page 28 and "3.1 Brief overview of messages" on page 24) | ||
If these hints do not solve the problem you can try to clear the fault as follows:
- Take the battery out of the parent unit.
- Unplug the mains adapters from their power sockets.
-
Wait a few minutes.
-
Replace the battery and plug the mains adapters back in.
If this has not resolved your problem, please contact one of our Service Centres (see "11.2 Service Centres Babyphone" on page 33).
- Technical data
| Wireless connection 2.4 GHz FHSS | |
| Transmission frequency 2408 MHz - 2474 MHz, max EIRP 100mW | |
| Number of channels 12 / automatic channel selection | |
| Line of sight range about 250 m | |
| Range within enclosed rooms | about 40 m. Successful transmission depends on the environment. Walls or trees can seriously interfere with reception. |
| Baby unit | |
| Operating temperature 0 °C to | 40 °C ambient temperature |
| Parent unit | |
| Operating temperature 0 °C to | 40 °C ambient temperature |
| Battery Lithium polymer battery | (LiPo), 3.7 V, 1200 mAh |
| Period of operation in normal transmission mode: at least 15 hours | |
| Period of operation in Eco-Mode: at least 18 hours | |
| Charging time when battery is charged for the first time: at least 10 hours, on subsequent occasions, charging takes about 5 hours | |
| Mains adapters | |
| Input 100-240 V AC; 50/60 Hz; | 0.1 A |
| Output | 5 V ---; 2.75 W; ---←+ |
9.1 FHSS Technology
The wireless transmissions of this baby monitor use modern FHSS technology.
Frequency Hopping Spread Spectrum (FHSS) is a digital frequency spreading method for wireless data transmissions. Unlike earlier methods, the whole of the transmission power is not concentrated on a single frequency. Instead, the carrier frequency is changed at random. The individual data packets transmitted via the different carrier frequencies are then reassembled in the receiver.
This method has several advantages over conventional radio transmission:
- It is also much more difficult to intercept the radio signal, because the listener does not know how the signal is
distributed among the different frequencies and how to correctly reassemble it. For this reason the same method is used by Bluetooth and by the military.
- Radio transmissions that use this method are also much less susceptible to interference. This is because a given carrier frequency is always used only very briefly before switching to another. If there is interference on one frequency it will affect only small data packets, and appropriate correction algorithms can compensate for such errors.
10. Disposal
10.1 Equipment

The symbol of the crossed-through wheelie bin means, within the European Union, that the product is subject to a separate waste collection. This applies to the product and all accessories marked with this
symbol. Products labelled as such must not be disposed of with the normal household waste collections; they must be taken to a recycling bank for electrical and electronic equipment. Recycling helps to reduce the use of raw materials and is eco-friendly.
10.2 Packaging
When you wish to dispose of the packaging, please observe the relevant environmental regulations for your country.
10.3 Disposable/rechargeable batteries

Batteries must not be disposed of with domestic waste. Flat batteries must be disposed of properly. Special containers for battery
disposal are provided for this purpose at shops selling batteries or at municipal collection points. Batteries and rechargeable batteries on which the following letters are printed contain, among other things, the following harmful substances: Cd (cadmium), Hg (mercury), Pb (lead).
11. Warranty
In addition to the seller's warranty obligations arising from the contract to purchase, we as the manufacturers provide a warranty of 24 months from purchase of the appliance as long as the appliance is used properly and the operating instructions are followed. Evidence of the date of purchase and the type of appliance should be provided by means of a receipt.
The purchaser's statutory rights are unaffected by this manufacturer warranty.
During the warranty period, we undertake to remedy any defects attributable to poor materials or workmanship. Wear parts are excluded from the warranty.
Minor deviations from specified quality which do not affect the value or usability of the appliance are not covered by the warranty. We are likewise unable to accept the warranty if the defects on the appliance are due to transport damage for which we are not responsible, if they are attributable to misuse or lack of care or if the appliance
has been interfered with by persons not authorized by us to do so.
The warranty service will involve repair, replacement of parts or replacement of the appliance at our discretion. The warranty period will be neither extended nor restarted by the performance of warranty services. The warranty for any spare parts fitted will expire with the warranty for the appliance as a whole.
Extended or different claims, especially those relating to the making good of damage sustained outside the appliance, are excluded unless liability is compulsory in law.
We will not accept the costs or risks of transport.
An appliance sent in without evidence of the purchase date will be treated as a repair. The appliance will only be repaired following discussion with the customer.
Please keep this address and article number in case of any queries.
Warranty conditions applicable for the country in question apply to devices not bought in Germany.
MAPA GmbH, Industriestraße 21-25, 27404 Zeven, Germany
11.1 Service Centres NUK
You will find our service addresses for guarantee questions and general queries about the NUK brand at "Contact addresses NUK" on page 115.
11.2 Service Centres Babyphone
If you have any queries about your babyphone, please contact our babyphone experts. You will find the product hotline at
"Product service babyphone in Europe" on page 116, or you can contact us via our website www.nuk-service.com.
Article no.: 10.256.438
11.3 Supplier
Please note that this is not an address for service. If you have any problems with or queries about your product, contact one of the Service Centres listed in 11.2.
MAPA GmbH
12. Declaration of conformity
The device meets all applicable European directives, as well as the relevant national laws implementing them. These are shown in the EU declaration of conformity which can be requested from the manufacturer.
You will find the Declaration of Conformity and the Operating Instructions in the package, or at www.nuk.de.
Sommaire
11.1 Centre de services NUK
5.1 Evpyoioiog kal aevpyoioiog movadac wpoob 106
5.2 LED eVdEiEηC 106
Ta Tovaa npoopaoyea 8ikTuou 19 TnC oovadac yovewv.
moVadac yovew 8, onpwxovtac to PPOC TA KATW.
- Aφaipεστε TOV ελaTTωμαTIKó ΣUOOSWρεUπ.
- ToTOnoTeTnToTov vTo OuaOwpeuTn OmuWvA u TIC oNmuavOeIC EVTOC Tou EpuApiou OuaOwpeuTu. AaTe OtnwoSnntE UTOyN Oac Tnv opHn TOnlkiOtnta (+Kai -).
- Ωθησε το καλιμμα συσωρευτή 9 εκ vέου στη μονάδα γονέων 8.
-
Tny npwn foopa, oopriote tn movada yovewyia 10 wpc ocuvexoEvva, ia va evepyoioioeTnv nI npn xwpntikotnta tou ouoawpuet (B4.1 2vdson movadac yovew" otn ola 103).
-
Bλάβες καὶ ἡποκατάστασή τους
Contact addresses NUK
DE - DEUTSCHLAND
MAPA GmbH
IndustriestraBe 21-25
27404 Zeven
+491801627246
KARAKA PROMET D.O.O.
Bilanzi bb
88260 Cittuk
info@karakapromet.com
BG-BULGARIA
BEBOJIHOOOD
yI. XpncTo IBaHOB TOnemn9
1618 Codon
029557500
CL-CHILE
Acam S.A.
Av. Ricardo Lyon
1343 Providencia
Santiago de Chile
( +562 2046633
German Products Estonia OU
Punane 16-312
13619 Tallinn
www.nuk.ee
ES - SPAIN
Roche Diagnostics, SL
Avda.de la Generalitat,171-173
Berkeley Business Park
Wainwright Road
Worcester WR4 9ZS
08453002467
GE-GEORGIA
GiSi Ltd
Tsereteli 115a
Tbilisi 0119
e-mail: info@qisi.ge
GR - GREECE
Φaμanpo EE-X.Tcμou&∑ia
T.Θ.291-Kαλoχωρi 57009
Oeosaaovikn, Elambda
2310751525
DaE: 2310789621
e-mail: info@nuk.gr
HR-CROATIA
Lola Ribar d.d.
Radnicka cesta 54
10000 Zagreb
Croatia
+385(0)13535310
HU-HUNGARY
Maresi Foodbroker Kft.
Homonna u. 2-4
1118 Budapest
+3612483073
IE - IRELAND
Intrapharma Consumer Health
Magna Business Park,
Citywest Road
Dublin 24
United Drug House
IT-ITALY
Mapa Spontex Italia S.p.A.
Via S. Giovanni Bosco, 24
20010 Pogliano Milanese (MI)
www.nuk.it
LT-LITHUANIA
German Products Lithuania UAB
Luk'sio 32
Vilnius
Lithuania
+370] 65676802
LV-LATVIA
German Products Balics SIA
Vietalvas iela 1
Riga, LV-1009
Latvija
+37167278532
MK-MACEDONIA
Euroalba Skopje d.o.o.
Bul. Partizanski Odredi 64 g 3/6
1000 Skopje
+38923065717
NL - NETHERLANDS
Allegre Puericulture
Maresi Foodbroker SRL
Str. 9 Mai Nr. 3
310118 Arad
Romania
Tel.: 0257/281177
Fax: 0257 / 210 211
RU - RUSSIA
A.K. Xaa3e
OctXaHdEnbCRe3eBbuaΦT M6X
MOCKOBCKOE npeCTaBtEnbctBO
yI. DMMTPNRA YIbRHOBA d16 Kopn.2
odnc 391-392
117292 MockBa
www.nuk-baby.ru
e-mail: medical@achaase.ru
SA-SOUTH AFBICA
Artemis Brands (PTY) LTD
P.O.Box 130782
Bryanston 2074
South Africa
+27114305600
Fax: Fax: +2711 885 1184
SE-SWEDEN
GB Bamartiklar AB
Fagelviksvagen 18-20
145 53 Norsborg
0855635825
info@gbab.com
www.nuk.se
SI-SLOVENIA
Merit International d.o.o.
Letaliska C. 3C
Ljubljana
Slovenia
SK-SLOVAKIA
Mapa Spontex CE s.r.o
Prodasice 4
29404 Dolni Bousov
Ceská republika
SR-SERBIA
YUGLOB DOO
Zrenjaninski put bb (121t)
11211 Beograd, Borca
+381 11 2960-784
e-mail: office@yuglob.rs
TR-TURKEY
Ithalato Firma:
ATAK DIS TIC.A.S.
Maya Akar Center K:20 Esentepe
Istanbul
212 211 7400
UA - UKRAINE
IMnopTeB YkpaiHy:
TOB «CMAPTI ΦEMINI»
Byn. BoxeHKa 6.19, op. 308
M. Ondeca
Oeobka o6n., 65098
ten. (0482) 305-454
UAE - UNITED ARAB
EMIBATES
ARABIAN ETHICALS CO
Al Quoz 1
Dubai
United Arab Emirates
备
04-3392141/02-6270720
Produktservice Babyphone in Europa Product service babyphone in Europe
Please not that cost will accrue for national or international calls