Oliver - Car seat Lionelo - Free user manual and instructions
Find the device manual for free Oliver Lionelo in PDF.

| Product Type | Child car seat, universal and semi-universal category |
| Brand | Lionelo |
| Model | Oliver |
| Mass Groups | Group I (9-18 kg), Group II (15-25 kg), Group III (22-36 kg) |
| Approximate Dimensions (H x W x D) | 62 x 44 x 52 cm |
| Product Weight | Approx. 8 kg |
| Materials | Plastic, foam, polyester fabric |
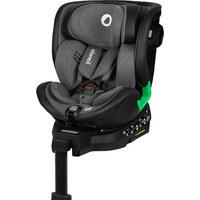
| Installation | 3-point seat belt (front or rear) or ISOFIX system + Top Tether |
| Installation Direction | Forward-facing only |
| Harness | 5-point, height and tension adjustable |
| Adjustable Headrest | Yes, height adjustment with lever |
| Seat Recline | 4 positions (Group I) or 1 position (Groups II/III) |
| Reducing Cushion | Removable for fitting younger children |
| Approval | ECE R44.04 |
| ISOFIX Standard | Yes, class B1 for Group I |
| Top Tether Strap | Integrated with green tension indicator |
| Care and Cleaning | Cover washable in lukewarm water with mild soap; do not dry in sunlight; clean plastic parts with lukewarm water without strong detergents |
| Storage | Dark, dry place, away from sunlight |
| Warranty and Contact | Manufacturer: BrandLine Group Sp. z o. o.; email: help@lionelo.com |
Frequently Asked Questions - Oliver Lionelo
User questions about Oliver Lionelo
0 question about this device. Answer the ones you know or ask your own.
Ask a new question about this device
Download the instructions for your Car seat in PDF format for free! Find your manual Oliver - Lionelo and take your electronic device back in hand. On this page are published all the documents necessary for the use of your device. Oliver by Lionelo.
USER MANUAL Oliver Lionelo
natural_image
Top-down view of a lionelo car seat with textured backrest and white sole (no text or symbols visible)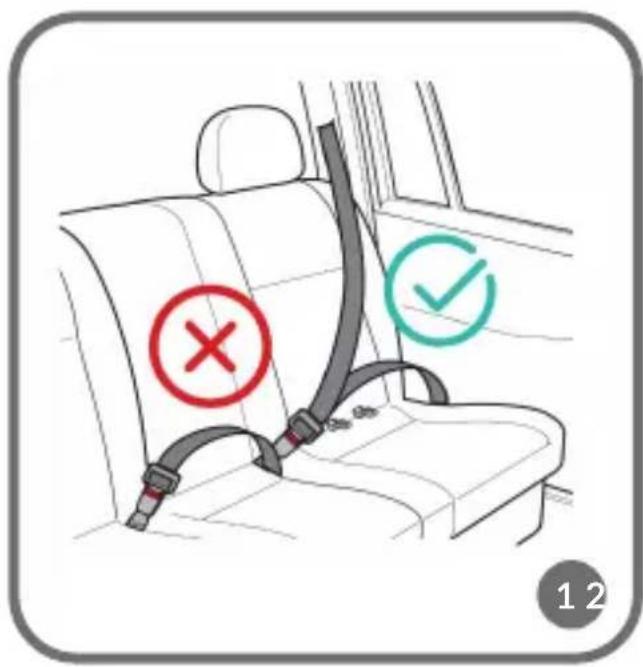

4
①
2
3
4
natural_image
Illustration of a person wearing a full-body harness and seatbelt, with number 5 displayed (no text or symbols on the figure itself)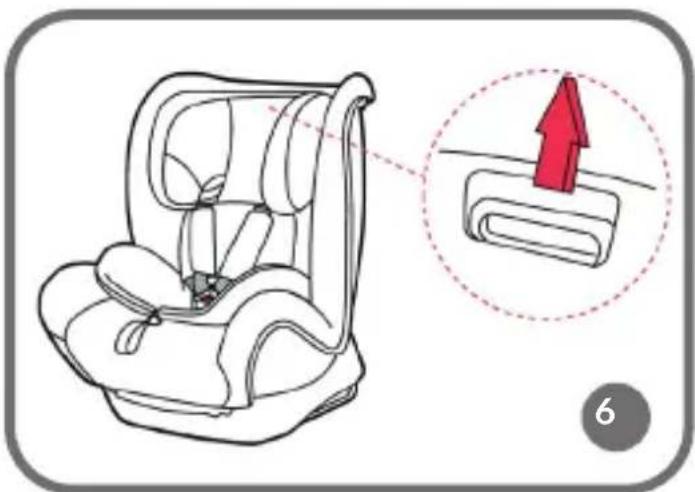
natural_image
Illustration of a car seat with a magnified inset showing the seatbelt detail (no text or symbols)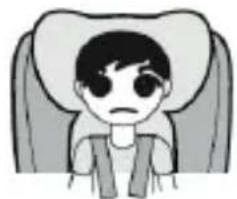
natural_image
Cartoon illustration of a person with large eyes and a neutral expression, wearing a vest (no text or symbols)A

natural_image
Illustration of a person sitting in a chair with eyes obscured, showing discomfort or pain (no text or symbols)B
natural_image
Cartoon illustration of a smiling child wearing a seatbelt (no text or symbols)C
7
natural_image
Illustration of a car seatbelt being adjusted for a person's seatbelt (no text or symbols present)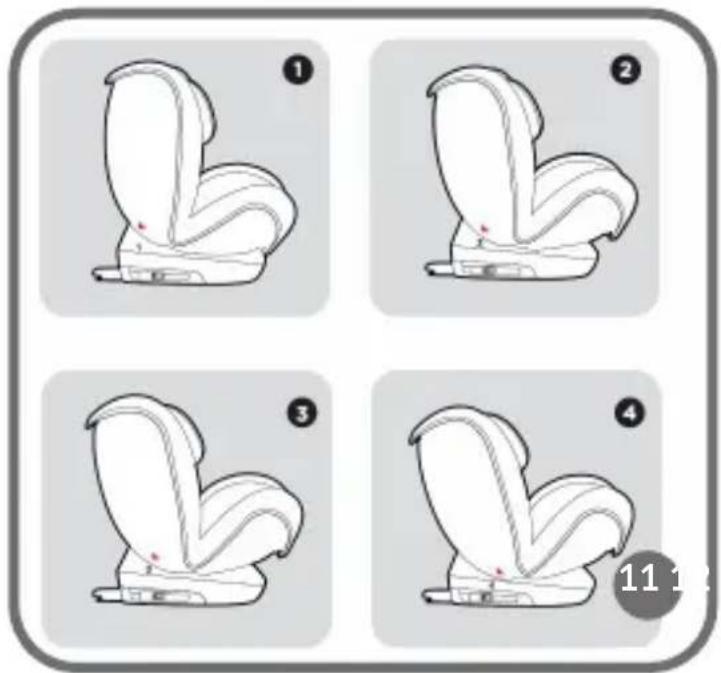
natural_image
Illustration of a car seatbelt with a red diagonal band, no text or symbols present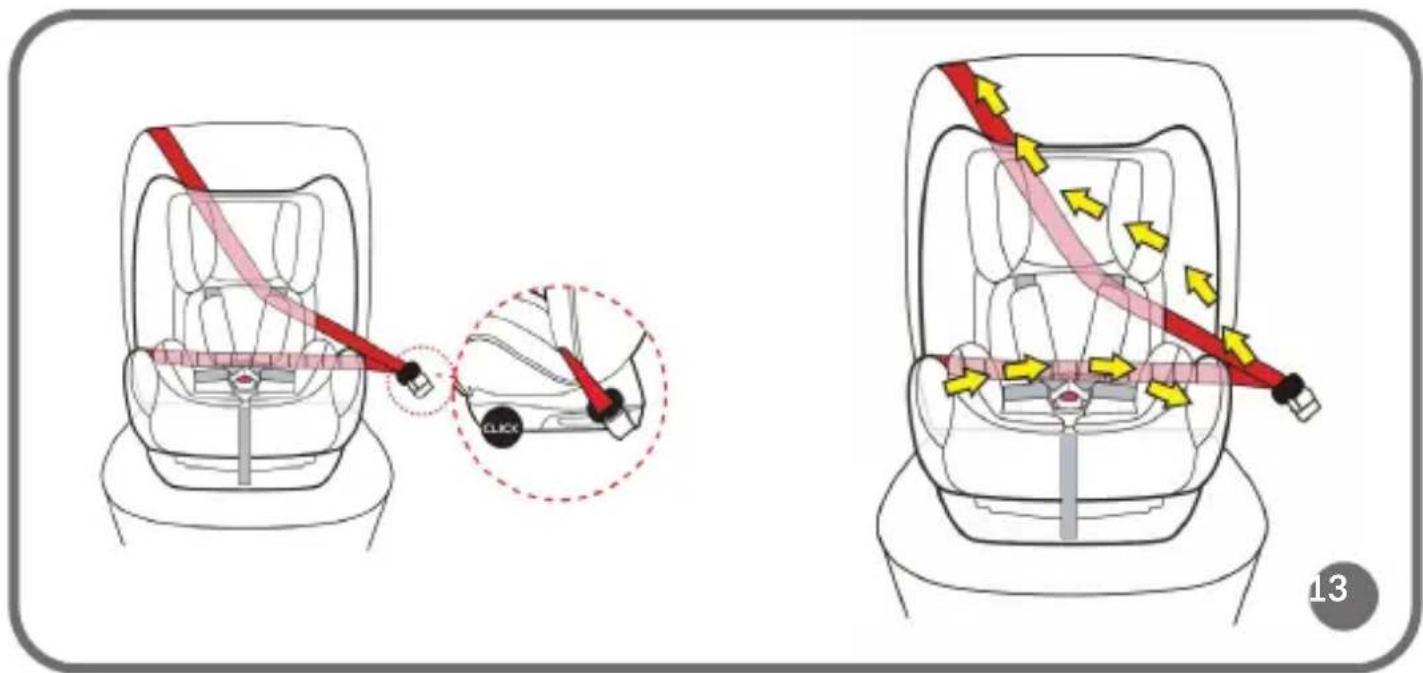

natural_image
Illustration of three car seat configurations with arrows indicating movement, no text or symbols present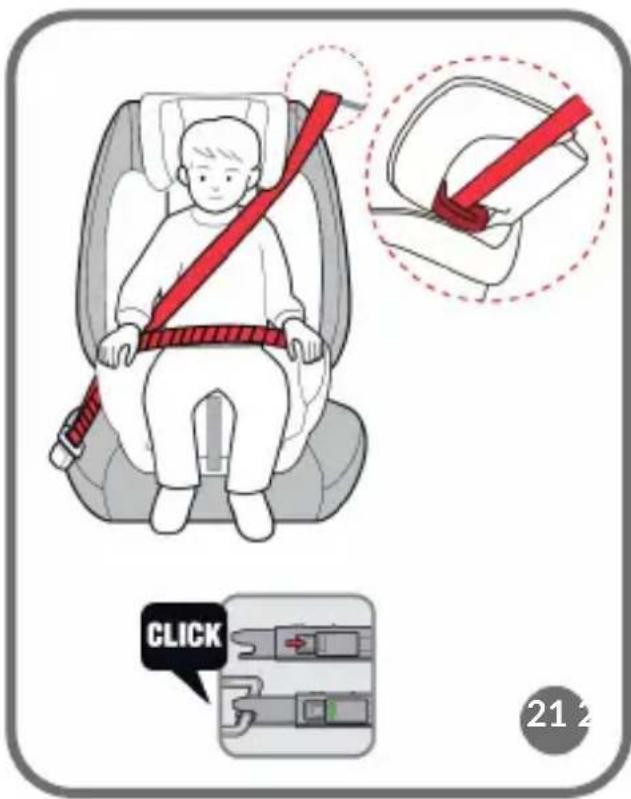
Information
The child restraint system is categorized as „universal” and „semi-universal”. It holds the certificate of approval pursuant to the UN regulations no. 44, series of amendments 04, for general use in vehicles, and is suitable for installation on most car seats.
A proper installation is possible if the vehicle manufacturer has declared in the vehicle manual that this vehicle supports installation of the child restraint system in „universal” and „semi-universal” category for this age group.
This child restraint system has been classified as „universal” in more demanding conditions when compared to previous designs which are not supplied with this information. Should you have any doubts, please consult the manufacturer or retailer of the device.
Suitable for installation only if type-approved vehicles are equipped with three-point seat belts fitted with a retractor that has been approved in accordance with UN Regulation No. 16 or other equivalent standards.
Information on ISOFIX system:
- This is ISOFIX CHILD RESTRAINT SYSTEM. It has been granted the certificate of approval in accordance with the UN regulations no. 44, amendments series 44, for general use in vehicles equipped with ISOFIX system.
- It is suitable for vehicles with positions approved as ISOFIX positions (in accordance with the vehicle manual), depending on the child safety seat and fixing categories.
- Weight group and ISOFIX size class to which the device is dedicated:
B1 for group I (9 - 18 kg) in a forward-facing position.
When using for gorups II, III - „semi-universal” category
This child restraint system has been classified as „semi-universal” and is fit for installation on seats in the following cars (full list at the end of the user manual):
| Car Front Back | ||
| (Model) External/Central | NO/NO | External/CentralYES/NO |
This device may be suitable for installation also on seats of other models of the car. In case of doubts, please consult the manufacturer or retailer of the device.
Dear customer!
Should you have any remarks or questions concerning the product, please do not hesitate to contact us: help@lionelo.com
Before you use the child safety seat for the first time, please read this manual carefully.
Producer:
BrandLine Group Sp. z o. o.
Please read this manual before you use the product and keep it for future reference. The manual can help you install the child safety seat properly. A wrong assembly may pose a threat to your child's health. The manufacturer shall not be held responsible for potential hazards arising from wrong installation of the product.
This child safety seat is intended for weight groups I, II and III, which means it can be used by children whose weight ranges from 9 to 36 kg.
Weight group I: 9 - 18 kg,
Weight group II: 15 - 25 kg,
Weight group III: 22 - 36 kg.
- Hard elements and plastic parts of the child restraint system must be placed and installed in a way that they are not trapped by sliding seat or door of the vehicle under regular operating conditions.
- Any fixing belts which attach the product to the vehicle must be tight, while safety belts must be adapted to child's body, the belt must not be twisted.
- Make sure the hip belts go low so that a pelvis is secured firmly.
- If the device has been overloaded during the accident, please replace it.
- Do not alter the child safety seat or install any additional elements without consent of competent bodies. A failure to follow the manual supplied by the manufacturer may pose a threat to the user.
- Protect the child safety seat against sunlight. Otherwise the child safety seat may be too hot for your child's skin.
-
Never leave your child in the product unattended.
-
Luggage and other items which may cause bodily injuries in case of accidents should be secured properly.
- Do not use the child restraint system without its upholstery. It is forbidden to replace the seat upholstery with other than recommended by the manufacturer because it is an integral part of the device and influences its operation.
- Keep the manual when using the device. Store it in the child safety seat locker.
- It is forbidden to use other points of contact than those specified in the manual and marked on the child safety seat.
- Should you have any doubts about the position of the safety belts buckle in relation to main points of contact, please contact the child safety seat manufacturer.
- If you assemble with ISOFIX: please read the manufacturer's vehicle manual.
Safety in the car:
To provide top safety to yourself and your passengers during travel, make sure:
- Folding elbow rests are folded (vertical position).
- Any items which may cause damage in the car in case of collision have been secured properly.
- All passengers have fastened their seat belts.
The child safety seat is intended for installation solely on seats in a forward-facing position. It is forbidden to assemble the product on seats/couches in a rear-facing position. They are common in vans or minibuses.
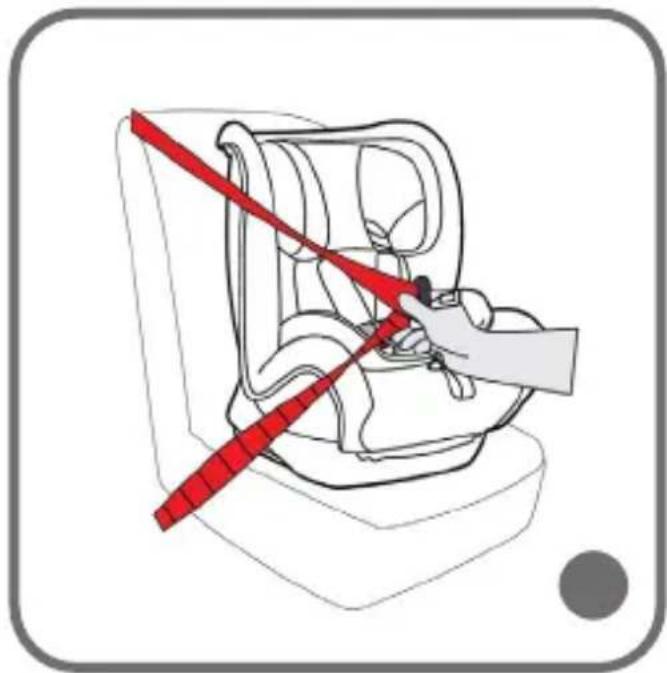
In the case of assembly with safety belts: do not install the child safety seat on seats equipped with two-point safety belts! (see: fig. 1).
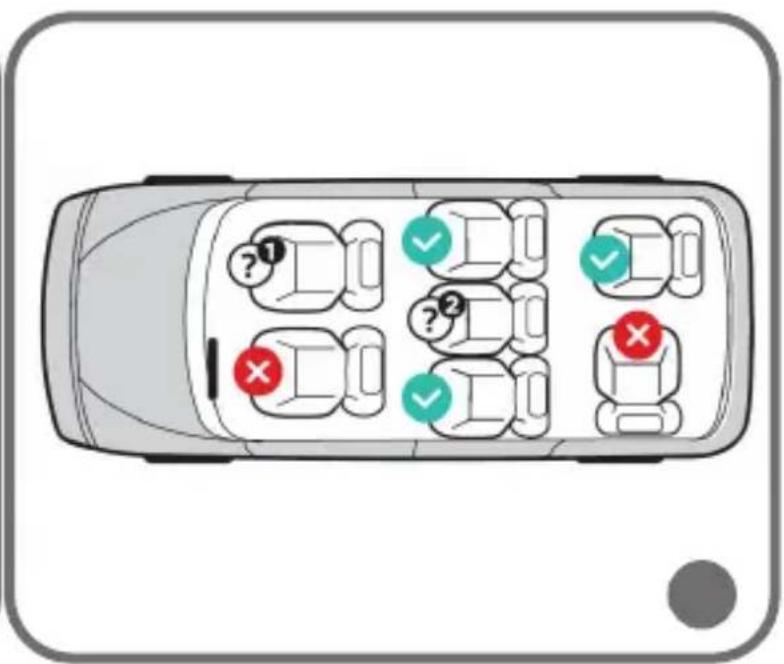
See: fig. 2

Installation in this place is possible

Installation in this place is forbidden
Installation in this place is possible provided the airbag is inactive

Installation in this place is possible provided the seat is equipped with three-point safety belts
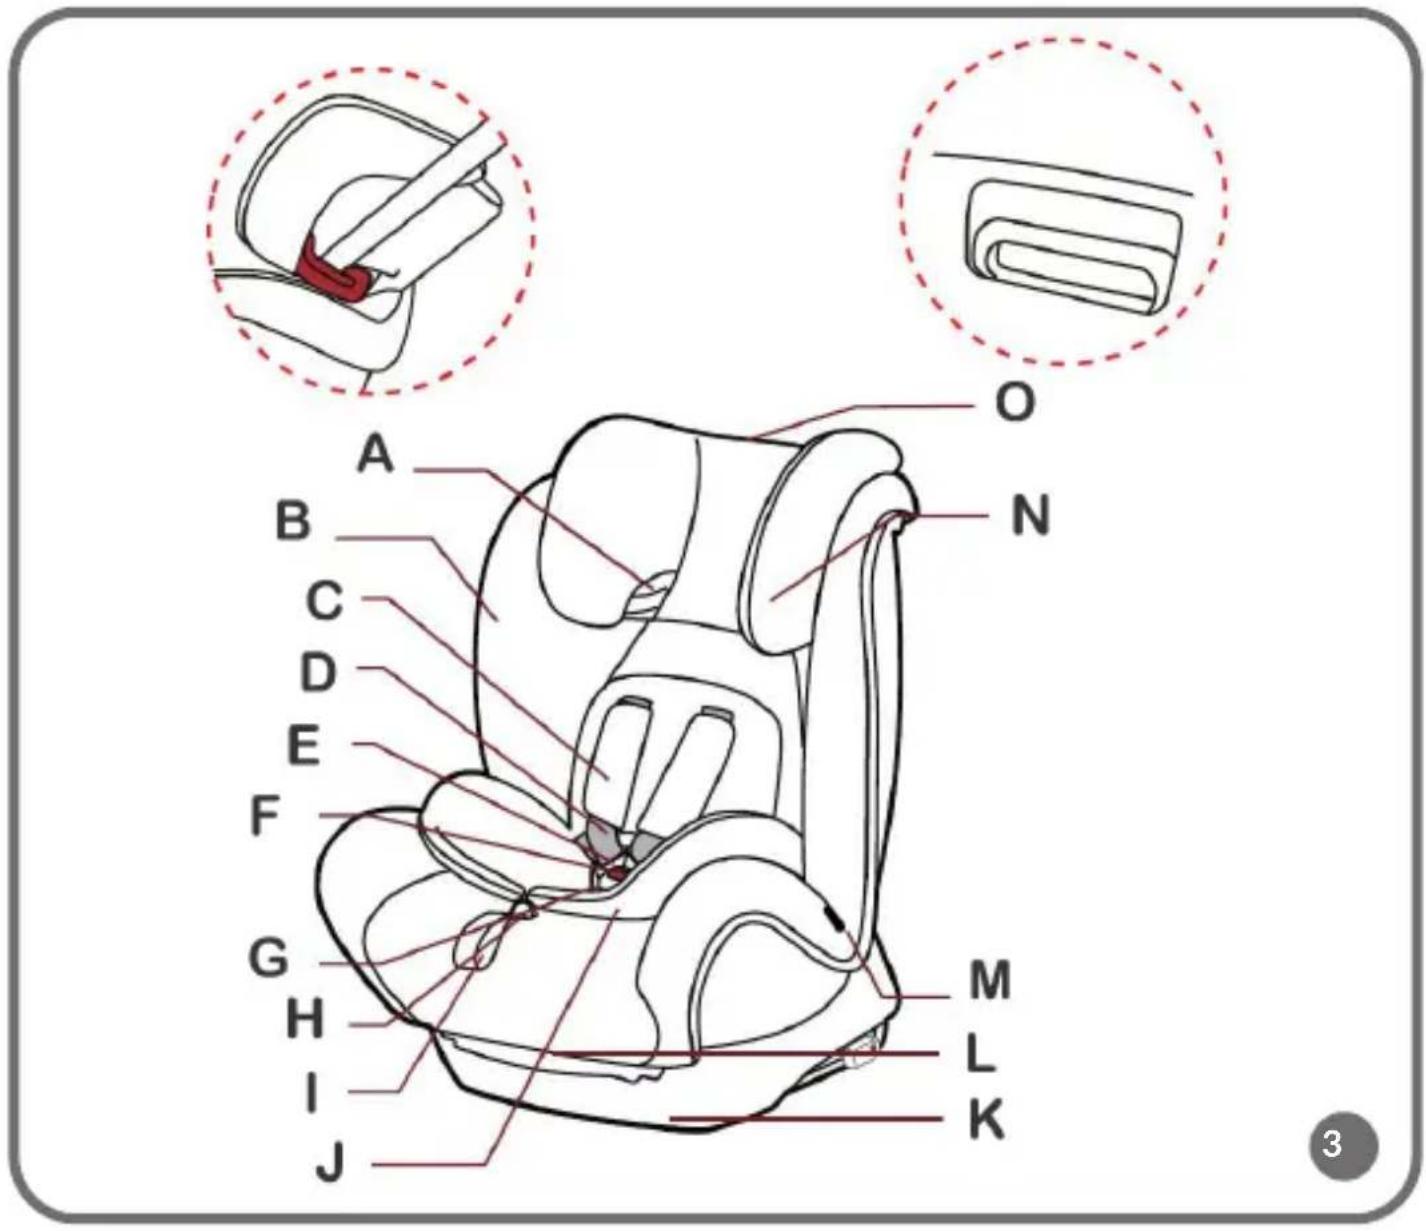
Description (fig. 3, fig. 4)
A. Shoulder belts guide
B. Child safety seat cover
C. Belts protective pad
D. Shoulder belt
E. Buckle
F. Undo button
G. Crotch pad
H. Belt tension adjustment button
I. Belt tension adjustment
J. Seat liner
K. Base
L. Seat tilting handle
M. Hip belt guide
N. Headrest
O. Headrest height adjustment lever
P. Shoulder belt guides
Q. Upper belt connector
R. Manual locker
S. TOP-TETHER belt fastener
T. TOP-TETHER belt length adjustment
U. ISOFIX arms
V. ISOFIX button
W. ISOFIX pads
HOW TO ADJUST
HOW TO FASTEN CHILD SAFETY SEAT BELTS
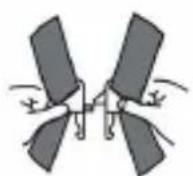
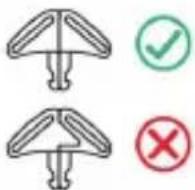
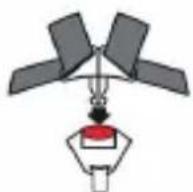
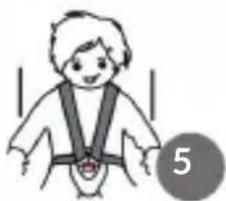
To fasten belts in the child safety seat (fig. 5):
- Connect belt buckles.
- Insert them in the fastening, you will hear a distinctive „click”.
- Make sure the belts have been properly tightened and are not twisted.
To undo 5-point belts of the child safety seat: press the red button (F) on the buckle and loosen the belts.
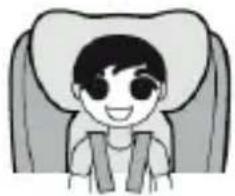
HOW TO ADJUST CHILD SAFETY SEAT BELTS TENSION
- To tighten the belts, pull the tension adjustment strap (I) (fig. 8).
- To loosen the belts, press the adjustment button (H) and pull the shoulder belts (fig. 9).
Note! Make sure the child safety seat belts fit the child's body tight and are not twisted. Make sure the hip belts go low and secure the child's pelvis. The belts must be tight in relation to child's body, yet must not be too tight and cause discomfort.
HOW TO DISASSEMBLE CHILD SAFETY SEAT BELTS
- Open the manual locker (R).
- Pull out the metal belt connector (Q) from the plastic fastener and then remove belts (fig. 15a).
-
Loosen the belts as much as you can (see chapter:
-
Slip off the belts from the lower belt connector (see: fig. 15b).
- Remove the belts from the child safety seat. Close the manual locker.
Assemble the belts in a reversed order.
SEAT LINER
If the child needs more space in the child safety seat, remove the seat liner.
HOW TO ADJUST THE HEADREST AND HEIGHT OF SHOULDER BELTS (fig. 6)
Note! Height of shoulder belts is integrated with the height of headrest.
Group I
To change height of the belts and the headrest: loosen the shoulder belts as much as you can and then grab the headrest height adjustment lever (O). Choose the desired height and then release the lever. Try to move the headrest to see if it has been secured properly as desired.
Groups II and III
Slide off the belts from the upper belt connector (Q) located inside the manual locker (R). Pull out the child safety seat belts in the front and then insert outstanding belt tips in the protective cushions so that they are not disturbing. Now you can close the locker and lift the headrest. Hide the belts connector in a safe place for future use.
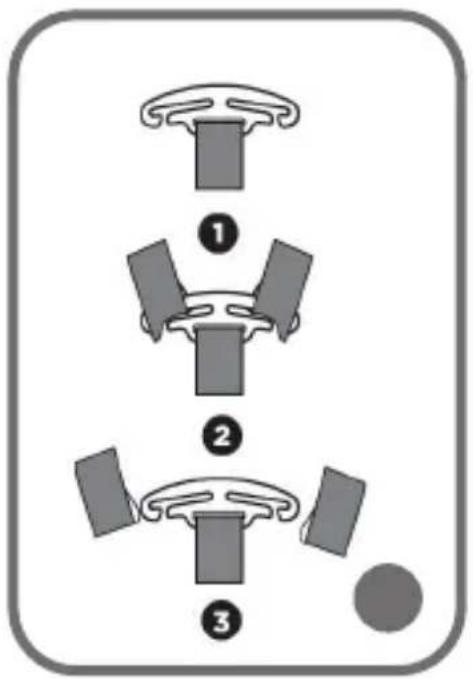
The height of the headrest must be adjusted so that the shoulder belts are at the child's arms height. The belts must not be too high (at the ears level or higher), or too low (behind child's back).
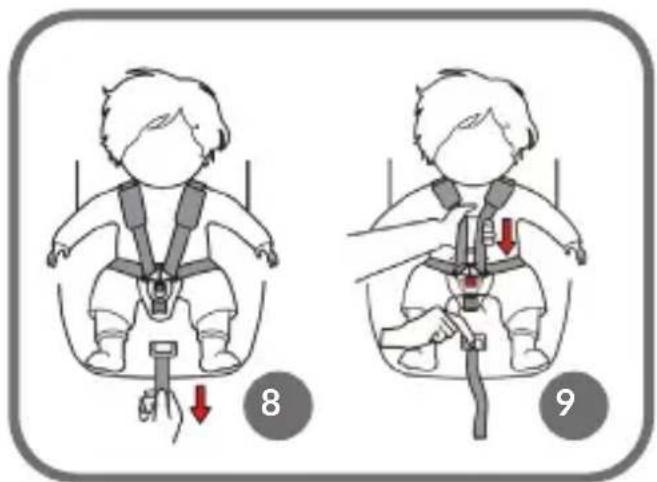
See: fig. 7.
A - too low
B - too high
C - perfect height of shoulder belts
HOW TO INCLINE CHILD SAFETY SEAT
It is possible to choose four inclination angles of the child safety seat (fig. 11).
To incline the child safety seat, grab the handle (L) located between the seat and base and set the desired inclination (fig. 10).
| Group I Groups II, III | |
| Positions 1 – 4 Position 1 |
HOW TO REMOVE COVER
- Remove 5-point belts of the child safety seat (see: HOW TO DISASSEMBLE CHILD SAFETY SEAT BELTS).
- Remove the cover from the base, backrest and then headrest by sliding off and detaching rubber fasteners.
To put the cover back on, take the aforesaid actions in a reversed order.
NOTE: Never use the child safety seat without its cover.
HOW TO ASSEMBLE
With car seat belts
Group I (9 - 18 kg)
The child secured with child safety seat belts.
- Place the child safety seat on the car seat.
- Pull the car safety seat (fig. 12).
- Carry the shoulder part of the belts through the shoulder belt guide (P).
- Carry the hip part of the belt through the hip belt guide (M).
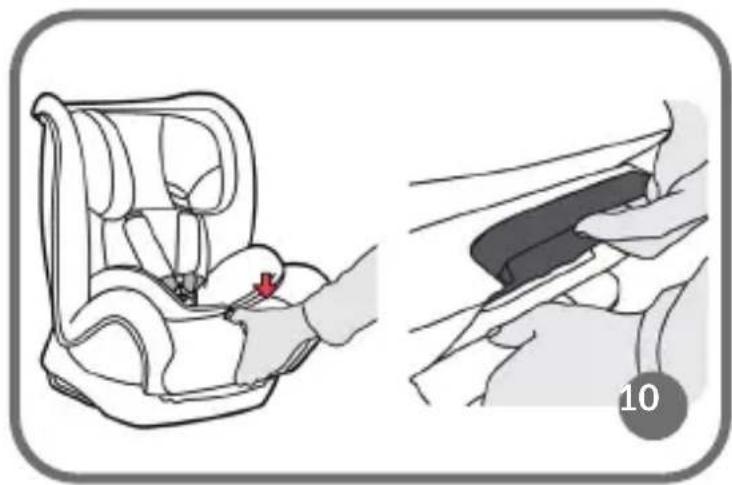
- Carry the belts under the seat liner and backrest fabric (fig. 13).
- Fasten the belts.
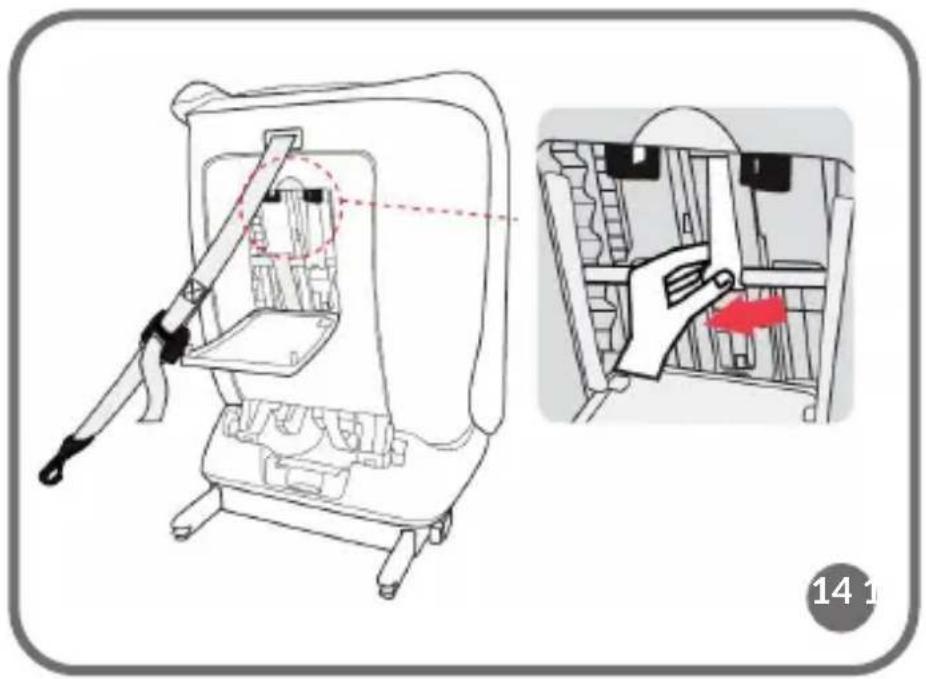
- Use your knee to press the child safety seat against the car seat. Tighten the car safety belts up to make sure they hold the child safety seat properly (fig. 14).
- Insert the child in the child safety seat and secure with its belts.
When the assembly is over, make sure the belts have been carried through the guides properly and are tightened correctly. To do so, try to move the child safety seat and check if it is stable.
Group II and III (15 - 36 kg)
The child safety seat belts are disassembled. The child is secured with car safety belts.
- Disassemble 5-point child safety seat belts (see: „HOW TO DISASSEMBLE CHILD SAFETY SEAT BELTS”).
- Remove the seat liner (J).
- Place the child safety seat on the car seat. Place the child in it.
- Pull the car safety belt.
- Carry the shoulder belts through the guide in the headrest (A).
- Carry the hip part of the belt through the guide of the hip belt (M).
-
Now pull both belts through the second guide of the hip belt (M) and fasten them.
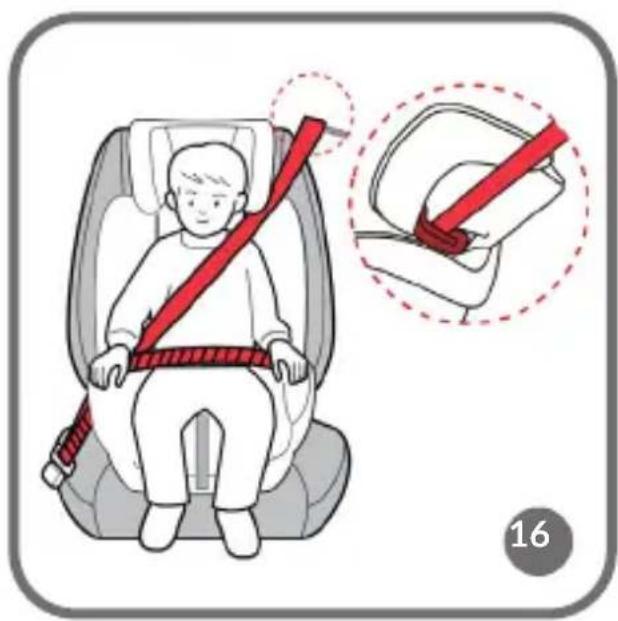
-
Fasten the car safety belts (fig. 16). Check if the child safety seat has been fixed properly. Make sure the shoulder part goes through the child's collarbone, not its neck. The hip belt must be positioned as low as possible.
With ISOFIX and TOP TETHER
Group I (9 - 18 kg)
The child secured with child safety seat belts.
- If necessary, put both ISOFIX pads (W) on car fixing points.
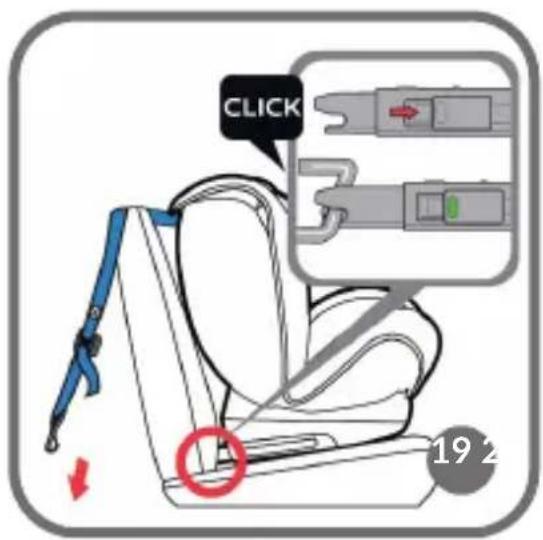
- Press ISOFIX buttons (V) to pull out the connecting arms (U). Pull them out as far as you can and then connect to car fixing points. Press the child safety seat against the car seat as much as you can, ISOFIX handles should anchor. ISOFIX indicators should be green on both ISOFIX arms (fig. 19).
- Pull out TOP TETHER belt and then stretch it more with the adjustment (T). Fasten the handle in the place recommended in the vehicle manual (fig. 20). Tighten TOP TETHER up with the adjustment (T). The upper fixing belt is properly tightened when you can see a green indicator on the buckle.
- Place the child in the child safety seat and secure with child safety seat belts.
Note! The upper belt fastening point may differ, depending on the car, The figure 20 shows examples of ways of fixing, depending on car model.
Groups II and III (15 - 36 kg)
The child safety seat belts are disassembled. The child is secured with car safety belts.
- Disassemble 5-point child safety seat belts (see: „HOW TO DISASSEMBLE CHILD SAFETY SEAT BELTS”).
- Remove the seat liner (J).
- Press ISOFIX buttons (V) to pull out the connecting arms (U). Pull them out as far as you can and then connect to car fixing points. Press the child safety seat against the car seat as much as you can, ISOFIX handles should anchor properly. ISOFIX indicators should be green on both ISOFIX arms.
Next take one additional step - A or B. Installation with ISOFIX handles only is forbidden!
A. ISOFIX + Car seat belts
1. Put the child in the child safety seat.
2. Pull the car seat belt.
3. Carry the shoulder belts through the guide in the headrest (A).
4. Carry the hip part of the belt through the hip belt guide (M).
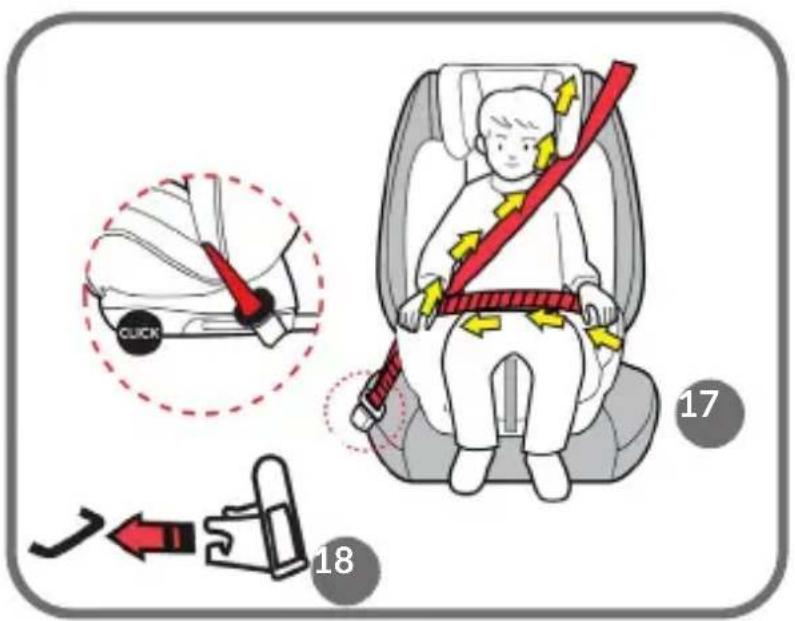
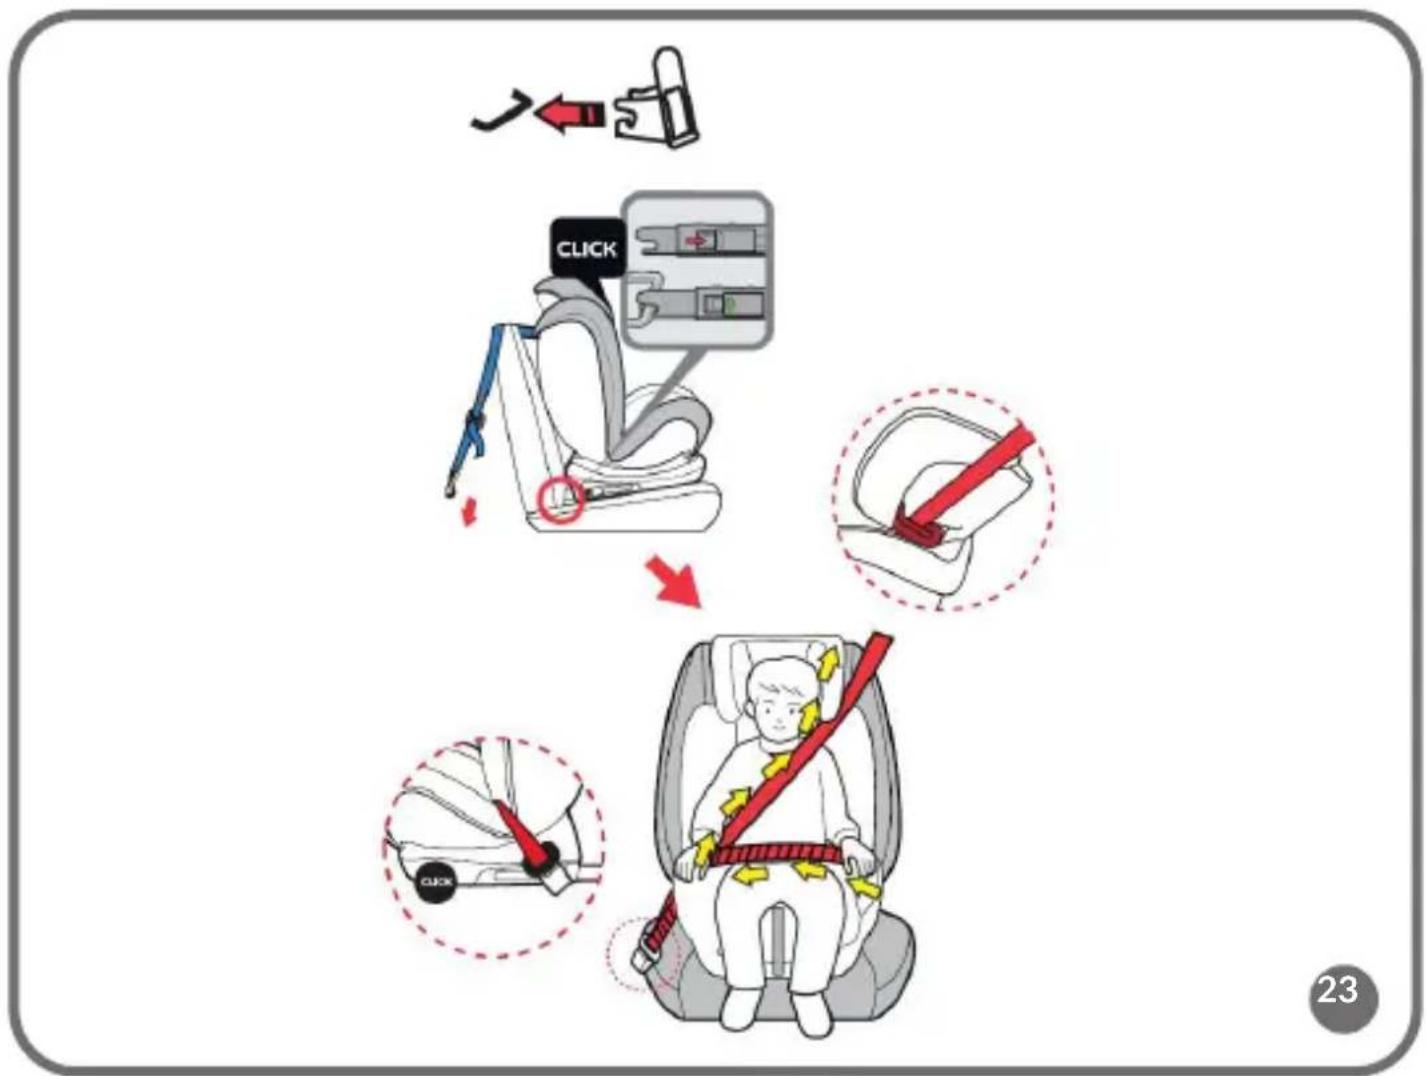
- Pull both belts through the second guide of the hip belt (M) and fasten them (fig. 21).
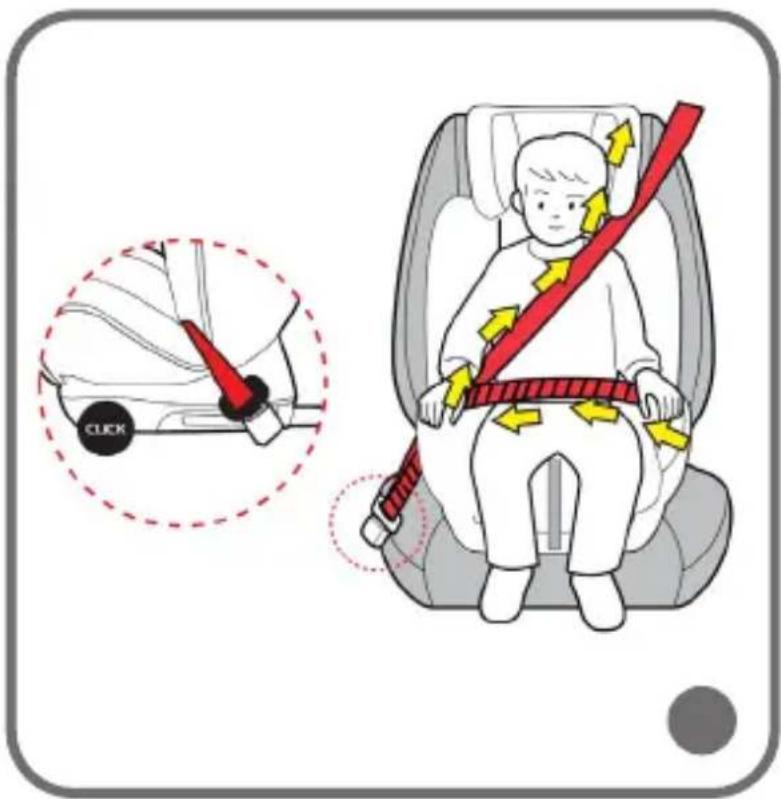
- Fasten the car seat belts (fig. 22). Check if the child safety seat is properly fixed.
Make sure the shoulder part goes through the child's collarbone, not its neck. The hip belt must be as low as possible.
B. ISOFIX + TOP TETHER + Car seat belts
- Take steps described in subpoint A concerning assembly of the child safety seat with car seat belts.
- Pull out TOP TETHER fixing belt and then stretch it more with the adjustment (T). Fasten the handle in the place recommended in the car manual (fig. 20). Tighten up TOP TETHER with the adjustment (T). The upper fixing belt is properly tightened when you can see green indicator on the buckle.
HOW TO MAINTAIN AND CLEAN
You can clean the cover in warm water with soap or soft detergent. Do not expose the cover to sunlight to dry it. Wash the buckle, child safety seat belts and plastic components with warm water. Do not use strong detergents. If you do not use the product, please store it in a dark and dry place, away from sunlight.
The product meets the requirements of the ECE R44.04 standard
The pictures are for reference only. The real design of the products may differ from the pictures presented.
Informacja
W. ISOFIX overlappingen