
Sportsline 85 - Camera ROLLEI - Free user manual and instructions
Find the device manual for free Sportsline 85 ROLLEI in PDF.

| Brand | Rollei |
| Model | Sportsline 85 |
| Product type | Waterproof compact digital camera |
| Sensor | 8.0 megapixels CMOS |
| Max. resolution (photo) | 4000 x 3000 (12 M) |
| Max. video resolution | 1920 x 1080 (Full HD) |
| Lens | Fixed focal length f=5.3 mm, aperture F/2.8 |
| Digital zoom | Yes (T/W buttons) |
| Screen | 2.4" TFT color LCD |
| Flash | Built-in flash (auto, forced, off) |
| ISO sensitivity | Auto, 100, 200, 400 |
| White balance | Auto, Daylight, Cloudy, Incandescent, Fluorescent |
| Scene modes | Auto, Night portrait, Night scene, Portrait, Scene, Sport, Group, Beach, High sensitivity, Underwater |
| Shutter speed | 1/2 to 1/1800 second |
| Self-timer | 2, 5 or 10 seconds |
| Storage | SD/MMC card (not included) |
| Power supply | Rechargeable Li-ion battery (included) |
| Connectivity | USB 2.0 (cable included) |
| Dimensions (L x H x D) | 101 x 64 x 23.4 mm |
| Weight (without battery) | Approx. 135 g |
| Operating temperature | 0°C to 40°C |
| Box contents | Camera, Li-ion battery, USB cable, wrist strap, user manual |
Frequently Asked Questions - Sportsline 85 ROLLEI
User questions about Sportsline 85 ROLLEI
0 question about this device. Answer the ones you know or ask your own.
Ask a new question about this device
Download the instructions for your Camera in PDF format for free! Find your manual Sportsline 85 - ROLLEI and take your electronic device back in hand. On this page are published all the documents necessary for the use of your device. Sportsline 85 by ROLLEI.
USER MANUAL Sportsline 85 ROLLEI
natural_image
Technical line drawings of two views of a digital camera module, showing front and side views with no text or symbols.natural_image
Line drawing of a compact digital camera with internal components and mounting holes (no text or symbols)natural_image
Technical line drawings of a two-part digital camera module, showing front and side views with no text or symbolsnatural_image
Diagram of a device being inserted into a rack, showing internal components and connection lines (no text or symbols)Thank you for purchasing this product. Please read these operating instruction carefully in order to use the digital video camera correctly. Keep the instructions in a safe place after reading so that you can refer to the
Precautions
Before using the digital camera, please ensure that you read and understand the safety precautions described below.
- Do not try to open the case of the digital camera or attempt to modify this digital camera in any way. Maintenance and repairs should be carried out only by authorized service providers.
- Use only the recommended power accessories. Use of power sources not expressly recommended for this equipment may lead to overheating, distortion of the equipment, fire, electrical shock or other hazards.
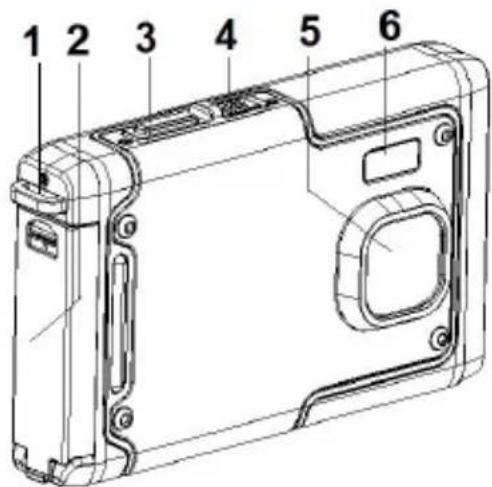
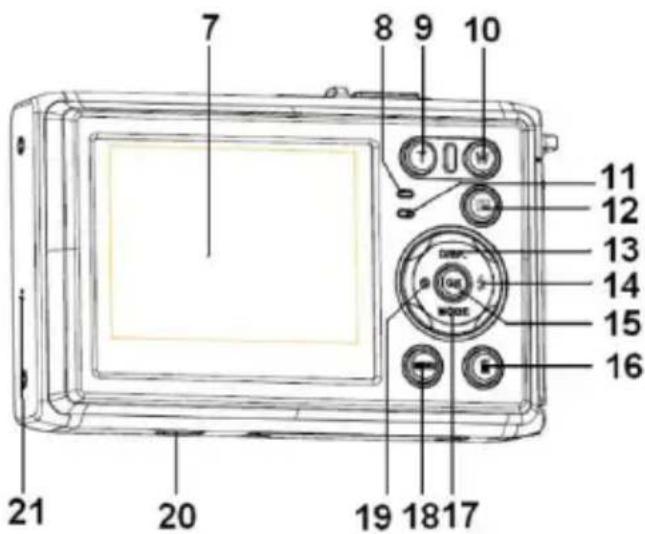
1. Parts of the digital camera
1: Strap hole
2: Battery cover
3: Shutter button
4: Power button
5: Lens
6: Flash strobe
7: LCD screen
8: Charger indicator LED
9: T/Zoom in button
10: W/Zoom out button
11: Busy /Power indicator LED
12: Playback button
13: Up/Display button
14: Right/Flash button
15: OK button
16: Delete button
17: Down/Mode button
18: Menu button
19: Left/Self-timer button
20: Tripod Socket
21: Microphone
2. Preparing for using
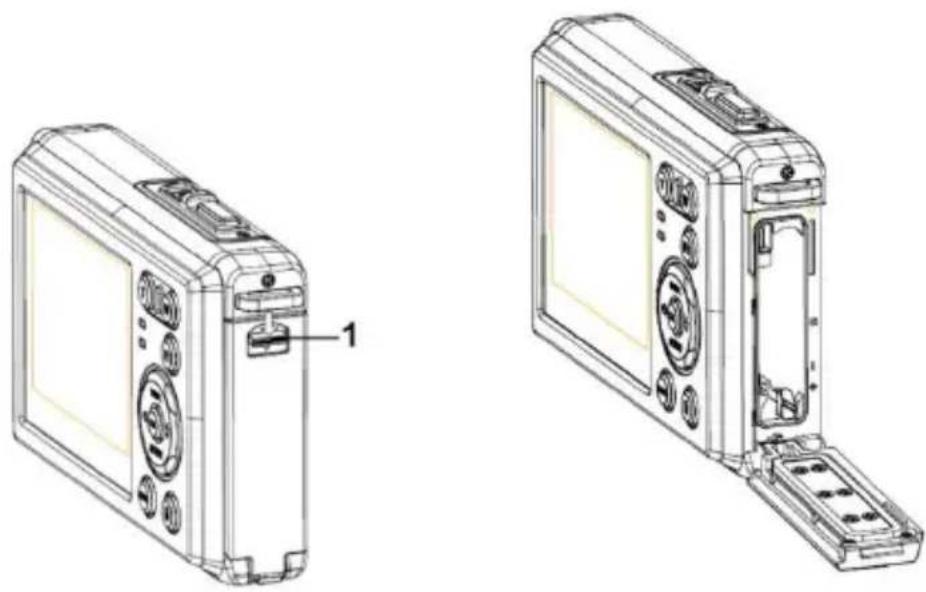
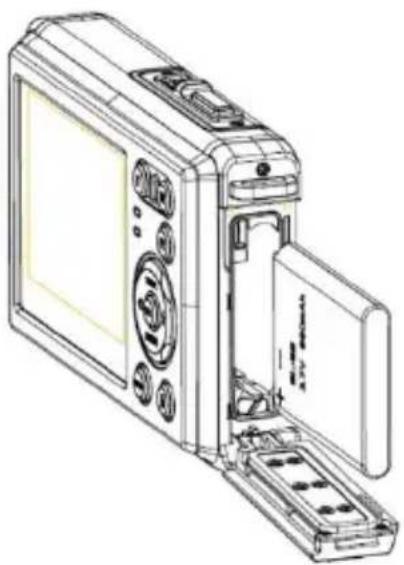
Installing the Battery
1: Push the lock button (1) down to open the battery cover.
natural_image
Technical line drawings of two views of a digital camera module, showing front and side views with no text or symbols.2: Insert the battery with the positive (+) and negative (-) poles matching the directions indicated inside the battery compartment.
natural_image
Line drawing of a digital camera module with open lid and internal components (no text or symbols)3: After the battery is properly installed, replace the battery cover until a clearly click is heard.
Charge the battery
Please charge the battery when the indicator shows the icon.
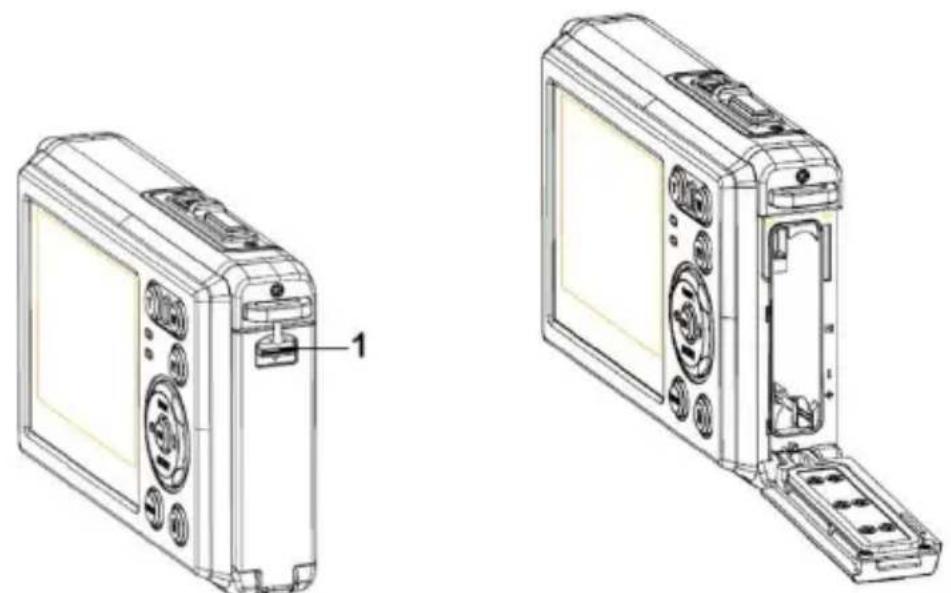
Inserting the Memory Card
1.Turn off the digital camera.
- Push the lock button (1) down to open the battery cover. And then you will set the SD card slot.
natural_image
Technical line drawings of two views of a digital camera module, showing front and side views with no text or symbols.- Insert the memory card to the card slot with the label against the LCD screen. Check the right direction before insert the memory card.
- To release the memory card open the battery cover firstly and then the edge of the card gently.
Format the memory card
It is important to format the memory card when it is the first time you use this
digital camera. All data will be deleted including protected files. Be sure to download important files to your computer before formatting.
1: Turn the power on, and set the digital camera to the Setup Menu.
2: Press the Up/Display or Down/Mode button to select [Format] then press the OK button to launch the submenu.
3: Press the Up/Display or Down/Mode button to select the item [OK] and then press the OK button to launch the format submenu.
4: Press the Up/Display or Down/Mode button to select the item [Yes] and then press the OK button to erase all data.
Setting the Language
When using the digital camera for the first time after purchasing it, be sure to choose a language and set the date & time before using the digital camera.
1: Turn the power on, and set the digital camera to the Setup Menu..
2: Press the Up/Display or Down/Mode button to select [Language] then press the OK button to launch the submenu.
3: Press the Up/Display or Down/Mode button to select the desired
language and then press the OK button to confirm the setting.
Setting the date and time
1: Turn the power on, press the MENU button to display the menu.
2: Press the Left or Right button to select [Capture Setting] Menu.
3: Press the Up or Down button to select [Date] then press the OK button to launch the submenu.
4: Press the Up or Down button to select [Set Date] then press the OK button to launch
the dialog box.
5: Press the Up or Down button to change the highlighted value. Press the Left or Right button to move the cursor between settings.
6: Press the OK button to confirm the settings.
Note: The date and time can be only added to still images by setting the function [Date] in Capture Setting menu.
3. Using this digital camera
Turning the Digital camera On and Off
- Press the POWER button to turn on the camera and press it again to turn the digital camera off.
To save battery power, you can change the power-off time by setting the function [Auto Power Off] in the Setup menu.
Change the record mode
There are three modes in this digital camera.
1: Press the POWER button to turn on the digital camera.
2: Press the Down/Mode button to change the mode. Each time the Down/Mode button is pressed the mode icon is changed.
| Display | Title | Description |
 | Capture mode | For taking still photos. |
 | Video mode | For recording movie clips. |
 | Audio mode | For recording audio files. |
 | Playback mode | For previewing record files. |
Note:
You can only switch the digital camera to playback mode by using the PLAYBACK button. Press the PLAYBACK button to set the camera to playback mode and press it again to set it record mode.
Taking still images
1: Turn on the digital camera and set the digital camera to default capture mode, the icon appears on the LCD screen.
2: Zooming:
Press the T or W button to zoom in or zoom out the screen. the value of magnification level appears on the LCD monitor.
3: Hold the digital camera steady and then press the SHUTTER button completely down to take a picture.
4: Press the MENU button to display the menu, including Scene, Image Size, Anti-Shake, Face Detect, Smile Capture, Shooting, Capture Setting, Image Setting.
Using the Self-timer
Use the self-timer to set a delay from the time the shutter button is pressed to the time the image is shot.
1: Turn the power on, and set the digital camera to the Capture mode.
2: Press the LEFT/SELF-TIMER button to change the self-timer mode. Each time the LEFT/SELF-TIMER button is pressed the self-timer icon changes.

Off: Don't use self-timer.
2 Seconds: The shutter release will delay for 2 seconds.
5 Seconds: The shutter release will delay for 5 seconds.
10 Seconds: The shutter release will delay for 10 seconds.
3: Press the SHUTTER button to take a picture.
4: After Self-timer begins, the self-timer LED will flash. One second for a
flash, till countdown is over.
Using the Flash
The flash is not only for taking pictures when there is insufficient light, but also for when the subject is in shade or with backlight conditions. Pressing the RIGHT/FLASH button cycles your camera through the various flash modes. The flash will not activate during continuous shooting or movie recording.
1: Set the digital camera to the Capture mode.
2: Press the RIGHT/FLASH button to change the flash mode.
Each time the flash button is pressed, the flash icon changes.
 | Auto: Automatically turn on/of |
 | Flash on: Force on the flash |
 | Flash off: Force off the flash |
3: Press the SHUTTER button to take a picture.
Note:
When the battery power level is low, the flash strobe does not work.
Press the RIGHT/FLASH button, the message shows "Low battery" on the
LCD screen.
Recording a video clip
1: Turn on the digital camera, press the DOWN/MODE button to set the digital camera to video record-mode.
2: Zooming:
Press the T or W button to zoom in or zoom out the screen. The value of magnification level appears on the LCD monitor.
3: Press the SHUTTER button to start recording.
4: Press the SHUTTER again to end the recording. If the memory is full the video camera will stop recording automatically.
5: Press the MENU button to display the menu, including Size, Image Setting.
- On the upper of the LCD monitor displays the recorded time.
- Don't remove the card when video recording, Or, it may cause the digital camera cannot work normally.
Recording audio
1: Turn on the camcorder and set the camera to audio record mode ().
2: Press the SHUTTER button to start recording.
3: Press the SHUTTER button again to end the recording. If the memory is full the camera will stop recording automatically.
4. Playback
Playback still image
1: Press the PLAYBACK button to playback mode.
The latest recorded file appears on the LCD screen. If there are no images stored, a message [No File Exist] appears.
2: Press the LEFT or RIGHT buttons to preview the previous or next image.
3: Press the UP button to play slide show.
4: Zooming:
Press the T or W button to zoom in or zoom out the image. When the picture is enlarged press the UP, DOWN, LEFT, RIGHT button to browse the details of the image.
5: Press the OK button to resume the normal mode.
Playing back movie clips
1: Set the digital camera to playback mode.
2: Press the LEFT or RIGHT buttons to select the movie clips you want to playback.
3: Press the SHUTTER button to start playing and press it again to pause, press UP button to end the playing.
Playing back audio files
1: Press the PLAYBACK button to set the digital camera to playback mode.
2: Press the LEFT or RIGHT buttons to select the audio file you want to Playback.
3: Press the SHUTTER button to start playing, press the OK button to pause and press it again to continue, press the SHUTTER button again to end the playing.
Viewing Thumbnails
Press the W button in playback mode to view the file in thumbnails mode. Use the LEFT/RIGHT/UP/DOWN buttons to select a file. Press the OK
button to view the file in full screen.
5. Making connections
Connecting the Digital camera to a PC
There are two ways to download files from the digital camera's internal memory or memory card to a computer:
- By inserting the memory card into a card reader
- By connecting the camera to a computer using the supplied USB cable.
Using a Card Reader
1: Eject the memory card from the digital camera insert it into a card reader that is connected to computer.
2: Open [My Computer] or [Windows Explorer] and double-click the
natural_image
Diagram of a device being inserted into a rack, showing internal components and connection (no text or symbols)removable disk icon that represents the memory card.
3: Copy images from the card into a directory of your choice on the computer's hard disk.
Connecting the Digital camera to a PC with the USB Cable
1: Connect the supplied USB cable to the computer's USB port and turn on the digital camera. An icon "MSDC" appears on the screen when connection to the computer has been successfully completed.
2: Open [My Computer] or [Windows Explorer]. A "Removable Disk" appears in the drive list. Double-click the "Removable Disk" icon to view its contents. Files stored on the camera are located in the folder named "DCIM".
3: Copy the photos or files to your computer.
Notes: To enter PC CAM mode, at first you have to hold and press the shutter button for a few seconds, then connect the camcorder to the computer with the supplied USB cable. An icon "PC CAM" will appear on the screen. If not, please continue to press the shutter button and press the power button as well. An ico "PC CAM" appears on the screen.
6. Technical Specifications
| Sensor | 8.0Mega Pixels CMOS |
| Display | 2.4" TFT Color LCD |
| Aperture | F/2.8, f=5.3mm |
| Shutter | Shutter: 1/2~1/1800sec. |
| Resolution | Still Image:[12M]: 4000x3000; [10M]: 3648x2736;[8M]: 3264x2448; [7M]: 3072x2304;[5M]: 2592x1944; [3M]: 2048x1536;[2M]: 1600x1200; [VGA]: 640x480;Video:FHD 1920x1080; HD:1280x720;D1:720x480;VGA: 640x480;QVGA: 320x240 |
| Auto PowerOff | [Off]/[1Minute]/[2 Minutes]/[3 Minutes]/[4 Minutes]/[5 Minutes]/[10 Minutes] |
| Sensitivity | ISO Auto/100/200/400 |
| White balance | Auto/Daylight/Cloudy/Incandescent/Fluorescet |
| Scene | [Auto]/[Night Portrait]/[Night Scenery]/[Portrait]/[Scenery][Sport]/[Party]/[Beach]/[HighSensitivity]/[Underwater] |
| Exposure control | -3EV to +3EV in 1step |
| Continue shot | YES |
| Self-timer | 2 /5 /10 sec. |
| Storage | External memory: SD / MMC |
| Power Supply | Li-ion battery |
| Ambient temperature | Operating: 0°C to 40°CStorage: -20 to 60°C |
| Dimension | 101x64x23.4 (mm) |
| Weight | Camera Body w/o battery: Approx. 135g |
Conformity
TheManufacturerherebydeclaresthattheCEmarkingwasappliedtothe RolleiSportsline85inaccordancewiththebasicrequirementsandotherrelevant provisionsofthefollowingCEDirectives:
2011/65/ECRoHsDirective
2004/108/ECLowVoltageDirective
2006/95/EECLVDDirective
2002/96/EGWEEEDirective

The EC Declaration of Conformity can be requested from the address specified ontheWarrantycard.
natural_image
Technical line drawings of two views of a digital camera module, showing front and side views with no text or symbols.natural_image
Line drawing of a digital camera module with open lid and internal components (no text or symbols)natural_image
Technical line drawing of two views of a compact digital camera module, showing front and side views with no text or symbols.natural_image
Diagram of a device being inserted into a rack, showing internal components and a close-up of the component (no text or symbols present)2004/108/CEDirectiveCEM
2006/95/EECDirectiveLVD
2002/96/EGDirectiveWEEE

natural_image
Line drawing of a digital camera module with open lid and internal components (no text or symbols)natural_image
Technical line drawings of two views of a digital camera module, showing front and side views with no text or symbols.natural_image
Technical line drawing of a mechanical assembly with a bracket and clamped parts (no text or symbols)natural_image
Technical line drawings of two compact digital camera modules, one with a labeled component (1), showing internal components and mounting brackets (no text or symbols present)natural_image
Line drawing of a digital camera module with internal components and ventilation slots (no text or symbols)natural_image
Technical line drawings of two views of a compact digital camera module, showing internal components and mounting brackets (no text or symbols)natural_image
Diagram of a device being inserted into a rack, showing internal components and a close-up of the component (no text or symbols present)natural_image
Technical line drawings of two views of a compact digital camera module, showing front and side views with no text or symbols.natural_image
Line drawing of a digital camera module with open lid and internal components (no text or symbols)natural_image
Technical line drawings of two views of a digital camera module, showing front and side views with no text or symbols.natural_image
Technical line drawing of a mechanical component inserted into a rack (no text or symbols)natural_image
Technical line drawings of two views of a compact digital camera module, showing front and side views with no text or symbols.natural_image
Line drawing of a digital camera module with open lid and internal components (no text or symbols)natural_image
Line drawing of a digital camera with labeled parts (no text or symbols beyond label)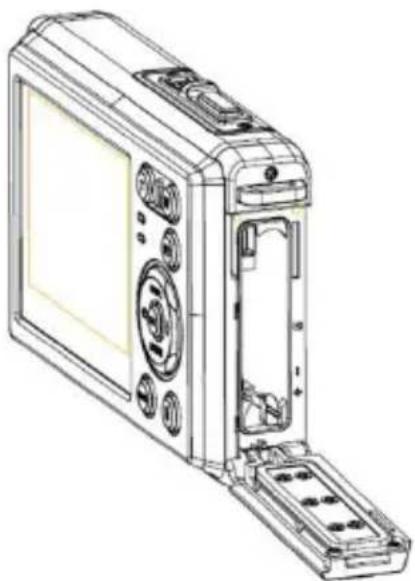
natural_image
Line drawing of a digital camera module with visible ports and casing (no text or symbols)natural_image
Diagram showing a device being inserted into a rack, with no visible text or symbolsnatural_image
Technical line drawings of two views of a digital camera module, showing front and side views with no text or symbols.natural_image
Line drawing of a digital camera module with open lid and internal components (no text or symbols)natural_image
Technical line drawings of two views of a digital camera module, showing front and side views with no text or symbols.natural_image
Technical line drawing of a mechanical component with a bracket and mounting bracket (no text or symbols)natural_image
Technical line drawings of two views of a digital camera module, showing front and side views with no text or symbols.natural_image
Line drawing of a digital camera module with open lid and internal components (no text or symbols)natural_image
Technical line drawing of two views of a digital camera module, showing front and side views with no text or symbols.natural_image
Technical line drawing of a mechanical component with a bracket and mounting bracket (no text or symbols)Koppla digitalkameran till en dator med USB-kabeln
natural_image
Technical line drawings of two views of a compact digital camera module, showing front and side views with no text or symbols.natural_image
Line drawing of a digital camera module with open lid and internal components (no text or symbols)natural_image
Technical line drawings of two views of a compact digital camera module, showing front and side views with no text or symbols.natural_image
Diagram of a device with a connector inserted into a slot, showing internal components and wiring (no text or symbols)natural_image
Technical line drawings of two views of a compact digital camera module, showing front and side views with no text or symbols.natural_image
Line drawing of a digital camera module with open lid and internal components (no text or symbols)natural_image
Technical line drawings of two views of a compact digital camera module, showing front and side views with no text or symbols.natural_image
Diagram of a device with an attached rectangular component and surrounding compartments (no text or symbols)natural_image
Technical line drawings of a two-part digital camera module, showing front and side views with no text or symbolsnatural_image
Line drawing of a digital camera module with open lid and internal components (no text or symbols)natural_image
Technical line drawings of two views of a digital camera module, showing front and side views with no text or symbols.natural_image
Technical line drawing of a mechanical component with a bracket and mounting holes (no text or symbols)11: Bezig/Voeding-LED
12: Afspelen-knop
13: Omhoog/Display-knop
14: Rechts/Flitser-knop
15: OK-knop
natural_image
Technical line drawing of a two-part digital camera module with labeled components (no text or symbols present)natural_image
Line drawing of a digital camera module with open lid and internal components (no text or symbols)natural_image
Technical line drawing of two views of a digital camera module, one showing front panel and one internal unit (no text or symbols)natural_image
Diagram of a device with an attached component and a connector, showing no text or symbols.natural_image
Technical line drawings of two digital camera modules, one with a labeled component and the other showing internal components (no text or symbols present)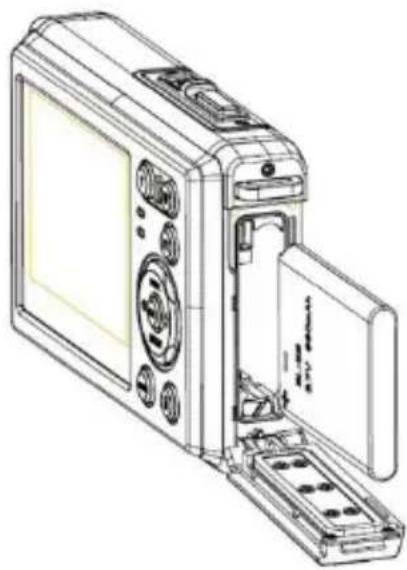
natural_image
Line drawing of a compact digital camera with open lid and internal components (no text or symbols)natural_image
Technical line drawing of a two-part digital camera module with labeled components (no text or symbols present)natural_image
Diagram of a device being inserted into a rack, showing internal components and a close-up of the component (no text or symbols present)2006/95/EECLVDDirective
2002/96/EGWEEEDirective

19: Kouμπί Left/Self-timer button
natural_image
Technical line drawings of two views of a compact digital camera module, showing front and side views with no text or symbols.natural_image
Line drawing of a digital camera module with open lid and internal components (no text or symbols)natural_image
Technical line drawings of two views of a digital camera module, showing front and side views with no text or symbols.natural_image
Diagram of a device with an attached component and surrounding hardware racks (no text or symbols)www.rollei.com/social
Distribution:
Rollei Service Germany
Denisstraße 28a
D-67663 Kaiserslautern

- Precautions
- Parts of the digital camera
- Preparing for using
- Installing the Battery
- Charge the battery
- Inserting the Memory Card
- Format the memory card
- Setting the Language
- Setting the date and time
- Using this digital camera
- Turning the Digital camera On and Off
- Change the record mode
- Taking still images
- Using the Self-timer
- Using the Flash
- Note:
- Recording a video clip
- Recording audio
- Playback
- Playback still image
- Playing back movie clips
- Playing back audio files
- Viewing Thumbnails
- Making connections
- Connecting the Digital camera to a PC
- Using a Card Reader
- Connecting the Digital camera to a PC with the USB Cable
- Technical Specifications
- Conformity
- Koppla digitalkameran till en dator med USB-kabeln
Brand : ROLLEI
Model : Sportsline 85
Category : Camera