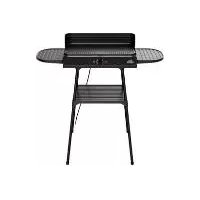
SSGE 2400 A1 - Electric barbecue Grillmeister - Free user manual and instructions
Find the device manual for free SSGE 2400 A1 Grillmeister in PDF.

User questions about SSGE 2400 A1 Grillmeister
0 question about this device. Answer the ones you know or ask your own.
Ask a new question about this device
Download the instructions for your Electric barbecue in PDF format for free! Find your manual SSGE 2400 A1 - Grillmeister and take your electronic device back in hand. On this page are published all the documents necessary for the use of your device. SSGE 2400 A1 by Grillmeister.
USER MANUAL SSGE 2400 A1 Grillmeister
Operating instructions and safety instructions
NL EE
Deutsch 2
English....26
Français....48
Nederlands 76
Polski 100
Čeština 125
Slovensky 147
Español 169
Dansk 193
Italiano....214
Magyar 237
Slovenščina 261
Inhaltsverzeichnis
natural_image
Technical line drawings of three different propeller designs (no text or symbols)natural_image
Technical line drawing of a mechanical component with no visible text or symbolsnatural_image
Technical line drawing of a dome-shaped object with labeled points A, B, C and an attached bracket (no text or symbols beyond labels)
natural_image
Technical line drawing of a circular mechanical component with mounting bracket and side features (no text or symbols)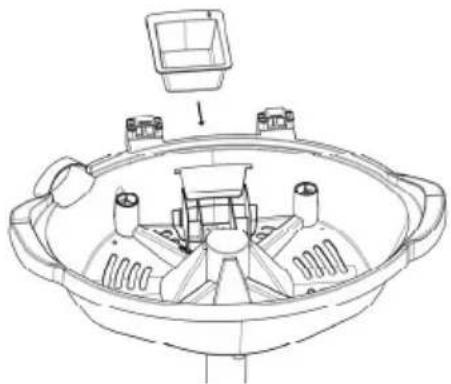
natural_image
Technical line drawing of a circular mechanical component with internal components and a small inset panel (no text or symbols)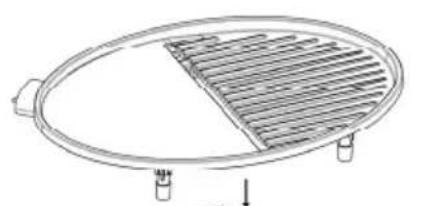
natural_image
Technical line drawing of a circular metal grate with slatted top and base, showing mounting feet (no text or symbols)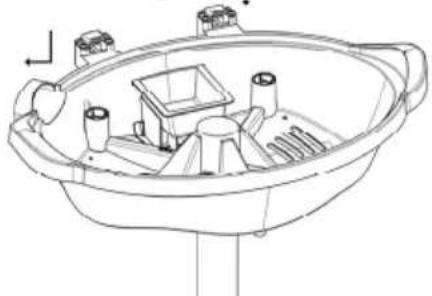
natural_image
Technical line drawing of a boat interior with handle, hull, and side-mounted equipment (no text or labels)natural_image
Technical line drawings of a portable grill with open lid and internal grating, shown from top and side views (no text or symbols)
- Intended use....27
- Package contents...... 27
- Overview 28
- Technical specifications .... 28
- Safety instructions 28
- Copyright....36
- Before you start.... 36
7.1 Unpacking....36
7.2 Mounting.... 36 - Getting started 39
8.1 First use....39
8.2 Grilling....39 - Repairs / cleaning...... 40
9.1 Repairs....40
9.2 Cleaning 41
9.2.1 Cleaning the grill plate....41
9.2.2 Cleaning the grease collection tray....42
9.2.3 Cleaning the stand tube, feet, barbecue housing and thermostat with mains cable..... 42
9.2.4 Cleaning the metal lid 42 - Troubleshooting.... 43
- Storage when not in use 43
- Environmental regulations and disposal information.... 43
- Food-grade use....45
- Conformity notes 45
- Warranty and service information....45
Congratulations!
By purchasing the GRILLMEISTER SSGE 2400 A1 2in1 barbecue, hereinafter referred to as the barbecue, you have opted for a quality product.
Before first using it, familiarise yourself with the way the barbecue works and read these operating instructions through carefully. Be careful to follow the safety instructions and only use the barbecue as described in the operating instructions and for the applications given.
Keep these operating instructions in a safe place. If you pass the barbecue on to someone else, make sure to give them all the relevant documents with it.
1. Intended use
This barbecue has been designed to grill foods such as meat, fish or vegetables. It has not been designed for corporate or commercial applications. Use the barbecue in indoor and protected outdoor environments for private applications only. Any other use does not correspond to the intended use. The barbecue must also not be used in tropical climates. This barbecue fulfils all relevant norms and standards associated with CE Conformity. In the event of any modification to the barbecue that was not approved by the manufacturer, compliance with these standards is no longer guaranteed. The manufacturer accepts no liability for any damage or malfunctions resulting from this. Only use accessories specified by the manufacturer.
Observe the regulations and laws in the country of use.
2. Package contents
- Metal lid (3)
• Thermometer (1) including fastening nut
• Thermostat (including mains cable) - Handle (2) including 2 fitting screws
- Grease collection tray
- Barbecue housing (6)
- Grill plate (4)
- Short and long stand tube
- Bag of screws (4 units)
- 5 feet and base for feet
- Support (11)
• These operating instructions
3. Overview
These operating instructions have a fold-out cover. On the inside of the cover, the barbecue is shown with figures indicated. The meanings of the numbers are as follows:
1 Thermometer
2 Handle
3 Metal lid
4 Grill plate
5 Carry handles
6 Barbecue housing
7 Top stand tube
8 Bottom stand tube
9 Base for feet
10 Non-slip feet
11 Support
12 Opening for thermostat connection
13 Grease collection tray
14 Thermostat with mains cable
15 Thermostat connection socket
- Technical specifications
| Model SSGE 2400 A1 | |
| Power supply 220-240 V | ~, 50/60 Hz |
| Power consumption 2000 - 2400 W | |
| Length of power cord 290 cm | |
| Dimensions including foot (W x H x D) approx. 66 x 97 x 66 cm (without thermostat) | |
| Dimensions without foot (W x H x D) approx. 56.5 x 43.5 x 27.5 cm (without thermostat) | |
| Grill area (W x H) approx. 46.5 x 33.8 cm | |
| Weight approx. 7 kg | |
| Degree of protection IPX4 |
The technical data and design may be changed without prior notice.
5. Safety instructions
Before you use this barbecue for the first time, please read the following instructions and heed all warnings, even if you are familiar with handling electrical and barbecue devices. Keep these operating instructions in a safe place for future reference. If you sell the barbecue or give it away, pass on the operating
instructions at the same time. The operating instructions are part of the product.
Explanation of symbols used

This symbol indicates important information in the operating instructions which you must read and observe.

DANGER! This icon and the word "DANGER" alert you to a potentially dangerous situation. Ignoring it can lead to severe injury or even death.

WARNING! This signal word indicates a danger with a moderate risk, which can lead to death or major injuries if not avoided.
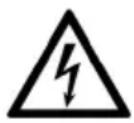
DANGER! This symbol denotes danger for human health and risk of death and/or risk of damage to equipment due to electric shock.
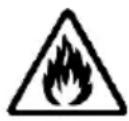
DANGER! This symbol denotes danger for human health and risk of death and/or risk of damage to equipment due to fire.
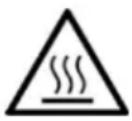
DANGER! Warning, hot surfaces! This symbol denotes the risk of injuries or burns from hot surfaces on the grill.

CAUTION! This signal word indicates important instructions to protect against damage to property.

This symbol denotes further information on the topic.

This symbol indicates that you should wear barbecue gloves when handling the barbecue.

This is an electrical engineering symbol which denotes the PE wire (earth conductor).
L
This is an electrical engineering symbol which denotes the L wire (phase).
N
This is an electrical engineering symbol which denotes the N wire (neutral conductor).

This symbol means that grease collection tray (13) is dishwasher-safe to a maximum of 60 °C .
Operating environment
This barbecue is only suitable for use in dry inside spaces and protected outdoor spaces.
The barbecue is not for use in rooms with a high temperature or humidity (e.g. bathrooms), and must be kept free of excessive dust.

DANGER! Personal safety
- Small parts can represent choking hazards. Keep the packaging out of the reach of these people. There is a risk of suffocation.
- This barbecue can be used by children aged 8 and above as well as people with reduced physical, sensory or mental capacities or a lack of experience and/or knowledge if they are supervised or have been instructed how to safely use the device and understand the resultant risks. Do not allow
children to play with the barbecue. Cleaning and user maintenance must not be carried out by children unless they are older than 8 years old and supervised.
WARNING! Some parts of the barbecue can get very hot and cause burns. Be particularly careful if children or persons requiring extra protection are present.
Keep children younger than 8 years away from the barbecue and its mains cable.
General safety instructions
- The barbecue must not be operated in the immediate vicinity of a garden hose, a basin, a bathtub, a shower or a swimming pool as water splashes could get into the device.
- Do not operate the barbecue in direct sunlight and keep it away from other sources of heat.
- Do not use the barbecue if its is damaged or malfunctioning as this could cause further damage. Get customer services or a qualified person to check the barbecue and repair it if necessary.
- Only use the barbecue to prepare food and never use it as a heater to warm up a car, a caravan, a tent or similar.
- Never leave the barbecue unattended when in use.
- The barbecue must only be used with the thermostat with mains cable (14) supplied, and not with any other thermostat.
- The barbecue is not designed to be operated with an external timer or a separate remote control system.
- WARNING! This device is not suitable for use with charcoal or other fuels.

DANGER! Risk of electric shock!
- Do not modify the barbecue in any way.
- The barbecue must be connected to a properly installed mains plug, the circuit for which is protected by means of a residual current device (RCD) with a trip current of no more than 30 mA.
- Only plug the barbecue into an easily accessible mains socket. Only operate the barbecue at the voltage indicated on the rating plate!
- If you use an extension cable, it must have a minimum cross section of 1.5 mm^2 . For cable drums, the cable must be completely unwound so it cannot form closed loops.
- Protect the barbecue from drips and splashes. If liquid penetrates into the barbecue, unplug the mains plug immediately and get the barbecue checked or repaired by customer service or similarly qualified personnel.
- If liquid does penetrate into the device, disconnect the mains plug immediately. Get the product checked by an expert before using it again.
- Never operate the product with wet or damp hands.
- Do not touch the barbecue if it is in water or another liquid, instead, pull the plug from the mains socket.
- Do not use the barbecue if the mains plug or the mains cable is damaged, if it does not work properly, if it has fallen into water, been dropped, or if it showing any other signs of
damage. In this case, please consult an expert to repair the product.
- Never use adapter plugs or extension cables that do not comply with the safety regulations applicable in your country, and do not modify the mains cable yourself!
- Make sure that the mains cable cannot be damaged by sharp edges or hot spots.
- When using the product, make sure that the mains cable is not jammed or squashed in any way.
- When it is switched off, the barbecue is not fully disconnected from the mains power. Pull the power plug to disconnect it completely. Always pull on the power plug, not the cable.
- Unplug the power plug from the power socket,
○ if a problem occurs,
○ if you are not using the barbecue,
○ for installation,
- before cleaning the barbecue and
○ if there is a thunderstorm.
- Never try to repair the barbecue yourself. In the event of a problem, switch off the barbecue, unplug the mains plug and contact our customer service.
- If the mains cable of this product is damaged, it must be replaced by the manufacturer, its customer service or a similarly qualified person, in order to avoid any possible danger.

Risk of fire!
- In order to minimise the fire risks, textiles, curtains and all flammable materials must be kept at least 50 cm away from the barbecue.
- Always place the barbecue on an even, heat-resistant surface away from heat sources and combustible materials, liquids or gases. Leave clearance of at least 50 cm on all sides.
- The barbecue must not be covered in order to avoid overheating.
- Combustible items such as curtains or paper should be kept away from the barbecue when it is in use.
- Make sure that no fire hazards (e.g. burning candles) are placed on or near the grill.

DANGER! Risk of getting burnt!
- The barbecue gets very hot when in use. Therefore, do not touch the metal lid (3) when it is in use. Use pot holders or oven gloves to prevent burns. Always use the handle (2) to open and close the metal lid (3).
- Wait until the barbecue is completely cool before transporting it. Always carry it by carry handles (5).
- Do not clean the barbecue until it is completely cool.

WARNING! Risk of injury!
- Do not use the product near explosive or flammable materials.
-
Do not move the product while it is in use.
-
If you notice any smoke, unusual noises or strange smells, immediately unplug the mains plug from the socket. If this occurs, the barbecue should no longer be used until it has been inspected by authorised service personnel.
- Lay the power cord and the extension cable, if using, so they do not represent a trip hazard.
- Do not wear clothing with long sleeves when barbecuing. Make sure your hair never comes into contact with the barbecue. There is a danger of injury!
CAUTION! Damage to equipment!
- Do not leave the barbecue unattended when it is switched on!
- Never put the barbecue on a hot surface (e.g. a hob) or near heat sources or open fires.
- Only use original accessories.
- If you use the barbecue without the stand, only operate it on an even, heat-resistant surface. Place a heat-resistant board in between the surface and the barbecue housing (6) if the surface itself is critical.
- Do not place the barbecue right next to a wall or, for example, under wall cupboards, in order to prevent heat build-up.
- Do not expose the barbecue to any direct heat sources (e.g. heaters), direct sunlight or strong artificial light. The product must not be exposed to spray or dripping water or abrasive liquids. Do not use the barbecue near water. It is particularly important that the barbecue is never immersed (do not place
any containers containing liquids such as drinks, vases, etc. on the barbecue). Make sure that the barbecue is not subject to excessive shocks or vibrations. Do not introduce any foreign bodies into the device.
- When turning food on the grill, do not use metal utensils. These could damage the coating on the grill plate (4).
- Do not put pots or pans on the grill plate (4). Do not use aluminium foil, plates or similar.

No action is required by the user to set the product to 50 or 60 Hz. The product automatically adjusts to 50 and to 60 Hz.
6. Copyright
All the contents of this user manual are protected by copyright and provided to the reader for information only. Copying data and information without the prior explicit written consent of the author is strictly forbidden. This also applies to any commercial use of the contents and information. All texts and diagrams are up-to-date as of the date of printing. Subject to change without notice.
7. Before you start
7.1 Unpacking
Unpack the barbecue from the packaging and remove all packaging material. Inspect the barbecue for damage. If the barbecue is damaged, do not use it. Please contact Customer Service immediately if any items are missing.
7.2 Mounting
Equipment required:
- Phillips screwdriver
How to assemble the barbecue:
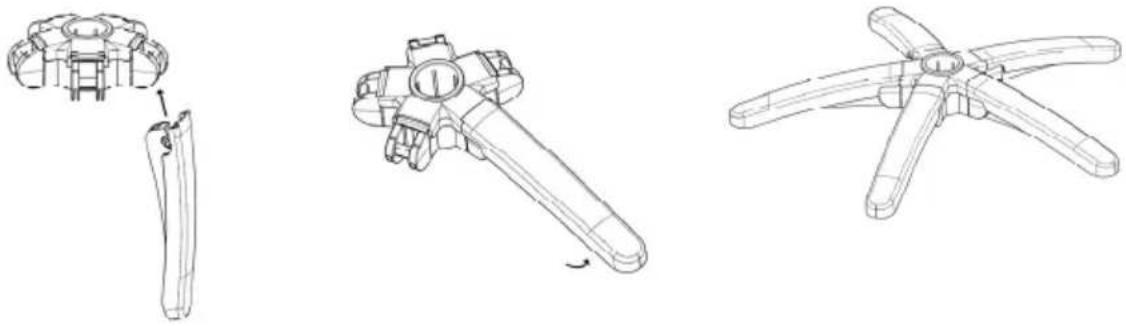
- Push the five feet (10) in order from the bottom up into the base for the feet (9). Then fold the feet (10) up until they click into place.
natural_image
Technical line drawings of three different mechanical components with no visible text or symbols- Screw the threaded bolt sticking out of the top stand tube (7) into the lower stand tube (8). Make sure that the two stand tubes (7, 8) are screwed together securely.

-
Place the feet (10) assembled in step 1 and the base for the feet (9) on a smooth, stable surface and place the assembled stand with the lower stand tube (8) pointing downwards into the middle of the base for the feet (9).
-
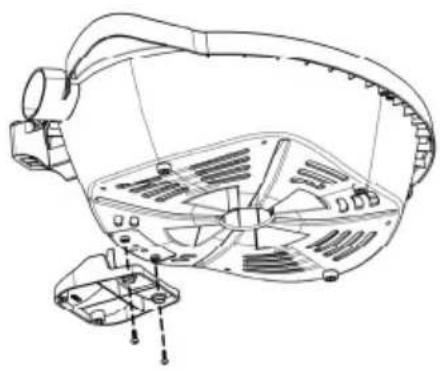
Connect the support (11) to the barbecue housing (6) using two of the screws provided. The holes can be found on the bottom of the barbecue housing (6). The support (11) ensures the barbecue does not tip over if placed on a table (i.e. without the base and stand tubes).
natural_image
Technical line drawing of a mechanical component with internal parts and mounting holes (no text or symbols)-
Place the barbecue housing (6) onto the top stand tube (7). Hold the barbecue housing (6) by the handles (5) to do this.
-
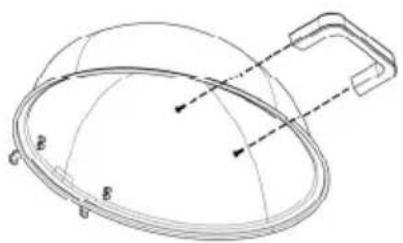
Screw in the handle (2) onto the metal lid (3) from the outside using the two remaining screws.
natural_image
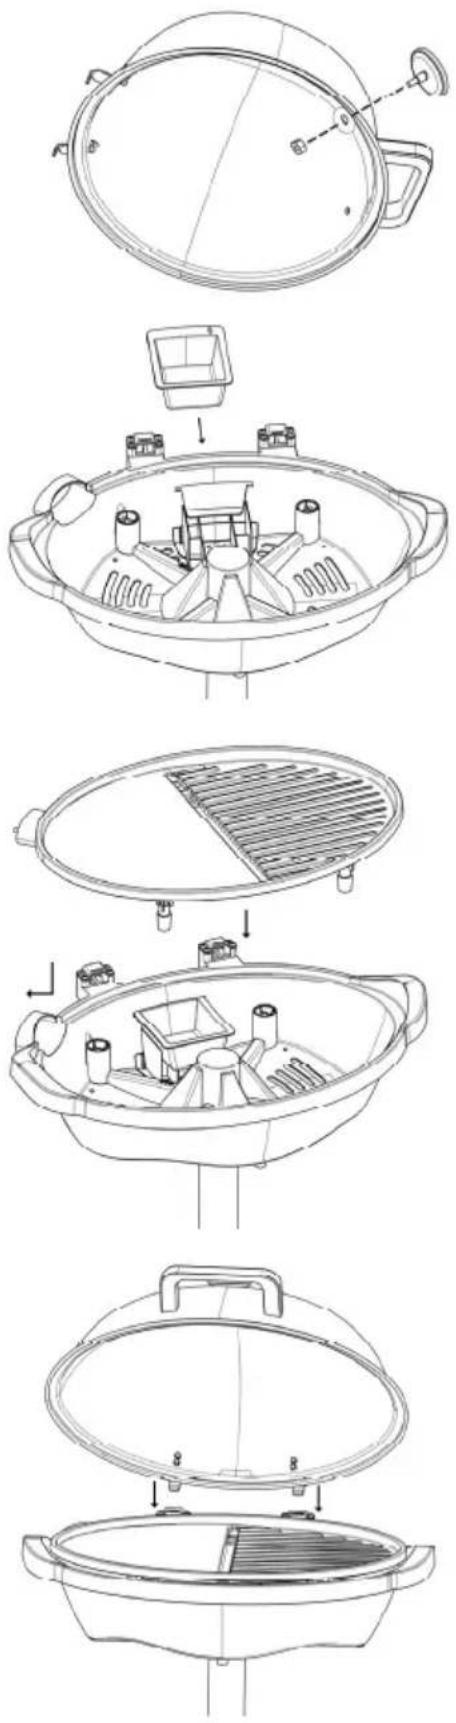
Technical line drawing of a dome-shaped object with labeled points (A, B, C, D) and dashed lines indicating internal alignment or measurement (no text or symbols beyond labels)- Release the nut on the threaded bolt of the thermometer (1), insert the threaded bolt on the thermometer (1) through the hole in the metal lid (3) above the handle (2) and tighten the nut again. Make sure that the thermometer (1) is seated securely and that the numbers on the temperature display are the right way up.
- Insert the grease collection tray (13) into the barbecue housing (6) from behind. To do this, grab the front of it with your index finger and thumb and push the opposite side into the barbecue housing (6) first. If you cannot push the grease collection tray (13) in any further, this means the catches on both outside edges of the grease collection tray (13) have engaged. This means it is locked into place and cannot accidentally slide out.
- Insert the grill plate (4) into the barbecue housing (6). To do this, hold the grill plate (4) with both hands and place it in the barbecue housing (6) with the ribbed section to the right. Lower it a little on the left-hand side and push the connection socket for the thermostat (15) into the opening for the thermostat connection (12). Then lower the right hand of the grill plate (4) and push the grill plate (4) to the left until it is properly seated on the barbecue housing (6).
- Place the metal lid (3) on the barbecue housing (6). To do this, lift the metal lid (3) by the handle (2) and place the two metal brackets on the rear of the metal lid (3) into the recesses provided. Fold the metal lid (3) closed.
natural_image
Exploded view diagram of a portable stove or cooker with internal components and mounting base (no text or labels)- Push the thermostat with mains cable (14) through the opening for the thermostat connection (12) and connect it to the connection socket for the thermostat (15). Make sure that the three metal pins engage properly into the holes provided and the control dial is pointing upwards.

natural_image
Line drawing of a helmet with attached mechanical components (no text or symbols)
When inserting the thermostat with mains cable (14) make sure that you do not accidentally push the lever to unlock the thermostat with mains cable (14). If you do this, you will not be able to insert it properly.
8. Getting started
8.1 First use

Always carry the assembled barbecue and stands by the stand tube (7, 8). If you lift it by the handles (5), it will come loose from the stand tube (7, 8) and you can then use the barbecue housing (6) on a table as a tabletop barbecue.

WARNING! Plug the mains plug into an easily accessible mains socket.
- When you use it for the first time, do not place any food on the grill plate (4).
- Connect the mains cable of the barbecue to an easily accessible socket and fold the metal lid (3) closed.
- Turn the temperature controller on the thermostat with mains cable (14) clockwise as far as it will go (highest setting / Max). The heating indicator on the thermostat with mains cable (14) lights up and the barbecue heats up to the maximum temperature. As soon as the barbecue reaches the set temperature, the heating indicator goes out.
- Allow the barbecue to heat up for approx. 15 minutes. When you use it for the first time, slight smells or smoke may develop. This is completely normal and safe. Open a window to ensure sufficient ventilation.
- Turn the temperature controller on the thermostat with mains cable (14) anticlockwise as far as it will go ("Off" position) in order to switch the barbecue off.
- Unplug the power plug from the mains socket and allow the barbecue to cool completely.
- Clean the barbecue as described in the chapter on "Cleaning".
8.2 Grilling

Always carry the assembled barbecue and stands by the stand tube (7, 8). If you lift it by the handles (5), it will come loose from the stand tube (7, 8) and you can then use the barbecue housing (6) on a table as a tabletop barbecue.

If necessary, put a little heat-resistant oil on the griddle side of the grill plate (4). This prevents food sticking to the grill plate (4).

The grill plate (4) is split into two different surfaces. The smooth griddle surface is used for frying, especially when you what as large as possible a contact surface with the food. The ribbed surface is for grilling and can be used to give a grill pattern to food and reduce the fat in cooking.

WARNING! Plug the mains plug into an easily accessible mains socket.
- Make sure that the grease collection tray (13) is fitted into the barbecue housing (6).
- Fold the metal lid (3) closed and adjust the temperature controller on the thermostat with mains cable (14) to the required temperature level. Please refer to the table below.
| Temperature setting Suitable for: | |
| 1 to 3 Fish, mushrooms and vegetables | |
| 4 to Max Steaks, meat and poultry |

You can prepare your food with the metal lid (3) open or closed. If you close the metal lid (3), the barbecue will reach a higher temperature and the cooking time will be shorter.
- Please wait until the grill has reached the desired temperature. The heating indicator is lit while the barbecue is heating up. As soon as the barbecue reaches the set temperature, the heating indicator goes out.
- Open the metal lid (3) and place the food directly on the grill plate (4). Never use any aluminium foil, a plate or similar objects.
- Close the metal lid (3).
- Turn over the foodstuff from time to time.
- Remove the food from the grill plate (4) as soon as it is cooked.
- Switch the barbecue off after use. Turn the temperature controller on the thermostat with mains cable (14) anticlockwise as far as it will go ("Off" position).
- Unplug the power plug from the mains socket and allow the barbecue to cool completely.
- Clean the barbecue as described in the chapter on "Cleaning".
9. Repairs / cleaning
9.1 Repairs

WARNING! Repair work is required if the barbecue has been damaged in any way, for example, if liquid has entered the product, if the barbecue has been exposed to rain or moisture, if the barbecue is not working properly or if it has been dropped. If you notice any smoke, unusual noise
or strange smells, switch off the barbecue immediately and pull the plug from the mains socket. If this occurs, the barbecue should no longer be used until it has been inspected by authorised service personnel. All servicing work must be carried out by qualified specialist personnel. Never open the housing of the thermostat with mains cable (14).
9.2 Cleaning

DANGER! Unplug the mains plug from the mains socket before you start to clean, there is the risk of electric shock!

DANGER! Wait until the grill has cooled down completely. Otherwise, there is a risk of getting burnt!

DANGER! Never immerse the barbecue itself in water, there is a risk of electric shock!
9.2.1 Cleaning the grill plate
- Unplug the mains cable from the mains socket.
- Pull the thermostat with mains cable (14) out of the thermostat connection socket (15). To do this, push the bar by grabbing it and the handle with your hand and pulling the thermostat with mains cable (14) out.
- Remove the grill plate (4) from the barbecue housing (6). To do this, lift the grill plate (4) a little more on the right-hand side and pull it slightly to the right and up.

WARNING! Never clean the grill plate (4) with a wire brush or other aggressive implements.
- Start by using kitchen roll or similar to remove the worst of the residues. Then use a cloth which has been dampened in washing-up liquid and warm water. Rinse with clean water and then dry the grill plate (4) thoroughly. You can also clean the grill plate (4) under running water.

WARNING! The grill plate (4) must be completely dry before it is used again. Never use any wire brush or scrubbing objects.
9.2.2 Cleaning the grease collection tray
The grease collection tray (13) can be removed for cleaning.
- To do this, carefully remove the grease collection tray (13) from the barbecue. Make sure that you do not spill anything into the barbecue housing (6).
- Dispose of the grease in the tray. If necessary, wipe it round with a piece of kitchen roll.
- You can clean the grease collection tray (13) in the dishwasher or wash it up with washing-up liquid and warm water.
- Rinse the grease collection tray (13) with clean water and dry it carefully before returning it to the barbecue.
9.2.3 Cleaning the stand tube, feet, barbecue housing and thermostat with mains cable

DANGER! Before cleaning the thermostat with mains cable (14), always remove the mains plug from the mains socket, there is a risk of electric shock!
- Pull the thermostat with mains cable (14) out of the thermostat connection socket (15). To do this, push the bar by grabbing it and the handle with your hand and pulling the thermostat with mains cable (14) out.
- Clean the stand tube (7, 8) with feet (10), the barbecue housing (6) and the thermostat with mains cable (14) with a damp cloth, never use solvents or detergents which are aggressive to plastics. If necessary, use a little washing-up liquid.
- Wipe with cold water, dry the stand tube (7, 8), the feet (10), the barbecue housing (6) and the thermostat with mains cable (14) thoroughly and only use the barbecue again when all parts are completely dry.

WARNING! When cleaning the thermostat with mains cable (14) make sure that no moisture enters the thermostat with mains cable (14).
9.2.4 Cleaning the metal lid

WARNING! Never clean the metal lid (3) with a wire brush or other aggressive implements.
- Fold the metal lid (3) open.

If necessary, you can also remove the metal lid (3) completely. To do this, fold it all the way open and pull it gently upwards in order to lift the brackets on the hinges out of the guides. In order to replace the metal lid (3) after cleaning, hold the metal lid (3) by the handle (2) and guide the two brackets carefully into the recesses provided. Open and close the metal lid (3) a little to ensure the brackets are properly engaged and the metal lid (3) can be closed fully.
-
To clean the inside, start by using kitchen roll or similar to remove the worst of the food residues. Then use a cloth or sponge which has been dampened in washing-up liquid and warm water. Rinse with clean water and then thoroughly dry the inside of the metal lid (3).
-
Use a damp cloth to clean the outside. If necessary, use a little washing-up liquid or water. Then thoroughly dry the outside of the metal lid (3).
10. Troubleshooting
If your barbecue does not work as normal, follow the instructions below to try to solve the problem. If working through the tips below does not fix the fault, please contact our hotline (see "Warranty information" on page 45).
- Check that the mains plug is correctly inserted into the mains socket.
- Check that the connector on the thermostat with mains cable (14) is properly inserted into the thermostat connection socket (15). The control dial should point upwards and the bar should not be pressed in.
- Check the setting of the temperature controller on the thermostat with mains cable (14) and turn it clockwise to a higher temperature if necessary.
11. Storage when not in use
If you do not wish to use the barbecue for some time, clean it as described in the chapter on "Cleaning" and keep it in a clean, dry place away from direct sunlight.
12. Environmental regulations and disposal information
 | Devices marked with this symbol are subject to the European Directive 2012/19/EU. All electrical and electronic devices must be disposed of separately from household waste at official disposal centres. Avoid damage to the environment and risks to your personal health by disposing of the device properly. For further information about proper disposal, contact your local government, disposal bodies or the shop where you bought the device. |
 | Respect the environment. Old batteries must not be disposed of with domestic waste. They must be handed in at a collection point for waste batteries. Please note that batteries must be disposed of fully discharged at appropriate collection points for old batteries. If disposing of batteries which are not fully discharged, take precautions to prevent short circuits. |
 | Dispose of all packaging in an environmentally friendly manner. Cardboard packaging can be taken to paper recycling centres or public collection points for recycling. Any film or plastic contained in the packaging should be taken to your public collection points for disposal. |
 |
GRILLMEISTER SSGE 2400 A1
| ES/PT | |
 | Only relevant for France:The product is recyclable, but is subject to more restrictive manufacturer responsibility terms and must be collected separately. |
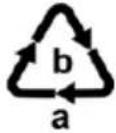
 | Please note the markings on the packaging material when disposing of it, it is labelled with abbreviations (a) and numbers (b), the meanings of which are as follows:1-7: plastic / 20-22: paper and cardboard / 80-98: composite materials. |
 |
| Symbol M | Material Contained in the following packaging elements for this product | |
 | Polyethylene terephthalate | - |
 | High density polyethylene | - |
 | Polyvinyl chloride - | |
 | Low density polyethylene | Bags to protect components |
 | Polypropylene | - |
 | Polystyrene | Inside packaging |
 | Other plastics - | |
 | Corrugated cardboard | Sales packaging |
 | Other cardboard - | |
 | Paper | - |
 | Paper/cardboard/ plastic | - |
| C/PAP | Paper/cardboard/plastic/aluminium | — |
13. Food-grade use

This symbol designates products whose physical and chemical composition has been tested and found to be non-hazardous to health when used in contact with food in accordance with the requirements of Regulation EU 1935/2004.
14. Conformity notes

This device complies with the basic and other relevant requirements of the low voltage systems directive 2014/35/EU.
The complete EU Declaration of Conformity is available for download from this link:
www.targa.de/downloads/conformity/388934_2107.pdf
15. Warranty and service information
Warranty of TARGA GmbH
Dear Customer,
This device is sold with three years warranty from the date of purchase. In the event of product defects, you have legal rights towards the seller. These statutory rights are not restricted by our warranty as described below.
Warranty conditions
The warranty period commences upon the date of purchase. Please keep the original receipt in a safe place as it is required as proof of purchase. If any material or manufacturing faults occur within three years of purchase of this product, we will repair or replace the product free of charge as we deem appropriate.
Warranty period and legal warranty rights
The warranty period is not extended in the event of a warranty claim. This also applies to replaced and repaired parts. Any damage or defects discovered upon purchase must be reported immediately when the product has been unpacked. Any repairs required after the warranty period will be subject to charge.
Scope of warranty
The device was carefully manufactured in compliance with stringent quality guidelines and subjected to thorough testing before it left the works. The warranty applies to material and manufacturing faults. This warranty does not cover product components which are subject to normal wear and which can therefore be regarded as wearing parts, or damage to fragile components such as switches, rechargeable batteries or components made of glass. This warranty is void if the product is damaged, incorrectly used or serviced. To ensure correct use of the product, always comply fully with all instructions contained in the user manual. The warnings and recommendations
in the user manual regarding correct and incorrect use and handling of the product must always be observed and complied with. The product is solely designed for private use and is not suitable for commercial applications. The warranty is rendered void in the event of incorrect handling and misuse, if it is subjected to force, and also if any person other than our authorised service technicians interfere with the device. No new warranty period commences if the product is repaired or replaced.
Submitting warranty claims
To ensure speedy handling of your complaint, please note the following:
- Before using your product for the first time, please read the enclosed documentation carefully. Should any problems arise which cannot be solved in this way, please call our hotline.
- Always have your receipt, the product article number as well as the serial number (if available) to hand as proof of purchase.
- If it is not possible to solve the problem on the phone, our hotline support staff will initiate further servicing procedures depending on the fault.
- You can find this and many more manuals, product videos and installation software available for download at www.lidl-service.com. This QR code takes you directly to the LIDL service page (www.lidl-service.com). There, you can enter the item number (IAN) to access your operating manual.


Service

Phone: 0800 404 7657
E-Mail: targa@lidl.co.uk
IE
Phone: 1800 101010
E-Mail: targa@lidl.ie
MT
Phone: 800 62230
E-Mail: targa@lidl.com.mt
CY
Phone: 8009 4241
E-Mail: targa@lidl.com.cy
IAN: 388934_2107

Manufacturer
Please note that the following address is not a service address. First contact the service point stated above.
TARGA
GmbH
Coesterweg 45
59494 Soest
GERMANY
Table des matières
natural_image
Technical line drawings of a mechanical component with three views: top, side, and cross-section (no text or symbols)natural_image
Technical line drawing of a mechanical component with no visible text or symbolsnatural_image
Technical line drawing of a dome-shaped object with labeled points A, B, C and dashed lines indicating internal alignment (no text or symbols beyond labels)natural_image
Technical line drawing of a circular mechanical component with mounting flanges and a handle (no text or symbols)natural_image
Technical line drawing of a mechanical component with no visible text or symbols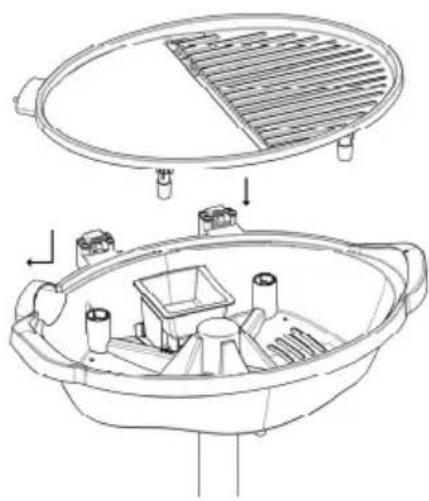
natural_image
Technical line drawing of a mechanical component with internal parts and mounting brackets (no text or symbols)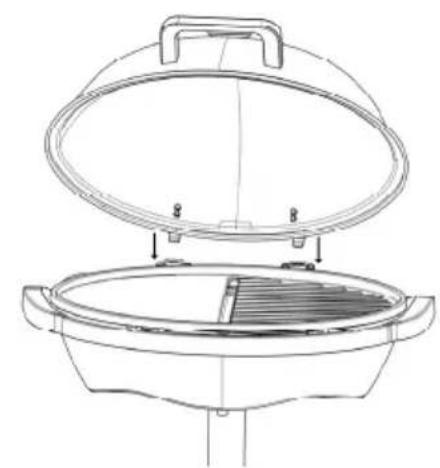
natural_image
Line drawing of a portable grill with lid and grating (no text or symbols)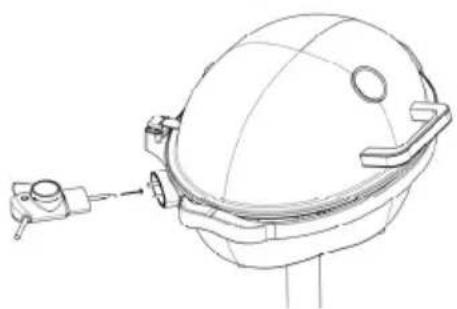
natural_image
Technical line drawing of a helmet with attached sensor and mounting bracket (no text or symbols)
Cher client, chère cliente,
Cher client, chère cliente,
natural_image
Technical line drawings of a four-blade propeller tool assembly (no text or symbols)natural_image
Technical line drawing of a mechanical component with internal parts and mounting features (no text or symbols)natural_image
Technical line drawing of a dome-shaped object with labeled points A, B, C and dashed lines indicating internal alignment (no text or symbols beyond labels)
natural_image
Technical line drawing of a circular mechanical component with mounting flanges and a handle (no text or symbols)natural_image
Technical line drawing of a circular mechanical component with internal components and a small inset box (no text or symbols)
natural_image
Technical line drawing of a mechanical component with internal parts and mounting brackets (no text or symbols)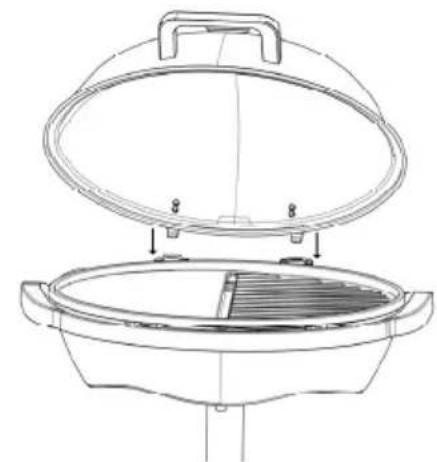
natural_image
Line drawing of a portable grill with lid and side grating (no text or symbols)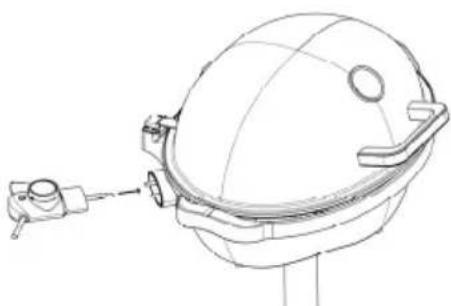
natural_image
Line drawing of a helmet with attached sensor and connector (no text or symbols)
natural_image
Technical line drawings of three mechanical components with no visible text or symbolsnatural_image
Technical line drawing of a mechanical component with no visible text or symbolsnatural_image
Technical line drawings of a portable stove or cooker with internal components and mounting hardware (no text or labels)
natural_image
Technical line drawings of three different mechanical components or assemblies, showing different assembly states (no text or symbols present)natural_image
Technical line drawing of a mechanical assembly with no visible text or symbolsnatural_image
Technical line drawing of a dome-shaped structure with labeled points (no text or symbols present)
natural_image
Technical line drawing of a circular mechanical component with mounting flanges and a handle (no text or symbols)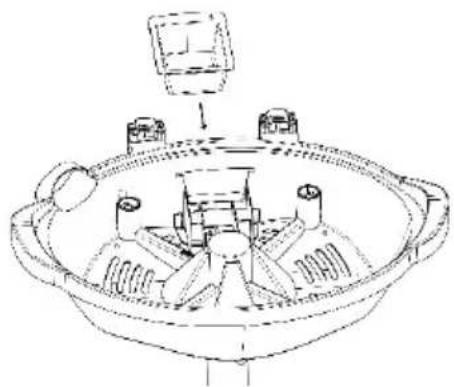
natural_image
Technical line drawing of a mechanical component with no visible text or symbols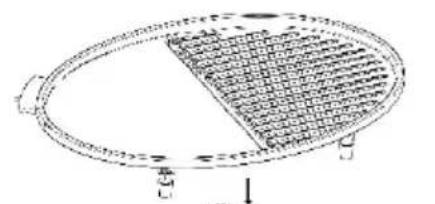
natural_image
Technical line drawing of a circular mechanical component with internal grid structure (no text or symbols)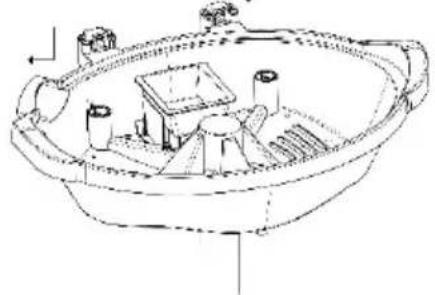
natural_image
Technical line drawing of a boat interior with no visible text or symbolsnatural_image
Technical line drawings of a portable stove or cooking appliance, showing top, front, and side views (no text or symbols)
natural_image
Technical line drawings of three different mechanical components or assemblies, showing different assembly states (no text or symbols present)natural_image
Technical line drawing of a mechanical assembly with no visible text or symbolsnatural_image
Technical line drawing of a dome-shaped structure with labeled points (no text or symbols present)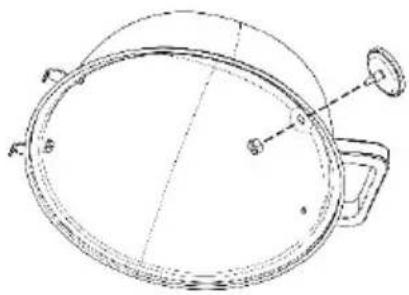
natural_image
Technical line drawing of a circular mechanical component with mounting flanges and a handle (no text or symbols)
natural_image
Technical line drawing of a mechanical component with no visible text or symbols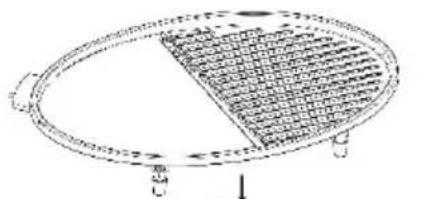
natural_image
Diagram of a circular structure with internal grid pattern and directional arrows, no readable text or symbols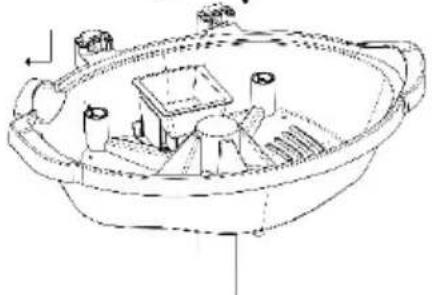
natural_image
Technical line drawing of a boat with internal compartments and structural elements (no text or labels)natural_image
Technical line drawings of a portable stove or cooking appliance, showing top, front, and side views (no text or symbols)
natural_image
Technical line drawings of three mechanical components with no visible text or symbolsnatural_image
Technical line drawing of a mechanical component with no visible text or symbolsnatural_image
Technical line drawing of a dome-shaped object with labeled points A, B, C and dashed lines indicating internal alignment (no text or symbols beyond labels)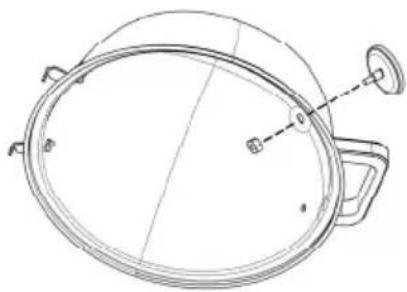
natural_image
Technical line drawing of a circular mechanical component with mounting flanges and a handle (no text or symbols)
natural_image
Technical line drawing of a mechanical component with no visible text or symbolsnatural_image
Technical line drawings of a portable stove or cooker with internal components and mounting hardware (no text or labels)
natural_image
Technical line drawings of three different propeller designs (no text or symbols)natural_image
Technical line drawing of a mechanical component with internal parts and mounting features (no text or symbols)natural_image
Technical line drawing of a dome-shaped object with labeled points A, B, C and dashed lines indicating internal alignment (no text or symbols beyond labels)natural_image
Technical line drawing of a circular mechanical component with mounting flanges and a handle (no text or symbols)
natural_image
Line drawing of a helmet with attached mechanical components (no text or symbols)
natural_image
Technical line drawings of three mechanical components with no visible text or symbolsnatural_image
Technical line drawing of a mechanical component with no visible text or symbolsnatural_image
Technical line drawing of a dome-shaped object with labeled points A, B, C and dashed lines indicating internal features (no text or symbols beyond labels)
natural_image
Technical line drawing of a circular mechanical component with mounting flanges and a handle (no text or symbols)
natural_image
Technical line drawing of a mechanical component with no visible text or symbolsnatural_image
Technical line drawings of a portable air fryer with internal compartments and mounting hardware (no text or symbols)
natural_image
Technical line drawings of three different mechanical components with no visible text or symbolsnatural_image
Technical line drawing of a mechanical component with no visible text or symbolsnatural_image
Technical line drawing of a dome-shaped object with labeled points A, B, C and a U, showing internal lines and dashed arrows indicating direction (no text or symbols beyond labels)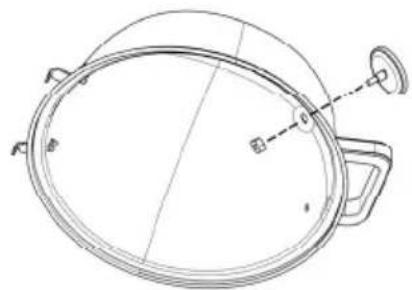
natural_image
Technical line drawing of a circular mechanical component with mounting flanges and a handle (no text or symbols)
natural_image
Technical line drawing of a circular mechanical component with internal components and a small inset device (no text or symbols)natural_image
Technical line drawings of a portable grill with internal components and mounting base (no text or symbols)
natural_image
Technical line drawings of a mechanical device with three views: top, side, and bottom (no text or symbols)- Navojni vijak, ki sega iz spodnje cevi stojala (7), privijte v zgornjo cev stojala (8). Obe cevi stojala (7, 8) morata biti dobro priviti skupaj.

natural_image
Technical line drawing of a mechanical component with mounting brackets and internal slots (no text or symbols)natural_image
Technical line drawing of a dome-shaped object with labeled points A, B, C and an attached bracket (no text or symbols beyond labels)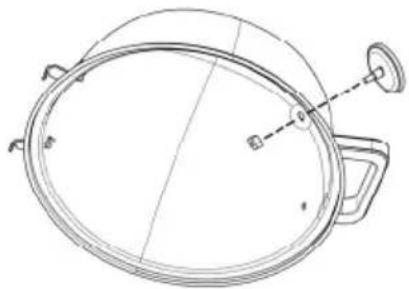
natural_image
Technical line drawing of a circular mechanical component with a handle and mounting bracket (no text or symbols)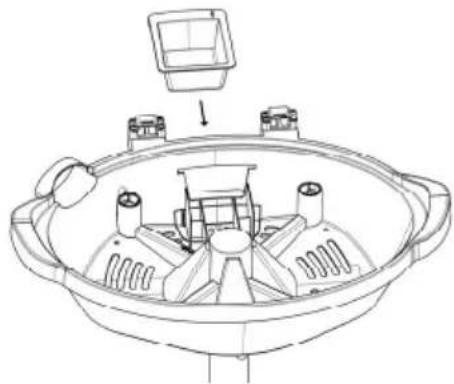
natural_image
Technical line drawing of a mechanical component with no visible text or symbols
natural_image
Technical line drawing of a circular metal grate with a slatted side and two handles (no text or symbols)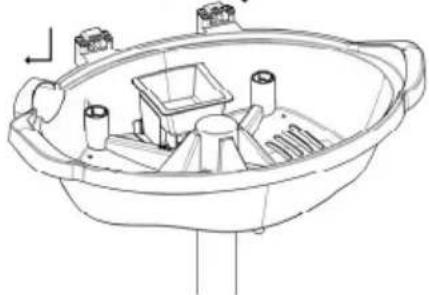
natural_image
Technical line drawing of a boat hull with internal compartments and support structures (no text or symbols)natural_image
Technical line drawings of a portable gas stove with open lid and internal grating (no text or symbols)
Pri vstavljanju termostata z napajalnim kablom (14) pazite, da nehote ne potisnete ročice za sprostitev termostata z napajalnim kablom (14). Če jo potisnete, termostata ne boste mogli pravilno vstaviti.
8. Začetek uporabe
8.1 Prva uporaba