
MasterCrossLaser 2 - Laser pointer Laserliner - Free user manual and instructions
Find the device manual for free MasterCrossLaser 2 Laserliner in PDF.


| Product type | Cross-line laser for horizontal and vertical alignment |
| Brand | Laserliner |
| Model | MasterCrossLaser 2 |
| Laser class | 2 according to EN 60825-1:2014 |
| Laser power | < 1 mW |
| Wavelength | Red 635 nm, Green 510 nm |
| Accuracy | ± 2 mm / 10 m |
| Self-leveling range | ± 3° |
| Range with receiver | Up to 50 m (depending on conditions) |
| Power supply | 4 AA alkaline batteries (1.5 V) |
| Battery life | Approx. 15 h (red) / 4 h (green) |
| Dimensions (L x H x D) | 66 x 100 x 125 mm |
| Weight (including batteries) | 570 g |
| Operating temperature | 0 °C to +50 °C |
| Storage temperature | -10 °C to +70 °C |
| Tilt mode | Yes, for sloped planes (flashing laser) |
| Receiver mode | RX-/GRX-READY (high frequency pulses) |
| Magnetic wall mount | Yes, for drywall profiles |
| Tripod threads | 1/4" and 5/8" |
| Transport safety | Pendulum lock (LOCK) |
| Maintenance | Clean the output windows with a soft cloth |
| Repairability | Contact UMAREX-LASERLINER customer service |
| Warranty | See manual for conditions |
Frequently Asked Questions - MasterCrossLaser 2 Laserliner
User questions about MasterCrossLaser 2 Laserliner
0 question about this device. Answer the ones you know or ask your own.
Ask a new question about this device
Download the instructions for your Laser pointer in PDF format for free! Find your manual MasterCrossLaser 2 - Laserliner and take your electronic device back in hand. On this page are published all the documents necessary for the use of your device. MasterCrossLaser 2 by Laserliner.
USER MANUAL MasterCrossLaser 2 Laserliner
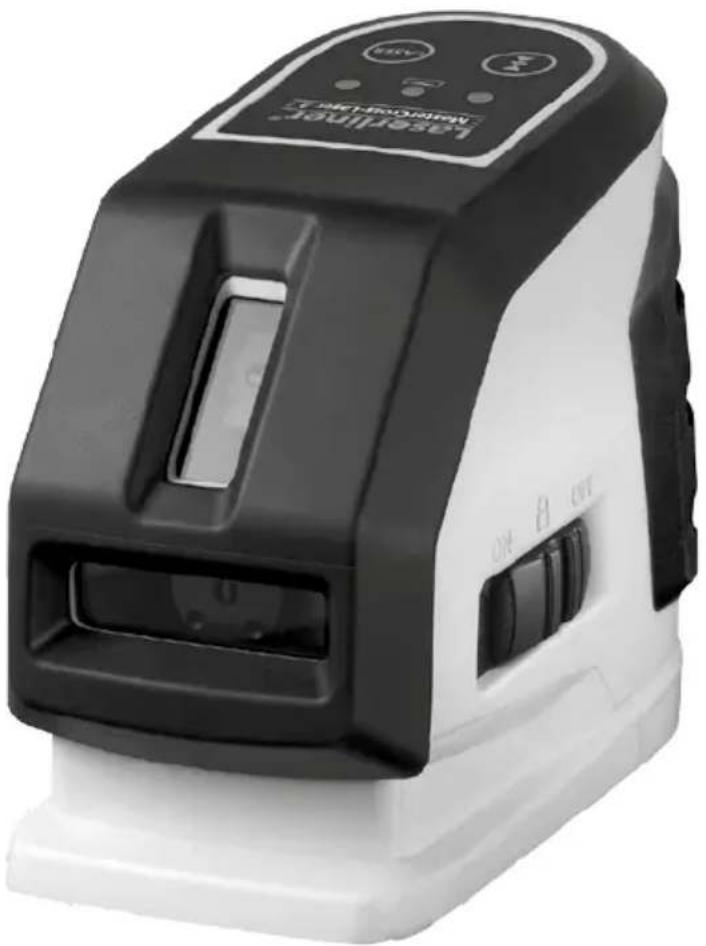
MasterCross-Laser 2 / MasterCross-Laser 2G
natural_image
Exterior view of a LaserJet printer (no visible text or symbols on the device body)AUTOMATIC LEVEL
Laser 635 nm
lock
PowerBright + LASER
RX READY
Laser 510nm
DLDTEC
GRX READY
natural_image
Two 3D wireframe diagrams labeled 1H and 1V, showing geometric shapes inside cubes (no text or symbols beyond labels)Laserliner®
!
natural_image
Close-up of a white and black electric shaver with labeled parts (no text or symbols visible)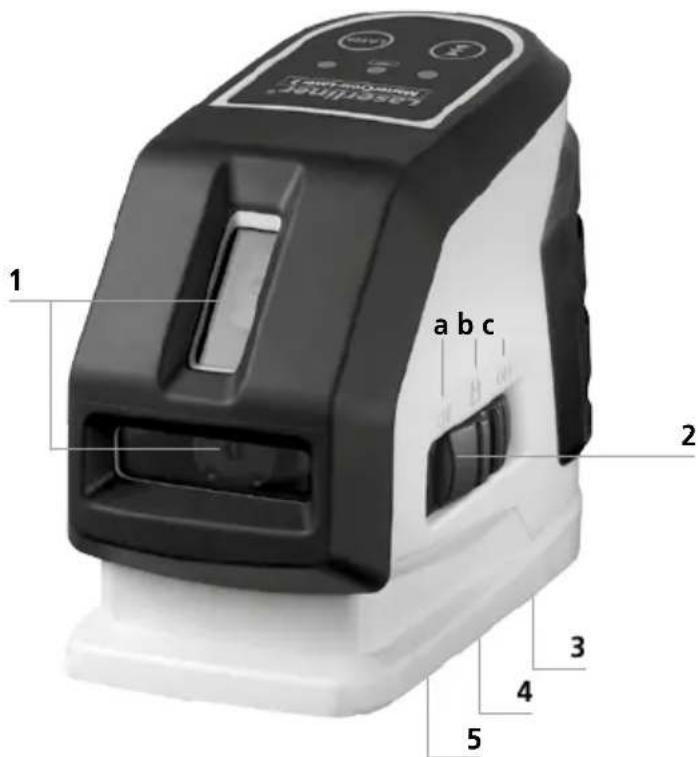
!

!
Read the operating instructions and the enclosed brochure „Guarantee and additional notices“ completely. Follow the instructions they contain. This document must be kept in a safe place and if the laser device is passed on, this document must be passed on with it.
Function / Application
Cross-line laser vertical and horizontal alignment
- The slope-mode feature is an extra that permits gradients to be laid out.
– Individually switchable laser lines - Out-Of-Level: is indicated by optical signals when the unit is outside its self-levelling range.
- With the magnetic clamp and wall bracket the device can be used as a standalone unit, in a combination as well as in horizontal and vertical position.
- Ideal for mounting horizontally and vertically on drywall construction profiles.
- Automatic levelling range 3^ , accuracy 2 mm / 10 m
General safety instructions
- The device must only be used in accordance with its intended purpose and within the scope of the specifications.
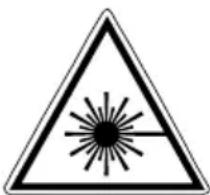
Laser radiation! Do not stare into the beam! Class 2 laser < 1 mW · 635 nm EN 60825-1:2014
Laser radiation! Do not stare into the beam! Class 2 laser < 1 mW · 510 nm EN 60825-1:2014
- Attention: Do not look into the direct or reflected beam.
- Do not point the laser beam towards persons.
- If a person's eyes are exposed to class 2 laser radiation, they should shut their eyes and immediately move away from the beam.
- Under no circumstances should optical instruments (magnifying glass, microscope, binoculars) be used to look at the laser beam or reflections.
- Do not use the laser at eye level (1.40 ... 1.90 m)
- Reflective, specular or shiny surfaces must be covered whilst laser devices are in operation.
- In public areas shield off the laser beam with barriers and partitions wherever possible and identify the laser area with warning signs.
- Tampering with (making changes to) the laser device is not permitted.
- This device is not a toy - keep out of the reach of children.
Special product features

Automatic alignment of the device with a magnetically dampened pendulum system. The device is brought into initial position and aligns itself autonomously.

Transport LOCK: The device is protected with a pendelum lock during transport.

Special high performance laser diodes generate even brighter laser lines as units with PowerBright Technology do. They remain visible over longer distances, in bright ambient lighting conditions and on dark surfaces.

RX-/GRX-READY technology enables line lasers to be used even in unfavourable light conditions. The laser lines pulsate at a high frequency and this can be picked up by special laser receivers over long distances.
Green laser technology

Laser modules in DLD design stand for high line quality as well as a clean and clear and therefore easily visible line image. Unlike previous generations they are more temperature-stable and energy efficient.
Furthermore, the human eye has a higher sensitivity to the wave range of the green laser than the red laser, for example. This makes the green laser diode appear much brighter than the red one.
Green lasers, especially in the DLD design, thus offer advantages with regards to how visible the laser line is under unfavourable conditions.
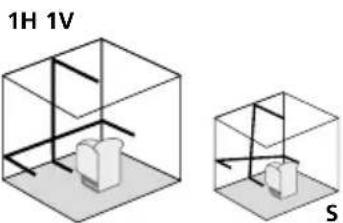
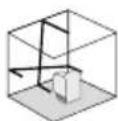
Number and direction of the lasers
H = horizontal laser / V = vertical laser / S = slopefunction
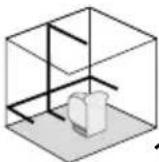
1H 1V S
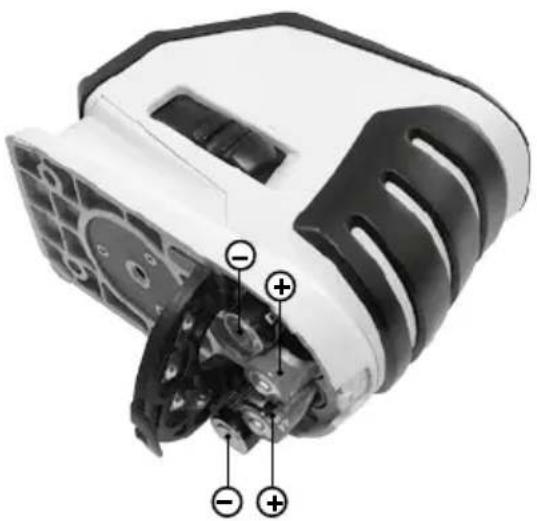
■Inserting the batteries
Open the battery compartment (3) and insert the batteries in accordance with the installation symbols, ensuring the correct polarity.
natural_image
Close-up of a white and black electric shaver with visible internal components and mounting holes (no text or symbols)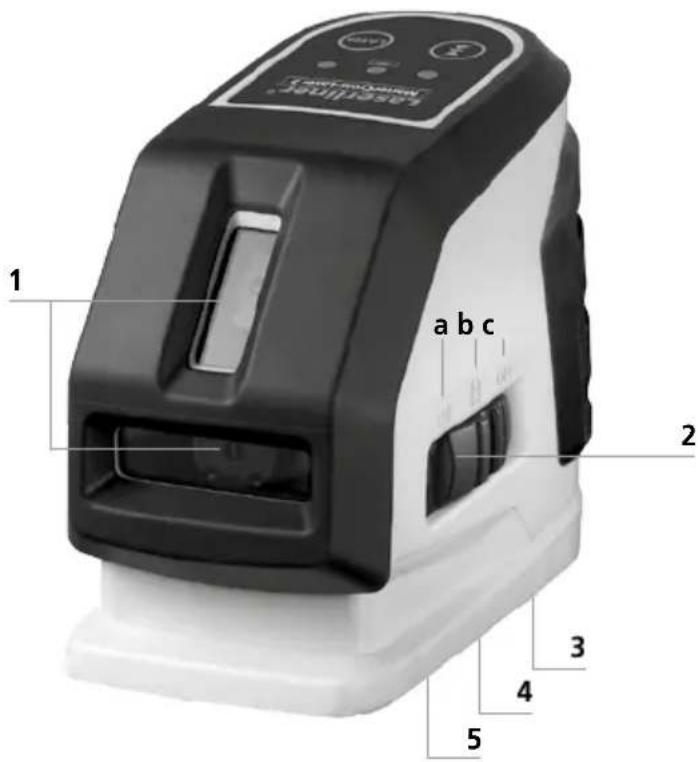
When transporting always switch off all lasers, secure the pendulum and set the slide switch to "OFF"!
1 Laser emitting window
2 Slide switch
a ON
b Slope mode
c OFF / Transport lock
3 Battery compartment (bottom)
4 5/8" tripod threads (bottom)
5 1/4" tripod threads (bottom)
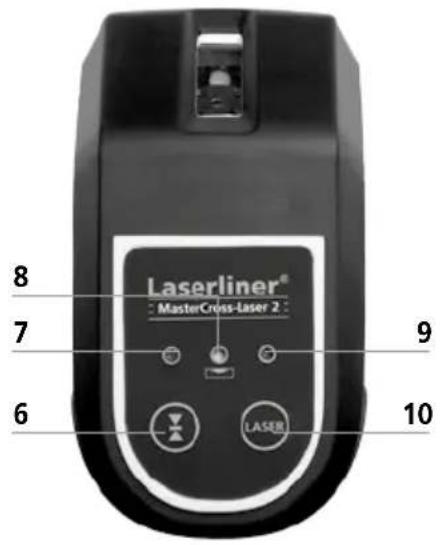
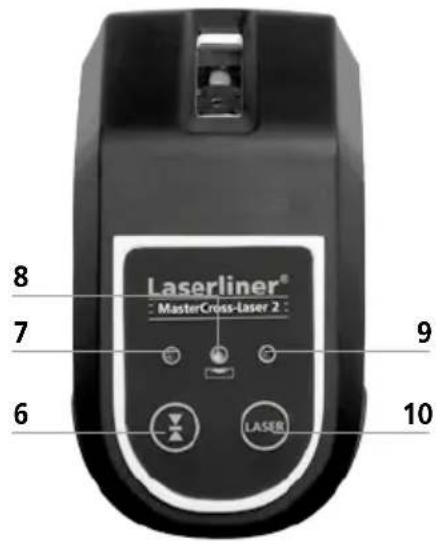
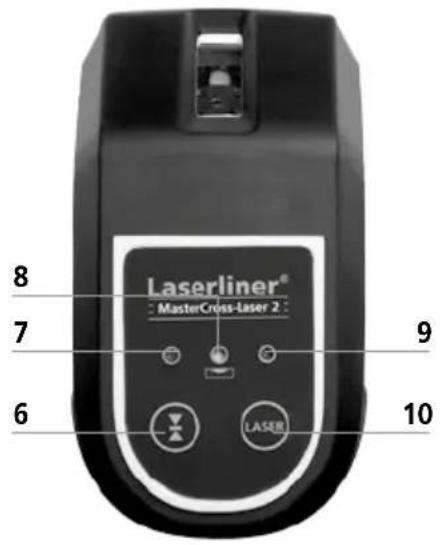
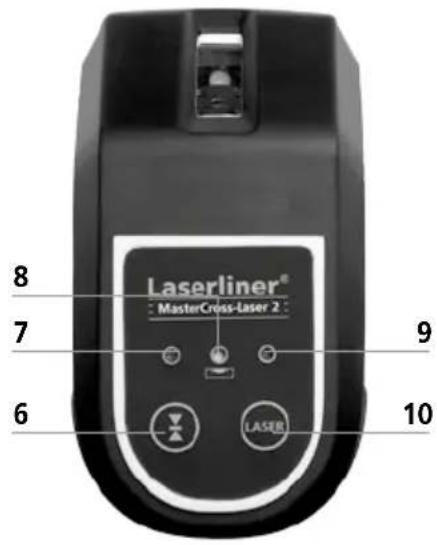
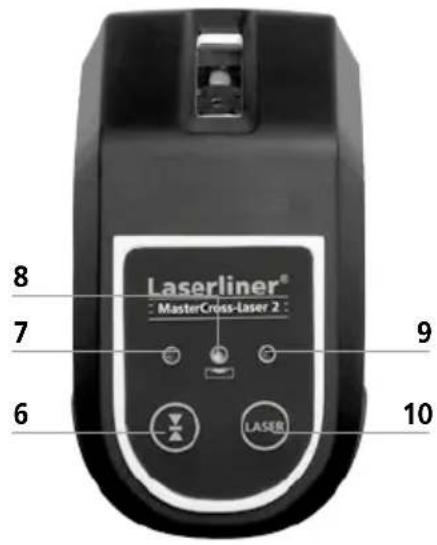
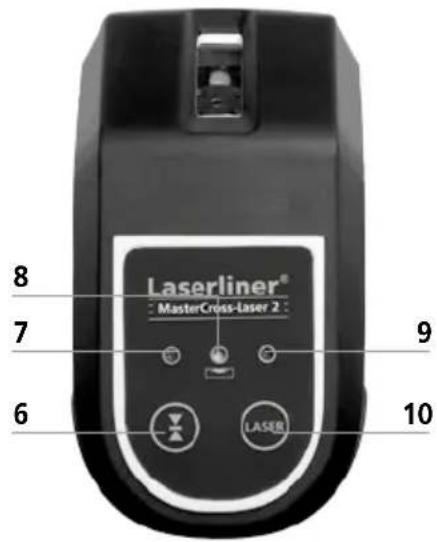
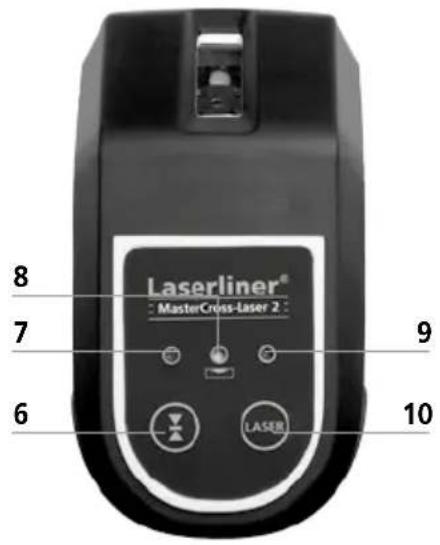
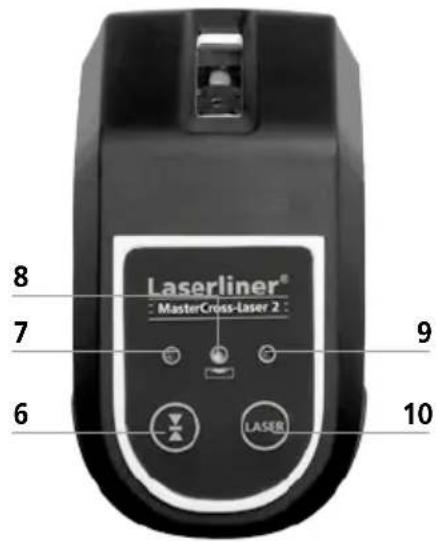
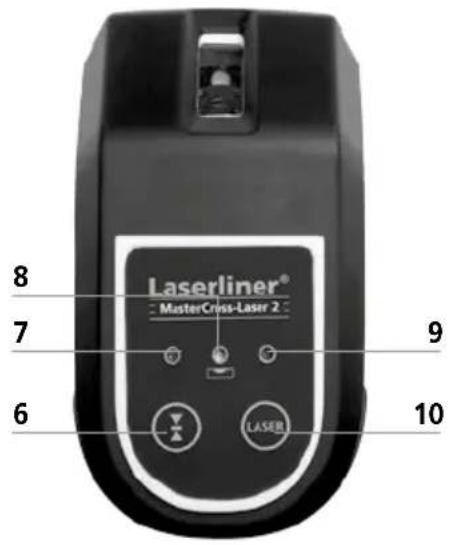
6 Hand receiver mode
7 LED Hand receiver mode
8 LED levelling
red: levelling off
green: levelling on
9 LED Status indicator
10 Laser line selection button
2Horizontal and vertical levelling
Release the transport restraint, set slide switch (2) to "ON". The laser cross will appear. The laser lines can be switched individually with the selection button.
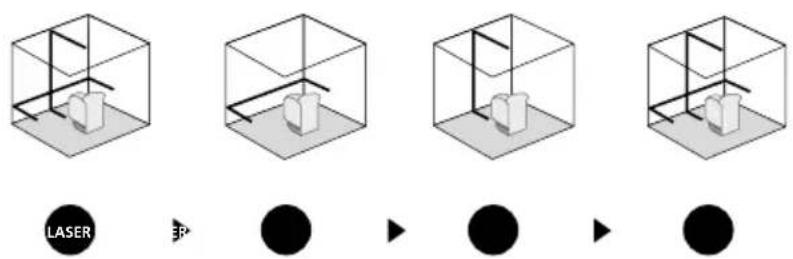
The transport restraint must be released for horizontal and vertical levelling. The LED shows a permanent green light. The laser lines flash and the LED lights red as soon as the device is outside the automatic levelling range of 3°. Position the device such that it is within the levelling range. The LED switches back to green and the laser lines stop flashing (steady light).
3Slope mode
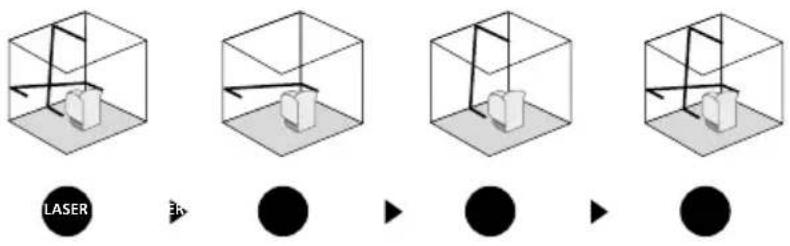
Do not release the transport restraint, set slide switch (2) to the mid-position and select the lasers with the selector switch. Sloping planes and tilts can now be measured. In this mode, the laser lines no longer align automatically. This is signalised by the laser lines flashing. In addition, the LED light (8) remains red.
4Hand receiver mode
Optional: Working with the laser receiver RX / GRX
Use an RX / GRX laser receiver (optional) to carry out levelling at great distances or when the laser lines are no longer visible.
To work with a laser receiver, switch the line laser to hand-held receiver mode by keeping button 6 (hand-held receiver mode on / off) pressed. The laser lines will now pulsate with high frequency, making the laser lines darker. The laser receiver can detect these pulsating laser lines.
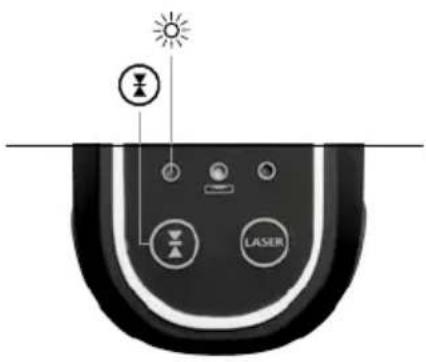
! Follow the operating instructions of the corresponding laser receiver.
Preparing the calibration check:
It is possible for you to check the calibration of the laser. To do this, position the device midway between 2 walls, which must be at least 5 metres apart. Do this by turning the unit on, thus releasing the transport restraint (cross laser on). Please use a tripod.
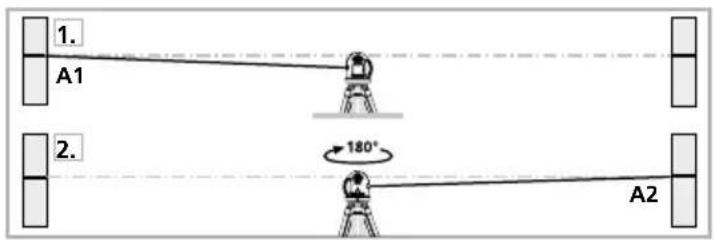
Performing the calibration check:
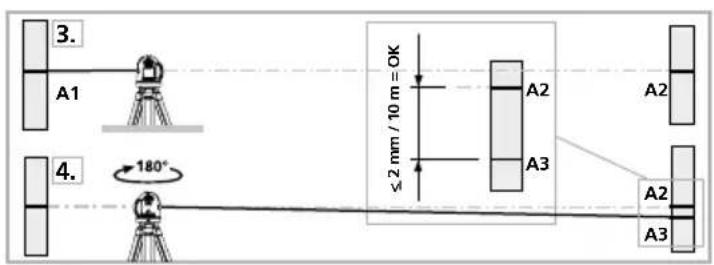
-
Mark point A1 on the wall.
-
Turn the device through 180^ and mark point A2. You now have a horizontal reference between points A1 and A2.
-
Position the device as near as possible to the wall at the height of point A1.
-
Turn the device through 180^ and mark point A3. The difference between points A2 and A3 is the tolerance.
When A2 and A3 are more than 2 mm / 10 m apart, an adjustment is necessary. Contact your authorised dealer or else the UMAREX-LASERLINER Service Department.
Checking the vertical line:
Position the device about 5 m from a wall. Fix a plumb bob with a line of 2.5 m length on the wall, making sure that the bob can swing freely. Switch on the device and align the vertical laser to the plumb line. The precision is within the specified tolerance if the deviation between the laser line and the plumb line is not greater than ± 1 mm.
Checking the horizontal line:
Position the device about 5 m from a wall and switch on the cross laser. Mark point B on the wall. Turn the laser cross approx. 2.5 m to the right and mark point C. Check whether the horizontal line from point C is level with point B to within ± 1 mm. Repeat the process by turning the laser to the left.
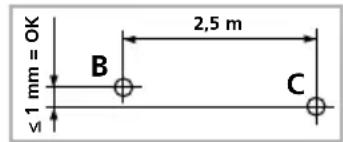

Regularly check the adjustment before use, after transport and after extended periods of storage.
| Technical data (Subject to technical alterations 02.16) | |
| Self-levelling range ± 3° | |
| Precision ± 2 mm / 10 m | |
| Laser wavelength linelaser (red) | 635 nm |
| Laser wavelength linelaser (green) 510 nm | |
| Laser class 2 / < 1 mW | |
| Power supply | 4 x 1.5 V alkaline batteries (Type AA) / battery |
| Operating time 2 / 2G approx. 15 hours / approx. 4 | hours |
| Operating temperature 0°C ... + 50°C | |
| Storage temperature -10°C ... + 70°C | |
| Weight (incl. batteries) 570 g | |
| Dimensions (W x H x D) 66 x 100 x 125 mm | |
EU directives and disposal
This device complies with all necessary standards for the free movement of goods within the EU.
This product is an electric device and must be collected separately for disposal according to the European Directive on waste electrical and electronic equipment.
Further safety and supplementary notices at:
www.laserliner.com/info
!
natural_image
Close-up of a white and black robotic device with visible mechanical components and labeled parts (no text or symbols)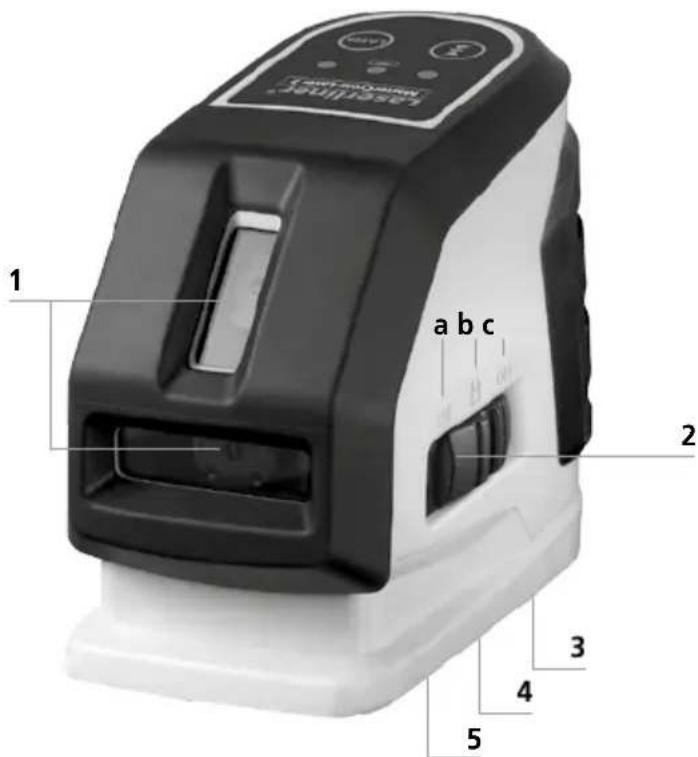
!
!

!
natural_image
Warning symbol with a triangular triangle containing a central starburst pattern (no text or numbers)natural_image
Cutaway view of a white electric shaver with labeled parts (no text or symbols visible)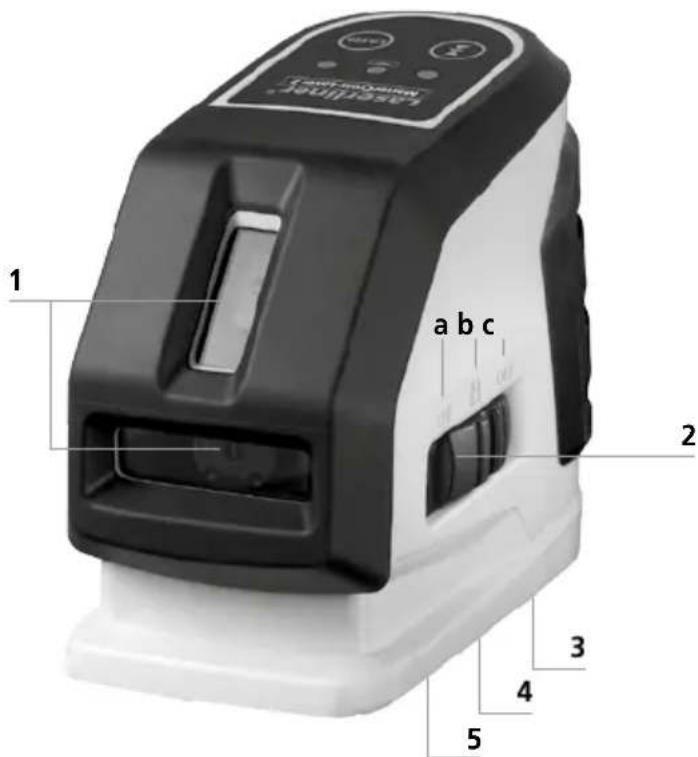
!
Til transport skal man altid slukke alle lasere, fastlåse penduler og stille skydekontakter på "OFF"!
1 Laserudgangsvindue
2 Skydekontakt
4 5/8" gevindbøsning (underside)
!

!
natural_image
Close-up of a white and black robotic device with visible mechanical components and labeled parts (no text or symbols)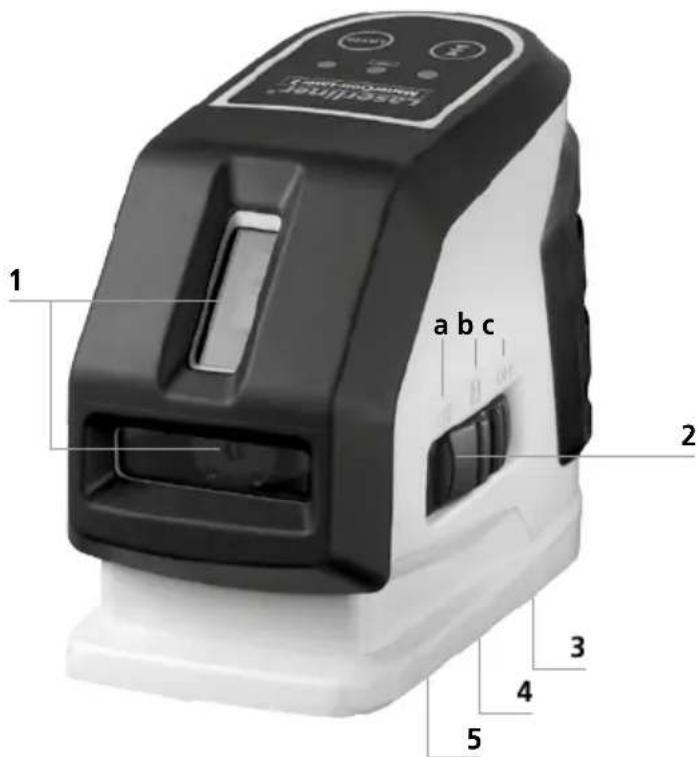
!
natural_image
Close-up of a white and black electric shaver with visible internal components and mounting holes (no text or symbols)
!

natural_image
Close-up of a white and black electric motor with visible cooling fins and internal components (no text or symbols)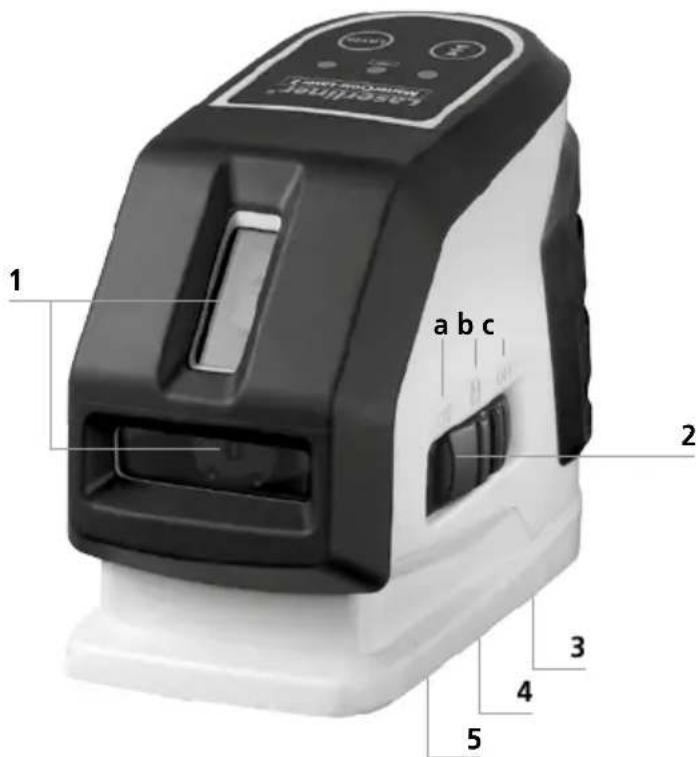
natural_image
Cutaway view of a white electric shaver with labeled parts (no text or symbols visible)
natural_image
Warning symbol with a triangular triangle containing a central sunburst pattern (no text or numbers)natural_image
Close-up of a white and black electric shaver with visible internal components and mounting holes (no text or symbols)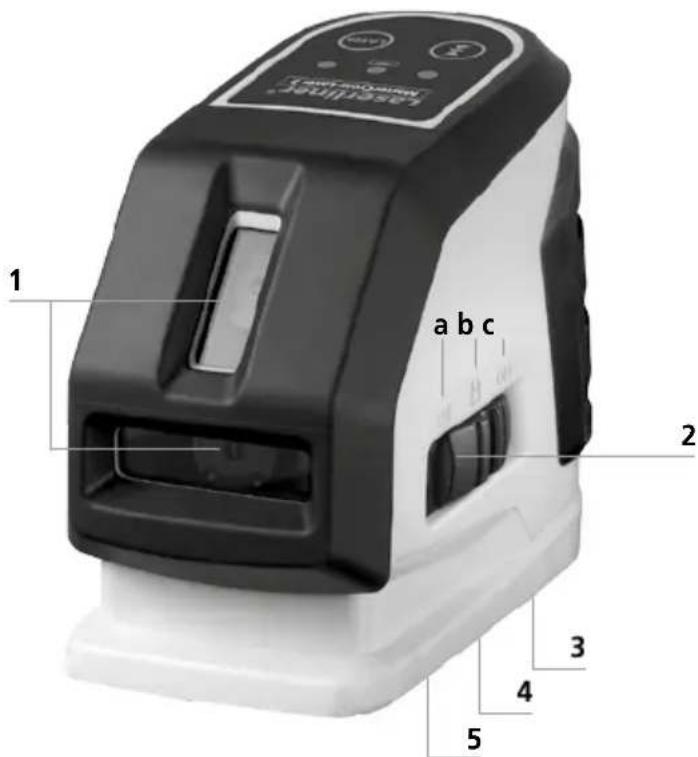
!

!
natural_image
Close-up of a white electric shaver with visible cooling fins and mechanical components (no text or symbols)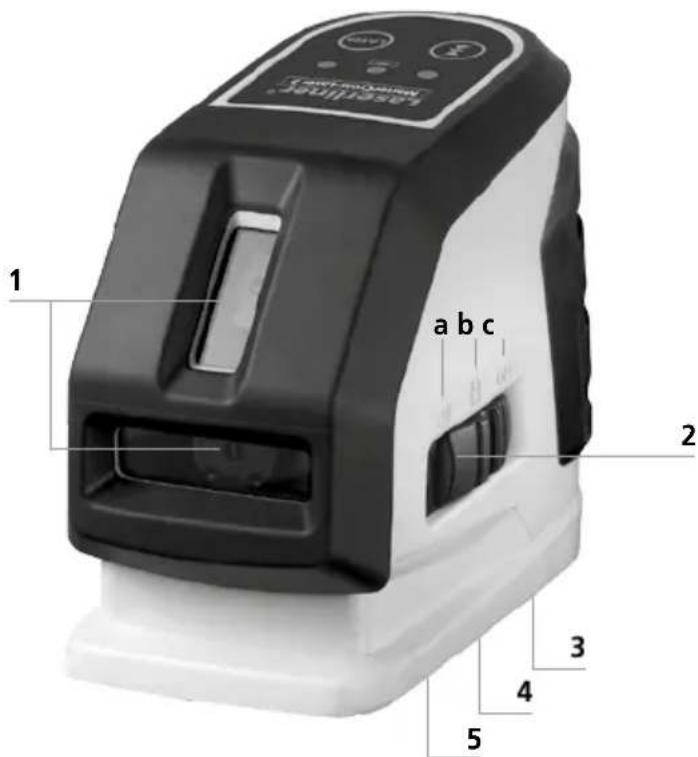
!

!
Laserstrålning! Titta aldrig direkt in i laserstrålen! Laser klass 2 < 1 mW · 635 nm EN 60825-1:2014
Laserstrålning! Titta aldrig direkt in i laserstrålen! Laser klass 2 < 1 mW · 510 nm EN 60825-1:2014
natural_image
Close-up of a mechanical device showing internal components and labeled parts (no readable text or symbols)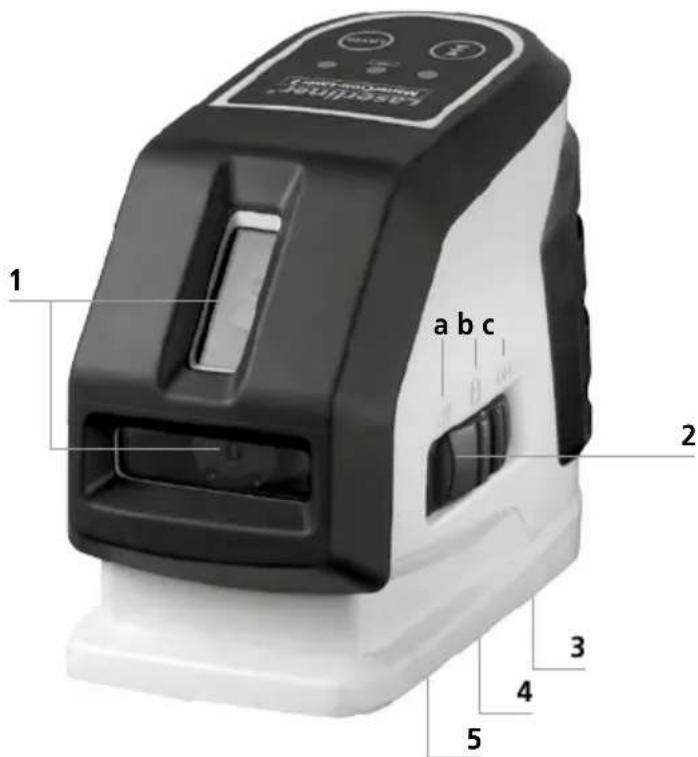
!

Beakta bruksanvisningen till den aktuella lasermottagaren.
natural_image
Architectural diagram showing two vertical metal supports mounted on a brick wall, with no visible text or symbols.SERVICE


Umarex GmbH & Co. KG
- Laserliner -

- MasterCross-Laser 2 / MasterCross-Laser 2G
- Function / Application
- General safety instructions
- Special product features
- Green laser technology
- Number and direction of the lasers
- ■Inserting the batteries
- 2Horizontal and vertical levelling
- 3Slope mode
- 4Hand receiver mode
- Optional: Working with the laser receiver RX / GRX
- Preparing the calibration check:
- Performing the calibration check:
- Checking the vertical line:
- Checking the horizontal line:
- EU directives and disposal
Brand : Laserliner
Model : MasterCrossLaser 2
Category : Laser pointer