ThermoInspector - Thermometer Laserliner - Free user manual and instructions
Find the device manual for free ThermoInspector Laserliner in PDF.
| Product type | Professional multi-sensor thermometer for food hygiene |
| Brand | Laserliner |
| Model | ThermoInspector |
| Infrared measuring range | -60 °C to 350 °C |
| Infrared accuracy (at 25 °C ambient) | ±0.6 °C from 15 °C to 35 °C; ±1.0 °C from 0 °C to 15 °C and from 35 °C to 65 °C; ±1.5% above 65 °C |
| Probe accuracy (at 25 °C ambient) | ±0.5 °C from -5 °C to 65 °C; ±1.0 °C below -5 °C; ±1.0% above 65 °C |
| D:S ratio | 8:1 |
| Adjustable emissivity | 0.10 to 1.00 (preset to 0.95) |
| Aiming laser | 2-point target laser, class 2, < 1 mW, 650 nm |
| Measurement functions | Infrared (IR) and foldable contact probe; MIN, MAX, LOCK modes; Hold function; °C/°F switching |
| HACCP control | Green LED backlight (<4 °C or >60 °C) and red (4 °C to 60 °C, danger zone) |
| Display | Backlit multicolour liquid crystal display |
| Power supply | 2 AAA 1.5 V batteries |
| Dimensions (L x H x D) | 40 x 158 x 53 mm |
| Probe length | 95 mm, diameter 3.3 mm |
| Weight (incl. batteries) | 146 g |
| Protection class | IP54 (protected against splash water and dust) |
| Operating conditions | -20 °C to 70 °C, max. 80% relative humidity non-condensing, max. 2000 m altitude |
| Maintenance and cleaning | Clean the probe before and after each use; wipe the device with a slightly damp cloth without solvent; store in dry conditions; calibrate once a year |
| Safety | Laser class 2 – do not look into the beam; do not use in a closed oven; do not immerse; keep out of reach of children |
| Warranty and repairability | Consult the warranty card; reset possible by removing batteries; after-sales service if error message persists |
Frequently Asked Questions - ThermoInspector Laserliner
User questions about ThermoInspector Laserliner
0 question about this device. Answer the ones you know or ask your own.
Ask a new question about this device
Download the instructions for your Thermometer in PDF format for free! Find your manual ThermoInspector - Laserliner and take your electronic device back in hand. On this page are published all the documents necessary for the use of your device. ThermoInspector by Laserliner.
USER MANUAL ThermoInspector Laserliner
text_image
Laserliner® Thermalopector 20.6 20.6 HACCP PROBE MODE
Laser
650 nm

Laserliner®
!
text_image
Technical diagram showing a device with a magnified inset view of its internal components, including a warning label and control buttons.natural_image
Diagram showing internal components of a device with battery and housing, no text or symbols present2 Infrarot-Messung
Read the operating instructions and the enclosed brochure „Guarantee and additional notices“ completely. Follow the instructions they contain. This document must be kept in a safe place and if the laser device is passed on, this document must be passed on with it.
Function / application
The Thermolinspector is a professional multisensor thermometer for ensuring hygiene in the food industry in accordance with HACCP guidelines and temperature specifications in production, food and beverage dispensing, sampling and goods inwards inspection. The fold-out probe thermometer is used to measure liquid, pasty and semisolid materials. Surface temperatures can be determined with the infrared sensor.
General safety instructions
- The device must only be used in accordance with its intended purpose and within the scope of the specifications.
- Not suitable for medical diagnoses.
- The measuring tools and accessories are not toys. Keep out of reach of children.
- Modifications or changes to the device are not permitted, this will otherwise invalidate the approval and safety specifications.
- Do not expose the device to mechanical stress, extreme temperatures, moisture or significant vibration.
- The measuring device must not be used in closed ovens.
– Thoroughly clean the sensor before and after use. - The measuring device is not water tight. Only dip the measuring probe into the material up to approx. 10 mm below the casing.
- Only hold the device by the handle.
- Do not touch the measuring probe, it can become very hot during the measuring procedure.
- Always protect the measuring probe by folding in the probe sensor when not in use.
- Do not power the measuring probe with an external voltage.
Safety instructions
Using class 2 lasers
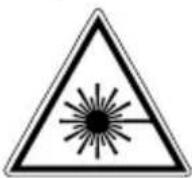
Laser radiation! Do not stare into the beam! Class 2 laser < 1 mW · 650 nm EN 60825-1:2014
- Attention: Do not look into the direct or reflected beam.
- Do not point the laser beam towards persons.
- If a person's eyes are exposed to class 2 laser radiation, they should shut their eyes and immediately move away from the beam.
- Under no circumstances should optical instruments (magnifying glass, microscope, binoculars) be used to look at the laser beam or reflections.
Laser outlet
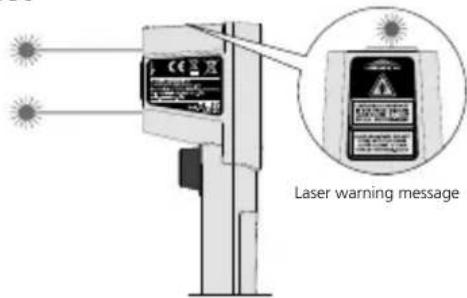
text_image
Laser warning messageSafety instructions
Using artificial, optical emission (OStrV)
LED outlet
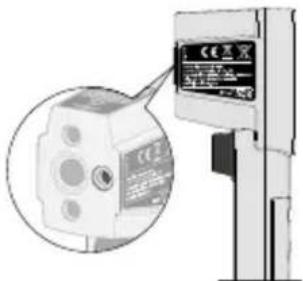
text_image
Technical diagram showing a device with a magnified inset view of its internal components, including a warning label and control buttons.- The device works with LEDs of risk group RG 0 (exempt, no risk) in accordance with the latest versions of applicable standards relating to photobiological safety (EN 62471:2008-09ff / IEC/TR 62471:2006-07ff).
- Radiation power: Peak wavelength equals 453 nm. Mean radiance is below the limit values of risk group RG 0:
- Photochemical retinal damage, LB <100 W/(m ^2 sr) within 2.8 hours
– Thermal retinal damage, LR <280 kW/(m 3sr) within 10 seconds - When used for the intended purpose and under reasonably foreseeable conditions, the accessible radiation of the LEDs is safe for the human eye and skin.
- Temporary, irritating optical effects (e.g. dazzling, flash blindness, afterimages, colour vision impairment) cannot be completely ruled out, especially under low ambient light conditions.
- Do not intentionally look directly into the radiation source for longer periods of time.
– Special safety precautions are not necessary. - No specific measures are required to ensure the limit values of risk group RG 0 are maintained.
Safety instructions
Dealing with electromagnetic radiation
– The measuring device complies with electromagnetic compatibility regulations and limit values in accordance with RED Directive 2014/30/EU.
- Local operating restrictions – for example, in hospitals, aircraft, petrol stations or in the vicinity of people with pacemakers – may apply. There is a possibility of a dangerous impact on – or interference with – electronic devices.
- The measuring accuracy may be affected when working close to high voltages or high electromagnetic alternating fields.
Laserliner®
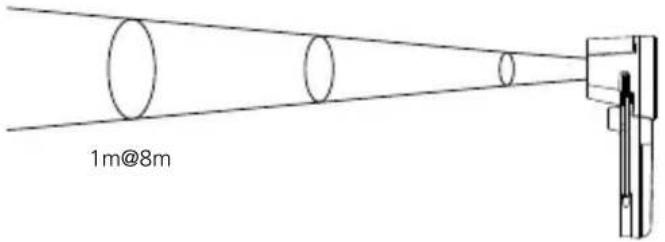
Dual laser target mark
The dual laser is a targeting aid to sight the location for the infrared measurement. The temperature is only measured between the two laser points on the surface. Please ensure that the space between the instrument and surface to be measured is free of disturbances (steam, gas, contamination, glass).
text_image
1m@8mD:S ratio: 8:1
text_image
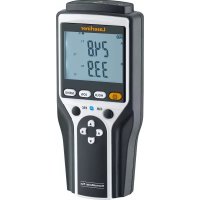
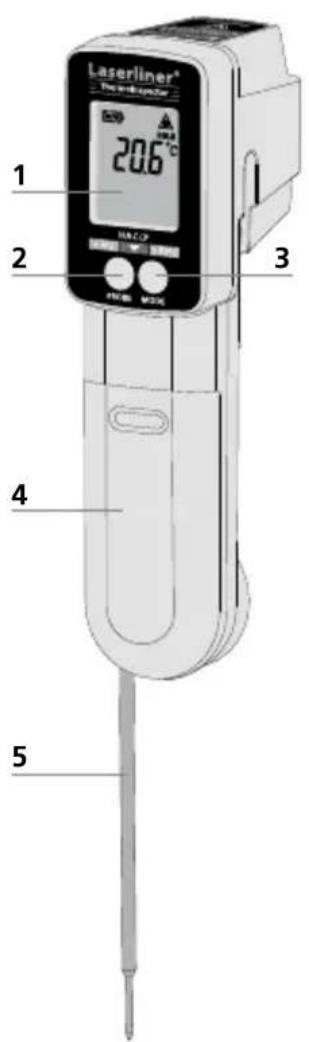
Laserliner® 20.6°C 1 2 3 4 5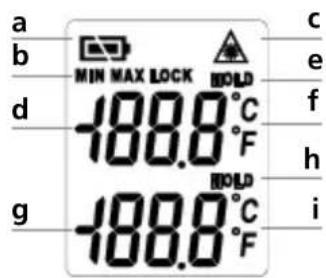
text_image
a b MIN MAX LOCK HOLD d -188.0°C F g -188.0°C F c e f h i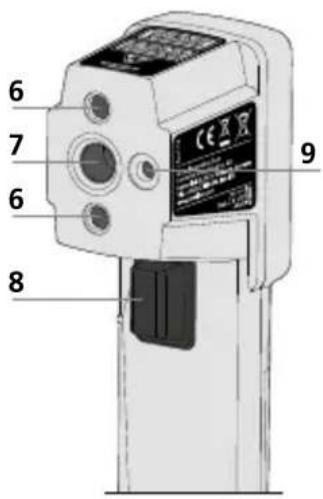
text_image
6 7 6 8 91 LC display
2 „Probe" button
3 „Mode" button
4 Battery compartment
5 Fold-out probe sensor
6 Laser output
7 Infrared sensor
8 Trigger
9 LED outlet
a Battery charge
b MIN, MAX and LOCK mode
c Laser beam switched on Infrared measurement:
d Measured value display
e Hold function
f Unit of measurement °C / °F
Measurement with sensor:
g Measured value display
h Hold function
i Unit of measurement
°C / °F
Thermolinspector
Insertion of batteries
Open the battery compartment and insert batteries according to the symbols. Be sure to pay attention to polarity.
Infrared measurement
The laser is switched on and an infrared measurement can be performed by pressing the trigger button (8). Measured values are continually shown by pressing and holding the trigger button.
MIN mode
MIN
Trigger (8) Mode button (3)
1x 1x
MIN mode determines the minimum measured value within a continuous measurement (keep trigger button pressed). The measured value is held for 15 seconds (Hold) after the trigger is released. Pressing the button again will start a new measurement, reset the MIN value and record the lowest measured value.
MAX mode
MAX
Trigger (8) Mode button (3)
1x 2x
MAX mode determines the maximum measured value within a continuous measurement (keep trigger button pressed). The measured value is held for 15 seconds (Hold) after the trigger is released. Pressing the button again will start a new measurement, reset the MAX value and record the highest measured value.
LOCK mode
LOCK
Trigger (8) Mode button (3) Trigger (8)
1x 3x 1x
LOCK mode triggers continuous measurement for a period of up to 60 minutes. With no mode set, measured values are shown continually when the trigger button is pressed (keep trigger button pressed).
^ C <> ^ F
Trigger (8)
Mode
Trigger (8)
°C
button (3)
1x
4x
1x
°F
Trigger (8)
Mode button (3)
Trigger (8)
°F
1x
4x
1x
°C
7 Setting the emissivity
E Trigger (8) Mode button (3) 1x 5x
Short press (button 8): Value +0.1
Long press (button 8): Value runs through 0.1 ... 1.00
An integrated sensor head detects the material/surface-specific infrared radiation emitted by all objects. The level of these emissions is determined by the specific emissivity of the material (0.1/10E to 1.00/100E). After switching on for the first time, the device is preset to an emissivity factor of 0.95, which is suitable for most organic materials and non-metals (plastics, ceramics, wood, rubber, paints, varnishes and stone). For materials with different emissivity factors, refer to the table under Point 10.
Wherever possible, paint or matt black stickers can be applied on non-coated metals and metal oxides, which due to their low, temperature-unstable emissivity are suitable for IR measurement only for a limited extent, as well as on surfaces with unknown emissivity in order to set the emissivity factor to 0.95. If this is not possible, use a contact thermometer.

The emissivity last selected is set after the device is switched on. Check the emissivity setting before each measurement.
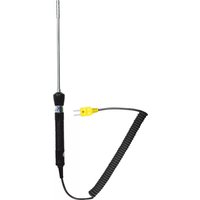
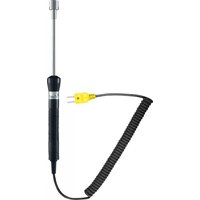
8 Probe sensor
To use the probe sensor for a measurement, fold out the probe sensor and briefly press the „Probe“ button (2). The measurement takes 4 minutes. The device then switches off automatically. The measured value is held (Hold) by pressing the „Probe“ button (2) again. Pressing the „Probe“ button (2) once more will restart the measurement. In Hold mode the device switches off after 10 seconds.
It is possible to switch back to infrared measurement while measuring with the probe sensor. By pressing and holding the „Trigger“ button (8) the value from the probe sensor is held and marked with (Hold); infrared measurement starts. By pressing the „Probe“ button you switch back to measurement with the probe sensor.

To measure the core temperature in frozen food, drill a hole and then insert the measuring probe into the product.

In accordance with regulation (EC) 1935/2004, the fold-out probe sensor is designed for continuous contact with food, from the measuring probe up to approx. 10 mm before the plastic casing.
9 HACCP Check
Green LED backlighting
Green LED backlighting indicates safe cooling or frozen state below 4°C (40°F) or a safe holding temperature above 60°C (140°F).
Red LED backlighting
The LED backlighting is red when the measured temperature is between 4°C and 60°C. The product temperature is in the HACCP danger zone.
The backlighting flashes when measuring with the probe sensor.

Above 60°C: Hot food zone
Bacteria are killed by heat above 60°C.
4°C ... 60°C: Danger zone
Bacteria grow rapidly between 4°C and 60°C.
0°C ... 4°C: Cool zone
Bacteria grow very slowly between 0°C and 4°C.
Below 0°C: Freeze zone
No bacterial growth below -18°C
10 Emissivity table
(reference values with tolerances)
Metals
| Alloy A3003 | Iron, forged | ||
| Oxidised | 0.20 | Matt | 0.90 |
| Roughened | 0.20 | Lead | |
| Aluminium | Rough | 0.40 | |
| Oxidised | 0.30 | Platinum | |
| Polished | 0.05 | Black | 0.90 |
| Brass | Steel | ||
| Polished | 0.30 | Cold rolled | 0.80 |
| Oxidised | 0.50 | Ground plate | 0.50 |
| Chromium oxide 0.81 | Polished plate | 0.10 | |
| Copper | Steel | ||
| Oxidised | 0.72 | Alloy (8% nickel, 18% chromium) | 0.35 |
| Copperoxide | 0.78 | Galvanised | 0.28 |
| Inconel | Oxidised | 0.80 | |
| Oxidised | 0.83 | Heavily oxidised | 0.88 |
| Electropolished | 0.15 | Freshly rolled | 0.24 |
| Iron | Rough, flat surface | 0.96 | |
| Oxidised | 0.75 | Rusty, red | 0.69 |
| With rust | 0.60 | Sheet, nickel plated | 0.11 |
| Iron, cast | Sheet, rolled | 0.56 | |
| Non-oxidised | 0.20 | Stainless steel | 0.45 |
| Molten mass | 0.25 | Zinc | |
| Oxidised | 0.10 |
Nonmetals
| Asbestos 0.93 | Laminate | 0.90 | |
| Asphalt 0.95 | Lime | 0.35 | |
| Basalt 0.70 | Lime malm brick | 0.95 | |
| Brick, red 0.93 | Limestone | 0.98 | |
| Carborundum 0.90 | MarbleBlack, dull finishGreyish, polished | 0.940.93 | |
| Cement 0.95 | |||
| Ceramics 0.95 | Masonry 0.93 | ||
| ChinaBrilliant whiteWith glaze | 0.730.92 | PaintBlack, mattHeat-resistantWhite | 0.970.920.90 |
| Clay 0.95 | PaperAll colours | 0.96 | |
| CoalNon-oxidised | 0.85 | PlasticTranslucentPE, P, PVC | 0.950.94 |
| Concrete, plaster, mortar | 0.93 | Quartz glass | 0.93 |
| Cotton 0.77 | RubberHardSoft, grey | 0.940.89 | |
| Earthenware, matt | 0.93 | Sand 0.95 | |
| Fabric 0.95 | Screed | 0.93 | |
| Food 0.95 | Snow | 0.80 | |
| Glass 0.90 | Soil | 0.94 | |
| Glass wool 0.95 | Tar | 0.82 | |
| Graphite 0.75 | Tar paper 0.92 | ||
| Gravel 0.95 | Transformer paint | 0.94 | |
| Grit 0.95 | Wallpaper, light-coloured | 0.89 | |
| Gypsum | 0.88 | Water | 0.93 |
| Gypsum cardboard | 0.95 | WoodUntreatedBeech, planed | 0.880.94 |
| Heat sinkBlack, anodized | 0.98 | ||
| Human skin | 0.98 | ||
| IceClearWith heavy frost | 0.970.98 |
Error messages
Hi Outside measuring range
Lo Outside measuring range
Er2 Change in ambient temperature too fast
Er3 Outside ambient temperature 0°C ... 50°C. Adaptation time: min. 30 minutes
Er The device must be reset. After the device has switched off automatically, remove the batteries, wait for 1 minute, reinsert batteries and switch on the device. If the message remains, contact the Service department.
Information on maintenance and care
Clean all components with a damp cloth and do not use cleaning agents, scouring agents and solvents. Remove the battery(ies) before storing for longer periods. Store the device in a clean and dry place.
Calibration
The meter needs to be calibrated and tested on a regular basis to ensure it produces accurate measurement results. We recommend carrying out calibration once a year.
Technical data
| Measurement range -60°C | ... 350°C |
| D:S ratio | 8:1 |
| Infrared accuracy(ambient temperature=25°C) | ± 1,0°C + 0,1°C/degree (< 0°C)± 1,0°C (0°C ... 15°C)± 0,6°C (15°C ... 35°C)± 1,0°C (35°C ... 65°C)± 1,5% (>65°C) |
| Probe accuracy(ambient temperature=25°C) | ± 1,0°C (< -5°C)± 0,5°C (-5°C ... 65°C)± 1,0% (>65°C) |
| Emission coefficient 0.1 ... | 1.0 adjustable |
| Display | LCD with multicolour backlighting |
| Laser 2-point target laser | |
| Laser wavelength 650 nm | |
| Laser class 2 / < 1 mW | |
| Power supply Batteries, 2 x | 1.5 V, type AAA |
| Degree of protection IP 54 | |
| Operating conditions | -20°C ... 70°C, 80% rH,no condensation,max. altitude 2000 m |
| Storage conditions | -20°C ... 70°C, 80% rH,no condensation |
| Dimensions (W x H x D) 40 | x 158 x 53 mm |
| Probe sensor L 95 mm /ø 3,3 mm | |
| Weight (incl. batteries) 146 g |
Technical revisions reserved. 07.17
EU directives and disposal
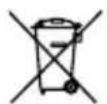
This device complies with all necessary standards for the free movement of goods within the EU.
This product is an electric device and must be collected separately for disposal according to the European Directive on waste electrical and electronic equipment.
Further safety and supplementary notices at:
http://laserliner.com/info?an=thein

Laserliner®
!
Uittree-opening laser

text_image
Laserwaarschuwingtext_image
Technical diagram showing a device with a magnified view of its internal components, labeled in Chinese.natural_image
Diagram showing internal components of a device with battery and switch, no text or symbols present2 Infraroodmeting
natural_image
Diagram showing internal components of a device with battery and housing, no text or symbols present2 Infrarød-måling
natural_image
Diagram showing internal components of a device with battery and housing, no text or symbols present2 Mesure infrarouge
text_image
Model LEDnatural_image
Diagram showing internal components of a device with battery and housing, no text or symbols presentnatural_image
Diagram showing internal components of a device with battery and housing, no text or symbols presentnatural_image
Interior view of a room with a closed display case and tiled floor, no visible text or symbolsSERVICE
Umarex GmbH & Co. KG
-Laserliner-