
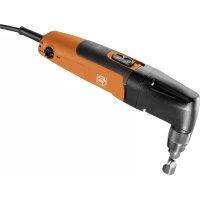
KFH 178 R - Milling machine Fein - Free user manual and instructions
Find the device manual for free KFH 178 R Fein in PDF.

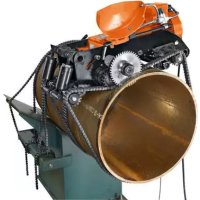
| Product type | Portable chamfering milling machine (chamfering machine) |
| Brand | Fein |
| Model | KFH 178 R |
| Application | Edge preparation for welding (K, V, X, Y shapes), finishing of visible edges, rounding for painting or impact protection |
| Machinable materials | Steel, cast steel, fine-grain steel, stainless steel, aluminum, aluminum alloys, brass, plastic |
| Rotation speed | 6 speed levels (electronic adjustment) |
| Max. chamfer height (steel 400 N/mm²) | 5.7 mm (KFH17-8) / 9.9 mm (KFH17-15) depending on version |
| Power supply | Mains, 230 V ~ (estimate) |
| Frequency | 50 Hz (estimate) |
| Double insulation | Yes (symbol ☐) |
| Sound pressure level (LpA) | Not specified, but hearing protection recommended |
| Hand-arm vibrations (example) | 5.4 m/s² (1st step, chamfer 45°, steel S235JR, thickness 30 mm) |
| Electrical protection | 30 mA residual current circuit breaker recommended |
| Safety equipment | Hand guard, eye protection, hearing protection, gloves |
| Routine maintenance | Cleaning of ventilation slots with dry, oil-free compressed air |
| Lubrication | Oil the thread of the height adjustment device if necessary |
| Included accessories | Insert holder, removable chamfering and radius inserts, guide roller (depending on version) |
| Spare parts | List available at www.fein.com |
| Warranty | Statutory warranty + FEIN manufacturer warranty |
| Country of manufacture | Germany (headquarters C. & E. Fein GmbH) |
Frequently Asked Questions - KFH 178 R Fein
User questions about KFH 178 R Fein
0 question about this device. Answer the ones you know or ask your own.
Ask a new question about this device
Download the instructions for your Milling machine in PDF format for free! Find your manual KFH 178 R - Fein and take your electronic device back in hand. On this page are published all the documents necessary for the use of your device. KFH 178 R by Fein.
USER MANUAL KFH 178 R Fein
natural_image
Illustration of a robotic grinding tool with a GERM4 brand tag, showing blade and base components (no text or symbols on the tool itself)KFH17-8 ( ^ ) 7 238 16.. KFH17-15 ( ^ ) 7 238 18..
| KFH17-8 (**) KFH17-15 (**) | |||
| 7 238 16 .. 7 238 18 .. | |||
| UV 220 - 230 220 - 230 | |||
| P_1 | W 1700 1700 | ||
| P_2 | W | 1 | 0 |
| I | ~ (a.c.) ~ (a.c.) | ||
| n_0 | /min, min ^-1 , rpm, r/min 7500 | 7500 | |
| a ° | max. 80 | max. 80 | |
| c (max., 45°) mm | 8,0 | 15,0 | |
| a (max., 45°) mm | 5,7 | 10,6 | |
| R mm | 2 / 3 / 4 | 2 / 3 / 4 | |
| KX KX | |||
| kg | 4,6 | 6,4 | |
| L_pA | dB | 90 | 90 |
| K_pA | dB | 3 | 3 |
| L_wA | dB | 101 | 101 |
| K_wA | dB | 3 | 3 |
| L_pCpeak | dB | 104 | 104 |
| K_pCpeak | dB | 3 | 3 |
| ☐ | ☐ | ||


flowchart
graph TD
A["Start"] --> B["Assembly Step 1"]
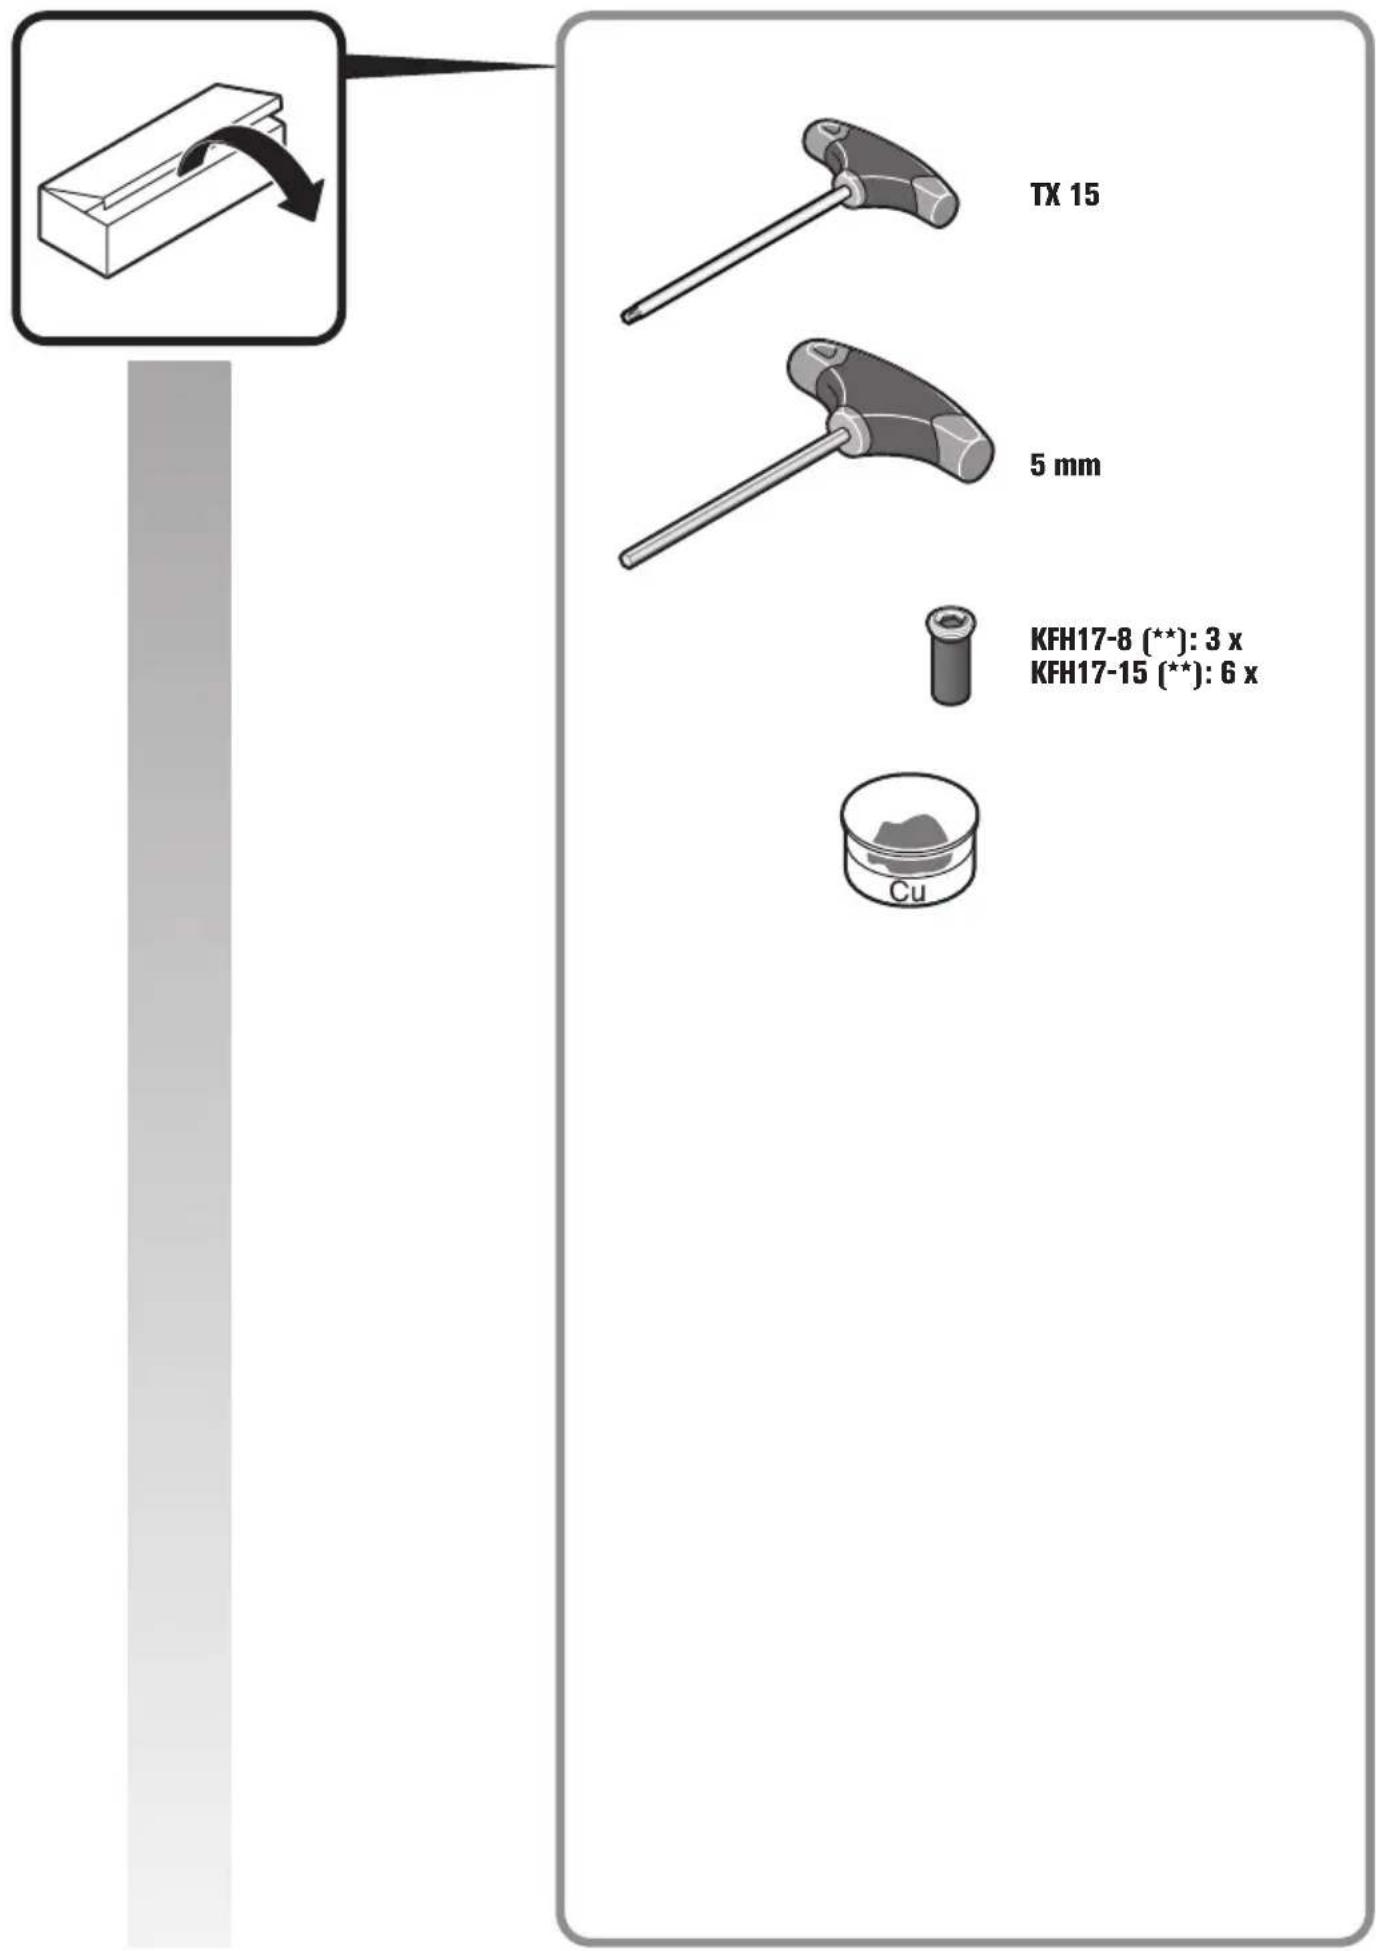
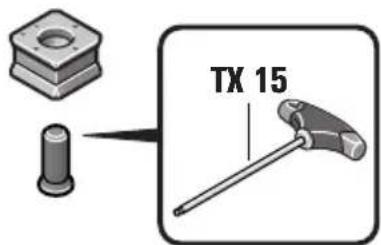
B --> C["Step 2: TX 15 → Cu → 3.5 - 4.0 Nm"]
C --> D["Step 3: TX 15 → Cu → Cu → 3.5 - 4.0 Nm"]
D --> E["Step 4: TX 15 → Cu → Cu → Cu → 3.5 - 4.0 Nm"]
E --> F["Step 5: TX 15 → Cu → Cu → Cu → 3.5 - 4.0 Nm"]
F --> G["Step 6: TX 15 → Cu → Cu → Cu → 3.5 - 4.0 Nm"]
G --> H["Step 7: TX 15 → Cu → Cu → Cu → 3.5 - 4.0 Nm"]
H --> I["Step 8: TX 15 → Cu → Cu → Cu → 3.5 - 4.0 Nm"]
I --> J["End"]
flowchart
graph TD
    A["Start: 8mm/5/16" scale, 0.1mm/1/254""] --> B["Step 1: Disassembly with X and ✓ arrows"]
    B --> C["Step 2: Disassembly with checkmark and checkmark arrow"]
    C --> D["Step 3: Disassembly with X and ✓ arrows"]
    D --> E["End: Disassembly with checkmark and ✓ arrow"]
flowchart
graph TD
    A["Start"] --> B{Condition 1: Locking}
    B -->|Yes| C["Step 1: Speed/Distance"]
    B -->|No| D["Step 2: Locking"]
    C --> E["Step 3: Speed/Distance"]
    D --> F["Step 4: Locking"]
    E --> G["Speed/Distance Metric: 7500, 6800, 5700, 4700, 3400, 2300, 7500"]
    F --> H["Speed/Distance Metric: 2300, 3400, 4700, 5700, 6800, 7500"]


natural_image
Mechanical assembly diagram of a robotic arm with a Geringer brand logo, showing rotational movement (no text or symbols)A
30° / 45°
B
KX B.
C
KX / R3

D
Translation of the Original Instructions.
Symbols, abbreviations and terms used.
| Symbol, character Explanation | |
 | Make sure to read the enclosed documents such as the Instruction Manual and the General Safety Instructions. |
 | Observe the instructions in the text or graphic opposite! |
 | Observe the instructions in the text or graphic opposite! |
 | General prohibition sign. This action is prohibited. |
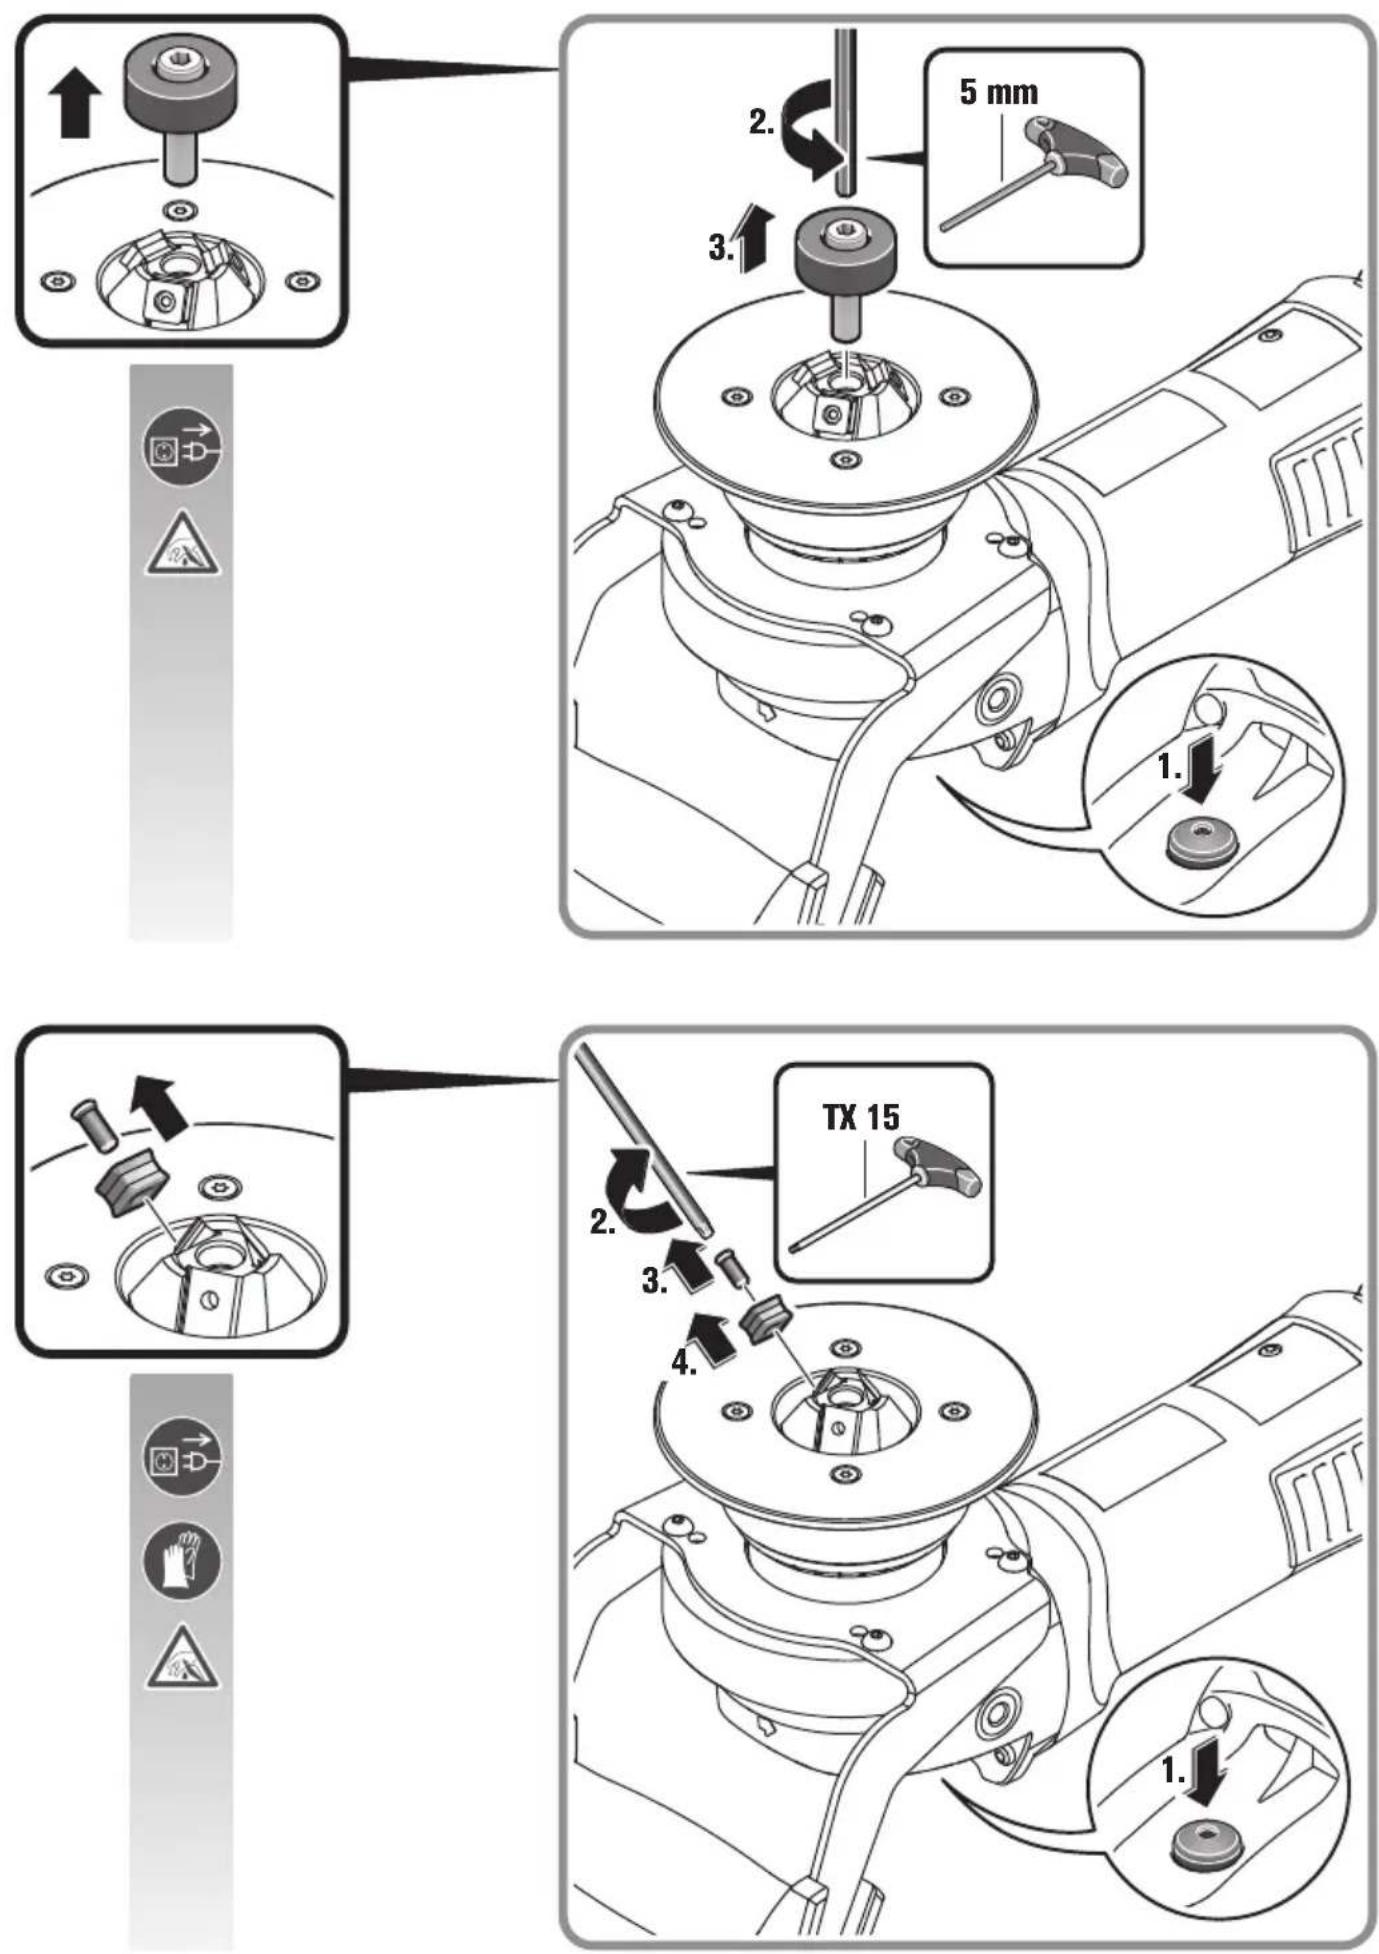
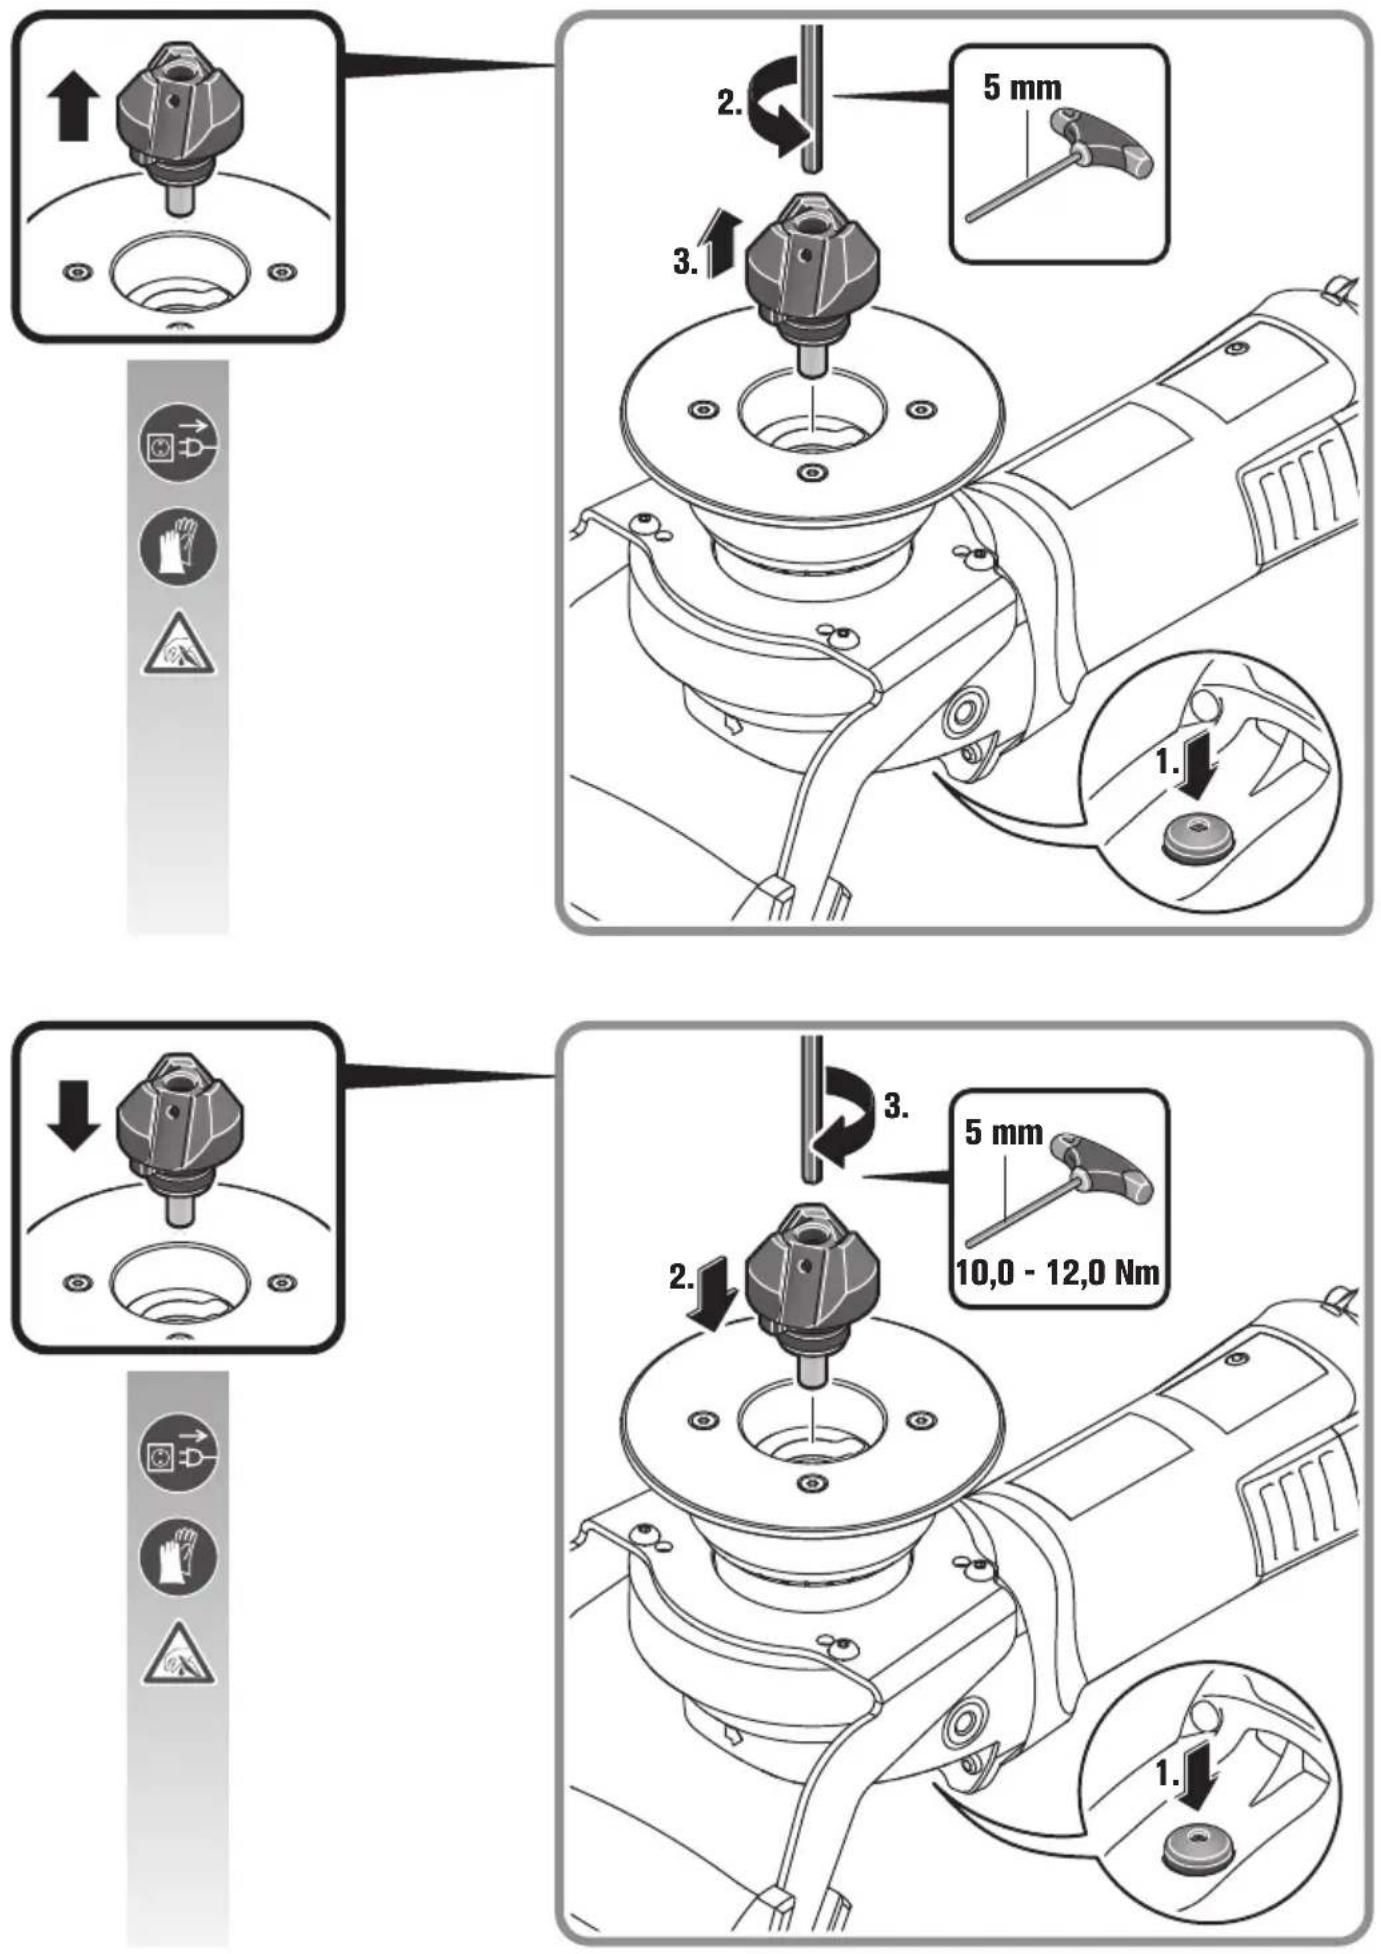
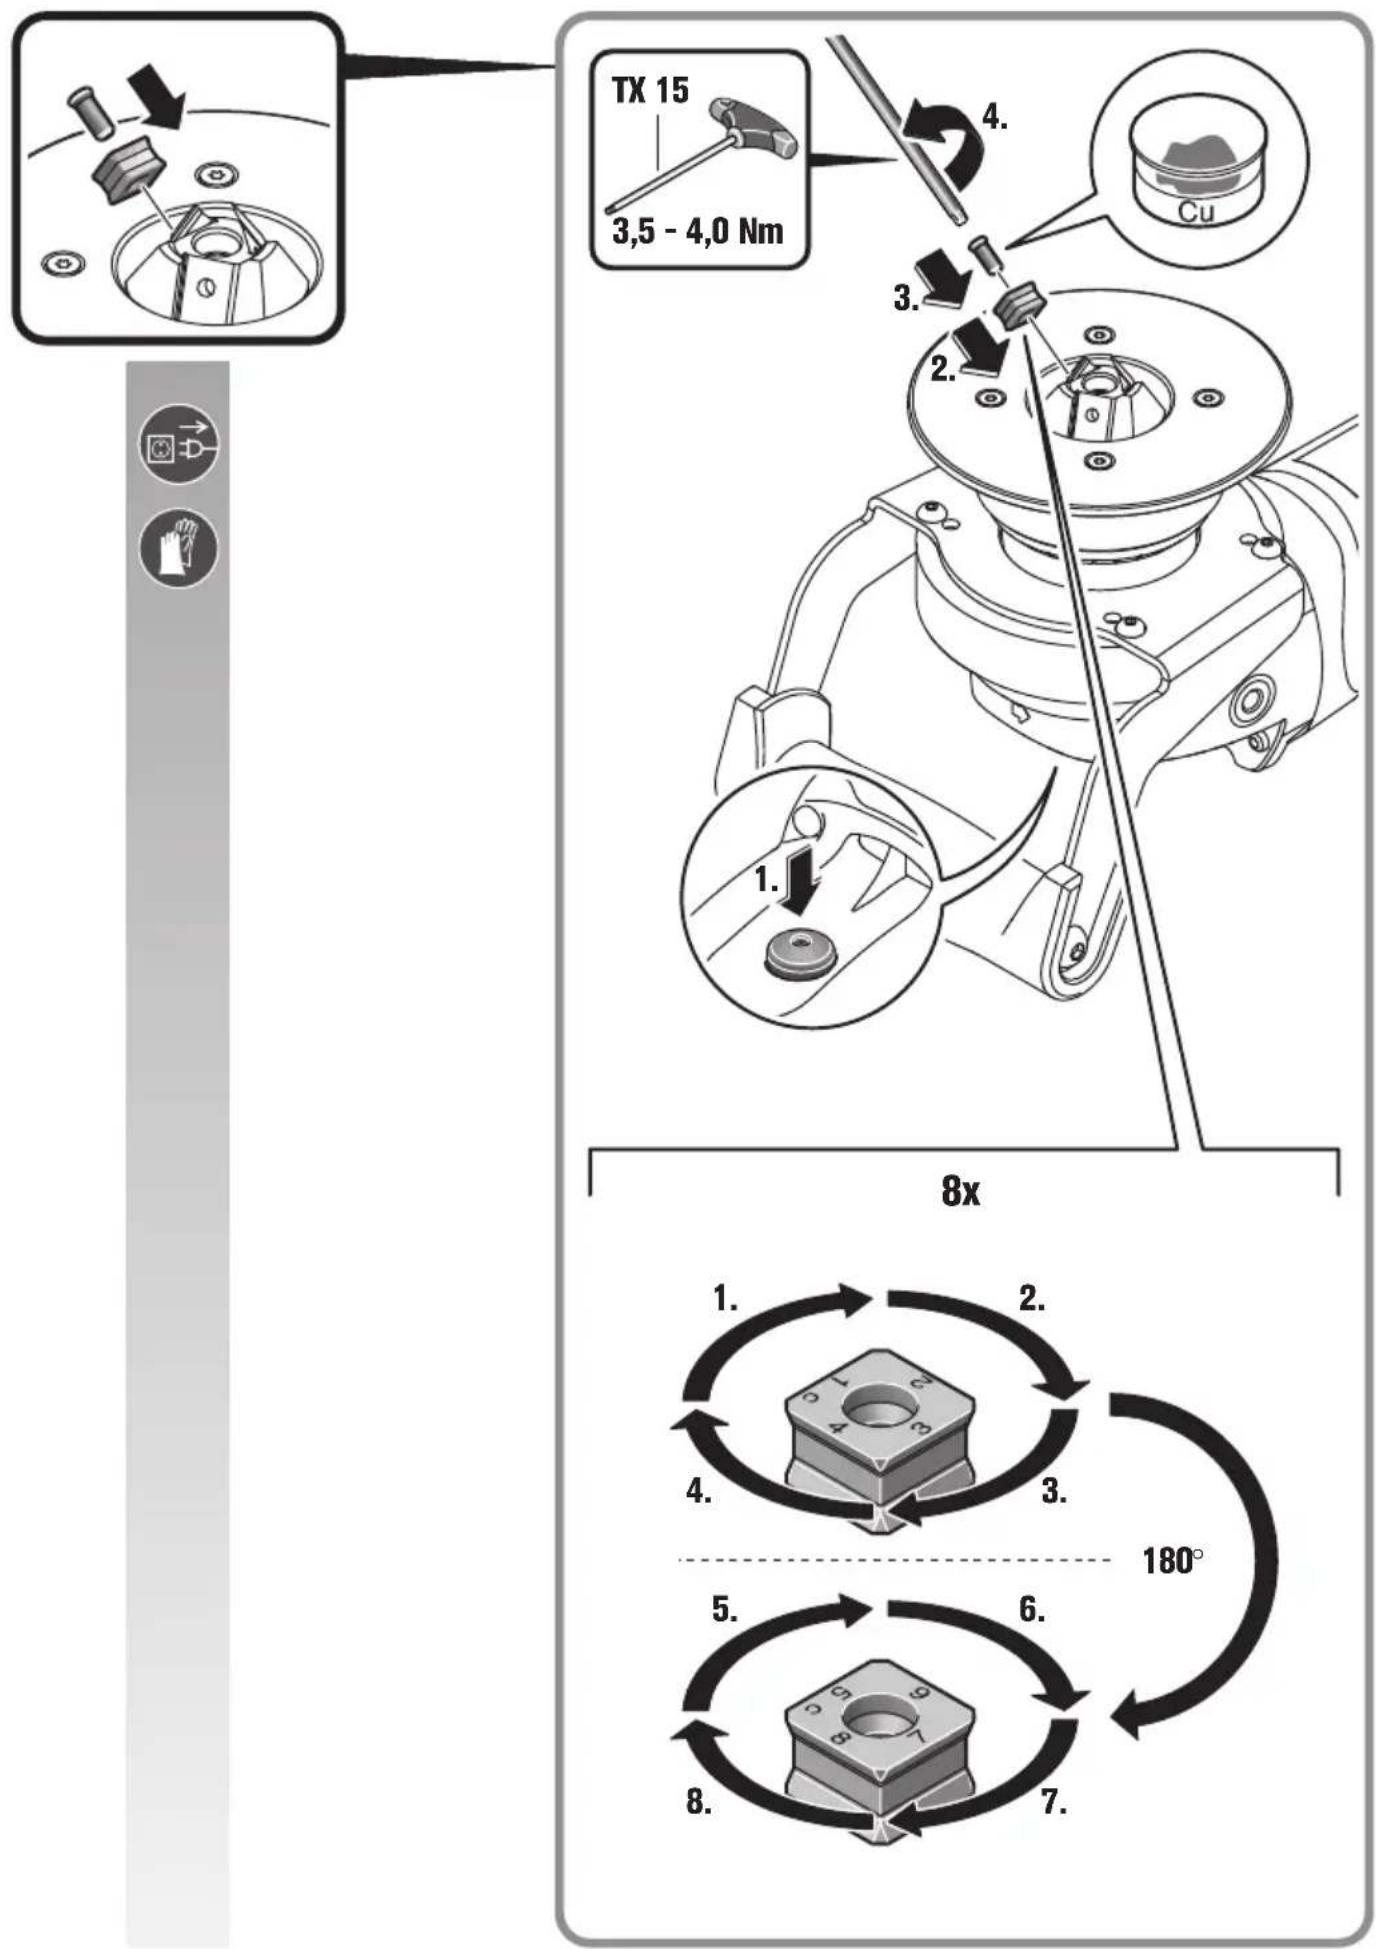
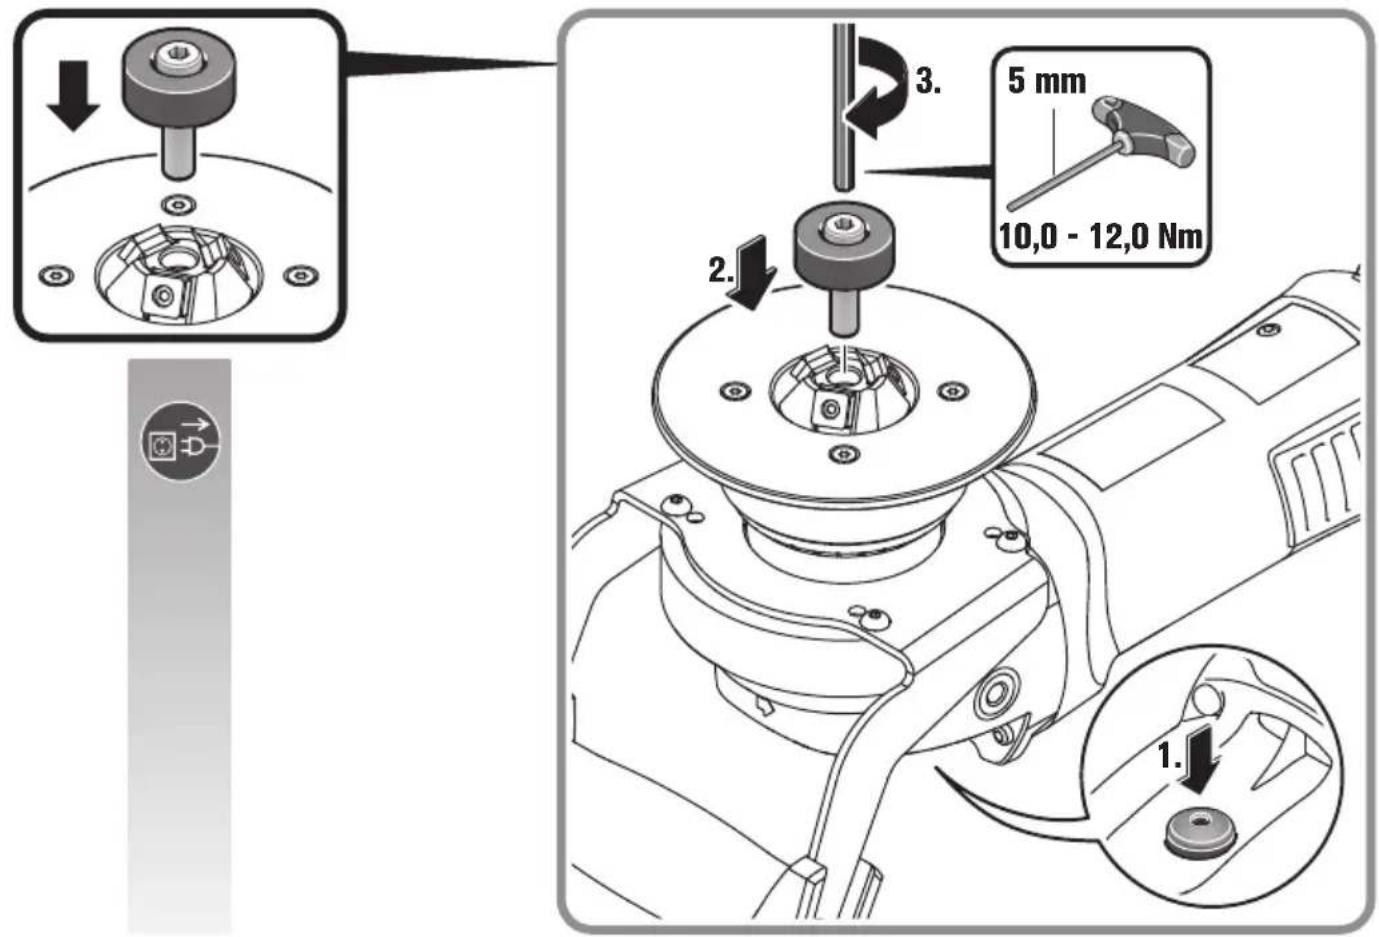
 | Before commencing this work step, pull the mains plug out of the socket. Otherwise there will be danger of injury if the power tool should start unintentionally. |
 | Do not touch the rotating parts of the power tool. |
 | Use eye protection during operation. |
 | Use ear protection during operation. |
 | Use protective gloves during operation. |
 | Warning against sharp edges of application tools, such as the cutting edges of the cutter blades. |
 | A surface that can be touched may be very hot and thus hazardous. |
 | Gripping surface |
 | Additional information. |
 | Confirms the conformity of the power tool with the directives of the European Community. |
 | Confirms the conformity of the power tool with the directives of Great Britain (England, Wales, Scotland). |
 | This sign indicates a possible dangerous situation that could cause severe or fatal injury. |
 | Worn out power tools and other electrotechnical and electrical products should be sorted separately for environmental-friendly recycling. |
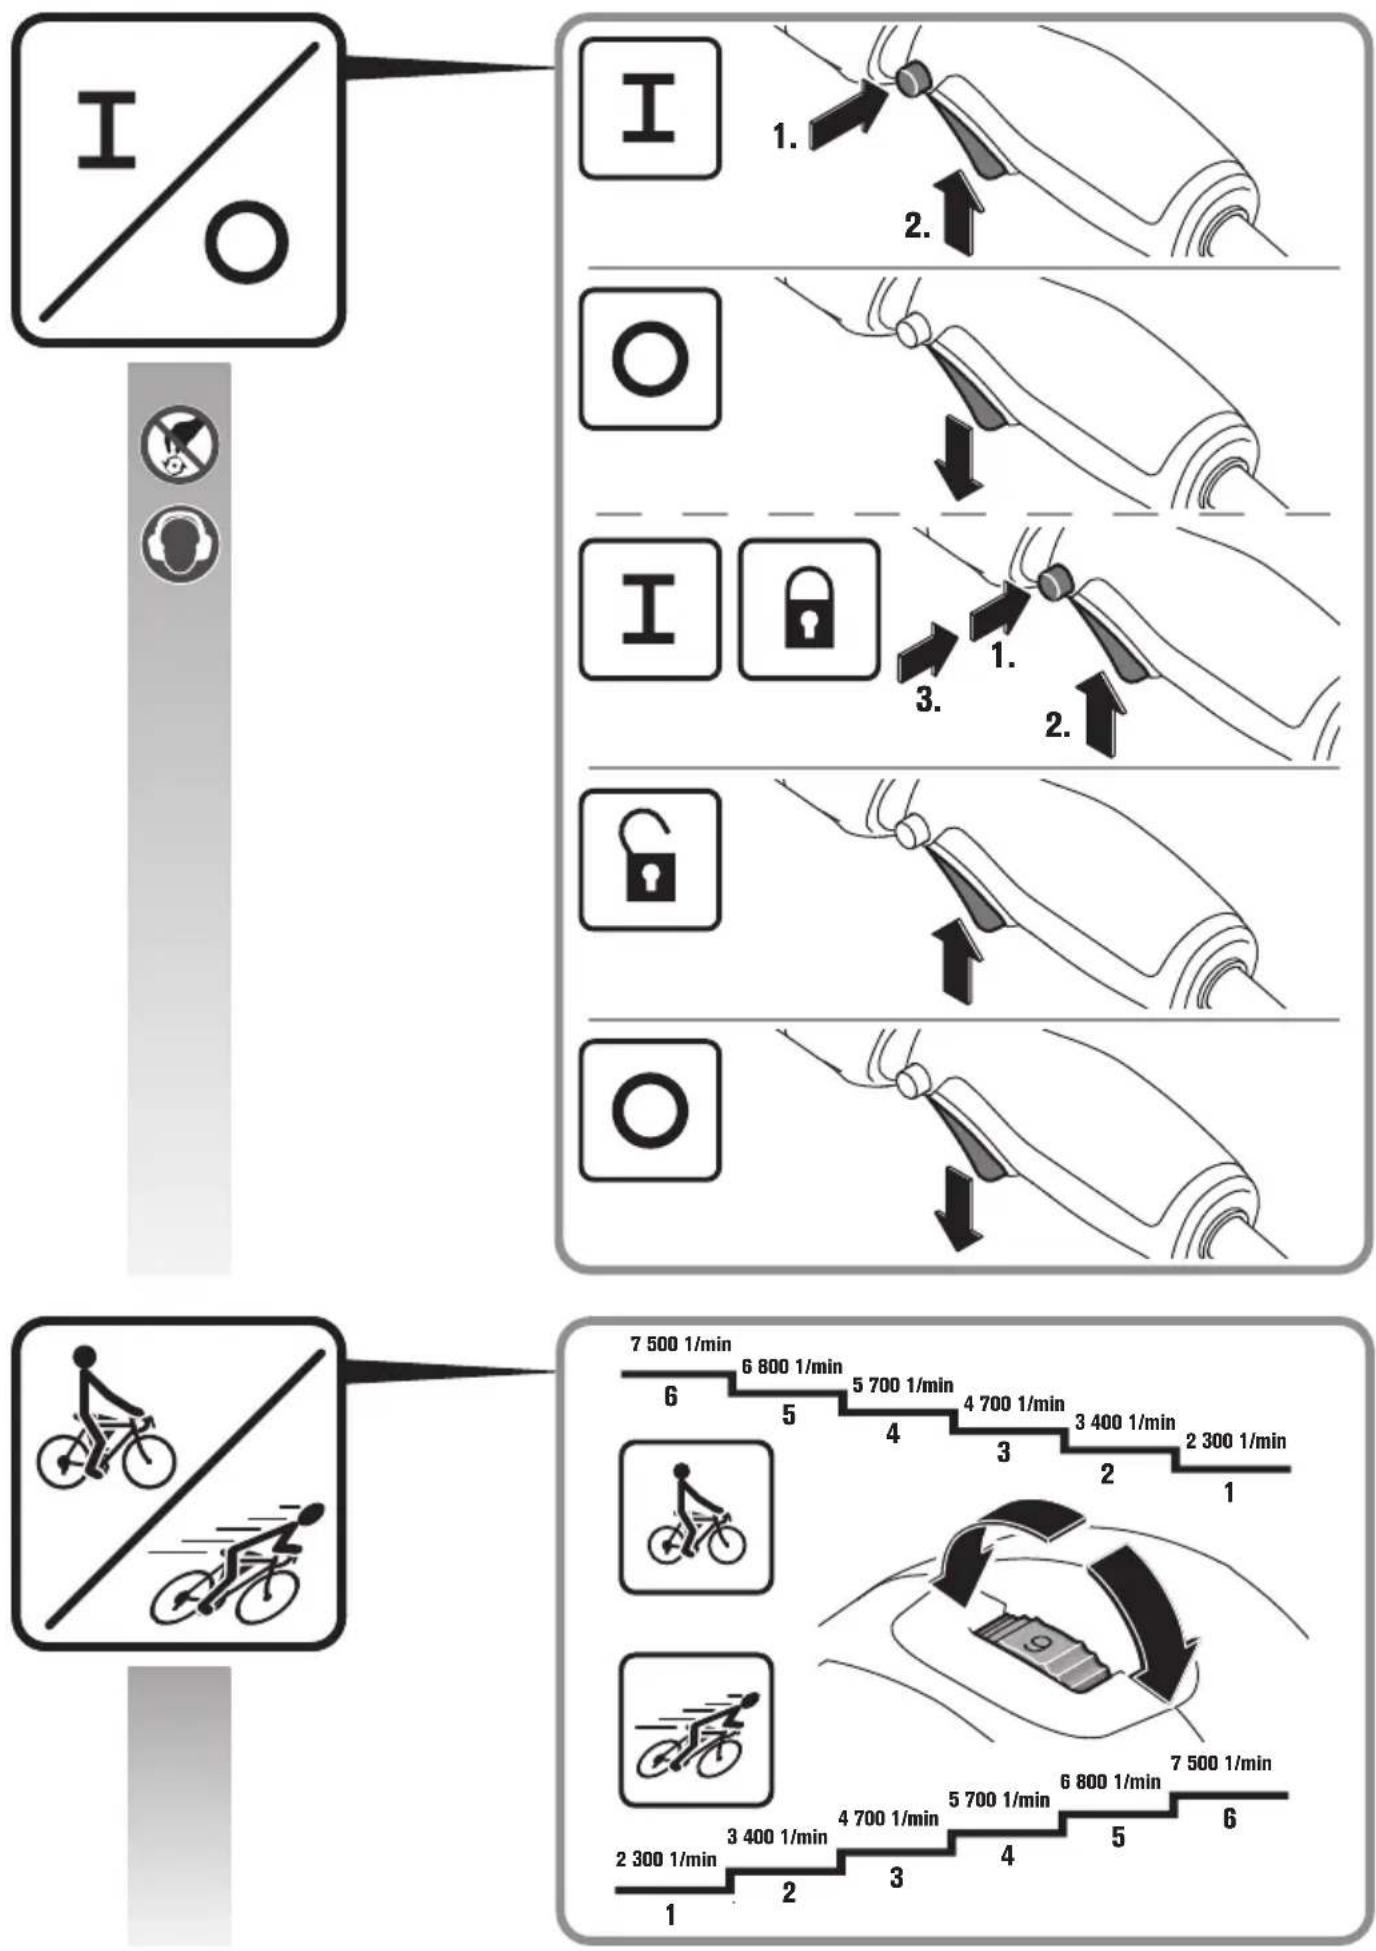
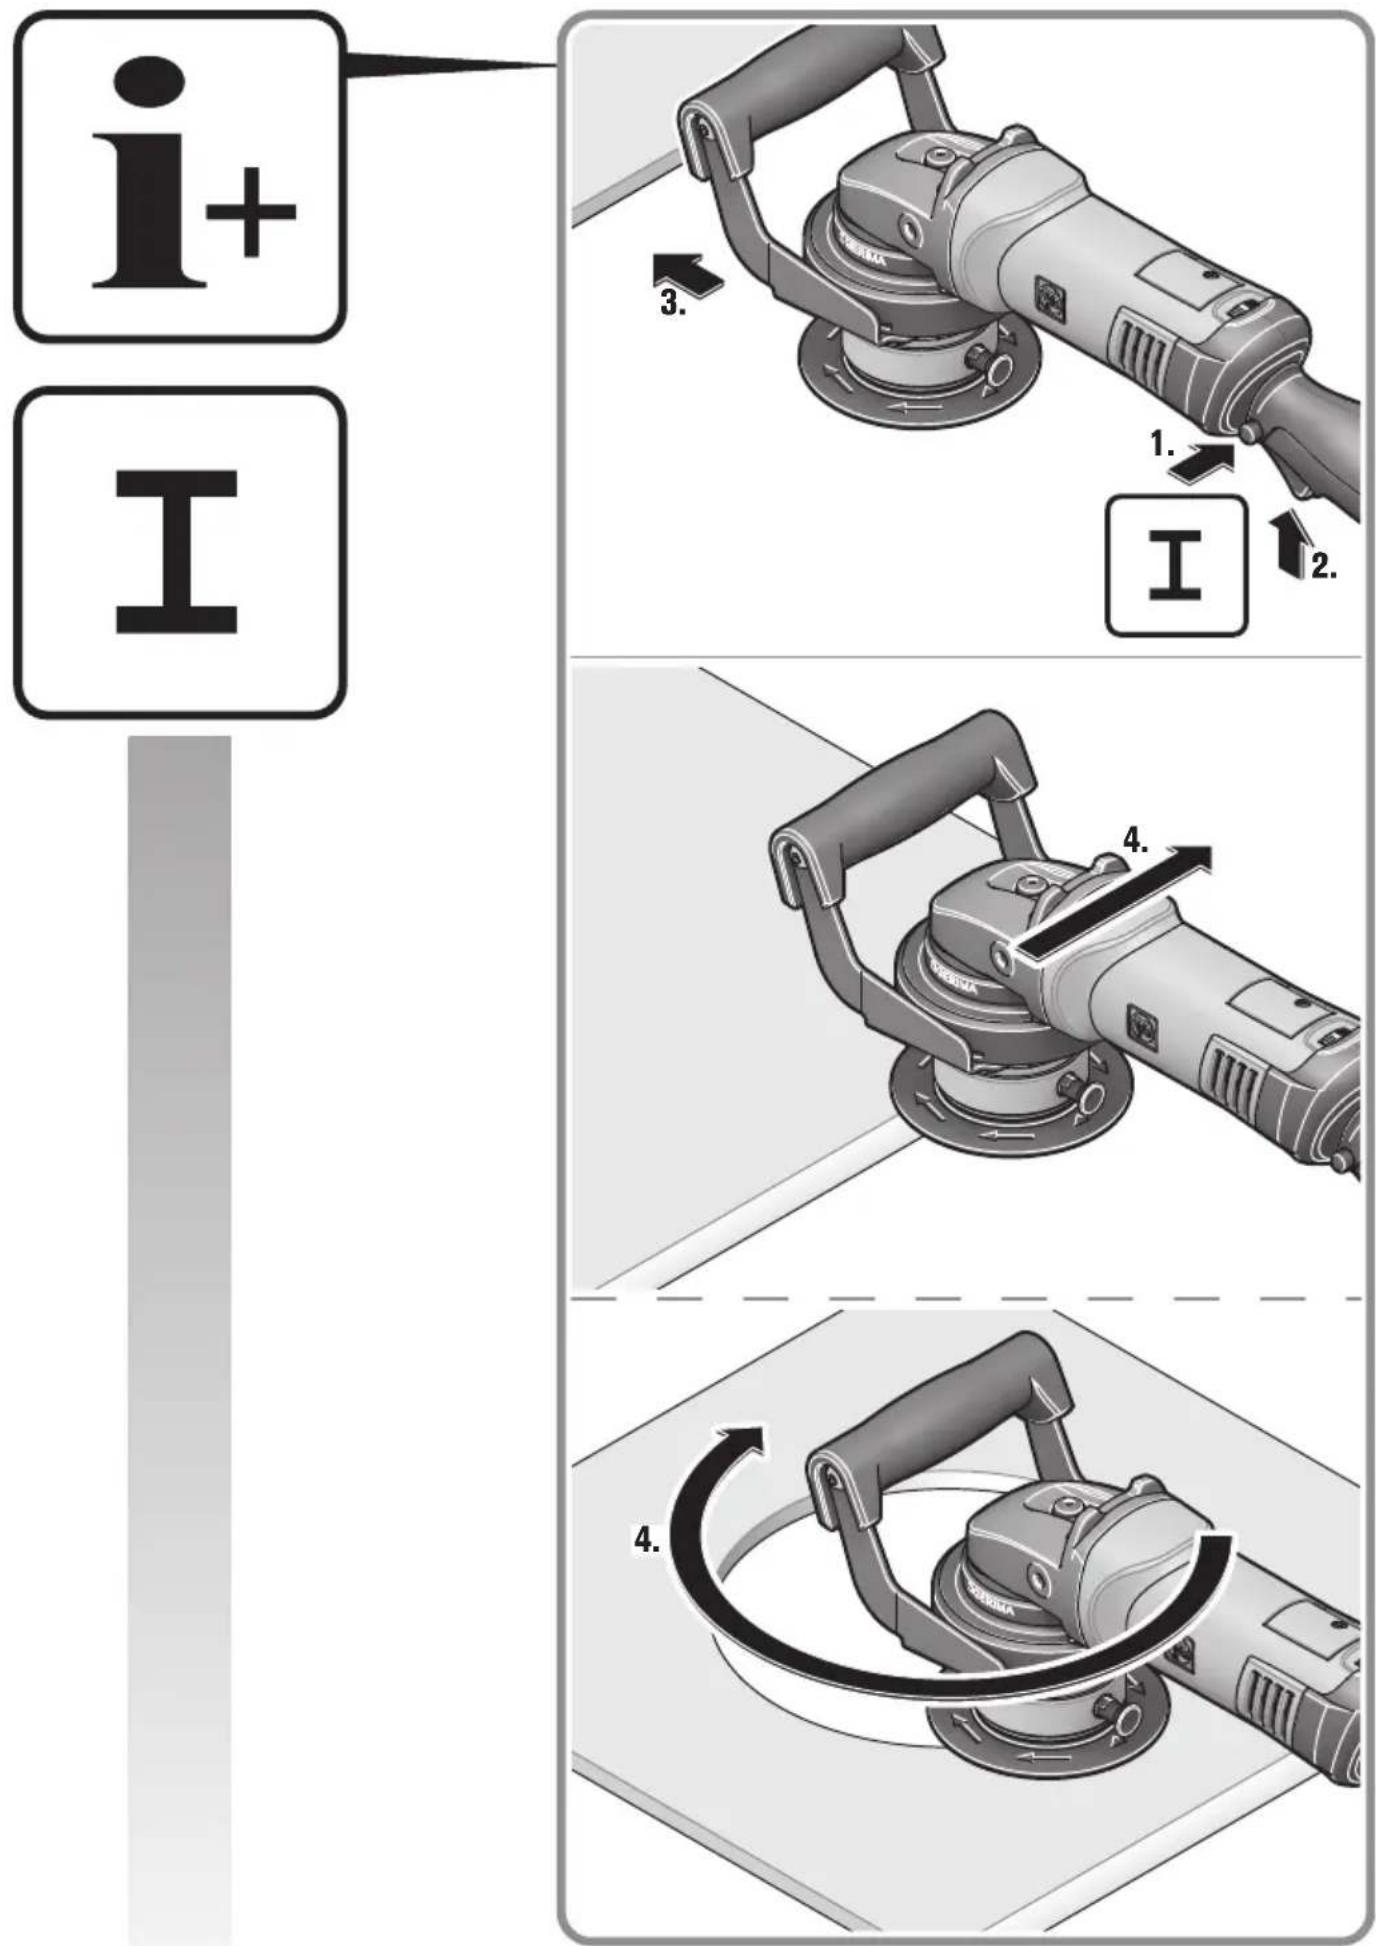
 | Switching on |
 | Switching off |
| [468B] | Locked |
 | Not locked |
| Product with double or reinforced insulation | |
 | current |
 | Low speed |
| [BDKH] | High speed |
 | Type: indexable insert |
 | Copper paste (Cu) |
 | See section “Operating Instructions” |
 | Apply oil |
| (**) May contain numbers and letters | |
| (Ax – Zx) Marking for internal purposes | |
| Character Unit of measurement, international | Unit of measurement, national | Explanation | |
| n_0 | /min, min ^-1 , rpm, r/min | rpm Rated no-load speed | |
| P_1 | W W Power input | ||
| P_2 | W W Output | ||
| UV | V | R | a t |
| fHz Hz | Frequency | ||
| M... | mm | mm | Size of metric thread |
| ∅ | mm | mm | Diameter of a round part |
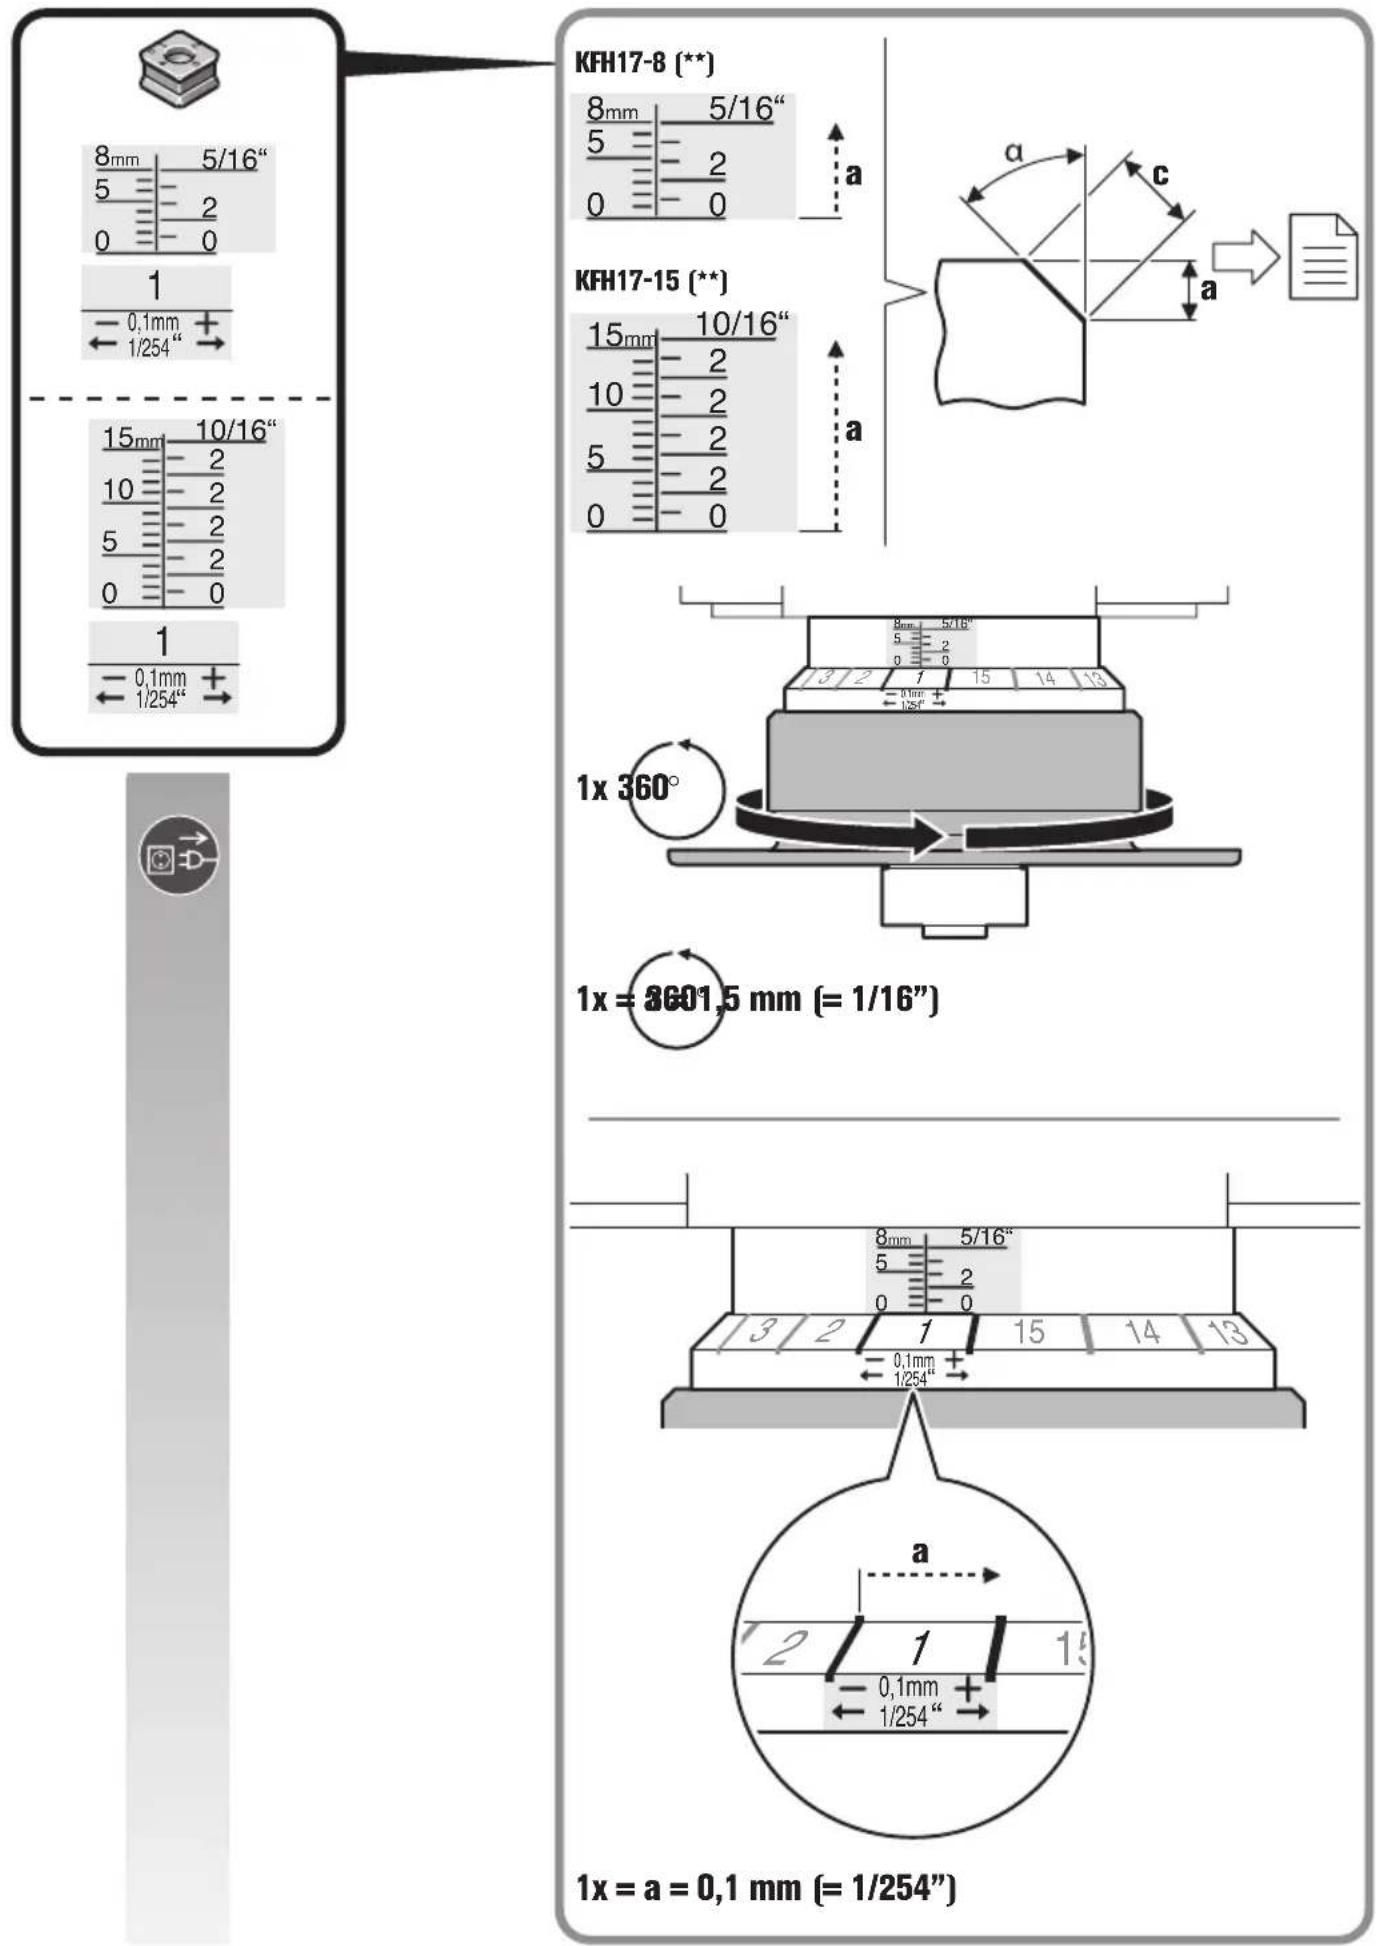
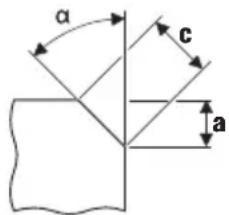
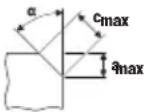 | ° | ° | α=bevel angle (milling head angle) |
| mm | mm | c (max., 45°)=max. bevel lengtha (max., 45°)=max. bevel height (setting dimension) | |
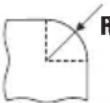 | mm | mm | R=radius |
| kg | kg | Weight according to EPTA-Procedure 01 | |
| L_pA | dB dB | Sound pressure level | |
| L_wA | dB dB | Sound power level | |
| L_pCpeak | dB dB | Peak sound pressure level | |
| K... | Uncertainty | ||
| α | m/s ^2 | m/s ^2 | Vibrational emission value according to EN 62841 (vector sum of three directions) |
| m, s, kg, A, mm, V, W, Hz, N, °C, dB, min, m/s ^2 | m, s, kg, A, mm, V, W, Hz, N, °C, dB, min, m/s ^2 | Basic and derived units of measurement from the international system of units SI. |
For your safety.
WARNING
Read all safety warnings and all instructions. Failure to follow the
warnings and instructions may result in electric shock, fire and/or serious injury.
Save all warnings and instructions for future reference.

Do not use this power tool before you have thoroughly read and completely understood this Instruction Manual and the enclosed "General
Safety Instructions" (document number
3 41 30 465 06 0). The documents mentioned should be kept for later use and enclosed with the power tool, should it be passed on or sold.
Please also observe the relevant national industrial safety regulations.
Intended use of the power tool:
hand-guided bevel milling machine for professional use by instructed operating personnel in weather-protected environments using the application tools and accessories recommended by FEIN:
- for machining workpieces made of steel, cast steel, fine-grained steel, stainless steel, aluminium, aluminium alloys, brass and plastic
- for commercial use in industry and trade
- for the preparation of K-, V-, X- and Y-shaped welding joints
- for machining visible edges in plant, equipment and general engineering
- for rounding edges for optimal paint preparation or as impact protection
This power tool is also suitable for use with AC generators with sufficient power output that correspond to the Standard ISO 8528, design type G2. This Standard is particularly not complied with when the so-called distortion factor exceeds 10 %. When in doubt, please refer to the generator instruction/specification guide.
Special safety instructions.
Hold the power tool only by the insulated gripping surfaces, as the cutting tool could cut into the machine's power cord. Contact with a “live” wire will also make exposed metal parts of the power tool “live” and shock the operator.
Fasten and secure the workpiece with screw clamps or other suitable clamps to a stable surface. When holding the workpiece manually it is unstable and can lead to loss of control and injury.
Do not use accessories which are not specifically designed and recommended by the tool manufacturer. Just because the accessory can be attached to your power tool, it does not assure safe operation.
Do not use a damaged accessory. Before each use, check the indexable inserts for chipping and cracks, wear or heavy use. If the machine or application tool is dropped, inspect for damage or install an undamaged application tool.
Wear personal protective equipment. Depending on application, use face shield, safety goggles or safety glasses. Where appropriate, wear dust mask, hearing protectors, gloves and workshop apron capable of stopping small abrasive or workpiece fragments. The eye protection must be capable of stopping flying debris generated by various operations. The dust mask or respirator must be capable of filtrating particles generated by your operation. Prolonged exposure to high intensity noise may cause hearing loss.
Keep bystanders a safe distance away from work area. Anyone entering the work area must wear personal protective equipment. Fragments of workpiece or of a broken accessory may fly away and cause injury beyond immediate area of operation.
Always hold the power tool firmly when starting it. The reaction torque of the motor, as it accelerates to full speed, can cause the power tool to twist.
If possible, use clamps to fasten or affix the workpiece. Never hold a workpiece in one hand and the power tool in the other hand while in use. Clamping workpieces allows you to use both hands for better control the power tool.
Never lay the power tool down until the accessory has come to a complete stop. The spinning accessory may grab the surface and pull the power tool out of your control.
Do not run the power tool while carrying it at your side. Accidental contact with the spinning accessory could snag your clothing, pulling the accessory into your body.
Regularly clean the power tool's air vents. The motor's fan will draw the dust inside the housing and excessive accumulation of powdered metal may cause electrical hazards.
Do not operate the power tool near flammable materials. Sparks could ignite these materials.
Do not use accessories that require liquid coolants.
Using water or other liquid coolants may result in electrocution or shock.
Secure the work piece firmly. A work piece that is gripped tightly in a clamping device or vice, is more secure than if held by hand.
Before putting into operation, check the mains connection and the mains plug for damage.
Recommendation: The tool should always be supplied with power via a residual current device (RCD) with a rated current of 30 mA or less.
Kickback and related warnings
Kickback is the sudden reaction to a pinched or snagged rotating application tool. Pinching or snagging causes the rotating application tool to rapidly stop. This can cause a power tool to be forced in the opposite direction to the rotating application tool at the point of binding.
For example, if the indexable insert is snagged or pinched in the workpiece, the edge of the indexable insert entering into the workpiece can get caught, causing the indexable insert to break out or cause kickback. The indexable-insert holder may either jump toward or away from the operator, depending on the direction of the indexable-insert holder at the point of binding. Indexable inserts can also break under these conditions. Kickback is the result of power tool misuse or incorrect operating procedures. It can be avoided by taking proper precautions as described below.
Maintain a firm grip on the power tool and position your body and arms to allow you to resist kickback forces.
The operator can control torque reactions or kickback forces, if proper precautions are taken.
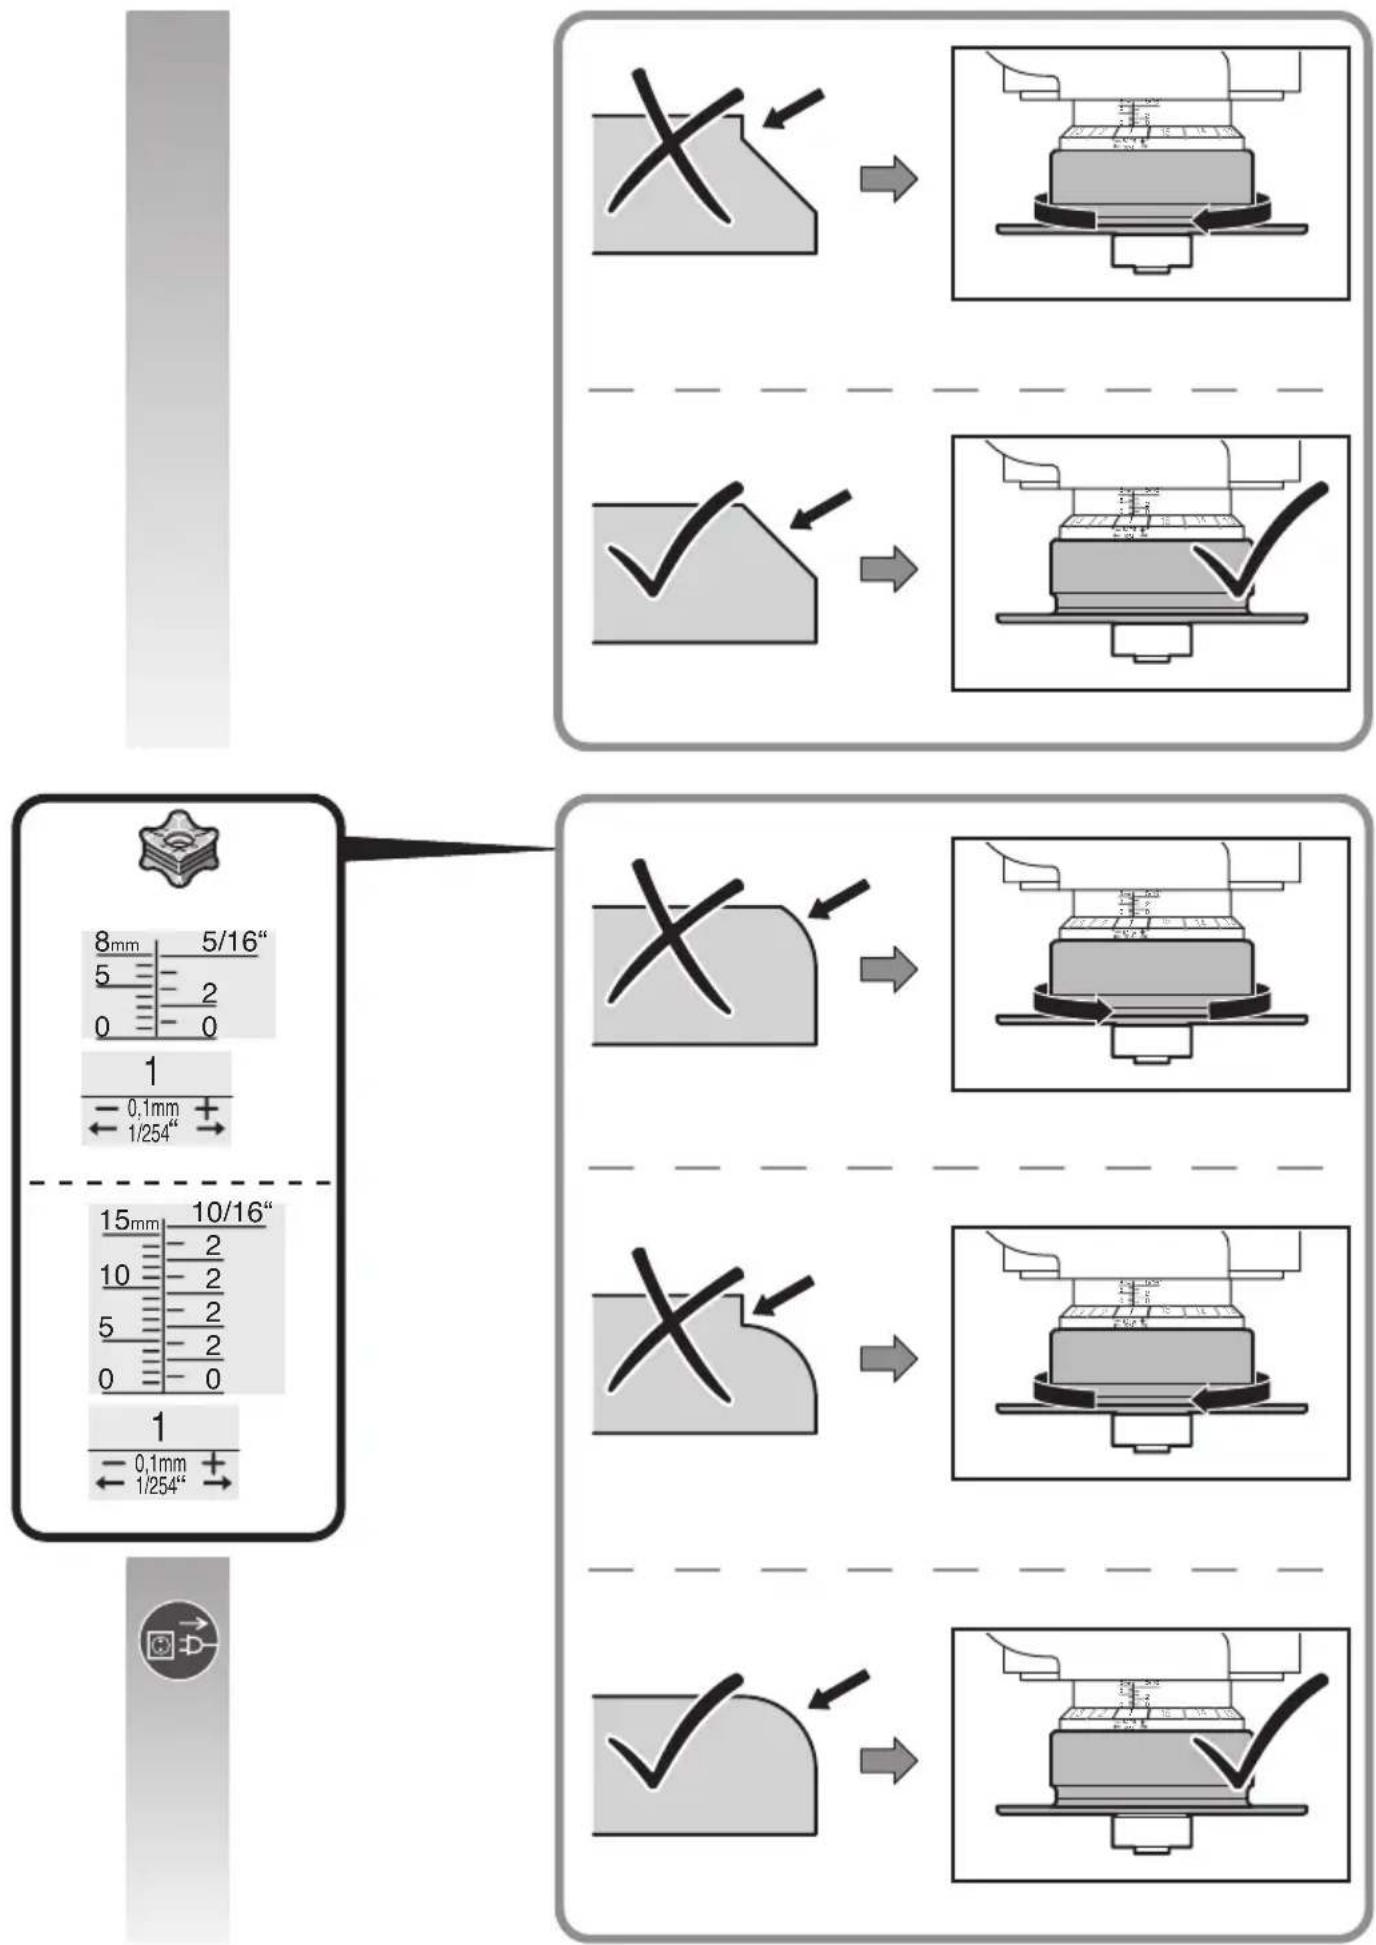
Use special care when working corners, sharp edges, etc. Avoid bouncing and snagging the accessory. Corners, sharp edges or bouncing have a tendency to snag the rotating accessory and cause loss of control or kickback.
Always feed the application tool into the material in the same direction as the cutting edge is exiting from the material (which is the same direction as the chips are thrown). Guiding the power tool in the wrong direction causes the cutting edge of the application tool to climb out of the workpiece and pull the tool in the direction of this feed.
Do not jam or seize the indexable insert or apply excessive pressure. Do not set a larger bevel height than the maximum allowed. Overstressing the indexable inserts increases the loading and susceptibility to wedging or snagging in the cut, and thus increases the possibility of kickback or indexable insert breakage.
Do not position your body directly in front or behind the indexable insert when operating the machine, position yourself parallel to the cutting surface. When moving the indexable inserts into the workpiece any potential kickback could result in contact with the indexable inserts.
Turn or replace blunt indexable inserts or those with worn off coating in good time. Blunt indexable inserts increase the risk of the machine jamming and breaking out.
Do not use the power tool without the guide plate.
Further safety warnings

Use ear protection during operation.
Indexable inserts, indexable-insert holder, workpiece and chippings can be hot after working. Wear protective gloves.
Use only sharp, undamaged indexable inserts.
Keep your hands away from the milling area and the application tools.
Do not direct the power tool against yourself, other persons or animals. Danger of injury from sharp or hot application tools.
Use a stationary extraction system, blow out ventilation slots frequently and connect a residual current device (RCD) on the line side. When working metal under extreme operating conditions, it is possible for conductive dust to settle in the interior of the power tool. The total insulation of the power tool can be impaired.
Do not rivet or screw any name-plates or signs onto the power tool. If the insulation is damaged, protection against an electric shock will be ineffective.
Do not work with materials containing magnesium.
Danger of fire.
Do not work with CFRP (carbon-fiber-reinforced polymer) and materials containing asbestos. These materials are considered carcinogenic.
Replace a damaged or cracked auxiliary handle. Do not operate the power tool with a defective auxiliary handle.
Hand/arm vibrations
The vibration emission level given in this information sheet has been measured in accordance with a standardised test given in EN 62841 and may be used to compare one tool with another. It may be used for a preliminary assessment of exposure.
The declared vibration emission level represents the main applications of the tool. However, if the tool is used for different applications, with different accessories or poorly maintained, the vibration emission may differ. This may significantly increase the exposure level over the total working period.
An estimation of the level of exposure to vibration should also take into account the times when the tool is switched off or when it is running but not actually doing the job. This may significantly reduce the exposure level over the total working period.
Identify additional safety measures to protect the operator from the effects of vibration such as: maintain the tool and the accessories, keep the hands warm, organisation of work patterns.
Emission values for vibration
Determined with a 45^ bevel.
Material being worked: S235JR, material thickness: 30 mm
| KFH17-8 (**) | a |
| Work procedure Weighted | acceleration* |
| 1. workstep (c = 5 mm) 5.4 m/s | 2 |
| 2. workstep (c = 8 mm) 6.2 m/s | 2 |
| Ka | 1.5 m/s2 |
| * This measured value depends on the material and application and can therefore also be exceeded. | |
| KFH17-15 (**) | a |
| Work procedure Weighted | acceleration* |
| 1. workstep (c = 5 mm) 3.7 m/s | 2 |
| 2. workstep (c = 12 mm) 4.1 m/s | 2 |
| 3. workstep (c = 15 mm) 4.3 m/s | 2 |
| Ka | 1.5 m/s2 |
| * This measured value depends on the material and application and can therefore also be exceeded. | |
Handling hazardous dusts
For work procedures with this power tool where material is removed, dusts develop that can be hazardous to one's health.
Contact with or inhaling some dust types, e. g. asbestos and asbestos-containing materials, lead-containing coatings, metal, some wood types, minerals, silicate particles from materials containing stone, paint solvents, wood preservatives, antifouling paints for vessels, can trigger allergic reactions to the operator or bystanders and/or lead to respiratory infections, cancer, birth defects or other reproductive harm. The risk from inhaling dusts depends on the exposition. Use dust extraction matched appropriately for the developing dust, as well as personal protective equipment and provide for good ventilation of the workplace. Leave the processing of asbestos-containing materials to specialists.
Wood and light-metal dust, hot mixtures of grinding dust and chemical materials can self-ignite under unfavourable conditions or cause an explosion. Avoid sparking in the direction of the dust collector as well as overheating of the power tool and the materials being sanded, empty the dust collector/container in time, observe the material manufacturer's working instructions, as well as the relevant regulations in your country for the materials being worked.
Operating Instructions.
Guide the power tool toward the workpiece only when switched on. Otherwise, the workpiece and application tools may be damaged.
During machining, the guide roller must always be in contact with the workpiece.
Firstly remove the switched-on power tool from the workpiece and then switch it off. Otherwise, the workpiece and application tools may be damaged.
If power tool vibrations increase significantly, check the setting parameters for the respective application material and the condition of the application tool.
WARNING
Danger of injury from chippings.
Always keep your hands, clothing
etc. away from chippings. Do not attempt to remove the application tool when still rotating. This can lead to serious injuries.
WARNING
Danger of injury from sharp edges of the milling head. Do not touch
the sharp edges of the milling head.
WARNING
Danger of burning. The application tool can become hot during opera-
tion. Allow the application tool to cool down:
- after placing the power tool down
- prior to tool changing.
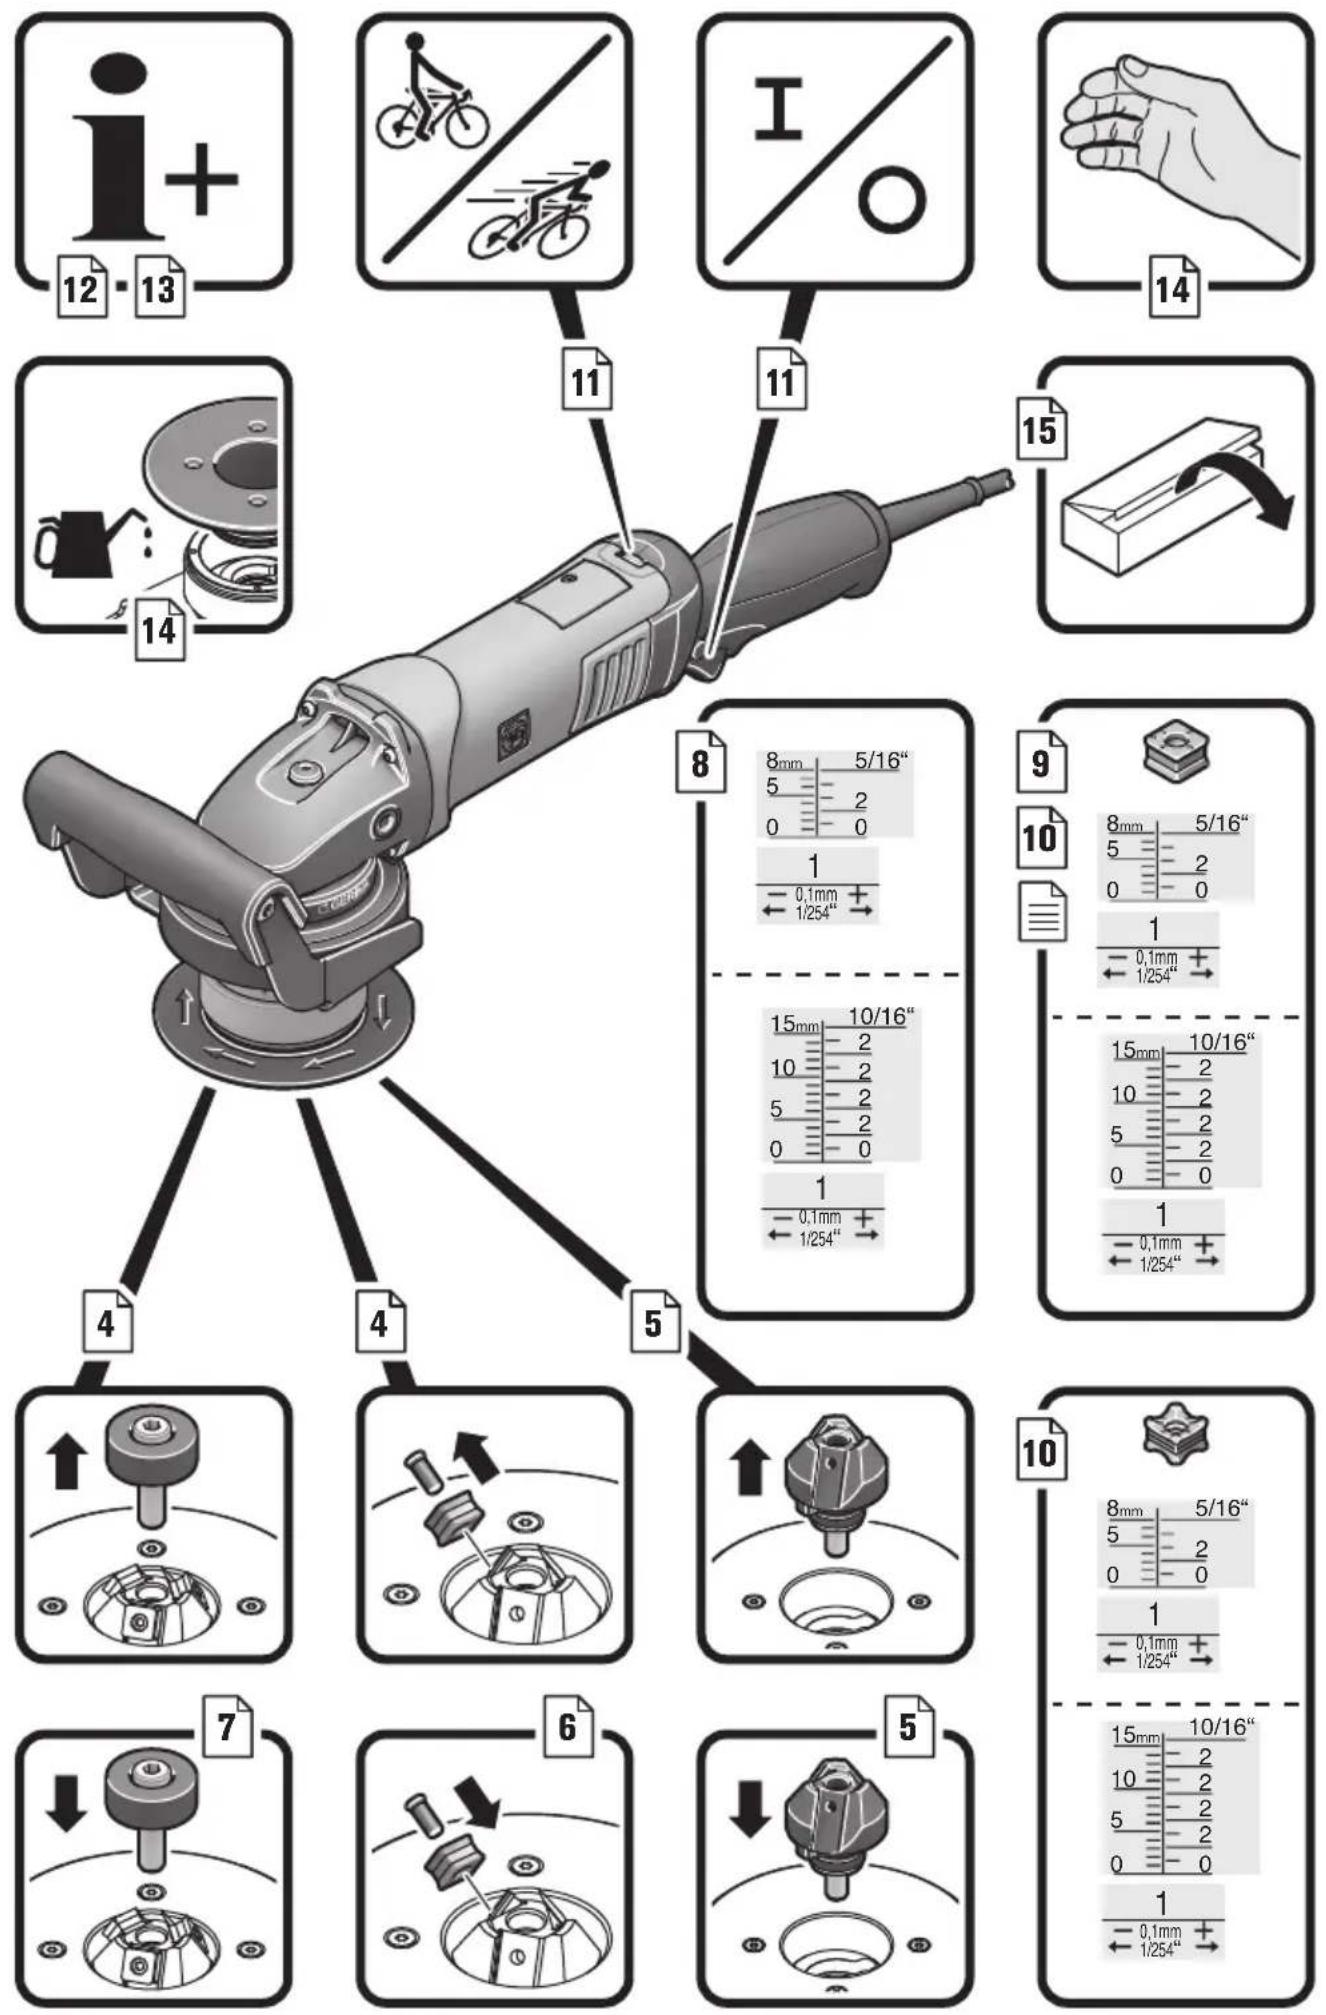
Rotate or turn around the eightfold heads as required. Please note that milling head, guide rollers and indexable inserts may vary depending on the application. Only use accessories approved for the application.
When machining bevels and radii, pay attention that the correct speed stage is set dependent of the material.
Various materials can be subject to hardening at the edges due to heating, plasma or laser cutting. This can lead to very high deviations from the specified reference values.
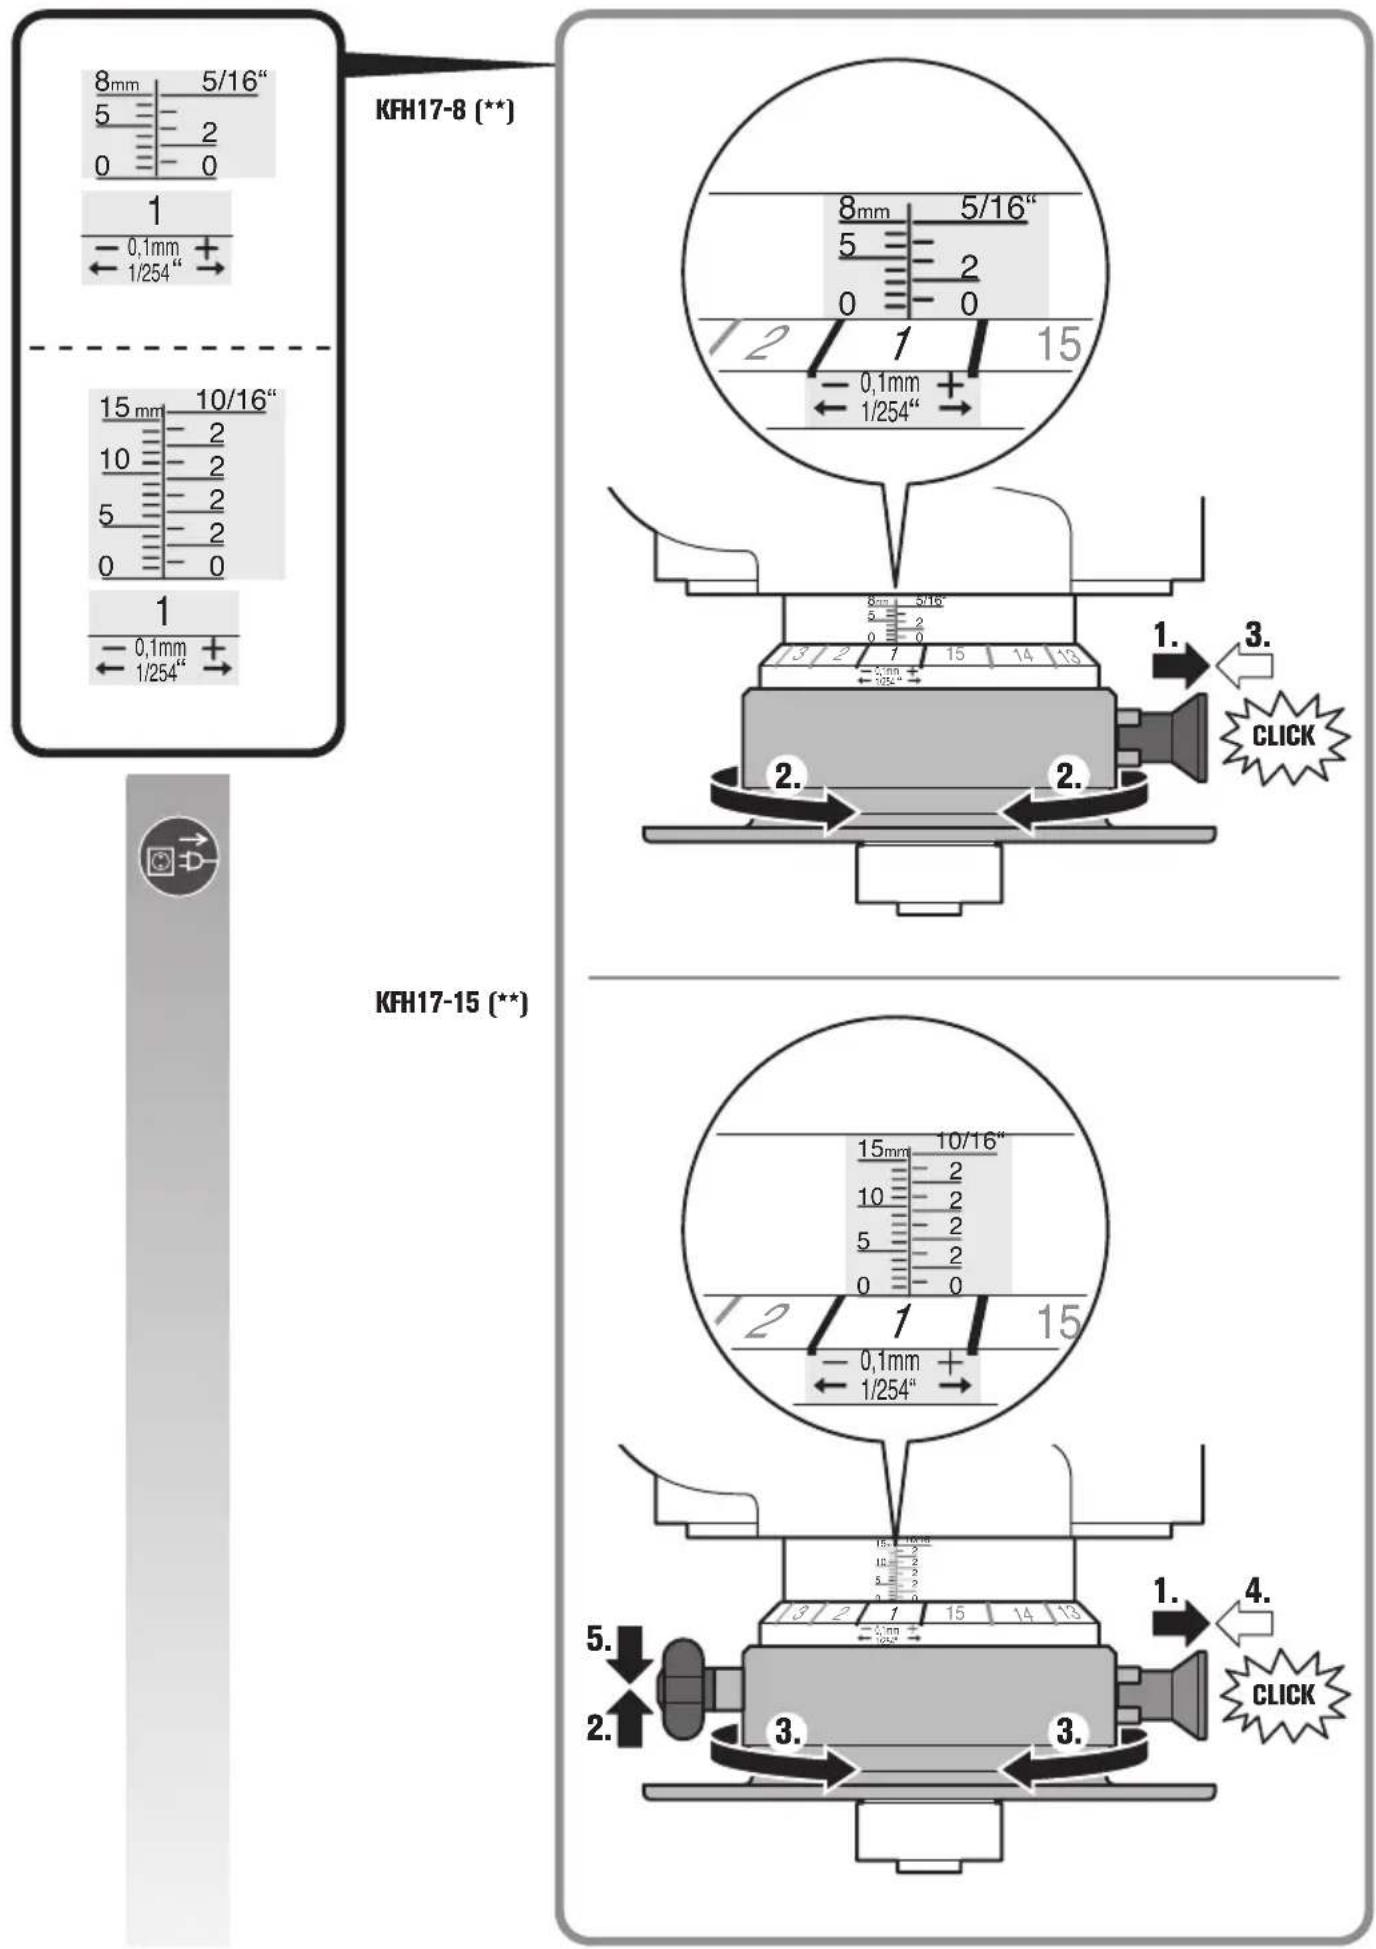
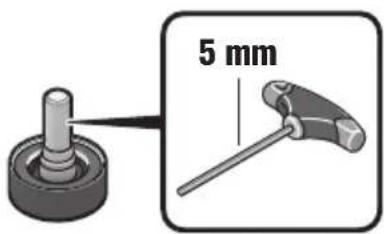
Setting the bevel height (see page 9/10)
Use indexable inserts for bevels, which are available as accessories. Set the bevel height "a" via the setting dimension at the guide plate. Make a test run. As the scale has a tolerance of approx. ± 1 mm (approx. 1/32"), readjustment may be necessary. Readjustment is made using the second scale (numbers 1 to 15) on the guide plate. The guide plate is adjusted by 0.1 mm (1/254") per digit. The maximum, material-dependent setting dimension and the recommended speed stage can be found in the following two tables.
Setting the radius dimension (see page 10)
Use indexable inserts for radii, which are available as accessories. The setting dimension of the guide plate must be adapted to the respective radius. For setting dimension values, please refer to the respective accessory. For the material-dependent speed stage, please refer to the two tables below.
| KFH17-8 (**): Max. setting dimension (applies for 45° bevel and radius) [mm] [inch] | Recommended speed stage | ||
| Aluminium 5.7 | 4/16 6 | ||
| Steel 400 N/mm2 | 5.7 4/16 6 | ||
| Steel 600 N/mm2 | 4.2 3/16 4-5 | ||
| Steel 900 N/mm2 | 2.8 2/16 4-5 | ||
| Stainless steel | 2.1 1/16 1-3 | ||
| KFH17-15 (**): | Max. setting dimension (applies for 45° bevel and radius) [mm] [inch] | Recommended speed stage | |
| Aluminium 10. | 6 7/16 6 | ||
| Steel 400 N/mm2 | 9.9 6/16 6 | ||
| Steel 600 N/mm2 | 8.5 5/16 4-5 | ||
| Steel 900 N/mm2 | 5.7 4/16 4-5 | ||
| Stainless steel | 5.0 3/16 1-3 | ||
The specified values are empirical values and cannot be guaranteed.
Repair and customer service.


When working metal under extreme operating conditions, it is possible for conductive dust to settle in the interior of the power
tool. The total insulation of the power tool can be impaired. Blow out the interior of the power tool via the ventilation slots frequently with dry and oil-free compressed air, and connect a residual current device (RCD) on the line side.
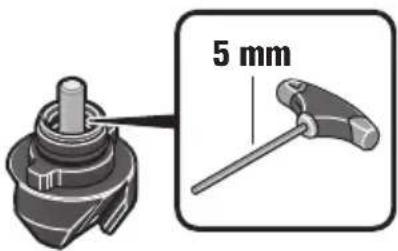
Clean and lubricate the thread of the height adjustment on the guide plate as required. Unscrew the guide plate and turn out the guide-plate holder. Clean the thread on both sides and apply oil.
Products that have come into contact with asbestos may not be sent in for repair. Dispose of products contaminated with asbestos according to the applicable country-specific regulations for such disposal.
When the machine's power supply cord is damaged, it must be replaced by the manufacturer or their representative.
The current spares parts list for this power tool can be found on our website at www.fein.com.
If required, you can change the following parts yourself:
application tools, milling head, guide roller
Warranty and liability.
The warranty for the product is valid in accordance with the legal regulations in the country where it is marketed. In addition, FEIN also provides a guarantee in accordance with the FEIN manufacturer's warranty declaration.
The delivery scope of your power tool may include only a part of the accessories described or shown in this Instruction Manual.
Declaration of conformity.
This CE declaration is only valid for European Union and EFTA (European Free Trade Association) countries and only for products intended for the EU- or EFTA market. After placing the product on the EU market the UKCA mark loses its mark validity.
The UKCA declaration is only valid for the Great Britain market (England, Wales and Scotland) and only for products intended for the Great Britain market. After placing the product on the Great Britain market the CE mark loses its mark validity.
FEIN declares itself solely responsible for this product conforming with the relevant provisions given on the last page of this Instruction Manual.
Technical documents at:
C. & E. Fein GmbH
Hans-Fein-Straße 81
73529 Schwäbisch Gmünd-Bargau, Germany
Environmental protection, disposal.
Packaging, worn out power tools and accessories should be sorted for environmental-friendly recycling.
Selection of accessories (see page 16).
Use only original FEIN accessories. The accessories must be intended for the power tool type.
A Milling head
B Indexable insert for bevels
C Indexable insert for radii
D Guide roller
This CE declaration is only valid for European Union and EFTA (European Free Trade Association) countries and only for products intended for the EU or EFTA market. After placing the product on the EU market the UKCA mark loses its mark validity.

EN 62841-1:2015+AC:2015
EN 55014-1:2017+A11:2020
EN 55014-2:2015+AC:2016
EN 55014-2:1997+A1:2001+A2:2008+AC:1997
EN 61000-3-2:2019
EN 61000-3-3:2013+A1:2019
EN 63000:2018
2011/65/EU, 2006/42/EG
2014/30/EU
U. Hergosell
i. V. S. Böhm i. V. Dr. M. Hergesell Director of Quality Director of Product Management Development
The UKCA declaration is only valid for the Great Britain market (England, Wales and Scotland) and only for products intended for the Great Britain market. After placing the product on the Great Britain market the CE mark loses its mark validity.

EN 62841-1:2015+AC:2015
EN 55014-1:2017+A11:2020
EN 55014-2:2015+AC:2016
EN 55014-2:1997+A1:2001+A2:2008+AC:1997
EN 61000-3-2:2019
EN 61000-3-3:2013+A1:2019
EN 63000:2018
Supply of Machinery Regulations 2008,
EMC Regulation 2016, The Restriction of the Use of Certain Hazardous Substances in Electrical and Electronic Equipment Regulations 2012
U. Hergosell
i. V. S. Böhm i. V. Dr. M. Hergesell Director of Quality Director of Product Management Development


- Translation of the Original Instructions.
- Symbols, abbreviations and terms used.
- For your safety.
- WARNING
- Intended use of the power tool:
- Special safety instructions.
- Kickback and related warnings
- Further safety warnings
- Hand/arm vibrations
- Emission values for vibration
- Handling hazardous dusts
- Operating Instructions.
- Danger of injury from chippings.
- Danger of injury from sharp edges of the milling head. Do not touch
- Danger of burning. The application tool can become hot during opera-
- Setting the bevel height (see page 9/10)
- Setting the radius dimension (see page 10)
- Repair and customer service.
- If required, you can change the following parts yourself:
- Warranty and liability.
- Declaration of conformity.
- Environmental protection, disposal.
- Selection of accessories (see page 16).
Brand : Fein
Model : KFH 178 R
Category : Milling machine