TC09PM - Portable air conditioner HONEYWELL - Free user manual and instructions
Find the device manual for free TC09PM HONEYWELL in PDF.
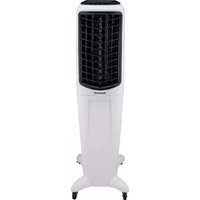
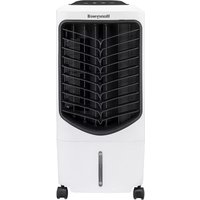
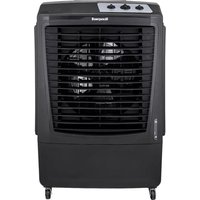
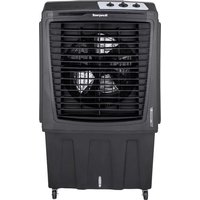
| Product Type | Portable evaporative air cooler |
| Brand | Honeywell |
| Model | TC09PM |
| Use | Water evaporative cooling |
| Power supply | Mains 230V~50Hz |
| Control | Rotary knobs (speed, cooling/oscillation) |
| Fan speeds | 3 speeds: Low (I), Medium (II), High (III) |
| Oscillation | Automatic, left-right, manual vertical adjustment |
| Cooling mode | Evaporative, activation via dedicated button |
| Water level indicator | Front window with Min and Max marks |
| Tank capacity | Not specified (fill to Max mark) |
| Cooling system | Removable honeycomb pad |
| Casters | Yes, for mobility |
| Filling door | At the back of the unit |
| Drain plug | Yes, at the bottom |
| Rear grille | Removable for access to honeycomb pad |
| Maintenance | Regular cleaning of tank and honeycomb pad |
| Safety | Unplug before maintenance; do not use dirty or salty water |
| Included accessories | User manual and safety guide |
| Origin | Made in China |
Frequently Asked Questions - TC09PM HONEYWELL
User questions about TC09PM HONEYWELL
0 question about this device. Answer the ones you know or ask your own.
Ask a new question about this device
Download the instructions for your Portable air conditioner in PDF format for free! Find your manual TC09PM - HONEYWELL and take your electronic device back in hand. On this page are published all the documents necessary for the use of your device. TC09PM by HONEYWELL.
USER MANUAL TC09PM HONEYWELL
Read and save these instructions before use
natural_image
Line drawing of a portable air conditioner unit with tiered heat exchanger (no text or symbols)text_image
QR code image containing encoded data, no visible human-readable textwww.honeywellaircomfort.com
E-mail: info@honeywellaircomfort.com

text_image
1 2 3 4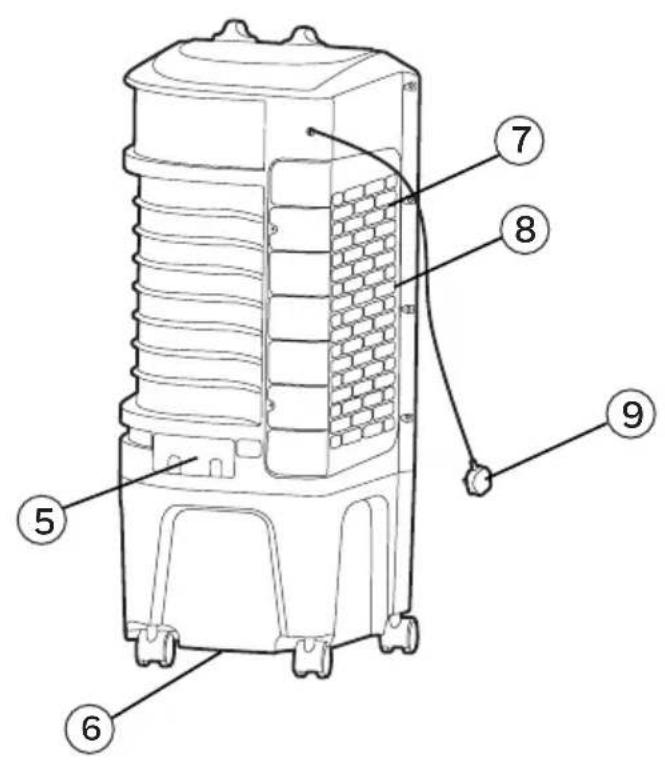
text_image
Technical diagram of a portable air conditioner unit with numbered parts labeled 5 to 91) Control Panel 6) Drain Plug
2) Louvers 7) Side Grill
3) Water Level Indicator 8) Honeycomb Cooling Media
4) Casters 9) Power Cord & Plug
5) Water Fill Door
WARNING -- READ AND SAVE THE AIR COOLER SAFETY & MAINTENANCE GUIDE AND USER MANUAL BEFORE USING THIS PRODUCT. FAILURE TO FOLLOW THESE INSTRUCTIONS MAY DAMAGE AND/ OR IMPAIR ITS OPERATION AND VOID THE WARRANTY. IN CASE THERE IS ANY INCONSISTENCY OR CONFLICT BETWEEN THE ENGLISH VERSION AND ANY OTHER LANGUAGE VERSION OF THE CONTENT OF THIS MATERIAL, THE ENGLISH VERSION SHALL PREVAIL.
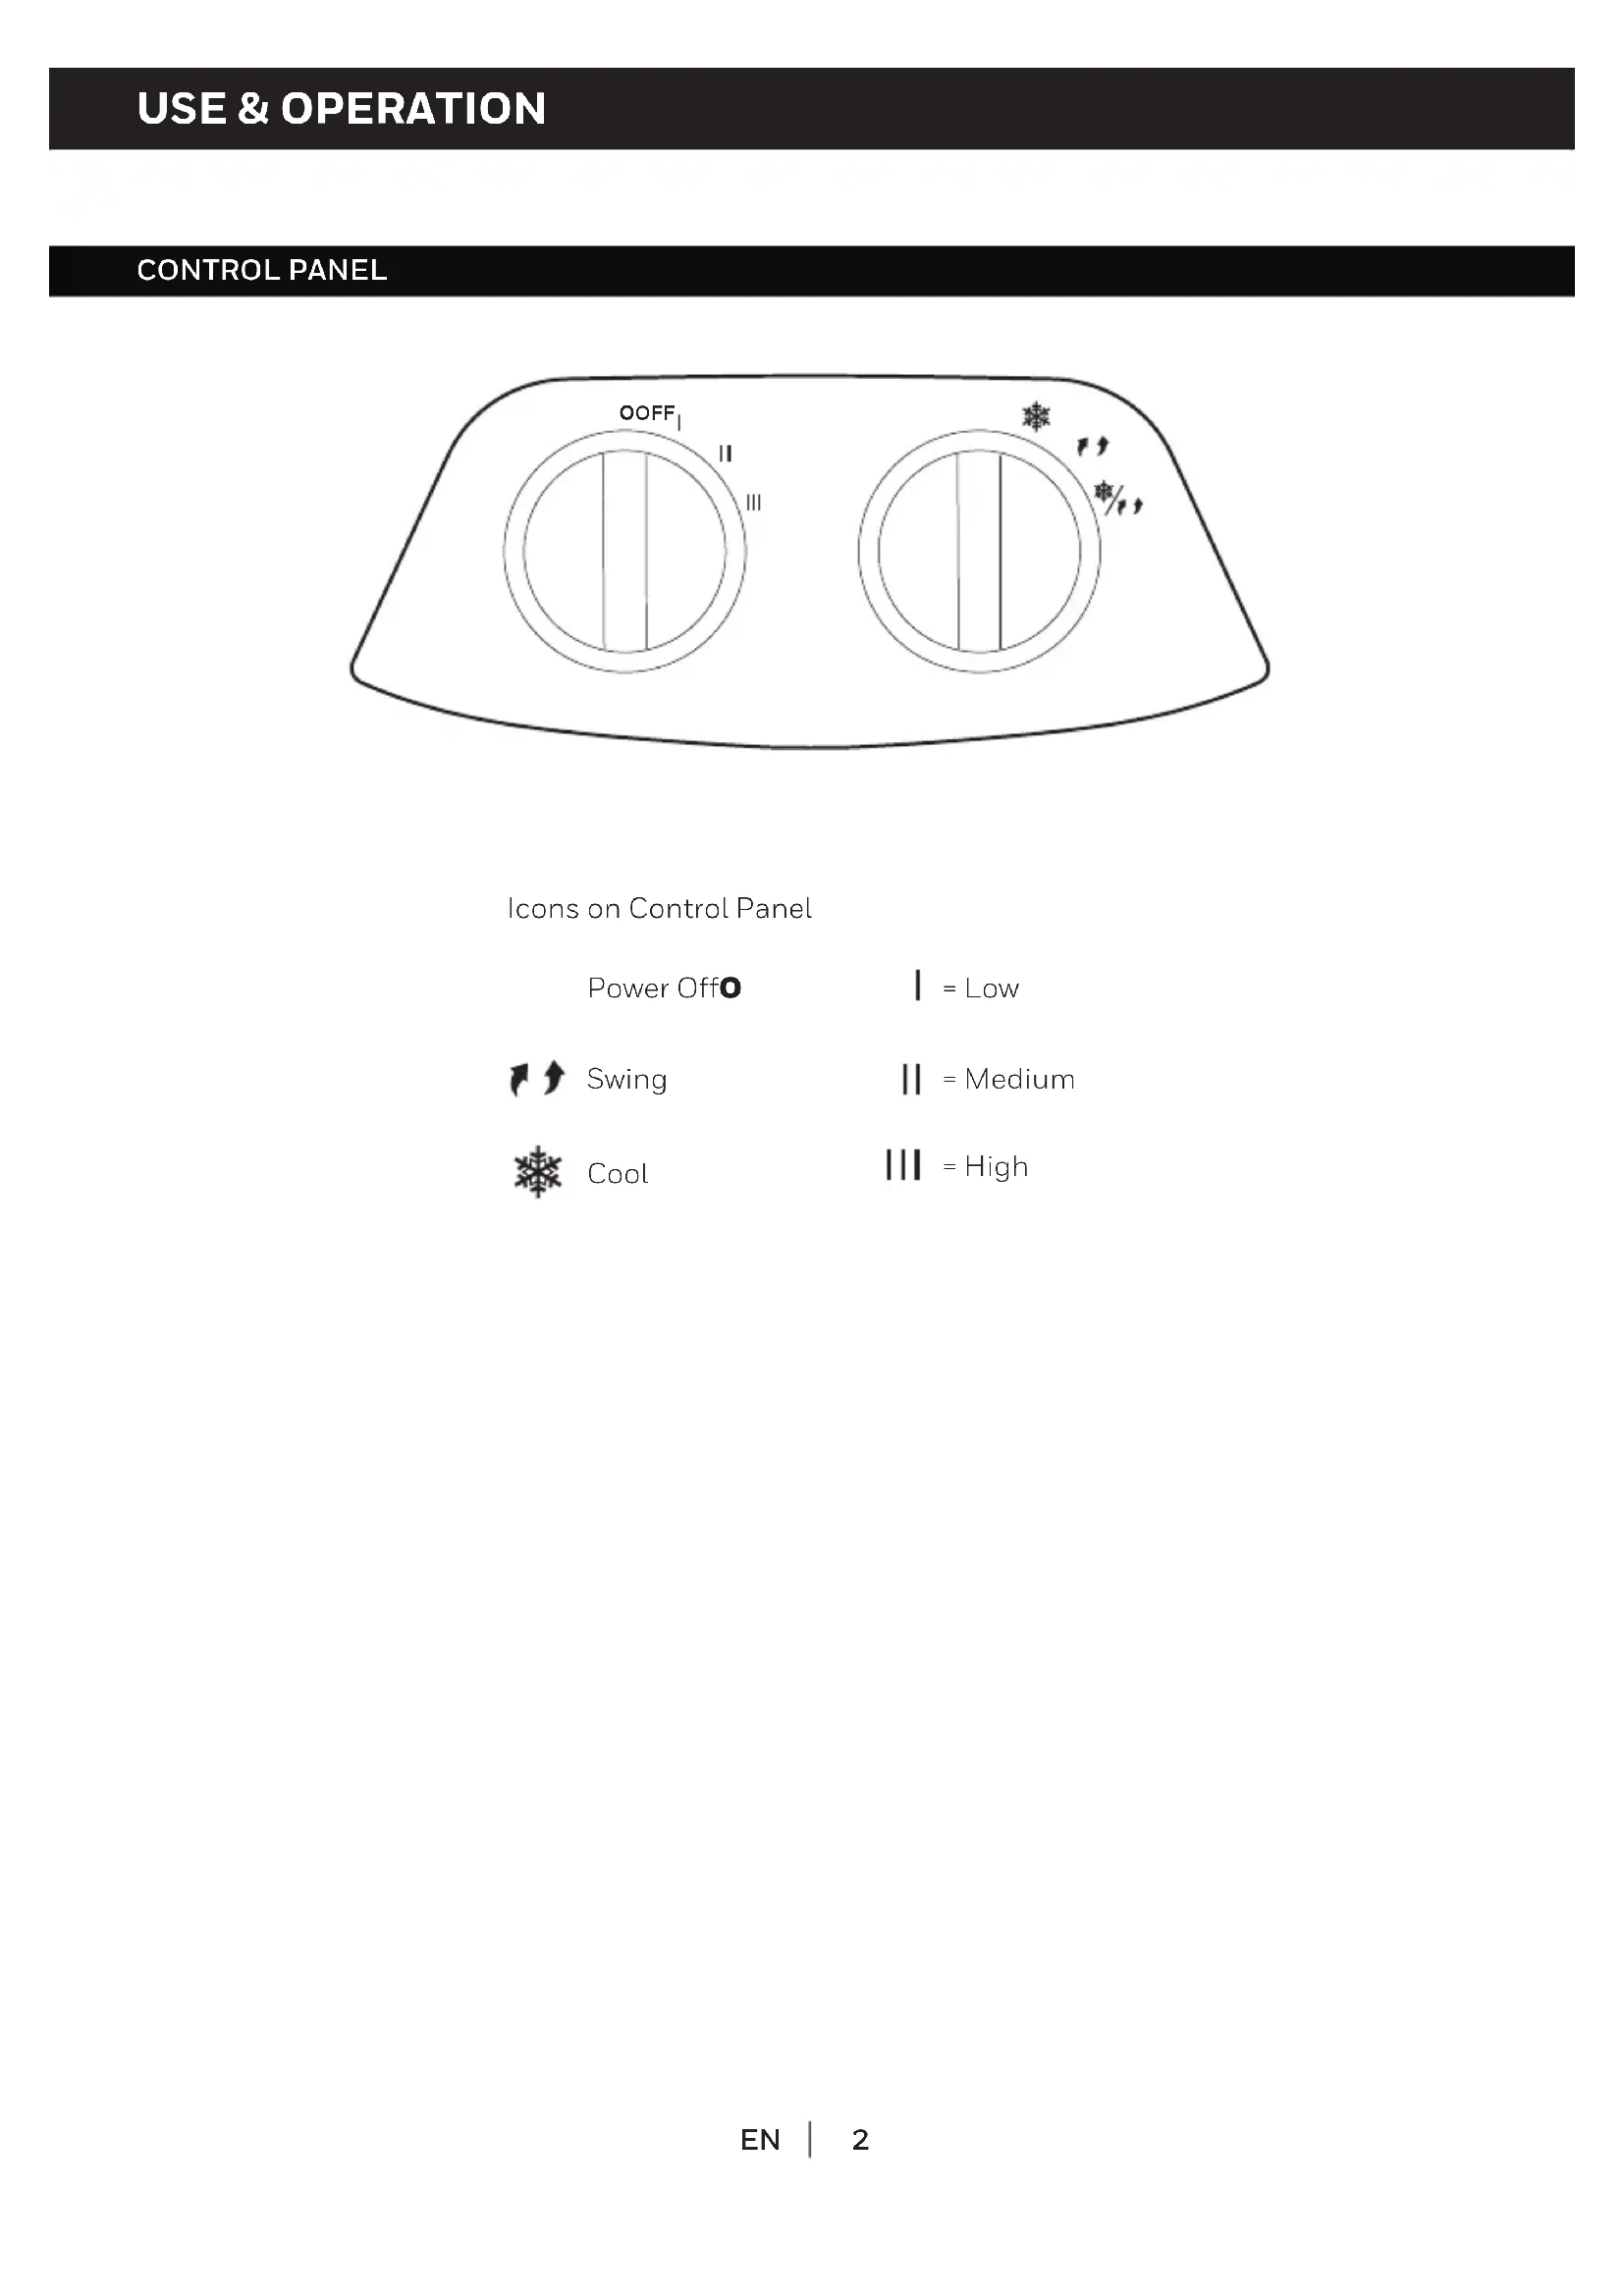
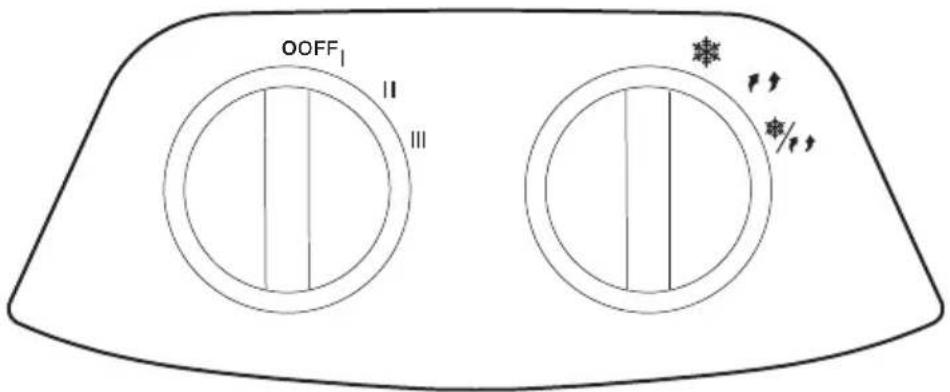
CONTROL PANEL
text_image
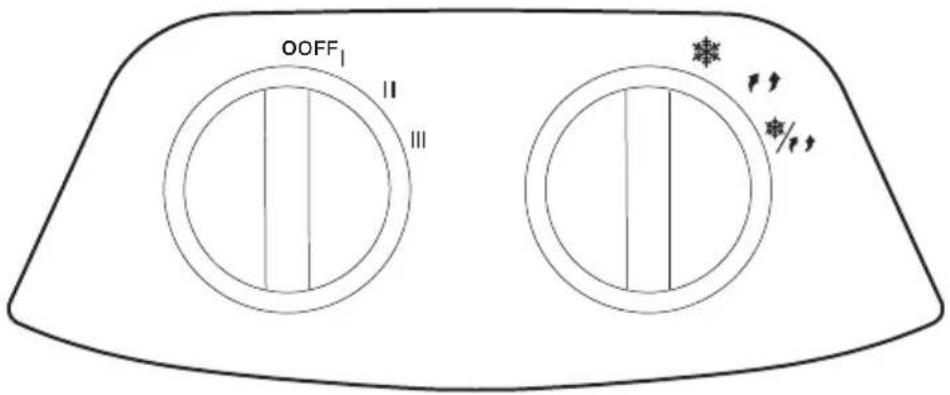
OOFF II III * / *Icons on Control Panel
Power Off
| = Low

Swing
|| = Medium

Cool
III = High
FUNCTION BUTTONS
SPEED
Connect to the power supply and turn the SPEED knob. The fan will start. Change the speed from Low to High (I for Low, II for Medium and III for High fan speed). To switch off the unit, turn the SPEED knob to O.
COOL / SWING
You must add water before operating the unit on Cool mode. Turn the COOL position to activate evaporative cooling. The water pump will operate and you will feel the cooler air after the Honeycomb Cooling Media is completely wet.
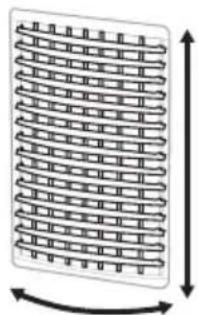
Turn the COOL / SWING ✦/11 position to activate evaporative cooling and the movement of the louvers. The louvers will begin to move left to right automatically. Vertical Air Flow - You can manually adjust the lever located at the front of the unit to change vertical air flow.
TurntheSWINGposition to activate the movement of the louvers.
natural_image
Diagram of a coiled spring or mesh structure with directional arrows indicating rotation (no text or symbols)Louver Movement
COOLER LOCATION
Make sure to position the air cooler correctly before you set up and start using the product. Please refer to the COOLER LOCATION section of the separate Safety & Maintenance Guide.
FILLING WITH WATER
CAUTION: Unplug the unit from the electrical socket before emptying or refilling the water tank.
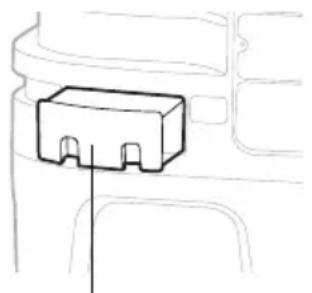
Open the Water Fill Door located on the back of the unit.
Manual Tank Refilling:
The Water Level Indicator is located at the front of the unit. Refill the water tank when water level is low. Do not fill water above the "Max." water level mark to avoid water droplets collecting on the louvers. Check the water level in the tank before running the COOL function. Make sure that the water in the tank is above the minimum water level mark. Running the unit in COOL mode with inadequate water may cause pump failure.
Note: The water capacity refers to the total volume of water that can be contained within the air cooler water tank and water distribution system. The water capacity in the tank at the "Max." indicator level may be lower than the actual water capacity of the air cooler.
WARNING: Do not fill water tank with dirty water or salt water. This can damage the unit and Honeycomb media.
natural_image
Simple line drawing of a rectangular electronic component with a vertical line pointing to it (no text or symbols)Water Fill Door
CLEANING & DRAINING THE WATER TANK
Below are instructions on how to clean and maintain your air cooler. If the cooler will not be used for a long period of time, please refer to the STORAGE & MAINTENANCE GUIDELINES located in the separate Safety & Maintenance Guide.
WARNING:
Before cleaning the unit, power OFF the unit and disconnect from the electrical socket.
- Move the unit to a location where the water can be drained. Remove the cap from the drain plug located at the bottom of the unit. Allow the tank to empty.
- Refill the water tank with clean water, up to the maximum level and drain it completely.
- Use a damp cloth to remove the dirt and dust from the surface of the unit. Never use corrosive elements or chemicals to clean this product.
- When the product is not in use, store the unit in a dry place out of direct sunlight.
CLEANING THE HONEYCOMB COOLING MEDIA
WARNING:
Before cleaning the unit, switch the unit OFF and disconnect the power adapter from the unit and electrical socket.
• The appliance is supplied with a Honeycomb Cooling Media.
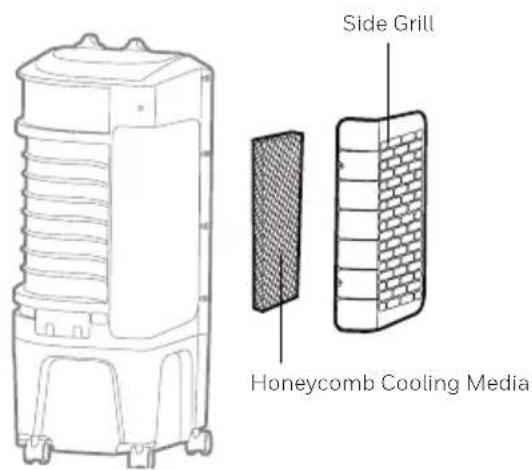
- The Honeycomb Cooling Media are located inside the Side Grill. See Figure 1 for instructions on how to remove them from the unit for cleaning and maintenance.
- Do not run the unit in COOL mode with stale water in the tank. You must empty the water tank and refill with fresh water, especially if the tank has not been cleaned in a long time.
- The cleaning frequency for the Honeycomb media depends on local air and water conditions. In areas where the mineral content of water is high, mineral deposits may build up on the Honeycomb Cooling Media and restrict air flow. Draining the water tank and refilling with fresh water at least once a week will help reduce mineral deposits. If mineral deposits remain on the Honeycomb Cooling Media, the media should be removed and washed under fresh water. The media should be cleaned every two months or sooner, depending on your needs.
- For best results allow the Honeycomb Cooling Media to dry after each use by turning off the cool function 15 minutes before turning the unit off.
Removing the Mesh Filter and Honeycomb Cooling Media:
- Remove all the screws from the side grill of the Air Cooler, carefully pull out the side grill from the cooler.
- Rinse the side grill with clean water and let it dry before re-installing to the unit.
- Carefully pull out the Honeycomb Media from the unit.
- Replace or clean media with water and a damp cloth as needed.
WARNING: DO NOT operate the Air Cooler when the side Grill is removed from the Air Cooler, or if there is a loose-fitting side Grill. Doing so can cause serious injury or dangerous electrical shock.
Figure 1:
text_image
Side Grill Honeycomb Cooling Media
text_image
1 2 3 4
text_image
Technical diagram of a portable air conditioner unit with numbered parts labeled 5 to 9natural_image
Diagram of a brick wall with uniform circular elements and directional arrows indicating rotation (no text or symbols)natural_image
Simple line drawing of a rectangular electronic component with a vertical line pointing to it (no text or symbols)text_image
Technical diagram of a portable air conditioner unit with numbered parts labeled 5 to 9natural_image
Diagram of a coiled spring with directional arrows indicating rotation (no text or symbols)natural_image
Simple line drawing of a rectangular electronic component with a vertical line pointing to it (no text or symbols)text_image
Technical diagram of a portable air conditioner unit with numbered parts labeled 5 to 9natural_image
Diagram of a grid-patterned rectangular structure with bidirectional arrows indicating rotation (no text or symbols)natural_image
Simple line drawing of a rectangular electronic component with a vertical line pointing to it (no text or symbols)Vuldeur Water
REINIGER EN LEEGMAKEN VAN DE WATERTANK
text_image
Technical diagram of a portable air conditioner unit with numbered parts labeled 5 to 9natural_image
Simple line drawing of a rectangular electronic component with a vertical line pointing to it (no text or symbols)Wasserfüll-Tür
text_image
Technical diagram of a water heater with numbered parts labeled 5 to 9text_image
Diagram of a device control panel with labeled buttons including directional, power, and signal iconstext_image
Diagram of a device control panel with icons for navigation, power, and operation symbolsSimboli su Display a Led

Accensione

Velocità

Rotazione
| = Bassa

Raffrescamento
|| = Media

lonizzatore**
||| = Alta
natural_image
Diagram of a grid-patterned rectangular structure with bidirectional arrows indicating rotation (no text or symbols)Movimento Alette
text_image
Honeywelltext_image
Honeywellnatural_image
Simple line drawing of a rectangular electronic component with a vertical line pointing to it (no text or symbols)text_image
Technical diagram of a portable air conditioner unit with numbered parts labeled 5 to 9$$ | = \text { Medium } $$

Kühlen
$$ \left| \right| = H \ddot {o} g $$
ANVÄNDNING & FUNKTION (FORTSÄTTNING)
FUNKTIONSKNAPPAR
HASTIGHET
natural_image
Diagram of a coiled spring or coil structure with directional arrows indicating rotation (no text or symbols)text_image
Sidogaller Honeycomb kylmedia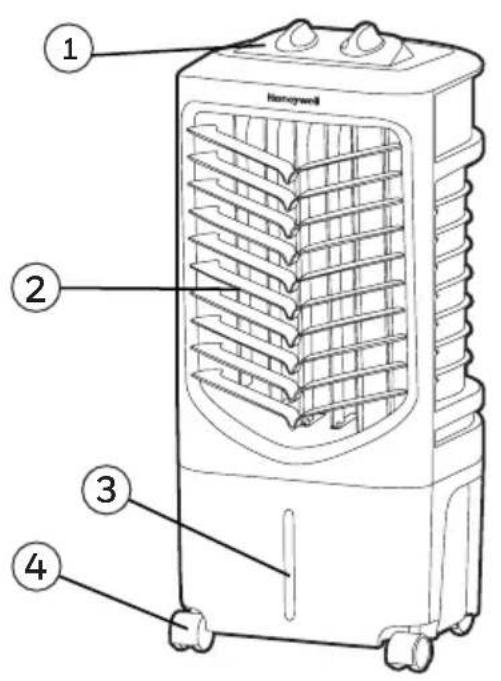
text_image
1 2 3 4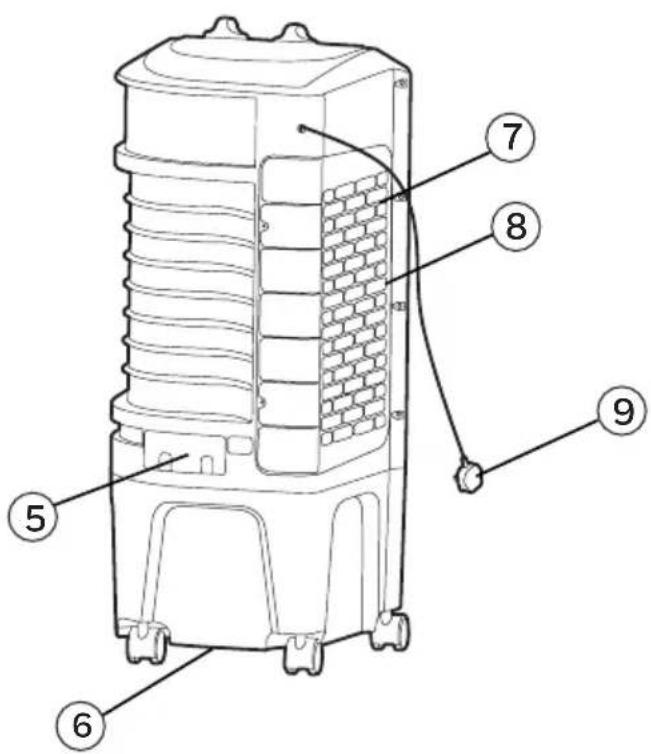
text_image
Technical diagram of a portable air conditioner unit with numbered parts labeled 5 to 91) Kontrolpanel 6) Bundprop
2) Lameller 7) Sidegrillen
3) Vandstandsviser 8) Honeycomb Kølemedie
4) Hjul 9) Strømledning & Prop
5) Vand Påfyldnings Dør
ADVARSEL -- LÆS OG GEM LUFT K∅LER SIKKERHED & VEDLIGEHOLDELSE VEJLEDNING OG BRUGERVEJLEDNING, INDEN DU BRUGER PRODUKTET. MANGLENDE OVERHOLDELSE AF DISSE INSTRUKSER KAN SKADE OG/ELLER FORRINGE DRIFTEN OG UGYLDIGG∅RE GARANTIEN. UDEN BEGRÆNSNING AF FORANSTÅENDE GÆLDER DET, AT HVIS DER ER EN KONFLIKT ELLER UOVERENSSTEMMELSE MELLEM DEN ENGELSKE SPROGVERSION AF DENNE AFTALE OG EN ANDEN OVERSAT VERSION AF DENNE AFTALE, ER DEN ENGELSKE SPROGVERSION OG FORTOLKNING GÆLDENDE.
KONTROLPANEL
text_image
OOFF II III * / *Ikoner på Skærmen
Sluk
| = Lav

Schwingen
|| = Medium

Cool
||| = H∅j
FUNKTIONSKNAPPER
HASTIGHED
natural_image
Diagram of a corrugated panel with directional arrows indicating rotation (no text or symbols)Lameller Bevægelse
COOLER PLACERING
RENG∅RING & T∅MNING AF VANDBEHOLDEREN
text_image
Technical diagram of a portable air conditioner unit with numbered parts labeled 5 to 9natural_image
Diagram of a coiled spring pattern with directional arrows indicating rotation (no text or symbols)Säleikön liikkeet
JÄÄHDYTTIMEN ASENTO
TANKIN TYHJENNYS JA PUHDISTUS
text_image
Technical diagram of a portable air conditioner unit with numbered parts labeled 5 to 9natural_image
Diagram of a coiled spring or coil structure with directional arrows indicating rotation (no text or symbols)natural_image
Simple line drawing of a rectangular electronic component with a vertical line pointing to it (no text or symbols)Klapka wlewu wody
CZYSZCZENIE I OPRÓZNIANIE POJEMNIKA NA WODE
text_image
Technical diagram of a portable air conditioner unit with numbered parts labeled 5 to 91) Kontrol Paneli 6) Tahliye Fii
2) Havalandırma Panjuru 7) Yan Lzgara
3) Su Seviyesi Göstergesi 8) Petek Sogutma Ortamı
4) Atıcılar 9) Elektrik Kablosu ve Priz
5) Su Doldurma Kapağı
UYARI -- BU ÜRÜNÜ KULLANMADAN ÖNCE SOGUTUCU GÜVENLIK VE BAKIM KILAVUZUNU OKUYUN VE SAKLAYIN. TALIMATLARIN UYGULANMAMASI DURUMUNDA CIHAZ HASAR GÖREBILIR YA DA ETKISI AZALABILIR VE GARANTI DII KALABILIR. BU IÇERİĞIN İNGILIZCE DILINDEKI VERSIYONU ILE DIĞER HERHANGI BIR DILE YAPILAN TERCÜME VERSIYONU ARASINDA FARKLILIK OLMASI DURUMUNDA, İNGILIZCE DILINDEKI VERSIYONU GEÇERLI OLACAKTIR.
KONTROL PANELI

text_image
OOFF II III * / *Ekran Simgeleri
GüçO
| = Düşük

Dönme
|| = Orta

Serin
III = Yüksek
FONKSIYON TULARI
HIZ
text_image
Technical diagram of a portable air conditioner unit with numbered parts labeled 5 to 9natural_image
Diagram of a brick wall pattern with directional arrows indicating rotation (no text or symbols)Движение заслонок
УСТАНОВКА ПРИБОРА
natural_image
Simple line drawing of a rectangular electronic component with a vertical line pointing to it (no text or symbols)text_image
Technical diagram of a portable air conditioner unit with numbered parts labeled 5 to 9natural_image
Diagram of a grid-patterned rectangular structure with directional arrows indicating rotation (no text or symbols)Movimento das Grades
natural_image
Simple line drawing of a rectangular component with a vertical line pointing to it, no text or symbols present.Entrada de Água
LIMPAR E DRENAR O DEPÓSITO DE ÁGUA
text_image
Technical diagram of a portable air conditioner unit with numbered parts labeled 5 to 9$$ | = X a \mu \eta \lambda \acute {n} $$

Kivnon
$$ | = M \varepsilon \sigma a i a $$

Ψύξη
$$ \left| \right| = Y \psi \eta \lambda \acute {n} $$
ΚΟΥΜΠΙΑ ΛΕΙΤΟΥΡΓΙΑΣ
TAXYTHTA
natural_image
Diagram of a coiled spring or mesh structure with directional arrows indicating rotation (no text or symbols)Κίνηση περσίδας
© 2020 JMATEK Limited. All rights reserved. The Honeywell Trademark is used under license from Honeywell International Inc. Honeywell International Inc. makes no representations or warranties with respect to this product. This product is manufactured by Airtek Intl Corp. Ltd. (subsidiary of JMATEK Ltd.)
JMATEK limited
Manulife Financial Centre, Kwun Tong, Hong Kong Phone: 852-2559-5522 Email: info@jmatek.com Web: www.jmatek.com