
Magic Clean - Vacuum Cleaner HAYWARD - Free user manual and instructions
Find the device manual for free Magic Clean HAYWARD in PDF.
| Product type | Above-ground automatic pool cleaner |
| Brand | Hayward |
| Model | Magic Clean |
| Dimensions (overall) | Approximately 45 x 35 x 20 cm |
| Weight | Approximately 2.5 kg |
| Power supply | Hydraulic via filtration pump (max 2 bar) |
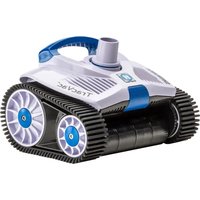
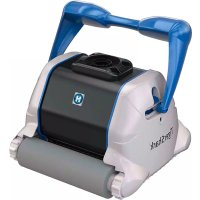
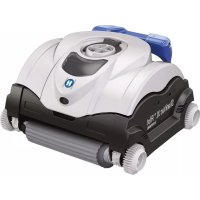
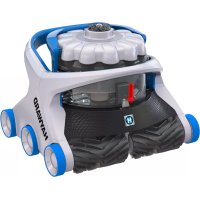
| Main functions | SmartDrive guidance system, random cleaning, bottom suction, improved water circulation |
| Hose length supplied | 9.75 m (11 hoses of 81 cm + 1 main hose) |
| Maintenance and cleaning | Clean the leaf trap, pre-filter and filter regularly. Brush the rear grid. |
| Safety | Use an outlet protected by a residual-current circuit breaker. Do not use an extension cord. Purge the air before use. Respect the maximum pressure of 2 bars. |
| Spare parts and repairability | Available parts: turbine kit, pad kit, wing kit, grid, gears, etc. See list in the manual. |
| Warranty | 2 years parts and labor (excluding pads, wings, fins) |
| Installation tips | Attach to the skimmer with included adapter. Purge the air from the circuit before commissioning. |
| Usage recommendations | Remove the cleaner during shock chlorination. Do not coil the hose. Disconnect from the skimmer for backwashing. |
Frequently Asked Questions - Magic Clean HAYWARD
User questions about Magic Clean HAYWARD
0 question about this device. Answer the ones you know or ask your own.
Ask a new question about this device
Download the instructions for your Vacuum Cleaner in PDF format for free! Find your manual Magic Clean - HAYWARD and take your electronic device back in hand. On this page are published all the documents necessary for the use of your device. Magic Clean by HAYWARD.
USER MANUAL Magic Clean HAYWARD
natural_image
Four colorful cartoon-style robotic vacuum cleaner models in different colors (red, yellow, blue, white) with no visible text or symbols.MAGIC CLEAN/SCUBA/ WHALY/AQUACRITTER NETTOYEURS AUTOMATIQUES DE PISCINE HORS SOL ABOVE-GROUND AUTOMATIC POOL CLEANER LIMPIAFONDOS AUTOMÁTICO PARA PISCINAS SOBRE EL SUELO AUTOMATISCHER REINIGER FÜR AUFSTELLBECKEN BOVENGRONDSE AUTOMATISCHE ZWEMBADREINIGER PULITORE AUTOMATICO PER PISCINE FUORI TERRA ASPIRADOR AUTOMÁTICO PARA PISCINAS ACIMA DO SOLO

natural_image
Abstract geometric logo with a stylized 'H' inside a circle, no text or symbols present.HAYWARD, POOL PRODUCTS INC.
Siège Social: U.S.A: 620 Division Street Elizabeth, NJ 07207 USA
1 Hayward Industrial Drive Clemmons, NC 27012
2935 Sidco Drive Nashville, TN 37204
2875 Pomona Blvd. Pomona, CA 91768
Canada: Europe: 2880 Plymouth Drive Parc industriel de la Plaine de l'Ain Oakville, Ontario L6H 5R4 Allée des chênes F-01150 St Vulbas France
Français .....page 3
Anglais .... page 14
Espagnole ..... page 25
natural_image
Four colorful cartoon-style robotic vacuum cleaner models in red, yellow, blue, and yellow (no text or symbols visible)natural_image
Abstract geometric logo with stylized 'H' shape inside a circle, no text or symbols presentHAYWARD, POOL PRODUCTS INC.
1 Hayward Industrial Drive
Clemmons, NC 27012
2935 Sidco Drive
Nashville, TN 37204
2875 Pomona Blvd.
Pomona, CA 91768
Canada: Europe:
natural_image
Simple black-and-white line drawing of a stick figure emerging from a light bulb (no text or symbols)natural_image
Simple line drawing of a ladybug with an arrow pointing to its head (no text or symbols)Figure 2
natural_image
Line drawing of a dome-shaped object with internal patterns and a handle (no text or symbols)Figure 3
Étape 4
natural_image
Illustration of two hands holding a small object with two star symbols, no text or labels presentFigure 4
Instructions d'installation (suite)
natural_image
Illustration of a hand using a tool to press down a small object, with no visible text or symbols.Figure 5
Étape 7
Hayward Pool Products, Inc. Hayward Pool Europe
natural_image
Four colorful cartoon-style cleaning or cleaning tools with different designs and facial features (no text or symbols visible)
natural_image
Abstract geometric logo with stylized 'U' shape inside a circle, no text or symbols presentHAYWARD, POOL PRODUCTS INC.
1 Hayward Industrial Drive Clemmons, NC 27012
2935 Sidco Drive
Nashville, TN 37204
2875 Pomona Blvd.
Pomona, CA 91768
Canada: Europe:
INSTALLATION, OPERATION, & PARTS
natural_image
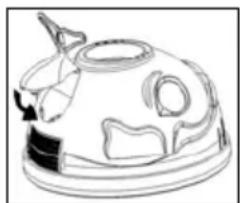
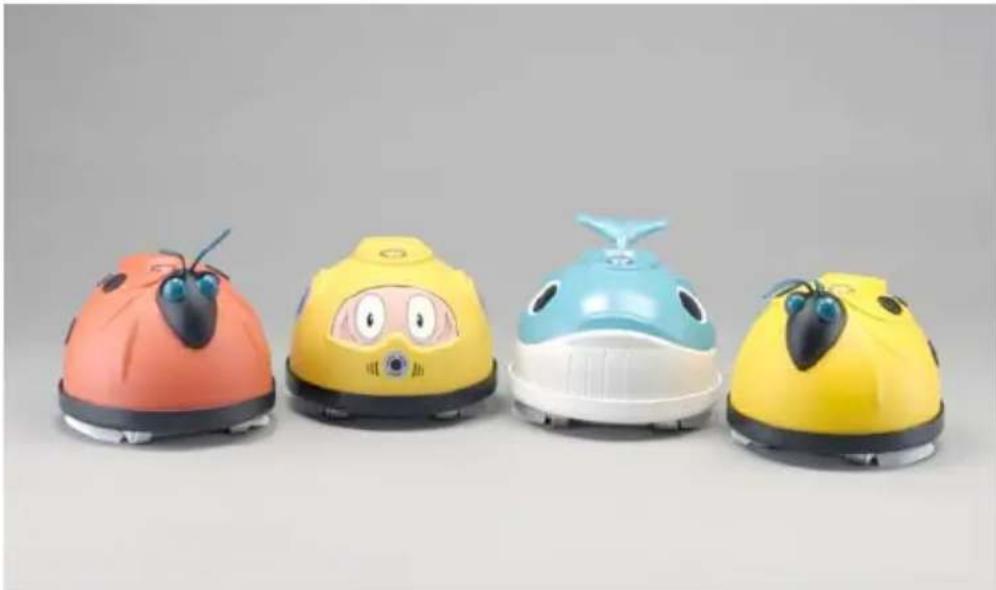
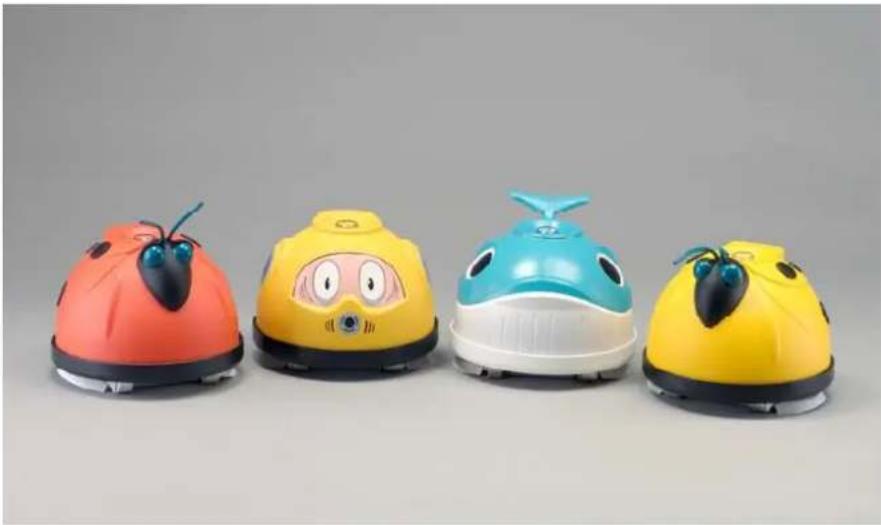
Four colorful cartoon-style robotic devices with different facial features and designs, arranged side by side (no text or symbols visible)Hayward® automatic pool cleaners are specifically engineered for the demanding requirements of today's above-ground swimming pools.
To prevent potential injury and to avoid unnecessary service calls, read this manual carefully and completely.
CAUTION- Hayward® Automatic Pool Cleaners are intended for use on permanently installed above-ground swimming pools only. A permanently installed pool is constructed on the ground such that it cannot be readily disassembled for storage.
WARNING – This manual contains important safety information that must be furnished to the end user of this product. FAILURE TO READ AND FOLLOW ALL INSTRUCTIONS COULD RESULT IN SERIOUS INJURY.
SAVE THIS INSTRUCTION MANUAL

natural_image
Simple icon of a storefront with a curved roof and patterned bottom (no text or symbols)HAYWARD POOL PRODUCTS, INC.
Corporate Headquarters: U.S.A:
620 Division Street
Elizabeth, NJ 07207
1 Hayward Industrial Drive
Clemmons, NC 27012
2935 Sidco Drive
Nashville, TN 37204
2875 Pomona Blvd.
Pomona, CA 91768
Canada: Europe:
IMPORTANT SAFETY INSTRUCTIONS
When installing and using electrical equipment always follow basic safety precautions.
CAREFULLY READ AND FOLLOW ALL INSTRUCTIONS IN THIS OWNER'S MANUAL AND ON EQUIPMENT.
KEEP SAFETY LABELS IN GOOD CONDITION AND REPLACE IF MISSING OR DAMAGED.

This is the SAFETY ALERT SYMBOL. When you see this symbol on your system or in the er's Manual, look for one of the following words and be alert to the potential for personal injury.

DANGER indicates an imminently hazardous situation, which, if not avoided, will result in death or serious injury.

WARNING indicates a potentially hazardous situation, which, if not avoided, could result in h or serious injury.

CAUTION indicates a potentially hazardous situation, which, if not avoided, may result in minor moderate injury.

WARNING – Pump and Filter System Operates Under High Pressure. Failure to remove surized air trapped in pump and filter system could result in violent component separation that can be death or severe personal injury.
To Relieve High Pressure: Open Manual Air Relief Valve before servicing or starting pump and filter system. Close Air Relief Valve when a steady stream of water, not air and water, is discharged from the valve.

WARNING – Hazardous Pressure. Pumps, filters, and other equipment/components of a
swimming pool filtration system operate under pressure. Incorrectly installed and/or improperly tested filtration equipment and/or components may fail resulting in injury and/or property damage. A qualified pool professional MUST conduct all pressure tests. Do NOT connect to a high-pressure system such as a municipal water main. To prevent explosion caused by entrapped air in the filtration system use provided air relief valve to bleed air from the system. Confirm that ALL filtration system component clamps, bolts, and covers have been tightened to the manufacturer's recommendations.

WARNING – Never operate or test the filter system at more than 2 BAR.

WARNING – Explosion Hazard. Purging the system with compressed air can cause components to ode, with risk of severe injury or death to anyone nearby. Use only a low pressure (below 0.4 BAR, high me blower when air purging the pump, filter, or piping.

WARNING – To reduce risk of injury, do not permit children to use or climb on the filtration system.

CAUTION – All suction and outlet valves MUST be OPEN when starting the filter system. Failure to do could result in severe personal injury and/or property damage. All drains and suction covers MUST be properly installed covers securely attached with the screws supplied with the covers. If screws are lost, or replacement parts from your supplier.
Important Safety Information (cont.)
natural_image
Simple black-and-white line drawing of a stick figure with radiating lines, no text or symbols present.DANGER – Suction Entrapment Hazard. Never use the pool or spa if a drain cover is damaged, cracked, missing, or not securely attached. Suction in drains and suction outlets can cause drowning, disembowelment, hair or body entrapment, severe injury, and death. Disembowelment, entrapment, or drowning is possible when body parts or hair come in contact with damaged, broken, cracked, missing, or unsecured drain covers and suction outlets. Suction from pumps with only one drain or suction outlet can cause
disembowelment, entrapment, or drowning. Pumps for pools and spas require two (2) functioning suction outlets at least three (3) feet apart, on two (2) walls or on the
floor and one (1) wall of the pool or spa. Installation of pump and suction outlets must be in compliance with all applicable local building codes. Replace damaged, broken, cracked, missing, or unsecured drain covers and suction outlets immediately.

WARNING – Risk of Electric Shock. Connect only to a grounding type receptacle by a Ground
Fault Circuit Interrupter (GFCI). Contact a qualified electrician if you cannot verify that the receptacle is protected by a (GFCI).
⚠ WARNING – To reduce the risk of electric shock replace damaged cord immediately. Do NOT bury cord. Locate cord to minimize abuse from lawn mowers, trimmers, and other equipment.
WARNING – To reduce the risk of electric shock, do NOT use an extension cord to
SAVE THESE SAFETY INSTRUCTIONS
connect unit to electric supply. Provide a properly located outlet. Qualified personnel MUST do all electrical wiring.
General Information
Introduction
This manual contains information for the proper installation and operation of Hayward's automatic pool cleaners. The instructions in this manual MUST be followed precisely.
Features
- Patented SmartDrive programmed steering system ensures the entire bottom of the pool is cleaned quickly and completely
• Installs in less than 10 minutes, without tools - Unique turbine/gearing system provides constant balanced water flow assuring quiet operation and gentle movement across the pool bottom
- Improves water circulation by pulling water from the pool bottom as it moves
- Advanced, contoured head design allows Hayward's automatic pool cleaners to complete their steering pattern in minimal time
- Deluxe bumper ring minimizes friction for easy movement away from walls and resumption of the programmed steering pattern
•2 year warranty
Installation Instructions
Step 1
Clean or backwash the filter, and clean the pump strainer basket prior to installing your Hayward automatic pool cleaner.
NOTE: If the pump does not have a strainer basket, it is absolutely necessary that the Hayward AEW560 Leaf Canister be installed. The Hayward AEW560 Leaf Canister can be purchased separately from your local Hayward dealer.
Following the installation of your Hayward automatic pool cleaner, clean the system at regular intervals according to individual pool conditions.
Step 2
Check the water chemistry. Make sure that the water is properly balanced and that the pool is free from algae. Also, check the pool and remove any objects that might clog your cleaner's bottom intake, including large amounts of leaves.
Step 3 – Head Assembly (Magic Clean, AquaCritter, & Whaly only)
Magic Clean/AquaCritter
- Antenna Installation - Pull Antenna through the back of the head to the front. Align flat section of Antenna base to Key inside of head. Pull until it snaps into place. (See Fig. 1)
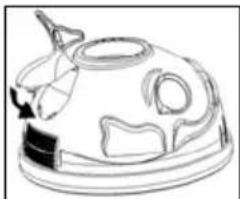
- Head Installation - Insert the tab at the bottom of the head into its corresponding hole on the cleaner body. Then swing the top of the head forward. Align tab with top hole. Apply forward pressure until head snaps firmly in place. (See Fig. 2)
Whaly
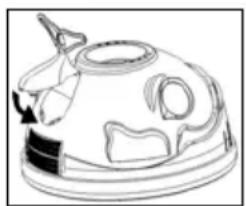
- Tail Installation - Insert the tab at the top of the tail into its corresponding hole on the cleaner body. Then swing the bottom of the tail down. Align the two (2) tabs with the corresponding holes. Apply forward pressure until the tail snaps firmly in place. (See Fig. 3) Figure 3
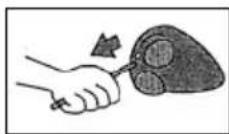
Figure 1
natural_image
Line drawing of a stylized insect head with a strawberry on its head (no text or symbols)Figure 2

natural_image
Line drawing of a dome-shaped object with cutouts and a handle, resembling a stylized helmet or decorative object (no text or symbols)Step 4
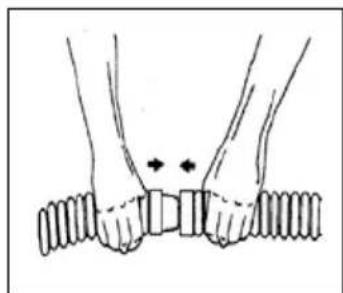
There are eleven (11) 81 cm connector hoses and one (1) 81 cm leader hose with a gray cuff. Connect the special cleaner hose sections together by pushing and twisting the tapered male connector end of each hose firmly into the female end of the adjacent hose sections (See Fig. 4). Depending on the size and shape of your pool, all hose sections might not be used. However, the leader hose MUST ALWAYS be used or your cleaner will not operate properly. It is not necessary to “Bottom Out” the connections, but they MUST be tight enough to prevent any air leaks. Wetting the hose ends will make it easier to connect the hose sections.
natural_image
Illustration of two hands holding a coiled spring, with arrows indicating movement or pressure points (no text or symbols)Figure 4
Installation Instructions (cont.)
Step 5 - Measure Hose Lengths
A simple rule of thumb to measure hose requirements is to measure the distance from the skimmer (or dedicated suction line) to the farthest point in the pool then add three (3) extra hose sections. This extra length is absolutely necessary for proper operation of your cleaner. If the total hose length is not long enough, it will be necessary to purchase additional hose sections from your Hayward dealer. The hose length supplied (9,75 meters) has been determined to be sufficient for the majority of pools, nationally. If your hose requirement is more than this, you must purchase additional hose sections for your cleaner to work properly.
Step 6
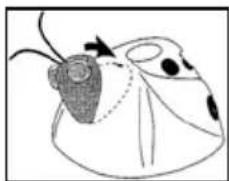
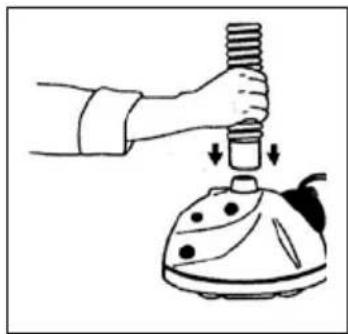
Check the bumper ring located on the bottom of your cleaner to make sure it turns freely. It may be necessary to reposition the ring on the small wheels. Next, read the instructions on the warning label applied to the top of the cleaner. Submerge your cleaner into the water and remove all of the entrapped air. When escaping air bubbles cease, you are ready to connect the leader hose. The leader hose has a gray cuff that reads “REMOVE LABEL AND CONNECT TO CLEANER”. Connect the gray cuff of the leader hose to your cleaner (See Figure 5) and submerge the entire lengths of hose to remove all of the air as when vacuuming the pool with a standard hand vacuum. Figure 5
natural_image
Illustration of a hand using a tool to press down a small steamer (no text or symbols present)Step 7
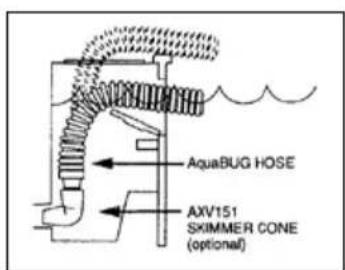
With the filter system turned OFF, connect the hose to the skimmer according to Figures 6, or 7.
NOTE: The optional methods for installing the hose over the pool rail or through the top opening in the skimmer.
Figure 6 shows the proper way to connect the hose to a skimmer with a bottom suction port using the AEXV093BP Skimmer Cone Adapter (included).
Figure 7 shows the proper way to connect the hose into a skimmer that has a back or side suction port. In this case, the standard AEXV093BP cannot be used because of the skimmer configuration, and the optional AEXV151 90-degree Elbow must be purchased from your Hayward dealer.
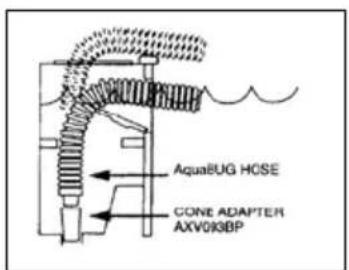
Figure 6 Figure 7
Installation Instructions (cont.)
Step 8
Turn ON your filter system. Now that your cleaner is operating, check to see that the cleaner is moving about the pool. It should be operating with left and right turns. It should turn away from the walls in a short time frame. If the cleaner is performing as stated above, your installation is complete.
NOTE: Hayward automatic pool cleaners are powered by your pool's filter system and are designed to work with most systems for above-ground pools. Therefore, the performance of your cleaner will be relative to the power source. It may be necessary to purchase a AEV096P "In-Line" Vacuum Gauge from your Hayward dealer to verify performance of your system.
Step 9
Observe your cleaner in operation. The pool's return water flow may affect the operation of your cleaner by interfering with the hose on the surface of the water or the cleaner on the bottom of the pool. If the pool is equipped with an adjustable-type “eyeball” return fitting, redirect the water flow so that it does not interfere with the cleaner’s movement. If the return water flow is preventing the cleaner from functioning properly, and the pool is not equipped with an adjustable-type “eyeball” fitting, it will be necessary to purchase a Hayward AEXK19A Return-line Diverter from your Hayward dealer. Now that your cleaner is installed and operating, enjoy a carefree pool. It is necessary to run your cleaner only long enough to clean the pool bottom, not for the entire filter cycle. It is, however, a good idea to run your cleaner daily, as this is an excellent way to improve water circulation and chemical distribution in the pool because your cleaner functions as a moving “bottom drain”.
Important Tips
- Periodically check to make sure all other outlets to the pump are securely closed (i.e., other skimmers or bottom drain) when operating your cleaner.
- Periodically check to make sure that the cleaner hose is securely attached to the suction fitting in the skimmer.
- Disconnect the cleaner hose from the skimmer prior to backwashing the filter. This will assure the flow of water necessary for effective backwashing.
- ⚠️ CAUTION – When shock treating your pool, the cleaner and hoses MUST be removed from your swimming pool until such time that the chlorine levels have normalized.
- ⚠️ CAUTION – Never coil the cleaner hose. Coiled hose is not under warranty.
- When the cleaner is out of the pool, always disconnect the leader hose from the cleaner head.
- When carrying or lifting the cleaner, always use the molded-in handle. Do NOT carry it by the hose.
- When swimming in the pool, remove the cleaner and hoses from the water.
- Pools bottoms that are severely wrinkled, have large bubbles, deep footprints, or other imperfections, might affect the cleaner's operation.
- Keep rear screen clear of fixed debris by brushing regularly.
NOTE: We do NOT recommend installation of your cleaner until these conditions are corrected.
Disclaimer
1) Vinyl can be affected by age, sunlight, and water chemistry.
2) Vinyl can become brittle and weak.
3) Vinyl can also be affected by the installation and the pool's surroundings.
4) When installing your cleaner, you must assume all responsibility for the condition of the pool and the pool's surroundings.
Troubleshooting
| Problem Cause Solution | ||
| Slow/no forward movement | Lack of/improper water flow through cleaner C | Clean In-Line Leaf CanisterClean Hair and Lint PotClean Filter System |
| Partial blockage of cleaner throat Clear blockage | ||
| Worn shoes Replace shoes | ||
| Worn wings Replace wings | ||
| Cleaners movement is fast and erratic Remove | AEV512A Turn off filter and 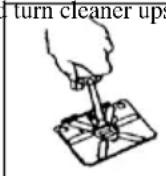 | down.Insert a small screwdriver in the notch at the rear of the opening. Using a prying motion, remove the throat. |
| Cleaner sticks at ladder or wall | Improper vacuum It may be necessary to purchase an | AEV096P, “In-Line” vacuum gauge from your Hayward dealer to verify performance of your system. |
| Worn shoes Replace shoes | ||
| Hose too short Add additional hose per installation instructions | ||
| Stuck on ladder Remove ladder or install a Hayward AEXW100 Ladder Bumper | ||
| Steering failure Check and clean rear screen | Check to see if cone gear rotates smoothly in both directions | |
| If the cleaner appears to be stuck or “hung up” at the wall, ladder, or other obstruction, or anywhere else in the pool, and does not return to normal operation within a minute or so, turn the filter system OFF. Remove the cleaner from your pool. Check for blockages or any other obvious problems. Check the Bumper Ring for free rotation. Check filter system for water flow and re-install the cleaner. If the cleaner is getting stuck, contact your Hayward dealer. Under no conditions should the cleaner remain in the pool connected to the filter system if the problem of getting stuck or “hung up” is not corrected. | ||
| To better serve you, please have the following information available if you call Hayward's Technical Service Department at (33) 825 000 549 (France):1) The purchase date of your cleaner.2) The serial number (located on the bottom) of your cleaner. | ||
Replacement Parts
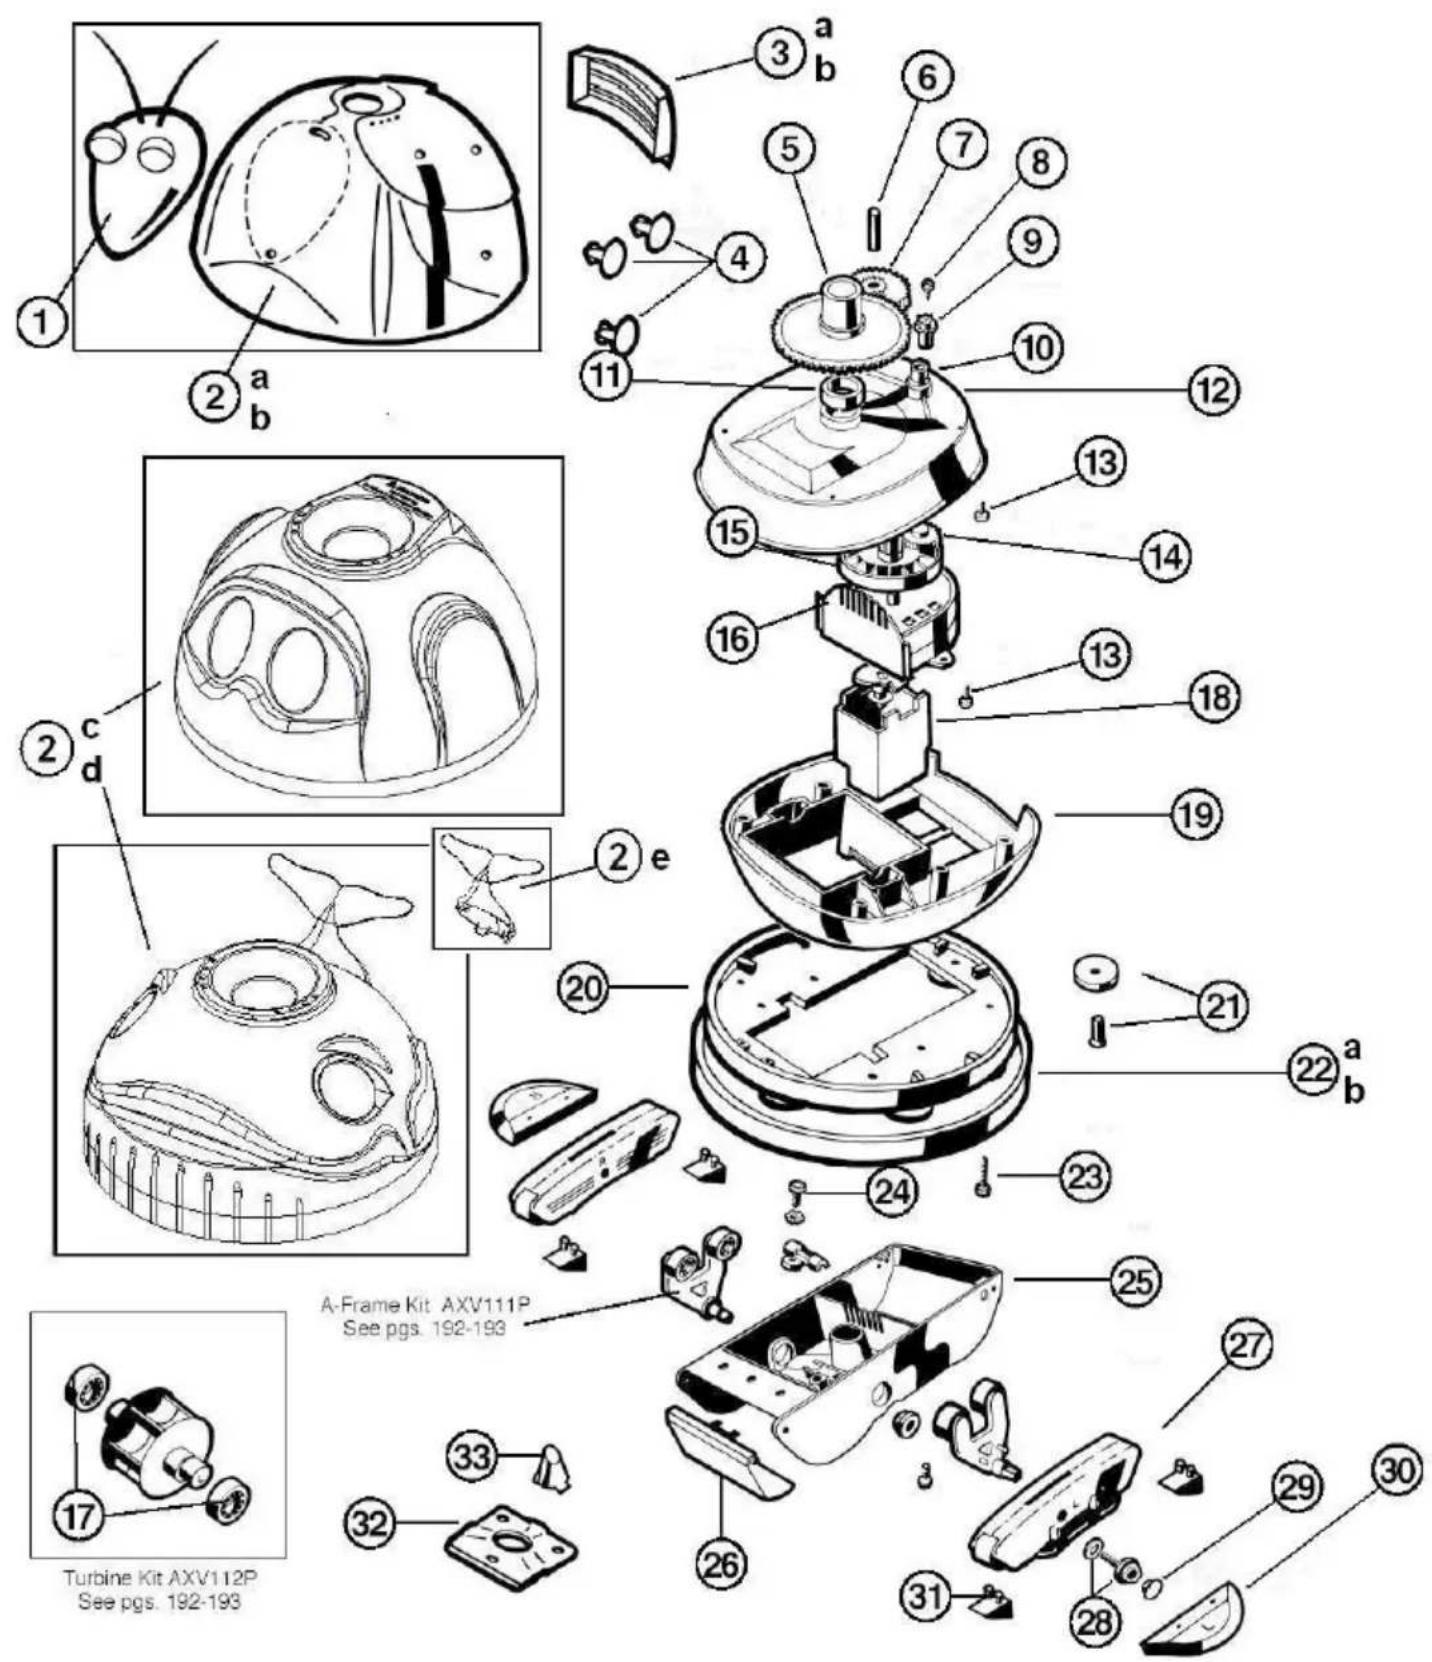
Parts Diagram
Replacement Parts (cont.)
Parts Listing
| Ref. No. | Part No. | Description | Ctn. Qty. | No. Req'd | |
| 1 AEXV464 Head Assembly (includes Head, Eyes & Antennae) 10 1 | |||||
| 2a AEXV457OR Shell, Magic Clean * 1 | |||||
| 2b AEXV457YL Shell, AquaCritter * 1 | |||||
| 2c AEXV457SD Head Assembly for Scuba * 1 | |||||
| 2d AEXV457W Head Assembly for Whaly including Tail | * 1 | ||||
| 2e AEXV457WT | Tail Assembly for Whaly | * 1 | |||
| 3 AEXV513BK Screen, Black | 10 1 | ||||
| 4 AEXV443 Magic Clean Spots, 4 lg. & 2 sm. | 10 1 | ||||
| 5 AEXV070 Cone Gear | * 1 | ||||
| 6 AEXV309 Intermediate Gear Shaft | * 1 | ||||
| 7 AEXV301 Intermediate Gear | 25 1 | ||||
| 8 AEXV068 Spindle Gear Screw | * 1 | ||||
| 9 AEXV303 Spindle Gear | 25 1 | ||||
| 10 AEXV066A Spindle Gear Bushing | 25 1 | ||||
| 11 AEXV306 Cone Gear Bushing | 50 1 | ||||
| 12 AEXV060WH | Upper Middle Body | * 1 | |||
| 13 AEXV065P Lower / Upper Body Screw (6 pack) | * 1 | ||||
| 14 AEXV064A Medium Turbine Drive Gear | 25 1 | ||||
| 15 AEXV062C | Medium Turbine | 25 1 | |||
| 16 AEXV009 Medium Turbine Case with Axle | 25 1 | ||||
| 17 AEXV055P Turbine Bearings (2) | 50 1 | ||||
| 18 AEXV518P Gear Box | 10 1 | ||||
| 19 AEXV050CWH | Lower Middle Body | * 1 | |||
| 20 AEXV525A Base Plate Assembly | 5 1 | ||||
| 21 AEXV551P Wheel Kit (6 wheels, axles) | 25 1 | ||||
| 22 AEXV458 Ring, Black | 5 1 | ||||
| 23 AEXV057P Middle Body Screw (6 pack) | * 1 | ||||
| 24 AEXV313 Lower Body Screw | * 1 | ||||
| 25 AEXV030A Lower Body (fixed throat) | 10 1 | ||||
| 26 AEXV442 Flap Kit, White (2 flaps, front & rear) 25 1 | |||||
| 27 AEXV417WHP | Pod Kit | 25 1 | |||
| 28 AEXV015P Pod Screw Kit (2 hex head screws & 2 washers) | 50 1 | ||||
| 29 AEXV016P Pod Plug (6 pack) | 50 1 | ||||
| 30 AEXV552WHP | Wing Kit, White | 50 1 | |||
| 31 AEXV014SP | Slotted Santoprene Shoes (4 pack) | 50 1 | |||
| 32 AEXV304A Bottom Plate | 25 1 | ||||
| 33 AEXV512A Nozzle | * 1 | ||||
*Special order
HAYWARD® LIMITED WARRANTY
To the original Consumer/Purchaser:
HAYWARD POOL PRODUCTS warrants the CLEANER excluding shoes (motion devices on bottom of unit), wings (motion devices on side of unit), and flaps (motion devices on the front and rear of unit) for TWO (2) years from the original date of purchase, to be free of defects in materials and workmanship.
Should a defect in workmanship and/or materials in the CLEANER become evident during the term of this Limited Warranty, the original consumer/purchaser shall ship the item freight prepaid to an authorized Factory Service Center as soon as possible after the discovery of the defect, together with a letter stating the CLEANER serial numbers or letters, date of purchase of the item claimed to be defective, the name and address of the consumer/owner and a brief description of the problems/defects encountered. Call (33) 825 000 549 for the name and address of the nearest Factory Service Center. HAYWARD POOL PRODUCTS will at its option, repair or replace all defective CLEANER parts covered by this Limited Warranty at its own cost and expense and return same to consumer freight prepaid. HAYWARD POOL PRODUCTS is not responsible for any costs or expenses of handling, packing, shipping or transporting the CLEANER or any parts thereof to or from the service facility, unless expressly provided to the contrary by state law. No dealer, distributor or other similar person has any authority to make any warranties or representations concerning HAYWARD POOL PRODUCTS, its CLEANER or to extend this warranty beyond the express terms contained herein. HAYWARD POOL PRODUCTS assumes no responsibility for any warranties beyond express terms contained in this Limited Warranty. This Limited Warranty is valid and enforceable only in the United States of America and Canada on CLEANER owned and normally operated in the United States of America and Canada.
You must provide, in some form, reasonable, acceptable to HAYWARD POOL PRODUCTS, written proof of the original date of purchase of the CLEANER.
THIS LIMITED WARRANTY EXCLUDES THE FOLLOWING:
(1) Hoses, which are warranted by the hose manufacturer, to be free of defects in material and workmanship for a period of TWO (2) years.
(2) Shoes (motion devices on bottom of unit) on the CLEANER.
(3) Wings (motion devices on side of unit) on the CLEANER.
(4) Flaps (motion devices on the front and rear of unit) on the CLEANER.
(5) Defects or damage caused by unauthorized service or the use of other than genuine HAYWARD parts.
(6) Any injury, loss, damage, defect, or malfunction of the CLEANER or failure to function resulting from any failure to operate or maintain the CLEANER in accordance with the directions contained in Owner's manual or operating instructions provided by HAYWARD POOL PRODUCTS; or any injury, loss, damage, defect, malfunction, or failure to function resulting from any accident, acts of God, alterations in the CLEANER by anyone other than HAYWARD POOL PRODUCTS, or misuse, unreasonable use, tampering, abuse, acts, omissions, failure or negligence by anyone other than HAYWARD POOL PRODUCTS, including but not limited to such damages or injuries to parts resulting from improper installation, or damage to pump parts resulting from running pump dry (e.g., interruption in or inadequate supply of water to internal pump parts due to loss of prime, or obstruction in lines, or otherwise); or damage, defect, or malfunction resulting from defects in, failure or malfunction of, or negligence, abuse, or misuse with respects to equipment other than the CLEANER.
(7) Malfunction of, damage to, materials failure in, or changes in the appearance of CLEANER resulting from chemical reaction to substances with which any part of the CLEANER may come in contact.
(8) Loss of time, inconvenience, incidental expenses such as telephone calls, labor or material charges incurred with the removal or reinstallation of the CLEANER, or any parts or device used with the CLEANER or ANY OTHER INCIDENTAL OR CONSEQUENTIAL DAMAGES. Some states do not allow the exclusion or limitation of incidental or consequential damages so that the above limitation or exclusion may not apply to you. As a matter of policy, HAYWARD POOL PRODUCTS will not refund the consumer's purchase price.
Vinyl liner pools are sometimes subject to brittleness of the vinyl due to a variety of factors including aging, pool chemicals, deficiencies caused by improper installation or cleaning of supporting walls or base and general wear and tear. Consequently the Manufacturer disclaims all liability for damage to any vinyl liner in the Customer's pool by reason of use and/or operation of CLEANER. Customer claims against the Manufacturer shall be limited to those claims which may be asserted under the Limited Warranty relating to any defect or malfunction of the CLEANER.
OTHER RIGHTS. This warranty gives you specific legal rights and you may also have other rights which vary from state to state.
Hayward Pool Products, Inc. Hayward Pool Europe
natural_image
Four colorful cartoon-style robotic vacuum cleaner models in red, yellow, blue, and yellow (no text or symbols visible)
natural_image
Simple black-and-white icon of a storefront with a curved roof and circular outline (no text or symbols)HAYWARD POOL PRODUCTS, INC.
Corporate Headquarters: U.S.A:
620 Division Street
Elizabeth, NJ 07207
1 Hayward Industrial Drive
Clemmons, NC 27012
2935 Sidco Drive
Nashville, TN 37204
2875 Pomona Blvd.
Pomona, CA 91768
Canada: Europe:
natural_image
Four colorful cartoon-style ice cream scooters with different designs and facial expressions, arranged side by side (no text or symbols visible)natural_image
Simple black-and-white icon of a storefront with a curved roof and a window, enclosed in a circle (no text or symbols)HAYWARD POOL PRODUCTS, INC.
Sede social: U.S.A:
620 Division Street
Elizabeth, NJ 07207
1 Hayward Industrial Drive
Clemmons, NC 27012
2935 Sidco Drive
Nashville, TN 37204
2875 Pomona Blvd.
Pomona, CA 91768
Canada: Europa:
natural_image
Simple black-and-white line drawing of a stick figure with motion lines, no text or symbols presentnatural_image
Line drawing of a ladybug head with antennae and antennae (no text or symbols)Ilustración 2
Whaly
natural_image
Line drawing of a dome-shaped object with internal cutouts and a small protrusion (no text or symbols)Etapa 4
natural_image
Illustration of two hands performing a finger massage or grip technique (no text or symbols)natural_image
Illustration of a hand using a power tool to press down a small steam iron (no text or symbols present)Ilustración 5
Etapa 7
Hayward Pool Products, Inc. Hayward Pool Europe
natural_image
Four colorful cartoon-style robotic vacuum cleaner models in a row, no text or symbols visible
natural_image
Abstract geometric logo with a stylized 'H' inside a circle, no text or symbols present.HAYWARD POOL PRODUCTS, INC.
Sede social: U.S.A:
620 Division Street
Elizabeth, NJ 07207
1 Hayward Industrial Drive Clemmons, NC 27012
2935 Sidco Drive Nashville, TN 37204
2875 Pomona Blvd. Pomona, CA 91768
Canada: Europa:
natural_image
Four colorful cartoon-style ice cream scooters with different facial expressions and designs, arranged side by side (no text or symbols visible)natural_image
Abstract geometric logo with a stylized 'U' above a house silhouette inside a circle (no text or symbols)HAYWARD POOL PRODUCTS, INC.
1 Hayward Industrial Drive
Clemmons, NC 27012
2935 Sidco Drive
Nashville, TN 37204
2875 Pomona Blvd.
Pomona, CA 91768
Kanada: Europa:
natural_image
Simple line drawing of a stylized insect head with antennae and segmented body (no text or symbols)Abb. 2
natural_image
Line drawing of a dome-shaped object with internal cutouts and a small black object at the base (no text or symbols)Abb. 3
Schritt 4
natural_image
Illustration of two hands holding a coiled spring, with arrows indicating movement or force direction (no text or symbols)Abb. 4
Installationsanweisungen (Forts.)
natural_image
Illustration of a hand using a screwdriver to press down a steam iron (no text or symbols present)Schritt 7
natural_image
Four colorful cartoon-style robotic vacuum cleaner models in different colors (red, yellow, blue, yellow) with no visible text or symbols.
natural_image
Abstract geometric logo with a stylized 'U' above a house silhouette, enclosed in a circle (no text or symbols)HAYWARD POOL PRODUCTS, INC.
1 Hayward Industrial Drive
Clemmons, NC 27012
2935 Sidco Drive
Nashville, TN 37204
2875 Pomona Blvd.
Pomona, CA 91768
Kanada: Europa:
INSTALLATIE, WERKING & ONDERDELEN
natural_image
Four colorful cartoon-style robotic devices with different facial features and designs, displayed side by side (no text or symbols visible)natural_image
Simple black-and-white icon of a storefront with a curved roof and circular outline (no text or symbols)HAYWARD POOL PRODUCTS, INC.
Hoofdzetel: V.S.:
620 Division Street
Elizabeth, NJ 07207
1 Hayward Industrial Drive
Clemmons, NC 27012
2935 Sidco Drive
Nashville, TN 37204
2875 Pomona Blvd.
Pomona, CA 91768
Canada: Europa:
natural_image
Silhouette of a person sitting on a cup with a bowl and radiating lines (no text or symbols)natural_image
Illustration of a stylized insect head with antennae and segmented body (no text or symbols)Figuur 2
natural_image
Line drawing of a dome-shaped object with internal cutouts and a small protrusion (no text or symbols)Stap 4
natural_image
Illustration of two hands performing a finger massage or grip technique (no text or symbols)Figuur 4
natural_image
Illustration of a hand using a power tool to press down a small appliance (no text or symbols present)Figuur 5
Stap 7
Hayward Pool Products, Inc. Hayward Pool Europe
natural_image
Four colorful cartoon-style robotic gloves with different designs and facial features, arranged side by side (no text or symbols visible)
natural_image
Abstract geometric logo with a stylized 'H' shape inside a circle, no text or symbols present.HAYWARD POOL PRODUCTS, INC.
Hoofdzetel: V.S.:
620 Division Street
Elizabeth, NJ 07207
1 Hayward Industrial Drive
Clemmons, NC 27012
2935 Sidco Drive
Nashville, TN 37204
2875 Pomona Blvd.
Pomona, CA 91768
Canada: Europa:
natural_image
Four colorful cartoon-style robotic head models in red, yellow, blue, and yellow, each with distinct facial features and beaks (no text or symbols visible)MAGIC CLEAN - SCUBA - WHALY - AQUACRITTER
PULITORE AUTOMATICO PER PISCINE FUORI TERRA
natural_image
Simple black-and-white icon of a house with a roof and window, enclosed in a circle (no text or symbols)HAYWARD POOL PRODUCTS, INC.
Sede legale U.S.A
620 Division Street 1 Hayward Industrial Drive 2935 Sidco Drive 2875 Pomona Blvd.
Elizabeth, NJ 07207 Clemmons, NC 27012 Nashville, TN 37204 Pomona, CA 91768
Canada
Europa
natural_image
Simple black-and-white line drawing of a human figure with a light bulb and radiating lines (no text or symbols)natural_image
Line drawing of a stylized helmet or dome with decorative patterns (no text or symbols)Figura 3
Fase 4
natural_image
Illustration of two hands holding a coiled spring with two arrows indicating movement or force (no text or symbols)Figura 4
natural_image
Illustration of a hand using a power tool to press down a small appliance (no text or symbols present)Figura 5
Fase 7
Hayward Pool Products, Inc. Hayward Pool Europe
natural_image
Four colorful cartoon-style robotic gloves with different facial expressions and designs, arranged side by side (no text or symbols visible)
natural_image
Simple black-and-white icon of a storefront with a curved roof and a house silhouette inside a circle (no text or symbols)HAYWARD POOL PRODUCTS, INC.
Sede legale U.S.A
620 Division Street 1 Hayward Industrial Drive 2935 Sidco Drive 2875 Pomona Blvd.
Elizabeth, NJ 07207 Clemmons, NC 27012 Nashville, TN 37204 Pomona, CA 91768
Canada Europa
natural_image
Four colorful cartoon-style cleaning robots with different facial features and designs, displayed against a plain background (no text or symbols visible)natural_image
Simple black-and-white icon of a storefront with a curved roof and circular outline (no text or symbols)HAYWARD POOL PRODUCTS, INC.
I Hayward Industrial Drive
Clemmons, NC 27012
2935 Sidco Drive
Nashville, TN 37204
2875 Pomona Blvd.
Pomona, CA 91768
Canadá: Europa:
natural_image
Simple black-and-white line drawing of a stick figure emerging from a circular object with radiating lines (no text or symbols)natural_image
Line drawing of a ladybug head with antennae and segmented body (no text or symbols)Figura 2
Whaly
natural_image
Line drawing of a dome-shaped object with internal cutouts and a handle (no text or symbols)Figura 3
Etapa 4
natural_image
Illustration of two hands holding a coiled spring, with arrows indicating movement or force direction (no text or symbols)natural_image
Illustration of a hand using a power tool to press down a small appliance (no text or symbols present)Etapa 7
Hayward Pool Products, Inc. Hayward Pool Europe
natural_image
Four colorful cartoon-style robotic devices with different facial features and designs, arranged side by side (no text or symbols visible)
natural_image
Abstract geometric logo with a stylized 'H' inside a circle, no text or symbols present.HAYWARD POOL PRODUCTS, INC.
1 Hayward Industrial Drive
Clemmons, NC 27012
2935 Sidco Drive
Nashville, TN 37204
2875 Pomona Blvd.
Pomona, CA 91768
Canada: Europa:
INSTALLATION, DRIFT & DELAR
natural_image
Four colorful cartoon-style cleaning robots with different facial features and designs, arranged side by side (no text or symbols visible)natural_image
Abstract geometric logo with a stylized 'H' inside a circle and patterned base, enclosed in a white circle (no text or symbols)HAYWARD POOL PRODUCTS, INC.
I Hayward Industrial Drive
Clemmons, NC 27012
2935 Sidco Drive
Nashville, TN 37204
2875 Pomona Blvd.
Pomona, CA 91768
Kanada: Europa:
natural_image
Line drawing of a dome-shaped object with internal cavities and a handle (no text or symbols)Steg 4
natural_image
Illustration of two hands holding a coiled spring, with arrows indicating movement or pressure direction (no text or symbols)Installationsinstruktioner (forts.)
natural_image
Illustration of a hand using a bulb to press down a small electronic device (no text or symbols present)Figur 5
Steg 7
Reservdelar (forts.)
Artikelförteckning
Hayward Pool Products Inc
Harvard Pool Europe
natural_image
Four colorful cartoon-style cleaning robots with different facial features and designs, arranged on a plain background (no text or symbols visible)
natural_image
Abstract geometric logo with a stylized 'H' inside a circle, no text or symbols present.HAYWARD POOL PRODUCTS, INC.
1 Hayward Industrial Drive
Clemmons, NC 27012
2935 Sidco Drive
Nashville, TN 37204
2875 Pomona Blvd.
Pomona, CA 91768
Kanada: Europa:
natural_image
Four colorful cartoon-style cleaning or cleaning tools with roundles and beaded caps, arranged horizontally (no text or symbols visible)natural_image
Abstract geometric logo with stylized 'H' shape inside a circle, no text or symbols presentHAYWARD POOL PRODUCTS, INC.
Sediul Central:
620 Division Street
Elizabeth, NJ 07207
Canada: Europa:
1 Hayward Industrial Drive
Clemmons, NC 27012
S.U.A:
2935 Sidco Drive
Nashville, TN 37204
2875 Pomona Blvd.
Pomona, CA 91768
01150 St Vulbas France
natural_image
Illustration of two hands adjusting a mechanical component with arrows indicating motion (no text or symbols)cm în
natural_image
Illustration of a hand using a bulb to press down an object on a surface, with no visible text or symbols.Figura 5
Pasul 7
natural_image
Four colorful cartoon-style cleaning robots with different facial features and designs, arranged side by side (no text or symbols visible)
natural_image
Abstract geometric logo with stylized 'H' shape inside a circle, no text or symbols presentHAYWARD POOL PRODUCTS, INC.
Sediul Central:
620 Division Street
Elizabeth, NJ 07207
S.U.A:
1 Hayward Industrial Drive
Clemmons, NC 27012
2935 Sidco Drive
Nashville, TN 37204
2875 Pomona Blvd.
Pomona, CA 91768
Canada:
- HAYWARD, POOL PRODUCTS INC.
- Étape 4
- Instructions d'installation (suite)
- Étape 7
- INSTALLATION, OPERATION, & PARTS
- SAVE THIS INSTRUCTION MANUAL
- HAYWARD POOL PRODUCTS, INC.
- IMPORTANT SAFETY INSTRUCTIONS
- CAREFULLY READ AND FOLLOW ALL INSTRUCTIONS IN THIS OWNER'S MANUAL AND ON EQUIPMENT.
- KEEP SAFETY LABELS IN GOOD CONDITION AND REPLACE IF MISSING OR DAMAGED.
- Important Safety Information (cont.)
- SAVE THESE SAFETY INSTRUCTIONS
- General Information
- Introduction
- Features
- Installation Instructions
- Step 1
- Step 2
- Step 3 – Head Assembly (Magic Clean, AquaCritter, & Whaly only)
- Magic Clean/AquaCritter
- Whaly
- Step 4
- Installation Instructions (cont.)
- Step 5 - Measure Hose Lengths
- Step 6
- Step 7
- Step 8
- Step 9
- Important Tips
- Disclaimer
- Replacement Parts
- HAYWARD® LIMITED WARRANTY
- Etapa 4
- Etapa 7
- Schritt 4
- Installationsanweisungen (Forts.)
- Schritt 7
- Stap 4
- Stap 7
- MAGIC CLEAN - SCUBA - WHALY - AQUACRITTER
- Fase 4
- Fase 7
- Steg 4
- Installationsinstruktioner (forts.)
- Steg 7
- Pasul 7
Brand : HAYWARD
Model : Magic Clean
Category : Vacuum Cleaner