
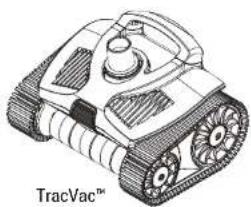
TracVac - Vacuum Cleaner HAYWARD - Free user manual and instructions
Find the device manual for free TracVac HAYWARD in PDF.

| Product type | Robotic pool cleaner |
| Brand | Hayward |
| Model | TracVac |
| Main function | Automatic cleaning of pool bottom and walls |
| Propulsion system | Robust tracks with programmed guidance system (6 rotation settings) |
| Turbine | Hollow turbine to avoid obstructions and maintain flow |
| Power supply | Hydraulic via water flow from pool pump |
| Recommended water flow | Adjust between Min and Max marks on flow meter |
| Wall climbing | Yes, if the curve radius between bottom and wall is sufficient; adjustable skirts to maintain suction |
| Installation | Connection to a dedicated suction line (with Vac-Loc safety cover) or to the skimmer |
| Safety | Stop pump before maintenance; do not use with swimmers; remove before chemical shock |
| Maintenance | Inspect and clean turbine before each use; check tracks and bearings |
| Storage | Store in shade; hoses stored straight, not coiled |
| Spare parts | Available: track kits, wheels, turbine, cover, chassis, etc. |
| Included accessories | Flow control valve, flow meter, float, hose cone, adapter, double clamp |
| Operating speed | RPM of right large wheel: 26.5 to 32 turns/30 seconds |
| Use with filter | Uses pool filter; a clogged filter may slow down the robot |
| Pool compatibility | Ideal for all pool surfaces and shapes |
Frequently Asked Questions - TracVac HAYWARD
User questions about TracVac HAYWARD
0 question about this device. Answer the ones you know or ask your own.
Ask a new question about this device
Download the instructions for your Vacuum Cleaner in PDF format for free! Find your manual TracVac - HAYWARD and take your electronic device back in hand. On this page are published all the documents necessary for the use of your device. TracVac by HAYWARD.
USER MANUAL TracVac HAYWARD
natural_image
Abstract geometric logo with stylized letter H inside a circular frame (no text or symbols)HAYWARD®
natural_image
Technical line drawing of a tracked robotic vehicle with visible gears and wheel profiles (no text or symbols)TracVac™

natural_image
Simple line icon of an open book with an information symbol inside (no text or numbers)
natural_image
Simple line drawing of an open book with no text or symbols visibleGUIDE DE L'UTILISATEUR
OWNER'S MANUAL
MANUAL DEL USUARIO
MANUAL DO UTILIZADOR
MANUALE D'USO
ANWENDERHANDBUCH
GEBRUIKERSHANDLEIDING
FR
HAYWARD

HAYWARD®
TracVac™
natural_image
Illustration of a tracked robotic vehicle with visible wheels and sensor array (no text or symbols)W3HSCTRACEU
CONSERVER CE MANUEL POUR CONSULTATION ULTÉRIEURE
FRFR
HAYWARD
INSTRUCTIONS DE SÉCURITÉ IMPORTANTES
natural_image
Line drawing of a tracked robotic vehicle (TracVacTM) with visible wheels and sensor array (no text or symbols on the device itself)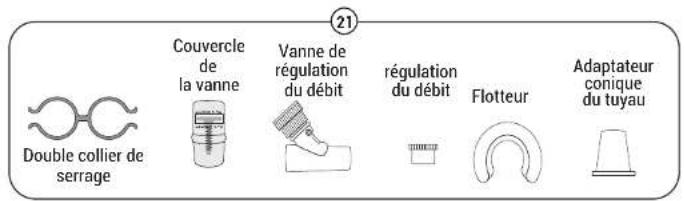
natural_image
Illustration of a tracked robotic vehicle with visible wheels and sensor components (no text or symbols)W3HSCTRACEU
KEEP THIS MANUAL FOR FUTURE REFERENCE
ENEN
HAYWARD
IMPORTANT SAFETY INSTRUCTIONS
Basic safety precautions should always be followed, including the following: Failure to follow instructions can cause death and/or severe injury.
- READ AND FOLLOW ALL INSTRUCTIONS
- If your pool has a dedicated suction port ("vac port") for vacuuming or for an automatic pool cleaner, it must be covered when not in use. If not already installed, use a spring loaded Safety Vac-Loc cover on the suction port to prevent entrapment and injury.
• Always stop the pump before attempting to clean or service the pool vacuum. - DO NOT use to remove large debris in new pools.
- REMOVE the cleaner before chemically shocking your pool.
- DO NOT allow swimmers in pool while pool cleaner is operating.
- Store the cleaner in a shaded safe area.
- Hoses must be stored straight. DO NOT coil the hoses.
- Children and pets should be supervised to ensure that they do not play with the appliance.
- REMOVE cleaner when performing backwash.
- Read and follow all instructions in this owner's manual and on the equipment. Failure to follow instructions can cause serious injury or death.
- This document should be given to the owner of the swimming pool and must be kept by the owner in a safe place.
- The cleaner can be used by children aged from 8 years and above and persons with reduced physical, sensory or mental capabilities, or lack of experience and knowledge, if they have been given supervision or instruction concerning use of the appliance in a safe way and understand the hazards involved.
- Use Only Genuine Hayward ^8 Replacement Parts.
图
HAYWARD
Overview
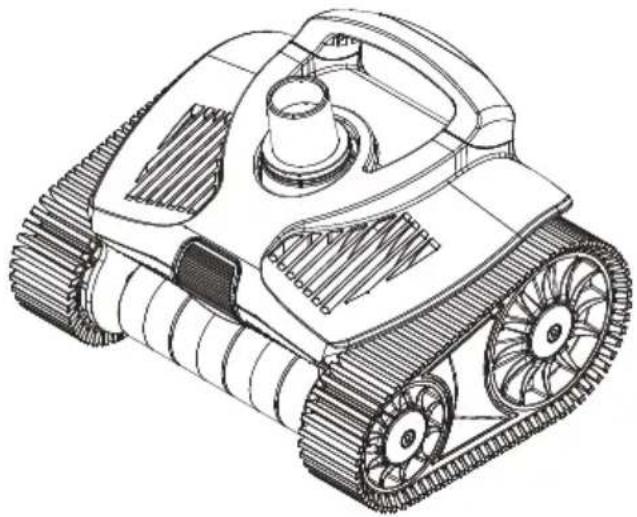
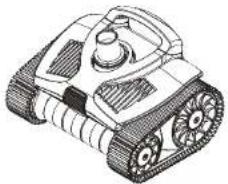
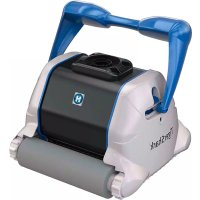
Congratulations, you have just acquired a Hayward ^20 suction pool cleaner TracVac ^TM
Features
Hollow Turbine
This cleaner utilizes a hollow turbine which enables flow to bypass the blades in the event of large debris blockage. This ensures the pool system is always provided flow.
Steering System and Hose Swivel
The tracked suction cleaner has an internal programmed steering system, allowing it to turn and then move into another direction. This steering system has 6 different programmed turns settings at various degrees that allow the cleaner to fully navigate the entire pool. The external hose swivel allows the cleaner to turn freely without interference from the hose due to debris buildup as well as unwanted hose coiling.
Robust Tracks
The TracVac ^™ 's patented track system and unique underbody ensures that the cleaner can easily negotiate main drains, uneven surfaces, strange shapes and steep corners on both the deep and shallow ends of the pool. This makes the Cleaner ideal for all pool surfaces and shapes.
Wall Climbing
The TracVac ^™ will only climb walls on pools with sufficient floor to wall radius. The cleaner has patented adjustable skirts that allow the cleaner to maintain optimal suction under the machine even when it encounters obstacles. When the cleaner encounters an obstacle, one or more of the skirts will lift up (adjust) over the obstacle while maintaining suction under the cleaner.
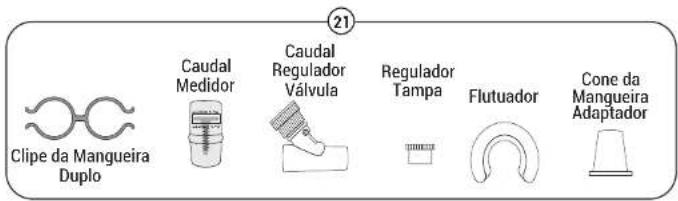
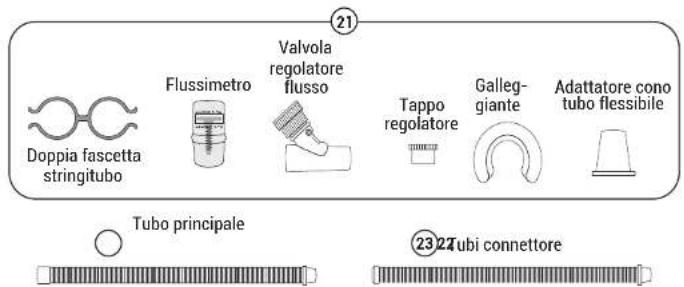
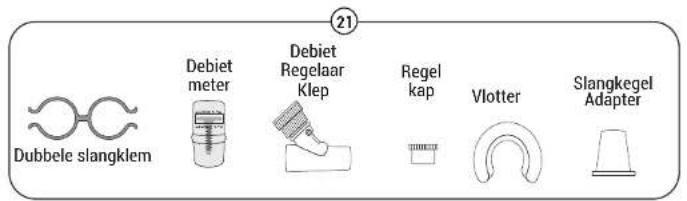
What's Included
natural_image
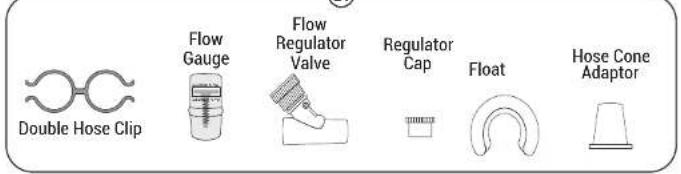
Illustration of a tracked robotic vehicle (TracVac™) with visible wheels and sensor array (no text or symbols on the device itself)Flow Regulator Valve
Flow Gauge
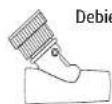
Regulator Cap


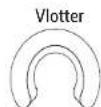
Float


Hose Cone Adaptor
Double Hose Clip
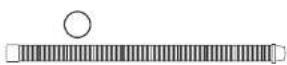
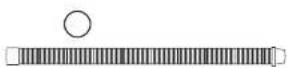
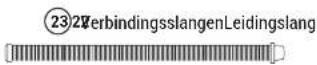
Connector Hoses (11 sections)

Leader Hose

Use only hayward® genuine replacement parts Use only hayward
ENEN
HAYWARD
Installation
IMPORTANT: Pools with Variable Speed Pumps - The cleaner requires a minimum & maximum rate of flow to operate optimally. If the variable speed pump has multiple speeds programmed, use the Flow Gauge to calibrate the recommended flow rate at the pump's highest programmed speed. This can be done by the using the Flow Regulator Valve and adjusting pump speed manually to attain the correct flow at the highest preset speed. See page 5 for more information. By using the highest preset speed, you'll ensure that all other settings will never exceed the recommended maximum flow rate.
IMPORTANT: Pools with Heating - Heating must be turned OFF whenever the TracVac ^™ is in use. If using Solar Heating and the TracVac ^™ , always alternate schedules.
Pool Preparation
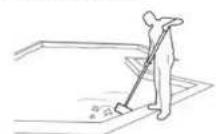
Manually remove very large and excessive debris from pool (ie. post- storm, spring cleaning/pool opening situations).
Perform a backwash or clean filter cartidges, clean your filter, skimmer baskets and pump basket.

Check that chemical balance is correct. If not, take the time to correct it before using the TracVac™. If you chemically shock the pool, wait 1-2 days before continuing.
Point all your return fittings downward to maximize cleaner pool coverage.
^® genuine replacement parts 2322
图 6
HAYWARD
IMPORTANT: Turn OFF Pool Pump before you begin the next steps.

IMPORTANT: Ensure that your dedicated suction port is fitted with a Safety Vac-Lock fitting (not included). If not, obtain one from your local pool store and have it installed first.
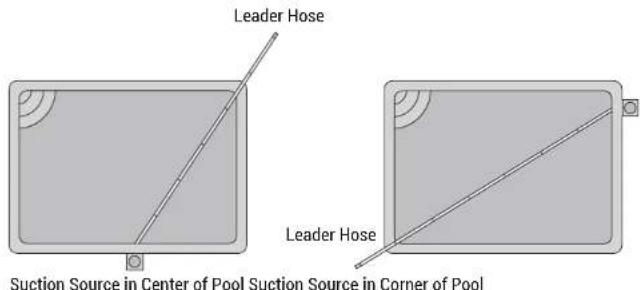
Dedicated Suction Port Connection
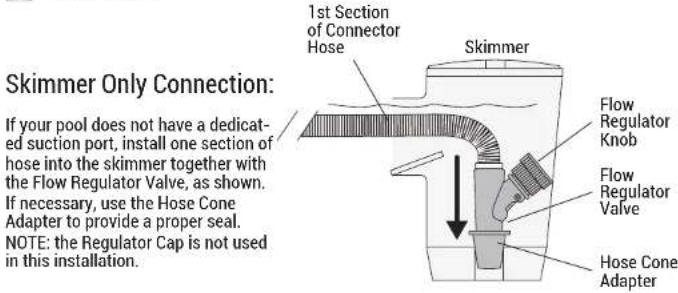
- With the pump turned off, insert the adjustable Flow Regulator Valve with the Regulator Cap into the skimmer. Use the Hose Cone Adapter to make a proper seal, if necessary.
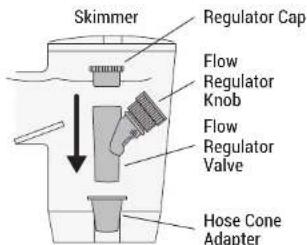
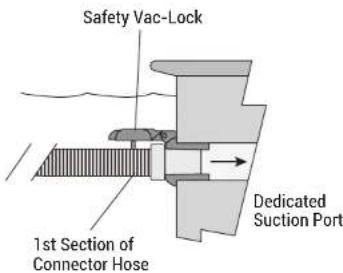
- Install one section of hose into the Safety Vac-Lock fitting of your dedicated suction port, as shown. If your pool does not have a dedicated suction port, go to Skimmer Only Connection.
Use only hayward® genuine replacement parts Use only hayward
ENEN
HAYWARD
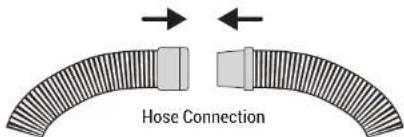
Connecting the Hoses
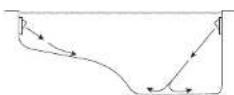
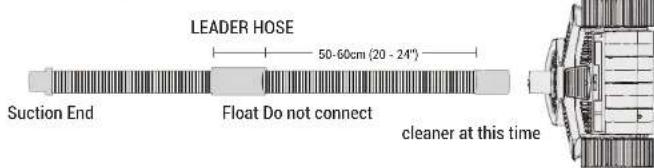
- Attach the Float to the Leader Hose (the single section of hose that will connect to the cleaner). The Float should be placed 50-60cm (20-24") from the cuff. Do not connect cleaner at this time.
- From the first section of hose at the suction source, connect together as many hose sections as needed to reach the farthest point of the pool and then add the Leader Hose. Refer to the diagram below and the top of page 6.
^® genuine replacement parts 2524
图 2-1
HAYWARD
Use Flow Gauge to Check Water Flow
- Submerge the entire length of hose to expunge all air.
- Insert the Flow Gauge into the end of the Leader Hose.
- Attach one end of the Double Hose Clip to the Leader Hose and the other end to the first section of hose at the vacuum source. This will form a loop in the pool as shown below.
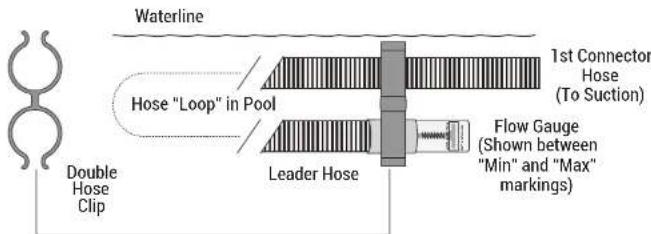
- With the air out of the entire hose, verify that the Leader Hose and Flow Gauge are underwater and turn the pump ON. Adjust Flow Regulator Valve knob "faster" or "slower" until the disc indicator in the Flow Gauge settles between "Maximum" and "Minimum" flow. NOTE: If you have an extraordinarily strong pump, you may need to open the main drain slightly.
- Turn off the pump. Remove the Double Hose Clip and Flow Gauge from the Leader Hose. Submerge the TracVac™ cleaner to remove all air and then connect the cleaner to the Leader Hose. Cleaner installation is now complete.
Use only hayward® genuine replacement parts Use only hayward
ENEN
HAYWARD
Operation
Before You Use The TracVac™
Understanding how the TracVac™ works will help ensure the proper operation and maintenance of your cleaner.
- Before every use, visually inspect the TracVac™ and always check that the turbine moves freely and is not obstructed by debris. Water flowing through the turbine drives the tracks and moves the cleaner. If the TracVac™ moves slowly or stalls, the turbine may be partially or fully blocked with debris. Refer to "Removing Debris from the Turbine" on the following page.
- Check that the pool's system is configured in a manner to maximize flow through the cleaner. Ensure that pool filter is clean, allowing for maximum flow. Make sure that supply and return valves are positioned properly and that the pump is running at the proper speed.
- The TracVac™'s cleaning performance is optimized when operating at a flow rate that has been set with the Flow Gauge (Step 5 on previous page). This flow rate will ensure that the TracVac™ moves at the proper speed (see Cleaner Speed). Note that the TracVac™ draws debris from the pool floor and moves it to the pool filter where it's trapped and later cleaned out through backwashing or cartridge cleaning. If the pool has a high debris load, you may notice a slow down in cleaner speed which is most commonly caused by the filter getting dirty. In these cases, you may have to clean your filter before the pool is entirely clean. Refer to your filter's pressure gauge and speed of the cleaner to determine when it's time for a filter cleaning.
Cleaner Speed
If the Flow Gauge is not available or you want to quickly check for proper operation, you can measure the TracVac™'s speed as an indication for proper water flow. To do this, raise the TracVac™ off of the pool floor and hold it by the handle just beneath the pool water surface. Be sure to keep the cleaner under the surface so that it does not draw in any air. Stay clear of moving parts. Now
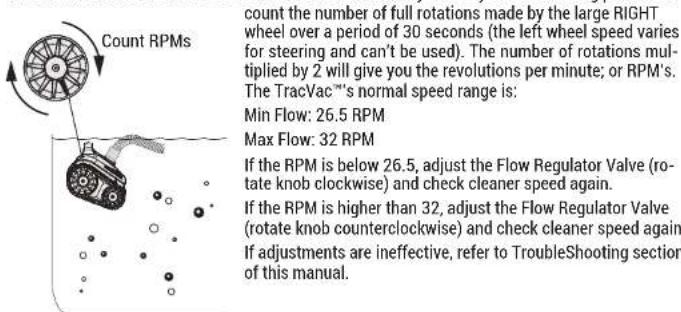
^® genuine replacement parts 2726
图
HAYWARD
Removing Debris from the Turbine
To clean debris out from the TracVac™, perform the following:
- Turn off the filter pump and remove the TracVac ^™ from the pool.
- A clog could be visible by looking into the turbine from where the leader hose connects. If no clog is seen, position the cleaner with the buckle facing you and attempt to rotate the left side track forward. If the wheels rotate smoothly there probably is no obstruction. If the track feels "locked", there is most likely a blockage.
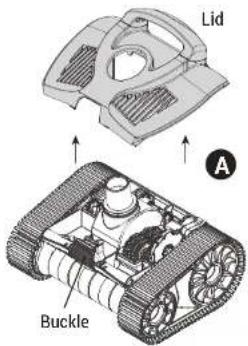
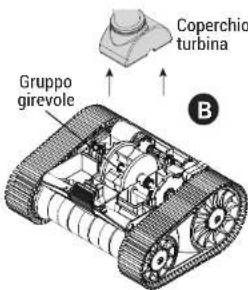
- To clear an obstruction, place the TracVac™ on a flat work surface. Refer to image A. Open the buckle on the front of the cleaner by pressing it and lifting the lid. Lift the front of the lid up and then firmly pull it forward. This will separate the lid from the cleaner body and you will now be able to lift the lid straight up from the cleaner chassis.
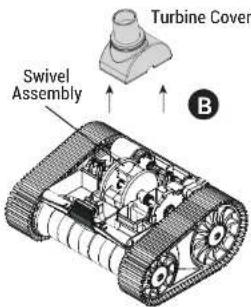
- Pull the turbine cover straight up and off of the cleaner chassis. Refer to image B. Inspect the turbine cover for debris or obstructions.
- With the turbine cover off, you have full access to the turbine. You should be able to see and remove any visible obstructions from the turbine.
- Install the turbine cover back onto the chassis by reversing Step 4.
- Visually inspect the rest of the cleaner and remove any debris that may be in the gears, drive shafts, swivel assembly, etc.
-
Repeat step 2 (turning the left track) to insure that the cleaner runs smoothly.
-
Place the lid over the swivel assembly.
-
Align the tabs on the back side of the top cover with the slots on the back side of the chassis, push down to engage the tabs. Firmly push the top cover backwards to fully engage the tabs.
-
Lock the top cover onto the cleaner chassis with the locking buckle on the front of the cleaner.
Use only hayward® genuine replacement parts Use only hayward
ENEN
HAYWARD
Troubleshooting
IMPORTANT: Always disconnect cleaner before servicing.
| Problem Solution | |
| Cleaner is not moving or is moving too slowly. | Check flow with Flow Gauge and if necessary, adjust the Flow Regulator Valve.Check for debris inside the cleaner itself.Check that pump is running at desired speed and is fully primed.If pump has lost prime, disconnect and wait for prime.Check if the pool filter needs cleaning or backwashing.Check to be sure that the main drain and all suction lines are closed, except for the vacuum or suction line to which the cleaner is attached.Check for leaks or obstructions in the system (e.g. debris in the filter, pump basket or pump impeller). |
| Cleaner's left track will not turn when rotated by hand. | Check for obstructions inside the cleaner (see page 8). |
| Cleaner stays in one end of the pool. | Hose may be limiting movement. Adjust the hose and remove any loops or coils.Check that hose is long enough (see page 5-6).Check flow with Flow Gauge and if necessary, adjust the Flow Regulator Valve (see page 6).Check the direction of the return line water flow. If it is interfering with the path of the cleaner, redirect to a different direction.Check the Leader Hose for float placement. The float may be in the wrong position.Be sure that the swivel assembly (at top of cleaner) rotates smoothly. If not, clean the area as described on page 8. |
| Cleaner climbs the wall too much or climbs out of pool. | Check flow with Flow Gauge. You may need to decrease the flow using the Flow Regulator Valve. |
| Cleaner won't climb the pool walls. | Check to be sure that the cleaner tracks are not excessively worn. Excessively worn tracks will not provide the grip necessary for your cleaner to climb pool walls.Check flow with Flow Gauge. You may need to increase the flow using the Flow Regulator Valve - do not exceed the maximum Flow Gauge setting.Check the Leader Hose for float placement. The float may be in the wrong position. |
| Cleaner stays on the main drain. | Check to be sure that main drain is closed. May need assistance from a pool professional.Check to be sure a main drain grate is installed. |
[Unreadable]
HAYWARD
| Cleaner falls on its side. Takes long time to recover if on its side. | ·Check the Leader Hose for float placement. The float may be in the wrong position. ·Check that the hose is long enough to reach the furthest point in the pool. ·Check the direction of the return line water flow. If it is interfering with the path of the cleaner, redirect to a different direction. |
| The left track wheel skips teeth when rotated forward by hand (looking from the front). | ·Wheel hub or right drive shaft gear worn/damaged. |
| The loops in the hoses won't come out. | ·Do not store hose in coiled position. ·Lay hose straight and in sunlight. ·Clean swivel on turbine, Reposition leaf canister if installed. It may be in wrong position or not floating. ·Total length of hose too long for your pool configuration. |
| The cleaner turns in circles, it won't go straight at all. | ·Wheel hub and/or long drive shaft gear and/or steering slide assembly and/or left drive gear are worn or damaged. |
| The cleaner does not clean the entire pool. | ·The hose is too short. ·The float may be in the wrong position on Leader Hose. Verify that it is 50-60cm (20-24") from cleaner head. ·Clean swivel on turbine. ·Check the direction of the return line water flow. If it is interfering with the path of the cleaner, redirect to a different direction. |
| If cleaner is behaving errati-cally while installed on pool with solar heating. | ·Operate suction cleaner and solar heating on alternating schedules. Remove TracVacTM when not in use on these type of pools. |
ENEN
HAYWARD
21

[Non-Text]

2Connector HosesLeader Hose
[Non-Text]
^® genuine replacement parts 3130
图
HAYWARD
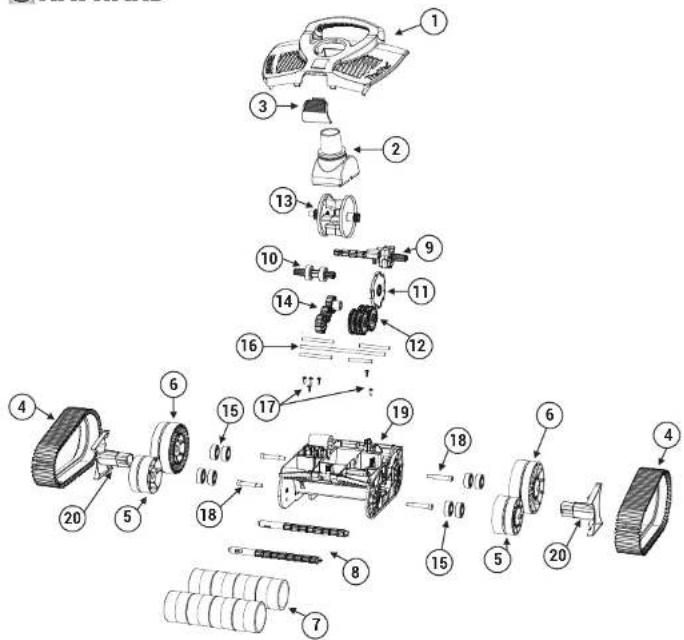
| COUNT DESCRIPTION |
| 1 Top Cover Kit (Top cover including handle and balancing weights) |
| 2 Turbine Cover Swivel Kit (Turbine Cover/Swivel) |
| 3 Buckle/Latch Kit |
| 4 Track Kit (Set of 2) |
| 5 Front Small Wheel Kit (Set of 2, including bearings and mushroom insert) |
| 6 Rear Large Wheel Kit (Set of 2, including bearings and mushroom insert) |
| 7 Roller Kit (Set of 4 rollers) |
| 8 Roller Bar kit (Set of 2) |
| 9 Left Drive Kit (Long drive shaft & Bearing Housing) |
| 10 Right Drive Kit (Short Drive Shaft & 2 bearings) |
| 11 Cam Kit (Cam & 1 reduction gear) |
| 12 Cam Reduction Gear Kit (5 reduction gears and SS Shaft) |
| 13 Turbine Kit (Just the Turbine) |
| 14 Drive gear Kit (3x drive side gears) |
| 15 Bearing kit (Set of 8) |
| 16 SS Shaft Kit (5x) |
| 17 SS Screw Kit (6x internal SS Shaft Screws) |
| 18 Wheel Screw Kit (4x SS Screws for the wheels) |
| 19 Chassis kit (Chassis with balancing weights & latch spring installed) |
| 20 Side Covers (2x), Left-Right |
| 21 Accessory Kit |
| 22 Leader hose |
| 23 Connector hose |
Use only hayward® genuine replacement parts Use only hayward
ENEN
HAYWARD
[Unreadable]
HAYWARD
NotesNotes
ES
HAYWARD

HAYWARD®
TracVac™
Manual del usuario
natural_image
Illustration of a tracked robotic vehicle with visible wheels and sensor components (no text or symbols)W3HSCTRACEU
CONSERVE ESTE MANUAL PARA FUTURAS CONSULTAS
ESES
HAYWARD
natural_image
Illustration of a tracked robotic vehicle (TracVac™) with visible gears and housing, no text or symbols present.
natural_image
Illustration of a tracked robotic vehicle with visible wheels and sensor components (no text or symbols)W3HSCTRACEU
natural_image
Illustration of a TracVac™ robotic vehicle with visible gears and housing (no text or symbols on the device itself)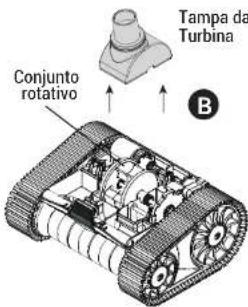
PTPT
HAYWARD

HAYWARD
natural_image
Illustration of a tracked robotic vehicle with visible wheels and sensor array (no text or symbols)W3HSCTRACEU
CONSERVARE QUESTO MANUALE PER RIFERIMENTI FUTURI
ITIT
HAYWARD
IMPORTANTI ISTRUZIONI DI SICUREZZA
natural_image
Illustration of a tracked robotic vehicle with visible wheels and sensor array (no text or symbols)W3HSCTRACEU
BEWAHREN SIE DAS HANDBUCH ALS REFERENZ AUF
DEDE
HAYWARD
natural_image
Line drawing of a tracked robotic vehicle (no text or symbols on the device itself)
natural_image
Illustration of a tracked robotic vehicle with visible wheels and sensor components (no text or symbols)W3HSCTRACEU
BEWAAR DEZE HANDLEIDING VOOR LATER GEBRUIK
NLNL
HAYWARD
BELANGRIJKE VEILIGHEIDSINSTRUCTIES
natural_image
Illustration of a tracked robotic vehicle (TracVac™) with visible wheels and control panels, no text or symbols on the device itself.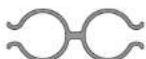
Dubbele slangklem
Regelkap

Debietmeter


NLNL
HAYWARD
Installatie
HAYWARD
www.hayward-pool.co.uk


Hayward is a registered trademark of Hayward Holdings, Inc. © 2023 Hayward Holdings, Inc.
All other trademarks not owned by Hayward are the property of their respective owners. Hayward is not in any way affiliated with or endorsed by those third parties.


- HAYWARD®
- INSTRUCTIONS DE SÉCURITÉ IMPORTANTES
- IMPORTANT SAFETY INSTRUCTIONS
- - READ AND FOLLOW ALL INSTRUCTIONS
- Overview
- Features
- Steering System and Hose Swivel
- Robust Tracks
- Wall Climbing
- Installation
- Dedicated Suction Port Connection
- HAYWARD
- Connecting the Hoses
- Use Flow Gauge to Check Water Flow
- Operation
- Before You Use The TracVac™
- Cleaner Speed
- Removing Debris from the Turbine
- Troubleshooting
- IMPORTANTI ISTRUZIONI DI SICUREZZA
- BELANGRIJKE VEILIGHEIDSINSTRUCTIES
- Installatie
Brand : HAYWARD
Model : TracVac
Category : Vacuum Cleaner