SharkVac XL Pilot - Vacuum Cleaner HAYWARD - Free user manual and instructions
Find the device manual for free SharkVac XL Pilot HAYWARD in PDF.

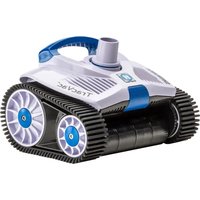
| Product type | Automatic pool cleaning robot |
| Brand | Hayward |
| Model | SharkVac XL Pilot |
| Carton dimensions (L x W x H) | 620 x 440 x 752 mm |
| Weight (without cable) | 10,45 kg |
| Floating cable length | 16,76 m |
| Power supply | 230 V ~, 50 Hz, 24 V transformer ===, 30 mA differential protection mandatory |
| Cleaning cycles | Full cycle (4 h) or bottom only (2 h), selectable on the power supply |
| Control technology | Microprocessor Adaptive Seek Control Logic (ASCL®) |
| Filter | Removable and reusable pleated filter panel (cellulose/polyester) |
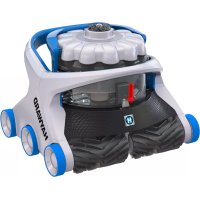
| Wall cleaning | 3 adjustable float positions for different cleaning behaviors (bottom, walls, waterline) |
| Materials | High impact resistant ABS, stainless steel metal parts |
| Overload protection | Electronic control with automatic stop |
| Electrical safety | Automatic stop at end of cycle, do not use in the presence of swimmers, minimum distance of 3,5 m from the edge |
| Routine maintenance | Filter cleaning after each use, rinsing of panels, checking of the impeller and wheels |
| Storage | In a dry place away from sunlight, temperature 4°C to 46°C |
| Water operating temperature | 10°C to 35°C |
| Warranty | 2 years against manufacturing defects (wear parts excluded) |
| Included accessories | Transport cart, transformer, floating cable |
Frequently Asked Questions - SharkVac XL Pilot HAYWARD
User questions about SharkVac XL Pilot HAYWARD
0 question about this device. Answer the ones you know or ask your own.
Ask a new question about this device
Download the instructions for your Vacuum Cleaner in PDF format for free! Find your manual SharkVac XL Pilot - HAYWARD and take your electronic device back in hand. On this page are published all the documents necessary for the use of your device. SharkVac XL Pilot by HAYWARD.
USER MANUAL SharkVac XL Pilot HAYWARD
natural_image
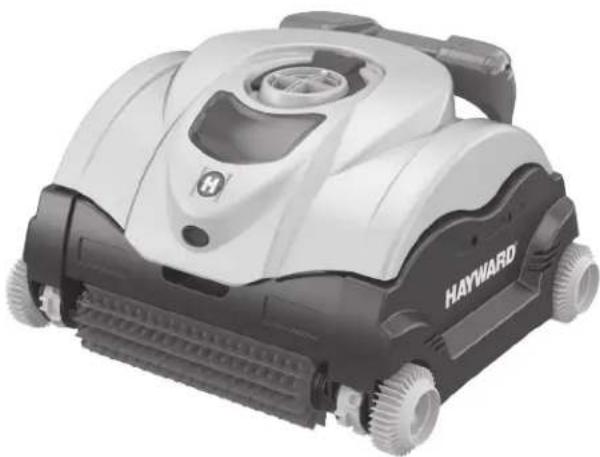
Exterior view of a modern Hayward robotic device with visible wheels and control panel (no text or symbols on body)GUIDE DE L'UTILISATEUR
OWNER'S MANUAL
MANUAL DEL USUARIO
MANUAL DO UTILIZADOR
ANWENDER - HANDBUCH
GEBRUIKERSHANDBOEK
MANUALE PER L'USO
ANVÄNDARHANDLEDNING
natural_image
Simple line icon of an open book with an information symbol inside (no text or labels)
natural_image
Simple line drawing of an open book with no text or symbols visible
ROBOT NETTOYEAR
GUIDE DE L'UTILISATEUR
natural_image
Exterior view of a modern HAYWARD robotic vacuum cleaner (no text or symbols visible)SharkVAC XL™ Pilot
natural_image
Illustration of a person kneeling beside an open box containing a car, with an arrow indicating motion (no text or symbols)text_image
X 1 X 1 X 1 X 2 X 2022 X 1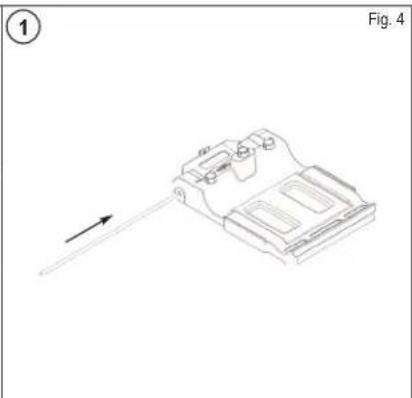
natural_image
Technical line drawing of a mechanical component with an arrow indicating direction (no text or symbols)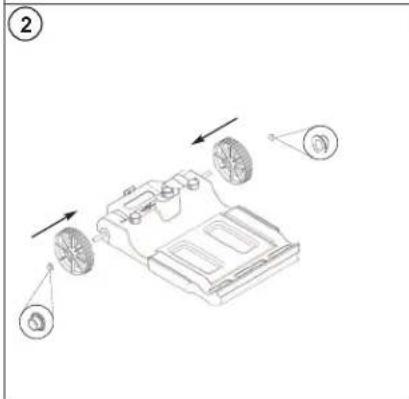
text_image
Technical diagram showing a vehicle battery pack with labeled components and directional arrows indicating assembly or movement.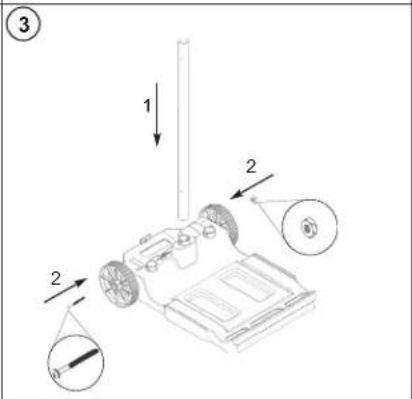
text_image
Technical diagram of a mechanical assembly with numbered components and directional arrows indicating motion or assembly.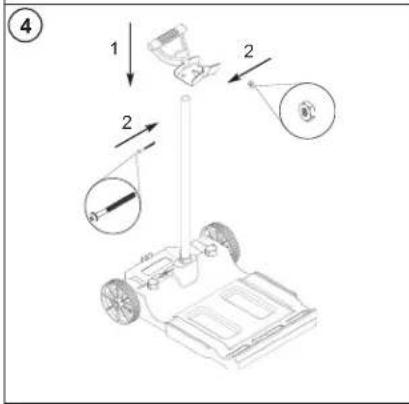
text_image
Diagram showing mechanical assembly with labeled components and directional arrows, including a cart, sensor, and motor parts.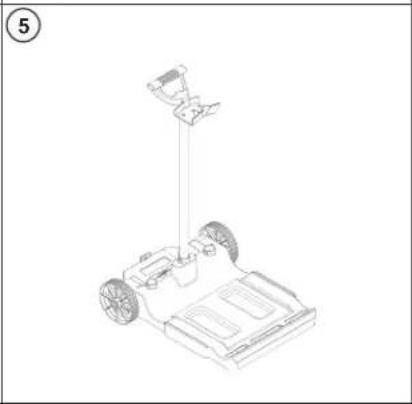
natural_image
Line drawing of a small wheeled vehicle with wheels and a vertical pole (no text or symbols)natural_image
Technical line drawings of a robotic car showing internal components and motion direction (no text or symbols)natural_image
Technical line drawing of a robotic vacuum cleaner with internal components and a close-up view of the device's handle (no text or symbols present)text_image
Diagram illustrating the installation of a solar panel with water spray, showing top-down and before-and-up states.natural_image
Technical line drawing of a mechanical assembly with arrows indicating downward motion (no text or symbols)natural_image
Technical line drawings of two robotic car components, one open showing engine compartment and the other closed with a circular emblem (no text or symbols)EXCEPTIONS ET EXCLUSIONS DE LA GARANTIE
natural_image
Exterior view of a modern HAYWARD robotic vacuum cleaner (no text or symbols visible)SharkVAC XL™ Pilot
Hayward robotic cleaners represent the highest standard in design, performance, and quality. The cleaner independently scrubs, vacuums, and filters your pool. It is completely automatic and requires no installation, no attachments. Just drop it in and turn it on. Filter cleaning is much easier with the top-access filter cartridge element. Adaptive Seek Control Logic (ASCL®) Microprocessor control optimizes cleaning routine for each individual pool size and shape. Electronic Self-Diagnostics, Overload Protection, and simple Direct Drive design with non-corrosive bearings provide high reliability. Adjustable float positioning allows the user to determine one of three cleaning behaviors they wish the cleaner to perform in their pool.
SAVE THIS INSTRUCTION MANUAL

CE
Basic safety precautions should always be followed, including the following: Failure to follow instructions can cause severe injury and/or death.

This is the safety-alert symbol. When you see this symbol on your equipment or in this manual, look for one of the ving signal words and be alert to the potential for personal injury.

WARNING warns about hazards that could cause serious personal injury, death or major property damage. I ignored presents a potential hazard.

CAUTION warns about hazards that will or can cause minor or moderate personal injury and/or property ge and if ignored presents a potential hazard. It can also make consumers aware of actions that are unpredictable unsafe.
The NOTICE label indicates special instructions that are important but not related to hazards.


WARNING - Read and follow all instructions in this owner's manual and on the equipment. re to follow instructions can cause injury.

WARNING – This document should be given to the owner of the swimming pool and must be by the owner in a safe place.

WARNING – The appliance can be used by children aged from 8 years and above and persons reduced physical, sensory or mental capabilities, or lack of experience and knowledge, if have been given supervision or instruction concerning use of the appliance in a safe way and understand the hazards involved.

WARNING – Do not let children use or play with the cleaner.

WARNING – Hayward only guarantees the quality, performance and safety of its products when mblled with genuine Hayward manufactured parts. Use of non genuine Hayward manufactured s will void all warranty.

CAUTION – Regularly inspect the cleaner and hoses; do not use if damaged or if any rough gases are visible on the cleaner as this can cause damage to the pool.

WARNING – Never operate the cleaner when there are people in the pool.

WARNING – Before installing this product, read and follow all warning notices and instructions which included. Failure to follow safety warnings and instructions can result in severe injury, death, or property damage.

CAUTION – Deterioration, discoloration or brittleness of any pool finish can be caused over time, rately by, or in combination with, age, incorrect pool water chemistry, improper installation, and others. Customer hereby disclaims any and all claims, and releases Manufacturer from any and all claims damages to any pool plaster or vinyl liner in Customer's pool by reason of the use and/or operation of the other. Under no circumstances shall the Manufacturer be liable for any loss or damage, whether direct, sequential or incidental, arising out of the use or inability to use the cleaner in Customer's pool.
Hayward only guarantees the quality, performance and safety of its products when assembled with genuine Hayward manufactured parts. Use of non genuine Hayward manufactured parts will void all warranty.
CONSUMER INFORMATION AND SAFETY
| ! DANGER | Risk of electrical shock or electrocutionThe electrical supply to this product must be installed in accordance with all applicable local codes (see p17) and ordinances. Improper installation will create an electrical hazard which could result in death or serious injury to pool users or others due to electrical shock, and may also cause damage to property. |
| ! WARNING | Do not play with cleaner or cable or apply to body. Can trap or tear hair or body parts. Cable can trip or entangle swimmers which could result in drowning. |
| ! CAUTION | Before installing the cleaner, understand cleaner coverage. The cleaner was not designed to automatically clean steps or to work under a solar cover. It was also not designed to do initial cleanup for a new pool installation. |
Operating the Cleaner
| WARNING | A 30 mA differential protection device must be installed to protect your electrical outlet and to prevent any possible electric shock. Failure to do so could create an electrical hazard which could result in death or serious injury to pool users or others due to electrical shock and may also cause damage to property. |
| CAUTION | DO NOT switch the pool cleaner to “ON” if it is not immersed in the water. Operating the cleaner out of the water may cause severe damage and will result in loss of warranty. Always remember to turn off the power supply “OFF” and unplug it from the power outlet before removing the cleaner from the pool. |
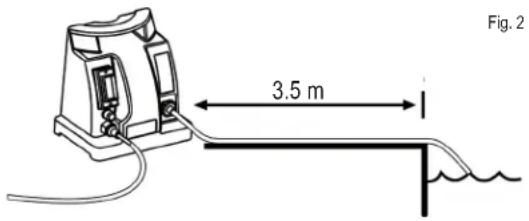
| WARNING | It is mandatory to allow a safety distance between the power supply and the pool as required by the current installation standard (3.5 m minimum). |
Hayward only guarantees the quality, performance and safety of its products when assembled with genuine Hayward manufactured parts. Use of non genuine Hayward manufactured parts will void all warranty.

text_image
STOPREAD THESE IMPORTANT OPERATING TIPS BEFORE USING YOUR UNIT!
Dear Hayward Robotic Cleaner Owner:
Thank you for choosing Hayward. In order to achieve optimal performance, please read and follow these steps:
- Cleaner filter cartridges should be thoroughly cleaned after each use or as often as needed to ensure cleaner's optimal performance.
- Before using your cleaner and especially when opening the pool for the first time remove larger items from the pool that may diminish the cleaner's performance. Clean filter frequently when pool is excessively dirty.
- For the first use, run cleaner for the full cycle (4 hours) to ensure a clean pool and give yourself a full understanding of the cleaner's capabilities.
- Cleaner may periodically go to the wall but not necessarily climb to the vertical position. This is a normal part of the programmed cycle.
- Cleaner may stop in the middle of the pool and reverse during cleaning cycle. This is a normal part of the programmed cycle.
- DO NOT start cleaner out of the water. Power button should only be switched to "On" position when unit is fully submerged. The unit will automatically shut off, but it is best to put power switch in "OFF" position when unit completes cleaning.
- Plug in only to a protected 230 V ∼ outlet that is close and protected from short circuits. Fit a 30 mA differential protection device to protect people from electric shock caused by a possible break in the electrical insulation.
- Place the cleaner power supply so that it is at a minimum distance of 3.5 meters from the pool edge. The length of the standard cleaner cable is 16,76 meters.
Hayward only guarantees the quality, performance and safety of its products when assembled with genuine Hayward manufactured parts. Use of non genuine Hayward manufactured parts will void all warranty.
GENERAL OPERATING INSTRUCTION
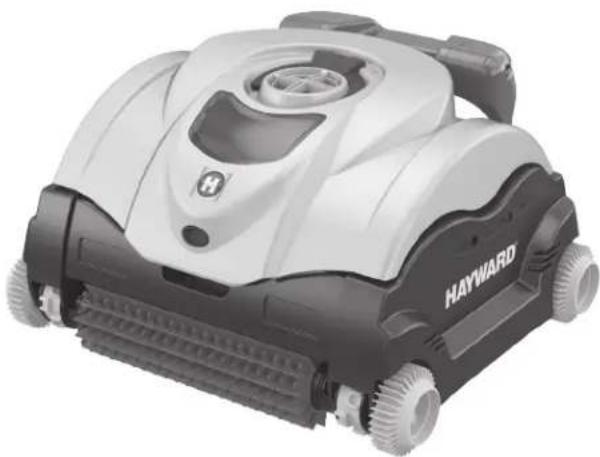
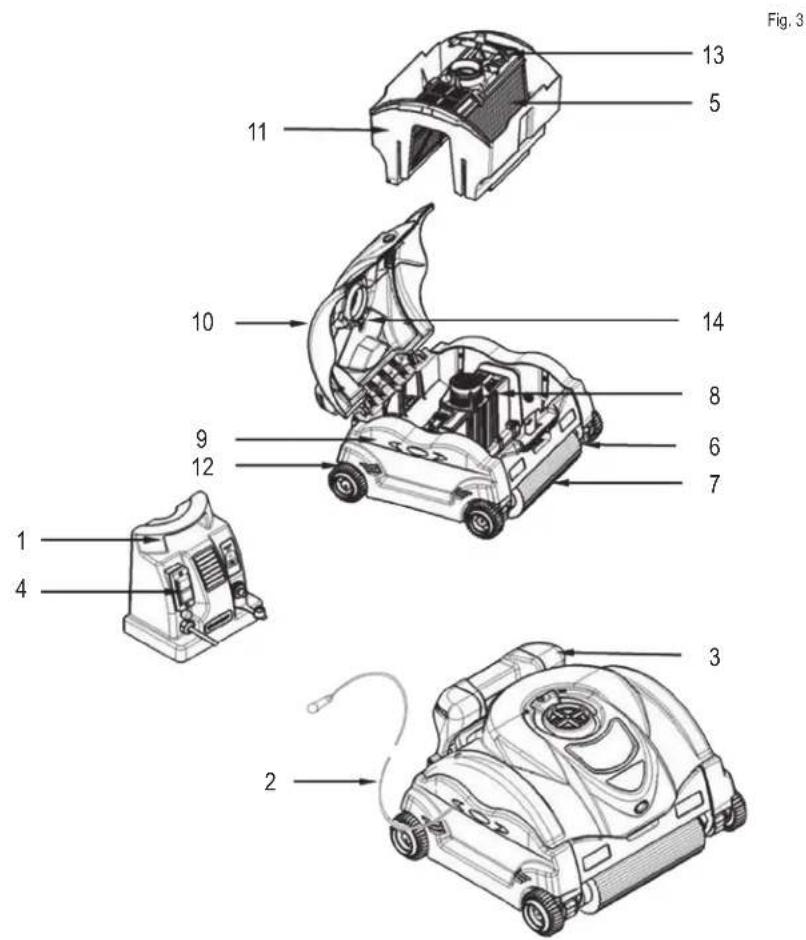
Take a moment to get familiar with the cleaner using the figure 3. Throughout this manual reference to this figure is made when referring to different components of the cleaner.
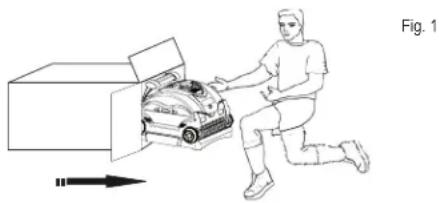
Remove the cleaner by placing the carton down and removing it from the box as shown. The cleaner and the Power Supply is premounted to the cart. See the figure 4 for Caddy Cart.
natural_image
Illustration of a person kneeling beside a car inside an open box, with an arrow pointing to the vehicle (no text or symbols)- Select the nearest 230 V outlet that is close and protected from short-circuits. Fit a 30 mA differential protection device to protect people from electric shock caused by a possible break in the electrical insulation.
- Place the power supply so that it is at a minimum distance of 3.5 meters from the pool edge. The length of the standard cable is 16,76 meters.
text_image
Fig. 2 3.5 m-
Connect the floating cable to the power supply. Use only the original Power Supply manufactured by Hayward.
-
Place the cleaner in the pool. It will slowly sink to the bottom of the pool as the air inside is released.
-
Connect the power supply to the protected outlet and switch it on. The cleaner will perform a self-diagnostics routine for several minutes before starting the cleaning cycle.
Caution: DO NOT switch power supply "ON" when the cleaner is out of water. This may result in damage to the pump and drive motor seals, which will VOID the warranty.
- The cleaner will automatically shut off after 90 minutes for the quick clean cycle or 4 hours for a full cleaning cycle. If your pool is cleaned in less time than 90 minutes, you may shut the cleaner off manually by switching the power supply to the off position.
Should a second cleaning cycle be required, switch OFF the power supply for 10 seconds and restart. (see Power Supply operating instructions)
Hayward only guarantees the quality, performance and safety of its products when assembled with genuine Hayward manufactured parts. Use of non genuine Hayward manufactured parts will void all warranty.

HAYWARD®
- After the pool has been cleaned, switch OFF the power supply before removing the cleaner from the pool.
- Remove the cleaner from the water at the shallow end of the pool by pulling the cable until the cleaner reaches the surface. Then lift it out of the water using the handle, NOT the cable.
- If the supply cord is damaged it must be replaced by the manufacturer, service agent, or similarly qualified persons in order to avoid a hazard.
- All electrical connections must be done by a qualified electrician according to local electrical standard (see p17).
Caution: When pulling the cable, reel it in hand-over-hand - do NOT reel it around your arm.
DO NOT ENTER THE SWIMMING POOL WHEN THE CLEANER IS OPERATING.
Optimum operating water temperature range for the cleaner is 10^ C - 35^ C.
Remove the cleaner from the pool after each use. Keeping the cleaner permanently in the pool may result in additional service requirements.
POWER SUPPLY OPERATING INSTRUCTIONS
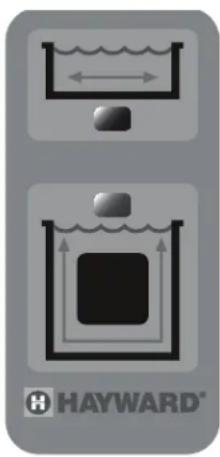
When the power supply is initially switched ON the BOTTOM ONLY CYCLE will be automatically selected. This is indicated by the light on the cycle selection switch. The cleaner will automatically shut-off after 2 hours of operation on this cycle.
To select the full clean cycle depress the FULL CYCLE button at any time during the cleaning operation. If the BOTTOM ONLY CYCLE has completed simply turn the power off and back on, then depress the FULL CYCLE button. The light on the cycle selection switch will indicate that the full cycle has been selected. The cleaner will automatically shut-off after 4-hours of operation on this cycle.
Nota: to exit the Bottom & Wall Mode and go to Bottom Only Mode, turn the Power Supply Off and On. The bottom only cycle will be automatically selected. This is indicated by the light on the cycle selection switch.
text_image
HAYWARD®Hayward only guarantees the quality, performance and safety of its products when assembled with genuine Hayward manufactured parts. Use of non genuine Hayward manufactured parts will void all warranty.
text_image
Fig. 3 13 5 11 10 14 8 9 6 7 1 4 2 3- Power Supply 8. Sealed Motor Unit
- Floating Cable 9. Side Panel
- Handle 10. Dome Assembly
- On/Off Switch 11. Filter Bucket
- Filter Cartridge 12. Wheel
- Drive Track 13. Filter Door
- Foam Roller 14. Float Assembly
Hayward only guarantees the quality, performance and safety of its products when assembled with genuine Hayward manufactured parts. Use of non genuine Hayward manufactured parts will void all warranty.
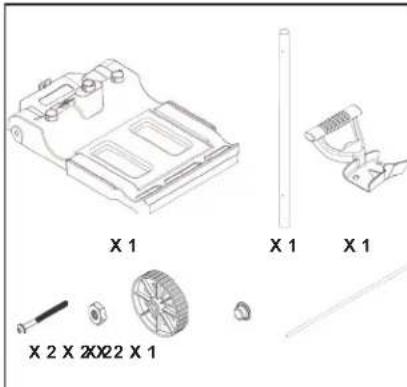
CADDY CART INSTRUCTIONS - SEE DIAGRAM
- Caddy Cart will come partially assembled in the carton less the handle & tube.
- Insert the screw into the tube at the base of the caddy cart & secure with bolt (3)
- Insert the handle into the top of the tube & insert the screw securing it with the bolt (4)
text_image
X 1 X 1 X 1 X 2 X 2022 X 1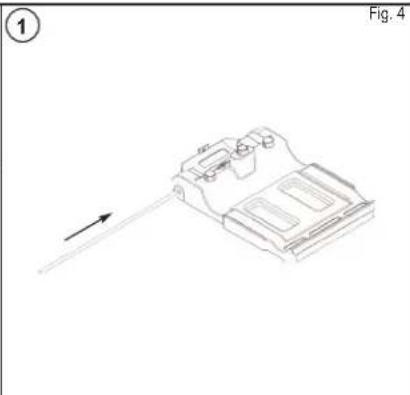
natural_image
Technical line drawing of a mechanical component with an arrow indicating direction (no text or symbols)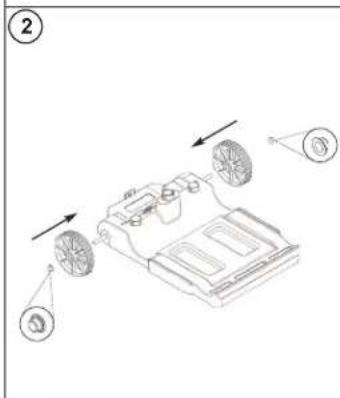
text_image
Technical diagram showing a mechanical assembly with labeled components and directional arrows indicating motion or assembly.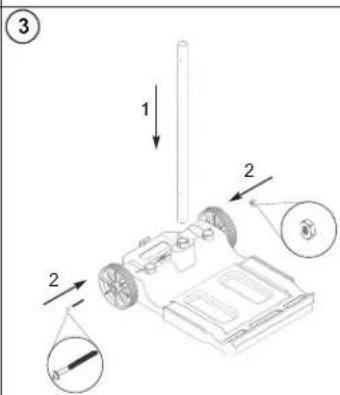
text_image
Technical diagram of a robotic device with labeled parts and directional arrows indicating motion or assembly.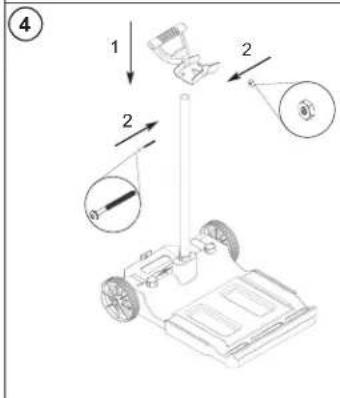
text_image
Diagram showing mechanical assembly with labeled parts and directional arrows, including a cart and a device component.
natural_image
Line drawing of a wheeled vehicle with wheels and a mounted sensor (no text or symbols)Hayward only guarantees the quality, performance and safety of its products when assembled with genuine Hayward manufactured parts. Use of non genuine Hayward manufactured parts will void all warranty.
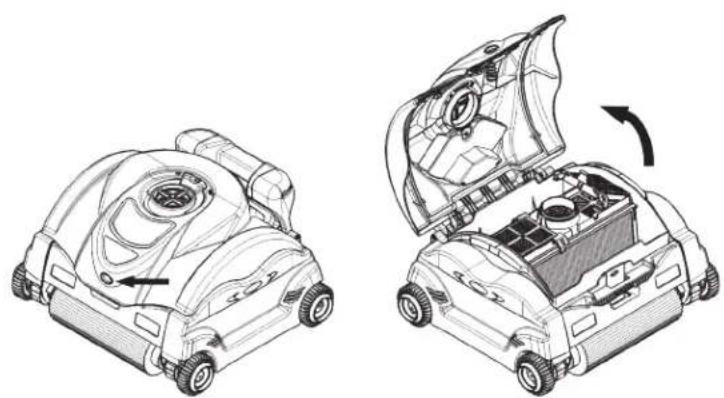
MAINTENANCE
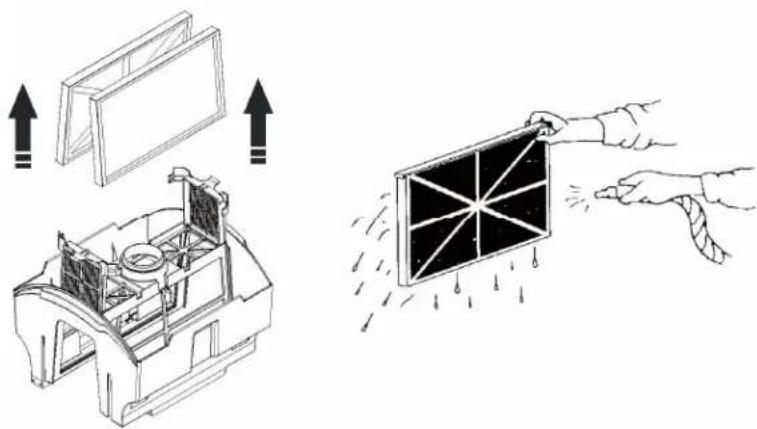
Clean the filter cartridge after each use:
- Open the cleaner by pressing the lid button and lifting up the dome cover.
natural_image
Technical line drawings of a robotic car showing internal components and airflow direction (no text or symbols)-
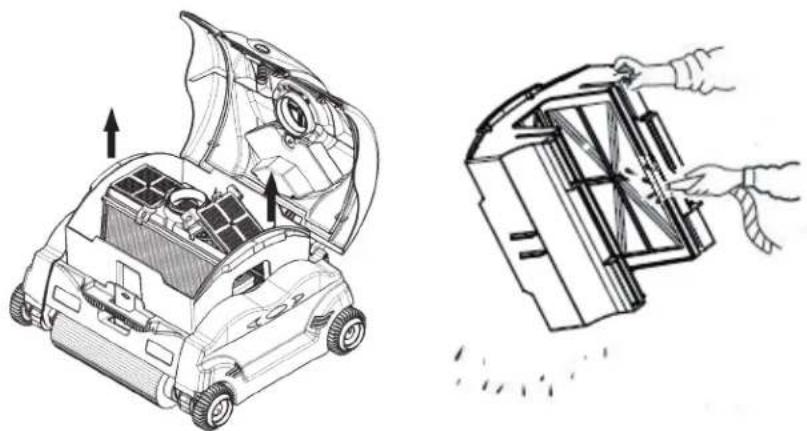
Remove the filter bucket assembly by lifting it up out of the cleaner with both hands from each side.
-
Flip the bucket assembly over to remove the debris and then rinse with a garden hose to remove small particles.
-
Filter cartridges do not need to be removed to clean.
natural_image
Technical line drawing of a robotic vacuum cleaner with internal components and a close-up view of the device's handle (no text or symbols present)Hayward only guarantees the quality, performance and safety of its products when assembled with genuine Hayward manufactured parts. Use of non genuine Hayward manufactured parts will void all warranty.

HAYWARD®
- Remove the filter cartridges:
a. Unsnap and lift up both filter door latches.
b. Pull out the filter cartridges. Using a garden hose with a spray nozzle, wash the filter elements to remove debris. Hold the filter elements as shown to allow the debris to fall out.
natural_image
Technical illustration showing a device interior with airflow indicators and a close-up of its screen (no text or symbols present)c. Wash the entire filter bucket assembly. (Previously shown).
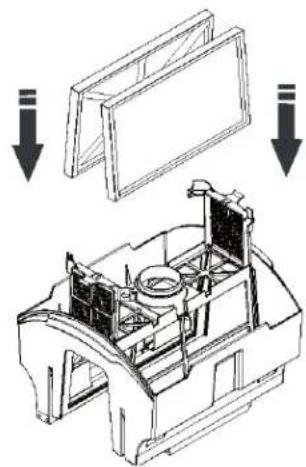
d. Place the filter cartridges back into the filter bucket assembly with the center frame reinforcements facing inward
natural_image
Technical line drawing of a mechanical assembly with arrows indicating downward motion (no text or symbols)e. Snap the filter door latches into place.
Hayward only guarantees the quality, performance and safety of its products when assembled with genuine Hayward manufactured parts. Use of non genuine Hayward manufactured parts will void all warranty.

HAYWARD®
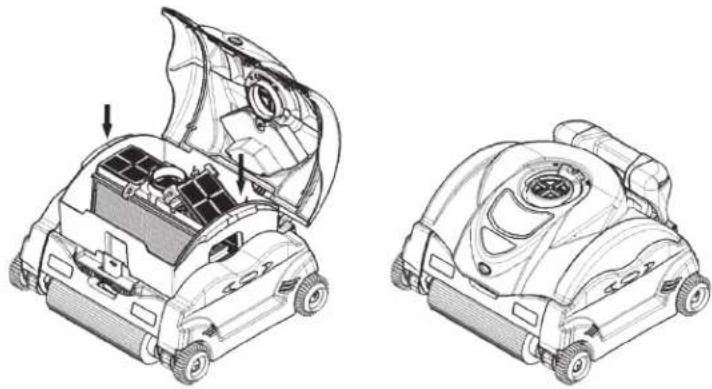
- Return the filter bucket assembly into the cleaner using the diagram shown to determine the front and back.
- Close the dome and press the lid button to snap dome into place.
NOTE: Filter cleaning solution can be used to remove excessive dirt and/or sand.
Remember: The cleaner your filter is, the more cleaning will be effective.
natural_image
Technical line drawings of two robotic car components, one open showing internal compartments and the other closed with a circular emblem (no text or symbols present)Periodic Cleaning of Moving Parts
⚠ WARNING: Disconnect the power supply from electrical outlet before cleaning moving parts.
- Inspect the venturi to ensure that no debris or hair has clogged the impeller.
• The impeller can be cleaned by spraying it with a garden hose. - Spray water using a garden hose around the float box assembly to remove any sand or debris to ensure free movement when changing float position.
- Remove any debris that has accumulated between the tracks and wheels.
Storage
When unit is out of the water, store the cleaner in a dry, shady location at temperatures between 4°C-46°C
Cable Care
With continued use, the cable may become coiled (like a telephone cord). To correct this, periodically stretching the cord out in the sun should remove any cord twists.
IMPORTANT: The cable should be checked periodically for any external damage.
Hayward only guarantees the quality, performance and safety of its products when assembled with genuine Hayward manufactured parts. Use of non genuine Hayward manufactured parts will void all warranty.
| Back side wall climbing | 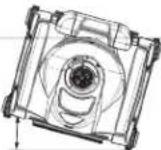 | 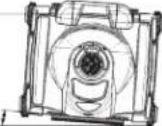 | 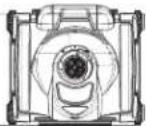 | WATER LINE |
| Float Position | II | I | III |
WATER LINE
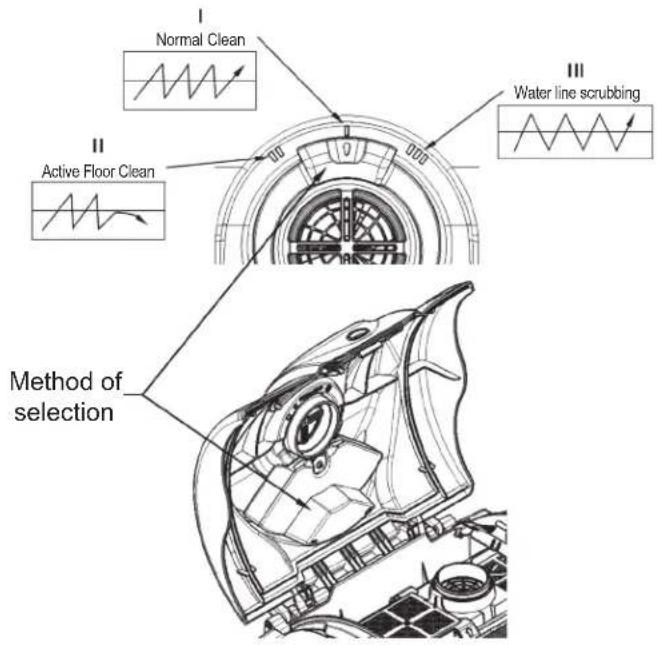
text_image
Normal Clean Active Floor Clean Water line scrubbing Method of selectionWALL CLIMBING FEATURE
SharkVAC XL™ Pilot is equipped with patent pending “movable flotation technology”. Each float position (I, II, and III) will provide different wall climbing action.
Float position "I" is the default position locating the float in the middle of the cleaner and will provide the best cleaning behavior for most swimming pools.
Float position "II" will provide an additional angle in the movement where the cleaner will travel along the water line or pool wall faster and benefit cleaning coverage.
Float position "III" will provide a reduced angle in the movement where the cleaner will spend more time scrubbing the pool wall along the water line. This float position will aid the wall climbing feature in pools with slick surfaces such as tile and fiberglass.
Method of selection: Position may be set while the cover is closed using the slide handle, or while the cover is opened by moving the float box to the preferred location.
Hayward only guarantees the quality, performance and safety of its products when assembled with genuine Hayward manufactured parts. Use of non genuine Hayward manufactured parts will void all warranty.
BOTTOM ONLY CLEANING FEATURE
The bottom only mode can be used when you want to only clean the bottom of your pool or when you are using a pool cover. Its primary feature is to clean the pool faster by only cleaning the pool bottom when the walls do not need cleaning. The bottom only mode is very useful when the pool is equipped with a hard cover by staying on the bottom the cleaner avoids hitting or damaging the cleaner or the cover when it is closed. During the season and for regular cleaning, the bottom only mode is faster and more energy efficient
IMPORTANT TIPS
- Avoid dropping or throwing machine into pool. Place cleaner away from the pool wall but do not throw the cleaner in the pool.
- Cleaning the filter cartridge after every use maximizes the unit's performance.
- Replace worn brushes and foam rollers.
- To avoid clogging the cleaner's filter elements, be sure all chemical powders are fully dissolved before operating the cleaner.
• In a pool with high calcium content, more frequent cleaning of the filter is recommended.
- Save the original carton for extended storage or shipping requirements should your cleaner require dealer service.
- The sealed Motor Unit and the Power Supply contain no user-serviceable parts. Opening them will automatically VOID your warranty.
- Remove items such as thermometer, toys and the like from the pool before operating the unit. Such items can jam the cleaner and cause damage to the unit and/or your pool.
- The filter bucket is designed to be cleaned with the filters installed for normal clean up. For deep cleaning, the user can remove each filter cartridge and clean separately.
- During the normal operating cycle of the cleaner, the handle side of the unit will rise from the pool bottom to allow the unit to clear obstacles, such as elevated main drains and stair steps.
- For cleaners used in areas that have a lot of sand the cleaner may need to be rinsed with water at all flapper (filter bucket's flapper is at intake port) areas, and may need rinsing at the dome push button to allow free operation.
Hayward only guarantees the quality, performance and safety of its products when assembled with genuine Hayward manufactured parts. Use of non genuine Hayward manufactured parts will void all warranty.
TROUBLESHOOTING
• If the cleaner fails to pick up fine or heavy debris:
o Clean the filter. It may be clogged. A filter cleaning solution can be used to remove excessive dirt and/or sand
- If the cleaner starts working momentarily but then stops working:
o Impeller may be clogged or jammed with debris, check and clean if necessary following the instructions in the maintenance section.
o. Brush roller or drive tracks may be stuck, check for debris and clean if necessary.
o Cleaner performs by both timing and a pool wall detection sensor, whichever comes first.
o There are 3 intake ports located at bottom of filter bucket and near the brush roller, check for debris and clean if necessary.
- Cleaner may get stuck if a high main drain is installed in the pool. Cleaner may remain lodged on the drain for a short period of time, but will eventually free it's self by virtue of the cleaner's embedded program.
- Perception of cleaner performance: Confusion may exist over the perception of how the cleaner operates at different times during each cycle. It is important to judge the performance of the cleaner by observing improved pool cleanliness after the cleaner has run a complete cleaning cycle.
- If a cleaner has poor coverage of the pool in one cycle or only covers a small area, check the filter and clean if necessary and make sure the unit is not getting caught on drains, floor cleaning heads or toys. The user may try starting the cleaner in different locations to find the optimum cleaning location.
- If debris falls from cleaner while removing from pool, it may be caused by filter overload, increase frequency of filter cleaning. Assure that there is no large debris blocking any of the three intakes. Large debris must be removed from the pool before using machine. If drain flaps are out of place or stuck by sand or leaves in the open position, the flaps can be snapped back into place, after cleaning the area.
- If the flotation cord gets twisted which can be caused by the cleaner getting stuck on large objects such as rocks, toys or main drains, it can be straightened by laying the flotation cord at full length (if possible) in the sun; heat from the sun will help reduce the twisting.
- If a high level of debris is visible through the dome windows, remove cleaner quickly from the water to reduce the chance of the debris escaping the filter bucket and reentering the pool.
- If you observe the cleaner spending more than the preferred amount of time on the walls/tile line, return the float position to position I (center/default position).
Hayward only guarantees the quality, performance and safety of its products when assembled with genuine Hayward manufactured parts. Use of non genuine Hayward manufactured parts will void all warranty.
SPECIFICATIONS
| Ref RC9743WCP / RC9745WCP | |||
| Weight (w/o cable) 10.45 Kg | |||
| Cable Length, Type 16,76 m | |||
| Materials High Impact ABS - Metal Parts of Non-Ferous Stainless Steel | |||
| Motor Unit Pump Drive PCB | |||
| Speed (rpm) 2 700 55 - | |||
| Voltage | 24 V === | 22 V === | 5 V === |
| Current (amp) | 2.62 A | 0.63 A | - |
| Waterproof Sealing | Triple Redundant Radial Shaft Seals & O-ring | ||
| Motor Housing | Sealed, Watertight, High Impact Polypropylene | ||
| Overload Protection | Electronic Overload Monitoring with auto-shutoff | ||
| Optimum water operating temperature | 10°C - 35°C | ||
| Filter | |||
| Type | Removable, Re-Usable, Pleated Element Cartridge | ||
| Media | Pleated Cellulose/Polyester Blend | ||
| Cleaning Routine Control | |||
| Type | Adaptive Seek Control Logic (ASCL®) Microprocessor | ||
| Cleaning Cycle | Full Cycle | Bottom only cycle | |
| 4 hours | 2 hours | ||
| Drive System | Direct Drive w/Polyurethane Drive Track & Acetal Stainless Steel Bearing System | ||
| Power Supply | |||
| Input Primary Voltage | 230 V~ | ||
| Output Secondary Voltage | 24 V === | ||
| Rated Output Current | 4 A | ||
| Weight | 3.8 Kg | ||
| Shipping | |||
| Length | Width | Height | |
| Carton Dimensions (mm) | 620 | 440 | 752 |
| Shipping Weight with Caddy | 22.3 Kg | ||
Hayward only guarantees the quality, performance and safety of its products when assembled with genuine Hayward manufactured parts. Use of non genuine Hayward manufactured parts will void all warranty.
IMPORTANT SAFETY INSTRUCTIONS
This robotic swimming pool cleaner has been manufactured with the highest degree of care and concern for safety. We suggest the following safety precautions become part of your pool safety regulations:
SAVE THESE INSTRUCTIONS
- ALWAYS PUT THE MACHINE INTO THE WATER BEFORE CONNECTING IT TO THE ELECTRICAL OUTLET.
- T IS IMPORTANT FOR SWIMMERS' SAFETY TO REMOVE THE UNIT IMMEDIATELY FOLLOWING USE. THIS CAN ALSO IMPROVE THE OPERATING LIFE OF YOUR CLEANER.
- BE CERTAIN THE MACHINE IS ONLY PLUGGED INTO A PROTECTED 230 V ∼ OUTLET THAT IS PROTECTED FROM SHORT-CIRCUITS. FIT A 30 MA DIFFERENTIAL PROTECTION DEVICE TO PROTECT PEOPLE FROM ELECTRIC SHOCK CAUSED BY A POSSIBLE BREAK IN THE ELECTRICAL INSULATION.
-
DO NOT HANDLE MACHINE WHILE IT IS PLUGGED INTO THE ELECTRICAL OUTLET.
-
DO NOT USE AN EXTENSION CORD. THIS COULD CREATE A SAFETY HAZARD AND/OR DAMAGE YOUR CLEANER.
-
ALWAYS STAY OUT OF THE POOL WHILE CLEANER IS IN OPERATION.
-
NEVER ALLOW PLUG TO ENTER THE POOL.
-
DO NOT OPERATE THE MACHINE OUT OF WATER. THIS WILL DAMAGE THE MOTOR SEAL AND VOID THE WARRANTY.
-
DO NOT DRAG THE MACHINE OUT OF THE POOL AGAINST THE SIDE WALL. THIS COULD DAMAGE UNIT AND/OR YOUR POOL WALL.
-
DO NOT BURY CORD. REPLACE DAMAGED CORDS.
-
⚠️ WARNING - TO REDUCE THE RISK OF INJURY, DO NOT PERMIT CHILDREN TO USE THIS PRODUCT UNLESS THEY ARE CLOSELY SUPERVISED AT ALL TIMES.
-
IF THE SUPPLY CORD IS DAMAGED IT MUST BE REPLACED BY THE MANUFACTURER, SERVICE AGENT, OR SIMILARLY QUALIFIED PERSONS IN ORDER TO AVOID A HAZARD.
While the cleaner has been made to operate as safely as possible, we suggest you exercise reasonable care in the handling of the vacuum and inspect the electrical cord frequently for damage or wear, as with any other electrical appliance. After use, remove the unit and rinse with fresh water and remove any twists that may be present in the cord.
Hayward only guarantees the quality, performance and safety of its products when assembled with genuine Hayward manufactured parts. Use of non genuine Hayward manufactured parts will void all warranty.
HAYWARD® Limited Warranty
All HAYWARD products are covered for manufacturing defects or material defects for a warranty period of 2 years as of date of purchases. Any warranty claim should be accompanied by evidence of purchase, indicating date of purchase. We would therefore advise you to keep your invoice.
The HAYWARD warranty is limited to repair or replacement, as chosen by HAYWARD, of the faulty products, provided that they have been subjected to normal use, in compliance with the guidelines given in their user guides, provided that the products have not been altered in any way, and provided that they have been used exclusively with HAYWARD parts and components. The warranty does not cover damage due to frost and to chemicals. Any other costs (transport, labour, etc.) are excluded from the warranty.
HAYWARD may not be held liable for any direct or indirect damage resulting from incorrect installation, incorrect connection, or incorrect operation of a product.
In order to claim on a warranty and in order to request repair or replacement of an article, please ask your dealer.
No equipment returned to our factory will be accepted without our prior written approval.
Wearing parts are not covered by the warranty.
EXCEPTIONS AND EXCLUSIONS FROM WARRANTY
The cleaner must be used with electrical requirements as indicated on the Power Supply. Otherwise damage, defects, malfunctions or other failures of the cleaner arising from use on electrical supply not as indicated are excepted and excluded from this warranty.
Defects, malfunctions, failure or damage of the cleaner caused by improper, unreasonable, or negligent use or abuse by the consumer, are excluded from this warranty.
If any repair is made on your cleaner by anyone other than authorized personnel (designated to perform such work) without first having obtained factory instructions, HAYWARD, at its sole option, may determine that this warranty will not apply and that reimbursement for such repair will not be made because of failure to comply with such factory specified instructions.
Filter cartridges are not covered by this warranty and will be replaced only with your prior approval of the charges.
Electric standard/country
| F N F C 15-100 GB BS7671:1992 | ||||
| D D IN VDE 0100-702 EW EVHS-HD 384-7-702 | ||||
| A Ö VE 8001-4-702 H MSZ 2364-702:1994 / MSZ 10-533 | 1/1990 | |||
| E | UNE 20460-7-702 1993, REBT ITC-BT-31 2002 | M | MSA HD 384-7-702.S2 | |
| IRL | Wiring Rules + IS HD 384-7-702 | PL | PN-IEC 60364-7-702:1999 | |
| I | CEI 64-8/7 | CZ | CSN 33 2000 7-702 | |
| LUX | 384-7.702 S2 | SK | STN 33 2000-7-702 | |
| NL | NEN 1010-7-702 | SLO | SIST HD 384-7-702.S2 | |
| P R SIUEE | TR TS | IEC 60364-7-702 | ||
Hayward only guarantees the quality, performance and safety of its products when assembled with genuine Hayward manufactured parts. Use of non genuine Hayward manufactured parts will void all warranty.
OWNER'S MANUAL
Congratulations on your purchase of a microprocessor controlled fully automatic pool cleaner. This manual contains important information regarding the operation and maintenance of your cleaner. Please retain it for reference. For Technical Assistance, call Hayward at +33 474 465 962.
TO REGISTER YOUR CLEANER IN OUR DATABASE, GO TO:
www.hayward.fr (section Services)

For Your Records
Record the following information for your convenience:
1) Purchase Date
2) Complete Name ____
3) Address
4) Zip code
5) Email Address
6) Part number ____ Serial number ____
7) Pool Dealer
8) Address
9) Zip code ____ Country ____
Note

Hayward Robotic Cleaners should not be used to clean the pool for spring start-up. On those occasions, where your pool is subjected to an abnormal debris load, maintenance steps should be taken to return the pool to “pre-installations” condition.
Hayward only guarantees the quality, performance and safety of its products when assembled with genuine Hayward manufactured parts. Use of non genuine Hayward manufactured parts will void all warranty.
LIMPIADORA AUTOMÁTICA
MANUAL DEL USUARIO
natural_image
Exterior view of a modern HAYWARD robotic vacuum cleaner (no text or symbols visible)SharkVAC XL™ Pilot
natural_image
Illustration of a person kneeling beside an open box containing a car, with an arrow pointing to it (no text or symbols)text_image
X 1 X 1 X 1 X 2 X 2022 X 1
natural_image
Technical line drawing of a mechanical component with an arrow indicating direction (no text or symbols)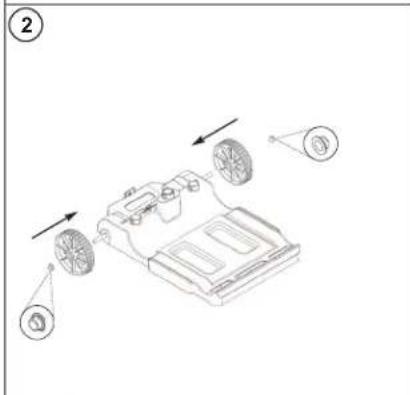
text_image
Technical diagram of a mechanical device with labeled parts and directional arrows indicating assembly or operation.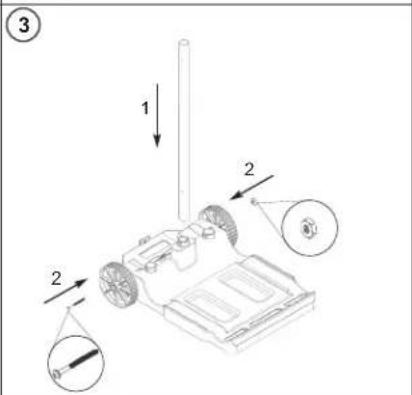
text_image
Technical diagram of a vehicle chassis with numbered components and directional arrows indicating motion or assembly.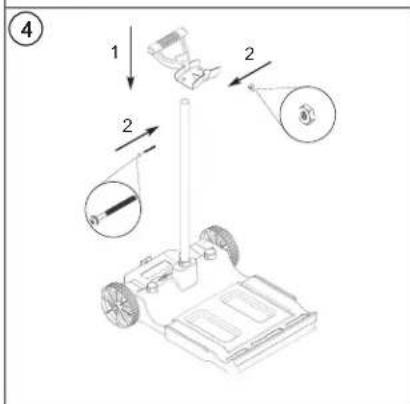
text_image
④ 1 2 2 3
natural_image
Line drawing of a small wheeled vehicle chassis with wheels and a vertical support structure (no text or symbols)natural_image
Technical line drawings of a robotic lawn mower and its internal components, showing external and internal views (no text or labels)natural_image
Technical line drawing of a robotic vacuum cleaner with internal components and a close-up view of the device being handled (no text or symbols present)natural_image
Illustration showing a device with internal components and a close-up of its screen, no text or symbols present.natural_image
Technical line drawing of a mechanical assembly with downward arrows indicating assembly or transformation (no text or symbols present)natural_image
Technical line drawings of two robotic car components, one open showing engine compartment and internal compartments, the other closed with a circular vent (no text or symbols)natural_image
Exterior view of a modern HAYWARD robotic vacuum cleaner (no text or symbols visible)SharkVAC XL™ Pilot
natural_image
Illustration of a person moving a car into a box with an arrow indicating direction (no text or symbols)text_image
Technical diagram of a robotic vacuum cleaner with numbered parts for identificationtext_image
X 1 X 1 X 1 X 2 X 2022 X 1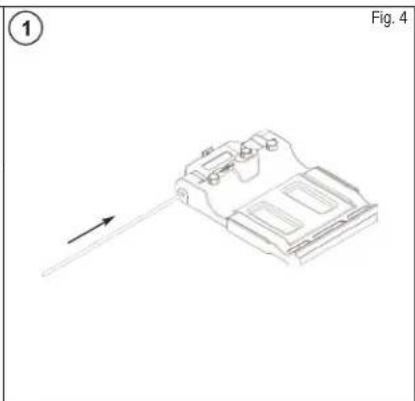
natural_image
Technical line drawing of a mechanical component with an arrow indicating direction (no text or symbols)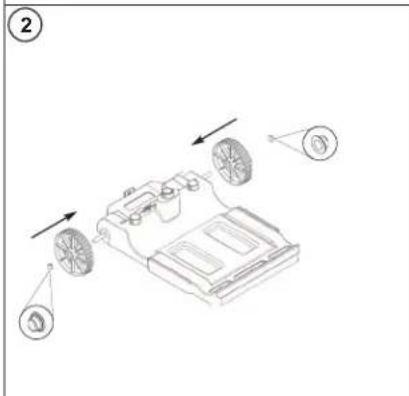
text_image
Technical diagram showing a mechanical assembly with labeled components and directional arrows indicating motion or assembly.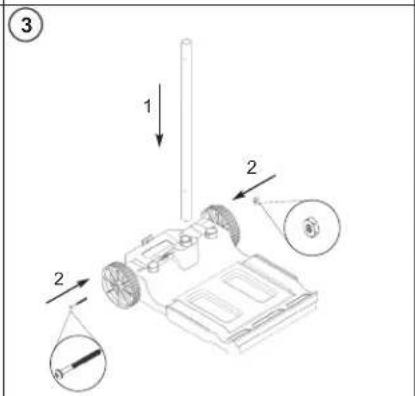
text_image
Technical diagram of a vehicle chassis with labeled parts and directional arrows indicating motion or assembly.
text_image
4 1 2 2 P
natural_image
Line drawing of a wheeled cart with wheels and a vertical pole, no text or symbols presentnatural_image
Technical line drawings of a robotic lawn mower showing internal components and motion direction (no text or labels)natural_image
Technical line drawing of a robotic car with internal components and a close-up of its mechanical assembly (no text or symbols)text_image
Diagram illustrating the installation of a solar panel with water spray, showing components before and after installation.natural_image
Technical line drawing of a mechanical assembly with two downward arrows indicating assembly or disassembly (no text or symbols present)natural_image
Technical line drawings of two robotic car components, one open showing engine compartment and the other closed with a mounted fan (no text or symbols)INDICAÇÕES IMPORTANTES
natural_image
Exterior view of a modern HAYWARD robotic vacuum cleaner (no text or symbols visible)SharkVAC XL™ Pilot
natural_image
Illustration of a person pushing a small car into an open box, with an arrow indicating motion (no text or symbols)text_image
X 1 X 1 X 1 X 2 X 2022 X 1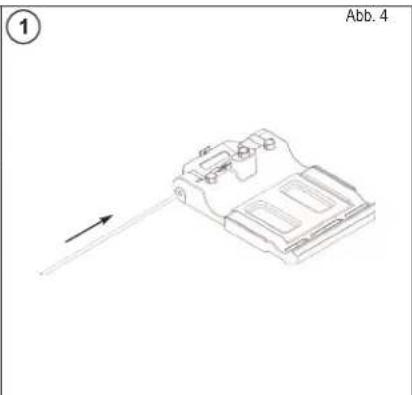
natural_image
Technical line drawing of a mechanical component with an arrow indicating direction (no text or symbols)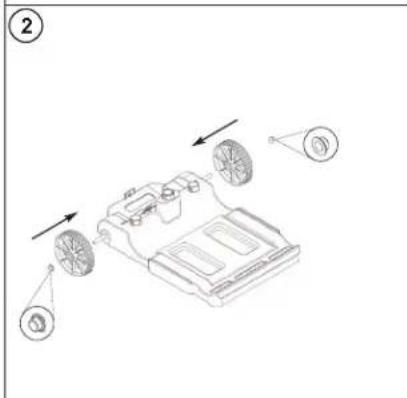
text_image
Technical diagram showing a mechanical assembly with labeled components and directional arrows indicating motion or assembly.
text_image
Technical diagram of a mechanical device with numbered components and directional arrows indicating motion or assembly.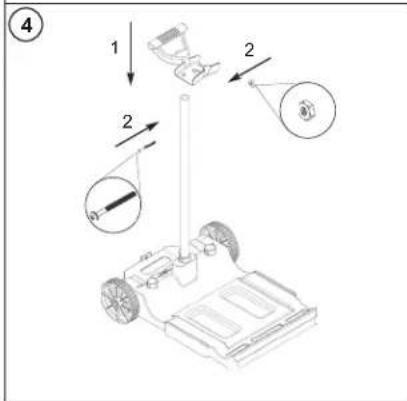
text_image
Diagram showing mechanical assembly steps with labeled components and directional arrows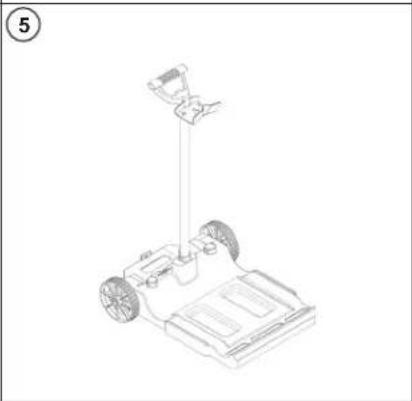
natural_image
Line drawing of a small wheeled vehicle with wheels and a vertical pole (no text or symbols)WARTUNG
natural_image
Technical line drawings of a two-engine robotic car showing internal components and external housing (no text or symbols)natural_image
Technical illustration of a robotic vacuum cleaner with internal components and a close-up view of its internal structure (no text or symbols present)natural_image
Illustration showing a device with internal components and a close-up of its screen with raindrops (no text or symbols)natural_image
Technical line drawing of a mechanical assembly with internal components and downward arrows indicating motion (no text or symbols)natural_image
Technical line drawings of two different robotic car components, one open showing engine compartment and the other closed with a circular vent (no text or symbols)natural_image
Exterior view of a modern HAYWARD robotic vacuum cleaner (no text or symbols visible)SharkVAC XL™ Pilot
natural_image
Illustration of a person pushing a toy car into a box, with an arrow indicating motion (no text or symbols)text_image
X 1 X 1 X 1 X 2 X 2022 X 1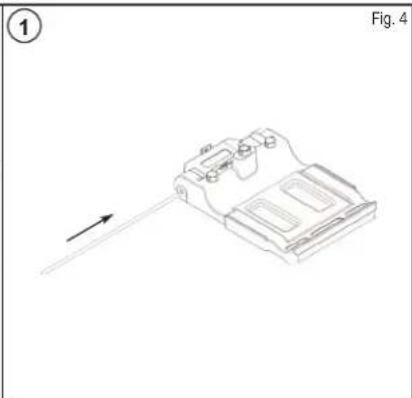
natural_image
Technical line drawing of a mechanical component with an arrow indicating direction (no text or symbols)
text_image
Technical diagram of a mechanical device with labeled parts and directional arrows indicating assembly or movement.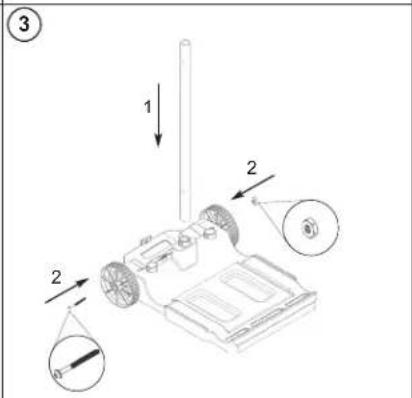
text_image
Technical diagram of a mechanical device with numbered components and directional arrows indicating assembly or movement.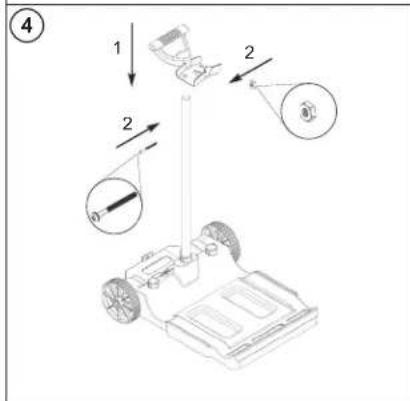
text_image
Diagram showing mechanical assembly with labeled parts and directional arrows, including a cart and a device component.
natural_image
Line drawing of a small wheeled vehicle chassis with wheels and a vertical sensor or sensor mounted on top (no text or symbols)natural_image
Technical line drawings of a robotic car showing internal components and motion arrows (no text or symbols)natural_image
Technical line drawing of a robotic car with internal components and a close-up of its internal structure being handled by hand (no text or symbols present)natural_image
Illustration showing a device with internal components and a close-up of its screen with raindrops (no text or symbols)natural_image
Technical line drawing of a mechanical assembly with internal components and downward arrows indicating motion (no text or symbols)natural_image
Technical line drawings of two different robotic car parts, one open showing engine compartment and the other closed with a fan (no text or symbols present)natural_image
Exterior view of a Hayward robotic vacuum cleaner (no text or symbols visible)SharkVAC XL™ Pilot
natural_image
Illustration of a person opening a car into a box, with an arrow indicating direction (no text or symbols)text_image
X 1 X 1 X 1 X 2 X 2022 X 1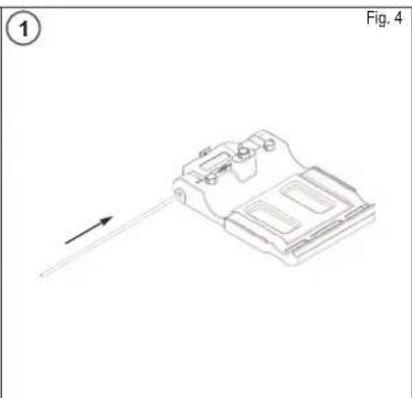
natural_image
Technical line drawing of a mechanical component with an arrow indicating direction (no text or symbols)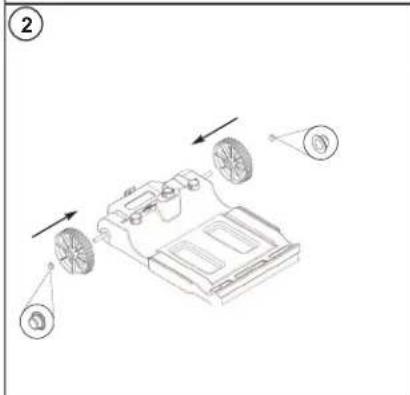
text_image
Technical diagram showing a mechanical assembly with labeled parts and directional arrows indicating motion or assembly.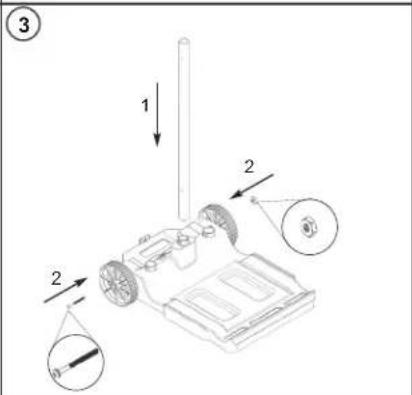
text_image
Technical diagram of a vehicle chassis with labeled parts and directional arrows indicating motion or assembly.
text_image
④ 1 2 2 3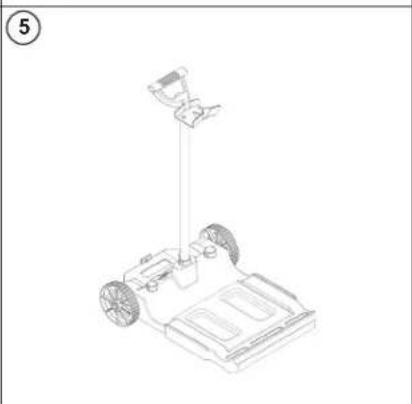
natural_image
Line drawing of a small wheeled vehicle chassis with wheels and a vertical pole (no text or symbols)natural_image
Technical line drawings of a robotic car showing front and side views (no text or symbols)natural_image
Technical line drawing of a robotic vacuum cleaner with internal components and a close-up view of the device's handle (no text or symbols present)text_image
Diagram illustrating the installation of a solar panel with water spray and heat transfer processnatural_image
Technical line drawing of a mechanical assembly with internal components and downward arrows indicating motion (no text or symbols)natural_image
Technical line drawings of two robotic car components, one open showing engine compartment and the other closed with a circular emblem (no text or symbols)GUIDA ALL'USO SICURO
natural_image
Exterior view of a Hayward robotic vacuum cleaner (no text or symbols visible)SharkVAC XL™ Pilot
natural_image
Illustration of a person running inside an open box with a toy car, no text or symbols presenttext_image
X 1 X 1 X 1 X 2 X 2X22 X 1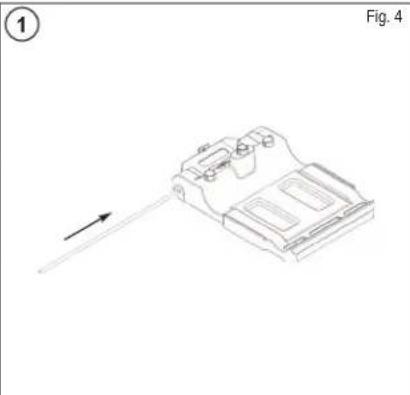
natural_image
Technical line drawing of a mechanical component with an arrow indicating direction (no text or symbols)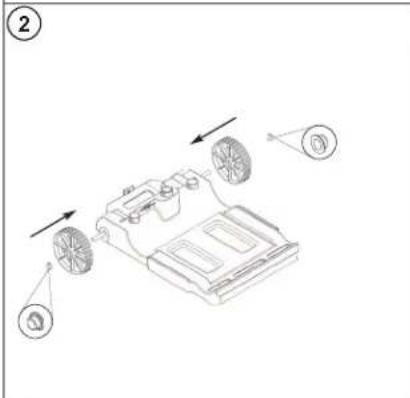
text_image
Technical diagram showing a mechanical assembly with labeled components and directional arrows indicating motion or assembly.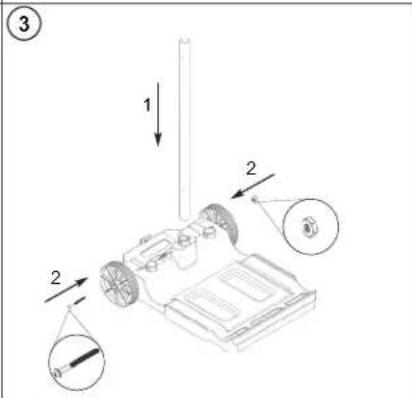
text_image
Technical diagram of a mechanical device with numbered components and directional arrows indicating motion or assembly.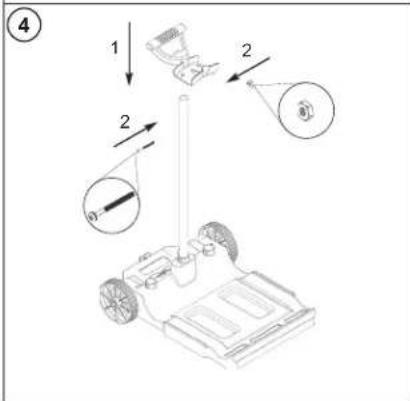
text_image
Technical diagram showing mechanical assembly with labeled components and directional arrows
natural_image
Line drawing of a wheeled vehicle chassis with wheels and a vertical pole (no text or symbols)natural_image
Technical line drawings of a robotic car showing front and side views with no text or symbolsnatural_image
Technical line drawing of a robotic car with internal components and a close-up of its mechanical assembly (no text or symbols)natural_image
Illustration showing a device interior with an open lid and a hand cleaning a panel with raindrops (no text or symbols)natural_image
Technical line drawing of a mechanical assembly with two downward arrows indicating motion or force (no text or symbols present)natural_image
Technical line drawings of two different automotive components, one open showing internal engine compartment and the other closed with a circular emblem (no text or symbols present)natural_image
Exterior view of a modern HAYWARD robotic vacuum cleaner (no text or symbols visible)SharkVAC XL™ Pilot
natural_image
Illustration of a person pushing a car into a box with an arrow indicating motion (no text or symbols)text_image
X 1 X 1 X 1 X 2 X 2022 X 1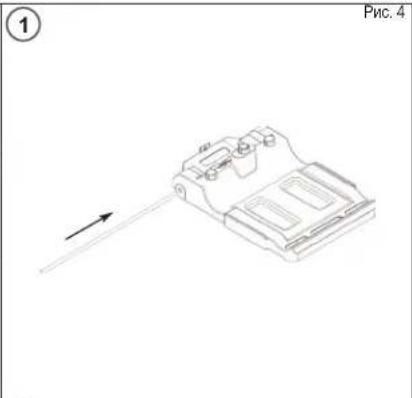
natural_image
Technical line drawing of a mechanical component with an arrow indicating direction (no text or symbols)
text_image
Technical diagram showing a mechanical assembly with labeled components and directional arrows indicating motion or assembly.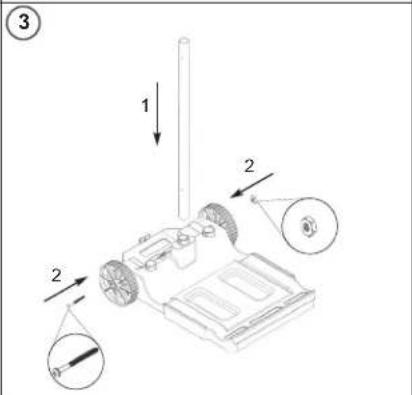
text_image
Technical diagram of a mechanical assembly with numbered components and directional arrows indicating motion or assembly.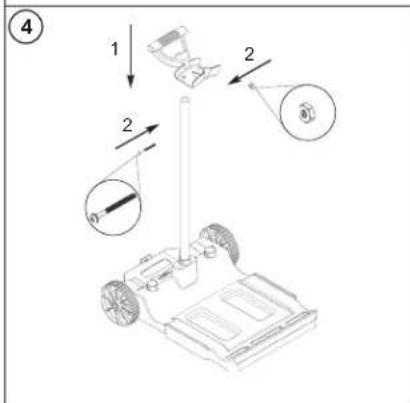
text_image
Diagram showing mechanical assembly with labeled parts and directional arrows, including a cart and wheel assembly.