
AquaRite Pro - Water pump HAYWARD - Free user manual and instructions
Find the device manual for free AquaRite Pro HAYWARD in PDF.

| Product Type | Salt chlorine generator for swimming pool |
| Brand | Hayward |
| Model | AquaRite Pro |
| Power supply voltage | 230 V~ / 50 Hz |
| Max pool volume | 150 m³ (with T-CELL-15 cell) |
| Compatible cell types | T-CELL-3 (60 m³), T-CELL-9 (95 m³), T-CELL-15 (150 m³) |
| Ideal salt concentration | 2.7 to 3.4 g/L (optimal 3.2 g/L) |
| Chlorine production | Adjustable from 0 to 100% |
| Super chlorination | 1 to 96 hours |
| Operating temperature | 12 °C to 60 °C |
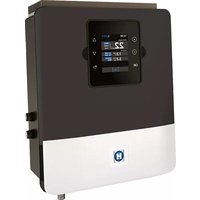
| Display type | Backlit screen with menus |
| Display languages | French, English, Spanish, Italian, German, Portuguese, Dutch |
| Warranty | 2 years |
| Maintenance | Clean cell every 3 months or 500 hours |
| Winterization | Drain water from pump, filter, and pipes |
| Installation distance | Minimum 3.5 m from the pool |
| Safety | Frost protection, automatic stop below 12°C |
| Compatible options | pH-ORP analysis kit and peristaltic pump (optional) |
| Housing material | Weatherproof sealed plastic |
| Protection rating | Not specified, sealed enclosure |
Frequently Asked Questions - AquaRite Pro HAYWARD
User questions about AquaRite Pro HAYWARD
0 question about this device. Answer the ones you know or ask your own.
Ask a new question about this device
Download the instructions for your Water pump in PDF format for free! Find your manual AquaRite Pro - HAYWARD and take your electronic device back in hand. On this page are published all the documents necessary for the use of your device. AquaRite Pro by HAYWARD.
USER MANUAL AquaRite Pro HAYWARD
natural_image
Simple line icon of an open book with an information symbol inside (no text or labels)
natural_image
Simple line drawing of an open book with no text or symbols visible
INSTRUCTIONS DE SÉCURITÉ IMPORTANTES

LIRE ATTENTIVEMENT TOUTES LES INSTRUCTIONS
13 / 20 AquaRite Pro Rev. C
14 / 20 AquaRite Pro Rev. C
Operation and Installation Manual

IMPORTANT SAFETY INSTRUCTIONS

READ AND FOLLOW ALL INSTRUCTIONS
- Warning as regards children/people with reduced physical capacity: This appliance is not intended for use by persons (including children) with reduced physical, sensory or mental capabilities, or lack of experience and knowledge, unless they have been given supervision or instruction concerning use of the appliance by a person responsible for their safety.
- All electrical connections must be done by a qualified electrician according to local electrical standard.
Electric standard/country
| F N | F EN C 15-100 GB BS7671:1992 | |||
| D D | IN VDE 0100-702 EW EVHS-HD 384-7-702 | |||
| A Ö | VE 8001-4-702 H MSZ 2364-702:1994 / MSZ 10-533 1 | 1990 | ||
| E | UNE 20460-7-702 1993, REBT ITC-BT-31 2002 | M | MSA HD 384-7-702.S2 | |
| IRL | Wiring Rules + IS HD 384-7-702 | PL | PN-IEC 60364-7-702:1999 | |
| I | CEI 64-8/7 | CZ | CSN 33 2000 7-702 | |
| LUX | 384-7.702 S2 | SK | STN 33 2000-7-702 | |
| NL | NEN 1010-7-702 | SLO | SIST HD 384-7-702.S2 | |
| P R | SIUEE | TR T | S IEC 60364-7-702 | |
- Check if the voltage indicated on the appliance corresponds to the local mains voltage before you connect the appliance.
- Disconnect all AC power during installation.
- If the supply cord is damaged, it must be replacing by the manufacturer, its service agent or similarly qualified persons in order to avoid a hazard.
- A green colored terminal marked “Ground” is located inside the wiring compartment. To reduce the risk of electric shock, this terminal must be connected to the grounding means provided in the electric supply service panel with a continuous copper wire equivalent in size to the circuit conductors supplying the equipment.
- Unit should be kept locked.
• SAVE THESE INSTRUCTIONS
OPERATION
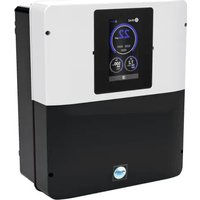
The AquaRite Pro is an automatic chlorine generation system for pool or spa sanitization. The operation requires a low concentration of salt (sodium chloride) in the pool water. These levels are low enough that it normally will not be tasted. The AquaRite Pro automatically sanitizes your pool by converting the salt into free chlorine which kills bacteria and algae in the pool. Chlorine will revert back to sodium chloride after killing bacteria. These reactions will continuously recycle virtually eliminating the need to add sanitizing chemicals to your pool. The only time you may need to add more salt to the pool is when water is replenished due to backwashing, draining, or splashing (not evaporation).
The AquaRite Pro is designed to handle the purification needs of most residential swimming pools up to 150 m^3 , or the needs of most commercial pools up to 95 m^3 . Check local codes for other restrictions. The actual amount of chlorination required to properly sanitize a pool varies due to bather load, rainfall, temperature, and the pool's cleanliness.
AquaRite Pro chlorine generators operating with software version 1.00 or later are designed to use one of 3 different chlorinator cells that are available from your authorized Hayward dealer. Choose the appropriate cell based on the size of your pool. The models are shown below:
T-CELL-15-E - for pools up to 150 m ^3
T-CELL-9-E - for pools up to 95 m ^3
T-CELL-3-E - for pools up to 60 m ^3
Note that the installation and mounting requirements are the same for all models.
The AquaRite Pro can be used with the optional Goldline AQL-CHEM to provide a fully integrated chemistry solution for your pool. With the AQL-CHEM installed, the AquaRite Pro senses the pool's ORP and pH levels and automatically generates the correct amount of chlorine to keep your pool properly sanitized. The AquaRite Pro can also control pH by introducing acid into the pool when needed. A dedicated on/off control output is available for pH dispensing devices using 230 V\~. The AquaRite Pro and AQL-CHEM products offer the user a complete automated system controlling both sanitization and pH balance.
NOTE: It is not recommended to use the AquaRite Pro to generate bromine.
NOTE: Before installing this product as part of a saline water purification system in a pool or spa using natural stone for coping or for immediately adjacent patios/decking, a qualified stone installation specialist should be consulted regarding the appropriate type, installation, sealant (if any) and maintenance of stone used around a saline pool with electronic chlorine generator in your particular location and circumstances.
Water Chemistry
The table below summarizes the levels that are recommended by Hayward. The only special requirements for the AquaRite Pro are the salt level and stabilizer. It is important to maintain these levels in order to prevent corrosion or scaling and to ensure maximum enjoyment of the pool. Test your water periodically. Your authorized AquaRite Pro dealer or most pool stores can provide you with the chemicals and procedures to adjust the water chemistry. Be sure to tell the pool store that you are using an AquaRitePro chlorine generator.
CHEMICAL IDEAL LEVELS
| Salt 2.7 to 3.4 g/l | |
| Free Chlorine 1.0 to pH 7.2 to 7.6 | 3.0 ppm |
| Cyanuric Acid (Stabilizer) | 20 to 30 ppm (25 ppm best)Add stabilizer only if necessary |
| Total Alkalinity 80 to Calcium Hardness 200 to 300 ppm | |
| Metals 0 ppm | |
| Saturation Index -.2 to .2 (0 best) |
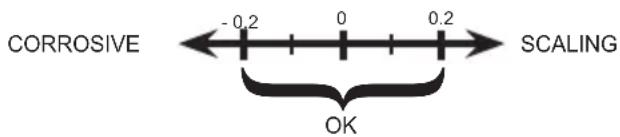
Saturation index
The saturation index (Si) relates to the calcium and alkalinity in the water and is an indicator of the pool water "balance". Your water is properly balanced if the Si is 0 ± .2 . If the Si is below -0.2, the water is corrosive and plaster pool walls will be dissolved into the water. If the Si is above +0.2, scaling and staining will occur. Use the chart below to determine the saturation index.
How to use: Measure pool pH, temperature, calcium hardness, and total alkalinity. Use the chart above to determine Ti, Ci and Ai into the above equation. If Si equals 0.2 or more, scaling and staining may occur. If Si equals -0.2 or less corrosion or irritation may occur.
Salt Level
Use the chart on page 4 to determine how much salt in Kgs need to be added to reach the recommended levels. Use the equations below if pool size is unknown.
| M3(pool size in meters) | |
| Rectangular | Length x Width xAverage Depth |
| Round | Diameter x Diameter xAverage Depth x 0.785 |
| Oval | Length x Width xAverage Depth x 0.893 |
The ideal salt level is between 2.7 - 3.4 g/L (parts per million) with 3.2 g/L being optimal. If the level is low, determine the number of M ^3 in the pool and add salt according to the chart on page 4. A low salt level will reduce the efficiency of the AquaRite Pro and result in low chlorine production. A high salt level can cause the AquaRite Pro to shutdown and may begin to give a salty taste to your pool (generally, the salt will begin to be tasted at a level of about 3.5 - 4.0 g/L). The salt in your pool/spa is constantly recycled and the loss of salt throughout the swimming season should be small. This loss is due primarily to the addition of water because of splashing, backwashing, or draining (because of rain). Salt is not lost due to evaporation.
Type of Salt to Use
It is important to use only sodium chloride (NaCl) salt that is greater than 99% pure. Use only salt for electronic chlorine generator usually available in 25 Kg bags. Do not use rock salt, salt with yellow prussiate of soda, salt with anti-caking additives, or iodized salt.
How to Add or Remove Salt
For new plaster pools, wait 10-14 days before adding salt to allow the plaster to cure. Turn the circulating pump on and add salt directly into the pool. Brush the salt around to speed up the dissolving process. Do not allow salt to pile up on the bottom of the pool. Run the filter pump for 24 hours with the suction coming from the main drain (use pool vac if there is no main drain) to allow the salt to evenly disperse throughout the pool. The salt display may take 24 hours to respond to the change in salt concentration.
The only way to lower the salt concentration is to partially drain the pool and refill with fresh water.
Always check stabilizer (cyanuric acid), when checking salt. These levels will most likely decline together. Use the chart on page 5 to determine how much stabilizer must be added to raise the level to 25 ppm. Use stabilizer only if necessary.
WEIGHT OF SALT (Kg) NEEDED FOR 3.2 g/l
| Current salt level g/l | M^3 of Pool water | |||||||||||||||||
| 30 37.5 45 52.5 60 67.5 75 82.5 90 97.5 105 112.5 120 127.5 135 142.5 150 | ||||||||||||||||||
| 0 97 1 | 21 145 170 | 194 218 | 242 267 | 291 315 3 | 39 364 38 | 8 412 436 | 460 484 | |||||||||||
| 0.2 | 91 | 114 | 136 | 159 | 182 | 205 | 227 | 250 | 273 | 295 | 318 | 341 | 363 | 385 | 408 | 430 | 453 | |
| 0.4 85 | 106 127 1 | 48 170 19 | 1 212 233 | 255 276 | 297 318 3 | 39 360 38 | 2 403 424 | |||||||||||
| 0.6 | 79 | 98 | 118 | 138 | 158 | 177 | 197 | 217 | 236 | 256 | 276 | 297 | 317 | 337 | 358 | 378 | 398 | |
| 0.8 73 | 91 109 12 | 7 145 164 | 182 200 | 218 236 2 | 55 273 29 | 1 310 328 | 346 364 | |||||||||||
| 1 | 67 | 83 | 100 | 117 | 133 | 150 | 167 | 183 | 200 | 217 | 233 | 250 | 267 | 283 | 300 | 317 | 333 | |
| 1.2 61 | 76 91 106 | 121 136 | 152 167 1 | 32 197 21 | 2 227 243 | 258 274 | 289 304 | |||||||||||
| 1.4 55 | 68 82 95 | 109 123 13 | 36 150 16 | 4 177 191 | 205 218 | 232 246 2 | 59 263 | |||||||||||
| 1.6 48 | 61 73 85 9 | 7 109 12 | 133 145 | 158 170 | 82 195 20 | 7 219 23 | 1 243 | |||||||||||
| 1.8 | 42 | 53 | 64 | 74 | 85 | 95 | 106 | 117 | 127 | 138 | 148 | 159 | 169 | 180 | 190 | 201 | 211 | |
| 2 36 4 | 5 55 64 73 | 82 91 10 | 0 109 118 | 127 136 | 45 154 1 | 63 172 181 | ||||||||||||
| 2.2 30 | 38 45 53 6 | 1 68 76 8 | 3 91 98 10 | 6 114 12 | 129 137 | 144 152 | ||||||||||||
| 2.4 24 | 30 36 42 4 | 8 55 61 6 | 7 73 79 8 | 5 91 98 10 | 4 110 117 | 123 | ||||||||||||
| 2.6 18 | 23 27 32 3 | 6 41 45 5 | 0 55 59 6 | 4 68 73 77 | 81 86 90 | |||||||||||||
| 2.8 12 | 15 18 21 2 | 24 27 30 3 | 3 36 39 4 | 2 45 48 5 | 54 57 60 | |||||||||||||
| 3 | 6 | 8 | 9 | 11 | 12 | 14 | 15 | 17 | 18 | 20 | 21 | 23 | 24 | 26 | 27 | 29 | 30 | |
| 3.2 | Ideal | Ideal | Ideal | Ideal | Ideal | Ideal | Ideal | Ideal | Ideal | Ideal | Ideal | Ideal | Ideal | Ideal | Ideal | Ideal | Ideal | |
| 3.4 | OK | OK | OK | OK | OK | OK | OK | OK | OK | OK | OK | OK | OK | OK | OK | OK | OK | |
| 3.6 & + | Dilute | Dilute | Dilute | Dilute | Dilute | Dilute | Dilute | Dilute | Dilute | Dilute | Dilute | Dilute | Dilute | Dilute | Dilute | Dilute | Dilute | |
WEIGHT OF STABILIZER (CYANURIC ACID in Kg) NEEDED FOR 25 PPM
| Current Stabilizer level in ppm | M^3 of Pool water | ||||||||||||||||
| 30 37.5 45 52.5 60 67.5 75 82.5 90 97.5 105 112.5 120 127.5 135 142.5 150 | |||||||||||||||||
| 0 ppm 0.75 | 0.94 1.13 | 1.34 1.53 | 1.69 1.91 | 2.09 2.28 | 2.47 2.66 | 2.84 3.03 | 3.22 3.41 | 3.59 3.75 | |||||||||
| 10 ppm 0.45 | 0.56 0.63 | 0.81 0.92 | 1.01 1.14 | 1.26 1.37 | 1.48 1.59 | 1.71 1.82 | 1.93 2.04 | 2.16 2.25 | |||||||||
| 20 ppm 0.15 | 0.19 0.23 | 0.27 0.31 | 0.34 0.38 | 0.42 0.46 | 0.49 0.53 | 0.57 0.61 | 0.64 0.68 | 0.72 0.75 | |||||||||
| 25 ppm 0 0 | 0 0 0 0 0 | 0 0 0 0 0 | 0 0 0 0 0 | ||||||||||||||
Controls
Keypad Buttons
RUN/STOP: The AquaRite Pro will toggle back and forth between RUN and STOP with each push of the RUN/STOP button.
RUN: When in RUN mode, the AquaRite Pro will produce chlorine according to the desired output % or ORP setting (when AQL-CHEM is used) for the entire filtering/pumping cycle. The AquaRite Pro can only produce chlorine when RUN is selected and the filter pump is running.
STOP: When in STOP mode, the AquaRite Pro is prevented from energizing the electrolytic cell. In this position there is no chlorine generation. NOTE: To service any of the pool equipment or the AquaRite Pro, the power must be turned off at the circuit breaker.
SUPER CHLORINATE: (if optional AQL-CHEM sensing is NOT used) When you have an abnormally high bather load, a large amount of rain, a cloudy water condition, or any other condition which needs a large amount of purification to be introduced, SUPER CHLORINATE should be selected. This electronically “super chlorinates” (shocks) the water for a user selectable period of 1-96 hours (filter pump must be on during this time) or until the power has been turned off, whichever comes first. The AquaRite Pro will automatically revert back to the previous desired output % setting at the end of the super chlorinate period.

INFO: Push the INFO button to enter the Information Menu (see Information Me page 7).

SETTINGS: Push the SETTINGS button to enter the Settings Menu (see Settings Menu page 9).
dURSORS (+, -, <, >): Use these buttons to scroll through submenus, make selections and adjust values.
Indicator LED's
RUN/STOP: When illuminated, the AquaRite Pro is in automatic mode and will produce chlorine based on the desired output % or ORP setting (when AQL-CHEM is used). When the LED is off, the AquaRite Pro has been manually turned off. It will not produce chlorine until RUN has been selected.
SUPER CHLORINATE: When illuminated, the Super Chlorinate feature is active.
CHECK SYSTEM: When Check System is illuminated, an error has occurred that requires attention. Refer to the Troubleshooting section of this manual for possible errors and solutions.
Information Menu
The Information Menu displays valuable system and pool information. The AquaRite Pro will default to displaying a portion of the Information Menu when no buttons have been pushed for 2 minutes. The unit will automatically scroll through several status displays. To access all of the Information Menu items, push the INFO button on the front panel. Advance through the various menu items using the "<" or ">" buttons. A list of the Information Menu items is shown below.
If ORP Auto Sensing is not used


The AquaRite Pro desired output % is shown here. If Super Chlorinate is active, the display will show the time remaining until the AquaRite Pro will return to the desired output %. This menu is disabled if an AQL-CHEM is used and ORP Auto Sensing is enabled (see AQL-CHEM manual).
If AQL-CHEM is used


This display will be shown only if chemical sensing is enabled. This display shows both pH and ORP levels/status when chemistry sensing is enabled via the Chemistry Configuration Wizard (requires the use of AQL-CHEM Sensing Kit). The AquaRite Pro will refer to these levels to determine how much chlorine to generate (ORP) and how much acid to dispense (pH). Refer to the AQL-CHEM manual for specific information about these levels as well as the recommended ranges.


+/- 23.45V is the voltage applied to the chlorinator cell
+/-6.75A is the current (amps) through the cell
29°C is the water temperature at the cell
3.2 g/L is the “instant” salt level at this time
For the chlorinator to be operating, several conditions must exist: the filter pump must be running, the flow switch must be detecting flow, the chlorinator setting must be set greater than 0%, the water temperature at the cell must be between 12°C and 60°C, and the salt level must be within the operating range. If any of these conditions are not met, the chlorinator diagnostic display will tell you the reason. It’s possible to have more than one reason, in which case after you rectify what was displayed the first time, a second display will appear.
If the current (amps) display is 0.00A, then the chlorinator is operating normally but is in the off part of its normal operating cycle. Simply press either the “+” or “-” key to start a new cycle.
The AquaRite Pro periodically reverses the polarity of the voltage applied to the cell in order to automatically clean off any calcium deposits that may have built up on the cell. It is important that you check the chlorinator operation in both polarities. To do this, press either the “+” or “-” buttons and the chlorinator will turn off, wait for 15 seconds and then turn on in the opposite polarity.
Salt Level
3.2 g/L

No Function
Move to previous/next menu item
This is the average "Salt Level" in the pool. This value is calculated over time and minimizes the effects of spikes or dips that may naturally occur.
Instant Salt
3.2 g/L [+=save]

Press to load the "Instant Salt" into the averaged salt display
Move to previous/next menu item
The “Instant Salt” is calculated based on the voltage, current (amps), and water temperature at the cell at that instant. There are a number of reasons why instant and average salt readings may differ. Some of these include salt having just been added to the pool and not yet thoroughly mixed, calcium buildup on the cell, and cell aging.
Press the "+" button to enter the instant salt value into the average salt level. The average salt level will use this new value for its calculations.
Flow Switch
Flow

No Function
Move to previous/next menu item
The current status of the flow switch is displayed. There is a short delay when transitioning from flow to no-flow and a longer delay on the transition from no-flow to flow. The delay time is displayed.
Main Software
Revision 1.00

No Function
Move to previous/next menu item
Display Software
Revision 1.00

No Function
Move to previous/next menu item
Chemistry Sense
Software r1.00

No Function
Move to previous/next menu item
Available displays depend on configuration. These displays show the software revisions of various components.
Inspect Cell
hold + to reset

Press to reset
Move to previous/next menu item
For optimum operation, you will need to inspect the AquaRite Pro chlorinator cell approximately every 3 months and clean the cell if necessary. The AquaRite Pro will automatically remind you and display “Inspect Cell, hold + to reset” as part of the rotating Information Menu. Clean the cell and then press the “+” button during the “Inspect Cell” display to reset the timer.
Refer to the Troubleshooting section for information about error conditions and possible causes.
Settings Menu
The Settings Menu is used to configure the AquaRite Pro and adjust various settings. Access this menu by pushing the Settings Menu button. Refer to the information below when setting system operating parameters.
To access the Settings Menu
Setting
Menu - Locked

Press BOTH buttons SIMULTANEOUSLY for 5 seconds to unlock
Setting
Menu - Unlocked

Move to settings menus
NOTE: To prevent unauthorized access, the settings menu automatically "locks" after 2 minutes of no buttons being pressed.
Language
English

Rotates between available languages

Move to previous/next settings menu
Language
The AquaRite Pro can display the following languages: English (default), French, Spanish, Italian, German, Portuguese and Dutch. Select the desired language.
Chlor. Config.
+ to view/change

Push to access Chlorinator option

Move to previous/next menu item
Body of Water Type
Pools

Toggle between Pool and Spa

Move to next menu item
Display
Salt

Toggle between Salt (default) and Minerals

Move to next menu item
Cell Type
T-CELL-15

Toggle between available cell types

Move to previous/next menu item
Body of Water Type
Select Pool or Spa. "Pool" should be selected for bodies of water over 4 M ^3 .
The AquaRite Pro will adjust its operation according to this selection.
Display
Allows for the display of salt (default) or mineral values.
Cell Type Selection
Make the proper selection based on the electrolytic cell that is used in your system. Selections are: T-CELL-3, T-CELL-9 and T-CELL-15 (default).
Note that the unit will not function properly if the wrong cell is selected
If AQL-CHEM is used
Chemistry Config. Wizard + to enter

Push to access Chemistry Config. Wizard Move to previous/next menu item
Sensing System Enabled

Toggle between Enabled and Disabled (default) Move to next menu item
Requires use of the optional AQL-CHEM Sensing Kit. Following the steps of the Chemistry Config. Wizard will set up the AQL-CHEM to sense ORP and pH levels. The AquaRite Pro will generate the correct amount of chlorine to properly sanitize the pool based on the AQL-CHEM sensing function. Refer to the AQL-CHEM manual for more detailed information.
If ORP Auto Sensing is not used
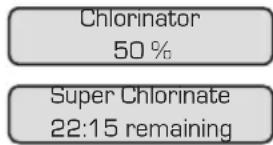
Chlorinator 50%

Adjust the desired output % for the pool Move to previous/next menu item
The desired output % is used to control the amount of chlorine the AquaRite Pro generates. Raise this setting to increase chlorine level and lower it to decrease chlorine level. If an AQL-CHEM is being used and ORP Auto Sensing is enabled (see AQL-CHEM manual), the AquaRite Pro will override the desired chlorinator output % setting and generate chlorine based on the pool's ORP level.
If ORP Auto Sensing is not used
Super Chlorinate 22 hours

Adjust Super Chlorinate period (1-96 hours) Move to previous/next menu item
Use the Super Chlorinate feature when there is an unusually high bather load, a large amount of rain, a cloudy water condition, or any other condition that requires a large amount of chlorine to be introduced to the pool. Note that the filter pump must be running for the entire time during the Super Chlorinate period. Set the actual time based on the size of the pool; larger pools require more hours, smaller pools require less.
If AQL-CHEM is used
pH Calibration Wizard + to enter

Push to access pH Calibration Wizard Move to previous/next menu item
Use this Wizard to calibrate the optional AQL-CHEM's pH probe. This requires a manual pH test of the pool water using a dependable red phenol test kit (see AQL-CHEM manual).
If AQL-CHEM is used
Clean Probe Wizard + to enter

Push to access Clean Probe Wizard Move to previous/next menu item
Use this Wizard to clean the optional AQL-CHEM's ORP and pH probes. The probes must be clean and free from oil, chemical deposits and contamination to function properly. Slow response, increased need to calibrate, and inconsistent readings are indications that the probes need to be cleaned (see AQL-CHEM manual).
The AquaRite Pro can display temperature and units in Metric (°C and g/L) or English (°F and PPM). Make the desired selection here.
Display Light
On for 60 sec

Toggle between Always On and On for 60 sec.
Move to previous/next menu item
This function controls the backlight on the display. Select between "Always On" and "On for 60 seconds". If "On for 60 seconds" option is selected, then the backlight will automatically turn off 60 seconds after the last key is pressed and will stay off until next time a key is pressed.
Beeper
Enabled

Toggle between Enabled (default) and Disabled Beeper
Move to previous/next menu item
When “Enabled”, the keypad will beep every time a key is pressed. If this audible indication is not desired, select “Disabled”.
Reset Config. to
Default Press +

Initiate reset of all configuration parameters
Move to previous/next menu item (config. not reset)
Are you sure?
+ to proceed

Reset all configuration parameters

Move to previous/next menu item (config. not reset)
Config. reset
Confirmed

Move to previous/next menu item
Use this function to erase all previous system configuration and reset all configuration parameters back to the factory default values. This function is NOT reversible, be careful
Operation
Assuming that the water chemical levels are in the recommended range, there are three factors that you can control which directly contribute to the amount of chlorine the AquaRite Pro will generate:
- filter run time each day (hours)
- the desired output % setting or ORP setting (when using AQL-CHEM)
- the amount of salt in the pool
The filter pump timer should be set so that entire volume of pool water passes through the filter each day. For pools with high chlorine demand, the timer may have to be set longer to generate enough chlorine.
If optional AQL-CHEM sensing is NOT used. To find the optimum desired output % setting, start at approximately 50%. Test the chlorine level every few days and adjust the setting up or down accordingly. It usually takes 2-3 adjustments to find the ideal setting for your pool/spa and after that, it should only take minor, infrequent adjustments. Because the chlorine demand of the pool increases with temperature, most people find they have to adjust the desired output up at the peak of the summer and down during the colder periods.
The AquaRite Pro automatically stops generating when the pool water temperatures drops below 12^ C. This is usually not a problem because bacteria and algae
stop growing at this temperature. You can override this low temperature cutoff by using the Super Chlorinate function for a day.
Prevent overchlorination during cold weather: Check chlorine levels periodically. Most pools require less chlorine during cold weather and the desired output % setting should be lowered accordingly.
Maintaining the AquaRite Pro System
To maintain maximum performance, it is recommended that you open and visually inspect the cell every 3 months or after cleaning your filter. The AquaRite Pro will remind you to do this by displaying the message “Inspect/Clean Cell” after approximately 500 hours of operation.
The AquaRite Pro electrolytic cell has a self cleaning feature incorporated into the electronic control's logic. In most cases this self cleaning action will keep the cell working at optimum efficiency. In areas where water is hard (high mineral content) and in pools where the water chemistry has been allowed to get "out of balance", the cell may require periodic cleaning.
Servicing and Cleaning the AquaRite Pro Cell
Turn off power to the AquaRite Pro before removing the electrolytic cell. Once removed, look inside the cell and inspect for scale formation (light colored crusty or flaky deposits) on the plates and for any debris which has passed through the filter and caught on the plates. If no deposits are visible, reinstall. If deposits are seen, use a high pressure garden hose and try to flush the scale off. If this is not successful, use a plastic or wood tool (do not use metal as this will scratch the coating off the plates) and scrape deposits off of plates. Note that a buildup on the cell indicates that there is an unusually high calcium level in the pool (old pool water is usually the cause). If this is not corrected, you may to have to periodically clean the cell. The simplest way to avoid this is to bring the pool chemistry to the recommended levels as specified.
Mild Acid Washing: Use only in severe cases where flushing and scraping will not remove the majority of deposits. To acid wash, turn off power to AquaRite Pro. Remove cell from piping. In a clean plastic container, mix a solution of water to acetic or phosphoric acid (Like descaler for coffee machine). ALWAYS ADD ACID TO WATER - NEVER ADD WATER TO ACID. Be sure to wear rubber gloves and appropriate eye protection. The level of the solution in the container should just reach the top of the cell so that the wire harness compartment is NOT submerged. It may be helpful to coil the wiring before immersing the cell. The cell should soak for a few minutes and then rinse with a high pressure garden hose. If any deposits are still visible, repeat soaking and rinsing. Replace cell and inspect again periodically.
Winterizing
The AquaRite Pro electrolytic cell and flow detection switch will be damaged by freezing water just as your pool plumbing would. In areas of the country which experience severe or extended periods of freezing temperatures, be sure to drain all water from the pump, filter, and supply and return lines before any freezing conditions occur. The electronic control is capable of withstanding any winter weather and should not be removed.
Spring Start-up
DO NOT turn the AquaRite Pro on, until the pool water chemistry has been brought to the proper levels. This information can be found on page 2
INSTALLATION
Installation must be performed in accordance with Local codes.
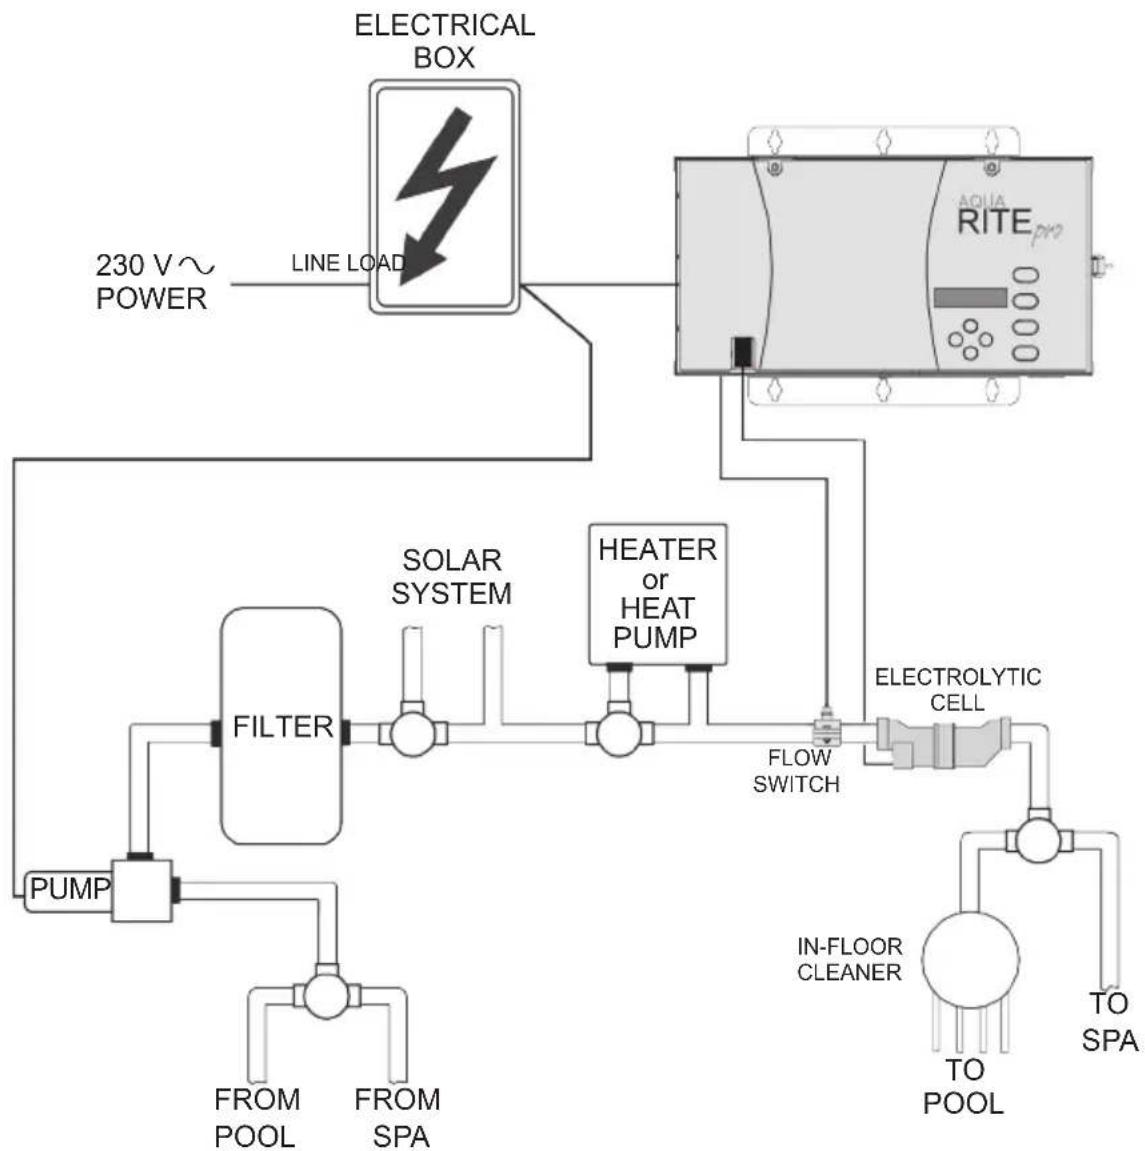
flowchart
graph TD
    A["230 V~ POWER"] --> B["LINE LOAD"]
    B --> C["ELECTRICAL BOX"]
    C --> D["AQUA RITE PRO"]
    D --> E["FLOW SWITCH"]
    E --> F["SOLAR SYSTEM"]
    E --> G["HEATER or HEAT PUMP"]
    E --> H["FILTER"]
    H --> I["PUMP"]
    I --> J["FROM POOL"]
    I --> K["FROM SPA"]
    E --> L["IN-FLOOR CLEANER"]
    L --> M["TO POOL"]
    L --> N["TO SPA"]
Preparing Pool/Spa Water
Refer to page 2 for recommended chemical levels. The pool's chemistry must be balanced BEFORE activating the AquaRite Pro. NOTE: If the pool does not have new water, add 1 liter of metal remover and 1 liter of non-copper based algaecide to the pool, per manufacturer's instructions. This ensures a quick, troublefree transfer to the AquaRite Pro system.
Mounting the AquaRite Pro Control
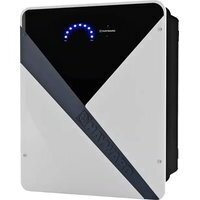
The AquaRite Pro is contained in a raintight enclosure that is suitable for outdoor mounting. The control must be mounted a minimum 3.5 meters horizontal distance (or more, if local codes require) from the pool/spa.
The control is designed to mount horizontally on a flat surface with the knockouts facing downward. Because the enclosure also acts as a heat sink (disperses heat from inside the box), it is important not to block the four sides of the control. Do not mount AquaRite Pro inside a panel or tight enclosed area.
If an AQL-CHEM kit will be used, take into consideration the space necessary for mounting the unit as well as running the plumbing lines from the AQL-CHEM's probe cell to the pool plumbing. Refer to the AQL-CHEM manual for specific mounting instructions.
Plumbing
Ensure that the AquaRite Pro installation does not constitute a cross connection with the local potable water supply. Consult local plumbing codes.
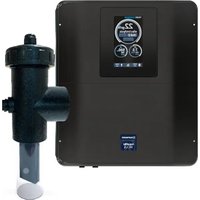
The AquaRite Pro is packaged with a flow switch that installs into either the supplied 50 mm or 63 mm saddle clamp. The chlorinator cell, sold separately, installs into the supplied 50 mm cell unions. For 63 mm pool plumbing, use the supplied adaptors to install the cell unions. Refer to page 1 for information about available chlorinator cells.
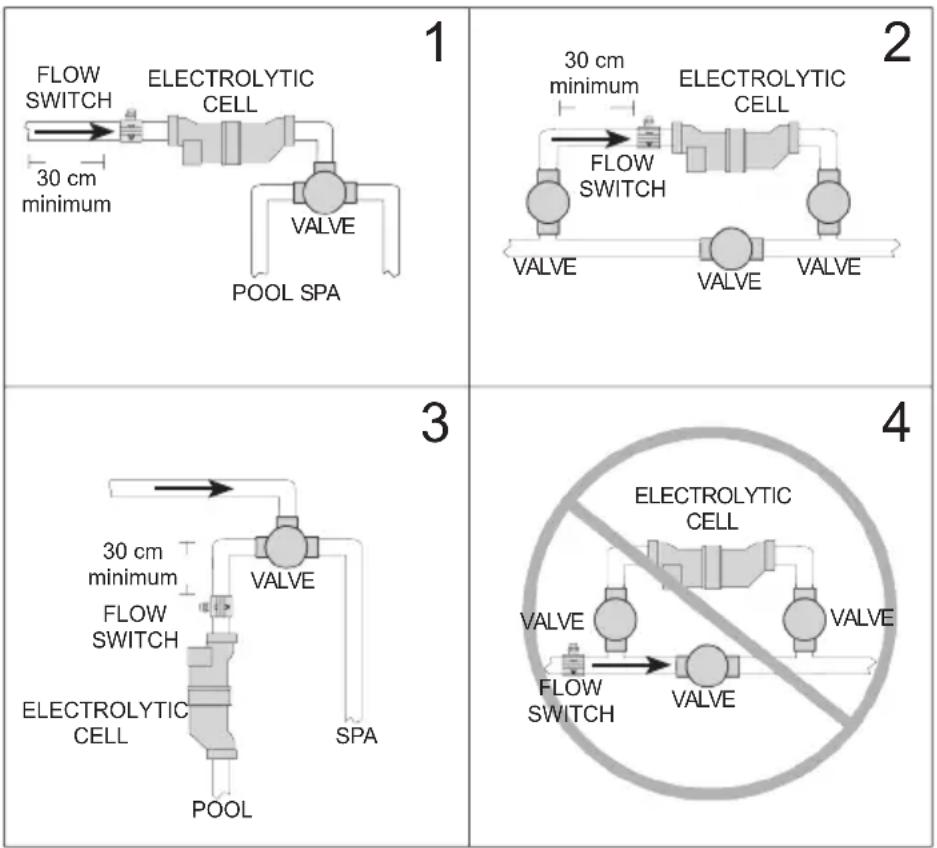
The flow switch and cell should be plumbed in the return line to the pool/spa. The preferred installation is after (downstream) all the pool equipment (filter, heater, solar, etc.). For proper plumbing, refer to the overview diagram on page 13. Below, alternate configuration #1, #2 and #3 shows the flow switch must be in front of the cell.
Never use configuration #4. The #2 is the best configuration.
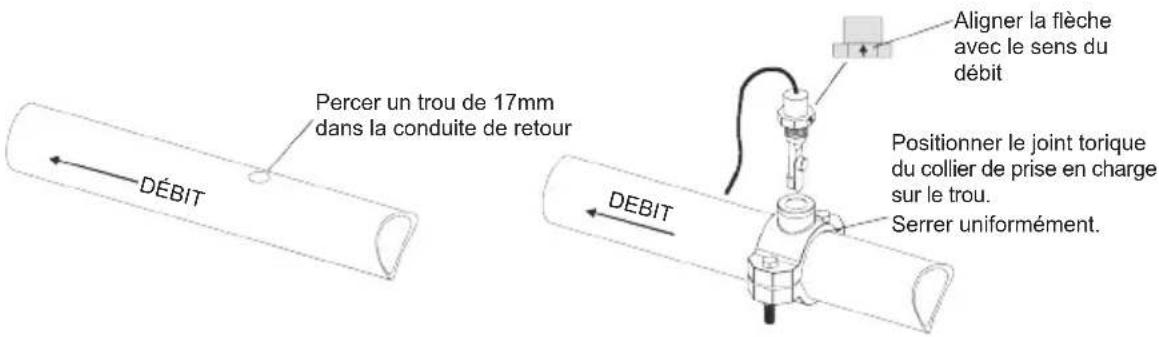
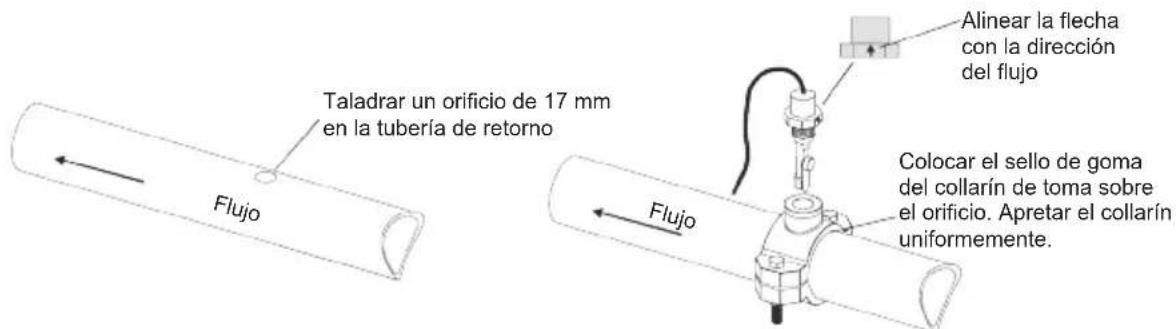
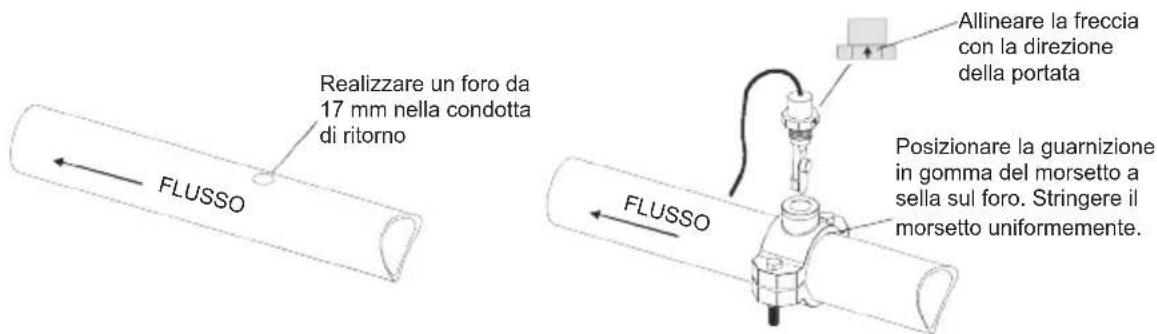
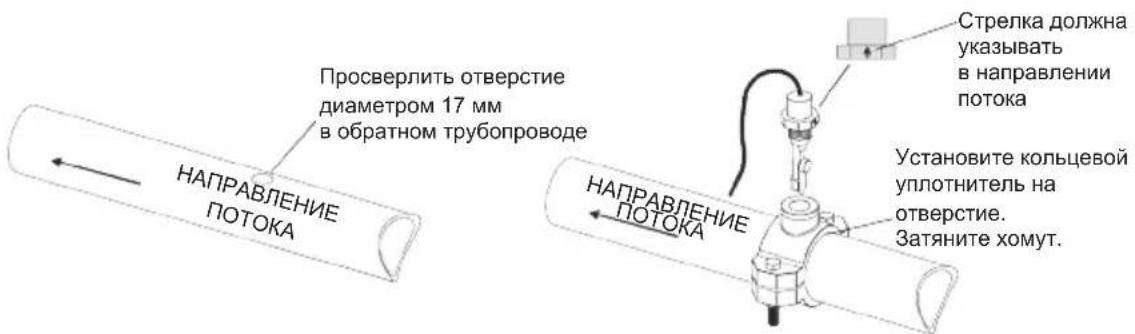
Flow Switch:
IMPORTANT: There must be at least a 30 cm straight pipe run before (upstream) the flow switch. The flow switch must be plumbed before the cell. To ensure proper operation, verify that the arrow on the flow switch (located on top of gray hex) points in the direction of water flow. Refer to the diagram on page 15.
14 / 20 AquaRite Pro Rev. C

Electrolytic Cell:
Install using the unions provided. Tighten unions BY HAND for a watertight seal. For pool/spa combination systems with spillover, use configurations #2 or #3 on page 14 to allow chlorination of both the pool and spa during spillover but preventing overchlorination when operating the spa only.
Wiring
Power must be shut off at the circuit breaker before performing any wiring. Be sure to follow Local electrical codes. To provide safe operation, the AquaRite Pro must be properly grounded. All metal equipments of the pool must be at the same electrical potential (ground).
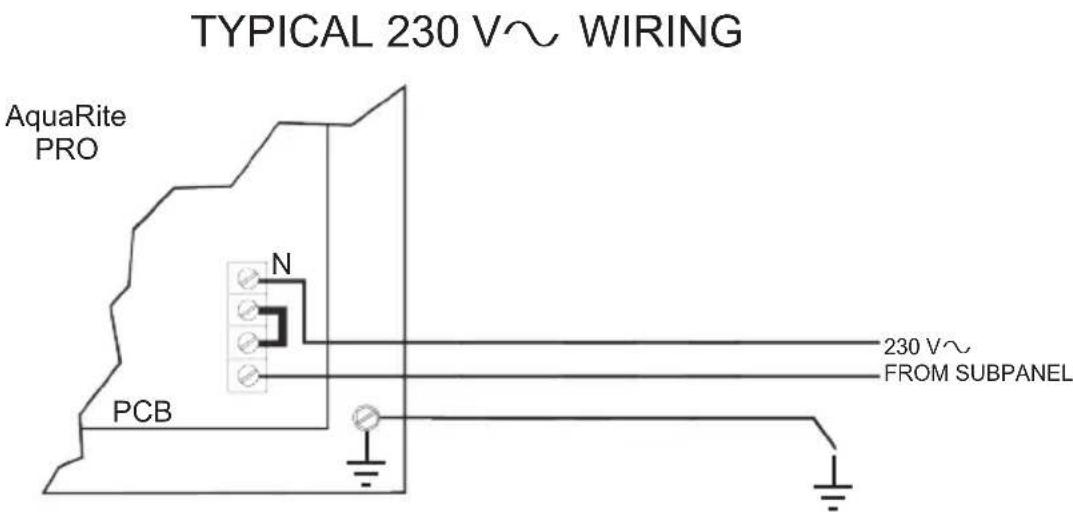
Input Power:
Wire the AquaRite Pro to the 230 V\~ from the subpanel.
This circuit must be protected by a differential protection device that protects against no more than 30ma leakage current.
Input power to the AquaRite Pro must be 230 V\~. Refer to the wiring label on the AquaRite Pro as well as the diagram below for correct wiring connections.
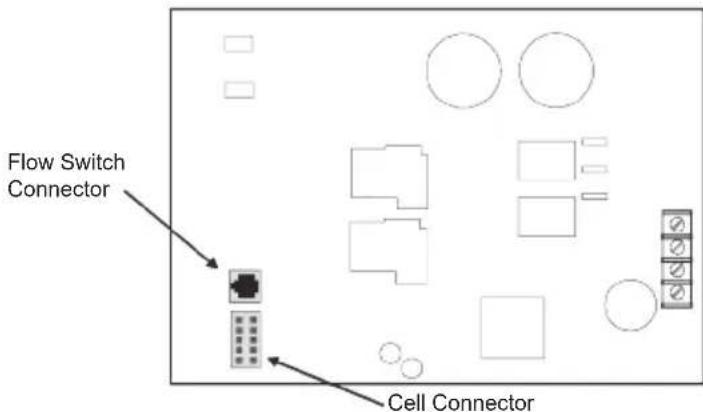
Electrolytic Cell and Flow Switch:
The electrolytic cell and flow switch cables are terminated with connectors which plug into the AquaRite Pro for easy attachment and removal. The door of the AquaRite Pro must be open and the front panel removed to access the cell cable and flow switch connectors. Route the flow switch cable through one of the knockouts. A cutout in the enclosure is provided for the cell cable. The diagram below shows the location of these connections.
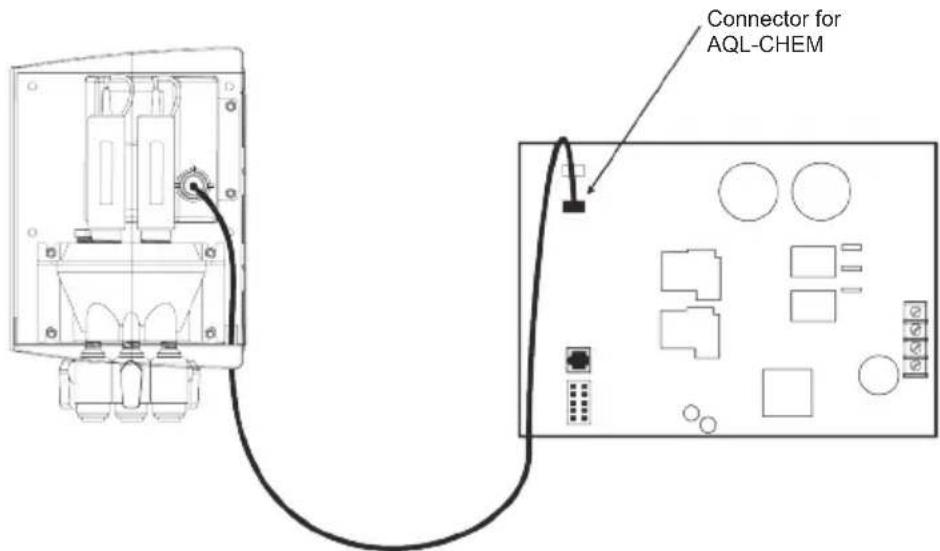
Optional AQL-CHEM Chemistry Kit
Plug the connector from the AQL-CHEM into the designated connector on the AquaRite Pro PCB as shown below. For detailed installation and operation information, refer to the AQL-CHEM instructions.
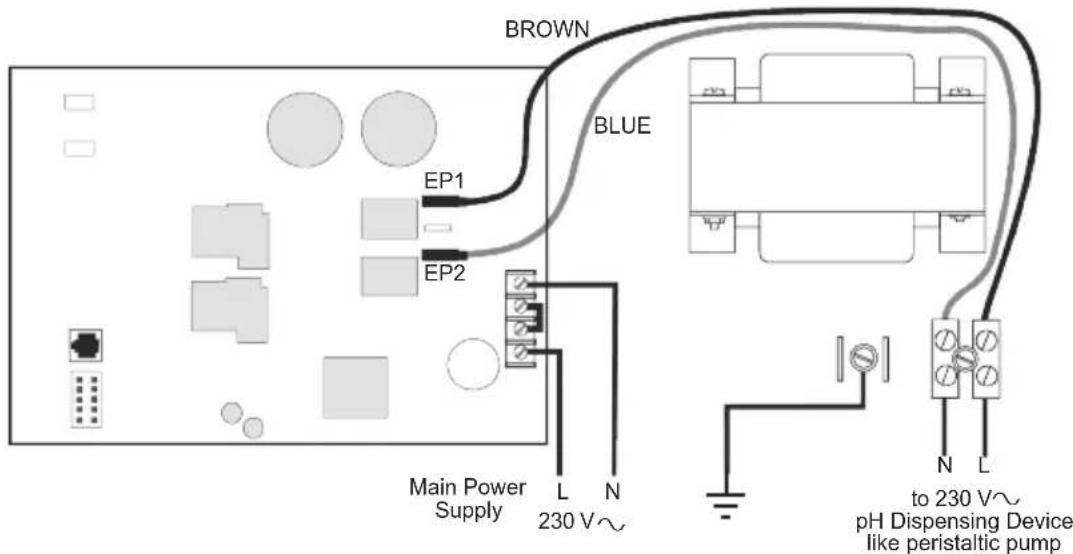
Optional pH Dispense Wiring
Requires the use of a Goldline AQL-CHEM. A screw terminal block located on the enclosure surface below the transformer is provided for connection to a 230 V\~ pH related dispensing device (peristaltic pumps). After properly installing and configuring the AQL-CHEM and the pH dispensing device, the AquaRite Pro will turn on the dispensing device when pH correction is required.
230 V\~ pH Dispensing Device
TROUBLESHOOTING
Check System Indicator
The “CHECK SYSTEM” LED will alert you when the AquaRite Pro detects any of the following conditions that are abnormal and require attention for optimal operation of your pool. Press “<” or “>” to view all of the existing “Check System” conditions.
- Inspect Cell -- For optimum operation, you will need to inspect the AquaRite Pro chlorinator cell approximately every 3 months and clean the cell if necessary. The AquaRite Pro will automatically remind you when it is time and display “Inspect Cell, + to reset” as part of the rotating Default Menu. Clean the cell (see instructions, page 12) and then press the “+” button during the “Inspect Cell” display to reset the timer.
- Low Salt/Minerals or Very Low Salt/Minerals -- When the salt is too low the AquaRite Pro will generate less chlorine and the life of the cell is degraded. Check the cell and clean if necessary before adding salt.
- High Salt/Amps/Minerals -- The AquaRite Pro will stop generating chlorine under certain high salt conditions in order to protect the internal electronics from damage. The only way to lower the salt level is to partially drain the pool and add fresh water.
- Chlorinator Cell Sensor -- The cell sensor is either an open or short circuit.
- Low Volts -- If the chlorinator cell voltage is too low.
- No Cell Power -- If no chlorinator cell power is detected on the printed circuit board.
- Check Flow Switch -- If the flow switch input is invalid.
- Cell Power Error -- If a chlorinator cell power error is detected on the printed circuit board.
- Cell Missing -- If the chlorinator is enabled but no cell is detected.
- CSM Comm Error: -- If Chemistry Sensing is enabled and the Chemistry Sense Module (CSM) is not responding.
- pH Probe Error -- If the CSM indicates that there is a problem with the pH probe.
- pH Low - Check Feeder -- If a pH level of 6.9 or less is detected, check the feeder for proper operation
- pH High - Check Feeder -- If a pH level of 8.1 or higher is detected, check the chemical supply and the feeder for proper operation
- pH Timeout - Check Feeder -- If the unit has been dispensing for more than the selected timeout without reaching the desired level. Check the chemical supply and the feeder. If both are OK, the timeout may need to be increased. Press the “+” button to reset the alarm and resume dispensing.
- pH Calibration Error -- When using the pH Calibration Wizard and the entered test result was different from the measured pH level by ± 1.0 or more. The pH probe may need to be cleaned or replaced.
18 / 20 AquaRite Pro Rev. C
- ORP Probe Error -- If the CSM indicates that there is a problem with the ORP probe.
- ORP Low - Check Chlor -- If an ORP level of 350mV or less is detected. Check the chlorinator for proper operation.
- ORP High - Check Chlor -- If an ORP level of 950mV or higher is detected. Check the chlorinator for proper operation.
- ORP High - Chlor Off -- If an ORP level of 950mV or higher is detected and the chlorine feed mode is ORP Auto Sensing, the chlorinator has been turned off. Check the chlorinator for proper operation.
- ORP Timeout -Chlor Off -- If the unit has been chlorinating for more than the selected sanitizer timeout without reaching the desired level, the chlorinator has been turned off. Press the “+” button to reset the alarm and resume chlorination.
- Ambient Sensor -- If the internal (ambient) sensor is either open or short circuit.
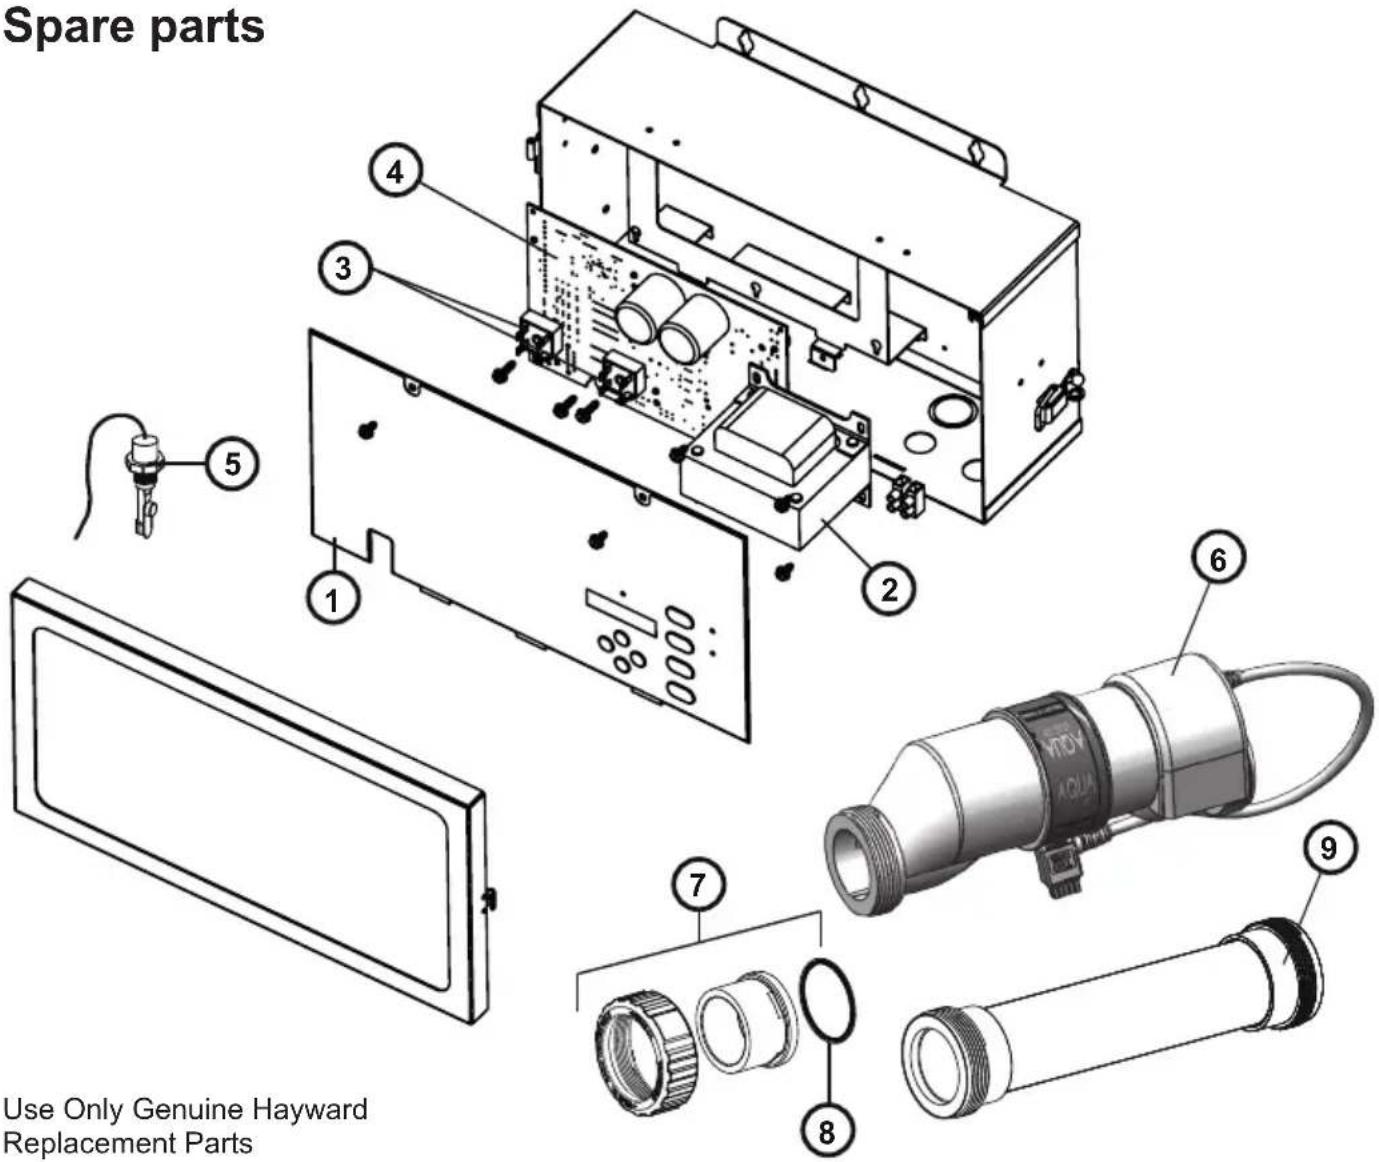
| 1 GLX-ARPRO-MEM-E 5 GLX-FLO-RP 7 GLX-CELL-UNIONE | |||||
| 2 GLX-XFMR-E 6 T-CELL-3-E (60 m ^3 ) 8 GLX-UNION-ORING | |||||
| 3 GLX-R-10PK 6 T-CELL-9-E (95 m ^3 ) 9 GLX-CELL-PIPE | |||||
| 4 | GLX-PCB-ARPRO-E | 6 | T-CELL-15-E (150 m ^3 ) | ||
LIMITED WARRANTY Hayward warrants its AquaRite, AquaRite Pro products to be free of defects in materials and workmanship, under normal use and service for a period of two (2) years. This warranty is applicable from the initial date of installation on private residential swimming pools in Europe. The warranty is not transferable and applies to the original owner only.
Proof of purchase is required for warranty service. If written proof of purchase is not provided, the manufacturing date code will be the sole determinant of the date of installation of the product.
To obtain warranty service or repair, please contact the place of purchase or the nearest Hayward authorized warranty service center. For more information on authorized service centers please visit the Hayward web site, www.hayward.fr.
WARRANTY EXCLUSIONS:
- Material supplied or workmanship performed by others in process of installation.
- Damage resulting from improper installation including installation on pools larger than the product rating.
- Problems resulting from failure to install, operate or maintain the product(s) in accordance with the recommendations contained in the owners manual(s).
- Problems resulting from failure to maintain pool water chemistry in accordance with-the recommendations in the owners manual(s).
- Problems resulting from tampering, accident, abuse, negligence, unauthorized repairs or alternations, fire, flood, lightning, freezing, external water, degradation of natural stone used in or immediately adjacent to a pool or spa, war or acts of God.
- Wearing parts (like probes).
DISCLAIMER. THE EXPRESS LIMITED WARRANTY ABOVE CONSTITUTES THE ENTIRE WARRANTY OF HAYWARD WITH RESPECT TO ITS POOL AUTOMATION AND CHLORINATION PRODUCTS AND IS IN LIEU OF ALL OTHER WARRANTIES, EXPRESSED OR IMPLIED, INCLUDING WARRANTIES OF MERCHANTABILITY OR FITNESS FOR A PARTICULAR PURPOSE. IN NO EVENT SHALL HAYWARD BE RESPONSIBLE FOR ANY CONSEQUENTIAL, SPECIAL OR INCIDENTAL DAMAGES OF ANY NATURE WHATSOEVER, INCLUDING, BUT NOT LIMITED TO, PERSONAL INJURY, PROPERTY DAMAGE, DAMAGE TO OR LOSS OF EQUIPMENT, LOST PROFITS OR REVENUE, COSTS OF RENTING REPLACEMENTS, AND OTHER ADDITIONAL EXPENSES, EVEN IF THE SELLER HAD BEEN ADVISED OF THE POSSIBILITY OF SUCH DAMAGES.
NO WHOLESALER, AGENT, DEALER, CONTRACTOR OR OTHER PERSON IS AUTHORIZED TO GIVE ANY WARRANTY ON BEHALF OF HAYWARD.
THIS WARRANTY IS VOID IF THE PRODUCT HAS BEEN ALTERED IN ANY WAY AFTER LEAVING THE FACTORY.
AQUA
RITE ^TM pro
8 / 20 AquaRite Pro Rev. C
13 / 20 AquaRite Pro Rev. C
14 / 20 AquaRite Pro Rev. C
6 / 20 AquaRite Pro Rev. C
Menü Informationen
11 / 20 AquaRite Pro Rev. C
12 / 20 AquaRite Pro Rev. C
INSTALLATION
13 / 20 AquaRite Pro Rev. C
GUIDA ALL'USO SICURO

LEGGERE E SEGUIRE ATTENTAMENTE LE ISTRUZI
13 / 20 AquaRite Pro Rev. C
14 / 20 AquaRite Pro Rev. C
6 / 20 AquaRite Pro Rev. C
Informatiemenu
11 / 20 AquaRite Pro Rev. C
13 / 20 AquaRite Pro Rev. C
6 / 20 AquaRite Pro Rev. C
Menu de informações
10 / 20 AquaRite Pro Rev. C
Unidades °C e g/L
+ - Alternar entre o sistema métrico e o sistema imperial < > Passar para o elemento anterior/seguinte do menu
11 / 20 AquaRite Pro Rev. C
12 / 20 AquaRite Pro Rev. C
INSTALAÇÃO
ОТЛОЖЕНИЯ
6 / 20 AquaRite Pro Rev. C
Информационное меню
Super Chlorinate 22:15 remaining
+- Не задействован
Inspect Cell hold + to reset
Setting Menu - Locked
Setting Menu - Unlocked
Body of Water Type Pools
Super Chlorinate 22 hours

pH Calibration Wizard + to enter

Clean Probe Wizard + to enter

14 / 20 AquaRite Pro Rev. C
- INSTRUCTIONS DE SÉCURITÉ IMPORTANTES
- LIRE ATTENTIVEMENT TOUTES LES INSTRUCTIONS
- / 20 AquaRite Pro Rev. C
- Operation and Installation Manual
- IMPORTANT SAFETY INSTRUCTIONS
- READ AND FOLLOW ALL INSTRUCTIONS
- OPERATION
- NOTE: It is not recommended to use the AquaRite Pro to generate bromine.
- Water Chemistry
- Saturation index
- Salt Level
- Type of Salt to Use
- How to Add or Remove Salt
- Controls
- Keypad Buttons
- Indicator LED's
- Information Menu
- Settings Menu
- To access the Settings Menu
- Language
- Body of Water Type
- Display
- Cell Type Selection
- Maintaining the AquaRite Pro System
- Servicing and Cleaning the AquaRite Pro Cell
- Winterizing
- Spring Start-up
- INSTALLATION
- Preparing Pool/Spa Water
- Mounting the AquaRite Pro Control
- Plumbing
- Flow Switch:
- Electrolytic Cell:
- Wiring
- Input Power:
- Electrolytic Cell and Flow Switch:
- Optional AQL-CHEM Chemistry Kit
- Optional pH Dispense Wiring
- TROUBLESHOOTING
- Check System Indicator
- WARRANTY EXCLUSIONS:
- AQUA
- RITE TM pro
- / 20 AquaRite Pro Rev. C
- Menü Informationen
- / 20 AquaRite Pro Rev. C
- GUIDA ALL'USO SICURO
- LEGGERE E SEGUIRE ATTENTAMENTE LE ISTRUZI
- Informatiemenu
- Menu de informações
- INSTALAÇÃO
- Информационное меню
Brand : HAYWARD
Model : AquaRite Pro
Category : Water pump