JARO 9050 - Lighting BRENNENSTUHL - Free user manual and instructions
Find the device manual for free JARO 9050 BRENNENSTUHL in PDF.

| Product type | LED floodlight with infrared motion detector |
| Brand | Brennenstuhl |
| Model | JARO 9050 |
| Rated power | 100 W |
| Rated voltage | 220-240 V ~ 50/60 Hz |
| Max. current | 0.45 A |
| Protection rating (with detector) | IP54 |
| Impact resistance (with detector) | IK08 |
| Protection class | I |
| Temperature range | -20°C to +50°C |
| Sensor type | Passive infrared sensor (PIR) |
| Detection range | Up to 10 m (horizontal) |
| Adjustable lighting duration | Approx. 10 s to 5 min |
| Adjustable brightness threshold | 0 to 2000 lux |
| Adjustable sensitivity | 3 to 10 m depending on mounting location |
| Recommended installation height | 2.5 m (max. 3 m) |
| Light source | Non-replaceable LED |
| Cable type | Non-replaceable (floodlight must be disposed of if damaged) |
| Use | Indoor and outdoor |
| Maintenance | No maintenance required; clean with a dry or slightly damp cloth |
| Safety | Do not look directly into the beam; do not use with a dimmer; keep out of reach of children |
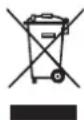
| Disposal | In accordance with WEEE Directive 2012/19/EU: do not dispose of with household waste |
| Manufacturer | H. Brennenstuhl S.A.S., 4 rue de Bruxelles, F-67170 Bernolsheim |
Frequently Asked Questions - JARO 9050 BRENNENSTUHL
User questions about JARO 9050 BRENNENSTUHL
0 question about this device. Answer the ones you know or ask your own.
Ask a new question about this device
Download the instructions for your Lighting in PDF format for free! Find your manual JARO 9050 - BRENNENSTUHL and take your electronic device back in hand. On this page are published all the documents necessary for the use of your device. JARO 9050 by BRENNENSTUHL.
USER MANUAL JARO 9050 BRENNENSTUHL
LED Light with infrared motion detector
Projecteur LED
Installation instructions 4-8
Operating Instructions
LED Light
LED Light with infrared motion detector
JARO
Attention: Before using the product, please carefully read the operating instructions and store them in a proper location!
SAFETY INSTRUCTIONS
- Always check the product for damage before use. Never use the product in case of any damage. If this is the case, please refer to an electrician or the manufacturer's service address.

Non-compliance poses a risk of fatal injury from electrical current!
- Do not use the product in potentially explosive atmospheres - danger of death!
- Keep the floodlight away from children. Children are not aware of the risks imposed by electric current.
- Please never look directly into the light.
- A destroyed protective cover cannot be replaced. The floodlight has to be disposed of.
- The external flexible cable of this lamp cannot be exchanged; if the cable is damaged, the lamp has to be scrapped.
- The following applies to the JARO 7050, 9050, 13050 floodlights:
Hot surface


Not suitable for applications with external dimmers.

If the minimum distance is not complied with, illuminated objects may overheat.
TECHNICAL DATA
Protection class: I
Protection type/impact resistance
versions without motion detector): IP65, IK08
Protection type/impact resistance
versions with motion detector):IP54,IK08
Nominal voltage: 220 - 240V 50 / 60Hz
Temperature range: -20^ to +50^
This product is suitable for indoor and outdoor lighting purposes.
INSTALLATION AND CONNECTION TO POWER SUPPLY 10 - 50 W
see figures p. 4, 7 and 8
1.Before installation, always switch off the voltage supply ①
2. Installation position: the floodlight should ideally be mounted using the wall bracket. The floodlight must be installed at a height of less than 3m 8. Recommended installation height for models with motion detector 2.5m .The floodlight can be angled up and down.
3. Remove the mounting bracket from the floodlight ②
4. Mark the position of the drill holes for fastening the mounting bracket and drill corresponding holes into the wall ②. Attach the bracket to the wall using suitable screws.
5. Open the plug connection ③.
6. Feed the connection cable through the plug sleeve, which has a seal ④.
7. Attach the floodlight to the mounting bracket.
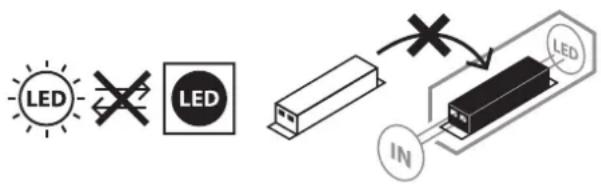
8. Connect the strands of the connection cable to the luster terminal in the input connector in accordance with (5) (N = blue cable, earth symbol = green/yellow cable, L = brown cable).
9. Slide the cases over the input connector as shown in ⑥ and tighten it. Take care to ensure that both cases are sufficiently tightened – this ensures a sufficient seal.
10. Re-attach the mounting bracket to the floodlight.
11. Adjust the desired position of the floodlight and fasten the U bolts.
12. Switch the supply voltage back on ⑦.
INSTALLATION AND CONNECTION TO POWER SUPPLY 80 - 150 W
see figures p. 5 and 6
Mounting position: The spotlight should be ideally fixed with the wall bracket. It must be installed at a height less than 3m 10
The light can be tilted by 90^ downwards and by 45^ upwards 10.
- Always turn off the power supply before installation ①.
- Unscrew the junction box ② on the back and loosen the pressure plate ③.
- Insert the connection cable ④ through the inlet pipe of the junction box and connect the braids of the connection cable according to marking N and L ④.
- Fasten the pressure plate and screw the junction box on ⑤.
- Remove the retaining bracket from the spotlight 6
- Mark the position of boreholes ⑦ for securing the retaining bracket and drill the respective holes on the wall. Attach the bracket to the wall with suitable screws ⑦ .
- Secure the spotlight to the retaining bracket 8
- Adjust the desired position of the spotlight and tighten the U-bolts ⑧.
- Turn the power supply back on ⑨
FUNCTIONAL DESCRIPTION
(only for versions with motion sensor)
This floodlight is equipped with an infrared sensor. It is switched on automatically if the sensor detects motion in the environment.
If possible, do not direct the motion sensor at swimming pools, heating air exhausts, air conditioning units or objects which are exposed to major temperature fluctuations.
Avoid directing the motion sensor at trees or bushes or at places which could be frequently visited by pets.
The motion sensor can be turned horizontally to the right and left and angled vertically up and down.
When mounting the floodlight remember that the motion sensor will react most sensitively to motions crossing its field of detection from one side to the other and least sensitively to motions directly approaching the unit.
CONFIGURING THE MOTION DETECTOR (PIR)
Three controllers are located on the rear of the motion detector 9.
TIME - time adjustment (left):
Using this controller, you can select any switch-on time between approx. 10 seconds and 5 minutes after the last motion was detected. Rotating the TIME controller clockwise decreases the time period, rotating it counterclockwise increases it.
LUX - light adjustment (sun and moon symbol, right) 10:
The light adjustment determines from what brightness level the sensor will switch on the floodlight.
The (sun symbol) position indicates that the sensor works by day and at night, in the (moon symbol) position, the sensor will only work at night. To adjust the sensor, wait until the desired ambient brightness is reached. Completely rotate the light adjustment controller to the (moon) symbol. Slowly rotate the controller in the direction of the (sun) symbol until the floodlight is switched on by the motion.
The floodlight will now be activated from the set brightness when a motion is detected.
SENS - SENSITIVITY ADJUSTMENT (CENTRE) 11:
The sensitivity of the sensor depends on the ambient temperature. The lower the ambient temperature, the greater the sensitivity of the motion detector.
The sensor is at its most sensitive when the SENS controller is turned all the way to the (+) direction.
Motion sensor: passive infrared sensor (PIR)
Detection range: up to 10m /up to 120^ (horizontal) ⑫
Time adjustment: approx. 10 sec. to 5 min.
Ambient brightness: 0 - 2000 lux
Sensitivity: 3 to 10m depending on the installation location ③
MAINTENANCE
ATTENTION! The LED lamp does not contain components that require maintenance. The light source in this lamp cannot be replaced; if the light source has reached the end of its service life, the entire lamp has to be replaced. The lamp may not be opened.
CLEANING
Before cleaning, disconnect the floodlight from the mains power.
Do not use solvents, caustic cleaning agents or similar products. Only use a dry or slightly moistened cloth for cleaning.
DISPOSAL

Dispose of electric appliances in an environmentally friendly manner! Electric appliances must not be disposed of in household waste!
The European Directive 2012/19/EU on Waste Electrical and Electronic Equipment rules that used electric appliances should be collected separately and recycled in an environmentally friendly manner.
For possibilities of disposal of the used appliance, please contact your local or municipal administration.

EU DECLARATION OF CONFORMITY

UK DECLARATION OF CONFORMITY
The declaration of conformity is deposited at the manufacturer.
ADRESSES
For more information please visit the Service/FAQ section on our homepage, www.brennenstuhl.com.

YKA3AHNMA MEP NOTEXHNIKE BE3ONACHOCTN
- Ipeed KaJdbim NcNoJIb3OBAHnEM n3dIeNne HxJHo npOBepaTb Ha BO3MOXHbIe NOBpeKDeHnA. Ppi O6HapUxKeHn KaKnx 6bl To Hn 6blIO NOBpeXdHn Hn B KOem cIyae HeIb3a NoJIb3OBAtbcr n3dEHNm. B 3TOM cIyuae Heo6xOIMo 6paTbCra K CneuaJIncTy no 3JIeKTpUueckO qactn IIN B cepBnCHyIO cIyK6by IO aIpeCy, yKa3aHHOMy n3ROTOBnteHm.

При несоблюдени濒TOROТpe6obahma cyusectbyet onaCHOCTbДЯЖИЗнВ pe3ynbTaTe nopaxhenna эneKTpoTOKOM!
- Henb3a nCnoB3OBaTb n3dJIne BO B3pbIOoNacOH cpeJe. OnacHocTb dIra JxN3Hn!
- He noDnycKaTb DeTei K n3nyaTeJIIO! DeTu He MOryToUceHHTb ONaCHOCTb NopaxeHnA 3JIeKTPOTOKOM.
- Hn B KOem cnyae He cneJyET CMOTpeTb HenocpeCTBeHHo Ha CBet.
- Pa3pyeHHbI 3aunTHbI KOxy 3ameHe He noJnEKeNT. I3nyaTeJIb DOJKeH 6bITb OTnpabNeHa yTUN3aCIO.
- Bheunn rnbkn ka6enb 3Toro cBeTNbHnka 3aMeHe He noJeKnt; B cnUyae nobpeXeHnKa6eJra CBtNbHnK CJeDyET OTnpaBnTa Ha yTuJIn3aUnIO.
- Ппсдунрждени в OTношени пожжторов JARO 7050, 9050, 13050: Harpeb noBepxHocTei!

Pn6Op He npuroeH dIa 3KcnpyaTaun C BHeuHmpeyraTopaM npKOCT cBeueHna.

Ipn yctaHOBKe Ha MeHee Yem MInHMaJIbHOM pacCTOaHn BO3MOxEh nepeRpeB OcBeueHHbIX npedMeTOB
TEXHNUECKNEXAPAKTEPUCTUKN
Knacc 3aunTbI: I
CTeneHb 3auntbI/ydapHa npoUHOCTb
(DJIaBepCNI6e3DeTeKTopaDbNXKeHnA):IP65,IK08
Ctenenb 3auntbI/ydapHa npouHocTb
(DJIABEPCNI CDeTeKTopOM DnBxKeHna):IP54,IK08
HomHaJIbHoe HApJxKeHne: 220 - 240 B nep. Toka, 50/60 T
PekomeHdoBaHHa MoHTaxHa BbICota Jn MaOeNe C DaTNUKOM DnXKeHn-2,5M.
I3nyaTeJIb MOxHO HaKIOHrB BHN3 N BBepX.
- ChTb KpeNexKHyO DyKky Cn3nyaTeIa ②
- Помаркироваь поожене кренихых OTверстдя закpenлесни кренихов дужки в Всберпгь tcOTbETCTByIOUIne дырknВ cTeHe ②.Зakpenntb dyykky Ha cTeHe cnomoцью COOTBETCTByIOUIx wypynob.
5.BckpbItb coeHHntbHbI uTekep ③ - Пotingус coeHHTbHbI Ka6eIb Yepe3 NaTpoHbI WTeKepa, Cha6KeHHbIe yNtOHeHnem ④.
- 3akpenntb n3nyuataeNb Ha KpeenKHOJ dyXke.
- IoDCoeHNHTb KINbI COeHNHTeJIbHOrO Ka6eJBA COOTBeTCTBnC ⑤Ha KJIeMMHOJ KOIOdKe BXoHOrO uTekepa (N = cInnKa6eJb, ycNoBHe o603HaueHne 3a3EmJeHnJ = 3eJIeHbI/ JeNTbIKa6eJb, L = KopuHReBbIKa6eJb).
- NaTPOHbHa BxOHOI WTeKep, KaHa 6N Tyro 3aKpyTnTBnx. YIOCTOBepuTbcra, UTO oBa naTPOHa npIKpyeHb IOCTaTOUHO Tyro - Tem cambIM oBecneuBAeTcRdoCTaTOUHOyILOTNHeHne.
- ChoBa cMOHTnIpObaTb KpeNexKHyIO duKky Ha n3nyaTeNe.
- Bbictabntb HxHHOe NOIOXKeHne JAMnbl N Tyro 3aTaryb BNHTb Ha XOMyTe.
- CHOBA BKIIIOHTb INCTOUYHK NITAHN ⑦.
MOHTAX I NOДКЛIOUЧЕНЕ K ЗЛЕКТРОПТAHИ 80 - 150 W
Cm. nllnoctpaun Ha ctpaHuaX 5n6
MohtaxHoe noIooKeHne: B nideaBHom cnyae n3nyaTeNb DoJKeH KpeNITbCn Ha HacTeHHOM KpeNekHOM yctpoiCTBe. MoHTaxHaj BBICota DOJxHa CoCTaBnTb MeHee 3 M 10.
CBeTnIbHnK MoXHO HaKNoHrTaB Bn3 Ha 90° N BBepx Ha 45°⑩
- Ipepe yctahOBKo HxKHO Bcerda OTKIIOuATb NCTOCHN NITaHn ①.
- OTBnHTb CoeHnHTenbHyIO Kopo6Ky ②Ha TblbHOI CTOpOHe I Ocna6NtB npnxmHyIO nlaCTnHy ③.
- IpoBecTn coeHHTeHbI Ka6eIb ④ uepe3 BxOHyTO Tpy6Ky coeHNHTeHbHO Kopo6Kn I NOdcoEHNHTb XINblc coeHNHTeHbHO Ka6eIa B COOTBeTCTBUN C MapKnpOBKO N U L ④.
- 3akpenntb npnxmHyo nlaCTnHy n npBHTntb coeHNHeIbHyo Kopo6Ky ⑤.
- ChTb KpeNexKHyU dYkKc u3nyaTeIe 6.
- Помаркнроваь положене кренихых OTberpctи ⑦ Дя зakpenпеня крениховдуKKИ BbICBepNTb COOTBeTCTByIOUne DbyIPKN B CTeHe. 3akpenNTb duKKky Ha CTeHe C NOMOUIBO COOTBeTCTByIOUnx UwpynOB ⑦.
- 3aKpeNtB n3JIyuaTeJb Ha KpeNexHOJ dYxke 8.
- BbIcTaBnTb HxKHOe noJoxKeHne n3JyuaTeI n Tyro 3aTMyTb BuHTbl Ha XOMyTe ⑧.
- CHOBA BKJIIOUHTb NCTOCHNK NITaHn ⑨
ФУHKUHOHAJIbHOEONUCAHNE
(TOJIbKO DnIa MoJeIe C DaTcHkOM DnIXKeHnI)
TOT n3nyaTeIb yKOMnIeKToBaH IHoPaKpaChbIM daTUnKOM. OH BKIOuaETcA ABTomaTuYeCKN, KOrda DaTUnK fNKcnpyET DvIXeHna Ha npuieraIouei TeppuTOPn.
IIO BO3MOXHOCTN He CIneJeT BbICTaBnTb DaTcNK DBNKeHnHa IJIaBaTeNbHbIe 6accSeHbI, BbITJxKn rOpayero BO3Dyxa, KOHNuCNOHepbI NII O6BeKTbl, KOTOpBie NOdBepKeHbI pe3KIM TEMpePAtypbIM KOle6aHnM.
CneyuETn36eraTb BbICTaBHeHna DaTuNka DnBxKeHna Ha DepeBbYn KcTapHNKn nnHa yactKN,HaKOTOpbIX YACTO MOryTH AxODNTbcr DomaWHne XNBOTHbe.
IaTnK DnBxKeHn MOxET NOBopaUuBaTbCBA BnpaBO N BJIeBO NO ROpN3OHTaJI N HaKIOHrTbcB BBePx N BHN3 NO BePTnKaJI.
Ipn yctahOBke n3nyaTeJIe CneJyET yuNTbIBaTb, YTO daTnK DnHexHnaH6Oone ue yBCTBnteJIbHO pearnpyeT Ha DBNXeHn, nepeceKaIOUme ero noJe OXBata N MeHee BCero yBCTBnteJIeN K DnIXeHnM, nprMo HnPaBHeHHbIM Ha np6op.
HACTPOIKA DATUKAKDUNXEHNRA (NACCUBHbIN UK-DATUKK)
Ha TbIbHOI CTOpOHe DaTcHka DnIXeHna paCNOIOXeHbI TpupeYyTApa 9.
TIME-HactpoynKaBpeMeHn(cJeBa):
C nomoubIO 3Toro peryIaTOPa B dnaana3OHe OT npIMepHO 10 ckyHd IO 5 MNHyT MOXHO BblpaTb npOn3BOJbHOe Bpemr BKJIooHEN Iocne TOrO, KaK 6blno 3aΦnKcnpoBaHO IocneJeDHEBnKeHne. Pn npOBopauBaHHn peryIaTOPa TIME no yacoboi CTpeNke INHTepBaI BpeMeHN yBeInuHbaETcA, Pn npOBopauBaHHn IpOTNB Yacoboi CTpeKN - yMeHbIaeTcA.
LUX - hactpoika npokctn (ycnoBhoe 6o3na n lyhbl, cnpaBa) 10:
HactpoikKa npKocTn onpeDeneT, hauHHa C kaKoN ocBeueHHOCtN BKJIouaetc daTnK n3nyatela.
Положенye (ycIOBHOe 6O3HaueHne: coHnce) yka3bIBAeT, YTO daTnK cpa6aTbIbAeT dHem n HocbU;В poloxheny (ycIOBHOe 6O3HaueHne: lyha) DaTnK cpa6aTbIbAeT ToIbKO hOhyo.ДЯ BblIOJIHeHna HAcTPOIKn HxKHOdoJdaTbcra HaCTynJIeHnN HyXHOJOCBeJeHHOCTN OKpykaIoUe Cpebl. PONHOCTbIO npOBepHyTb peryIaTOp HAcTPOIKn IpKoCTn Ha ycIOBHOe 6O3HaueHne (lyha).MeIJIeHNO npOBepHyTb peryIaTOp B haIpaBJIeHnN ycIOBHOrO 6O3HaueHnN (coHNc), NOKa B pe3yIbTaTe nepeDbIXKeHn N3nyuAtelb He BKIOUHTcR.
Tenepb n3nyateIb 6ydt BkIIOuATbcra npn fNKcaun DBNXeHna, HauHHa C hactpoehHOOCBeueHHoCTn.
SENS-HactpoIka yBCTBNTelbHocTn (no ceHTpy) 11:
UyBCTBnTeNbHOCTb DaTUnKa 3aBnCnT OT OkpykaIoSei TempepaTypbl. Yem HnKe OkpykaIooua TempepaTypa, Tem 6oIbIe UyBCTBnTeNbHOCTb DaTUnKa DnJxHnIa.
IaTnK cpa6aTbIbaet Han6oIee yBcTBnteIbHo, KOrda peryIaTOp SENS noHocTbIO npOBepHyT B HapabLeHH (+).
YyBCTBNTeNbHOCTb:OT3do10MB3aBNCUMOCTNOTMeCTaMOHTaKa ⑬
TEXHnueCKOE OBCJyKUBAHNE
BHNMAHNE! B cBeTnIbHnke Ha cBeToNDIOaX HeT KOMNoHErTOB, Tpe6yUoNx TexHnueCKOro 06cIyKuBaHn. NCTouHnK CBeTa B 3TOM CBETnIbHnKe He IOpIeJNT 3aMeHe; eCIn NCTouHnK CBeTa NcYePnA l CBoi pa6oyn peCypc, 3aMeHe IOpIeJNT BeCb CBeTnIbHnK. BckpbIbTa b CBeTnIbHnK 3aNpeuaetca.
OuNTKA
Ipeed ouincko n3nyaTeInb cneDyeT OTKIOuHTb OT CeTeBOrHaHpJxHeHH.
HeIb3a nCNoIb3OBaTb paCTBOpnteN, pa3beJaIOuIe YnCTraIue BeIecTBA n T. n. IJRA OUNCTKn CNeDyET NcNoIb3OBaTb TOIbKO cyXyIO nn CnErKa yBnaXHeHHyIO TkaHb.
YTNIN3AU
3neKtpnueckne np6opbl noJnxat yTnIn3aun C yyeTom 3aunTbI Okpykaoue Cpebl!
3anpeuaeTcBb6paCbBaTb 3eKTPonpN6Opbl BMeCTc 6bITOBbIMN OTxoJaMn!
B COOTBECTBnC DnapeKTHBOE EC N° 2012/19/EU no OTPa6oTaHHbIM 3neKtpOpnp6opam n 3neKtpOnHOB annapaType OTPa6oTaHHbIe 3neKtpOpnp6Opbl DOJXHbI CO6nPaTbcB OTODeJIbHbIE KOHTeINHepbI IN OTpAbJrTbcra Ha yTNIIN3aCNUO C CO6JIIODeHNEM HOPM 3aUNITbi OKpyKaIOUeI cpebl.
O Bo3MOxHOCTaX yTINn3aun npN6OpOB, Otpa6oTaBux CBOJ pecypc, MoxHO y3HaTb B MeCTHOM CeIbCKOM INn RopODCKOM CaOynpaBneHN.

DEKJIAPAUZU COOTBETCTBNA HOPMAMEC
AKT O COOTBeTCTBUN TOBapa XpaHHTbcra y npOu3BOJNTeJI.
U3ROTOBNTJIb
(modeli ar kustibu sensoru): IP54, IK08
Nominalais spiregums: 220 - 240V 50 / 60Hz
Temperatūras diapazons: -20°C lidz +50°C