CD230USB - DJ Equipment IMG STAGE LINE - Free user manual and instructions
Find the device manual for free CD230USB IMG STAGE LINE in PDF.
| Product Type | Professional dual CD / MP3 player for DJs |
| Brand and Model | IMG STAGE LINE CD230USB |
| Playback Media | Audio CD, CD-R, CD-RW, MP3 CD, USB flash drives, SD/SDHC cards (32 GB max.) |
| Number of Playback Units | 2 (A and B) with separate controls |
| Speed Adjustment Range (Pitch) | ±4 %, ±8 %, ±16 % selectable |
| Main Functions | Play, pause, CUE, Pitch Bend, Scratch, loop (IN/OUT/Reloop), programming (20 tracks), reverse play, Brake effect |
| Audio Outputs | 2 × LINE OUT (RCA), line level 2 V |
| Power Supply | 230 V / 50 Hz |
| Power Consumption | 30 VA max. |
| Control Unit Dimensions | 482 × 88 × 100 mm (2U) |
| Playback Unit Dimensions | 482 × 88 × 270 mm (2U) |
| Total Weight | 6.1 kg |
| Operating Temperature | 0 – 40 °C |
| Audio Specifications | Frequency response 20-20,000 Hz, distortion < 0.1 %, S/N ratio > 80 dB, dynamic range > 90 dB, separation > 80 dB |
| Care and Cleaning | Dry, soft cloth; no chemicals or water |
| Safety | Do not open the device (dangerous voltage), do not look into the laser beam, protect from liquids and moisture |
| Spare Parts and Repairability | Repairs by a specialized technician only; cleaning of the laser optics is the user's responsibility |
Frequently Asked Questions - CD230USB IMG STAGE LINE
User questions about CD230USB IMG STAGE LINE
0 question about this device. Answer the ones you know or ask your own.
Ask a new question about this device
Download the instructions for your DJ Equipment in PDF format for free! Find your manual CD230USB - IMG STAGE LINE and take your electronic device back in hand. On this page are published all the documents necessary for the use of your device. CD230USB by IMG STAGE LINE.
USER MANUAL CD230USB IMG STAGE LINE
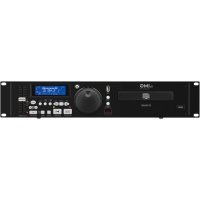
text_image
A B C D E F MP3 USB J 888 ELAPSED TOTAL REMAIN K TRACK CUE REPEAT 1 ALL PITCH G SINGLE S L A B PROGRAM 16.0 H M FOLDER N READING I ③
text_image
CD-230USB 21 22 23 24 SIN MWC USB A B INTRODUCTION SYSTEM SCAMLESS-LOGP SIN MWC USB L.IMG STABLINE ④
text_image
B CONNECT TO CONTROL UNIT L UNIT SUT R 27 28 LASER KLASSE 1 CLASS I LASER LASER CLASSE 1 230V~+50 Hz A CONNECT TO CONTROL UNIT L LINE OUT R 30 31 CE ⑤Professional Dual CD / MP3 Player
These operating instructions are intended for professional DJs and non-professional users with technical knowledge. Please read these operating instructions carefully prior to operating the unit and keep them for later reference. All operating elements and connections described can be found on the fold-out page 3.
1 Operating Elements and Connections
1.1 Control unit
1 Control panel for replay unit A see fig. 2 for details
2 Control panel for replay unit B see fig. 2 for details
3 Button OPEN/CLOSE ▲ open and close CD tray A
[like button ▲(25) of the replay unit]
4 LEDs, indicating the replay medium that has been selected with the button CD/USB/SD(11)
5 Button to change the function for the jog wheel (14)
The lighting colour of the button will indicate the function selected:
blue = function PITCH BEND
red=fastforward/reverse
blue / red alternating = scratch function
6 Button BRAKE to switch the start-up and brake function on and off
With the function switched on, the slow start-up or brake of a turntable will be simulated when the button ▶pressed.
7 Display see fig. 3 and chapter 1.1.1 for details
8 Button TIME to change the time indication (G) The indication (F) above the time indication will identify the information currently shown:
- REMAIN: remaining time of the title
– TOTAL REMAIN: remaining time of the CD (except for MP3 titles)
– ELAPSED: time already played of the title
9 Rotary knob to select titles and folders
10 Button REPEAT for the repeat functions 1^st press of the button: REPEAT 1 current title repeated
2^nd press of the button: REPEAT ALL all titles repeated 3^rd press of the button repeat function switched off
11 Button CD / USB / SD to select the replay medium: CD, USB flash drive or memory card The LEDs (4) above the jog wheel will indicate the replay medium selected.
12 Button SINGLE to switch between the single title replay mode and the total title replay mode; for the single replay mode, SINGLE (K) will be shown
13 Control PITCH to change the speed; the control is only operating when the button Pitch (18) is illuminated
14 Jog wheel for precise selection of a spot in the pause mode During replay, further functions will be available via the button (5).
15 Button REVERSE for reverse replay
16 Button CUE for shortly replaying the beginning of a title and for returning to a starting point previously defined
17 Button ▶II to switch between replay mode and pause mode
18 Button Pitch
- keep pressed until the button is illuminated or extinguishes: to activate or deactivate the control PITCH (13)
- press briefly: to select the speed setting range (4%, 8%, 16%) Buttons - and + for the function PITCH BEND
19 Buttons to replay a loop (continuous repeat of a section)
- button IN to define the starting point of the section
- button OUT to define the end point of the section and to start the loop at the same time; to exit the loop, press the button again
- button RELOOP to replay the loop once again
20 Button PGM to program your individual title sequence
1.1.1 Display
A Indication MP3 will appear for titles in the MP3 format
B Indication USB will appear when the USB port (23) has been selected via the button CD/USB/SD (11)
C Indication CUE will appear when the CD/MP3 player has been set to pause at the beginning of the title or at a starting point memorized (CUE point)
D Symbol for replay ▶ or pause II
E Indication REPEAT 1 for repeat of the current title, or indication REPEAT ALL for repeat of all titles
F Indication REMAIN when the remaining time of the title is shown Indication TOTAL REMAIN when the remaining time of the CD is shown (not supported for MP3 titles) Indication ELAPSED when the time already played of the title is shown
G The running time of a title is indicated numerically in minutes, seconds and frames (1 frame = 125 second) and graphically as a bar graph. item 8: button TIME The entire bar graph will flash while the final 30 seconds of a title are being replayed.
H Field PITCH when the control PITCH (13) has been activated, to indicate the adjusted deviation (%) from the standard speed
I Line to show text information, e.g. number of the title (Track 1) or, for MP3 titles, scrolling ID tags
J Title number
K Indication SINGLE for the single title replay mode
L Loop indications (A and B) indication (A only: - when the starting point of the section to be repeated has been defined - when a loop has been memorized, but is currently not being replayed indications (A and B) for replay of a loop
M Indication FOLDER will appear when folders can be selected with the rotary knob (9)
N Indication PROGRAM in the program mode and when replaying a programmed title sequence
1.2 Replay unit
21 CD tray of CD drive A
22 Slot SD/MMC of replay unit A for a memory card (32 GB max.)
23 USB port of replay unit A to insert a USB flash drive
24 Illumination for CD tray
25 Button OPEN/CLOSE ▲ to open and close CD tray A
[like button ▲(3) of the control unit]
26 POWER switch
27 Connection for the control unit: connect to the jack CONNECT TO MAIN UNIT B, using one of the connection cables provided
28 Audio output LINE OUT of replay unit B for connection to the line input of an amplifier or mixer, for example
29 Mains jack for connection to a socket (230V/50Hz) via the mains cable provided
30 Connection for the control unit: connect to the jack CONNECT TO MAIN UNIT A, using one of the connection cables provided
31 Audio output LINE OUT of replay unit A for connection to the line input of an amplifier or mixer, for example
2 Safety Notes
The unit corresponds to all relevant directives of the EU and is therefore marked with CE
WARNING

voltage. Leave servicing to skilled personnel. Inexpert handling may result in electric shock.
- Caution! Never look into the CD mechanism when the CD tray (21) is open; laser beams may be emitted causing eye damage.
- The unit is suitable for indoor use only. Protect it against dripping water, splash water and high air humidity. The admissible ambient temperature range is 0 – 40 °C.
- Do not place any vessel filled with liquid on the unit, e. g. a drinking glass.
-
Immediately disconnect the mains plug from the socket
-
if the unit or the mains cable is visibly damaged,
- if a defect might have occurred after the unit was dropped or suffered a similar accident,
- if malfunctions occur.
In any case the unit must be repaired by skilled personnel.
- Never pull the mains cable to disconnect the mains plug from the socket; always seize the plug.
- No guarantee claims for the unit and no liability for any resulting personal damage or material damage will be accepted if the unit is used for other purposes than originally intended, if it is not correctly connected or operated, or if it is not repaired in an expert way.

If the unit is to be put out of operation definitively, take it to a local recycling plant for a disposal which is not harmful to the environment.
3 Applications
The CD / MP3 player CD-230USB with two replay units is especially designed for professional DJ applications, offering special features such as single title replay, various replay effects, change of the replay speed to up to ±16 %.
With this unit, audio CDs (including CD-Rs and CD-RWs ^1 ) can be replayed. MP3 files can be replayed from CDs, USB flash drives ^2 and SD/SDHC memory cards ^2 (32 GB max.).
4 Setting up/ Connecting the Unit
The control unit and the replay unit are designed for installation into a rack for units with a width of 482 mm (19"), but they can also be used as tabletop units. The replay unit must always be operated horizontally, whereas the control unit can be installed as desired, e. g. also inclined. For rack installation, 2 rack spaces each are required for the control unit and the replay unit (1 RS = 44.45 mm).
Prior to making or changing any connections, switch off the CD-230USB and the units to be connected!
1) Use the two connection cables provided to connect the control unit to the replay unit: Connect the jack CONNECT TO CONTROL UNIT A (30) of replay unit A to the jack CONNECT TO MAIN UNIT A of operating unit A. Proceed in the same way to make a connection between replay unit B and operating unit B.
2) Connect each of the signal outputs LINE OUT (28, 31) to a line level input of a mixer or amplifier, for example (likely lettering: Line, CD, Aux).
3) Connect the mains jack (29) to a socket (230 V/50 Hz) via the mains cable provided.
5 Operation
Switch on the unit with the POWER switch (26). During the reading process, READING will appear on the display (7). After that, when a CD is inserted, the display will show information about the CD; if no CD is inserted, NO DISC will appear on the display.
1) To insert a CD, open the CD tray (21) with the button ▲(3 or 25). Insert the CD with the lettering facing upwards, and close the CD tray with the button ▲
Note: The CD tray will be locked as long as a CD is being replayed. If required, stop the replay with the button ▶II(17).
2) Additionally or as an alternative, insert a USB flash drive ^2 into the USB port (23) and/or
insert a memory card ^2 into the slot SD/MMC (22) with the notched corner of the card to the right and facing the unit. To remove the card, push the card into the slot until it disengages.
3) After switching on, the CD drives are always selected. To select the USB flash drive or the memory card, press the button CD/USB/SD (11) the appropriate number of times. The LEDs (4) above the jog wheel will indicate the replay medium selected.
Note: A different replay medium can only be selected in the pause mode. If required, use the button ▶II to set the player to pause.
4) All the other operating options are listed in the tables on the following pages. After operation, switch the CD/MP3 player off with the POWER switch.
6 Maintenance of the Unit
Protect the unit against dust, vibrations, humidity and heat (admissible ambient temperature: 0–40°C). For cleaning only use a dry, soft cloth; never use water or chemicals.
Note concerning sound interruptions and reading errors
Cigarette smoke and dust will easily penetrate through all openings of the unit and will also settle on the optics of the laser sampling systems. If this deposit should cause reading errors and sound interruptions, the unit must be cleaned by skilled personnel. Please note that there will be a charge on cleaning, even during the warranty period!
7 Specifications
Frequency range: ..... 20–20 000 Hz
THD: .... < 0.1%
Channel separation: .... > 80 dB
Dynamic range: .... > 90 dB
S/N ratio: >80 dB
Output: 2 V (line level), RCA jacks
Anti-shock memory: .... for CDDA 10 sec. for MP3 15 sec.
Power supply: 230V/50 Hz
Power consumption: .... 30 VA max.
Ambient temperature: ... 0 - 40°C
Dimensions (W × H × D)
Control unit: 482 × 88 × 100 mm, 2 RS
Replay unit: 482 × 88 × 270 mm, 2 RS
Weight: 6.1 kg
| Button Item Function | ||
| Basic functions | ||
| SINGLE 12 | Selecting the mode: Single title replay* [indication SINGLE (K)]Replay of all titles [indication SINGLE not shown]During single title replay, the player will replay a single title and will switch to the pause mode at the beginning of the next title. | |
| ▶II | 17 | Starting the replay [indication ▶(D)], pause [indication II], continue |
| TRACK/FOLDER SEARCH | 9 | Selecting a titleRotate the knob until the title desired is indicated. Press the knob.Press the knob so that the indication FOLDER (M) appears after releasing the knob.Rotate the knob to select the folder, then press the knob to confirm.As long as the title number (J) flashes (approx. 5 sec.), press the knob again to go to the first title of the folder, or first rotate the knob to select a different title in the folder and then press the knob to confirm.Do not wait for more than 5 sec. between two operating steps; otherwise, the player will return to the previous title. |
| CUE 16 | Shortly replaying the beginning of a titleSet the player to pause with the button ▶II2. Go to the title desired with the button TRACK / FOLDER (9).When CUE (C) appears on the display, keep the button CUE pressed to replay the beginning of the title. After releasing the button, the player will return to the beginning of the title and will be set to pause.Returning to the beginning of a titleBriefly press the button CUE to return to the beginning of a title and to set the player to pause.Then keep the button CUE pressed to replay the beginning of the title, or press the button ▶II to start the title again.Returning to a previously defined spot in the title (CUE point)1. Replay the title. At the spot to which you want to return, set the player to pause with the button ▶II. If required, precisely locate the spot with the jog wheel (14).2. After defining the spot, restart the replay with the button ▶II; this will automatically memorize the starting point as a CUE point. The button CUE will flash twice.3. To return to the CUE point, press the button CUE. | |
| TIME | 8 | Changing the time indication (G)Remaining time of the title* [indication REMAIN (F)]Remaining time of the CD [indication TOTAL REMAIN]indication of remaining time not supported for titles in MP3 formatTime already played of a title [indication ELAPSED] |
| REPEAT 10 | Repeat functions 1^st press of the button: indication REPEAT 1 (E) = current title repeated 2^nd press of the button: indication REPEAT ALL = all titles repeated 3^rd press of the button: repeat function switched off* | |
| 14 | Functions of the jog wheel | |
| PITCH BEND SEARCH SCRATCH | 5 | Selecting a spot in the title with the accuracy of 1 frame ( 1/2s ), e.g. for starting the replay from a certain spot instead of starting it at the beginning of the title.When you have reached the desired spot during replay, set the player to pause with the button ▶II and turn the jog wheel clockwise or counter-clockwise to precisely select the spot.Note:If the jog wheel has been switched to the function PITCH BEND* or SEARCH, the current spot will be repeated continuously. If required, press the illuminated button (5) above the jog wheel to mute the sound.To use the function PITCH BEND* (see next page) with the wheel, the button must be illuminated in blue. If required, press the button the appropriate number of times.Forforward/reverse, press the button repeatedly until it is illuminated in red. Then turn the jog wheel forwards or backwards.To create scratch effectswith the jog wheel, press the button repeatedly until it is alternately illuminated in blue and red (also see “Creating effects”). |
| *This setting or function is selected after the CD-230USB has been switched on. | ||
| Changing the speed and function PITCH BEND | ||
| - Pitch + 18 | Changing the replay speed and the pitch at the same timeKeep the button Pitch pressed until it is illuminated. This will activate the control PITCH (13). [To deactivate* the control, keep the button pressed again until it is no longer illuminated.]Briefly press the button Pitch to select the setting range: 16 %*, 8 %, 4 %. The field PITCH (H will briefly indicate the range, then it will indicate the deviation set from the standard speed with the control PITCH.Change the speed with the control PITCH. | |
| PITCH BEND - matching the beat between two music piecesWhen titles of approx. the same speed are replayed on the two replay units, the beats of these titles can be precisely synchronized with respect to time. Thus, the dancing rhythm will not be interrupted when crossfading from one title to the other.First match the speed of the title to which crossfading is desired to the speed of the current title.Keep the button + or - pressed to briefly increase or reduce the speed until the beats of the title are synchronized with those of the current title.As an alternative, turn the jog wheel (14) to increase or reduce the speed of the title. For this purpose, use the button (5) above the wheel to switch it to the function PITCH BEND* (button will be illuminated in blue) | ||
| Creating effects | ||
| BRAKE 6 | Brake and start-up effectWith the effect switched on, the slow start-up or brake of a turntable will be simulated when the button ▶II is pressed. | |
| REVERSE 15 | Reverse replay | |
| SCRATCH | 5 | Scratch effect (to simulate fast moving back and forth of a record)Press the button repeatedly until it is alternately illuminated in blue and red. Then turn the jog wheel (14) back and forth as desired. |
| IN OUT Reloop | 19 | Replaying a loopA section of a title can be repeated as many times as desired as a seamless loop.When you have reached the desired starting point of a section during replay, press the button IN.1The button will be illuminated and (A(L) will be displayed.When you have reached the end of the section, press the button OUT. The section between the points will be continuously repeated. The buttons IN and OUT will flash and (B) will be displayed additionally.To exit the loop and to continue the replay of the title, press the button OUT. However, the loop will be memorized. As an indication, the insert (A will remain on the display and the buttons IN and OUT will be permanently illuminated.To restart the loop, press the button Reloop, or, to replay a different loop, repeat steps 1 and 2, or, to define a different end point, press the button OUT.When you have reached the next title or selected a different title, the loop will be deleted.To precisely set the starting point and the end point: When you reach the point, set the player to pause; precisely select the point with the jog wheel (14). Then press the button IN or OUT. |
| Compiling your individual title sequence | ||
| PGM | 20 | For replaying only selected titles, a title sequence of up to 20 titles can be programmed.Set the player to pause with the button ▶II, and switch on the programming mode with the button PGM: PROGRAM (N) will be displayed, and the text line (I) will indicate the first memory location P-∅1.Select the desired title with the rotary knob TRACK/FOLDER (9). Only a title number (not a folder) can be selected. Prior to this and if required, make a note of the number that is indicated in the field TRACK (J) while replaying the title.Press the button PGM to memorize the title. The next memory location P-∅2 will be indicated.Repeat steps 2 and 3 until all titles of the title sequence have been memorized.To start the title sequence, press the button ▶II. The rotary knob TRACK/FOLDER can be used to go to any title of the title sequence.To delete the title sequence and to return to the normal replay mode, keep the button PGM pressed until the indication PROGAM extinguishes.*This setting or function is selected after the CD-230USB has been switched on. |
Dimensions (L × H × P)
Dimensiones (B × H × P)
Unidad de control: .... 482 × 88 × 100 mm, 2 U
Reproductor: 482 × 88 × 270 mm, 2 U
Peso: 6,1 kg