CD196USB - Cd player/recorder IMG STAGE LINE - Free user manual and instructions
Find the device manual for free CD196USB IMG STAGE LINE in PDF.
User questions about CD196USB IMG STAGE LINE
0 question about this device. Answer the ones you know or ask your own.
Ask a new question about this device
Download the instructions for your Cd player/recorder in PDF format for free! Find your manual CD196USB - IMG STAGE LINE and take your electronic device back in hand. On this page are published all the documents necessary for the use of your device. CD196USB by IMG STAGE LINE.
USER MANUAL CD196USB IMG STAGE LINE
text_image
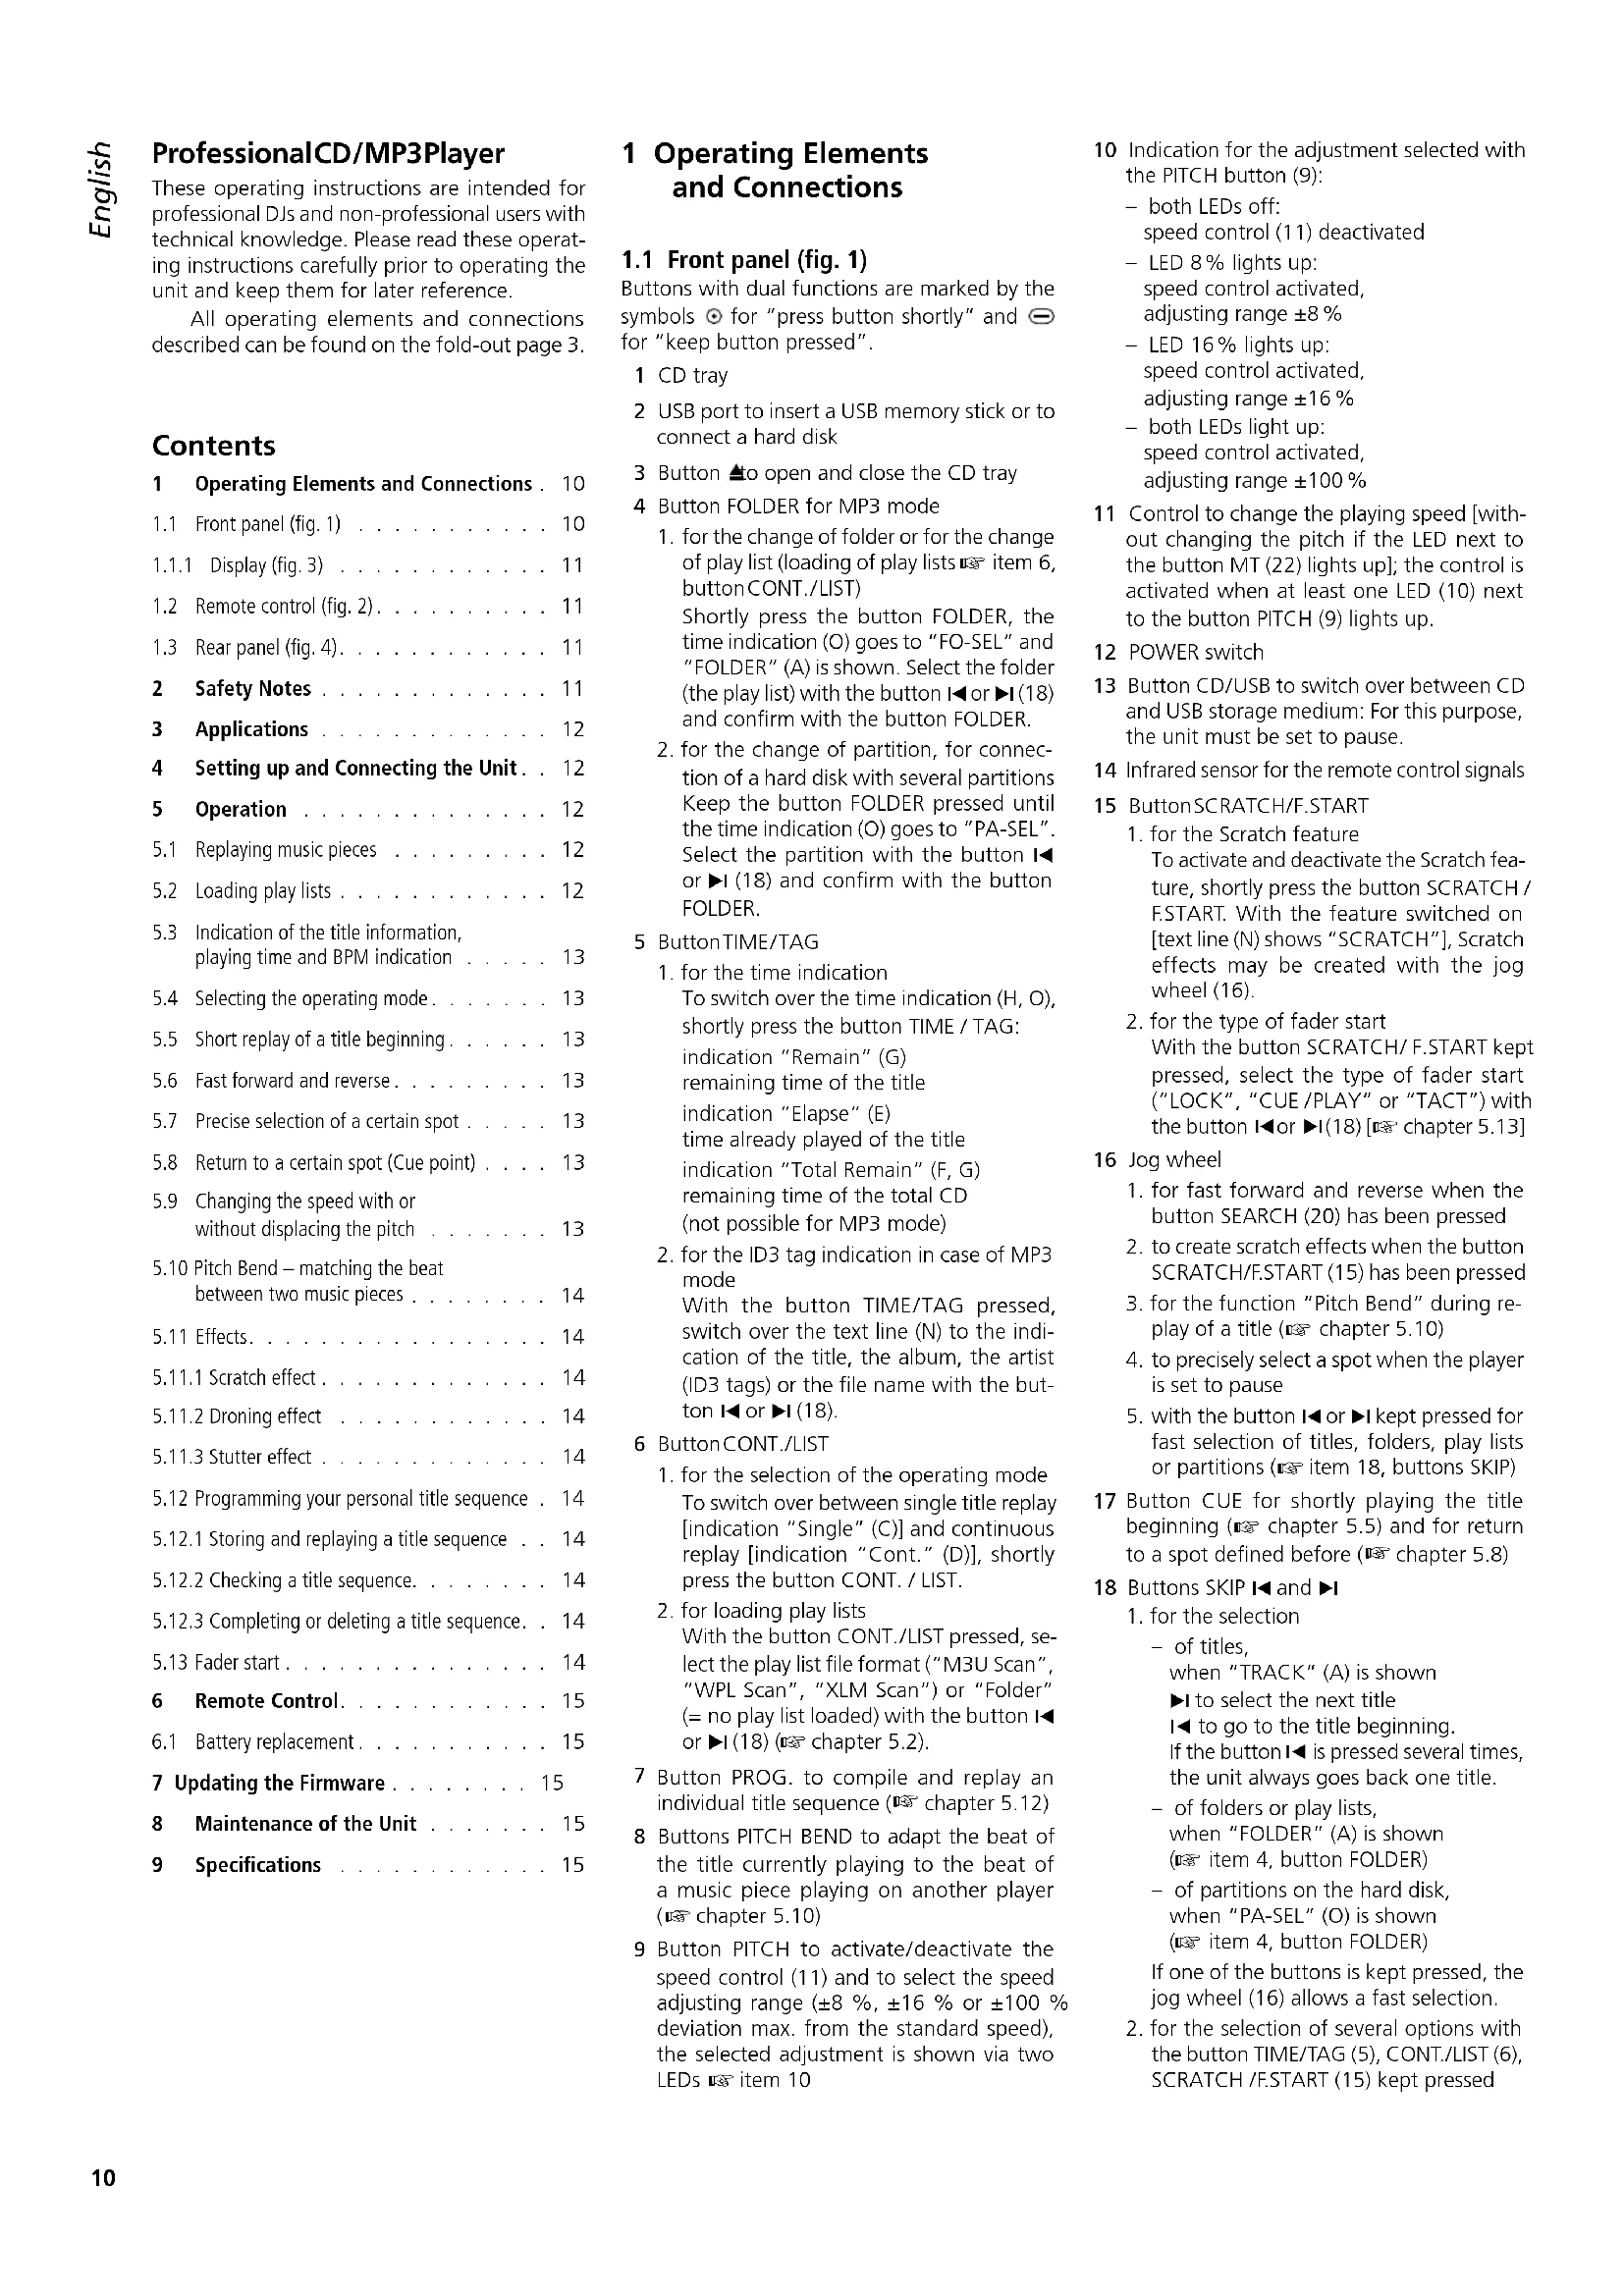
A B C D E F G H I TRACK Single Cont. Elapse Total Remain PITCH 178 -23.58 FOLDER Total 58:43:26 CUE 250 M S F CD USB TITLE ALBUM ARTIST WELCOME 186 BPM MT PG ③ J K L M N O P Q R
text_image
LINE OUT DIGITAL 37 38 39 40 230V/-150Hz Laser KLASSE! CLASSI LASER LASER CLASSE! IMG STAGELINE www.mgolphe.com ④ProfessionalCD/MP3Player
These operating instructions are intended for professional DJs and non-professional users with technical knowledge. Please read these operating instructions carefully prior to operating the unit and keep them for later reference.
All operating elements and connections described can be found on the fold-out page 3.
Contents
1 Operating Elements and Connections. 10
1.1 Front panel (fig. 1) ..... 10
1.1.1 Display (fig. 3) 11
1.2 Remote control (fig. 2)....11
1.3 Rear panel (fig. 4). 11
2 Safety Notes 11
3 Applications 12
4 Setting up and Connecting the Unit . . 12
5 Operation 12
5.1 Replaying music pieces 12
5.2 Loading play lists ..... 12
5.3 Indication of the title information, playing time and BPM indication ..... 13
5.4 Selecting the operating mode ..... 13
5.5 Short replay of a title beginning ..... 13
5.6 Fast forward and reverse ..... 13
5.7 Precise selection of a certain spot ..... 13
5.8 Return to a certain spot (Cue point) ..... 13
5.9 Changing the speed with or without displacing the pitch 13
5.10 Pitch Bend - matching the beat between two music pieces . . . . . . . 14
5.11 Effects. 14
5.11.1 Scratch effect ..... 14
5.11.2 Droning effect 14
5.11.3 Stutter effect 14
5.12 Programming your personal title sequence . 14
5.12.1 Storing and replaying a title sequence . . 14
5.12.2 Checking a title sequence. . . . . . . 14
5.12.3 Completing or deleting a title sequence. . 14
5.13 Fader start ..... 14
6 Remote Control. 15
6.1 Battery replacement....15
7 Updating the Firmware ..... 15
8 Maintenance of the Unit 15
9 Specifications 15
1 Operating Elements and Connections
1.1 Front panel (fig. 1)
Buttons with dual functions are marked by the symbols ⊙ for "press button shortly" and ⊖ for "keep button pressed".
1 CD tray
2 USB port to insert a USB memory stick or to connect a hard disk
3 Button ▲ to open and close the CD tray
4 Button FOLDER for MP3 mode
-
for the change of folder or for the change of play list (loading of play lists item 6, buttonCONT./LIST) Shortly press the button FOLDER, the time indication (O) goes to "FO-SEL" and "FOLDER" (A) is shown. Select the folder (the play list) with the button I◀ or ▶I(18) and confirm with the button FOLDER.
-
for the change of partition, for connection of a hard disk with several partitions Keep the button FOLDER pressed until the time indication (O) goes to "PA-SEL". Select the partition with the button I◀ or ▶I (18) and confirm with the button FOLDER.
5 ButtonTIME/TAG
-
for the time indication To switch over the time indication (H, O), shortly press the button TIME / TAG: indication "Remain" (G) remaining time of the title indication "Elapse" (E) time already played of the title indication "Total Remain" (F, G) remaining time of the total CD (not possible for MP3 mode)
-
for the ID3 tag indication in case of MP3 mode With the button TIME/TAG pressed, switch over the text line (N) to the indication of the title, the album, the artist (ID3 tags) or the file name with the button I◀ or ▶I (18).
6 ButtonCONT./LIST
-
for the selection of the operating mode To switch over between single title replay [indication "Single" (C)] and continuous replay [indication "Cont." (D)], shortly press the button CONT. / LIST.
-
for loading play lists With the button CONT./LIST pressed, select the play list file format ("M3U Scan", "WPL Scan", "XLM Scan") or "Folder" (= no play list loaded) with the button I◀ or ▶I(18) (Chapter 5.2).
7 Button PROG. to compile and replay an individual title sequence ( chapter 5.12)
8 Buttons PITCH BEND to adapt the beat of the title currently playing to the beat of a music piece playing on another player (Chapter 5.10)
9 Button PITCH to activate/deactivate the speed control (11) and to select the speed adjusting range (±8 %, ±16 % or ±100 % deviation max. from the standard speed), the selected adjustment is shown via two LEDs item 10
10 Indication for the adjustment selected with the PITCH button (9):
- both LEDs off: speed control (11) deactivated
- LED 8% lights up: speed control activated, adjusting range ±8%
- LED 16% lights up: speed control activated, adjusting range ±16%
– both LEDs light up: speed control activated, adjusting range ±100%
11 Control to change the playing speed [without changing the pitch if the LED next to the button MT (22) lights up]; the control is activated when at least one LED (10) next to the button PITCH (9) lights up.
12 POWER switch
13 Button CD/USB to switch over between CD and USB storage medium: For this purpose, the unit must be set to pause.
14 Infrared sensor for the remote control signals
15 ButtonSCRATCH/F.START
-
for the Scratch feature To activate and deactivate the Scratch feature, shortly press the button SCRATCH / F.START. With the feature switched on [text line (N) shows "SCRATCH"], Scratch effects may be created with the jog wheel (16).
-
for the type of fader start With the button SCRATCH/F.START kept pressed, select the type of fader start ("LOCK", "CUE/PLAY" or "TACT") with the button I◀or ▶I(18)[▶ chapter 5.13]
16 Jog wheel
-
for fast forward and reverse when the button SEARCH (20) has been pressed
-
to create scratch effects when the button SCRATCH/F.START (15) has been pressed
-
for the function "Pitch Bend" during replay of a title ( chapter 5.10)
-
to precisely select a spot when the player is set to pause
-
with the button ◀ or ▶ kept pressed for fast selection of titles, folders, play lists or partitions (item 18, buttons SKIP)
17 Button CUE for shortly playing the title beginning (chapter 5.5) and for return to a spot defined before (chapter 5.8)
18 Buttons SKIP ◀ and ▶
- for the selection
- of titles, when "TRACK" (A) is shown
▶ I to select the next title
I◀ to go to the title beginning. If the button I◀ is pressed several times, the unit always goes back one title.
- of folders or play lists, when "FOLDER" (A) is shown (item item 4, button FOLDER)
- of partitions on the hard disk, when "PA-SEL" (O) is shown (item 4, button FOLDER)
If one of the buttons is kept pressed, the jog wheel (16) allows a fast selection.
- for the selection of several options with the button TIME/TAG (5), CONT./LIST (6), SCRATCH /F.START (15) kept pressed
19 ButtonPLAY/PAUSE ▶II to switch over between replay (LED above the button lights up constantly) and pause (LED above the button flashes)
20 Button SEARCH to switch the jog wheel (16) to the function "fast forward / reverse"
21 Button BPM for the manual counting mode of the beat counter and to switch back to the automatic mode (Chapter 5.3)
22 Button MT (master tempo) to activate and deactivate the function for constant pitch ( chapter 5.9)
1.1.1 Display (fig. 3)
A when "TRACK" is shown: number of the title (MP3 mode: number of the title in the folder or number of the title in the play list) when "FOLDER" is shown [after pressing the button FOLDER (4)]: number of the folder or number of the play list
B replay symbol
C "Single": indicates the operating mode of single title replay
D "Cont.": indicates the operating mode for continuous replay of the titles
E "Elapse": indicates that the time already played of a title is displayed
F "Total": indicates together with the indication "Remain" (G) that the remaining playing time of the CD is shown (not possible for MP3 mode)
G "Remain": indicates that the remaining time of a title is displayed. With the indication "Total Remain" the remaining playing time of the CD is displayed.
H bar graph to indicate the relative playing time of a title
I indicates the deviation from the standard speed in percentage
J "CD" or "USB": indicates if a CD or a USB storage medium has been selected.
K "CUE": appears when the player is set to pause at the Cue point (CHAPTER 5.4 and 5.8).
L "TITLE", "ALBUM" or "ARTIST": when the respective title information (ID3 tag) in the text line (N) is shown for an MP3 title
M when "Total" is shown above the numbers: total number of the titles (MP3 mode: total number of the titles in the folder or total number of the titles in the play list) when "Total" has disappeared [after pressing the button FOLDER (4)]: total number of folders or total number of the play lists in the selected file format
N text line for additional information
O playing time indication, also see items E and G
P indication of the beats per minute
Q "PG": indicates that an individual title sequence has been memorized; flashes during programming and during replay of the title sequence
R "MT" (master tempo): indicates the feature for constant pitch ( chapter 5.9)
1.2 Remote control (fig. 2)
23 Button OPEN / CLOSE like button▲(3)
24 Numerical keys for the direct selection
– of titles when "TRACK" (A) is indicated
- of folders or play lists when "FOLDER" (A) is indicated (item 4, button FOLDER)
- of partitions on the hard disk when "PA-SEL" (O) is indicated (item 4, button FOLDER)
The buttons
25 FOLDER
26 PITCH BEND
27 MT
28 PITCH
29 PLAY/PAUSE
30 CUE
31 PROG.
32 CD/USB
correspond to the buttons of the same name on the unit
33 Button SINGLE/CONT same as button CONT./LIST(6); but loading of play lists is only possible on the unit
34 Button TIME same as button TIME / TAG (5); but switching over of the ID3 tag indication is only possible on the unit
35 Buttons SKIP I◀ and ▶I same as the SKIP buttons on the unit to select titles, folders, play lists or partitions; for fast selection keep the respective SKIP button pressed; but they cannot be used in combination with other buttons
36 Buttons SCAN ◀◀ and ▶▶ for fast forward and reverse
1.3 Rear panel (fig. 4)
37 3.5 mm jack REMOTE for the remote control of the function Start/Pause from a mixer (fader start)
38 Analog audio output LINE OUT with line level (RCA, L left / R right)
39 Digital audio output DIGITAL OUT (RCA)
40 Mains cable for connection to a socket (230V/50Hz)
2 Safety Notes
This unit corresponds to all relevant directives of the EU and is therefore marked with €€
WARNING

The unit is supplied with hazardous mains voltage. Leave servicing to skilled personnel only! Inexpert handling may result in an electric shock.
- Caution! Never look into the CD compartment when the CD tray is open; laser beams may be emitted causing eye damage.
- The unit is suitable for indoor use only. Protect it against dripping water, splash water and high air humidity. The admissible ambient temperature range is 0–40°C.
- Do not place any vessel filled with liquid on the unit, e.g. a drinking glass.
-
Immediately disconnect the mains plug from the socket
-
if there is visible damage to the unit or to the mains cable,
-
if a defect might have occurred after the unit was dropped or suffered a similar accident,
-
if malfunctions occur.
In any case the unit must be repaired by skilled personnel.
- A damaged mains cable must be replaced by skilled personnel only.
- Never pull the mains cable to disconnect the mains plug from the socket; always seize the plug.
- No guarantee claims for the unit and no liability for any resulting personal damage or material damage will be accepted if the unit is used for other purposes than originally intended, if it is not correctly connected or operated, or not repaired in an expert way. Likewise, no liability will be accepted for data loss caused by operating errors or by a defect and for any consequential damage of this data loss.
● Important for U. K. Customers!
The wires in this mains lead are coloured in accord ance with the following code:
blue = neutral brown = live
As the colours of the wires in the mains lead of this appliance may not correspond with the coloured markings identifying the terminals in your plug, proceed as follows:
- The wire which is coloured blue must be connected to the terminal which is marked with the letter N or coloured black.
- The wire which is coloured brown must be connected to the terminal which is marked with the letter L or coloured red.

If the unit is to be put out of operation definitively, take it to a local recycling plant for a disposal which is not harmful to the environment.
3 Applications
The CD / MP3 player CD-196USB has been specially designed for professional DJ applications. Many functional features have precisely been matched to this range of application, e. g. single title replay, automatic beat counter, change of speed without displacing the pitch, anti-shock memory.
The CD-196USB allows to replay standard audio CDs, audio CDs you have burnt yourself (CD-R) and CDs with titles in MP3 format. However, problems in replaying rewritable CDs (CD-RW) may occur depending on the CD type, the CD burner, and the burning software used.
Via the USB port, also MP3 files from a hard disk or USB memory stick can be replayed. The multi-partition support of the player allows connection of hard disks of different formatting (FAT16/FAT32, NTFS, HFS+).
Note: Due to the large number of storage device manufacturers and device drivers, it cannot be guaranteed that all storage media are compatible with the CD-196USB.
4 Setting up and Connecting the Unit
The CD / MP3 player can be set up as a tabletop unit on an even, horizontal surface or be mounted into a rack (482 mm / 19"). For rack installation, 2 rack spaces (1 rack space = 44.45 mm) are required.
Prior to connecting units or changing any connections, switch off the player and the units to be connected.
1) If a digital input is provided at your mixer or amplifier, connect it to the yellow RCA jack DIGITAL OUT (39).
For units without digital input connect the stereo output LINE OUT (38) – left channel L and right channel R – via the provided cable with RCA plugs to a line input (possible lettering of the input: LINE IN, AUX IN, CD).
2) The player can be started and set to pause via a mixer with fader start function. For this purpose, connect the jack REMOTE (37) via a cable with 3.5 mm plugs to the corresponding jack of the mixer. Set the player to the type of fader start of the mixer, chapter 5.13.
3) Finally connect the plug of the mains cable (40) to a mains socket (230 V/ 50 Hz).
5 Operation
Switch on the unit with the POWER switch (12). The display shortly shows "boot" (starting procedure) and WELCOME. Each time the unit is switched on, the CD player mechanism is automatically selected. If there is no CD in the player mechanism, the unit changes to the USB port. If no USB storage medium has been connected, "no dISC" (no CD) is displayed.
Switch off the unit with the POWER switch after operation. The following adjustments remain stored for the next operation:
– the operating mode selected chapter 5.4
– the playing time indication selected chapter 5.3
- the speed adjusting range selected chapter 5.9
The unit can be operated via the buttons on the unit or via the remote control. Chapter 5 only refers to the operation via the buttons on the unit. Chapter 6 includes all information about the remote control.
5.1 Replaying music pieces
1) To insert a CD, open the CD tray (1) with the button ▲3). Insert the CD with the lettering facing upwards and close the CD tray with the button ▲.
Additionally or alternatively, a USB memory stick can be inserted into the USB port (2) or a hard disk (if required, with a power supply of its own) can be connected to the USB port.
2) To switch over between CD and USB storage medium, press the button CD / USB (13). For this purpose, the player must be set to pause; if required, press the button ▶II (19). The selected data carrier is shown on the display: "CD" or "USB" (J).
3) After reading in a data carrier, the player is set to pause at the first title. The display shows the number of the title (MP3 mode: the number of the title in the folder) under the indication "TRACK" (A) and the total number of the titles (MP3 mode: the total number of the titles in the folder) under the indication "Total" (M).
If several partitions are provided on a hard disk, proceed as follows to select another partition:
a) Keep the button FOLDER (4) pressed until the time indication (O) of the display goes to "PA-SEL". The text line (N) shows the name of the present partition.
b) Select the partition with the button ◆ or ▶ (18). If one of the buttons is kept pressed, the partitions can quickly be selected with the jog wheel (16).
c) To confirm, press the button FOLDER.
Note about partitions with several folders: If the partition is not changed after calling the partition selection mode but the present partition is confirmed with the button FOLDER, the display shows "FO-SEL", the insertion "FOLDER" (A) and the number of the folders (M). If now one of the SKIP buttons (18) is pressed, the player changes to the folder selection mode and the desired folder can be selected step 4.
4) If for MP3 mode the titles are sorted into different folders, proceed as follows to select another folder:
a) Press the button FOLDER (4). The time indication (O) goes to "FO-SEL". The display field (A) changes from "TRACK" to "FOLDER" and now shows the number of the present folder. The display field (M) shows the total number of the folders.
b) Select the folder with the button ◀ or ▶. If one of the buttons is kept pressed, the folders can quickly be selected with the jog wheel (16).
c) To confirm the selection, press the button FOLDER; the display changes to the indication of the playing time (O) and the indication "TRACK" (A).
5) To start the first title, press the button ▶II (19). During the replay, ▶(B) is shown and the LED above the button lights up constantly. The replay can be interrupted at any time and continued with the button ▶II. In the pause mode the LED above the button flashes.
To select another title, use the buttons I◀ and ▶I(18):
Button ▶I : To go to the next title
Button ◀: To go to the beginning of the title presently playing. Each time the button is pressed, the unit always goes back one title.
If one of the buttons is kept pressed, the titles can quickly be selected with the jog wheel (16).
6) During replay of a CD the CD tray is locked. To change a CD, first set the unit to pause with the button ▶II, then press the button ▲ to open the tray.
During replay of a USB storage medium the CD tray can, however, be opened.
7) To switch off the unit, always close the CD tray with the button ▲ to protect the laser system against impurities.
5.2 Loading play lists
To replay a certain selection of MP3 files, it is possible to load play lists with the file extension "wpl", "xml" or "m3u" created on a computer into the player.
Important: The play list and the corresponding MP3 files must be on the same storage medium. The play lists must always be stored in the root directory.
1) The player must be set to pause; if required, press the button ▶II (19).
2) Keep the button CONT./LIST (6) pressed and select with the button I◀ or ▶I (18) which play list file format is searched for. The text line (N) shows the selection: "M3U Scan", "WPL Scan", "XML Scan" (When selecting the fourth option "Folder", no play list will be loaded).
After releasing the buttons, the first play list is loaded. The display shows the number of the title in the play list under the indication "TRACK" (A) and the total number of the titles in the play list under the indication "Total" (M).
Note: If no play lists are found, the display shows "no FILE". Then keep the button CONT. / LIST pressed and select with the button ◀ or ▶ either another file format or the option "Folder" to return to the folder replay mode.
3) If several play lists are available, proceed as follows to select another play list:
a) Press the button FOLDER (4). The time indication (O) goes to "FO-SEL". The display field (A) changes from "TRACK" to "FOLDER" and now shows the number of the present play list. The display field (M) shows the total number of the play lists in the selected file format.
b) Select the play list with the button ◀ or ►I. If one of the buttons is kept pressed, the play lists can quickly be selected with the jog wheel (16).
c) To confirm the selection, press the button FOLDER. The display changes to the playing time indication (O) and the indication "TRACK" (A).
4) Start the replay of the first title or select another title of the play list chapter 5.1, step 5.
5) To play the titles again without play list, set the unit to pause with the button ▶II. Keep the button CONT. / LIST pressed and press
the button I◀ or ▶I repeatedly until "Folder" appears in the text line. After releasing the buttons, no more play list is loaded.
5.3 Indication of the title information, playing time and BPM indication
- Information about the title are indicated in the text line (N):
– for standard audio CDs with CD text: the title name
- for MP3 mode: the file name
The text line can be switched over to the indication of the following information (ID3 tags). For this purpose keep the button TIME / TAG (5) pressed and select with the button ◀ or ▶I (18):
Indication (L)
TITLE = name of title
ALBUM = name of album
ARTIST = name of artist
none = file name
With the button FOLDER (4) it is possible to switch over the text line between the indication of the respective title information and the indication of the name of the folder (or, when a play list is loaded, the name of the play list).
-
The playing time of the title is displayed as a numeric indication (O); the seconds are subdivided in 75 frames. In addition, the bar graph (H) represents the playing time, referred to the duration of the title, graphically by its length (relative time presentation). The last 30 seconds of a title are indicated by the bar graph flashing in its full length, the last 15 seconds are indicated by faster flashing. The playing time indication can be switched over with the button TIME/TAG (5):
-
If "Elapse" (E) is shown, the time already played of the title is indicated.
- If "Total Remain" (F, G) is shown, the remaining time of the entire CD is indicated (not possible for MP3 mode).
-
If "Remain" (G) is shown, the remaining time of the title is indicated.
-
After selecting a title, the beat counter automatically determines the number of beats per minute (BPM). After a short time the number appears in the BPM indication (P). If the beat counter cannot determine a correct value (e.g. for quiet music titles), the value can also be determined manually:
a) Shortly press the button BPM (21) several times to the beat of the music (4 times as a minimum). The number of beats appears and the indication "BPM" flashes to show the manual counting mode.
b) To switch back to the automatic counting mode, keep the button BPM pressed until the indication "BPM" stops flashing.
5.4 Selecting the operating mode
To switch over between single title replay [indication "Single" (C)] and continuous replay [indication "Cont." (D)], press the button CONT./LIST (6).
- For the single title replay the unit is switched to pause after replay of each title.
This mode is especially provided for DJ applications. If this mode has been adjusted, after selecting a title, the player will be set to pause precisely on the spot where the music
starts (mostly not at the time index 0:00:00 but some frames later, e.g. 0:00:15). This spot will be automatically stored as a starting point (Auto Cue point) and shown on the display by the indication "CUE" (K). After starting the title, it is possible to return to this starting point with the button CUE (17). After replaying a title, the unit will be set to pause precisely on the spot where the music of the next title starts. This spot will then be stored as a new starting point.
- For the continuous replay all titles (MP3 mode: all titles of the folder or play list) are played continuously one after the other, i.e. after the last title the first title restarts. While replaying and when selecting titles, no Auto-Cue points are set.
Note: In some cases also in the mode "continuous replay" an Auto-Cue point is set (however, not exactly according to frame at the start of music but at the time index 0:00:00), e.g. after reading in a data carrier.
5.5 Short replay of a title beginning
The button CUE (17) allows the short replay of a title beginning as long as this button is kept pressed. After releasing the button, the unit will return to the title beginning and is set to pause.
1) The player must be set to single title replay: indication "Single" (C). If "Cont." (D) is shown, press the button CONT./LIST (6).
2) Select the title (selection of title and folder or play list 5.1 or 5.2).
3) By keeping the button CUE pressed, shortly replay the title beginning.
4) To replay the title, press the button ▶II (19).
5.6 Fast forward and reverse
For fast forward or reverse of a title, first press the button SEARCH (20). "SEARCH" will be indicated in the text line (N). Turn the jog wheel (16) into the corresponding direction. The forward / reverse speed depends on the turning speed of the wheel.
To switch off the function, press the button SEARCH again (indication "SEARCH" disappears). In the replay mode, the function will automatically be switched off 8 seconds after actuating the wheel the last time.
Note: In the pause mode, the current spot is constantly repeated after fast forward or reverse. To stop the repeat, either press the button CUE (17) shortly twice (new Cue point is set, chapter 5.8) or start the replay with the button ▶II (19).
5.7 Precise selection of a certain spot
A spot in the title can be selected with the precision of 1 frame ( 175 second) if e. g. for starting the replay from a certain spot instead of starting it from the beginning of a title.
1) When the desired spot is roughly reached by replaying the title or by using fast forward / reverse ( chapter 5.6 ), set the unit to pause with the button ▶II (19).
2) Precisely select the spot by turning the jog wheel (16) clockwise and counter-clockwise. For an acoustic check the adjusted spot will be constantly repeated.
3) When the desired spot has been found, shortly press the button CUE (17) twice. Thus, the spot will be stored and repeating will end. The replay can now be started from this point with the button ▶II.
5.8 Return to a certain spot (Cue point)
To be able to quickly go to a certain spot, a starting point (Cue point) can be stored with the button CUE (17). However, in the single title replay mode, this point will be overwritten with the starting point (Auto-Cue point) of the next title when the next title is reached or selected [if required, switch over to total title replay with the button CONT./LIST (6)].
Note: The Cue point stored will be deleted:
- when selecting another folder (or another play list)
– when switching over between CD and USB storage medium - when switching off the unit
1) While replaying, set the unit to pause with the button ▶II(19) when the spot is reached to which the unit is to return later. The LED above the button CUE (17) flashes.
2) If required, use the jog wheel (16) to go to the precise spot ( chapter 5.7). After turning the wheel, the spot is permanently repeated.
3) Press the button CUE. Thus, the spot is memorized as a Cue point. "CUE" (K) is indicated on the display and the LED above the button CUE lights up continuously. To stop the repeated replay of the spot, the button CUE can be pressed again.
4) Restart the replay with the button ▶II.
5) With the button CUE it is now possible to return to the Cue point. After the return, CUE is inserted on the display and the player is set to pause.
6) Start the replay with the button ▶II or keep the button CUE pressed as long as the title is to be played. After releasing the button CUE, the player goes back to the Cue point and is set to pause.
5.9 Changing the speed with or without displacing the pitch
The speed can be changed with the sliding control (11) up to ±100%:
+100% = double speed
-100% = standstill
1) Select the adjusting range with the button PITCH (9). The adjustment selected with the button PITCH is shown via the two LEDs (10) next to the button:
– both LEDs off:
speed control deactivated,
the title is played at standard speed
- LED 8% lights up: speed control activated, adjusting range ±8%
- LED 16% lights up: speed control activated, adjusting range ±16%
- both LEDs light up: speed control activated, adjusting range ±100%
In addition, each time the button PITCH is pressed, the text line (N) shortly shows the selected adjustment: "Pitch 8 %", "Pitch 16 %", "Pitch 100" or "Pitch off".
2) Adjust the speed with the sliding control. The display will show the percentage deviation from the standard speed on the top right (I). The number of beats per minute (P) will change accordingly.
3) When the speed is changed, the pitch will also change proportionally. However, for a
constant pitch, press the button MT (22). The display will show the indication "MT" (R) and the LED next to the button MT lights up. To switch off the function, press the button MT again.
5.10 Pitch Bend – matching the beat between two music pieces
When operating two CD / MP3 players, the beats of two music pieces with the same speed can be synchronized precisely. Thus, the dancing rhythm will not be interrupted when crossfading from one unit to the other.
1) First use the speed control (11) to adapt the speed of the music piece to which crossfading is desired to the speed of the current music piece. For this purpose, set the same number of beats per minute with the sliding control, see indication (P) at the bottom on the right of the display.
2) Synchronize the beats of the music piece to which crossfading is desired to the beats of the current music piece with the buttons PITCH BEND (8): As long as the button + or - is kept pressed, the replay of the title will be by 16 % faster or slower. Thus, the beats will be displaced with respect to the beats of the current music piece.
3) The beats will also be displaced when the jog wheel (16) is turned.
5.11 Effects
5.11.1 Scratch effect
For creating a scratch effect (corresponding to manual turning of a turntable platter) press the button SCRATCH / F. START (15) and turn the jog wheel (16) back and forth accordingly. The text line (N) will show "SCRATCH". To deactivate the function, press the button SCRATCH / F. START once again.
5.11.2 Droning effect
If the function Master Tempo (constant pitch) has been activated [indication "MT" (R) on the display and LED next to the button MT (22) lights up], deactivate it with the button MT. Turn the jog wheel (16) back and forth to increase or decrease the replay speed alternately. This will create a droning effect.
5.11.3 Stutter effect
The Cue point stored with the button CUE (17) ( chapter 5.8) can be used to create a stutter effect: When the button CUE is shortly pressed several times, a stutter effect will be created. The more suitable the Cue point (e.g. start of an instrument or beginning of a word), the more impressive the effect.
5.12 Programming your personal title sequence
The CD / MP3 player offers the possibility to programme an individual sequence of titles with 99 titles as a maximum. With MP3 mode, the titles can be compiled from different folders or play lists. However, different from a play list, the programmed title sequence cannot be called without limitation but will be deleted after switching over to another data carrier or switching off the unit.
5.12.1 Storing and replaying a title sequence
1) If a title is replayed, first set the unit to pause with the button ▶II (19).
2) Switch to the programming mode with the button PROG. (7). The time indication (O) goes to the indication of the first storage location "P-01". The indication "PG" (Q) flashes quickly.
Note: To exit this mode immediately, keep the button PROG. pressed until the display shows the playing time (O) again.
3) Select the first title for the title sequence (selection of title and folder or play list ▶ chapter 5.1 or 5.2).
4) To confirm the title selection, press the button PROG. The next memory location "P-02" is indicated.
5) Repeat the steps 3 and 4 until the title sequence will be complete. If you try to store another title after 99 titles have been stored, the message "FULL" will appear.
6) To replay the title sequence, press the button ▶II. The indication "PG" flashes more slowly. The display shows the number of the title (A) in the title sequence and the total number (M) of the programmed titles.
The titles are replayed depending on the operating mode selected (Chapter 5.4).
7) To return to the standard replaying mode, set the unit to pause with the button ▶II and keep the button PROG. pressed until the indication "PG" stops flashing.
To replay the title sequence once again, set the unit to pause and press the button PROG. so that the indication "PG" flashes again. Then start the title sequence with the button ▶II.
Note: As long as the indication "PG" flashes or lights up constantly, the title sequence can be called. If "PG" is not displayed any more, the title sequence has been deleted.
5.12.2 Checking a title sequence
1) If a title is replayed, first set the unit to pause with the button ▶II (19).
2) If the indication "PG" (Q) flashes now, press the button PROG. (7) once. If the indication "PG" lights up constantly, press the button PROG. twice.
3) Select the storage locations ("P-01" ... "P-99") successively with the button I◀ or ▶I (18). The name of the title stored in each case is indicated in the text line (N).
4) To replay the title sequence, press the button ▶II.
5.12.3 Completing or deleting a title sequence
1) If a title is replayed, first set the unit to pause with the button ▶II (19).
2) If the indication "PG" (Q) flashes, keep the button PROG. (7) pressed until "PG" stops flashing.
3) Shortly press the button PROG. so that "PG" flashes quickly and the time indication (O) is switched over to the indication of the next free storage location "P-...".
4) To delete the complete title sequence, press the button PROG. until the display indicates
the playing time (O) again. To add another title, select the desired title (selection of title and folder or play list chapter 5.1 or 5.2) and confirm with the button PROG. To replay the completed title sequence, press the button ▶II.
5.13 Fader start
The function Start / Pause of the button▶II (19) can be remote-controlled from a mixer with fader start function. The connection to the mixer is described in chapter 4. To adjust the player to the type of fader start of the mixer, keep the button SCRATCH / F.START (15) pressed and select "LOCK", "CUE / PLAY" or "TACT" with the button I◀ or ▶I (18). The adjustment is shown in the text line (N). After releasing the buttons, the selected type of fader start is adjusted.
LOCK = control via an on / off switch
This switch position must be selected for most mixers of the IMG STAGELINE range. By advancing the fader, a switch starting the replay will be closed in the mixer. When the fader is closed, the switch will open and thus set the player to pause.

flowchart
graph LR
    A["REMOTE"] --> B["Switch"]
    B --> C["Mixer"]
    C --> D["Start"]
    C --> E["Pause"]
Fig. 5 Fader start via on / off switch
TACT = control via a momentary pushbutton
When the momentary pushbutton is actuated for the first time by advancing the fader, the replay will start. When the momentary pushbutton is actuated for the second time by closing the fader, the player will be set to pause.

flowchart
graph LR
    A["REMOTE"] --> B["Switch"]
    B --> C["Mixer"]
    C --> D["1. × Start"]
    C --> E["2. × Pause"]
Fig. 6 Fader start via momentary pushbutton
CUE PLAY = control via a pulse
When the fader is advanced, the replay will be started from the title beginning (Auto Cue point chapter 5.4) or from the Cue point set with the button CUE (17) [chapter 5.8] by a short control pulse of the mixer. When the fader is closed, the player will return to this starting point by another control pulse and will be set to pause there.
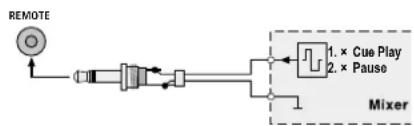
flowchart
graph LR
    A["REMOTE"] --> B["Switch"]
    B --> C["1. x Cue Play"]
    B --> D["2. x Pause"]
    C --> E["Mixer"]
    D --> E
    E --> F["Output"]
Fig. 7 Fader start via control pulse
6 Remote Control
The infrared remote control provided is supplied with a battery inserted. Prior to the first operation, remove the insulating foil from the battery support on the rear side of the remote control.
When pressing a button, always direct the remote control towards the infrared sensor (14) on the unit. There must be no obstacles between remote control and sensor.
The following buttons of the remote control can be used like the buttons on the unit:
OPEN / CLOSE (23) [corresponds to button▲(3)] FOLDER (25)
PITCH BEND (26)
MT (27)
PITCH (28)
PLAY/PAUSE(29)
CUE (30)
PROG. (31)
CD/USB(32)
The buttons SINGLE / CONT (33), TIME (34) and SKIP I◄/►I(35) can be used with limitations like the buttons on the unit CONT. / LIST (6), TIME/TAG (5) and SKIP I◄/►I(18):
- The button SINGLE / CONT can only be used for switching over the operating mode; it is not possible to load play lists.
- The button TIME can only be used for switching over the time indication; it is not possible to switch over the ID3 tag indication.
- The SKIP buttons ◄/▶ of the remote control can be used like the buttons on the unit for selection of titles, folders, play lists and partitions; for fast selection keep the respective button pressed.
However, the buttons cannot be used in combination with other buttons.
The numerical keys (24) and the SCAN buttons ◀◀ and ▶▶ (36) can be used as an alternative to the buttons on the unit:
- The numerical keys can be used instead of the SKIP buttons to select titles, folders, play lists and partitions. The selection is made by the input of the corresponding number. In case of numbers of several digits, press the corresponding numerical keys one after the other, e.g. the buttons "1" and "0" for number 10.
- The SCAN buttons ◀◀ and ▶▶ serve for fast forward and reverse: As long as the respective SCAN button is kept pressed, the title is played forward or backward.
If the remote control is not used for a longer period of time, remove the battery so that the remote control will not be damaged if the battery should leak.
6.1 Battery replacement
If the range of the remote control decreases, the battery must be replaced.
1) Press the locking of the battery support to the left ( 1^st arrow in fig. 8) and at the same time remove the support downwards ( 2^nd arrow).

Fig. 8 Battery replacement
2) Remove the old battery and insert a new one (3V button cell, type CR2025). Ensure that the positive pole of the battery shows upwards in the support.
3) Slide back the support into the remote control.

Used batteries must not be placed in the household waste; always take them to a special waste disposal, e.g. collection container at your retailer.
7 Updating the Firmware
If a new firmware (operating system of the unit) is available on the Internet, the firmware of your unit may be updated:
1) If a firmware update for the CD-196USB is offered on the home page of IMG STAGE-LINE (www.imgstageline.com), download and copy it onto a USB memory stick.
2) Switch off the CD/MP3 player with the power switch (12).
3) Insert the USB memory stick with the new firmware version into the USB port (2).
4) Keep the button PROG. (7) pressed and switch on the unit again. Do not release the button PROG. until "UPdAtE" is shown on the display.
5) After reading in, when "Ready" appears in the text line (N), press the button ▶II (19) to start the firmware update. By means of the bar graph indication (H) and the text line the update can be observed. When "Finish" is shown, the firmware has been updated.
6) Switch off the player and switch it on again.
Attention: The firmware update is made at your own risk. After the update the way of functioning of the unit may be different from that described in this manual.
8 Maintenance of the Unit
Protect the unit from dust, vibrations, humidity and heat. For cleaning only use a dry, soft cloth, never use water or chemicals.
Note concerning sound interruptions and reading errors:
Cigarette smoke and dust will easily penetrate through all openings of the unit and also settle on the optics of the laser sampling system. If this deposit should cause reading errors and sound interruptions, the unit must be cleaned by skilled personnel. This cleaning will be charged, even during the warranty period!
9 Specifications
Frequency range: ..... 20–20 000 Hz
THD:....< 0.1 %
Channel separation: ... > 75 dB
Dynamic range: ..... > 80 dB
S/N ratio: .... > 75 dB
Outputs
LINE OUT: ..... 2V
DIGITAL OUT: ..... 0.5Vpp S/PDIF
USB standard:....2.0
Readable file systems: .. NTFS, FAT, HFS+
Max. number of
partitions:....16
folders: 999 per partition, in 8 levels max.
MP3 files: 999 per folder
Anti-shock memory
standard audio CDs: .. 8s
MP3 files: ..... 10s
Power supply: 230 V/50 Hz
Power consumption: . . . 15 VA
Ambient temperature: . 0–40°C
Dimensions: 482 × 90 × 270 mm (W × H × D), 2 RS (rack spaces)
Weight: 4.4 kg
Connections
USB input: .... type A
analog output: ..... RCA Left/Right
digital output: ..... RCA
fader start: 3.5 mm connector
Subject to technical modification.
CDs audio standards : .8s