
WF2411I - Wi-Fi Router Netis - Free user manual and instructions
Find the device manual for free WF2411I Netis in PDF.
| Product Type | Wireless N Wi-Fi Router |
| Brand | Netis |
| Model | WF2411I |
| Dimensions (L x W x H) | Approx. 150 x 110 x 30 mm |
| Weight | Approx. 150 g |
| Power Supply | 9V, 0.6A AC adapter (included) |
| Number of LAN Ports | 4 Ethernet 10/100 Mbps ports |
| Number of WAN Ports | 1 Ethernet 10/100 Mbps port |
| Wi-Fi Standard | IEEE 802.11b/g/n |
| Max Wireless Speed | 300 Mbps |
| Frequency | 2.4 GHz |
| Wireless Security | WPA/WPA2, WEP |
| Default Configuration | IP Address: http://netis.cc, SSID: netis_XXXXXXXXX, Password: password |
| Main Functions | Router, Access Point, Repeater (via advanced mode), DHCP, NAT, Parental Control, MAC Clone |
| Maintenance and Cleaning | Clean with a soft dry cloth. Do not use liquid products. |
| Safety | Reset button (DEFAULT) at the back, Admin password changeable |
| Spare Parts and Repairability | Not applicable, device not user-repairable. Contact manufacturer. |
| General Information | Manual available in multiple languages. Compatible with Windows, Mac OS, Linux. |
Frequently Asked Questions - WF2411I Netis
User questions about WF2411I Netis
0 question about this device. Answer the ones you know or ask your own.
Ask a new question about this device
Download the instructions for your Wi-Fi Router in PDF format for free! Find your manual WF2411I - Netis and take your electronic device back in hand. On this page are published all the documents necessary for the use of your device. WF2411I by Netis.
USER MANUAL WF2411I Netis
netis Wireless N Router Quick Installation Guide

CONTENTS
English 1
Espanol 5
Portugues 9
Francais 13
Italiano 17
Deutsch 21
Nederlands 25
Polski 29
Čestina 33
EaAnvikα 37
Pycckn 41
Türkçé 45
Appendix A: Wireless Power Control (Turbo) 49
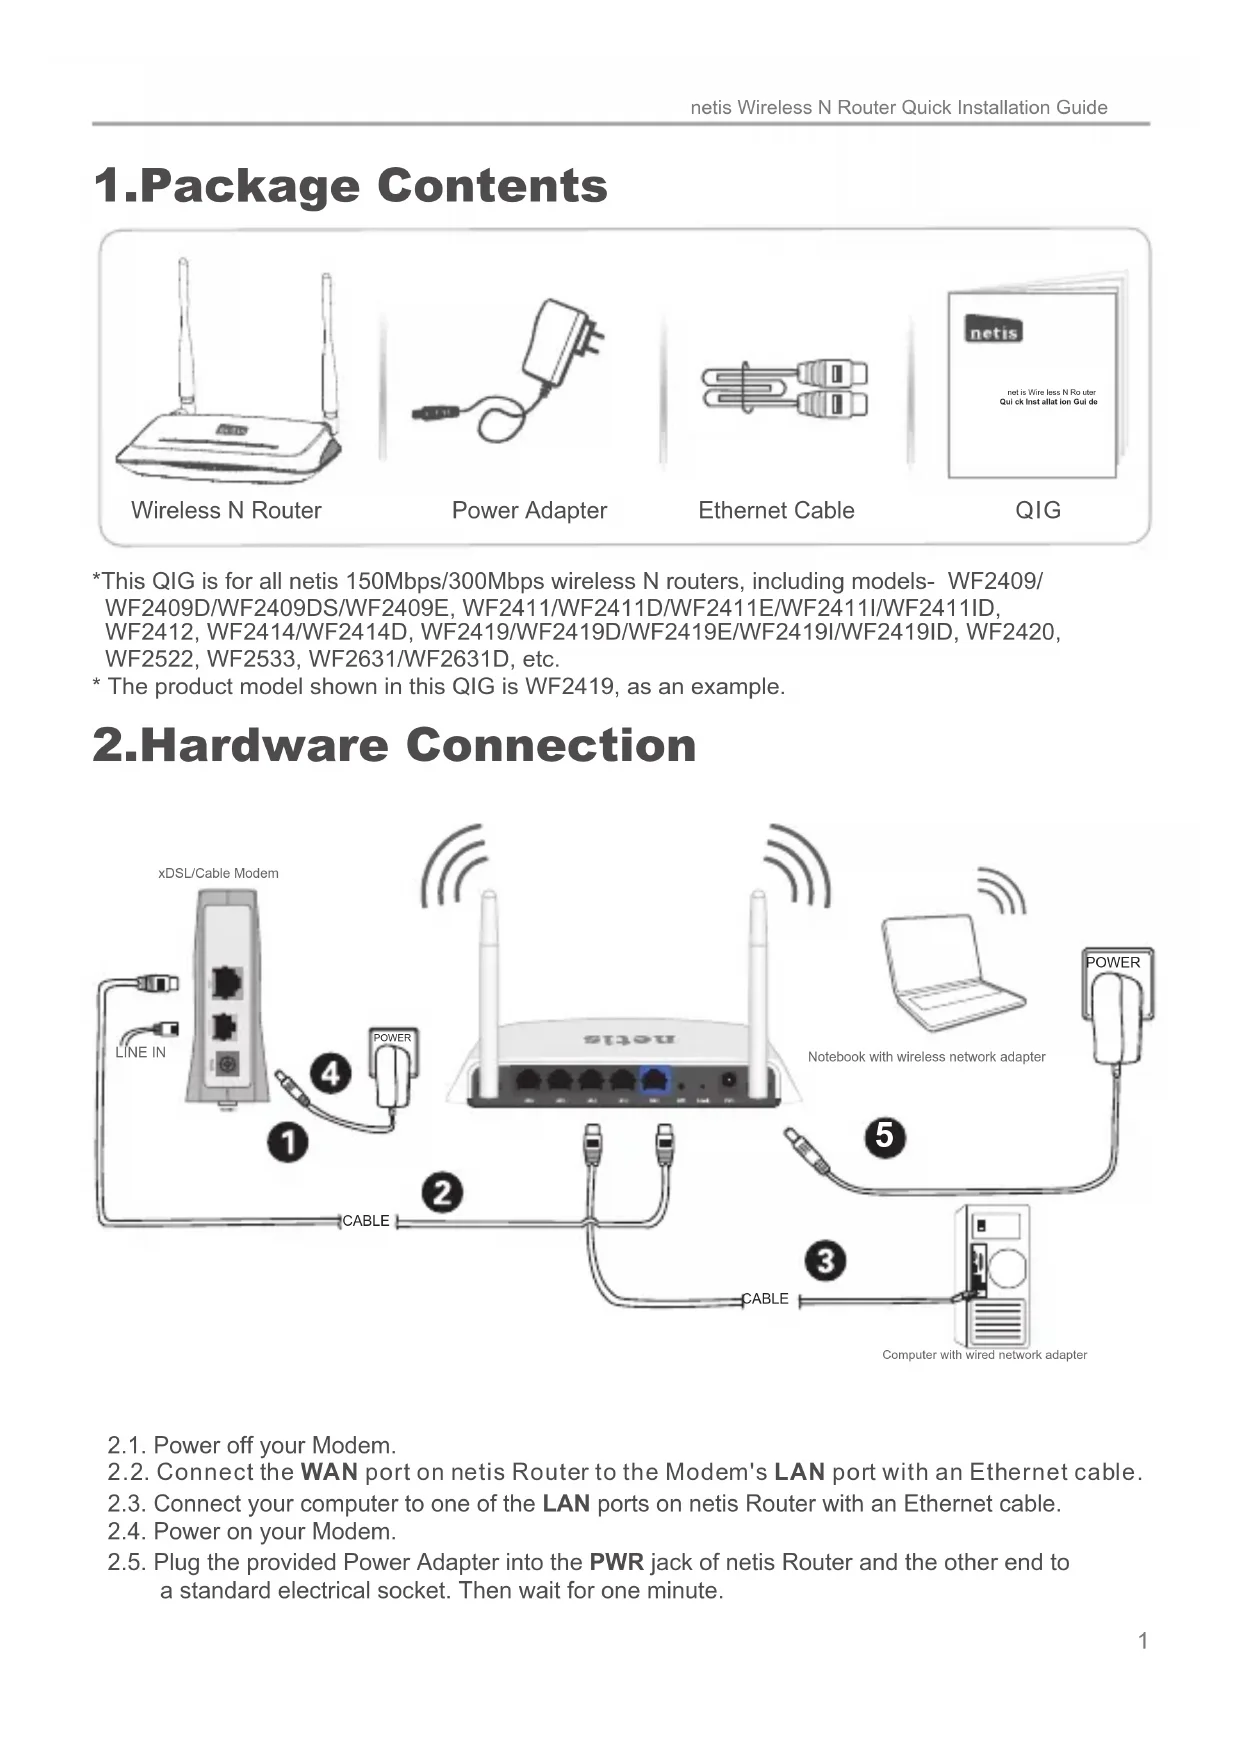
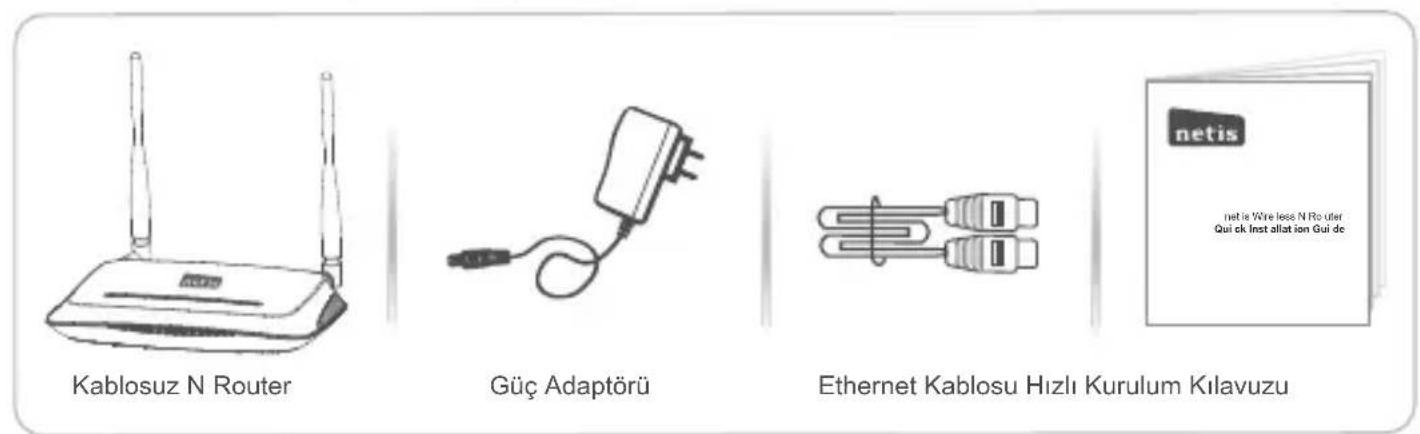
1.Package Contents
*This QIG is for all netis 150Mbps/300Mbps wireless N routers, including models- WF2409/ WF2409D/WF2409DS/WF2409E, WF2411/WF2411D/WF2411E/WF2411I/WF2411ID, WF2412, WF2414/WF2414D, WF2419/WF2419D/WF2419E/WF2419I/WF2419ID, WF2420, WF2522, WF2533, WF2631/WF2631D, etc.
- The product model shown in this QIG is WF2419, as an example.
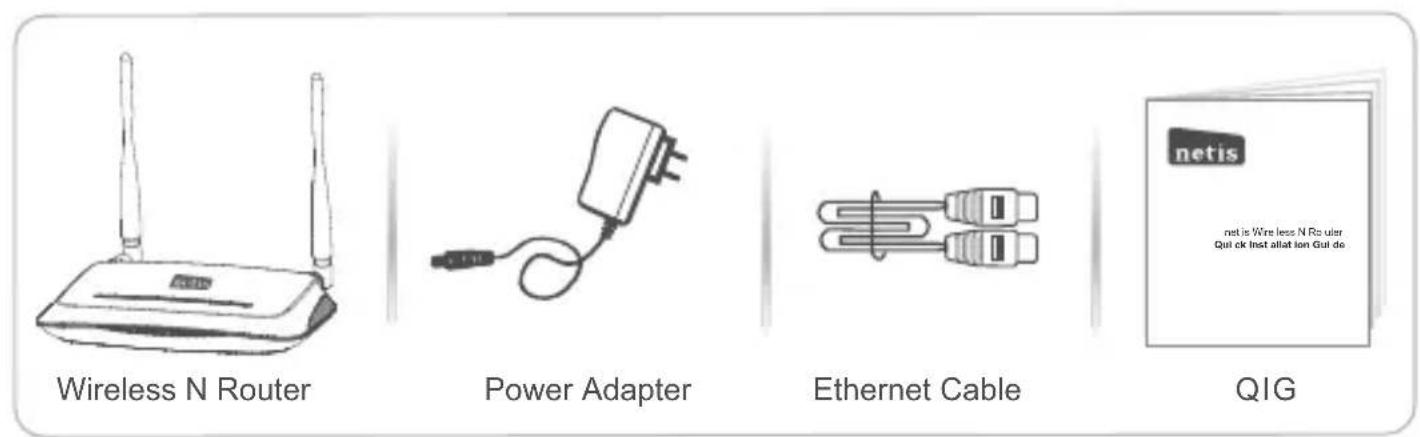
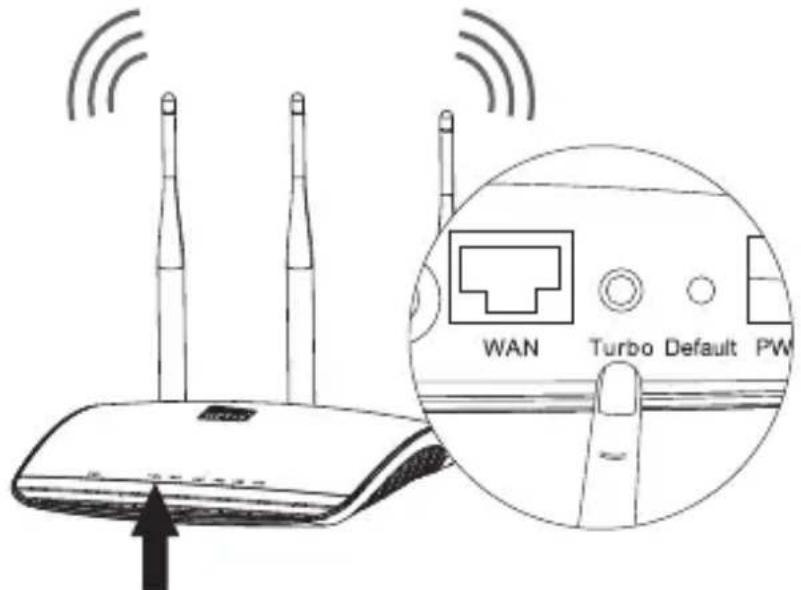
2.Hardware Connection
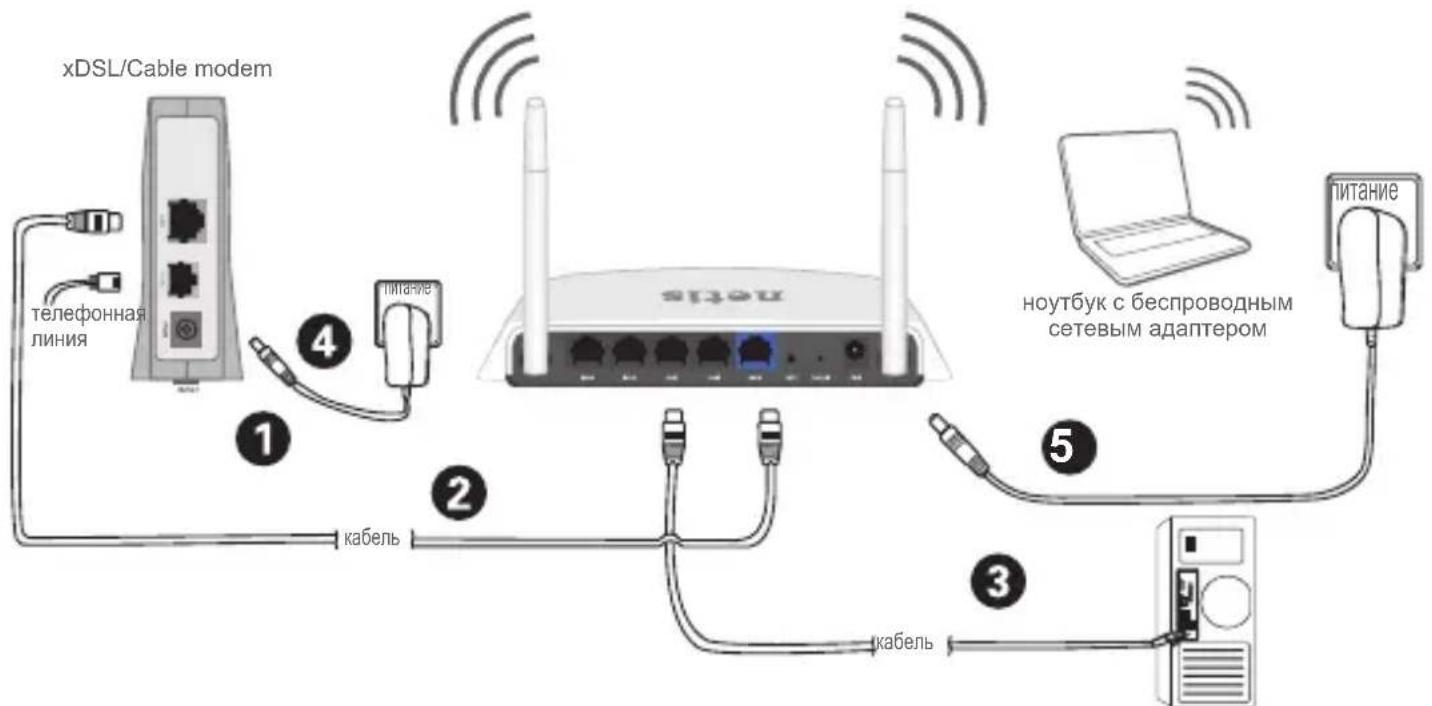
2.1. Power off your Modem.
2.2. Connect the WAN port on netis Router to the Modem's LAN port with an Ethernet cable.
2.3. Connect your computer to one of the LAN ports on netis Router with an Ethernet cable.
2.4. Power on your Modem.
2.5. Plug the provided Power Adapter into the PWR jack of netis Router and the other end to a standard electrical socket. Then wait for one minute.
3.Configure the Router via Web Management Page
3.1. Set the IP address of the wired network adapter on your computer as "Automatic" or "DHCP".
For Windows 8/7/Vista
1) Go to "Settings" (Win 8)/ "Start" (Win 7/Vista)> "Control Panel".
2) Left-click on "Network and Internet" > "Network and Sharing Center" > "Change adapter settings" (Win 8/7)/ "Manage network connections" (Win Vista).
3) Right-click on "Local Area Connection" and left-click on "Properties".
4) Double-click on "Internet Protocol Version 4 (TCP/IPv4)".
5) Select "Obtain an IP address automatically" and "Obtain DNS server address automatically" then left-click on "OK".
For Windows XP/2000
1) Go to "Start"> "Control Panel".
2) Left-click on "Network and Internet Connections" > "Network Connections".
3) Right-click on "Local Area Connection" and left-click on "Properties".
4) Double-click on "Internet Protocol (TCP/IP)".
5) Select "Obtain an IP address automatically" and "Obtain DNS server address automatically" then left-click on "OK".
For MAC OS
1) Click on the "Apple" menu> "System Preferences".
2) Click on the "Network" icon.
3) Click on "Ethernet" in the left side box and click on "Advanced" in the lower right corner.
4) In the top options, select "TCP/IP".
5) In the pull-down menu next to "Configure IPv4", select "Using DHCP".
6) Click "OK" then "Apply".
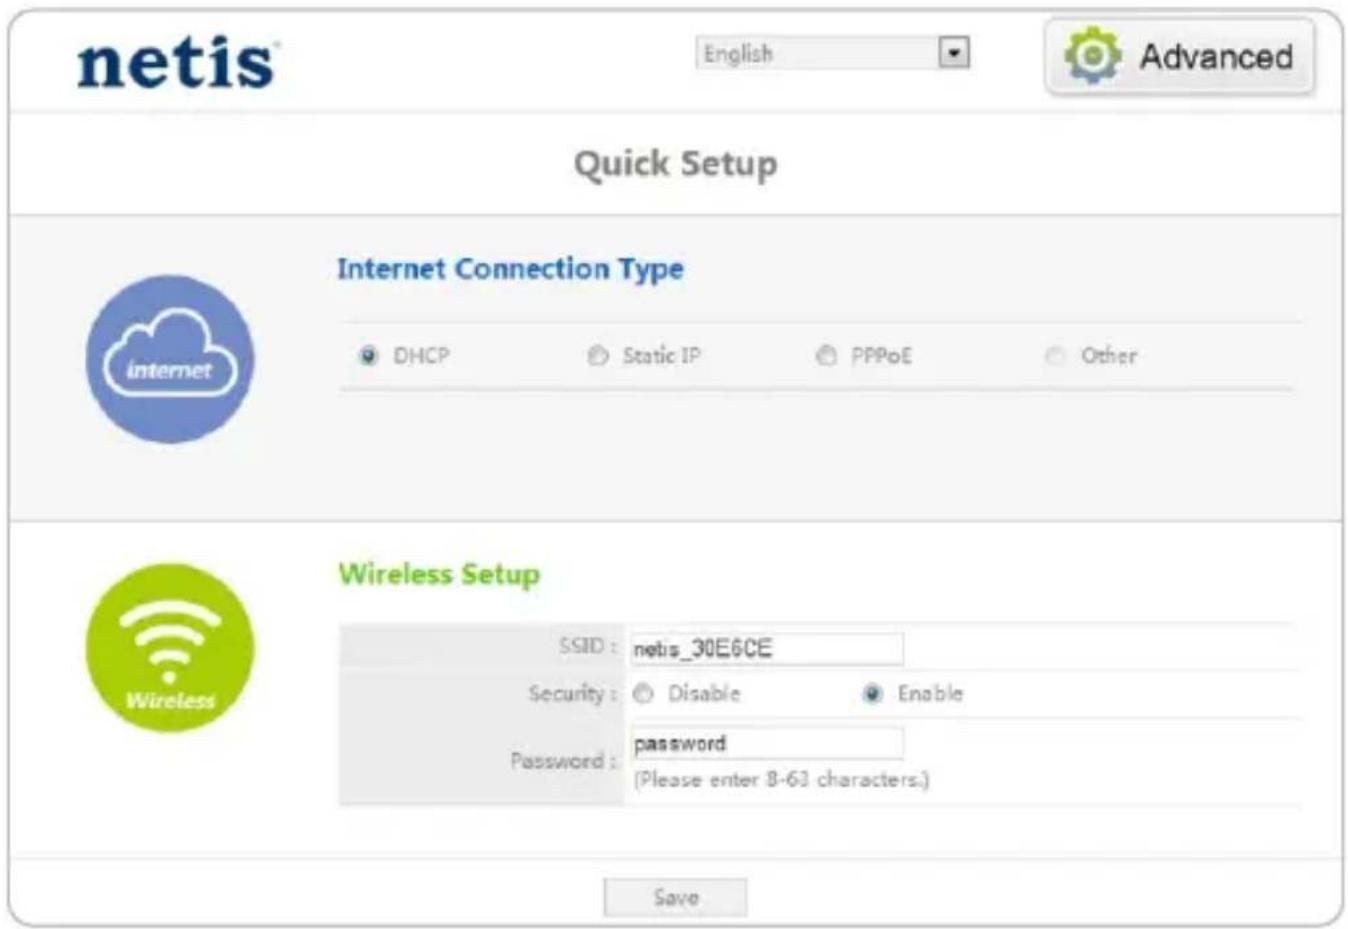
3.2. Open your browser and type in the address field to visit router's http://neti web management page.

http://netis.cc
-
- Select the language as you need on the top box, default is in English.
1) In "Quick Setup" page, select your Internet Connection Type.
If "DHCP (Cable Modem)" is selected, the router will automatically receive the IP parameters from your ISP (Internet Service Provider).
If "Static IP" is selected, please enter the IP Address/Subnet Mask/Default Gateway/DNS Servers given by your ISP.
If "PPPoE" is selected, please enter theUsername and Password given by your ISP.
2) Under Wireless Setup, configure your wireless network name (SSID) and password.
3) Left-click on "Save" to make your settings take effect.
Tip 1:
Default address: http://netis.cc
Default SSID: netis_XXXXXXXXX
Default wireless password: password
(XXXXXXXX: Last 6 digits of LAN MAC Address)
Tip 2:
You can click on Advanced button on the top for other Internet connection types and further settings.
4.Troubleshooting

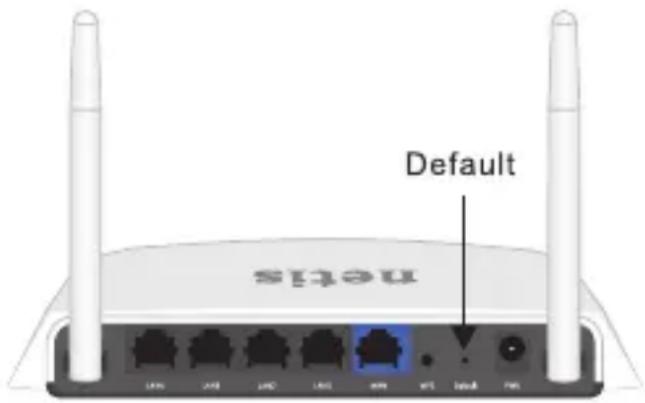
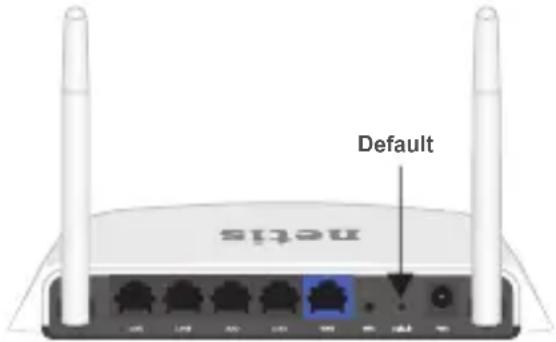
How do I restore my netis Router's configuration to its default settings?

With the router powered on, use a pin to press and hold the Default button on the rear panel for 8 to 10 seconds before releasing it. The router will reboot and all configurations are back to factory default.

What can I do if my Internet cannot be accessed?

1) Check to verify the hardware connections are correct.
Please refer to the "Hardware Connection" step.
2) Login to netis Router's web management page and ensure that you set the correct Internet Connection Type.
For cable modem users, please configure "MAC Clone" additionally.
On the left-side menu, left-click on Advanced > "Network" > "WAN". And in the middle page, left-click on "Advanced" > "MAC Clone" and then "Save" it.
MAC Address: 08:10:76:3a:70:fb
MAC Clone
Default MAC
3) Reboot the modem first and then netis Router. Wait for one minute before you check the Internet again.
4) If Internet access is not available, please connect your computer directly to your modem and try the Internet again. If the Internet is still not working, please contact your ISP for further help.
Technical Support: support@netis-systems.com
NETIS SYSTEMS CO., LTD.
www.netis-systems.com
MADE IN CHINA
Support technique: support@netis-systems.com
NETIS SYSTEMS CO., LTD.
www.netis-systems.com
MADE IN CHINA
*Questa GIR vale per tutti i router wireless N netis 150Mbps/300Mbps, inclusi i modelli WF2409/WF2409D/WF2409DS/WF2409E, WF2411/WF2411D/WF2411E/WF2411I/WF2411ID, WF2412, WF2414/WF2414D, WF2419/WF2419D/WF2419E/WF2419I/WF2419ID, WF2420, WF2522, WF2533, WF2631/WF2631D, ecc.
MAC Address: 08:10:76:3a:70:fb
MAC Clone
Default MAC
- HacToaee pyKoBOcTBo NO 6bIcTpoi yCTaHOBKe ppeHa3NaeHo dIЯ BCex 6ecnpoBOdHbIX
MapuTytn3aToPoB cepn N netis 150 M6nt/c n 300 M6nt/c, BKnIOUaY moJeIi - WF2409/
WF2409D/WF2409DS/WF2409E, WF2411/WF2411D/WF2411E/WF2411I/WF2411ID,
WF2412, WF2414/WF2414D, WF2419/WF2419D/WF2419E/WF2419I/WF2419ID, WF2420,
WF2522, WF2533, WF2631/WF2631D, enz.n T.D..
*B daHOM pyKOBoODCTBe B kauecTbe npimepa paccMaTpnuBaetc moJeIb WF2419.
2.Подключенье
KOMNbIOTeP C NPOBOIDHBIM CTeBbIM aanTepom
2.1.BbIKIOUHTeBaWMODEM
2.2. Coeinnhte nopT WAN ha MapuptyaTope netis c nopTom LAN moema c nOmoIbIO ka6eIa Ethernet.
2.3. CoeHnHe BaW KOMbTope c OdHm n3 LAN nopToB Ha mApwpyTu3aTope netis C nomoubKabEner Ethernet.
2.4. BkIIOUHTe BaW MoDEM
2.5. Поркюне постовсянь радапетер петеня К ра3бему петаня PWR
Mapшрутузатopa netis, a друго erо koheц подсоевине К олектpopo3etke.
Порождente odHy мнHyт.
3. Конфигуразnia mapштунзатopa спомоцью Be6-иNTерфейca
3.1. YctaHOBnTe aDPEC IP cTeBOrO aAnTepa Ha BaWeM KOMNbIOTepe Ha "Automatic" nII "DHCP".
�� Windows 8/7/Vista
1) Перейд范围内 "Hасторк" (Win 8)/"Пуск" (Win 7/Vista)> "Панель управлиения".
2) Haxmte JeBOH KHOKNOMMbIHNHa "Cetb N INHTepHeT"> "UnpaBHeHn CeTAMN O6zIM DOCTyPOM"> "N3MeHeHne napametpoB aAnTepa" (Win 8/7)/ "YnpaBJeHne cTeBbIMn NOdkNoueHnMaM" (Win Vista).
3) Haxmte npaBoi KhoNkoMbluHa "PoiKIOueHne no JokalbHOcTeu" I neBOI KhoNkoMbIuHa CboNCTBa".
4) Haxmte Dba pa3a Ha "PpotoKoI INTepeHeta BepCn 4 (TCP/IPv4)".
5) BbIbepeTte "POnyunTB IP-aDpec aBTomatnueckn" n "POnyunTB aDpeC DNS-cepBepa aBTomatnueckn", 3aTeM hAnMMte JneBOJ KHOKNKoMbluN "OK".
ДиЯ Windows XP/2000
1)Перейд范围内Meну">“Panaheь упраВленя”.
2) Haxmte IeBOH KHOKNOMMbIHNHa "Cetb N INHTepHeT"> "CeteBbIe NOdkNIOUChENr".
3) Haxmte npabOi KhoKoM mbiHn Ha "PoiKIOueHne no IokaIbHOcTn" NJIeBOI KhoKoM mbiHn Ha CBOIcTba".
4) Haxmte Dba pa3a Ha "PpotoKoJ NHTepHeTa (TCP/IP)".
5) BbIbepeTte "POnyunTB IP-aDpec aBTomatnueckn" n "POnyunTB aDpec DNS-cepBepa aBTomatnueckn", 3aTeM haxmTe JeBOJ KHOKNKoMbluN "OK".
1) Ha ctrpaHnue "PykoBoDcTBO no yCTaHOBke" BbIbepnte BaW Tn coeHNHeHnra TnnpoDKnIOy K NHTepHety.
EcnBbIbnpaetcHDP,TO MapuPyTHaTOp aBTOMaTnueckn noLyaaT npametpbIPOT BaWero INTepeHET-npOBAIDepa.
EcnBbIbupaetcra "Ctatnueckn IP", BbldoJIxHbIBBecTn IP-aDpec WAN/
Macka noocTeN/Un0 no ymoJuaHIO/DNS, 3aHaHHbIe Baunm
INHTepHET-npOBAuIdepom.
EcnBbIbIpaetcraPPPoE,BbldoJXHbIBBBeCTNIMMaNoIb3OBaTeJIaMnnoIb3OBaTeJIaNapOJIb NapOJIb, npedocTabJeHHbIe BaIIMnHTepHET-npoBaIdepom.
2) B MeHIO YcTaHOBka 6ecnpoBOIo CBra3n Bbl MoXeTe yCTaHOBNTb HAnMeHOBaHne BaWei 6ecnpoBOHOI cETn (SSID) n napOJIb.
3) Haxmte IeBOH KONKo HA "CoxpaHTb" dIa coxpaHeHnBaunx hAcTpoek.

Cobet 1:
Ampoc no ymoJIaHnIO: http://netis.cc SSID no ymoJIaHnIO: netis_XXXXX
Kak my Mory BOCCTaHOBNTb nepBOHauJIbHbIe HAcTpoIKN Moero MapwpyTu3aTopa netis?
OTBet
IpnBkJIHoueHHOM MapwpyTu3aTope BOCNoJb3yInTeCb OCTpbIM TOHKIM
IpeDMetOM HaxMMte KHOKNy Default Ha 3aDHei NaHeiN B TeueHne 8-10 cekyn. Bydet npOn3BeJeHa nepe3arpy3ka mapwpyTu3aTopa n
Bce HAcTpoKn No yMOJuaHnIO 6yDyT BOCCTaHOBNeHbl.
Bonpo
TOy CnataB B cnyae OTCyTCTBna NOKIOueHnK nHTepHeTy?
OTBet
1)Поверп Te npabnIbHocTb COeINHeHna CpeIcTB TexHnueCKOro o6ecneueHn. O3HaKOBTeCb c nHOpMaUne, yka3aHHoB B rIabe "NoDKnIOUeHne".
2) BoiDnte Ha Be6-CTpaHnCy ynpaBHeHna MapwpyTu3aTopom netis n y6eIInTeCb, YTO Bbl yka3aII npabNlbHbI TIN NOkIIOUcHnra. Iprn IcNoIb3OBaHnKabeJIbHO rO MoEma Heo6xOdIMO dONOLHTeJbHO BblONHtB HAcTPOkN "Kloh MAC".
B JIeBOJ YacTn MeHIO HaxMITE JIeBOJ KHOJKOJ MbluHa >“Cetb”>“WAN”.Jaanee HaxMITE JIeBOJ KHOJKOJ MbluHa

Advanced
"PacunpeHbIe">Knoh MAC" n 3aTeM Ha "CoxpaHtB" dIra coXpaHEnn.
MAC-aApec:08:10:76:3a:70:fb
KIOH MAC
MAC no ymonu.
3)Вначаile Bылолиte nepe3arpy3ky moDEma nnotom -MapspTy3aTopa netis.перд nobToPnoHoi npOBepkoi coeINHeHnI INTepeHeta noDoxdnte OndHy MInHyTu.
4) Ecni Het doctyna B nHTepHeT, coeHnHte BaW KOMnbIOTep HnnpMyo C moDemom N nonpo6yIte NOdkJIHOHTbcra K nHTepHety eue pa3. Ecni nocne 3toro cBra3n C nHTepHeTom He 6yJeT, o6paTntEc b 3a nomoubIO K BaWeMy nHTepHeT-npObaIdepy.
Texhnueckaj podepkka: support@netis-systems.com
NETIS SYSTEMS CO., LTD.
www.netis-systems.com
CDEJIAHOBKNTAE
1.Paket icerişi
- Bu Hizli Kurulum Kilavuzu, WF2409/WF2409D/WF2409DS/WF2409E, WF2411/WF2411D/ WF2411E/WF2411I/WF2411ID, WF2412, WF2414/WF2414D, WF2419/WF2419D/WF2419E/ WF2419I/WF2419ID, WF2420, WF2522, WF2533, WF2631/WF2631D, enz.vb. modeller de dahil olmak üzere:tüm netis.
Appendix A: Wireless Power Control (For WF2522, WF2533)
WF2522 and WF2533 are both wireless high power routers. In default, they work in normal power mode. You may change it into high power mode to improve the signal strength.
Before you change the settings, please check the color of the Turbo LED on your router. Blue - Normal Power Mode Red - High Power Mode
There're two methods to change the wireless power for your router.
Method 1: Through Turbo Button (Particularly recommended)
Turbo LED
Press the Turbo Button, then the Turbo LED color will change from blue to red. Now the router will work in the high power mode with perfect wireless performance in penetrating walls and eliminating the Wi-Fi dead zones.
Method 2: Through Web Management Page

Wireless Signal
Signal Strength:
Normal
Enhanced
1) In "Quick Setup" > "Wireless Signal" page, select "Enhanced" as the Signal Strength.
2) Click on "Save" to make your settings take effect.
Now the router will work in the high power mode with perfect wireless performance in penetrating walls and eliminating the Wi-Fi dead zones.
Note: The Quick Setup is just for the default wireless mode (Access Point). For the other modes (WISP, Repeater, AP+WDS, WDS, Client), you can click on Advanced > "Wireless" > "Signal Strength" to change the strength mode, then "Save" it.