
SM1 - Steam cleaner AENO - Free user manual and instructions
Find the device manual for free SM1 AENO in PDF.
| Product type | Steam cleaner |
| Brand | AENO |
| Model | SM1 |
| Power supply | 230 V AC, 50/60 Hz |
| Nominal power | 1000 W |
| Water tank capacity | 380 ml |
| Maximum runtime | 34 minutes |
| Water flow rate | 17 ml/min |
| Steam pressure | 3 bar |
| Steam temperature | 110 °C |
| Heat-up time | 17 seconds |
| Dry-running protection | Yes |
| Operating conditions | -5 °C to +40 °C |
| Dimensions (L × W × H) | 251 × 146 × 1130 mm |
| Included accessories | Brush set (plastic, metal, round, two-in-one, main), covers (large for floor, small for carpet), carpet nozzle, extension tube, extension hose, wall mount, shoulder strap |
| Warranty | 2 years |
| Manufacturer | ASBISc Enterprises PLC, Cyprus |
| Origin | Made in China |
Frequently Asked Questions - SM1 AENO
User questions about SM1 AENO
0 question about this device. Answer the ones you know or ask your own.
Ask a new question about this device
Download the instructions for your Steam cleaner in PDF format for free! Find your manual SM1 - AENO and take your electronic device back in hand. On this page are published all the documents necessary for the use of your device. SM1 by AENO.
USER MANUAL SM1 AENO
natural_image
Technical line drawing of two vertical cylindrical mechanical components with mounting bases (no text or symbols)User Manual
Steam Mop
SM1
(Model: ASM0001)
15.04.2022 | v 1.0.6
EN....7
RU....17
AR.... 16
BG....19
CS 24
DE.... 28
ET 33
FR 37
HR 42
HU.... 46
HY....50
IT.... 54
KA....58
KK....63
LT 68
LV....72
PL 76
RO....8
SK 85
SR....89
UK 93
UZ 98
ZH....103
3 aeno.com/documents

a)
5 aeno.com/documents
b)
d)


EN The AENO SM1 Steam Mop is a domestic appliance designed for wet cleaning of rooms, i.e. degreasing and dust removal from floors, tables, window sills, carpets and other similar surfaces.
Specifications
Input voltage: 230 V AC, 50/60 Hz. Rated power: 1000 W. Water tank capacity: 380ml. Operating time (Full water tank): up to 34 min. Water consumption: up to 17 ml/min. Steam pressure: up to 3 bar. Steam temperature: about +110 °C. Heating time: about 17 sec. Drying protection: Available. Operating conditions: -5 °C to +40 °C. Dimensions (L×W×H): 251 mm × 146 mm × 1130 mm.
Package Contents
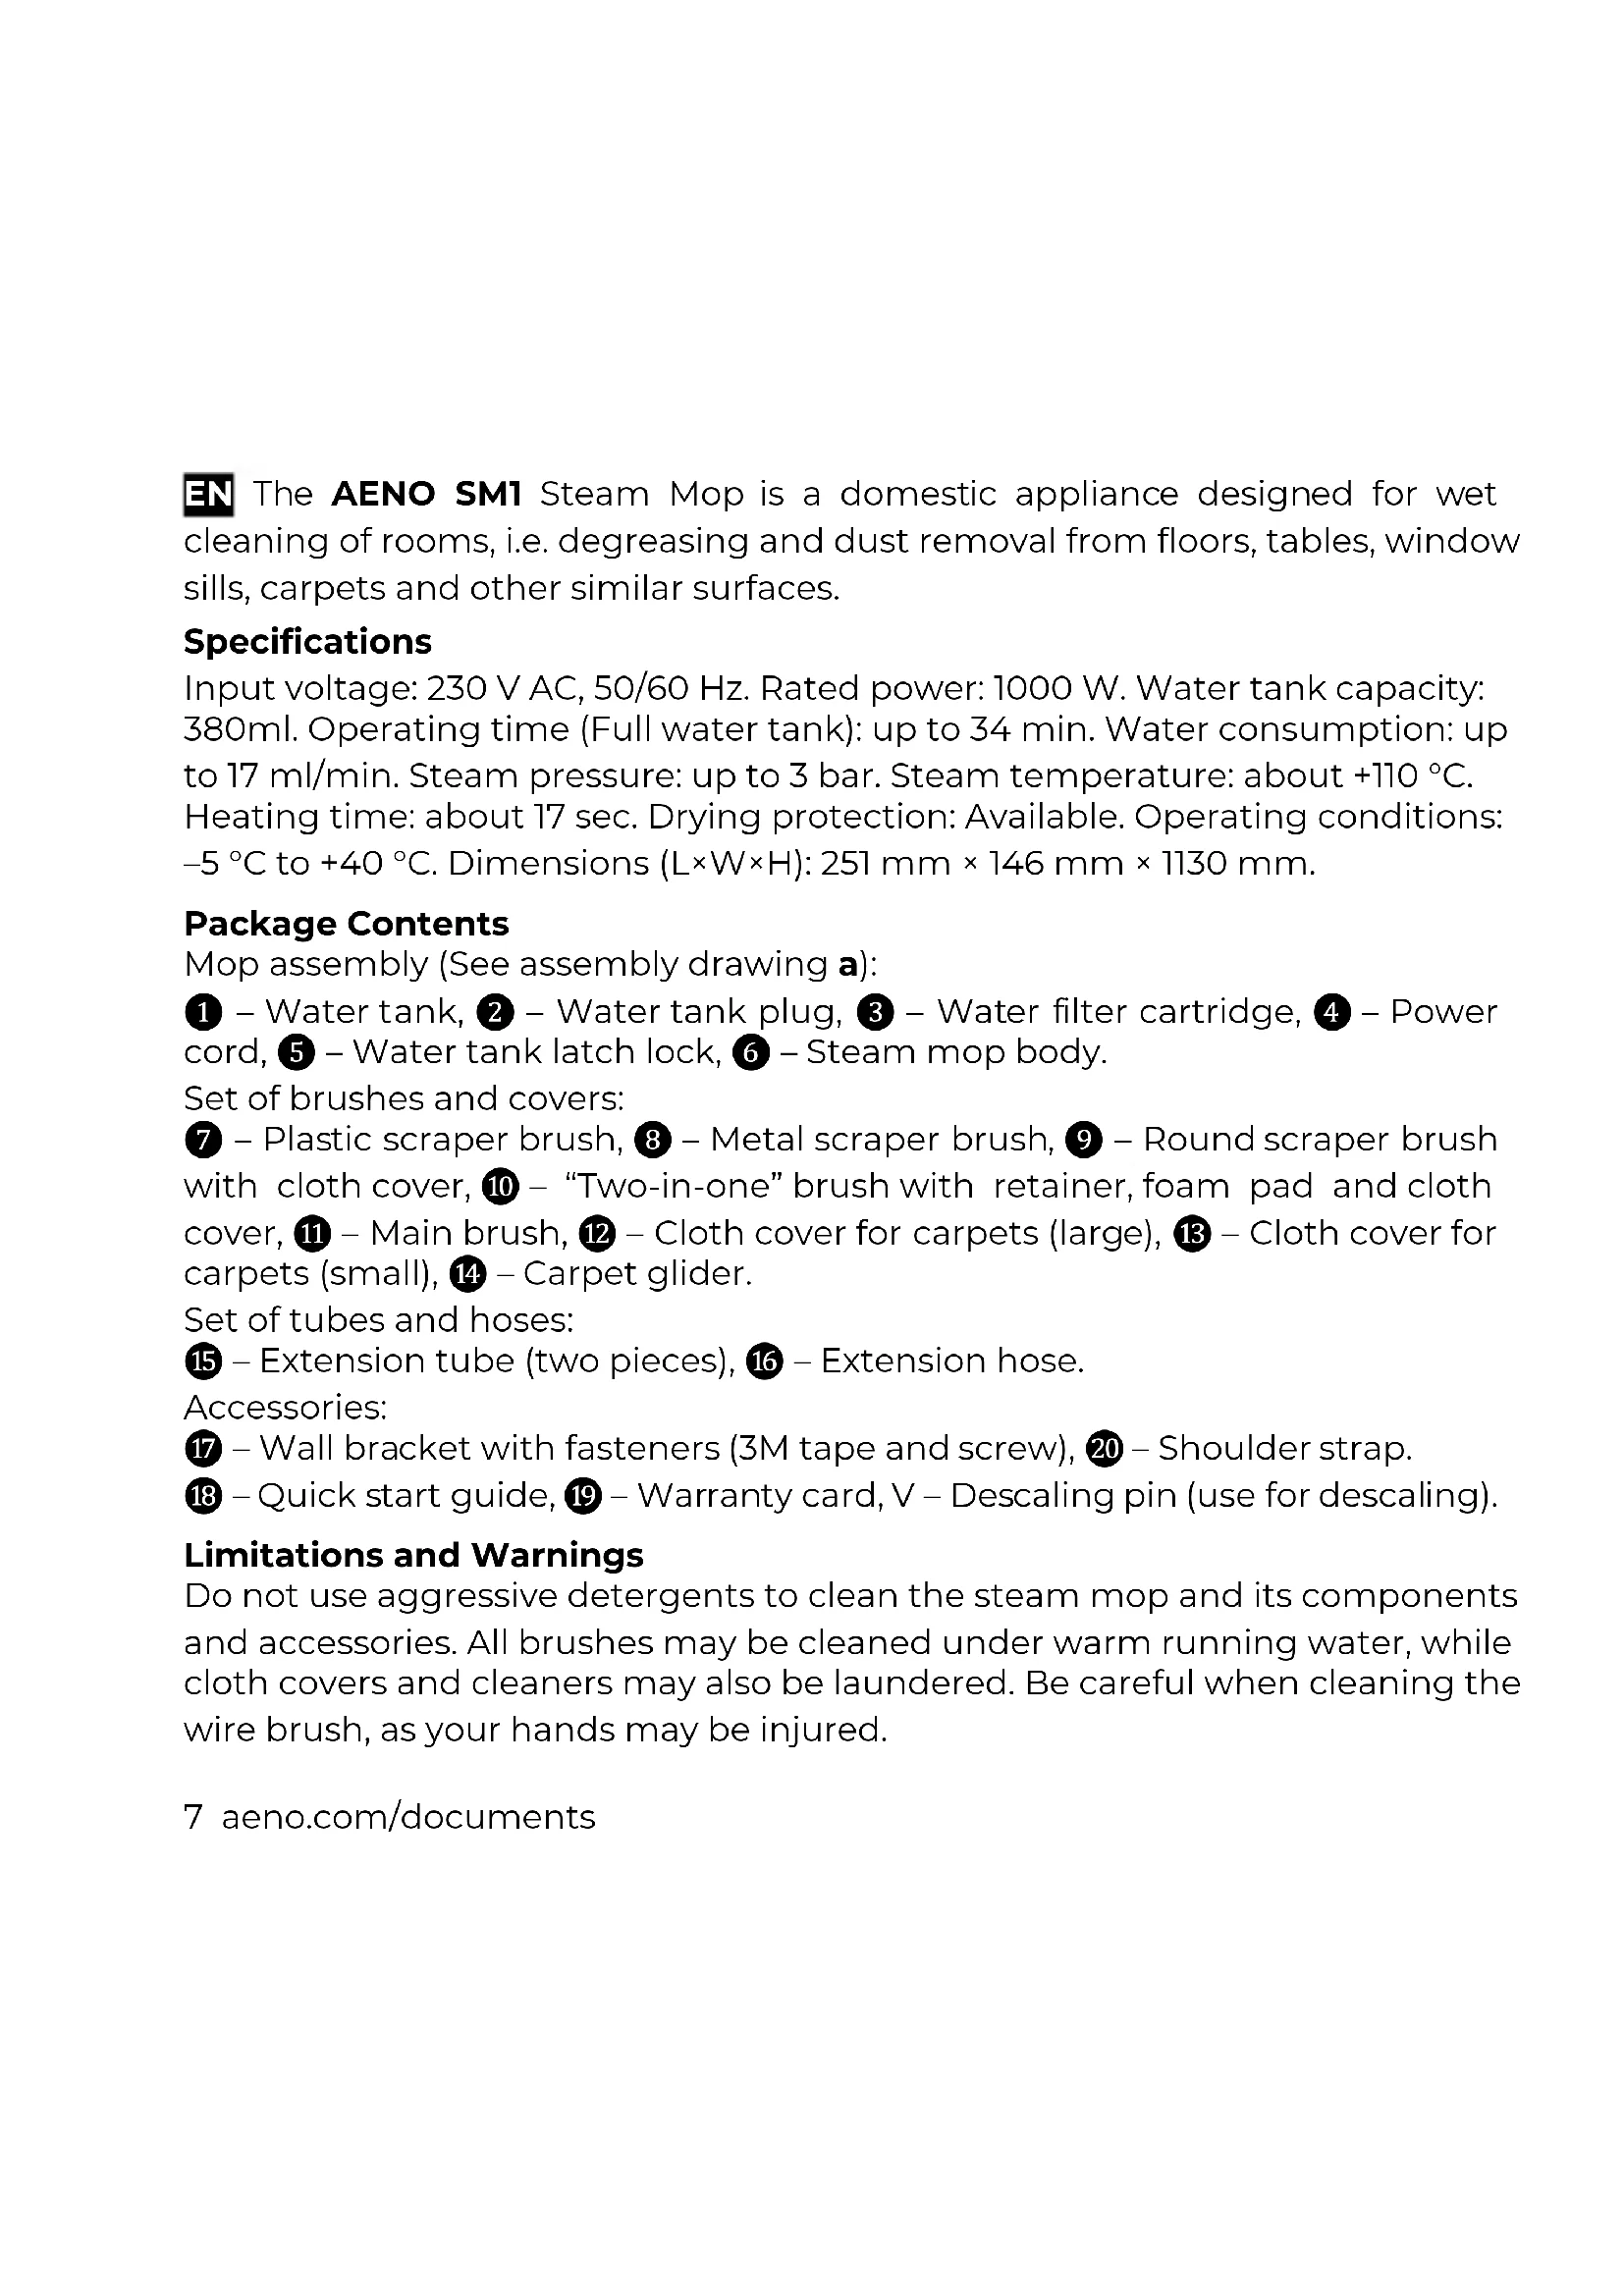
Mop assembly (See assembly drawing a):
① – Water tank, ② – Water tank plug, ③ – Water filter cartridge, ④ – Power cord, ⑤ – Water tank latch lock, ⑥ – Steam mop body.
Set of brushes and covers:
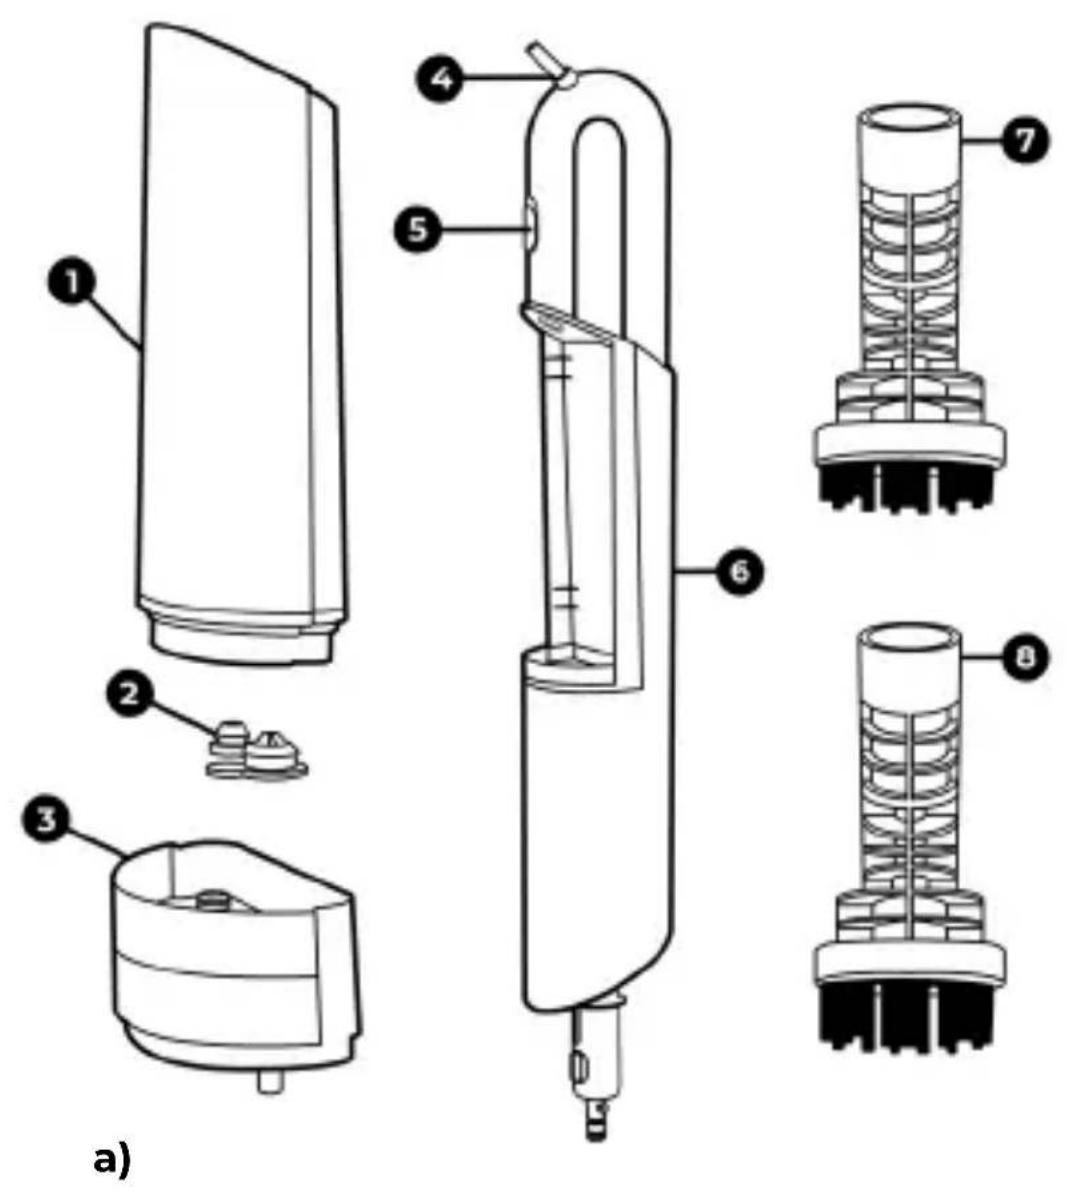
⑦ – Plastic scraper brush, ⑧ – Metal scraper brush, ⑨ – Round scraper brush with cloth cover, ⑩ – “Two-in-one” brush with retainer, foam pad and cloth cover, ⑪ – Main brush, ⑫ – Cloth cover for carpets (large), ⑬ – Cloth cover for carpets (small), ⑭ – Carpet glider.
Set of tubes and hoses:
15 – Extension tube (two pieces), 16 – Extension hose.
Accessories:
17 – Wall bracket with fasteners (3M tape and screw), 20 – Shoulder strap.
18 – Quick start guide, 19 – Warranty card, V – Descaling pin (use for descaling).
Limitations and Warnings
Do not use aggressive detergents to clean the steam mop and its components and accessories. All brushes may be cleaned under warm running water, while cloth covers and cleaners may also be laundered. Be careful when cleaning the wire brush, as your hands may be injured.
7 aeno.com/documents
Make sure the voltage of the power source is within the ranges specified in the steam mop specifications. You shall disconnect the steam mop from the source of power before carrying out any cleaning procedures. Please note that you should pull on the plastic part of the plug other than on the power cord when disconnecting the device from the power source. Do not immerse the steam mop in water or place it near a heater in order to avoid risk of fire. Do not use the steam mop in the case of any damage to its casing, or unusual noises or cracks, or when the power cord is damaged. Do not use a mop to clean insufficient surfaces where the heat resistance is below +100°C. To avoid injuries and burns, do not spray hot steam towards people and animals. Never disassemble the mop on your own. Do not use the mop outdoors.
Assembly and Operation
-
Unpack the mop and all the accessories. Remove the water tank ① from the steam mop body ⑥ and fill it with water (See assembly drawing b). To do this, pull the water tank latch lock ⑤ up, remove the tank and turn it upside down, and then remove the water tank plug ② by pulling its lug. Fill in the water tank to at least 2/3 of its capacity, then tighten the plug ② and re-install the water tank into the steam mop body ⑥.
-
Assemble the two pieces of the extension tube 15 and insert the assembled tube in the steam mop body 6 (See assembly drawing c).
-
Floors and carpets shall be cleaned up with different brushes and cloth covers as follows:
a. For floor cleaning, the large cloth cover 13 shall be attached to the black sticky surface of the main brush 11 with its lug back;
b. For carpet cleaning, attach the small cloth cover 12 and install the carpet cleaner 14 on the main brush 11. Both the cloth cover and the carpet cleaner lugs should be facing backwords (against the brush stroke).
-
Attach the main brush 11 to the assembled extension tube 15. You may use the extension hose instead of the tube, as well as the additional brushes 7, 8, 9 or 10 instead of the main brush.
-
Plug in the power cord of the steam mop into the mains socket to get started. The power cord 4 is rigidly integrated into the mop body.
-
Please note the indicator statuses (See figure d). The indicator will start flashing red upon plugging in the plug. To start operation, press and hold the indicator for at least 2 seconds – it will turn blue. Steam will start to come out after 17 seconds of operation. To stop the steam, press and hold the indicator for at least 2 seconds – it will turn red. When the indicator is orange, it means that the steam is at its maximum. To switch to normal steam mode, press the indicator – it will turn white. The indicator shows the current steam temperature.
-
When the cleaning process is finished, you should disconnect the mop from the source of power and put it upright into the wall bracket. Please make sure that the mop handle is properly installed in the bracket holder. The wall bracket shall be mounted using the screw and the dowel or the 3M tape that is within the package content. In the case of a regular use of the mop, you can also store it horizontally and unassembled. In this case, it is necessary to drain the water from the tank.
Troubleshooting
-
Steam is not generated. Possible reasons: The water tank is not installed or incorrectly installed in the mop, or there is no water in the tank. Solution: Install the water tank correctly, or fill in the tank with water.
-
The display shows the message E1, a beep is heard, no steam comes out. Possible reasons: The gravity sensor (ball on the cord) is not immersed in water, or there is not enough water in the tank, or the temperature is too high, or the drying protection has triggered. Solution: Switch off the mop, or
9 aeno.com/documents
disconnect the plug from the mains socket, or remove the tank and fill it in with water. Make sure the gravity sensor is submerged in water.
- The display shows the message E2, a beep is heard. Solution: Switch off the steam mop and contact the service center for repair.
ATTENTION! If your problem persists, please contact your local supplier or the service center for support. Please do not disassemble the device or try to repair it on your own.
Recycling information
natural_image
Simple line drawing of a trash bin with crossed lines indicating no text or symbols (no text or labels)The symbol indicates that you must follow the Waste Electrical and Electronic Equipment (WEEE) and Waste Battery and Battery Regulations when disposing of the device, its batteries and accumulators, and its electrical and electronic accessories. According to the rules, this equipment must be disposed of separately at the end of its service life.
Do not dispose of the device, its batteries and accumulators, or
its electrical and electronic accessories together with unsorted municipal waste, as this will harm the environment.
To dispose of this equipment, it must be returned to the point of sale or turned in to a local recycling facility.
You should contact your local household waste disposal service for details.
The warranty period and service life shall be 2 years as from the date of purchase of the device. Manufacturer: ASBISc Enterprises PLC, 43 Kolonakiou Street, Diamond Court, Ayios Athanasios, 4103 Limassol, Cyprus. Made in China.
For current information and details on the device description and specification, as well as connection process, certificates, warranty and quality issues, see relevant Installation and Operation Manuals available for downloading ataeno.com/documents. All trademarks and names herein are the property of their respective owners.
aeno.com/documents 10
natural_image
Simple line drawing of a trash bin with crossed lines indicating no text or symbols (no text or labels)natural_image
Simple line drawing of a trash bin with crossed lines indicating no waste or discharge (no text or symbols)natural_image
Simple line drawing of a trash bin with crossed lines indicating no waste or plastic discharge (no text or symbols)natural_image
Simple line drawing of a trash bin with crossed lines indicating no waste or plastic (no text or symbols)natural_image
Simple line drawing of a trash bin with crossed lines indicating no waste or plastic discharge (no text or symbols)natural_image
Simple line drawing of a trash bin with crossed lines indicating no waste or discharge (no text or symbols)natural_image
Simple line drawing of a trash bin with crossed lines indicating no waste or discharge (no text or symbols)natural_image
Simple line drawing of a trash bin with crossed lines indicating no waste or discharge (no text or symbols)Ovaj simbol znači da prilikom odlaganja uređaja, njegovih baterija i akumulatora te njegovog električnog i elektroničkog pribora morate slijediti propise o zbrinjavanja otpada električne i elektroničke opreme (WEEE) te o zbrinjavanju otpadnih baterija i akumulatora. Prema propisima, ova oprema podliježe posebnom prikupljanju na kraju radnog vijeka. Uređaj, njegove baterije i akumulatori te njegov električni i elektronički pribor
ne smiju se odlagati skupa s nerazvrstanim komunalnim otpadom jer to nanosi štetu okolišu. U svrhu urednog odlaganja ovakve opreme, morate je vratiti na prodajno mjesto ili u vaš lokalni centar za reciklažu. Za detaljne informacije obratite se lokalnoj službi za zbrinjavanje komunalnog otpada.
Jamstveni rok i radna trajnost je 2 godine od datuma nabavke proizvoda.
Podaci o proizvođaču: ASBISc Enterprises PLC, Agios Athanasios, Diamond Court, Kolonakiou Street, 43, 4103 Limassol, Cipar. Proizvedeno u Kini.
Ažurirane informacije i detaljan opis uređaja te upute za spajanje, certifikati, podaci o tvrtkama koje primaju reklamacije glede kvalitete i jamstva dostupne su za preuzimanje na poveznici
natural_image
Simple line drawing of a trash bin with crossed lines indicating no waste or discharge (no text or symbols)natural_image
Simple line drawing of a trash bin with crossed lines indicating no waste or plastic discharge (no text or symbols)Uju hunphnnwuh2utnp u2wuwlniú tú, np uwnpn, dnuu wwnunlngutpú ni hnunwuhzutnp i l lhtlunpwulquá i l hltlunpnñuwjhú wwnpuqwutpú niunhhqwgutjhu wtup t htunutp lhtlunpwulquá i l hltlunpnñuwjhú wwnpwulpnniutph wnwnwnpnijwú jəwuhnúutph (WEEE) i uwnunlgh i uwnunlgh pəwuhnúutph htun uwnultní lwiúnñuwunqtnphú: <wùwàwjú lwiúnñutph, unjwi uwnpwulpnnlùn ðwnwnlpjwú ðwúytunh wllwnunhg htunn túpəwlqu t pudwá niunhhqwghwjh:
Uwnpp, uwnunlngutpp l uynunwuhsutpp, huswtu fuwu htyunpwuwu l tālīyùnnūwǔhū wùnquwǔtṛn zh yuhtīh niunhīhqwǔgǔt l zuntuulwūlnpūd pwnwprwǔhū rəwǔnhūtṛph hṭn, puǔh np nǚ hǔfūwwh 2nqwlw uḥgwǔwynhū:
Uju uwnph nlunhjhqwghwjh hwiúw, wjú wltunp t ultnwnwnpǎulh ulwáwnph lytún lyuú huúdāulh untnwluwú ultnwú2wlyúwú lytún:
Uwāpwnu̯u̯u̯ uīn̯tln̯l̯əŋn̯l̯u̯tn̯ uunw̯u̯wn̯l̯ hwi̯wn̯ wāhpw̯dt̯z̯n̯ t̯ n̯hū̯tn̯ uīn̯nw̯lu̯u̯ lytāgwnu̯w̯h̯u̯ pəw̯hn̯l̯u̯tn̯ h̪ns̯wgǔw̯u̯ dwnw̯wn̯l̯əŋn̯l̯u̯:
Bnwhuhpwjhduwltunp u dwnwnipjuwduwltunp wwnwuph qduwupn opuuhg 2 unuph t
Stntbynipajmuhupununpnnh uuuuhu` «ASBISc Enterprises PLC», Uqhnu Uphuwuhnu, Yhuunun Yhnnu, Yhnuwuhnu, 43, 4103, Lhuwun, Yhpnu: Upununpulud t Qhwuwunwunu:
Uwnph wnph untntlynprjniuttnp u dwupwuwu tlywnwqnprjniun, huswtu dwu ohwguwu hpwhwukutnp, hwluwwunwqntnp, npwlh l tprwzhuhph utnwptpjuw wwhwugutnp pwnlunn pultpnuprjniutthp ewuhu untntlynprjniuttnp hwwutuh b u ttpptnudwu hwufw aeno.com/documents hnnlunl: 624wdd pnnp wwpnwupwuhztpni nl npwag wduwunuttnp hptag hwduwwunwwuhwi utwhulwau wntptph utwhulwunprjniutu tta
53 aeno.com/documents
natural_image
Simple line drawing of a trash bin with crossed lines indicating no waste or plastic discharge (no text or symbols)natural_image
Simple line drawing of a trash bin with crossed lines indicating no waste or plastic discharge (no text or symbols)gl bodomngdo zgmoubdmbl, hmd omjbo dmhydongmdol, dolo dsgsmggdoo qs szydymsgmfgdoo qs dolo gmyfgm qs gmyfgmmbgmo sylguysmgdou zqosgmoisl omjbi ybqs oso320 gmyfgm qs gmyfgmmbgmo szyfzmcomdou bsmbgbdois (WEEE) qs dsgsmgols qs szydymsgmmoi bsmbgbdoi oszopsb dmamgdol ngymsgdo. ngymsgdoi osbsbdo, gl dmhydongmds g3gdeogdsmgds 35m-g5m39 zqosgmsl dolo lsmgdmosbmdoi 35qol
δημμν.
natural_image
Simple line drawing of a trash bin with crossed lines indicating no waste or discharge (no text or symbols)natural_image
Symbol of a trash bin crossed out by two diagonal lines, with no text or labels present.natural_image
Pure electrical circuit lines without any symbolsnatural_image
Simple line drawing of a trash bin with crossed lines indicating no waste or plastic discharge (no text or symbols)natural_image
Simple line drawing of a trash bin with crossed lines indicating no waste or discharge (no text or symbols)natural_image
Simple line drawing of a trash bin with crossed lines indicating no text or symbols (no text or labels)natural_image
Simple line drawing of a trash bin with crossed lines indicating no waste or discharge (no text or symbols)natural_image
Simple line drawing of a trash bin with crossed lines indicating no text or symbols (no text or labels)Qurilmaning o'lchamlari (U × E × B): 251 mm × 146 mm × × 1130 mm.
Yetkazib berilgan mahsulotning to'plami
Po'lyuvgichning yig'ilgan holati (a yig'ish rasmiga qarang):
① – suv baki, ② – suv bakining probkasi, ③ – suv filtirining kartridji, ④ – elektr shnuri (usti yopiq elektr sim), ⑤ – suv bakining mandali, ⑥ – bug'li po'lyuvgichning korpusi.
Nasadkalarning to'plami:
⑦ – plastik cho'tka-qirg'ich, ⑧ – metalli cho'tka-qirg'ich, ⑨ – dumaloq cho'tka-qirg'ich va matoli qoplama, ⑩ – “ikkitasida bitta” cho'tka: cho'tka, fiksator (muayyan holatda mahkamlab qo'yadigan moslama), ko'pikli yostiq (nakladka) va matoli qoplama, ⑪ – asosiy cho'tka, ⑫ – gilamlar uchun mo'ljallangan matoli yostiq (nakladka) (kattasi), ⑬ – gilamlar uchun mo'ljallangan matoli yostiq (nakladka) (kichigi) ⑭ – gilamni tozalovchi nasadkalar.
Shlang va trubkaning to'plami: 15 – kengaytma trubkasi (ikki qismli), 16 – kengaytma shlangi. Aksessuarlar: 17 – devorga o'rnatiladigan kronshteyn va unga mo'ljallangan mahkamlagichlarning to'plami (3M lentasi va burama mix),
20 – belbog', 18 – tezkor qo'llanma, 19 – kafolat taloni, V – pin (kukunni tozalash uchun foydalaning).
Cheklovlar va ogohlantirishlar
Nasadkalarni tozalash uchun agressiv yuvish vositalarini ishlatmang.
Cho'tkalarni iliq suv ostida yuvish mumkin, matoli nakladkalarni esa yuvish kukuni bilan yuvish mumkin. Metalli cho'tkalarni tozalashda ehtiyot bo'ling, qo'llaringizga zarar etkazishi mumkin.
Quvvat manbaining kuchlanishi bug'li po'lyuvgichning texnik xususiyatlarida ko'rsatib o'tilgan kuchlanishga muvofiq ekanligiga ishonch hosil qiling. Bug'li po'lyuvgichni tozalash uchun uni elektr tarmog'idan uzishingiz kerak. Quvvatni o'chirishda elektr shnurini emas, balki vilkaning plastik qismini torting. Yong'in xavfini oldini olish uchun bug'li po'lyuvgichni suvga botirmang yoki isitgich yoniga qo'ymang. Iltimos, agar siz bug'li po'lyuvgichning korpusi shikastlanganligini ko'rsangiz, g'alati tovushlar yoki qasir-qusur tovushi eshitilsa, yoki elektr shnuri uzilib qolsa, unda bug'li po'lyuvgichdan foydalanmang. Yetarlicha issiqlikka chidamli bo'lmagan (+100 °C dan past) sirtlarni tozalash uchun po'lyuvgichni ishlatmang. Shikastlanmaslik uchun issiq bug'ni odamlarga qarab sepmang. Po'lyuvgichni hech qachon qismlarga ajratmang. Po'lyuvgichni honadan tashqari ochiq havoda ishlatmang.
Yig'ish va ishlatish
-
Po'lyuvgichni echib oling va uning barcha aksessuarlarini (qismlarini) qutidan chiqarib oling. Korpusdan ⑥ suv bakini ① chiqaring va uni to'ldiring (b yig'ish chizmasiga qarang). Buning uchun ⑤ suv bakining mandalini yuqoriga torting, bakni chiqazing va teskari o'girib oling, so'ngra katta silikonli tiqinning (probkaning) tilchasidan torting ②. Bakni to'liq hajmining kamida 2/3 qismini to'ldiring, keyin tiqinni (probkani) mahkam bekiting ② suv bilan to'ldirilgan bakni qaytib po'lyuvgich korpusiga o'rnating ⑥.
-
Kengaytma trubkasining ikki qismini birga ulang 15, keyin po'lyuvgich korpusiga kengaytma trubkasini ulang 6 (c yig'ish chizmasiga qarang).
-
Pollar va gilamlarni turli xil nasadkalar va matolar bilan yuvish mumkin:
a. pollarni tozalash uchun katta yostiqning (nakladkaning) matosini 13 asosiy cho'tkaning 11 qora yopishqoq yuzasining orqasiga tilchaning to'rtib chiqqan joyi bilan ulang;
b. gilamlarni yuvish uchun kichik matoli yostiqni (nakladkani) 12 va gilamlarni tozalovchi nasadkani 14 asosiy cho'tkaga 11 o'rnating, va bunda matodagi tilchaning to'rtib chiqqan joyi va nasadkadagi tilchaning to'rtib chiqqan joyi ortga qarab turgan bo'lishi kerak (ya'ni cho'tka zarbasiga qarshi).
-
Aasosiy cho'tkani ⑪ biz ikki qismdan yiqqan va po'lyuvgich korpusiga ulagan kengaytma trubkasi ⑮ bilan birlashtiring. Trubka o'rniga kengaytma shlangidan ⑯, asosiy cho'tka o'rniga qo'shimcha ⑰, ⑱, ⑲ va ⑳ dan foydalanishingiz mumkin.
-
Ishni boshlash uchun avval po'lyuvgichni rozetkaga ulang. Asosiy korpusga elektr shnuri ④ mahkam o'rnatilgan. Elektr shnurini rozetkaga ulang.
-
Indikator (ko'rsatgich) qiymatlarini o'rganib chiqing (d rasmiga qarang).
Vilkani rozetkaga ulagandan o'ng indikator (ko'rsatgich) darhol qizil rangda yonib keta boshlaydi. Ishni boshlash uchun indikatorni
(ko'rsatgichni) 2 soniyadan ko'proq bosib ushlab turing, u ko'k rangga aylanadi.
natural_image
Simple line drawing of a trash bin with crossed lines indicating no text or symbols (no text or labels)natural_image
Simple line drawing of a trash bin with crossed lines indicating no waste or discharge (no text or symbols)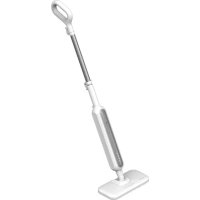


Brand : AENO
Model : SM1
Category : Steam cleaner