
SM2 - Steam cleaner AENO - Free user manual and instructions
Find the device manual for free SM2 AENO in PDF.

| Product type | Steam cleaner |
| Brand | AENO |
| Model | SM2 (ASM0002 for E/F plug, ASM0002-UK for G plug) |
| Power supply | 220-240 V AC, 50/60 Hz |
| Nominal power | 1200 W |
| Water tank capacity | 275 ml |
| Operating time (full tank) | Up to 24 min |
| Water flow rate | Up to 25 g/min |
| Maximum steam pressure | 3 bar |
| Steam temperature | Approx. +130 °C |
| Steam distribution modes | 3 modes (low, medium, high) |
| Heating time | Approx. 15 seconds |
| Dimensions (L×W×H) | 140 × 300 × 1140 mm |
| Protection rating | IPX4 |
| Compatible surfaces | Hardwood floors, laminate, marble, tiles, glass, metal, heat-resistant surfaces, furniture upholstery |
| Water type | Purified water only (no additives) |
| Supplied accessories | Handle, extension tube, mop head, 2 floor cloths, 2 nylon brushes, 1 brass brush, jet nozzle, squeegee, measuring cup, crevice brush |
| Warranty | 2 years |
Frequently Asked Questions - SM2 AENO
User questions about SM2 AENO
0 question about this device. Answer the ones you know or ask your own.
Ask a new question about this device
Download the instructions for your Steam cleaner in PDF format for free! Find your manual SM2 - AENO and take your electronic device back in hand. On this page are published all the documents necessary for the use of your device. SM2 by AENO.
USER MANUAL SM2 AENO
natural_image
Line drawing of a vacuum cleaner with handle and base (no text or symbols)User Manual
Steam Mop
SM2, SM2-UK
(Model: ASM0002, ASM0002-UK)
13.12.2022 | v 1.1.0
ENG.... 10
ARA.... 15
B UL.... 18
C ES.... 2
DEU....28
EST...... 至
FRA.... 38
HRV 43
HU N.... 48
HYE 53
ITA 58
KAT....63
KAZ 68
LAV....73
LIT 78
NLD....83
POL 88
RON....93
RUS....98
S LK.... 103
SRP 108
UKR....T13
UZB...... 118
ZHO 123

A


D

natural_image
Line drawing of a laboratory instrument with handle and internal components (no text or symbols)E
F

natural_image
Technical diagram of a mechanical component with two downward arrows indicating force or direction (no text or symbols present)
ENG The AENO steam mop is a household device designed for cleaning hardwood floors, laminate, marble, tiles, removing heavy soiling on glass, metal and other heat resistant surfaces, furniture upholstery.
Model: ASM0002 (Plug Type E/F), ASM0002-UK (Plug Type G).
Technical specifications
Rated voltage: 220–240 V (AC); frequency: 50/60 Hz. Rated power: 1200.0 W. Water tank capacity: 275 ml. Continuous operation time (with a full tank): up to 24 min. Water consumption: up to 25 g/min. Steam pressure: up to 3 bar (max). Steam temperature: approx. +130 °C. Steaming modes: 3. Heating time: approx. 15 sec. Dimensions (L×W×H): 140×300×1140 mm. Operating conditions: temperature – 0–50 °C, humidity 20–70 %. Storage conditions: temperature – 0–50 °C, humidity 20–70 %. Degree of protection: IPX4.
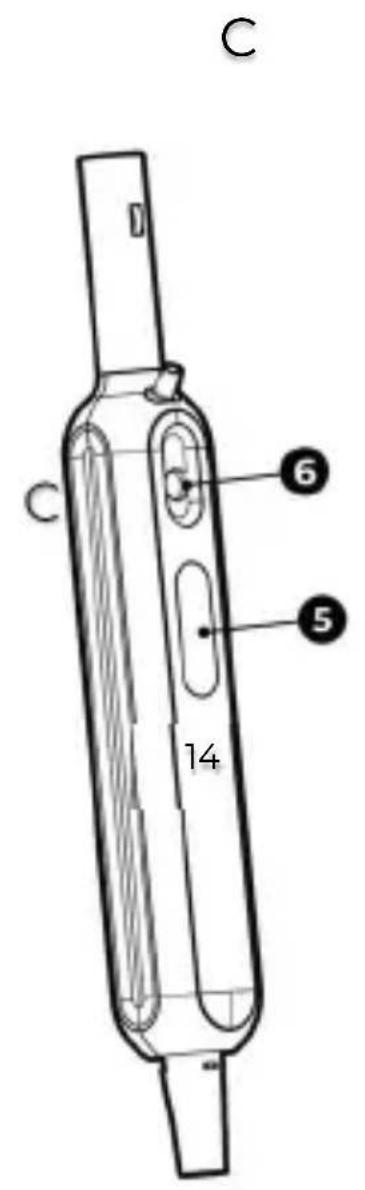
Scope of supply (Figures A, B, C, D)
Handle (1), extension tube (2), steam mop (carrying handle (3), device body (4), water tank (5), water tank lid (6), steam release button (7), steam LED indicators (8), steam mop head button (9), steam mop head (10)), microfiber pad (2 pcs.) (11), nylon brush (2 pcs.) (12), brass brush (13), jet nozzle (14), squeegee (15), measuring cup (16), crevice brush (17), quick start guide, guarantee card.
Limitations and Warnings
Make sure that the power supply voltage corresponds to the appliance technical specifications. Unplug the steam mop before filling the water tank, during cleaning and after use. Do not immerse the appliance, power cord, power plug, steam mop head or nozzles in water or any other liquid. Do not place the power cord near hot objects. Do not use an extension cord. To prevent burns during operation, be careful and do not touch the jet nozzle; do not direct
the steam mop towards people, animals or plants. Do not let steam come into contact with devices containing electrical components. This appliance is not intended for use by children or persons with lack of experience and knowledge without the supervision. Do not use the steam mop if the power cord is damaged, contact an Authorized Service Centre for replacement. If the appliance is damaged, do not disassemble or attempt to repair the appliance. Do not use the steam mop for cleaning surfaces with a temperature resistance of less than +100 °C. Use only purified water with no chemicals or detergents added. Allow the steam mop to cool down completely before disassembling and cleaning (at least 15 minutes). Do not use the brass brush on sensitive surfaces, e.g. enamel, acrylics.
Before you begin
- Unpack the mop and accessories.
- Open the cover of the water tank (6) on the body of the appliance (4). Fill the water tank (5) with water using a measuring cup (16). Put the cover (6) back.
Table 1. Function and installation of accessories
| Nozzle | Destination | Build |
| Steam mop head (10) | Floor cleaning together with cleaning cloth (11) | Connect the handle (1) to the extension tube (2) and attach it to the steam mop body (4). Slide the body (4) into the mop head opening (10) as shown in fig. F |
| Extension tube (2) | Extension of the appliance for effective cleaning of floors and hard-to-reach areas | Insert the tube (2) with the handle (1) into the steam mop body (4). Slide the steam mop body (4) into the steam mop head (10) as shown in fig. F |
| Microfiber pad (11) | Gentle cleaning of hard floor coverings | Assemble the mop (see instructions above). Attach the underside of the mop pad (11) to the Velcro of the steam mop head (10) as shown in fig. J |
| Jet nozzle (14) | Cleaning corners, skirting boards, gaps between tiles and other hard-to-reach areas | Assemble the mop (see instructions above). Attach the jet nozzle (14) to the body of the steam mop (4) according to figure G |
| Nylon brush (12) | Removing soiling using a minor mechanical action | Attach the jet nozzle (14) to the body of the appliance (see instructions above). Attach the nylon brush (12) to the jet nozzle (14) as shown in fig. H |
| Brass brush (13) | Removing stubborn soiling using a mechanical action | Attach the jet nozzle (14) to the steam mop body (4) (see instructions above). Attach the brass brush (13) to the jet nozzle (14) as shown in fig. H |
| Squeegee (15) | Cleaning glass and mirror surfaces | Attach the jet nozzle (14) to the steam mop body (4) (see above). Attach the squeegee (15) to the jet nozzle (14) as shown in fig. I |
| Crevice brush (17) | Cleaning tile joints | Install the jet nozzle (14) on the device body (4) (see above). Install the crevice brush (17) on the jet nozzle (14) according to figure J |
Operation
-
Install the required accessories according to the table 1.
-
Plug the power cord plug into a power socket.
-
Press the steam button (7) for 2 seconds to start heating. Wait approx. 15 seconds until two LEDs (8) flash. Press the steam button (7) again to start operation. Two LEDs (8) light up steadily and steam starts.
- When the appliance has finished operating, press the steam button (7) again for 2 seconds. Unplug the appliance from the mains.
- Wait until it has cooled completely and then wipe the mop with a clean, soft cloth.
Note: you can adjust the steam mode with the steam button (7). The number of lights (8) illuminated will change accordingly (from 1 for minimum mode to 3 for maximum mode).
WARNING! Keep an eye on the water level in the tank during use. Do not use the steam mop with an empty tank; do not empty the tank during operation as this could damage the appliance.
Troubleshooting
- The steam mop does not heat up. Possible reason: the appliance is not switched on or is not connected to the power supply. Solution: Ensure that the appliance is switched on, the power plug is connected to the power socket and that the power socket is in proper condition.
- The steam mop does not generate steam. Possible causes: low water level in the water tank; the appliance is not switched on or not plugged in. Solution: Unplug the appliance and fill the tank with water; check that the mop is switched on, the plug is connected to the socket and the socket is in order.
- The steam mop leaves water on the floor. Possible causes: the floor cloth is too wet; wrong steam release mode. Solution: switch off the appliance, detach and wring out the mop pad; select a different steam mode.
WARNING! If none of the possible solutions solves your problem, contact your supplier or service center. Do not disassemble or attempt to repair the unit yourse
aeno.com/documents
Recycling information
natural_image
Simple line drawing of a trash bin with crossed lines indicating no waste or discharge (no text or symbols)These symbols indicate that you must follow the Waste Electrical and Electronic Equipment (WEEE) and Waste Battery and Battery Regulations when disposing of the device, its batteries and accumulators, and its electrical and electronic accessories. According to the rules, this equipment must be disposed of separately at the end of its service life.
Do not dispose of the device, its batteries and accumulators, or its electrical and electronic accessories together with unsorted municipal waste, as this will harm the environment.
To dispose of this equipment, it must be returned to the point of sale or turned in to a local recycling facility.
You should contact your local household waste disposal service for details.
ASBISc reserves the right to modify the device and to make edits and changes to this document without prior notice to users.
The warranty period and service life shall be 2 years as from the date of purchase of the device. Information about the manufacturer: ASBISc Enterprises PLC, Iapetou, 1, Agios Athanasios, 4101, Limassol, Cyprus. Made in China.
For current information and details on the device description and specification, as well as connection process, certificates, warranty and quality issues, see relevant Installation and Operation Manuals available for downloading at aeno.com/documents. All trademarks and names herein are the property of their respective owners.
aeno.com/documents
natural_image
Simple line drawing of a trash bin with crossed lines indicating no waste or discharge (no text or symbols)natural_image
Simple line drawing of a trash bin with crossed lines indicating no text or symbols (no text or labels)natural_image
Simple line drawing of a trash bin with no text or symbolsnatural_image
Simple line drawing of a trash bin with crossed lines indicating no waste or discharge (no text or symbols)natural_image
Simple line drawing of a trash bin with crossed lines indicating no waste or discharge (no text or symbols)natural_image
Simple line drawing of a trash bin with crossed lines indicating no text or symbols (no text or labels)natural_image
Simple line drawing of a trash bin with crossed lines indicating no waste or discharge (no text or symbols)Ovaj simbol znači da prilikom odlaganja uređaja, njegovih baterija i akumulatora te njegovog električnog i elektroničkog pribora morate slijediti propise o zbrinjavanja otpada električne i elektroničke opreme (WEEE) te o zbrinjavanju otpadnih baterija i akumulatora. Prema propisima, ova oprema podliježe posebnom prikupljanju na kraju uporabnog roka.
Uređaj, njegove baterije i akumulatori te njegov električni i elektronički pribor ne smiju se odlagati skupa s nerazvrstanim komunalnim otpadom jer to nanosi štetu okolišu.
natural_image
Simple line drawing of a trash bin with crossed lines indicating no waste or plastic (no text or symbols)natural_image
Simple line drawing of a trash bin with crossed lines indicating no waste or discharge (no text or symbols)g y z d g m o y d
natural_image
Simple line drawing of a trash bin with crossed lines indicating no waste or discharge (no text or symbols)gù lòdōmāmngāo gǔmòu bāmǎl, Ḍmd oŋʒbō dōnghyādōmndol, dōlu dōsǒsmgjāol qos sīyādūmssgēmngāol qos dōlu gǔmǎdōm qos gǔmǎdōmmbgmo sīyādūmssgēol gāqsyóolsu oŋʒbī yībqos qosgāzsō m gǔmǎdōm qos gǔmǎdōmmbgmo sīyādūmssgēol bōnhgibāolus (WEEE) qos dōsǒsmgjāol qos sīyādūmssgēmndol bōnhgibāol omszopas dōndomngāol mǎgzhēmszogāo. mǎgzhēmszogāol omsbsbāsq, gù dōnghyādōmnds yīdōmǎdōmngās gōsm-βsm39 gāqsyóslu dōlu lōsmǎgādōmshmdol zsoou dōmnmu. sm gāqsszqomn dōnghyādōmnds, dōlu dōsǒsmgjāo qos
natural_image
Simple line drawing of a trash bin with crossed lines indicating no waste or discharge (no text or symbols)natural_image
Simple line drawing of a trash bin with crossed lines indicating no waste or discharge (no text or symbols)natural_image
Simple line drawing of a trash bin with crossed lines indicating no waste or discharge (no text or symbols)natural_image
Simple line drawing of a trash bin with crossed lines indicating no waste or discharge (no text or symbols)natural_image
Simple line drawing of a trash bin with crossed lines indicating no waste or discharge (no text or symbols)natural_image
Simple line drawing of a trash bin with crossed lines indicating no waste or restriction (no text or symbols)natural_image
Simple line drawing of a trash bin with crossed lines indicating no text or symbols (no text or labels)natural_image
Simple line drawing of a trash bin with crossed lines indicating no waste or discharge (no text or symbols)natural_image
Pure electrical circuit lines without any symbolsnatural_image
Simple line drawing of a trash bin with crossed lines indicating no waste or plastic (no text or symbols)natural_image
Simple line drawing of a trash bin with crossed lines indicating no waste or plastic (no text or symbols)Ushbu belgilar qurilma, uning batareyalari va akkumulyatorlari, shuningdek elektr va elektron aksessuarlarini utilisatsiya qilishda (WEEE) elektr va elektron uskunalarning hamda batareyalar va akkumulyatorlarning chqindilaridan foydali narsalar olish qoidalariga amal qilish kerak. Qoidalarga ko'ra, ushbu uskunaning ishlash muddati tugagandan so'ng alohida utilizatsiyaga yotadi.
Qurilmani, uning batareyalari va akkumulyatorlari,
natural_image
Simple line drawing of a trash bin with crossed lines indicating no waste or plastic (no text or symbols)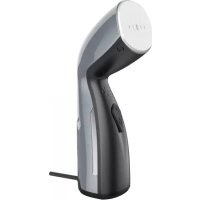


Brand : AENO
Model : SM2
Category : Steam cleaner